[Gaming NB/DT] Keystone - Introduction
Application Install& Uninstall
Keystone, is an actual physical key designed for gamers to set up their gear for an immersive experience. Keystone connects to the exclusive slot on the right side of the keyboard by magnetic force. When Keystone is docked, It can apply lighting effects, sound effects and activate Shadow Drive storage capacity.
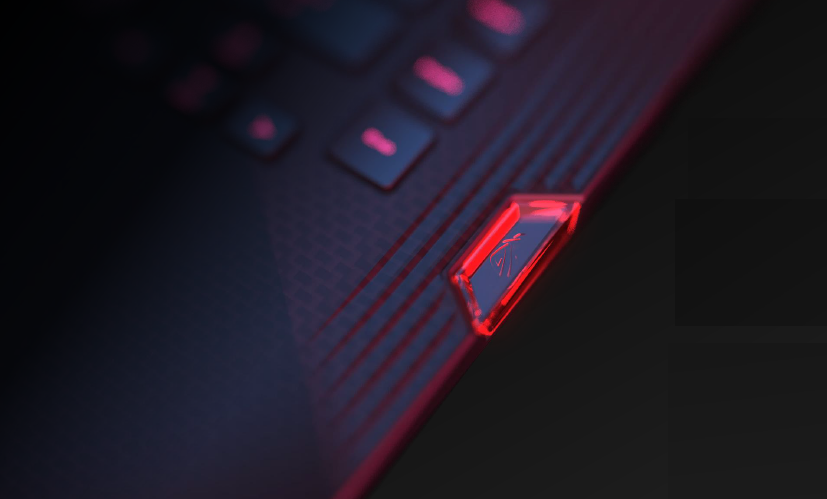
Models currently equipped with Keystone:
G531/G731 series (ROG Strix SCAR III& ROG Strix Hero III), G35DX (ROG Strix GA35) ROG Gaming Laptops& Desktop,
G532/G732 series(ROG Strix SCAR 15/17), G35CZ (ROG Strix GT35) ROG Gaming Laptops& Desktop,
G533/G733 series(ROG Strix SCAR 15/17) ROG Gaming Laptops.
* For more details on supported models, please refer to ASUS Official Website.
* Due to differences in model support functions, please refer to this table for more details.
The Keystone utility has been integrated into the Armoury Crate application. Users need to configure the Keystone settings through the Armoury Crate application. Support Windows 10 OS, and Armoury Crate application version must be higher than V3.0.4 above.
*Please refer to Link for more details about Armoury Crate Introduction.
4. Application Install& Uninstall
To get and install the application program,please refer to ASUS official website
To uninstall application program,please refer to ASUS official website
5-1 How to start Keystone
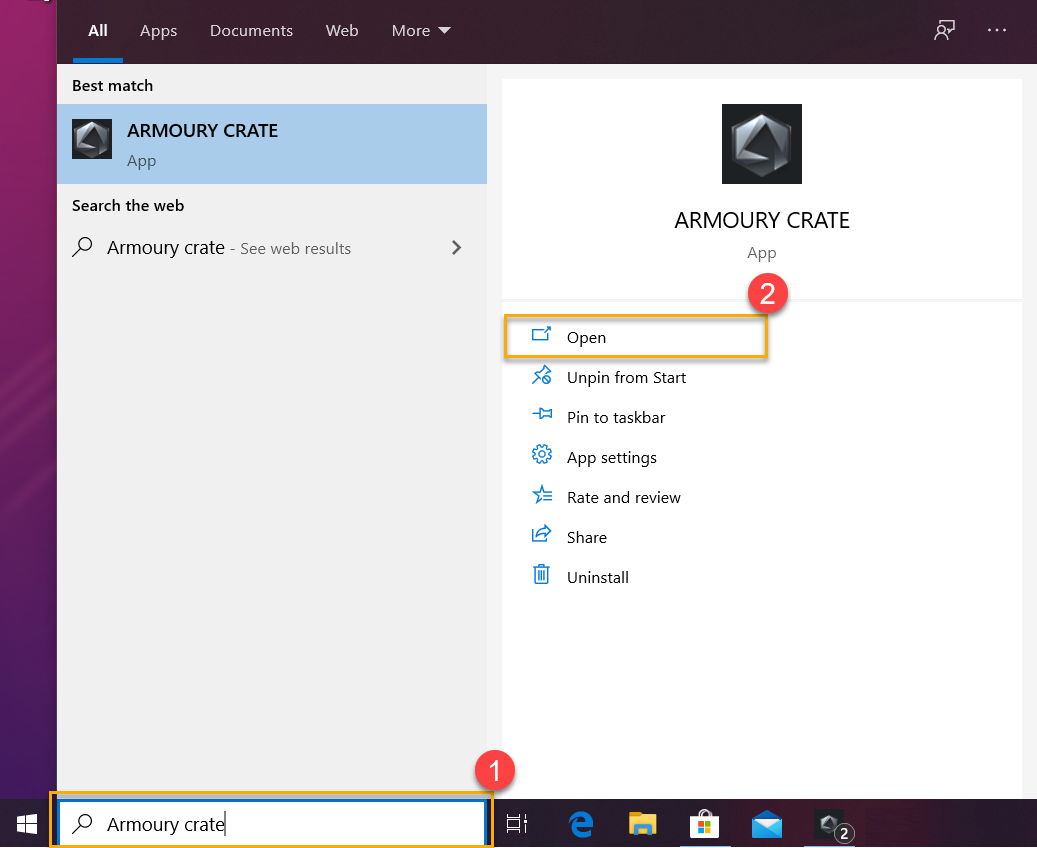
Please type and search [Armoury Crate]① in the Windows Search Box, and then click on [Open]②.
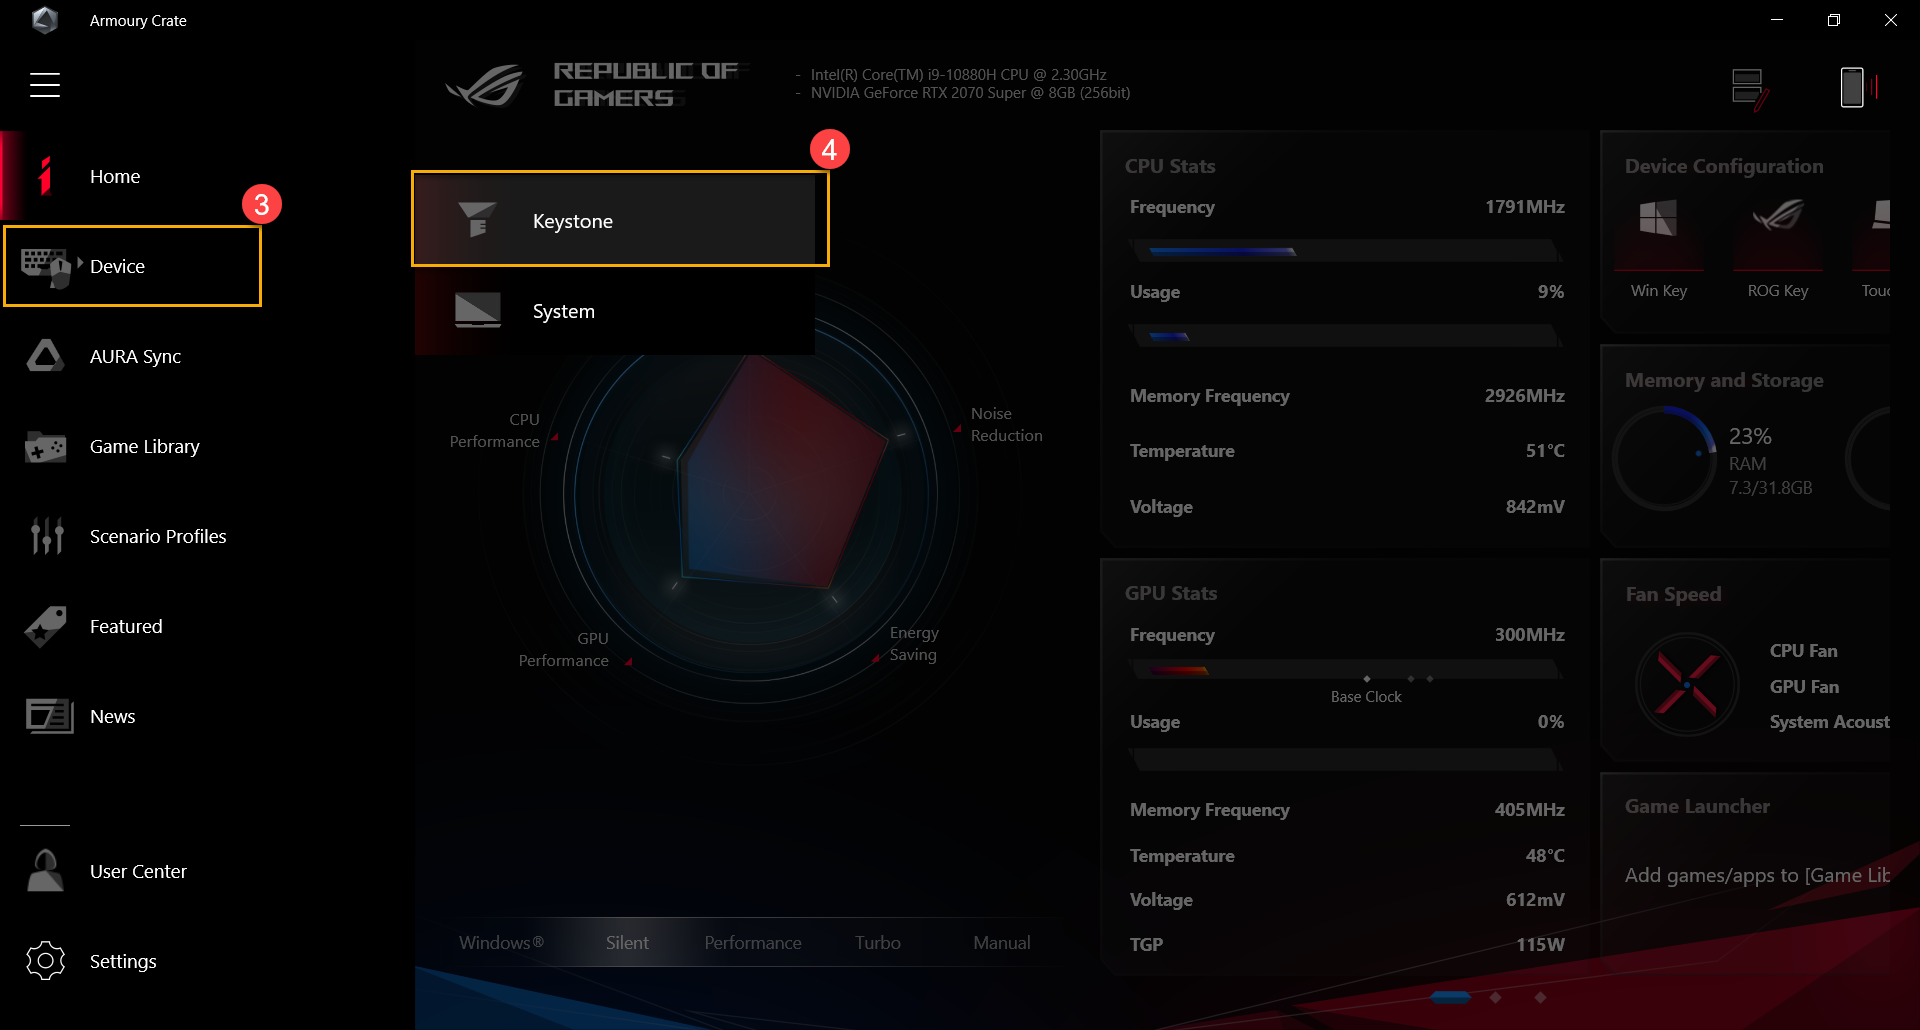
In Armoury Crate click [Device]③,and select [Keystone]④ into setting page.
5-2 Keystone Settings
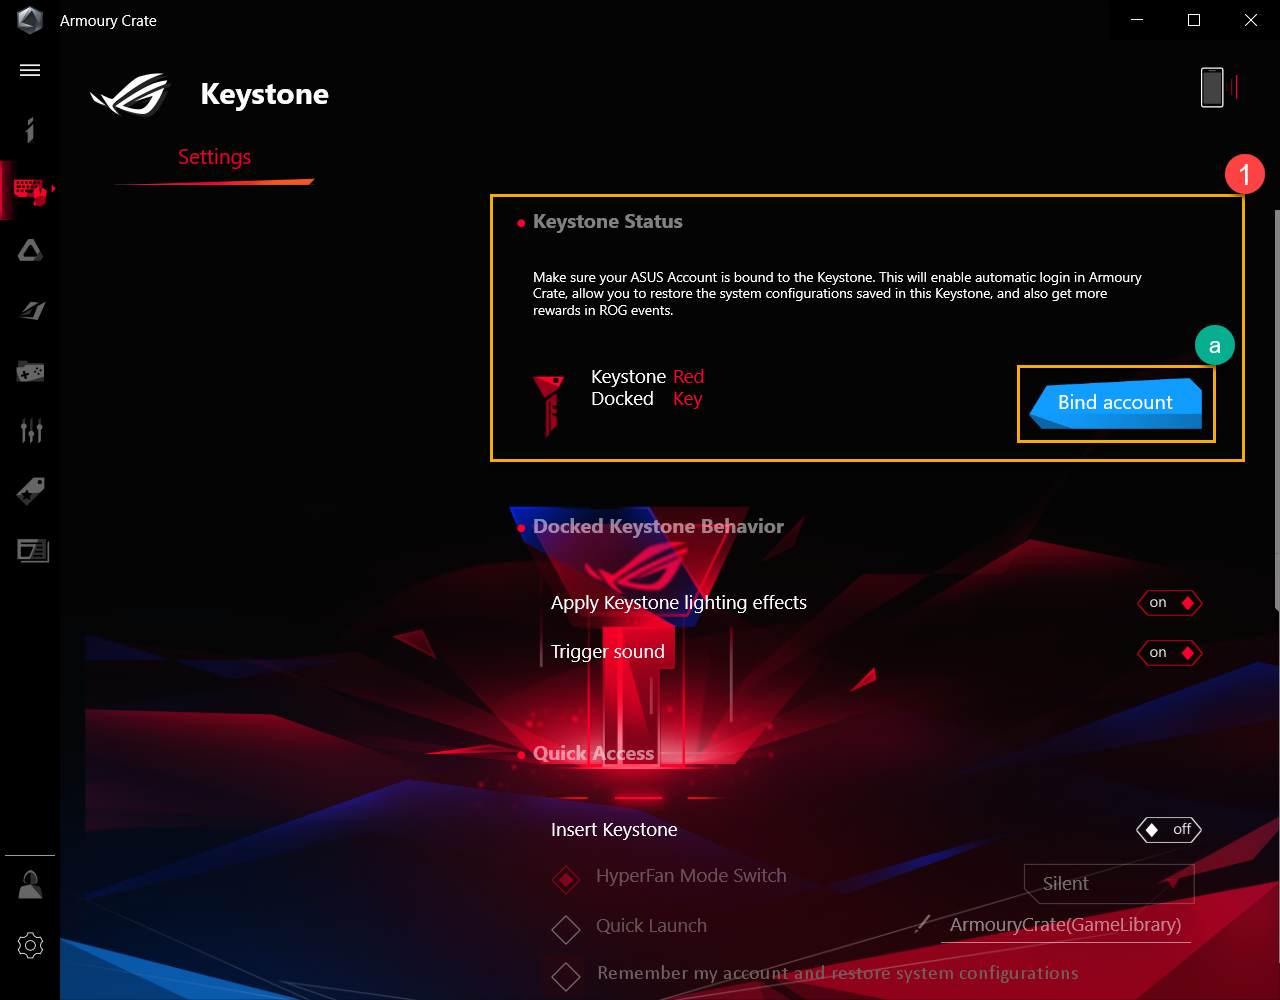
*Keystone Status
The area shows Keystone current status ①, for example Docked/ No detected, or Bind/ no bind account.
Bind Account*: Please dock the Keystone first, then click [Bind Account](a). After that, the login window will pop up.
*This function does not support G531 and G731 series (SCAR III & Hero III), G35DX (ROG Strix GA35)
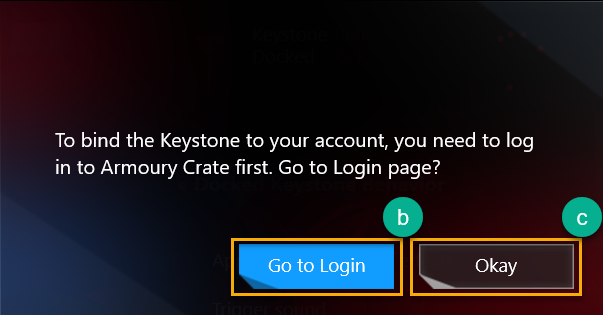
Click [Go to Login](b), the Armoury Crate login window will pop out.
*If already logged in to Armoury Crate before, click [Okay](c) and then the "Bind your account window" will pop out.
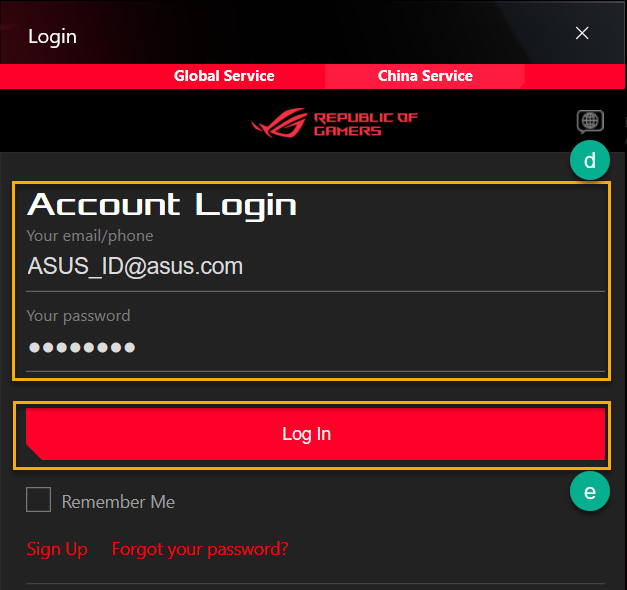
In login window,enter your ASUS Account and Password(d),after that click [Log In](e),and then Bind your account window will pop out.
In the Login window, enter your ASUS Account and Password(d), click [Log In] (e), then the Bind your account window will pop out.
*For how to register an ASUS member account, please refer to this Link
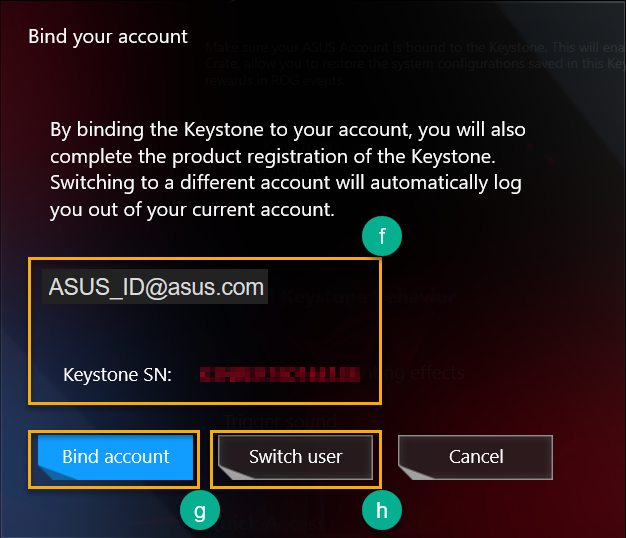
In the "Bind your account" window, you can confirm the Account ID and Keystone SN(f). Click [Bind account](g) to complete.
*If you need to login with another Account ID, click [Switch user](h).
IMPORTANT: To activate this feature, your PC must be connected to the Internet and the Keystone must also be docked.
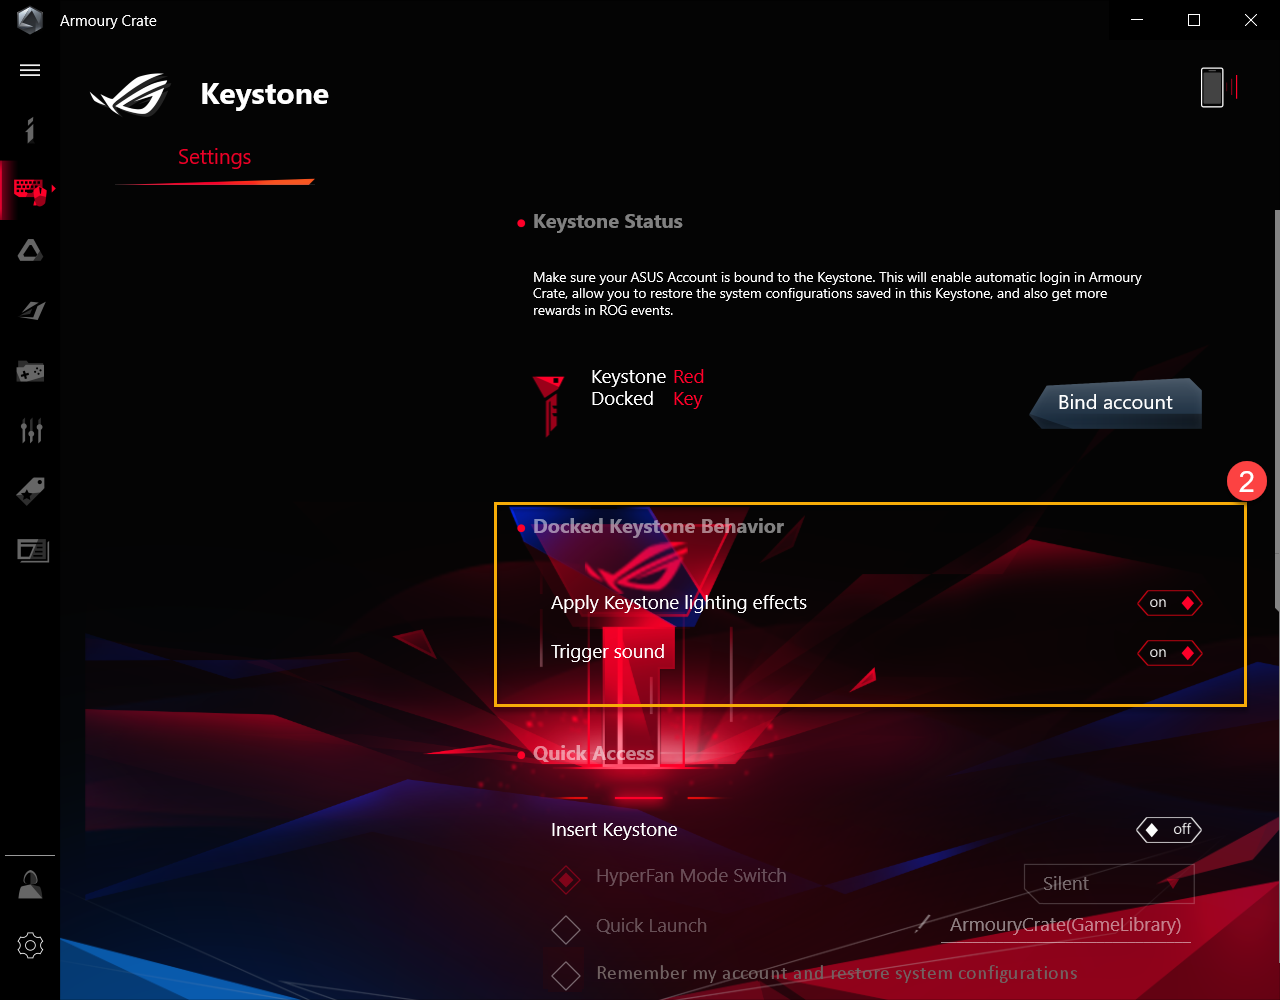
Apply Keystone lighting effects: While docking Keystone, the system preset light effect will be turned on.
Trigger sound: While docking Keystone, the sound effect will be turned on.
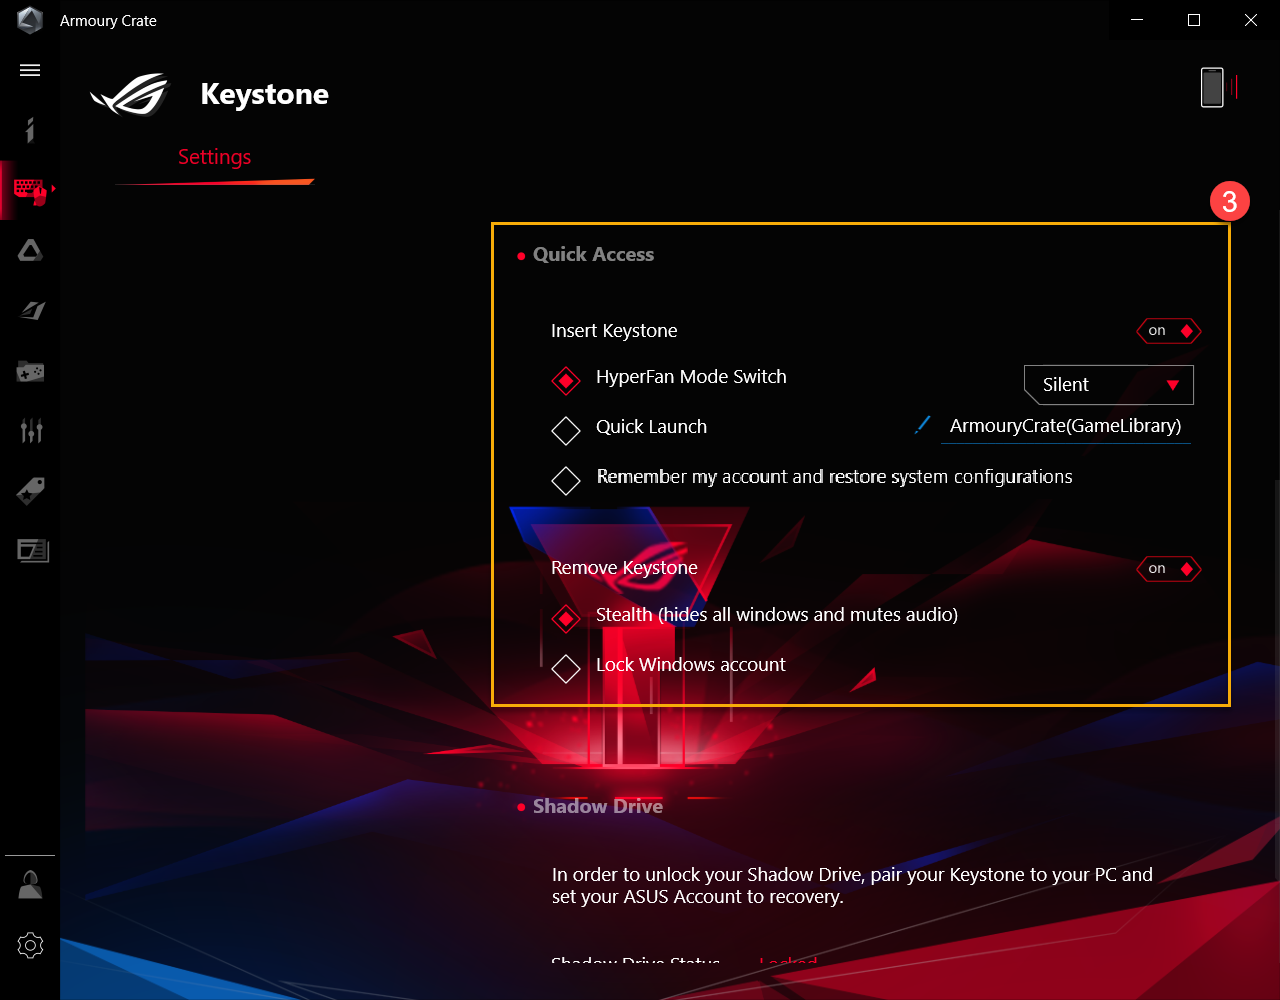
*Quick Access③
HyperFan Mode Switch: Customized fan settings for laptop performance: Silent/ Performance/ Turbo/ Windows®, while the Keystone is inserted.
Quick Launch: Allows the quick launch of an application program, while the Keystone is inserted.
Remember my account and restore system configurations*: To setup whether log in to My account bound to Keystone and restore system configurations after inserted Keystone.
*The function can only be enabled after Keystone is bound an account
Remove Keystone
Stealth (Hides all windows and mutes audio): All windows will minimize and audio will be muted, while the Keystone is removed.
Lock Windows account: Windows account will automatically lock, while the Keystone is removed.
Shadow Drive provides a hidden storage partition. When the keystone is docked into the slot, the hidden storage partition reveals itself and data within the storage becomes accessible.
*Once need to execute [Reset the PC and keep my personal files] or [Reset the PC and remove all of my personal files, apps and settings], gamers must back up the files in Shadow Drive first, and then reset Shadow Drive after.
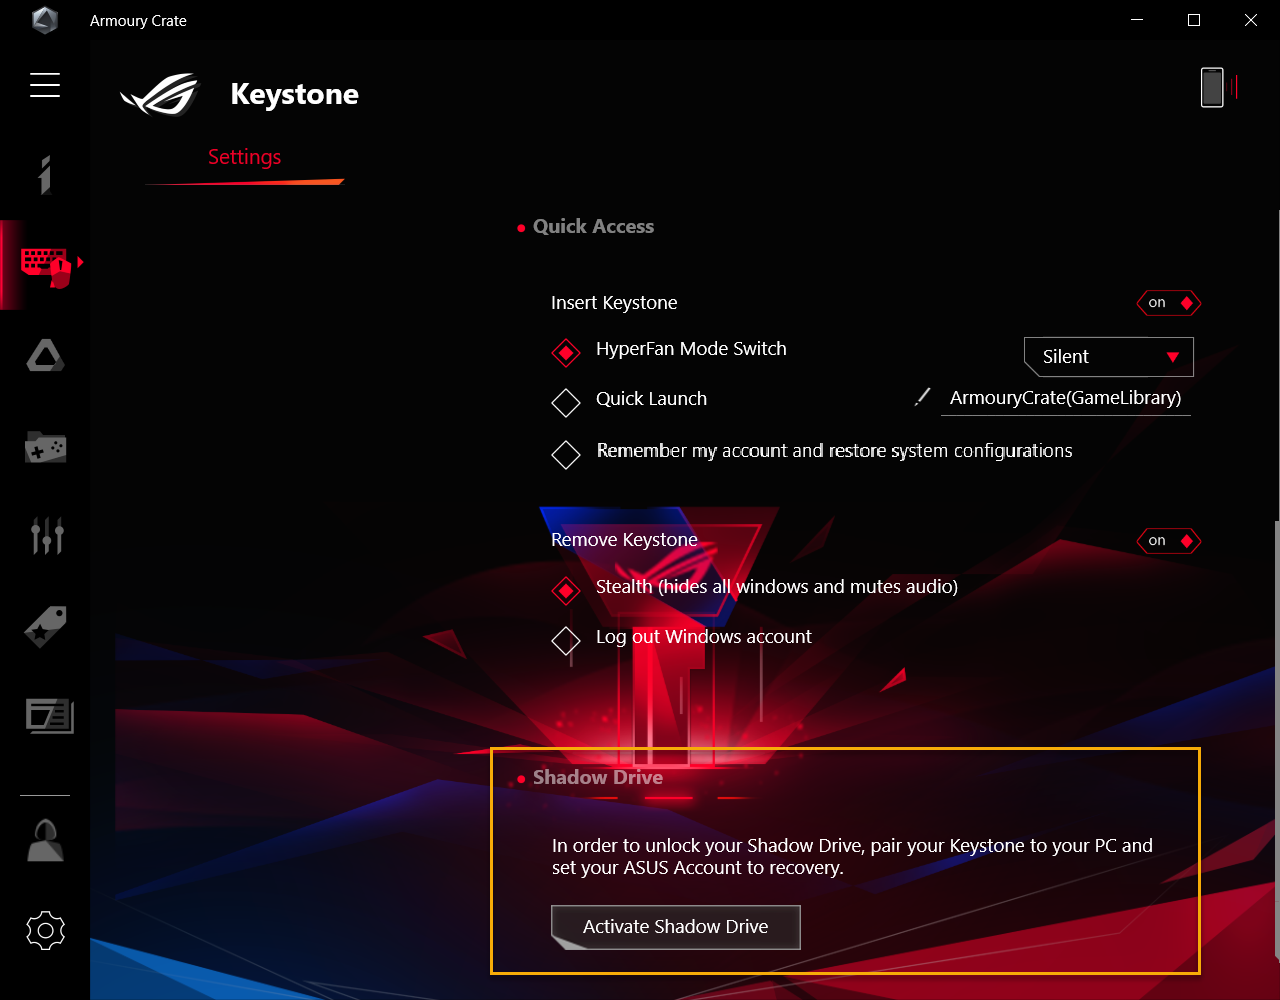
6-1 Activate Shadow Drive
Click [Activate Shadow Driver]①, and then Activate Shadow Drive window will pop out.

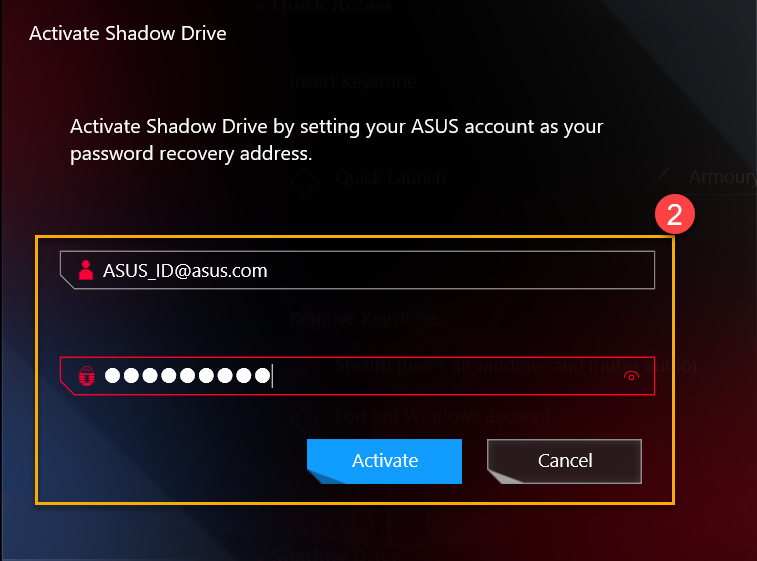
In Activate Shadow Drive window, enter your ASUS Account and Password, after that click [Activate]②.
For how to register an ASUS member account, please refer to this Link
IMPORTANT: Your PC must be connected to the Internet to activate this feature.
IMPORTANT: Your PC must be connected Internet to activate this feature.
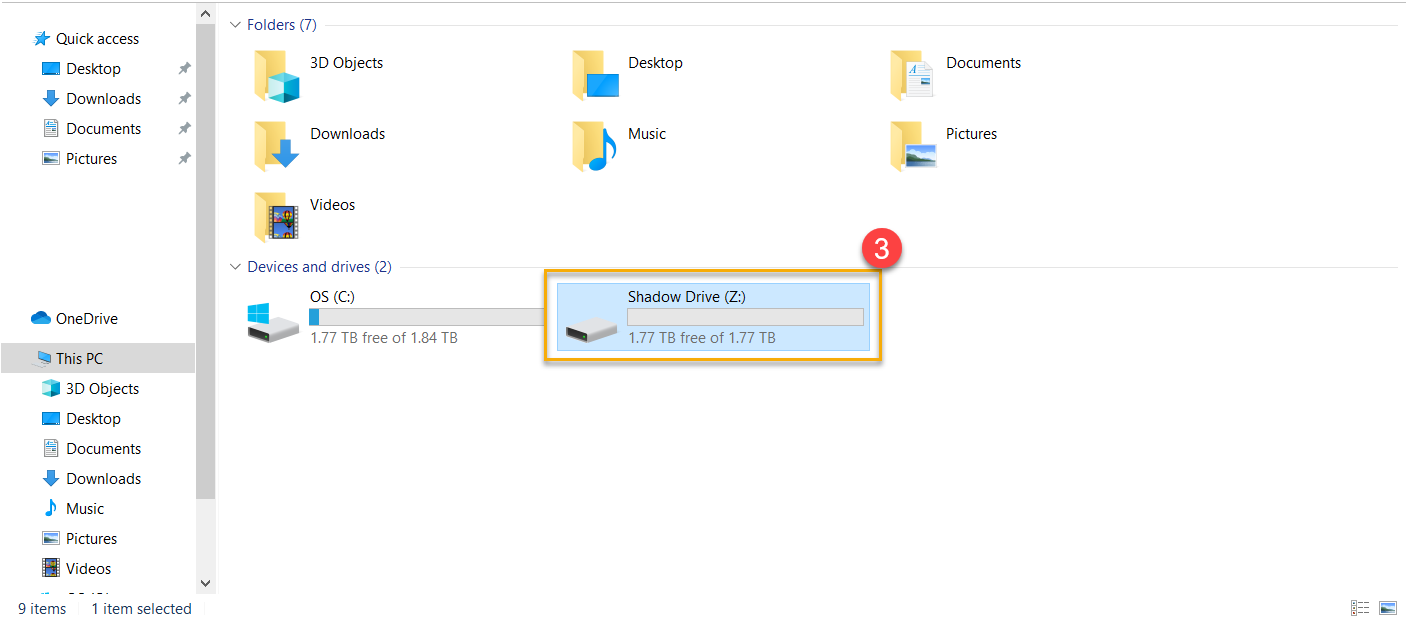
The Shadow Drive storage capacity [Shadow Drive(Z:)]③ will now be activated.
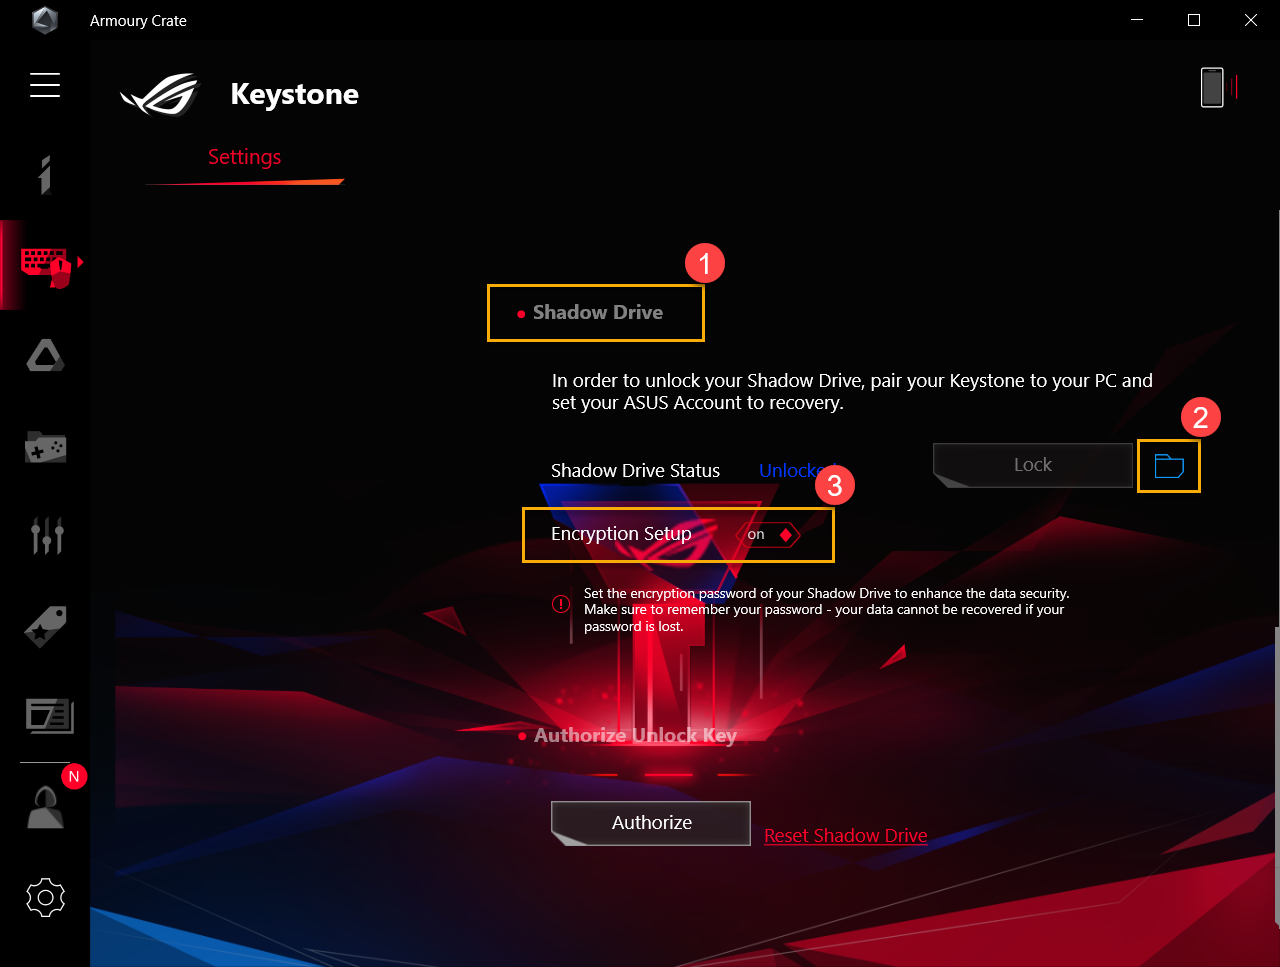
6-2 Shadow Drive Status①
To display current Shadow Drive storage status, select [Unlocked].
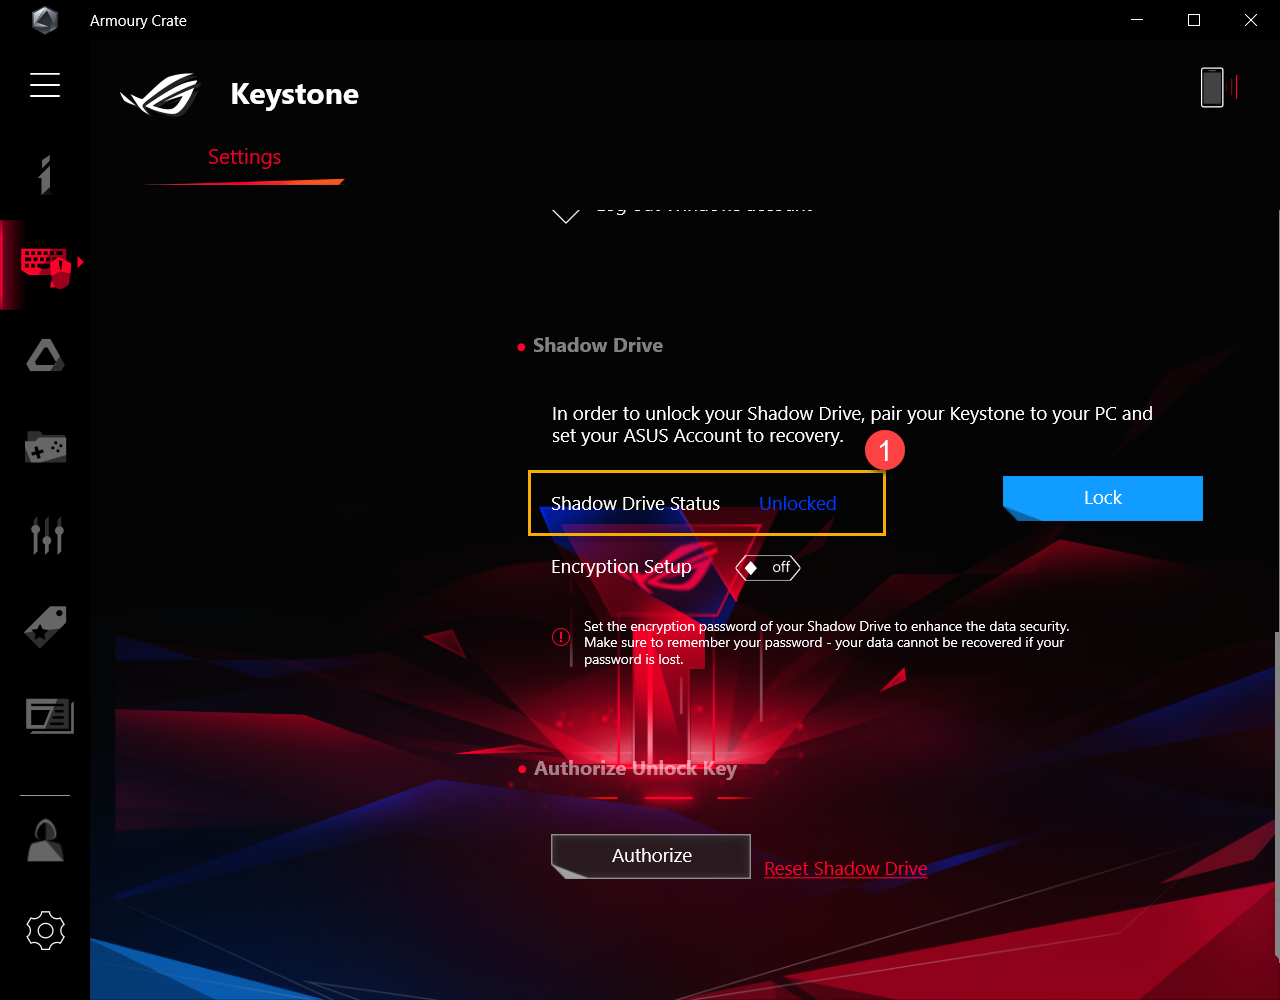
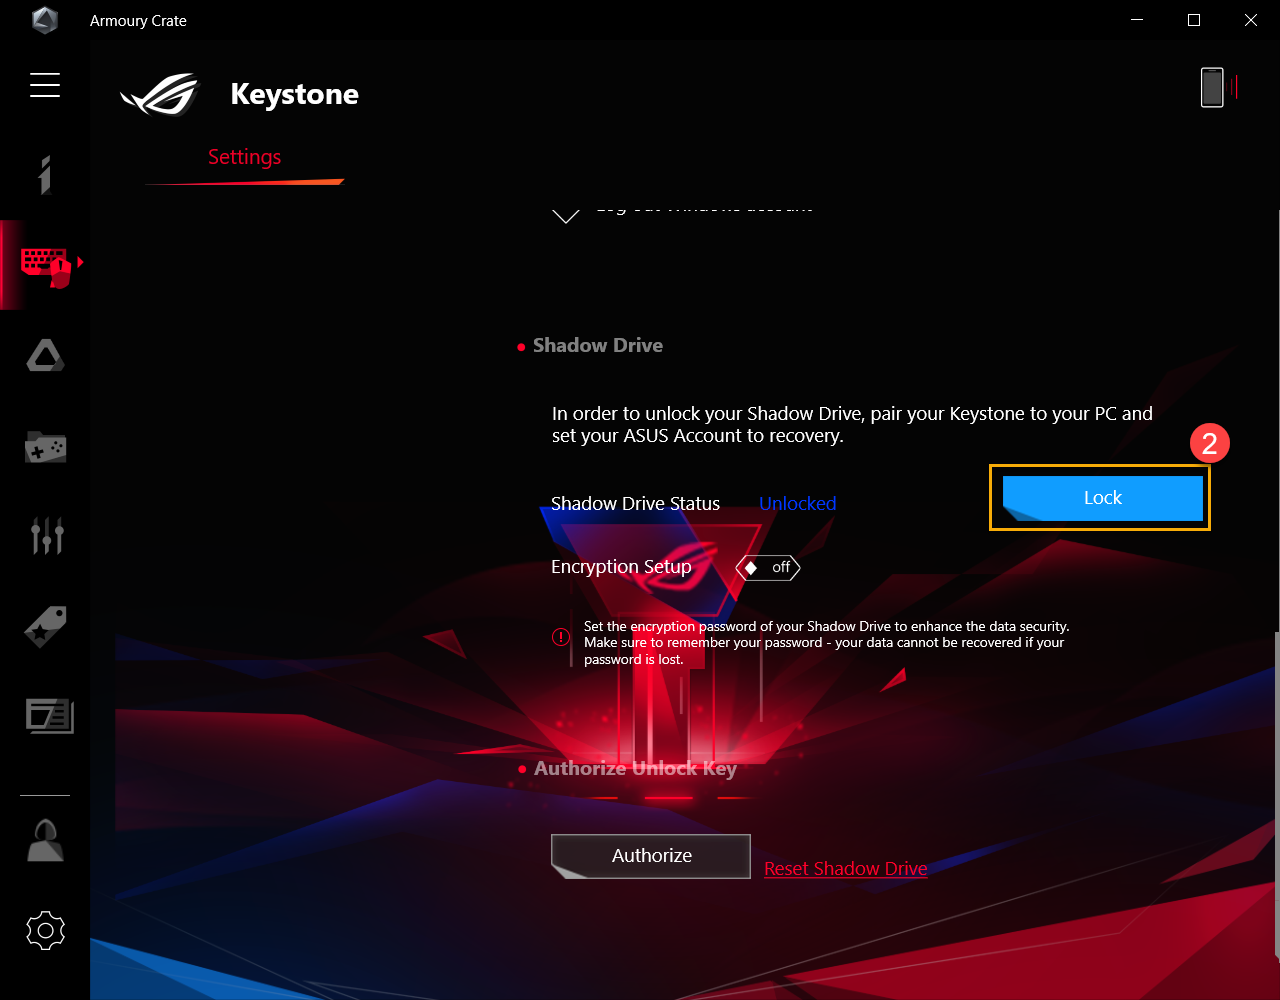
Lock Shadow Drive
Click [Lock]② to lock and hide Shadow Drive storage capacity.
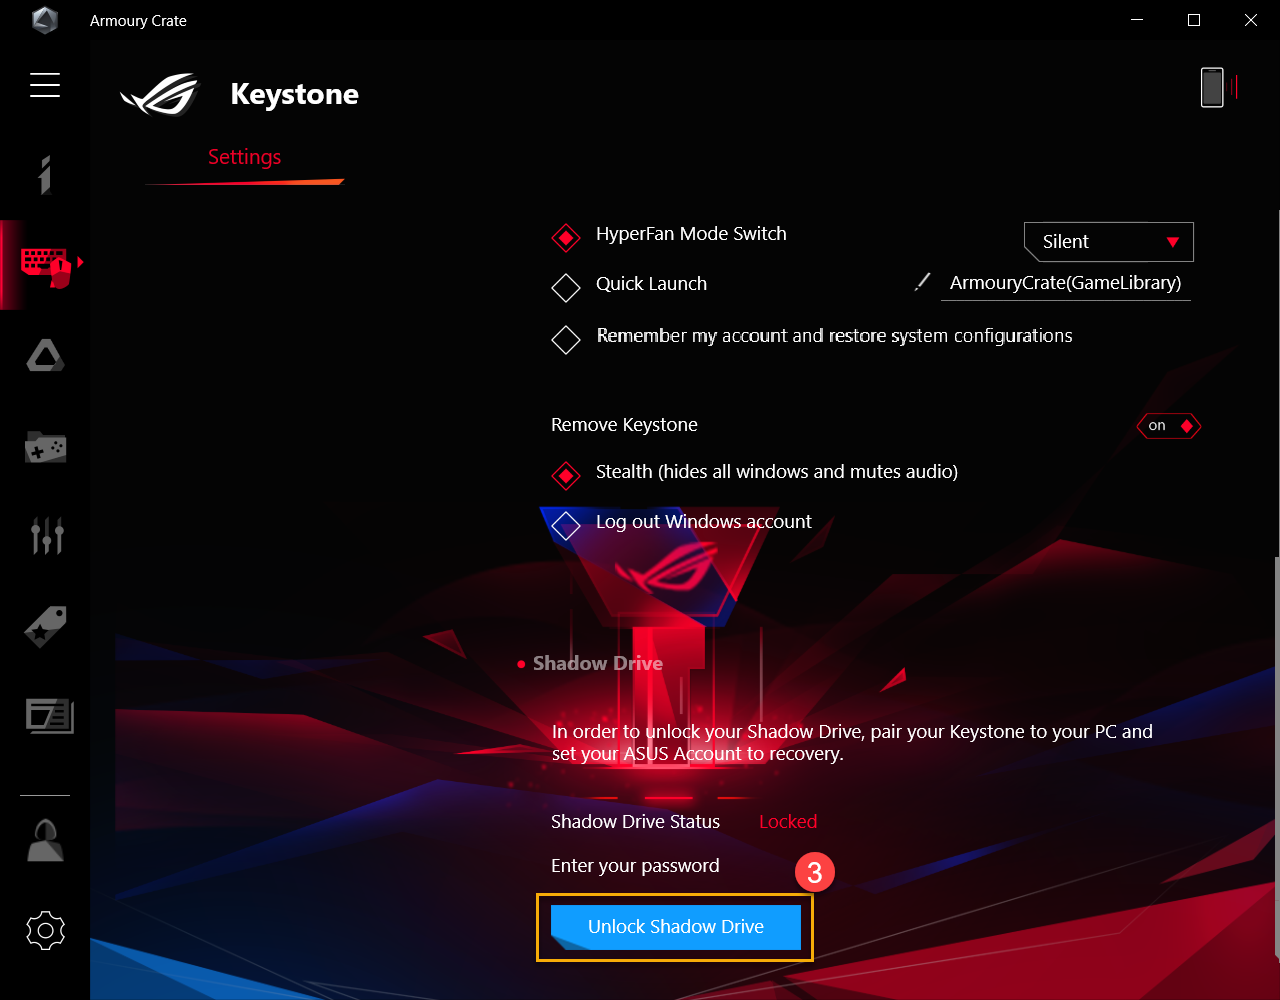
Unlock Shadow Drive
Click [Unlock Shadow Drive]③ , and then Unlock Shadow Drive window will pop out.
In Unlock Shadow Drive window, enter your ASUS Account password④, after that, click [OK] to unlock Shadow Drive storage capacity.
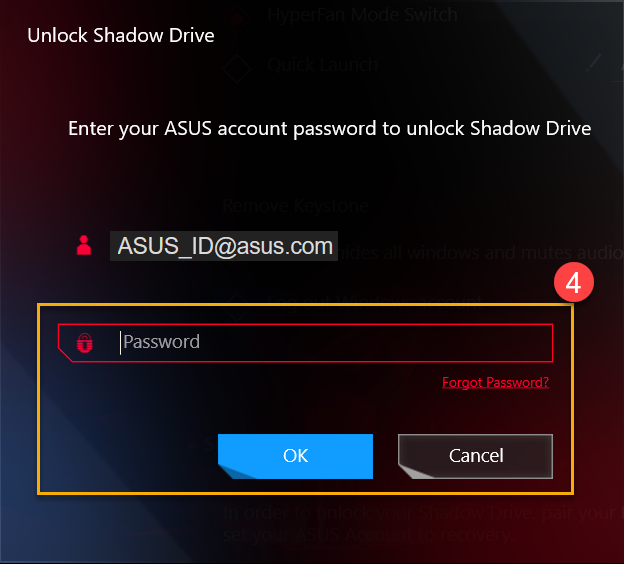
IMPORTANT: Your PC must be connected to Internet to activate this feature.
6-3 Shadow Drive Encryption Setup
To set Shadow Drive encryption password for enhanced data security. (For Windows 10 Pro environment only)
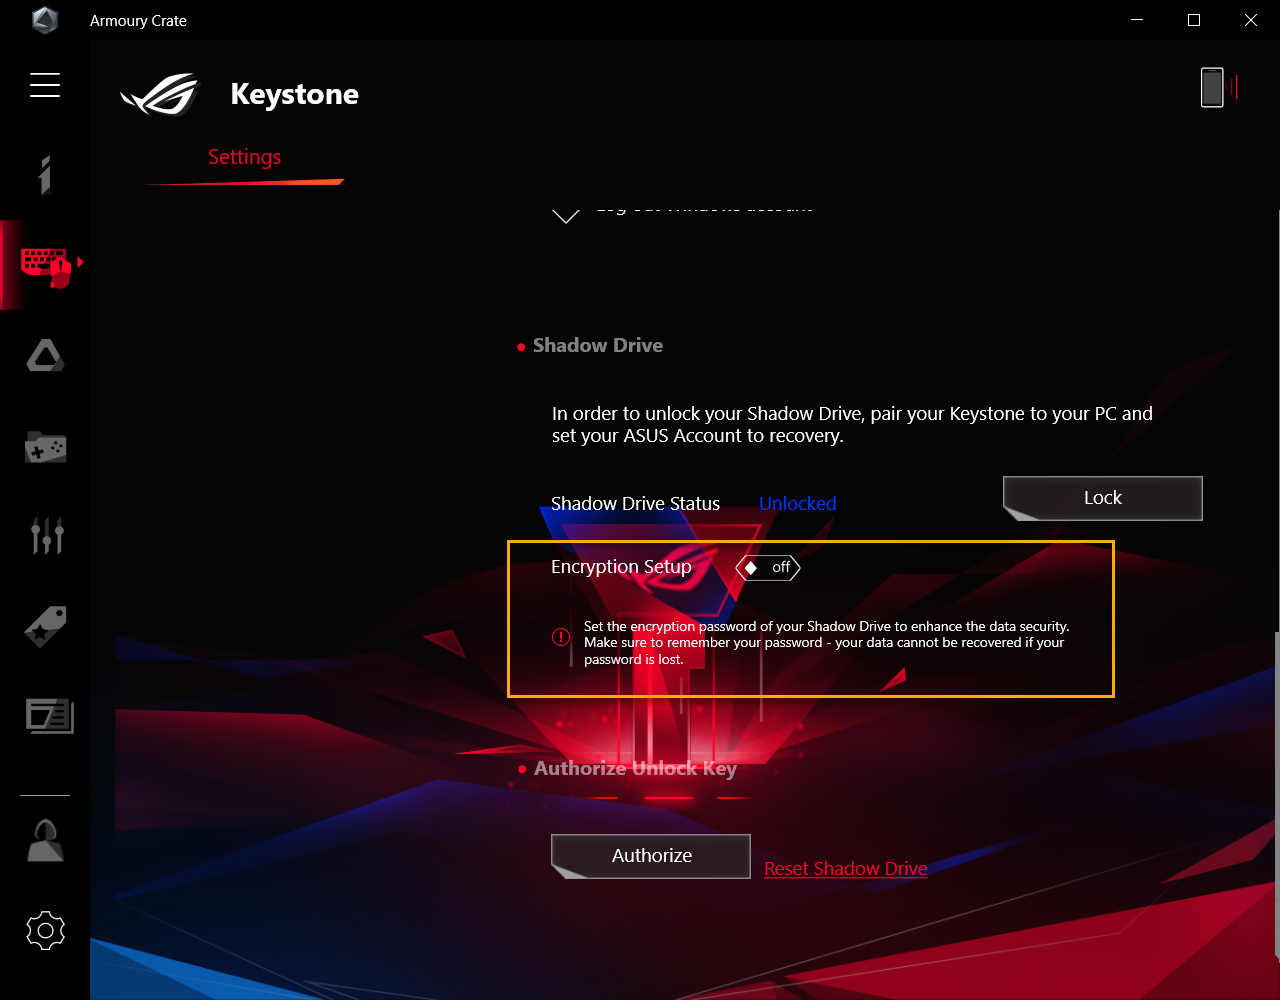
Encryption Setup On
Switch Encryption Setup to [On] ① and the Shadow Drive Encryption Setup window will pop out.

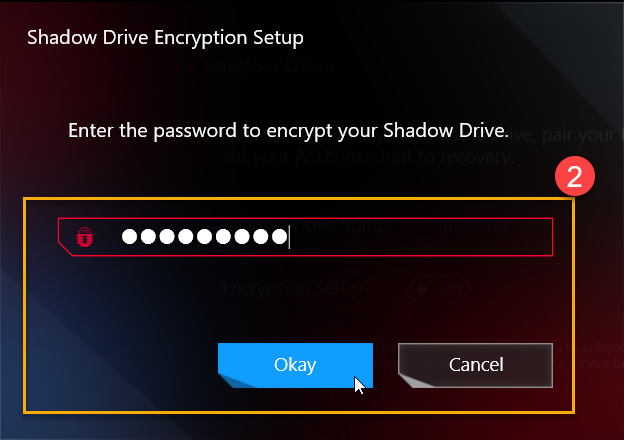
In Shadow Drive Encryption Setup window, please setup your own password② (minimum of 8 characters required), then click [Okay].
*Please make sure to remember your password - your data cannot be recovered if your password is lost.
Encryption Setup - Off
Switch Encryption Setup to [Off] ③ and the encryption function will be turned off.

6-4 Authorize Unlock Key - Authorize
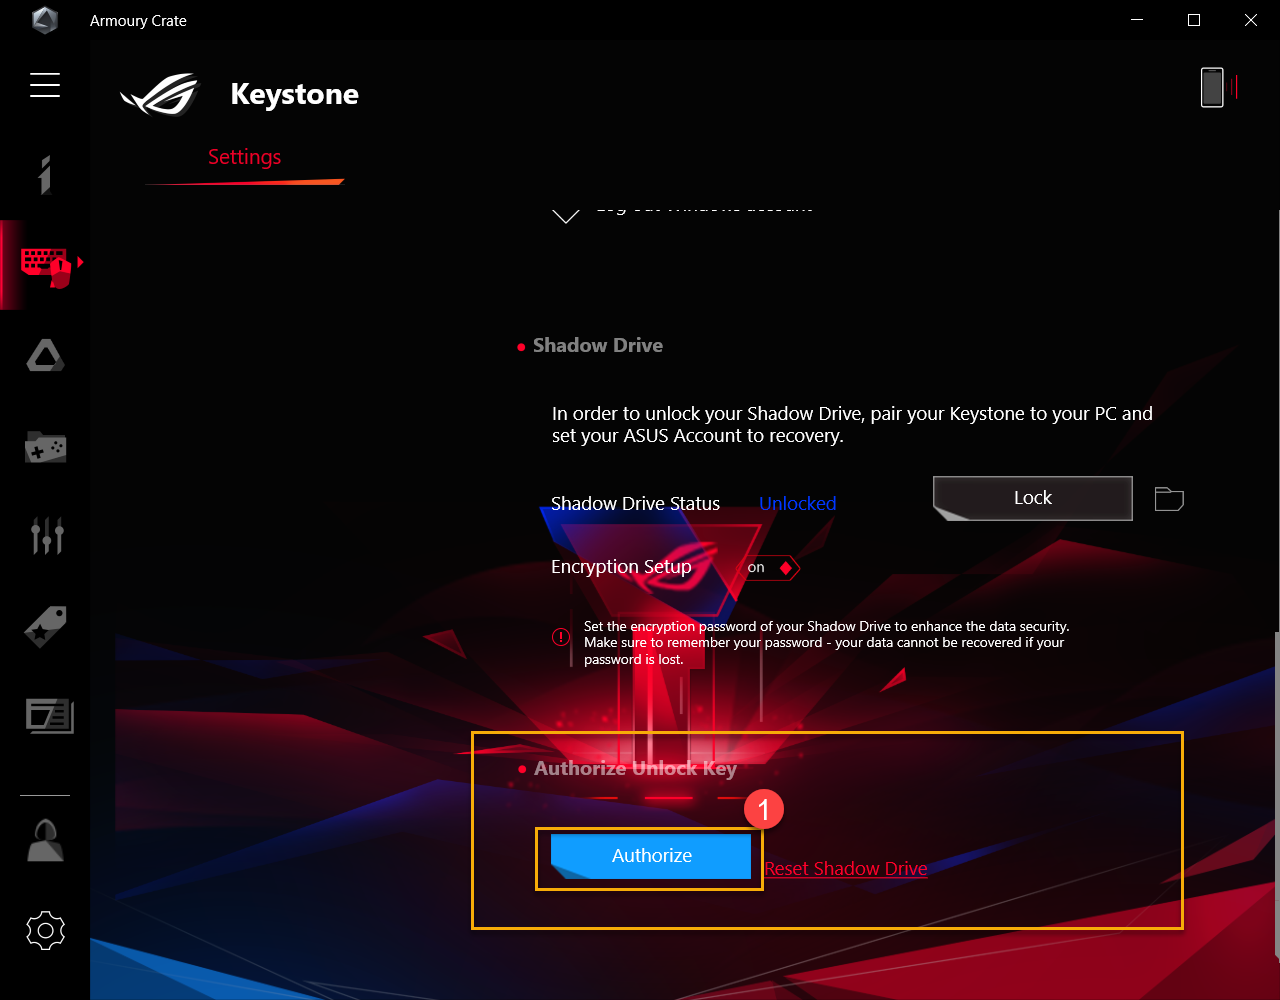
Authorizing the paired Keystone to unlock the Shadow Drive on this PC.
Click [Authorize]①, the login window will pop out.
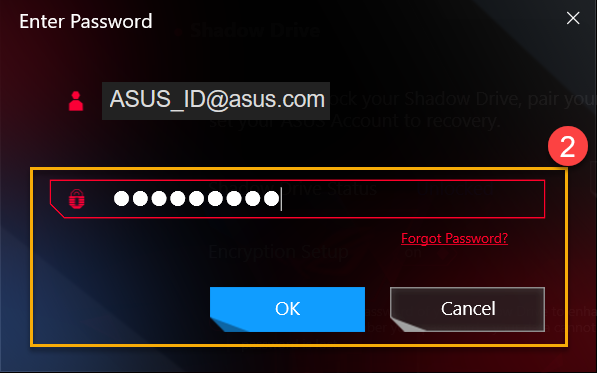
In login window, enter your ASUS Account Password②, after that click [OK] to Authorize Unlock Key window
IMPORTANT: Your PC must be connected to the Internet to activate this feature.
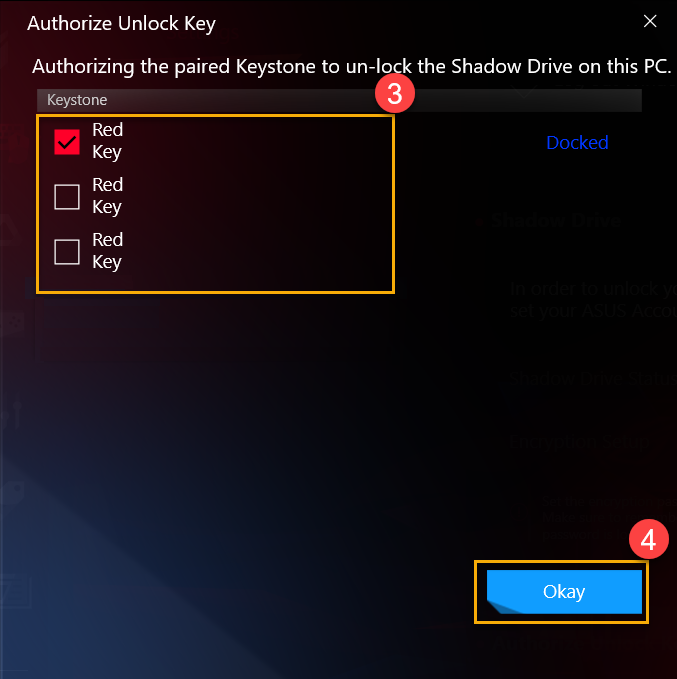
In the Authorize Unlock Key window, select any paired Keystone③ to authorize unlocking the Shadow Drive storage capacity, and then click [Okay]④.
6-5 Authorize Unlock Key - Reset Shadow Drive
To reset Keystone authorization setup and shutdown the Shadow Drive.
IMPORTANT: Reseting the Shadow Drive may delete all its documents and files
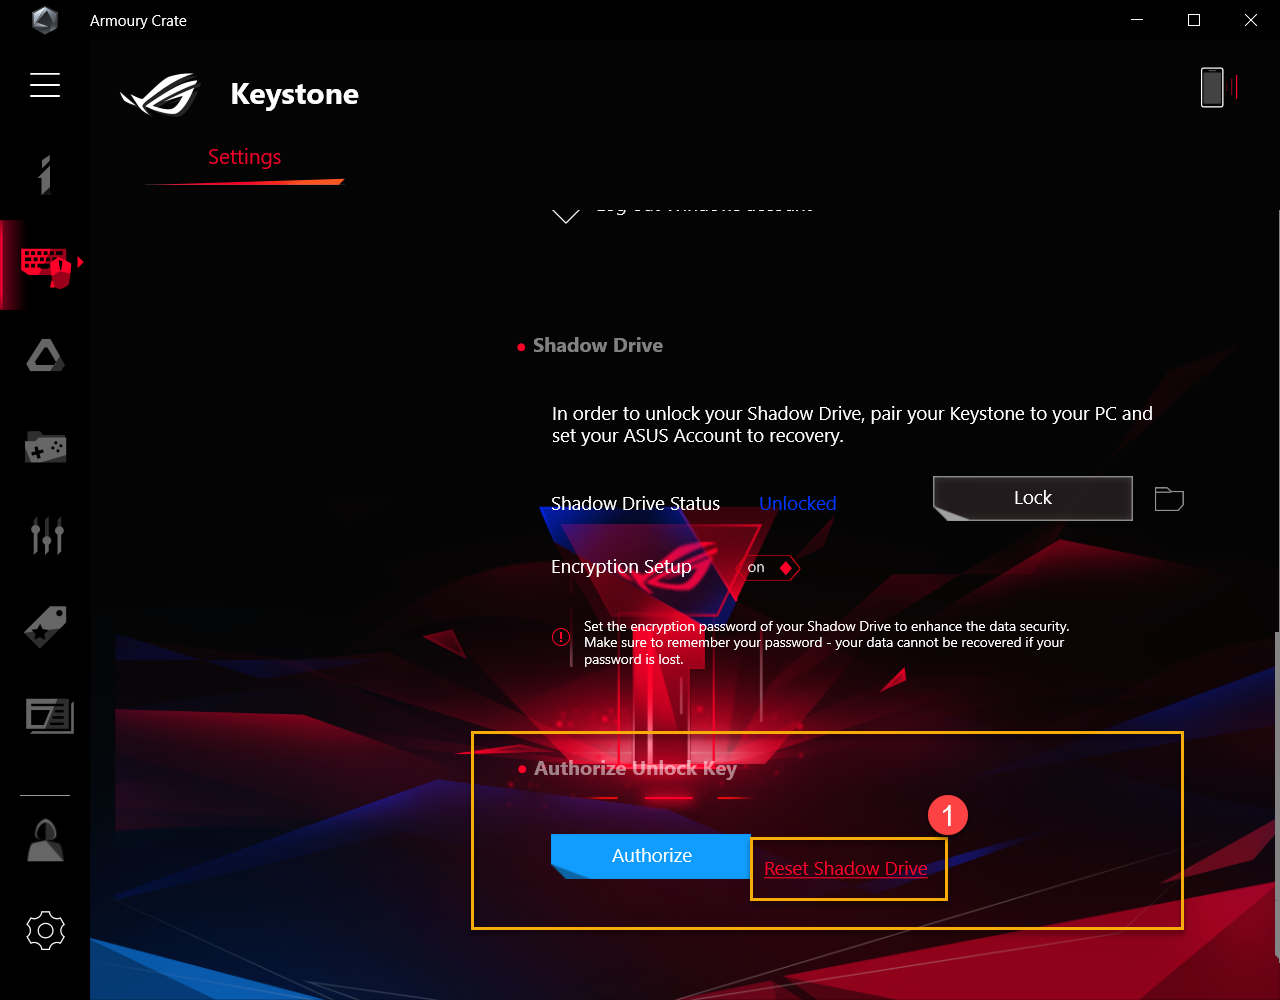
Clicking [Reset Shadow Drive]①, and then Reset Shadow Drive window will pop out.
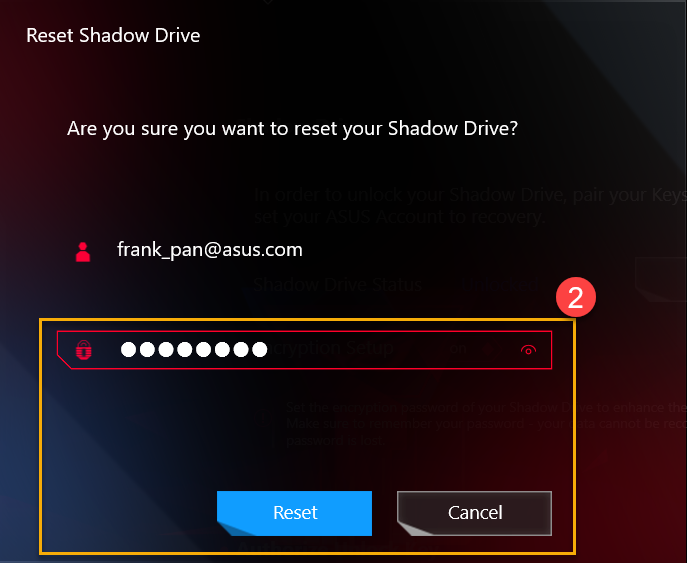
In the Reset Shadow Drive window, enter your ASUS Account Password②, then click [Reset] to complete.
IMPORTANT: Your PC must be connected to the Internet to activate this feature.
Q1: How to unlock the Shadow Drive with Encryption is enabled?
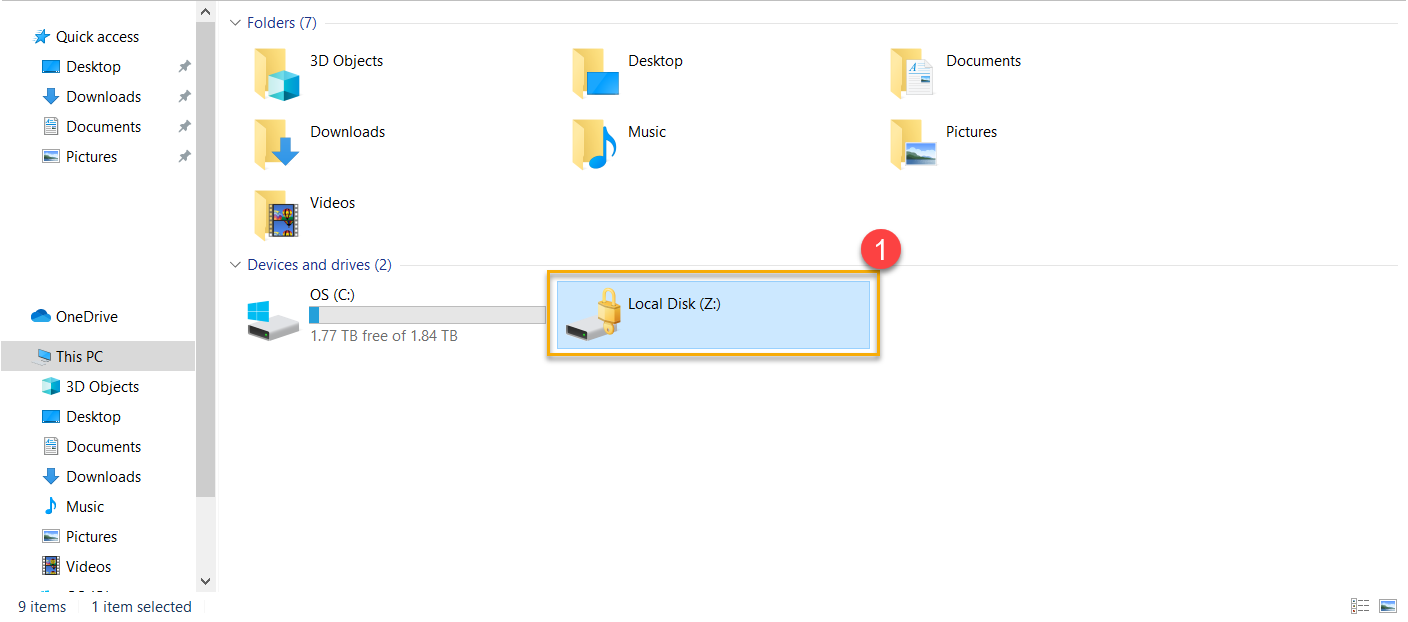
A1: If the Shadow Drive has encryption enabled, the Local Disk(Z:) will be locked with the icon below. Please click Local Disk(Z:) icon①, and then the BitLocker(Z:). The unlock window will pop out.
Enter your password② which was set in the Encryption Setup, then click [Unlock]③.
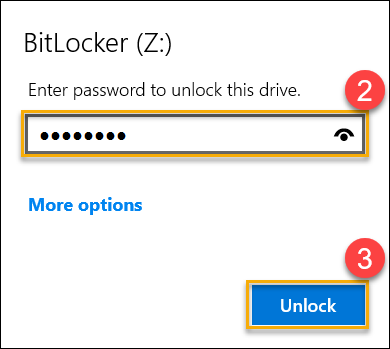
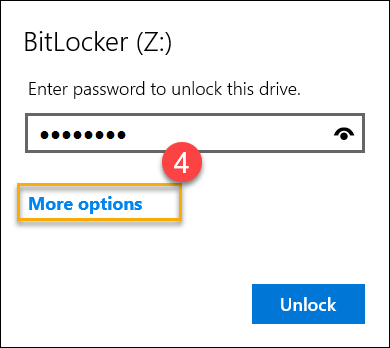
If forget your encryption password, you can select [More options]④, and click [Enter recovery key]⑤.
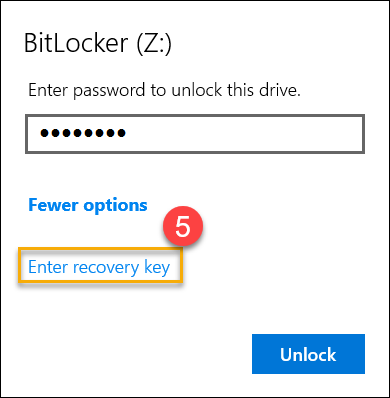
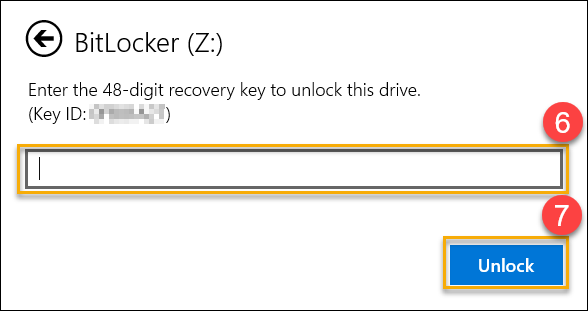
Enter the 48 digit recovery key⑥, and click [Unlock]⑦ to unlock this drive.
Q2: How to get the Recovery Key?
A2: In Shadow Drive① Settings, the download site② for the Recovery Key will show up, while the Encryption Setup③ is on. Click the download site to save the Recovery Key text file (Preset file name is "ShadowDrivePasswordBackup.TXT").
Q3: Why (C :) disk drive space does not recover after I delete files in the Shadow Drive?
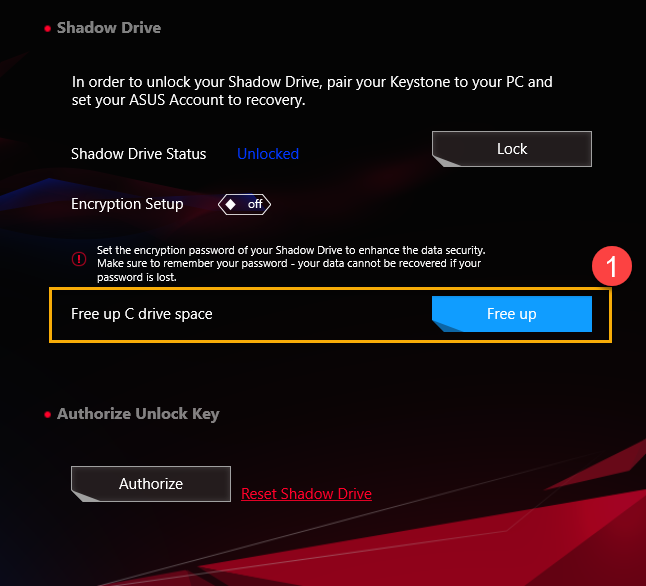
Q3: Since Shadow Drive uses Windows Dynamic Disk design, it is a normal phenomenon with design.
*You can use "Reset Shadow Drive" to recover disk drive space, but all ducuments in Shadow Drive will be deleted, once the Shadow Drive is reset.
*Or, you can select "Free up C drive space"① to free up the drive space.
Q4: The keystone support function table
A4:
G531/G731& G35DX | G532/G732& G35CZ | G533/G733 | |
| Keystone Bind Account | V | V | |
| Docked Keystone Behavior | V | V | V |
| Quick Access | V | V | V |
| Shadow Drive | V | V | V |
| Recover Key | V | V | V |
Q5: Why is there no sound or lighting effect after inserting Keystone?
A5: Please try to confirm Keystone utility setup , for example "Docked Keystone Behavior" or "Insert Keystone" in Quick Access whether is turn on or off. If still no reaction, please try to upgrade Armoury Crate to the latest version, or reinstall ASUS NFC Driver. If you still have the problem, please contact with local ASUS repair center for repair service.