[NUC] No Boot, Auto-Shutdown, or Hang Issues on NUC Element Products
It can be difficult to resolve situations where a system doesn't boot or doesn't appear to have power. Below are instructions for troubleshooting the most common causes for No Boot/No Power issues.
| Note | These steps will not resolve the problem in all cases, but have been proven to resolve issues for many customers. If you try all the steps below and your NUC still doesn't start properly, ASUS Customer Support can help with additional troubleshooting or warranty Service. See the instructions at the bottom of this page for information on contacting ASUS Customer Support. |
Click or the topic for details:
Step 1: If BIOS settings were changed, set them back to factory default values.
Follow these steps to revert your BIOS settings to default values:
- Press F2 during boot to enter BIOS Setup.
- Press F9 to set defaults.
- Press F10 to save and exit BIOS.
Or
- When the NUC is off, press and hold the power button for approximately 3 seconds, and then release. The Power Button menu should appear.
- Press F2 to enter BIOS Setup.
- Press F9 to restore BIOS factory default values.
- Press F10 to save and exit BIOS Setup.
Step 2: Determine if the boot problem is due to overheating.
These symptoms can occur if installed components in your NUC overheat:
- The system won't boot.
- The system randomly shuts down.
If any of the overheating symptoms appear, check the following:
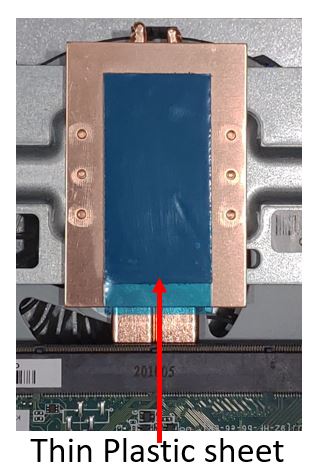
- The thin plastic sheet on the heatsink, protecting thermal grease removed before installing the Compute Element.
- The NUC is on a hard surface.
- The ventilation holes in the back and bottom of the chassis aren't blocked (not applicable for fanless Chassis Element CMCR1ABx).
- The NUC is set vertically on its left or right side (not applicable for fanless Chassis Element CMCR1ABx).
Step 3: Identify errors when starting the computer.
Follow these steps if you receive the following error:
A bootable device has not been detected
Check that the drive is detected in the BIOS:
(Use a USB keyboard. A Bluetooth keyboard won't be able to access the BIOS.)
- Press F2 during boot to enter BIOS Setup.
- On the Advanced > Boot menu, check the Boot Drive Order.
- Press F10 to exit BIOS Setup.
- If Boot Drive Order shows No Boot Drive, the drive inside your NUC might have failed. In this case, perform a BIOS recovery (Step 5 below) to restore the drive. If you see this issue from the first boot, reconnect the drive to the board. Make sure the storage drive is inserted correctly and fully seated in the socket.
- If you use a SATA drive inserted into a daughter card, make sure the SATA power and data wires are connected to the board. If your NUC is only equipped with one SATA wire, check that it's fully inserted to the connector on the board.
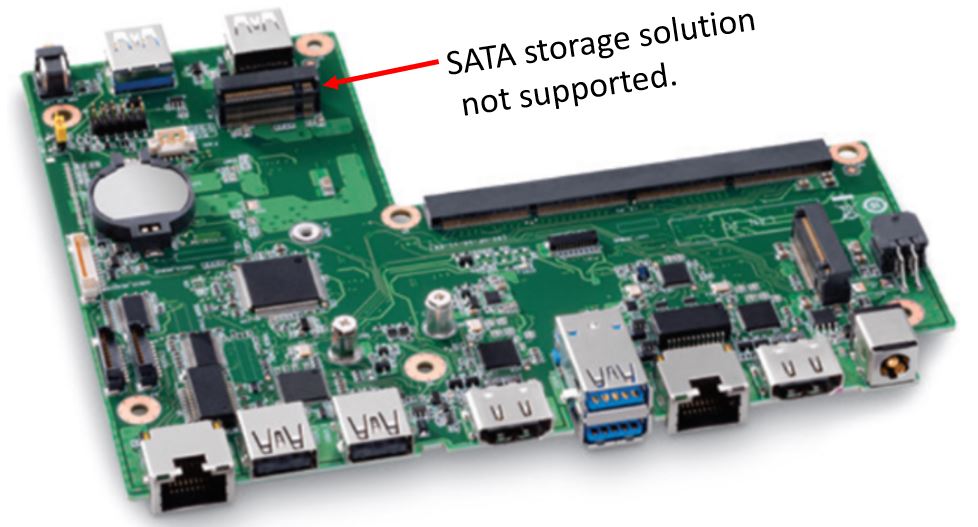
- On a CMCR1ABx or CMCM2FB/CMCM2FB chassis element, the M.2 connector perpendicular to the 300-pin connector has support for PCIe NVMe storage solutions only. SATA storage solution is not supported.
Step 4: Try a BIOS Recovery.
The NUC Element might not start properly if BIOS becomes corrupted. Try a BIOS Recovery.
Step 5: Try a EC Firmware update.
The NUC Element might become unstable if Embedded Controller (EC) firmware is not updated. Try a EC firmware update.
Step 6: Contact ASUS Customer Support for further investigation.
If you've tried all the steps listed above and your NUC still does not start properly, ASUS Customer Support can help. Be ready to explain the troubleshooting steps you tried when contacting Customer Support.