


[NUC] How to Recover an NUC BIOS, using the Aptio V UEFI Core, Using the Security Jumper
In the unlikely event that a BIOS update is interrupted, it's possible the BIOS may be left in an unusable state.
Please follow the instructions and/or watch the video below to try and recover the BIOS.
Here's the steps to recover the NUC by using the Security Jumper.
Prepare Recovery File
- Prepare a USB device.
- Download and save the BIOS file. ([NUC] Where Can I Download the BIOS File?)
- Navigate to the "Recovery File"
- Copy the .CAP BIOS to the ROOT of the USB device.
Remove the Security Jumper
- Shut down the computer and unplug the AC power adapter.
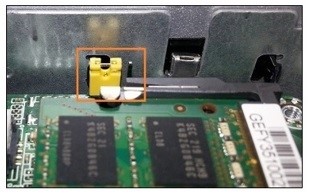
- Open the chassis and remove the BIOS security jumper. (See the Technical Product Specification for details including the location of this jumper.)
Do the Recovery
- Plug the USB drive into a USB port of the target computer and turn it on.
- Wait 2-5 minutes for the recovery process to complete.
- The computer will either turn off when the recovery process is complete, or it will prompt you to turn it off.
- Remove the USB drive.
- Replace the BIOS security jumper.
- Close the chassis.
- Restart the computer.
When using this method, if the NUC displays "Detected BIOS Security Jumper Removed" at boot and lists several menu options, it means the .bio or .cap file on the USB drive was not detected.
Try the following:
- Confirm the file was successfully copied to the USB drive
- Download and use a new copy of the .bio or .cap file
- Try a different USB drive
- Reformat the USB drive without using the Quick Format option. Be sure to backup and save any data from the USB drive first.
