Related Topics
[Wireless Router] How to set up Wireless MAC Filter on ASUS Router(WiFi Deny List)?
The WiFi deny list is used to manage whether wireless devices connected to the ASUS router can access the internet, enhancing the security of your home network. For example, if you see an unfamiliar phone connected to your ASUS router at home in the list of wireless devices on the router, you can add this phone to the router's WiFi deny list. This phone will not be able to access your WiFi network.
Note: Improve router network security, such as, set up encryption, use complicated password, or update firmware to latest, can greatly ensure your home network safety.
For more information, please refer to the FAQ [Wireless] How to make my router more secure
Prepare
1. Please update your router firmware to the latest version. For instruction about how to update the firmware, please refer the following FAQ
[Wireless Router] How to update the firmware of your router to the latest version
[ExpertWiFi] How to update the firmware of ExpertWiFi router
2. Please install the ASUS router app on your smart phone device first. Please make sure the app version is up to date.
For the information of how to install the app, please refer the following FAQ
[Wireless Router] How to set up ASUS Wi-Fi router via ASUS Router App
[Wireless Router]How to manage multiple ASUS routers by ASUS router app
[ExpertWiFi] How to set up ASUS ExpertWiFi router via ASUS ExpertWiFi App
3. Some functions of wireless will be different due to firmware version.
You can set up the WiFi deny list through ASUS Router APP or ASUS Router Web GUI (web settings page).
A. Use ASUS Router APP / ASUS ExpertWiFi App to set up a WiFi deny list(The following uses the ASUS router app as an example)
Interface 1: Supports routers with firmware later than 3.0.0.6.102_35404(including)
1. Login to App and tap [Settings] > [Network] > [Main network profile(Test_WiFi-1 is used as an example below)] > select [Accept] or [Reject].
[Accept] : Select Accept to allow devices in the MAC filter list to access to the wireless network.
[Reject] : Select Reject to prevent devices in the MAC filter list to access to the wireless network.
[Disable] : Disables this feature.

2. The following uses [Reject] as an example.
For example, if you do not want this phone to connect to Test_WiFi-1's, you can select [Reject] in the Test_WiFi-1 profile, add the wireless device to the list and click [Apply] to complete the setting.
Note: ASUS wireless routers have different functions depending on the model. Please check ASUS product specifications to confirm that your router supports bands.
(1) [Enable MAC Filter] : Select [Reject].
(2) [MAC Filter list] : Click the edit icon.
(3) Select your wireless device from the MAC address drop-down menu.
(4) Click add icon to add this device to the list.
(5) Click [OK].
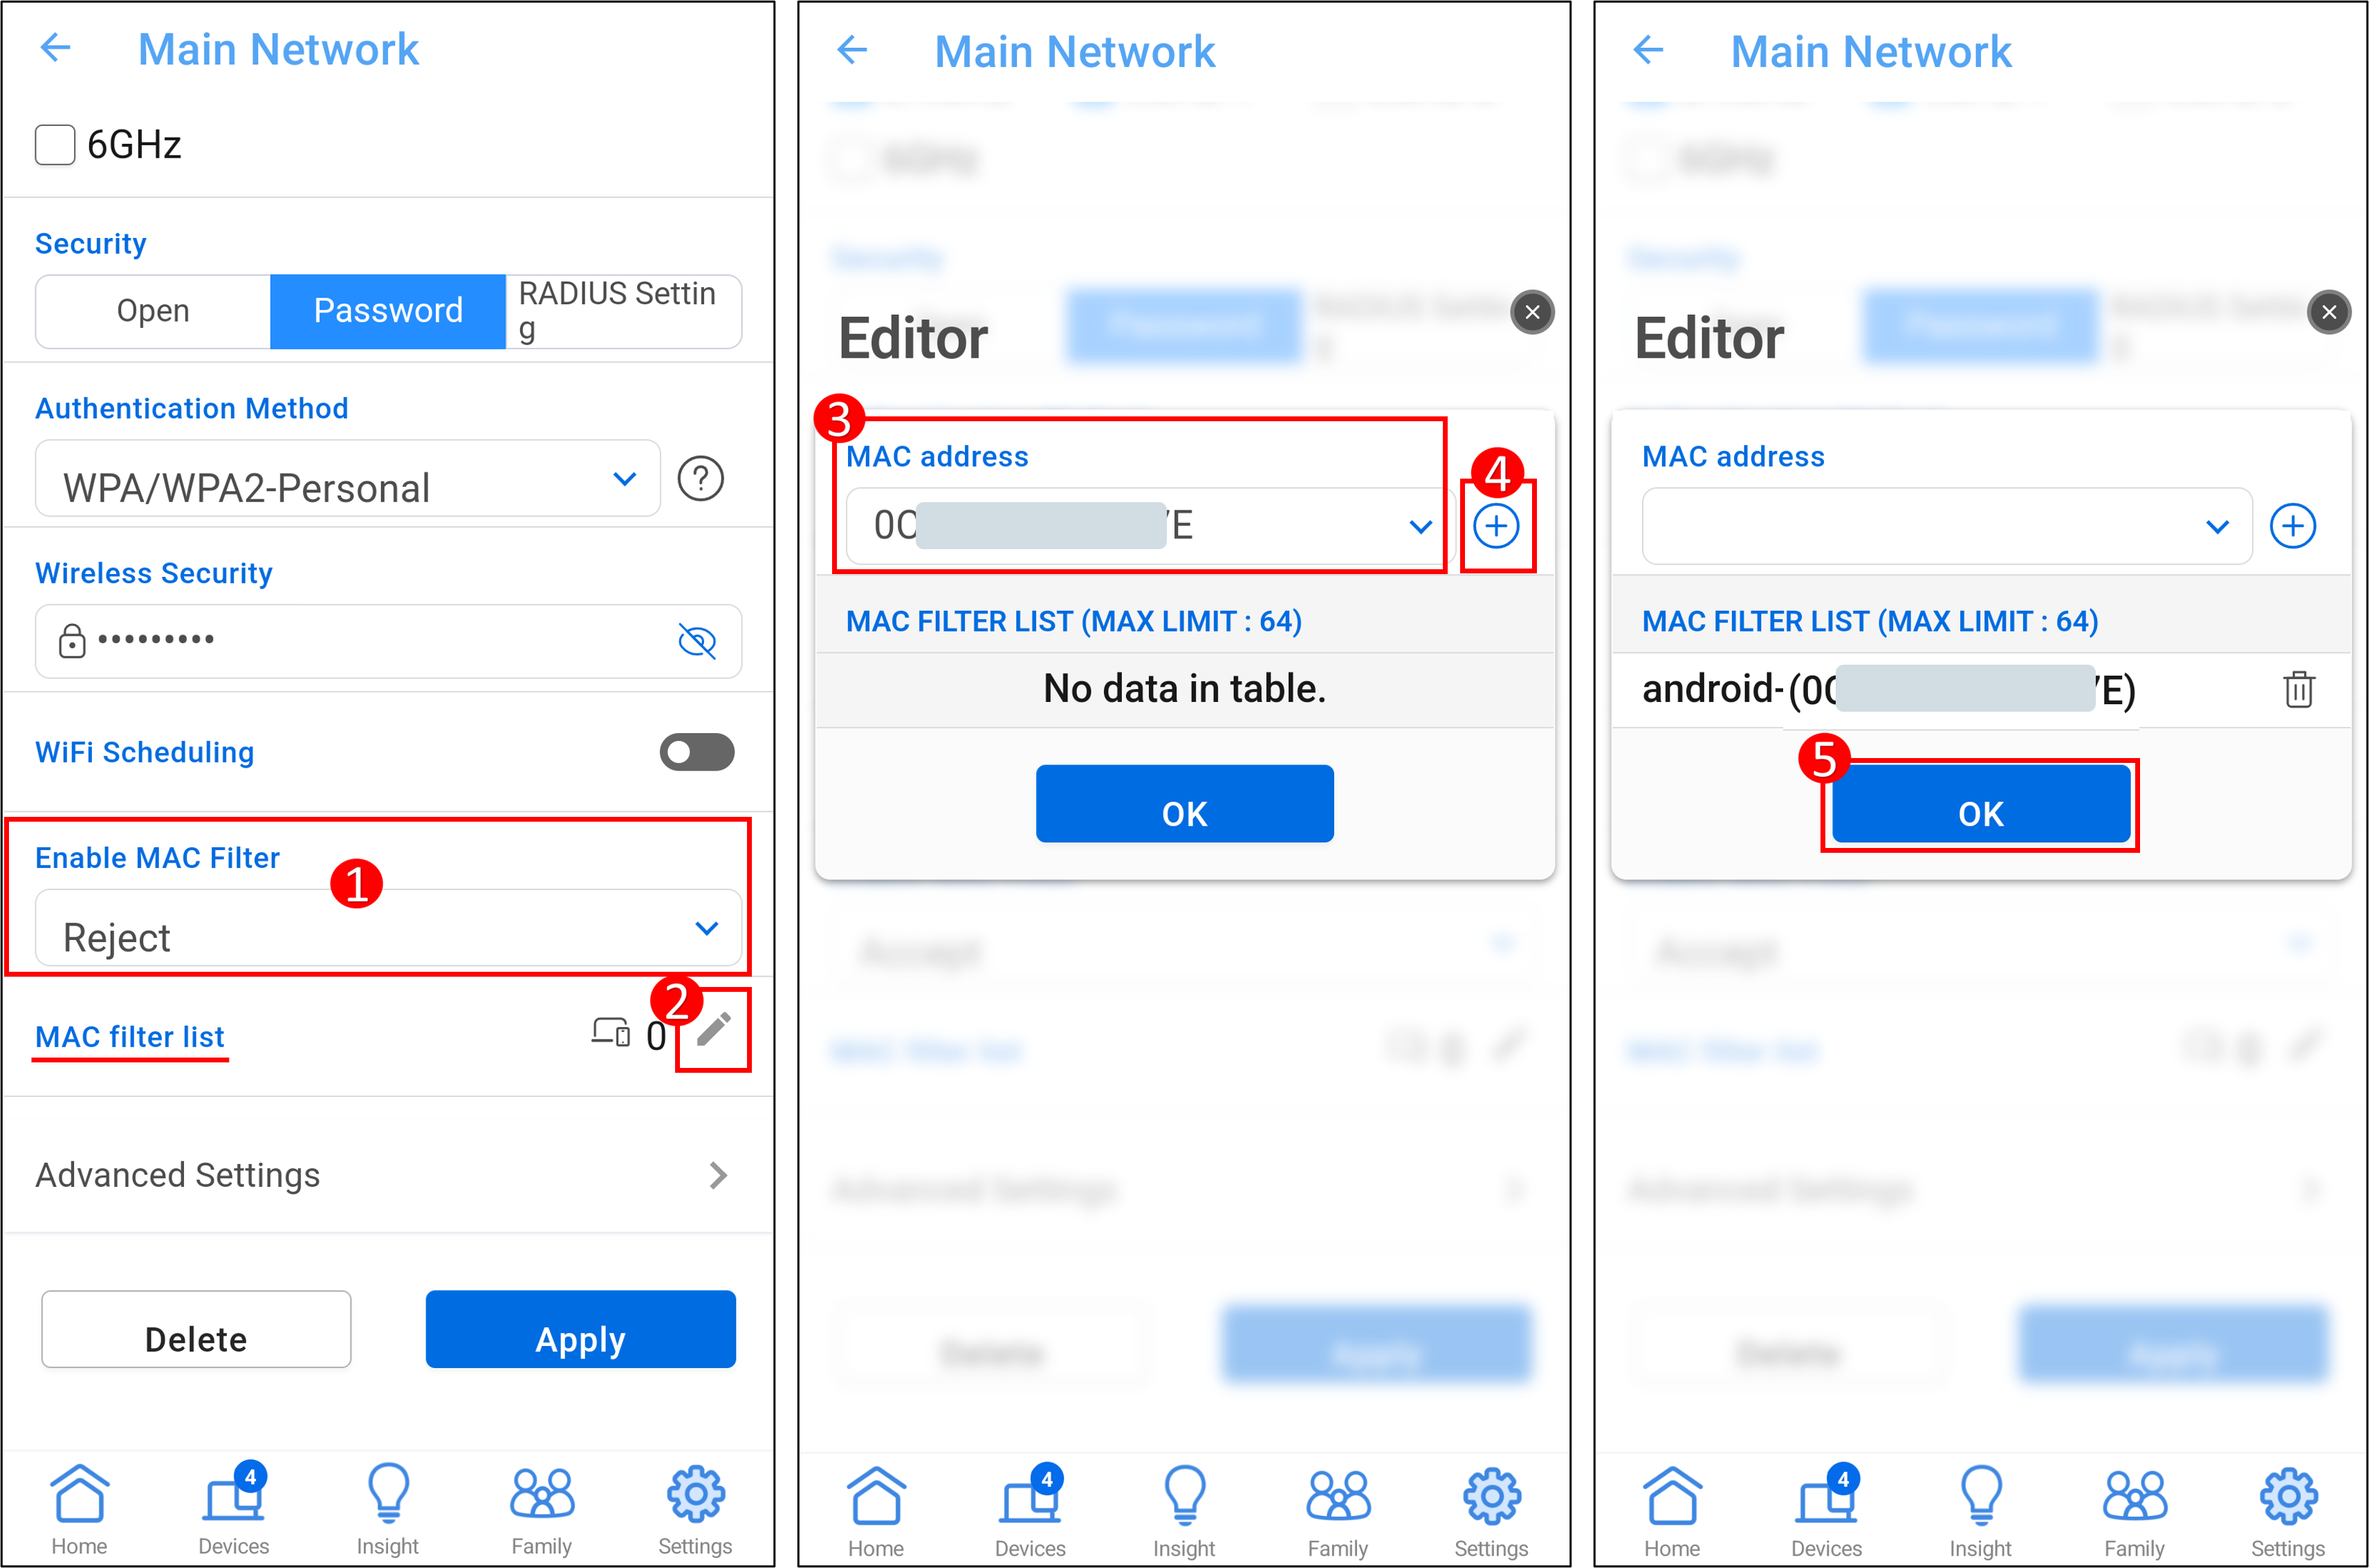
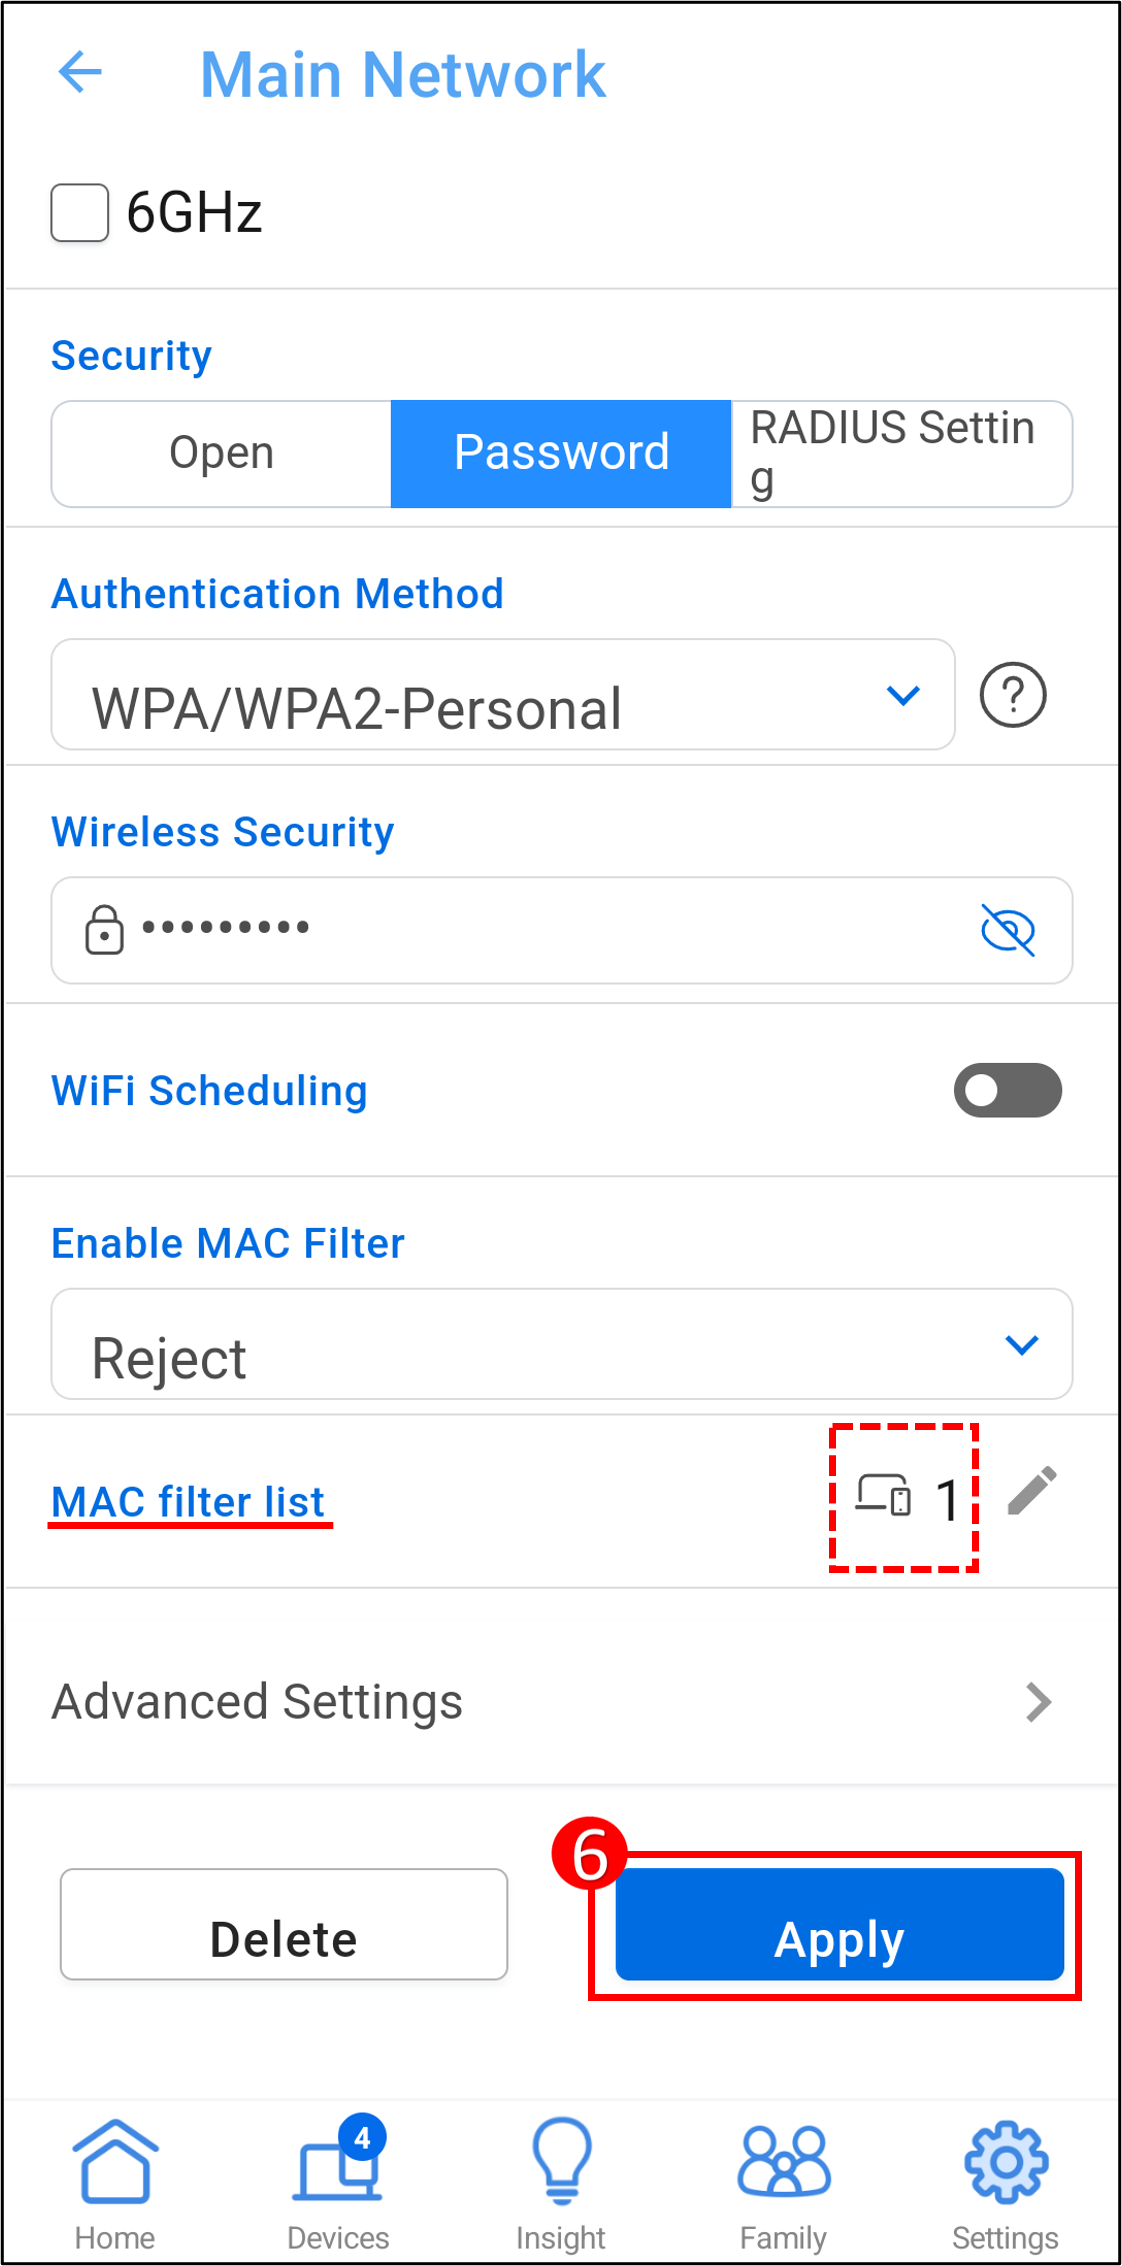
(6) The number of devices is shown in the figure below, click [Apply] to save the settings.
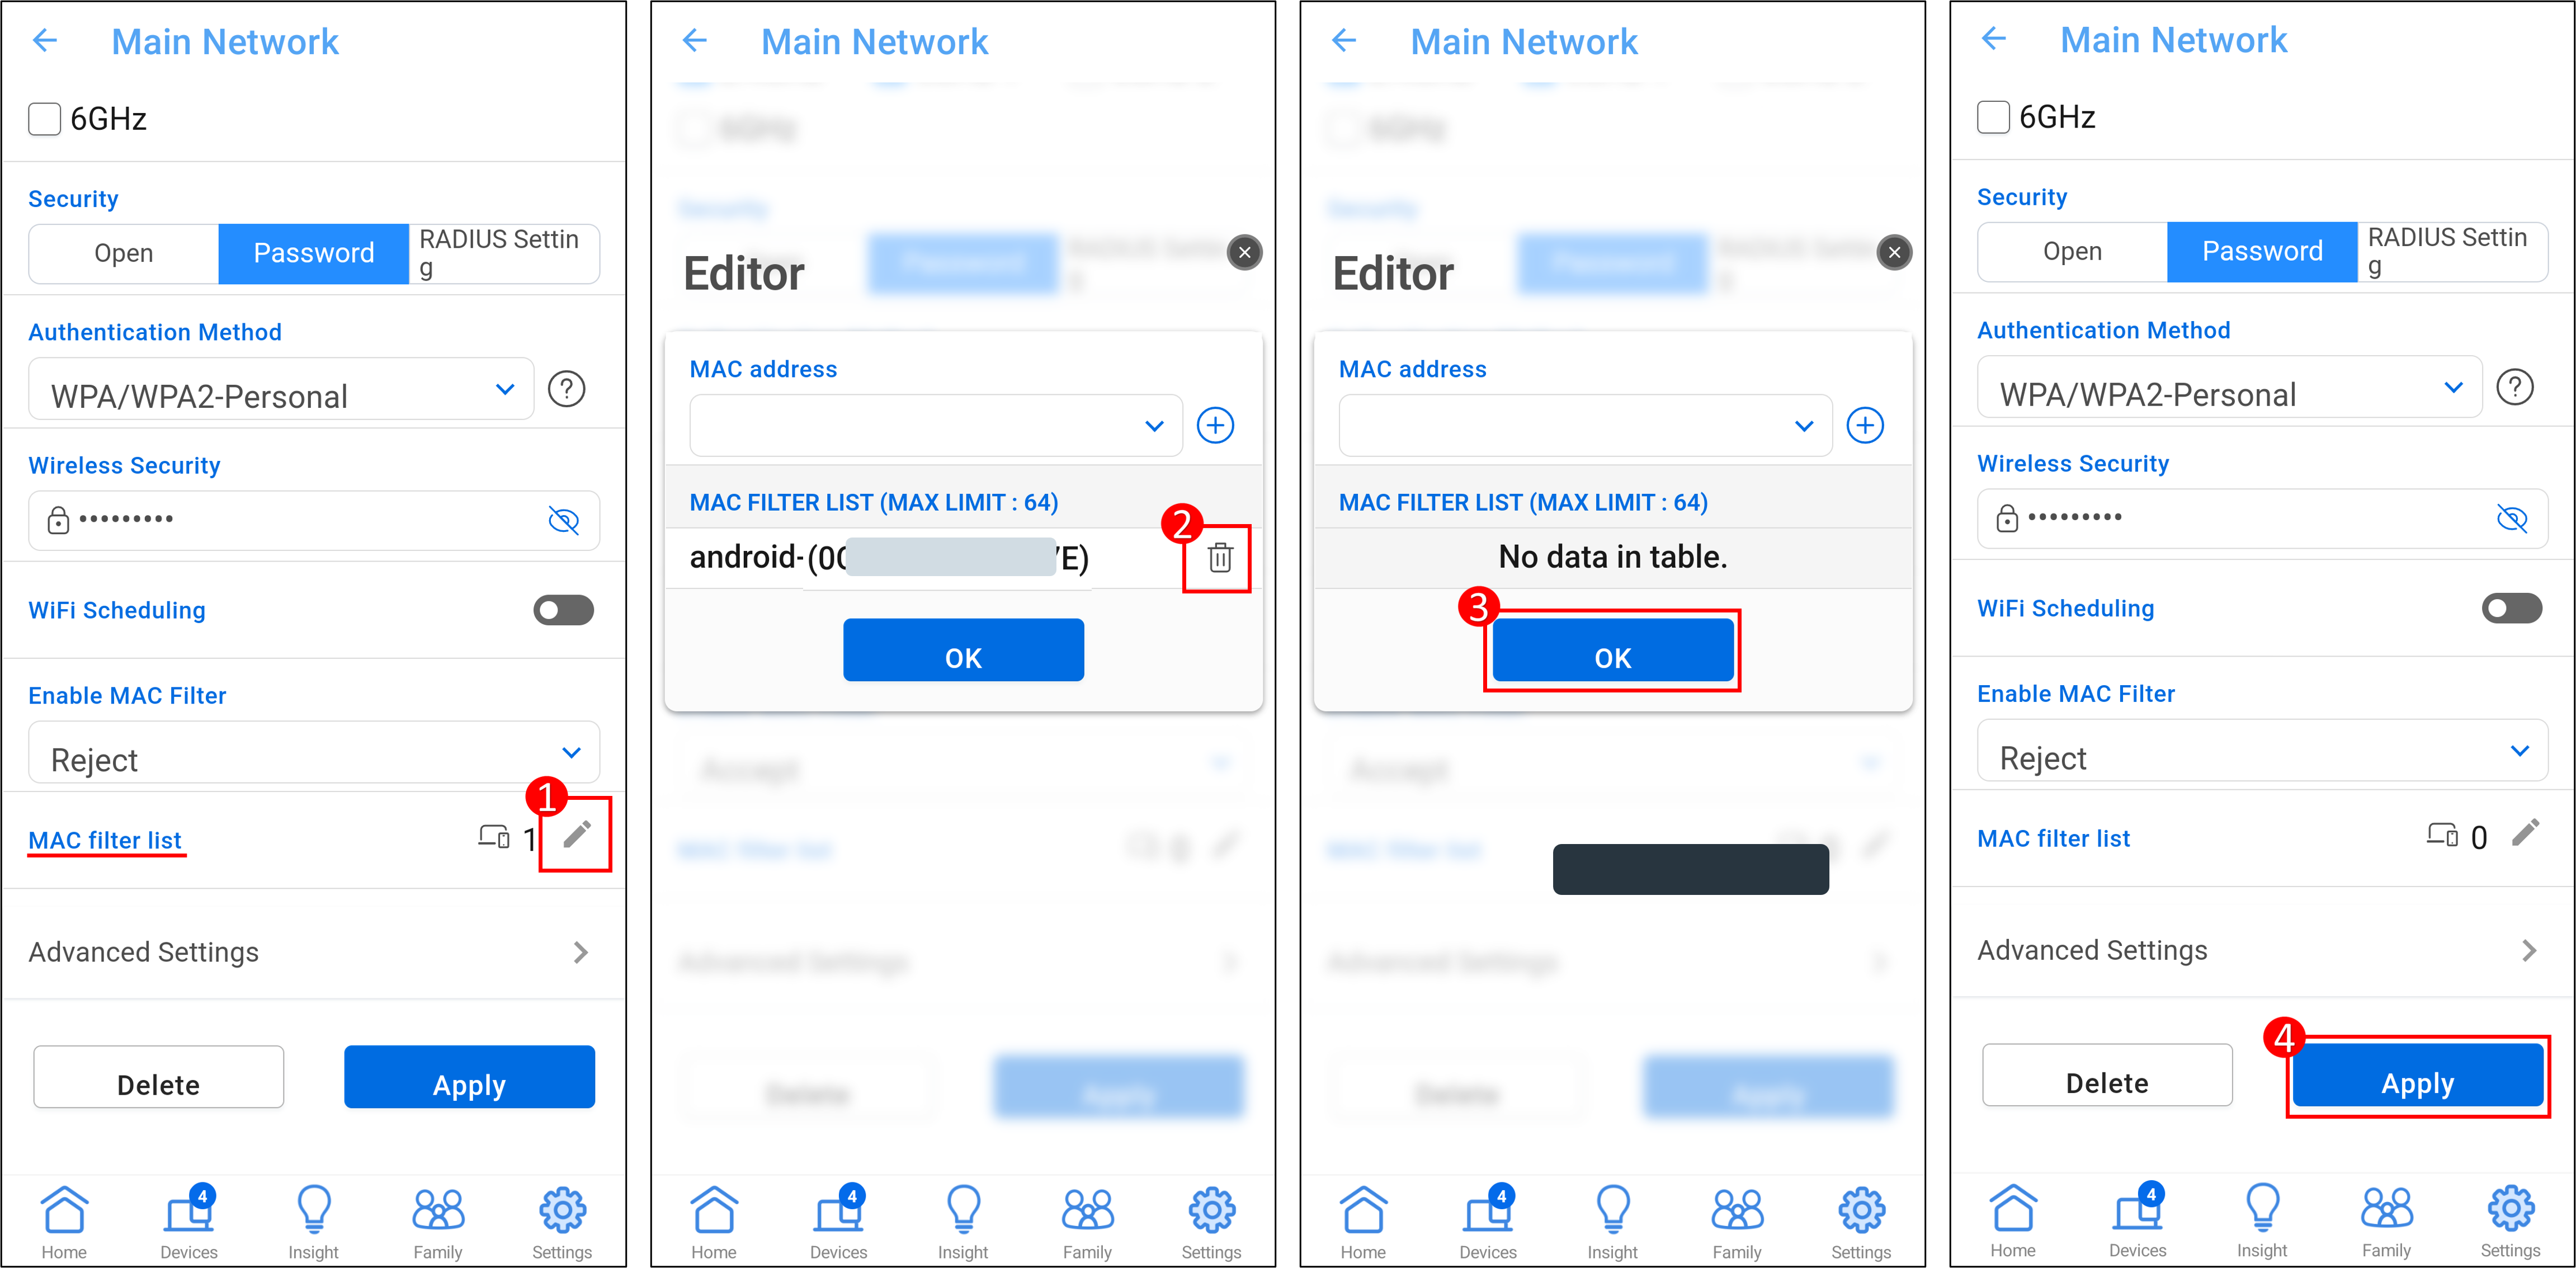
To remove a device from the list, (1) Click the edit icon. (2) Click the delete icon on the device you want to remove. (3) Click [OK]. (4) Click [Apply] to save the settings and complete the deletion.
Interface 2: Supports routers with firmware earlier than 3.0.0.6.102_35404
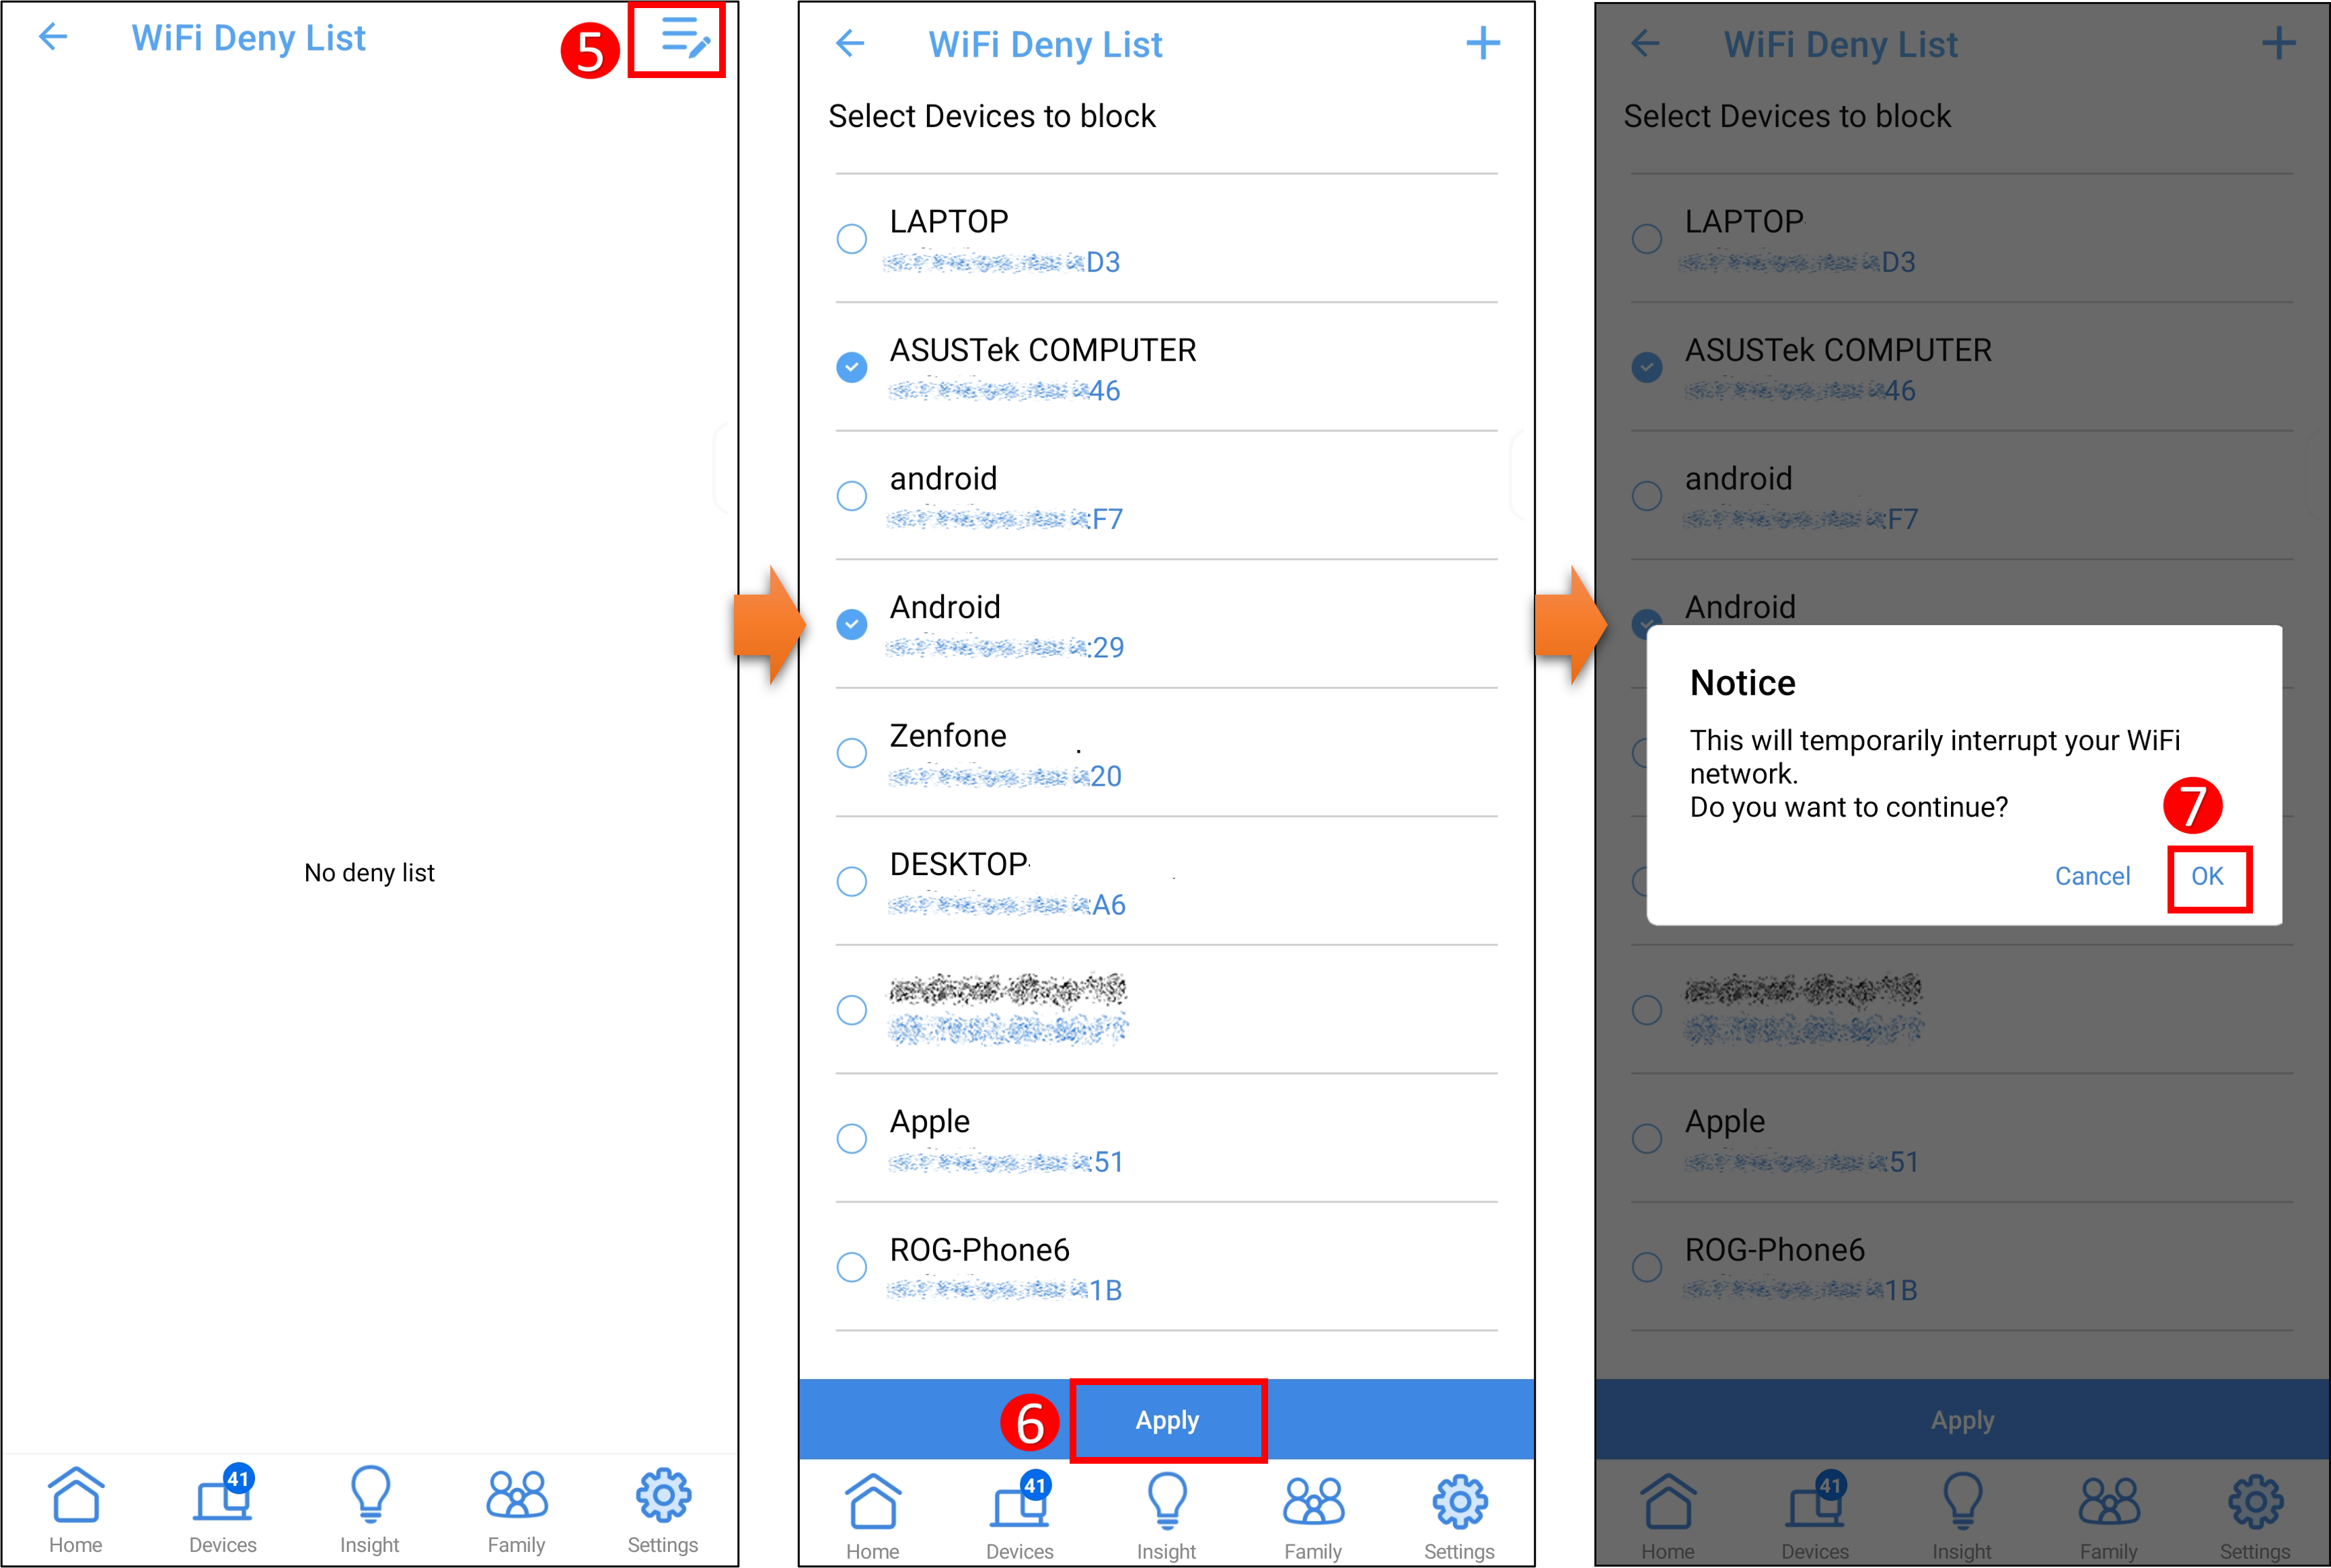
1. Enter the App, tap [ Settings ] > [ WiFi ] > [ WiFi Deny List ] > [ Manage Deny List ].
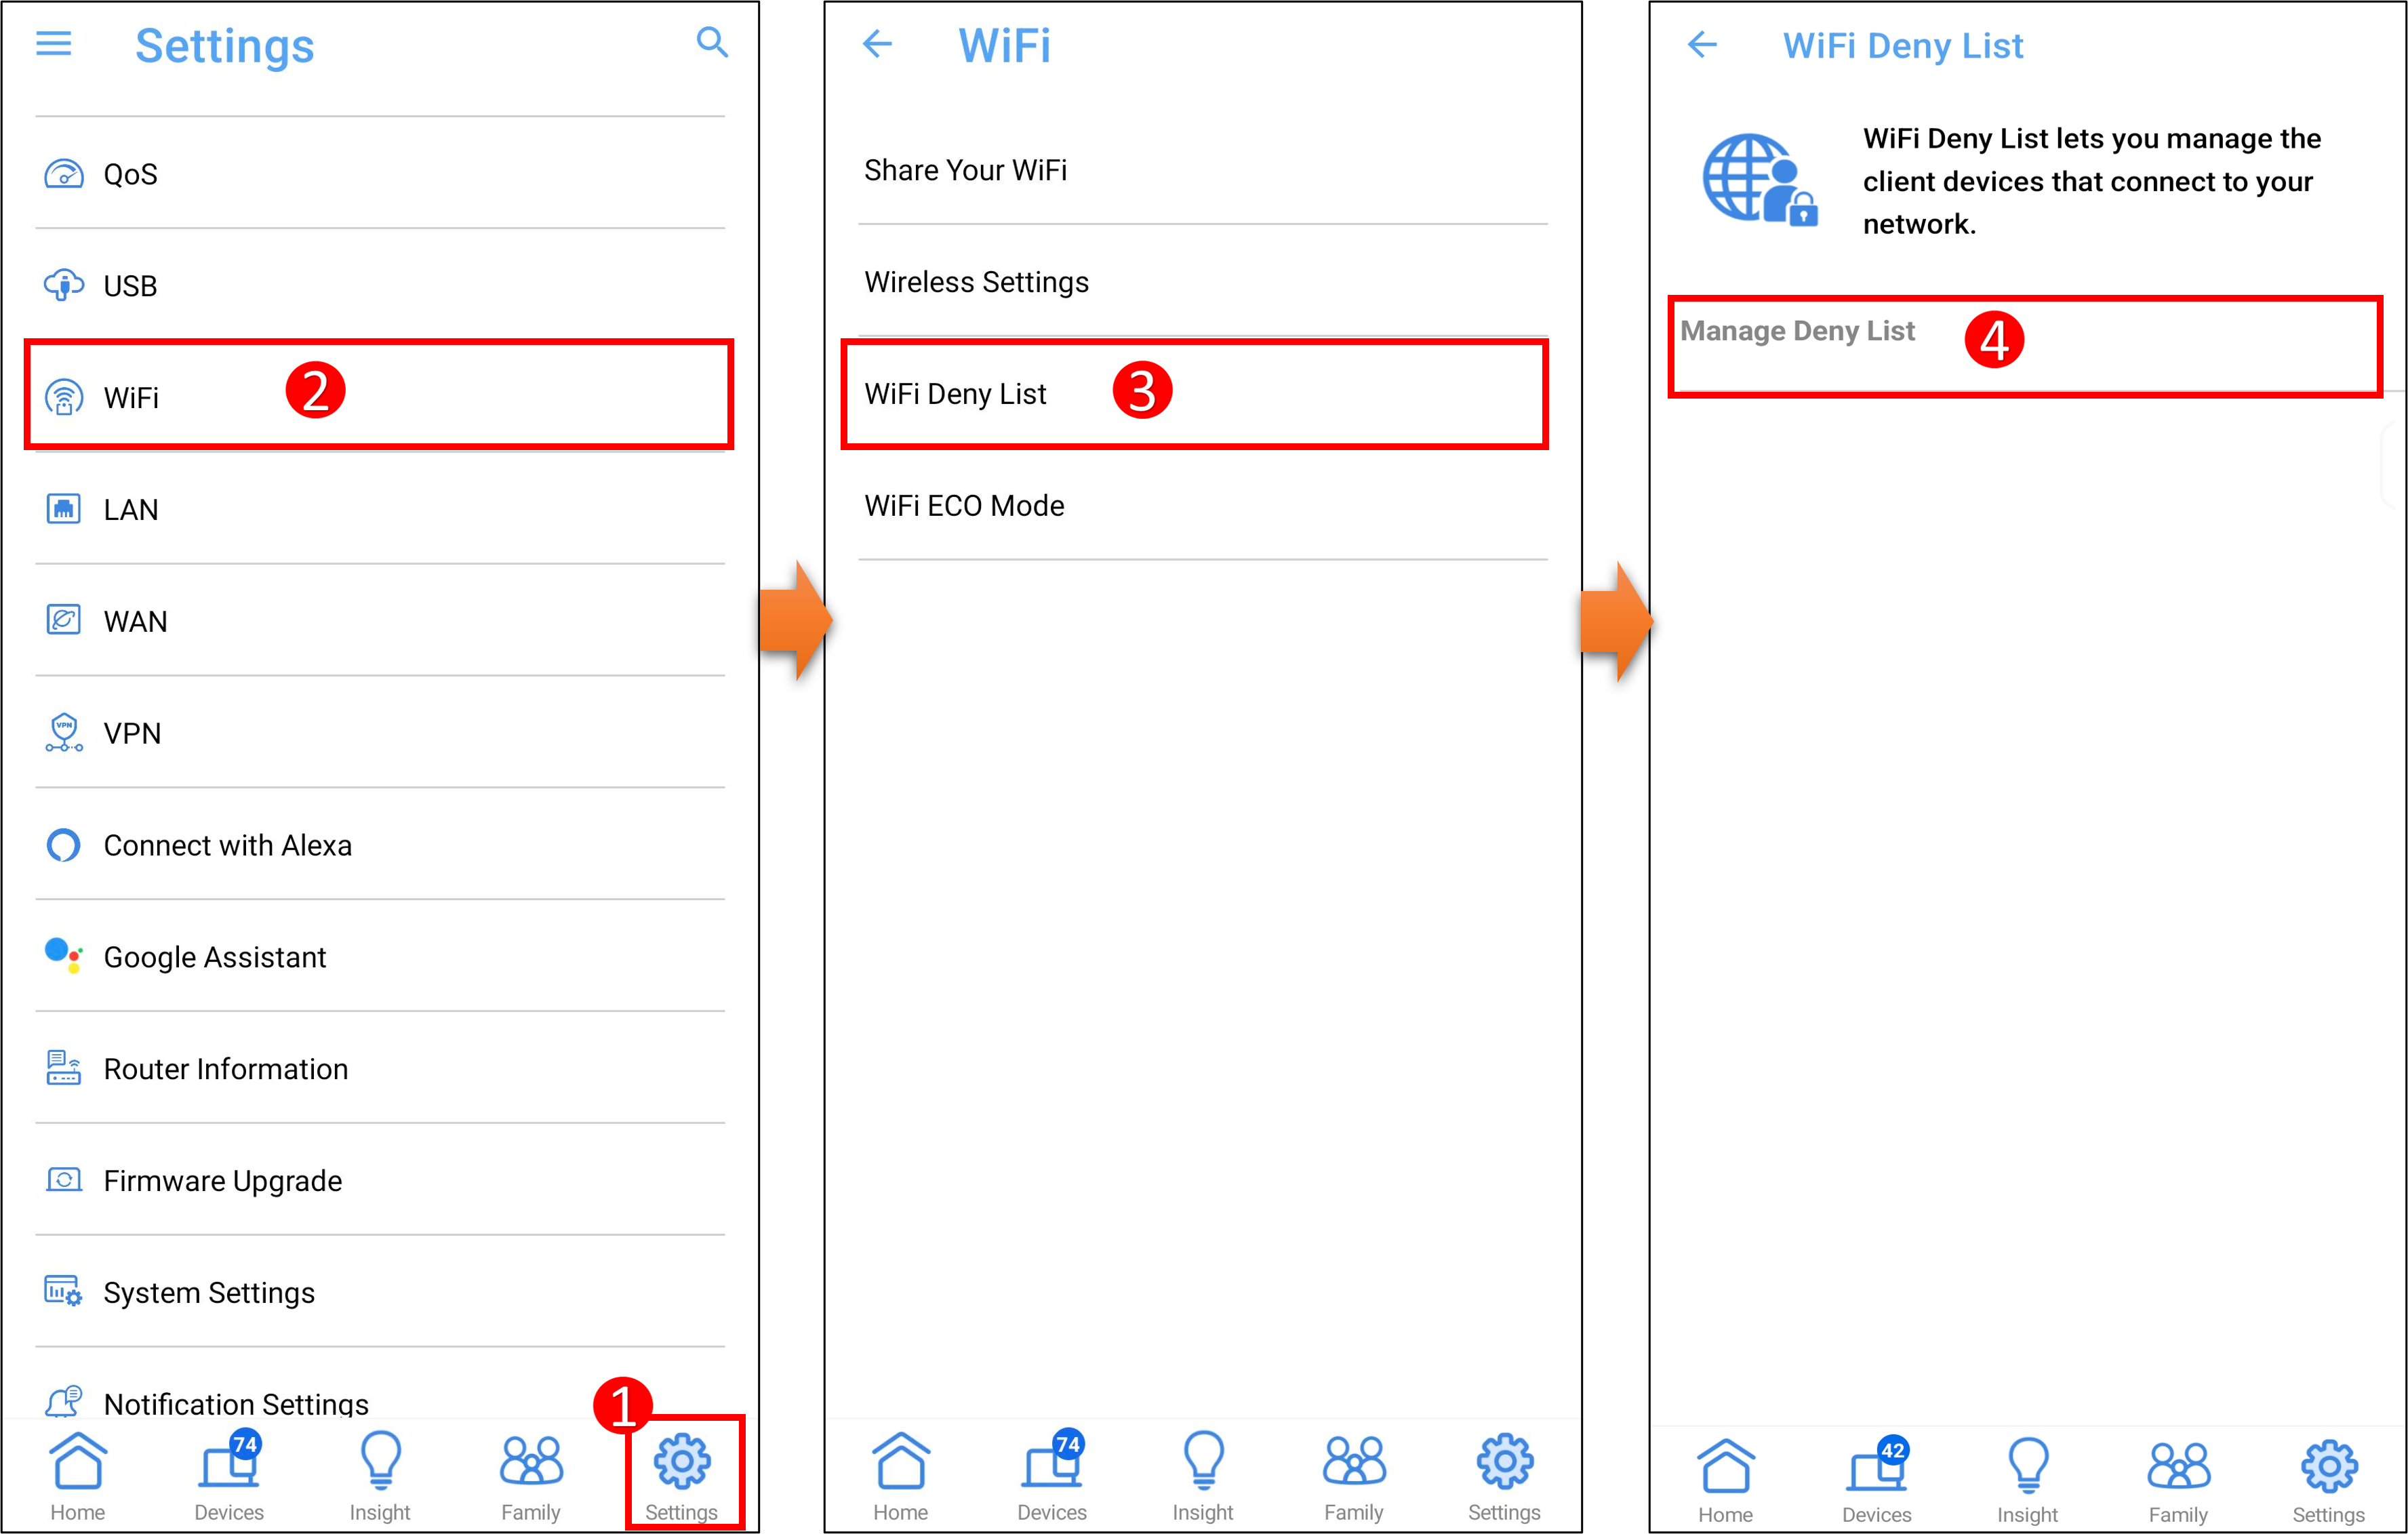
2. Tap the edit icon and select the device you want to add to the WiFi deny list. Tap [Apply] to save the setting.
Note: Setting this feature will temporarily interrupt your WiFi signal.
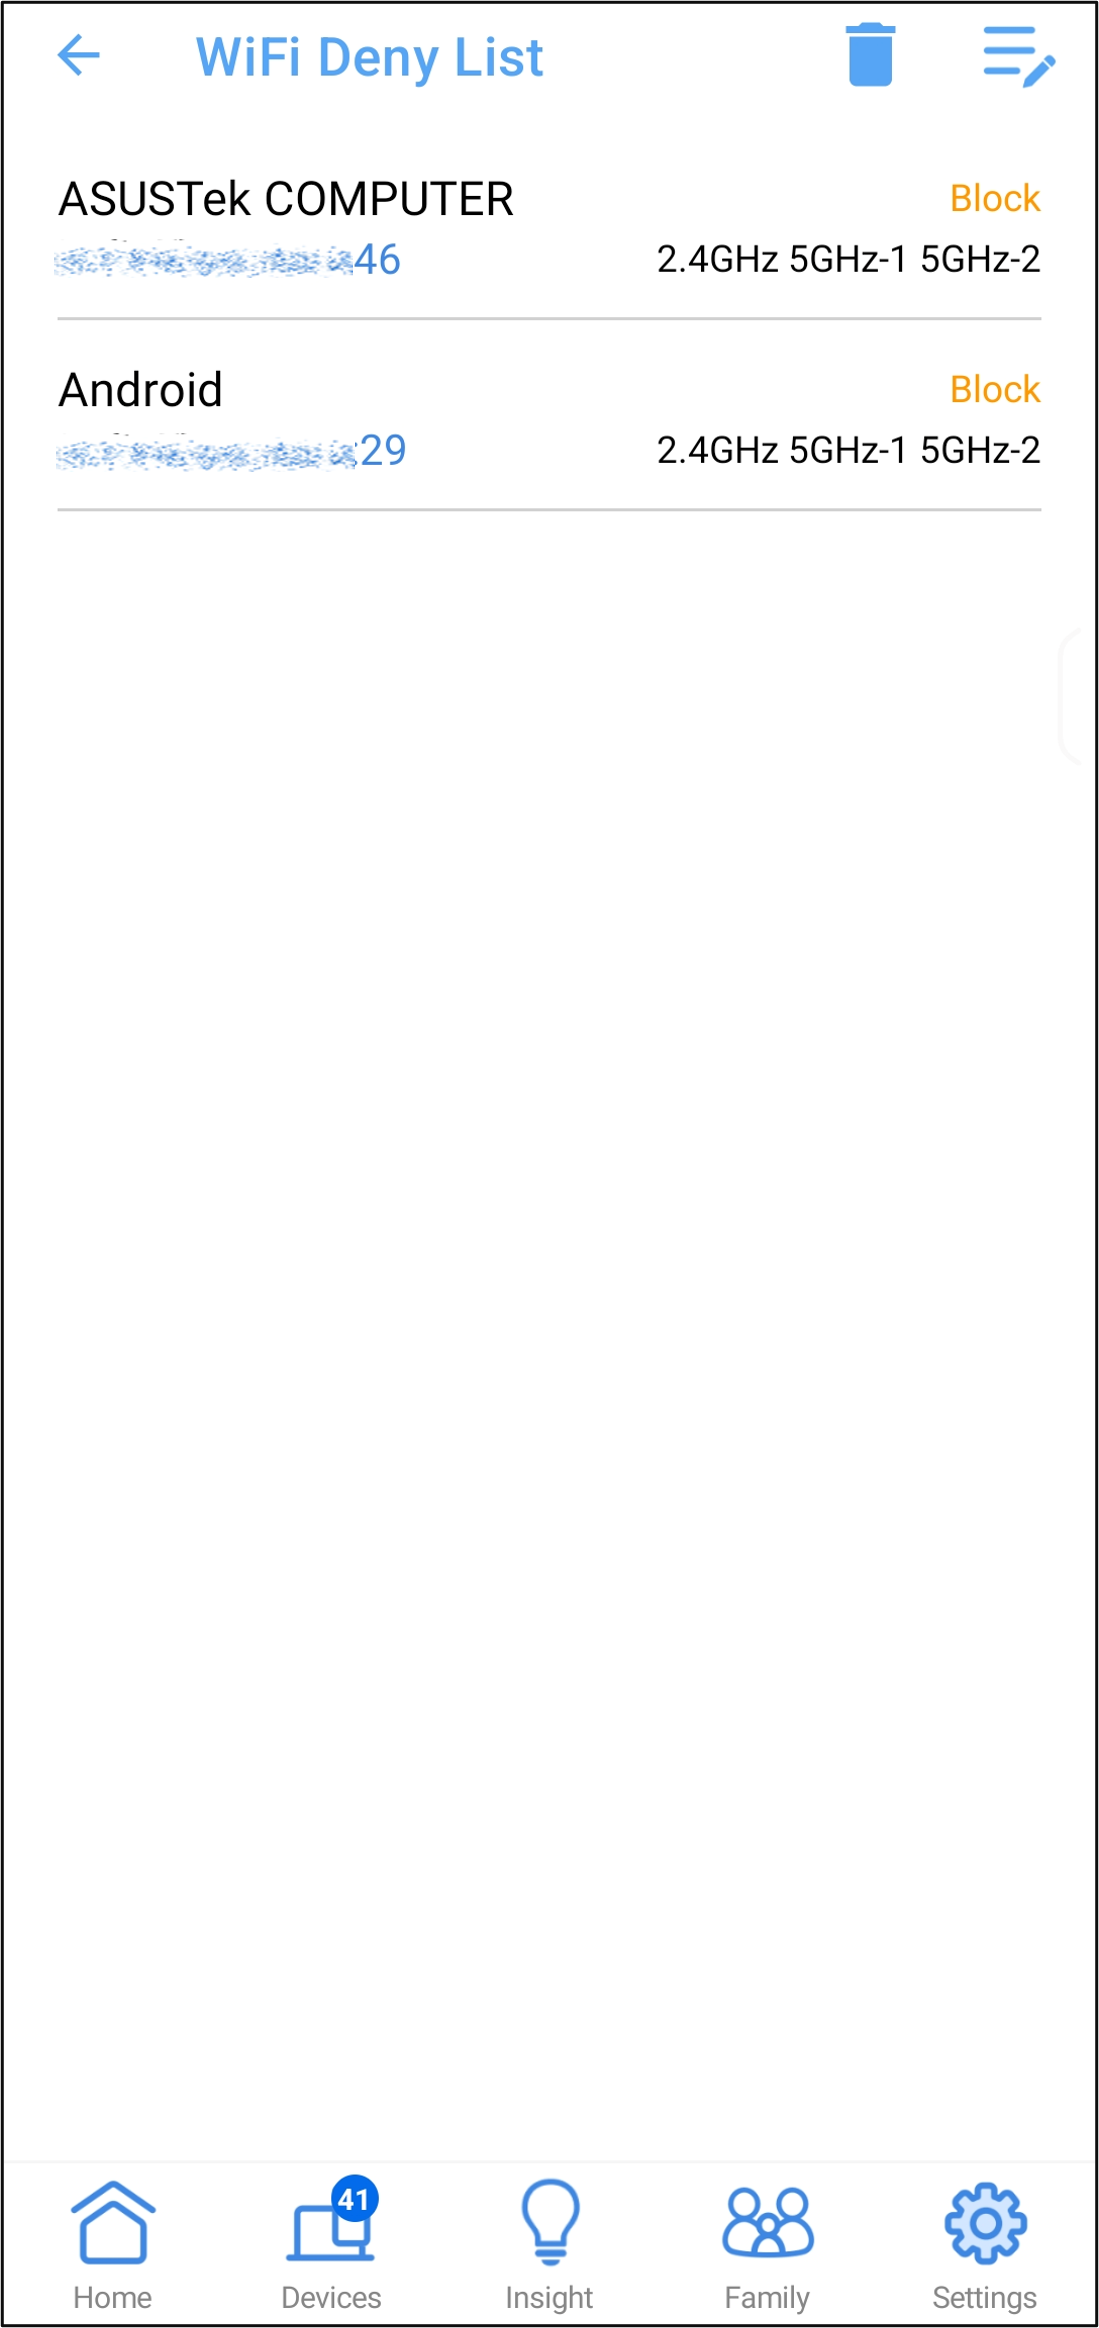
3. You can see the list of blocked devices in the WiFi deny list.
To remove a device from the WiFi deny list, tap the  icon, select the device you want to remove, and then tap [Delete] to complete the setting.
B. Set up a WiFi deny list in the ASUS router Web GUI
1. Connect your computer to the router via wired or WiFi connection. Open a web browser and enter your router LAN IP or router URL http://www.asusrouter.com to the WEB GUI.

2. Key in your router's username and password to log in.
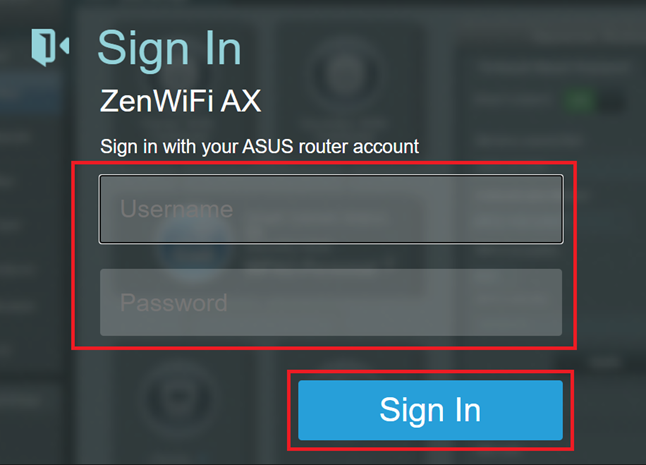
Note: If you forget the user name and/or password, please restore the router to the factory default status and setup.
Please refer to [Wireless Router] How to reset the router to factory default setting? for how to restore the router to default status.
3. Set to allow or deny wireless devices to connect to WiFi
Interface 1: Supports routers with firmware later than 3.0.0.6.102_35404(including)
3-1 Go to [Network] > [Main network profile(Test_WiFi-1 is used as an example below)].
3-2 Set up [Enable MAC Filter](default is disable)
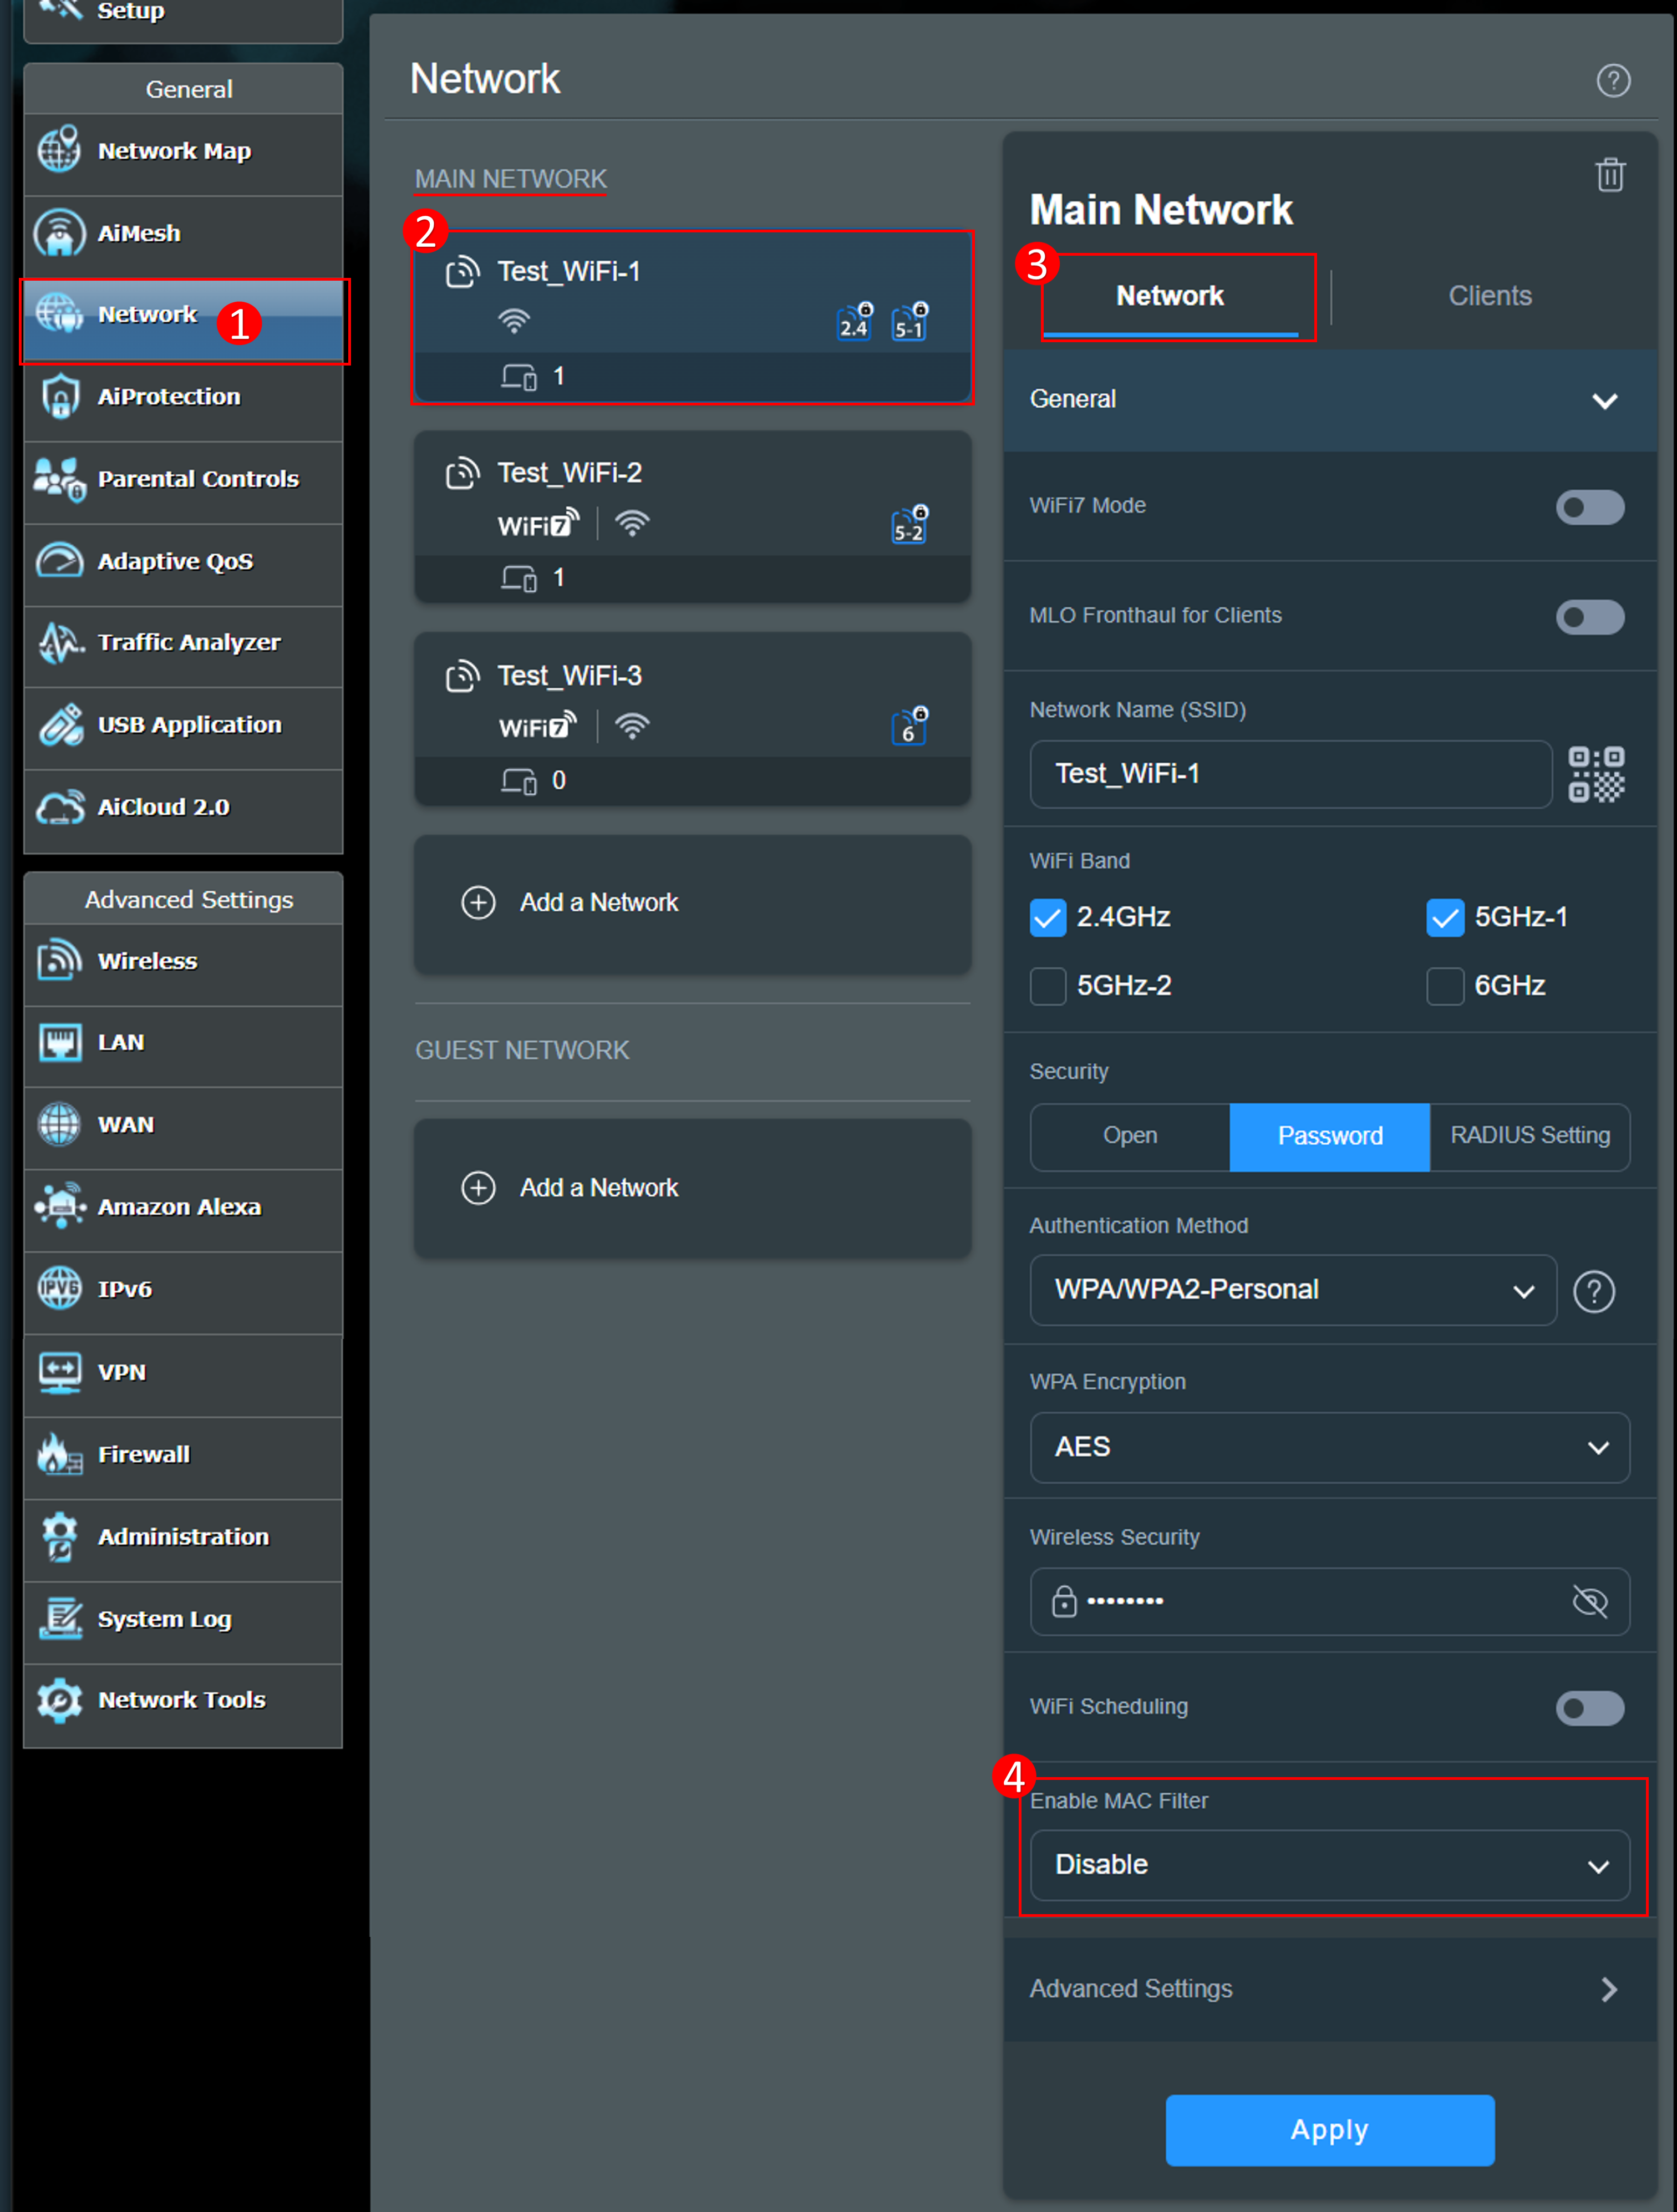
Wireless MAC filter provides control over packets transmitted to a specified MAC (Media Access Control) address on your wireless network.
MAC Filter Mode:
[Accept] : Select Accept to allow devices in the MAC filter list to access to the wireless network.
[Reject] : Select Reject to prevent devices in the MAC filter list to access to the wireless network.
[Disable] : Disables this feature.
For example, if you do not want this phone to connect to Test_WiFi-1's, you can select [Reject] in the Test_WiFi-1 profile, add the wireless device to the list and click [Apply] to complete the setting.
Note: ASUS wireless routers have different functions depending on the model. Please check ASUS product specifications to confirm that your router supports bands.
(1) [Enable MAC Filter] : Select [Reject].
(2) [MAC Filter list] : Click the edit icon.
(3) Select your wireless device from the MAC address drop-down menu.
(4) Click add icon to add this device to the list.
(5) Click [OK].

(6) The number of devices is shown in the figure below, click [Apply] to save the settings.
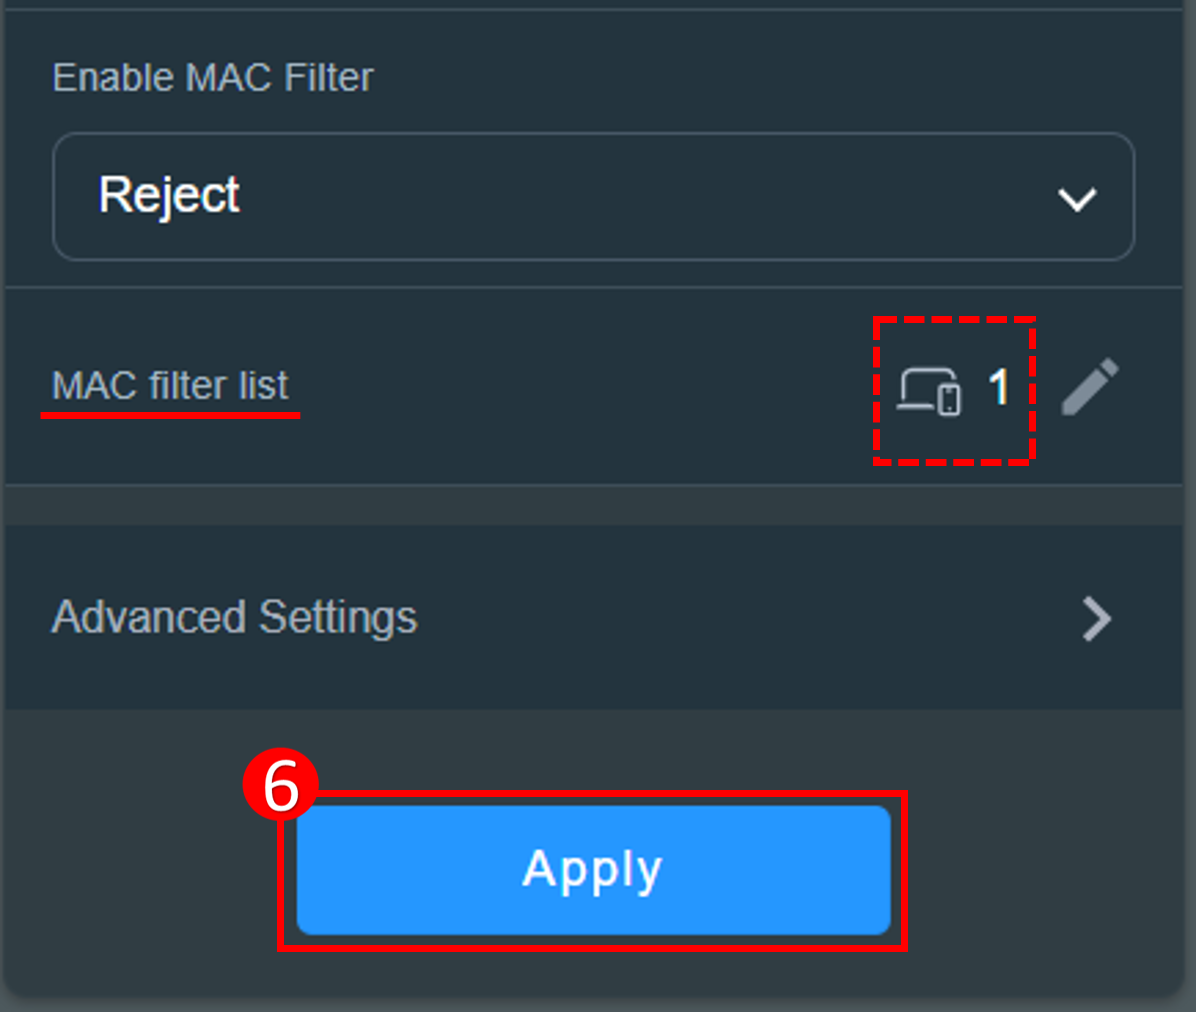
To remove a device from the list, (1) Click the edit icon. (2) Click the delete icon on the device you want to remove. (3) Click [OK]. (4) Click [Apply] to save the settings and complete the deletion.

Interface 2: Supports routers with firmware earlier than 3.0.0.6.102_35404
3-1 Go to [Wireless] > [Wireless MAC Filter] > To set the WiFi deny list, you need to select [Yes] for the [Enable MAC Filter].
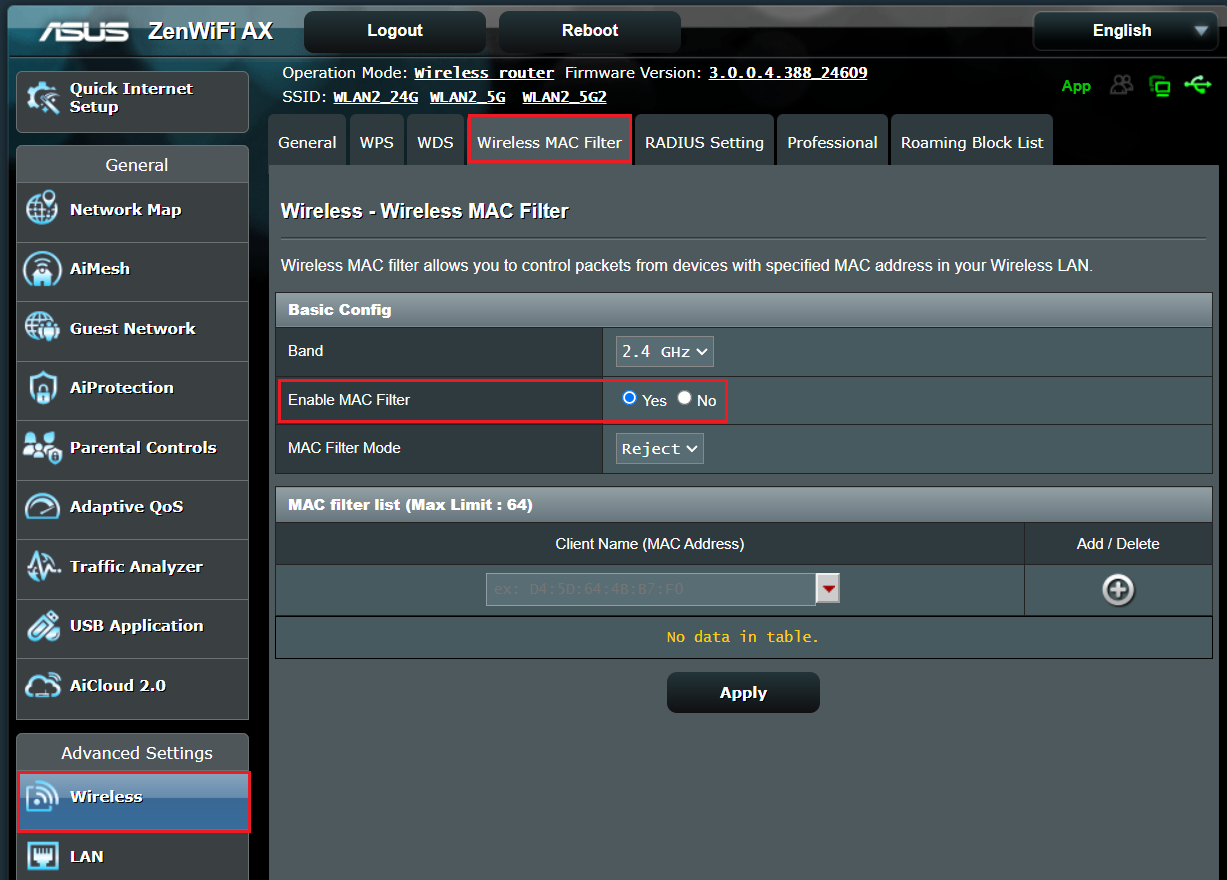
3-2 Wireless MAC filter provides control over packets transmitted to a specified MAC (Media Access Control) address on your wireless network.
MAC Filter Mode:
[Accept] : Select Accept to allow devices in the MAC filter list to access to the wireless network.
[Reject] : Select Reject to prevent devices in the MAC filter list to access to the wireless network.
For example, a mobile phone supports 2.4GHz and 5 GHz bands. If you do not want this phone to connect to 2.4GHz WiFi signal, you can set different bands respectively, select the wireless device to be controlled [Band] and then select [MAC Filter Mode]. Add the wireless device to the list and click [Apply] to complete the setting.
Note: ASUS wireless routers have different functions depending on the model. Please check ASUS product specifications to confirm that your router supports bands.
(1) Select the WiFi [band] : The below takes [2.4GHz] as an example.
(2) Select [MAC Filter Mode] : The below takes [Reject] as an example.
(3) Select your wireless device from the client name (MAC Address) drop-down menu.
(4) Click to  add this device to the list.
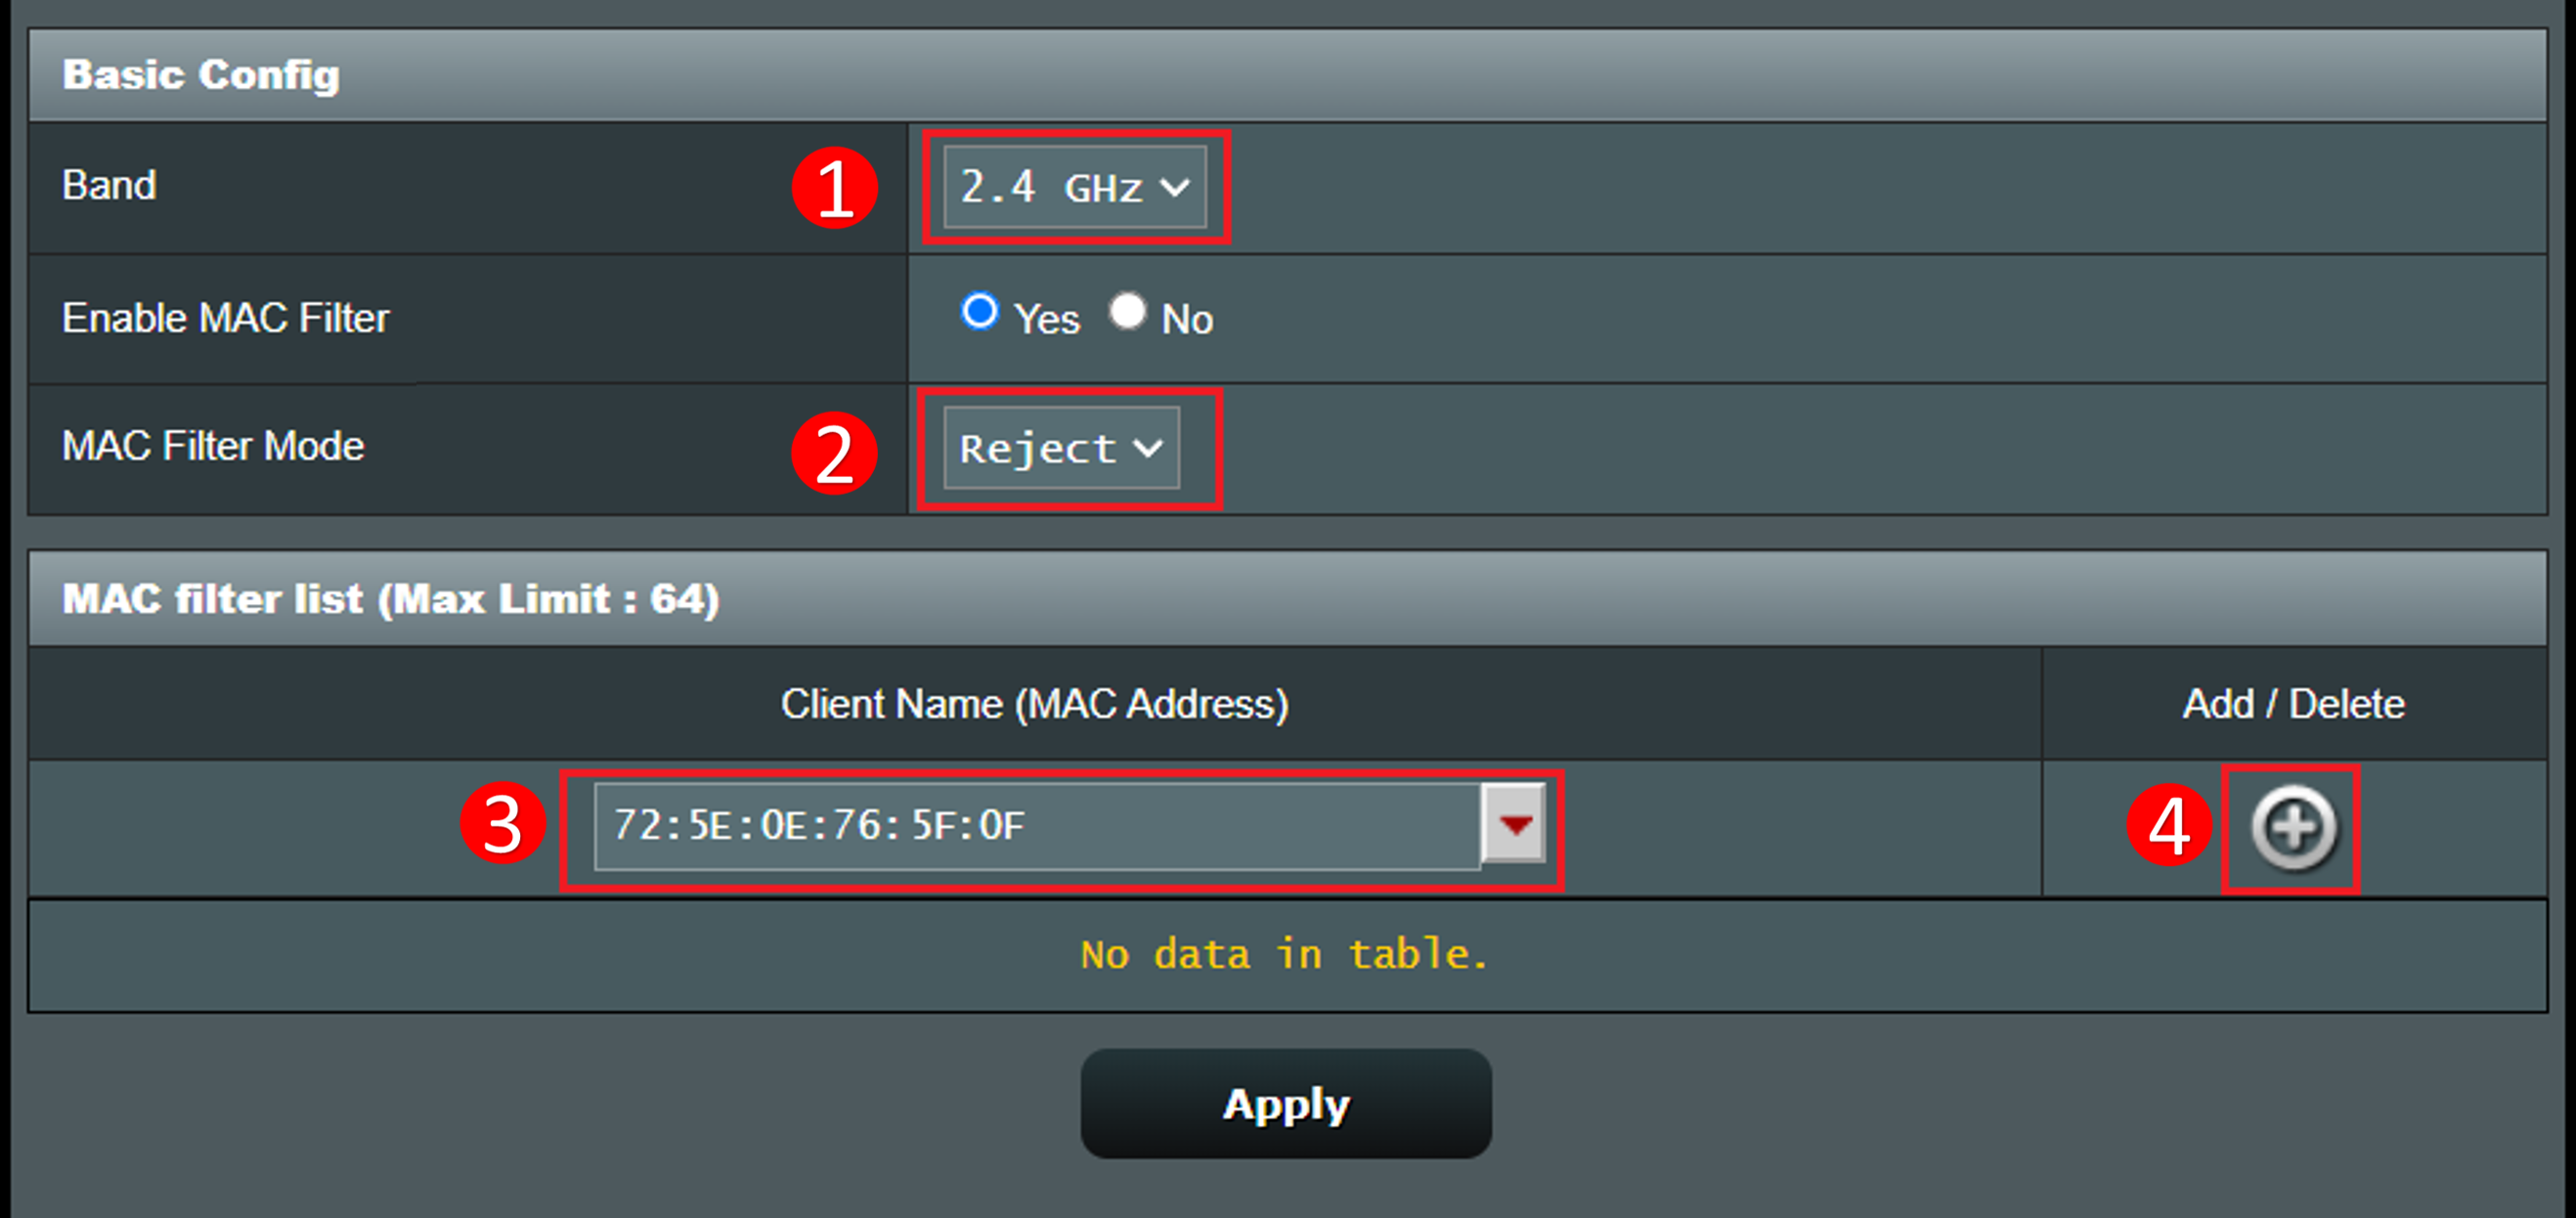
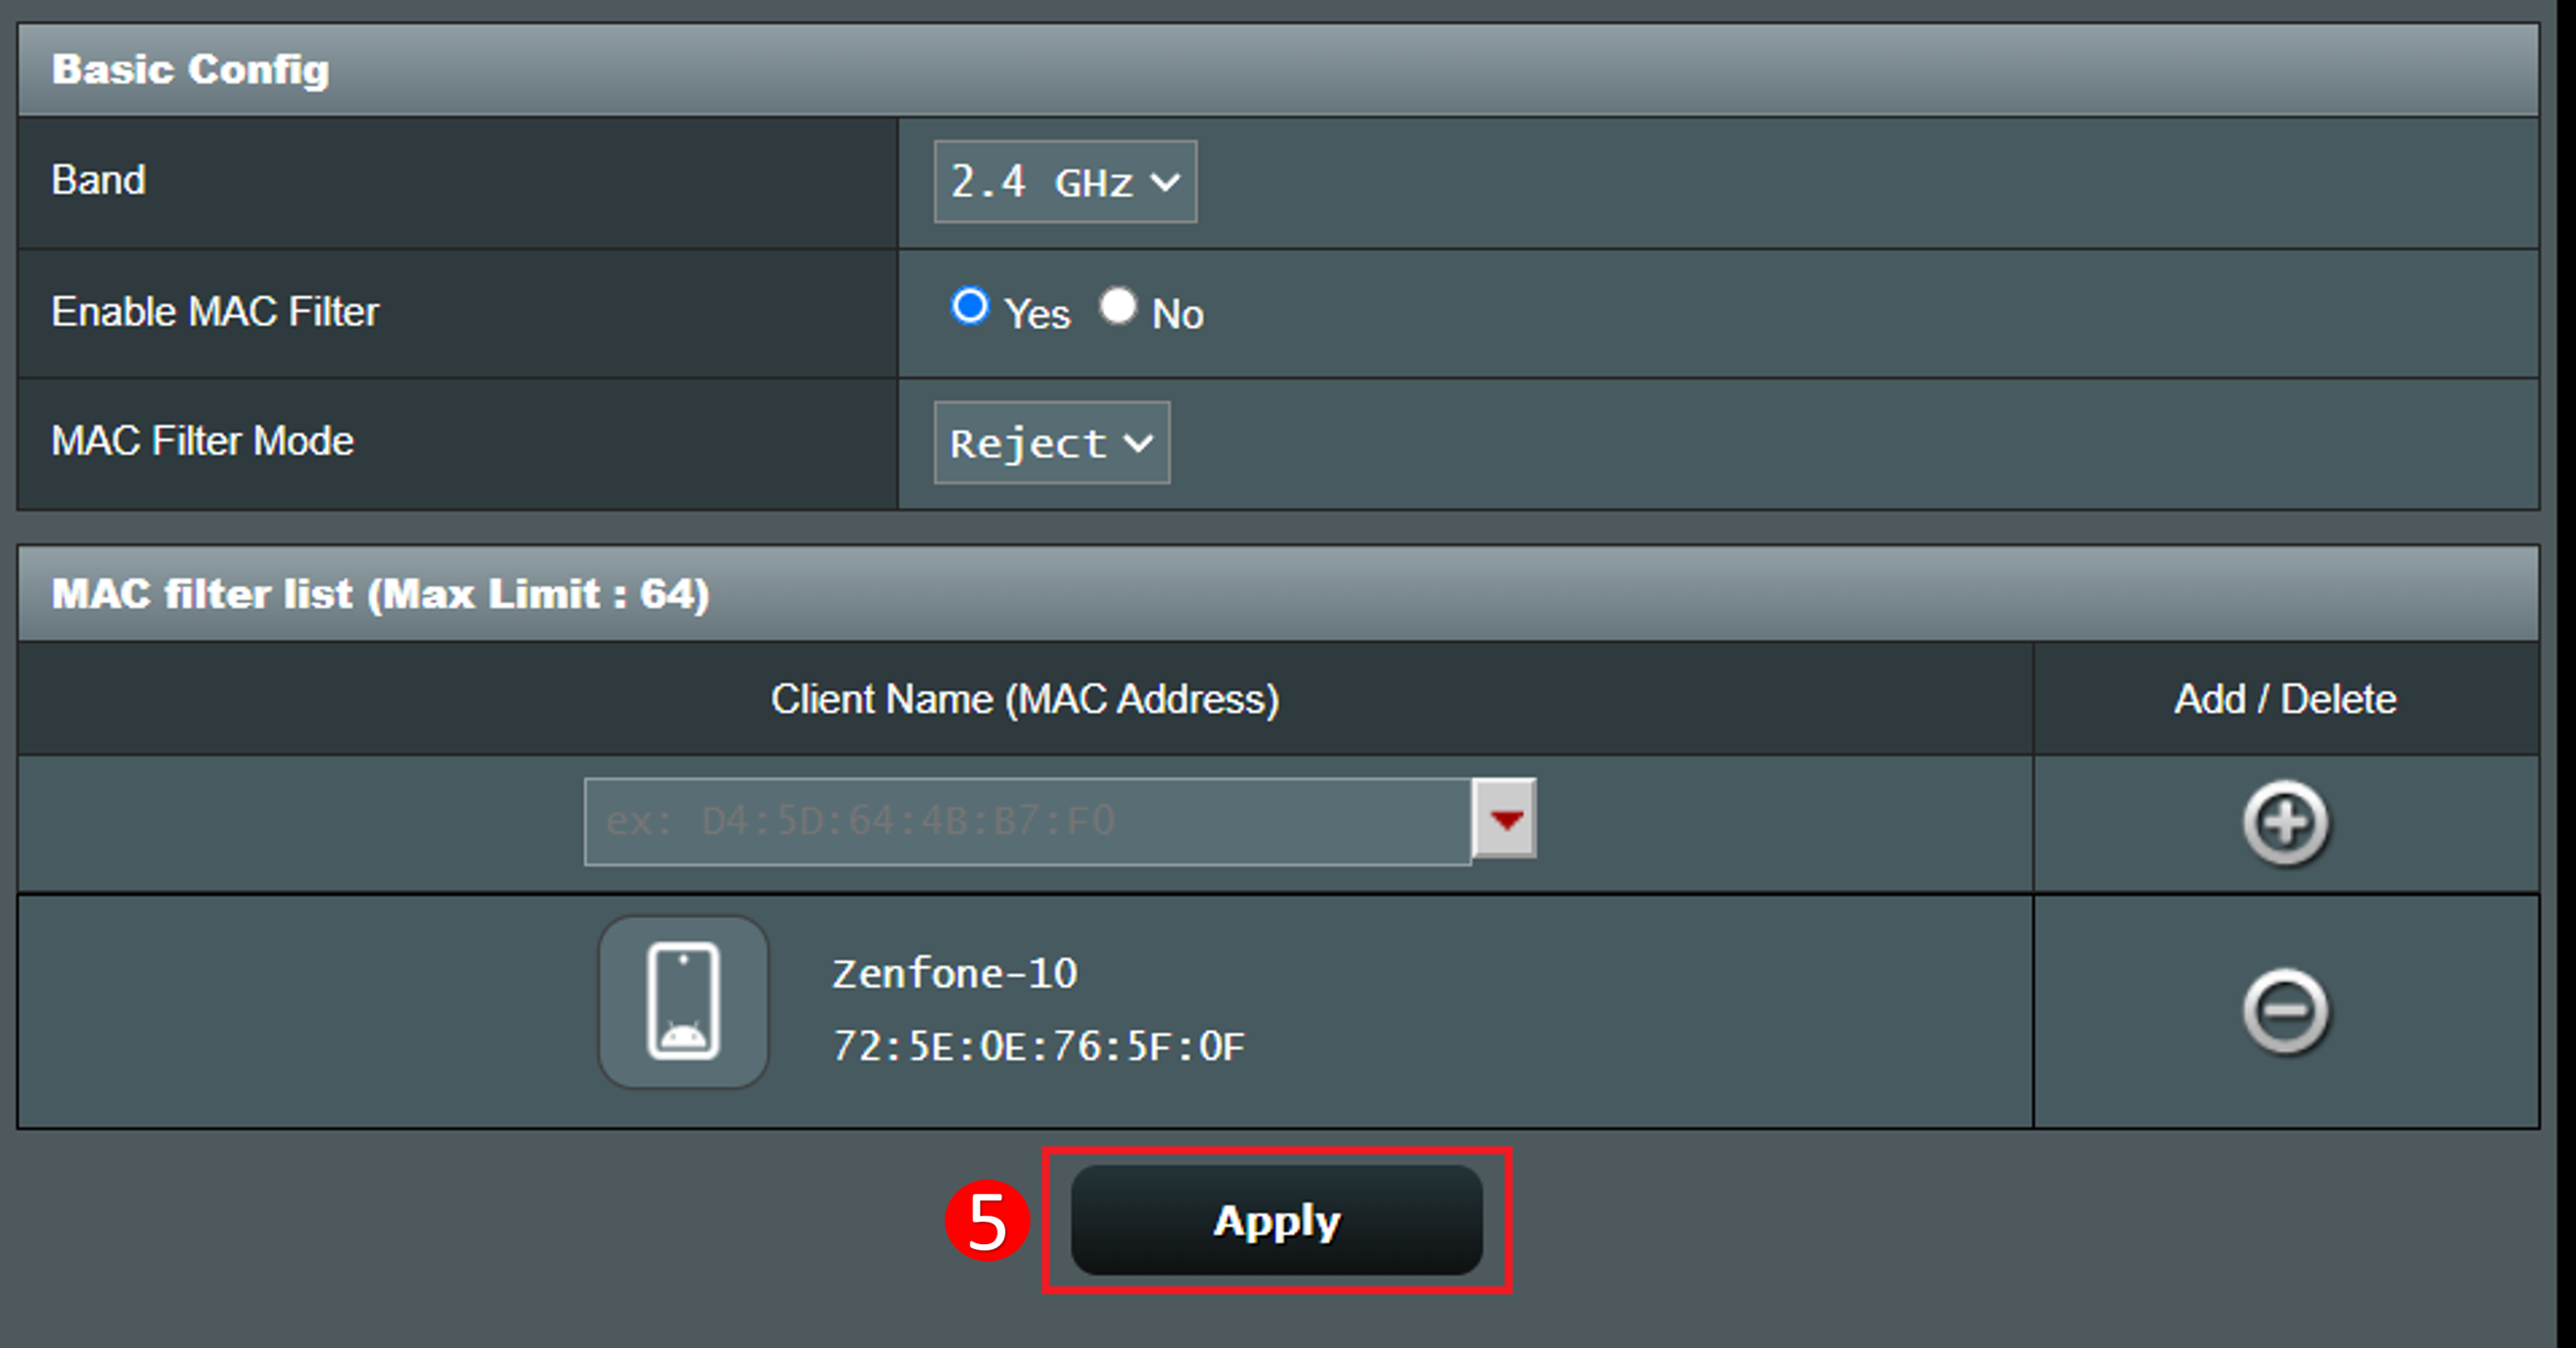
(5) Click [Apply] to save the settings.
To remove a device from the list, click on  the icon and click [Apply] to save the settings and complete the deletion.
C. Set up a WiFi deny list in the ASUS ExpertWiFi router Web GUI
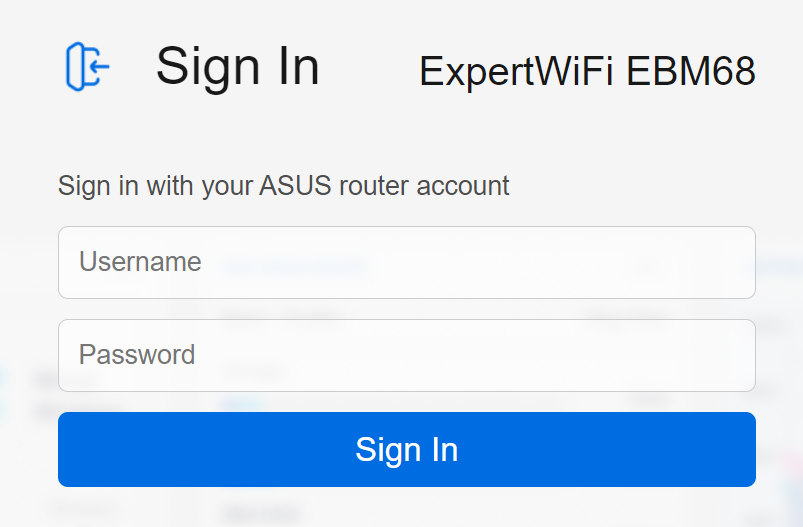
1. Connect your computer to the ExpertWiFi router via wired or WiFi connection and enter your ExpertWiFi router LAN IP or ExpertWiFi router URL http://www.expertwifi.net to the WEB GUI.

2. Key in your router's username and password to log in.
3. Go to [Settings] > [Wireless] > [Wireless MAC Filter] tab. To set the WiFi deny list. you need to select [Yes] for the [Enable MAC Filter].
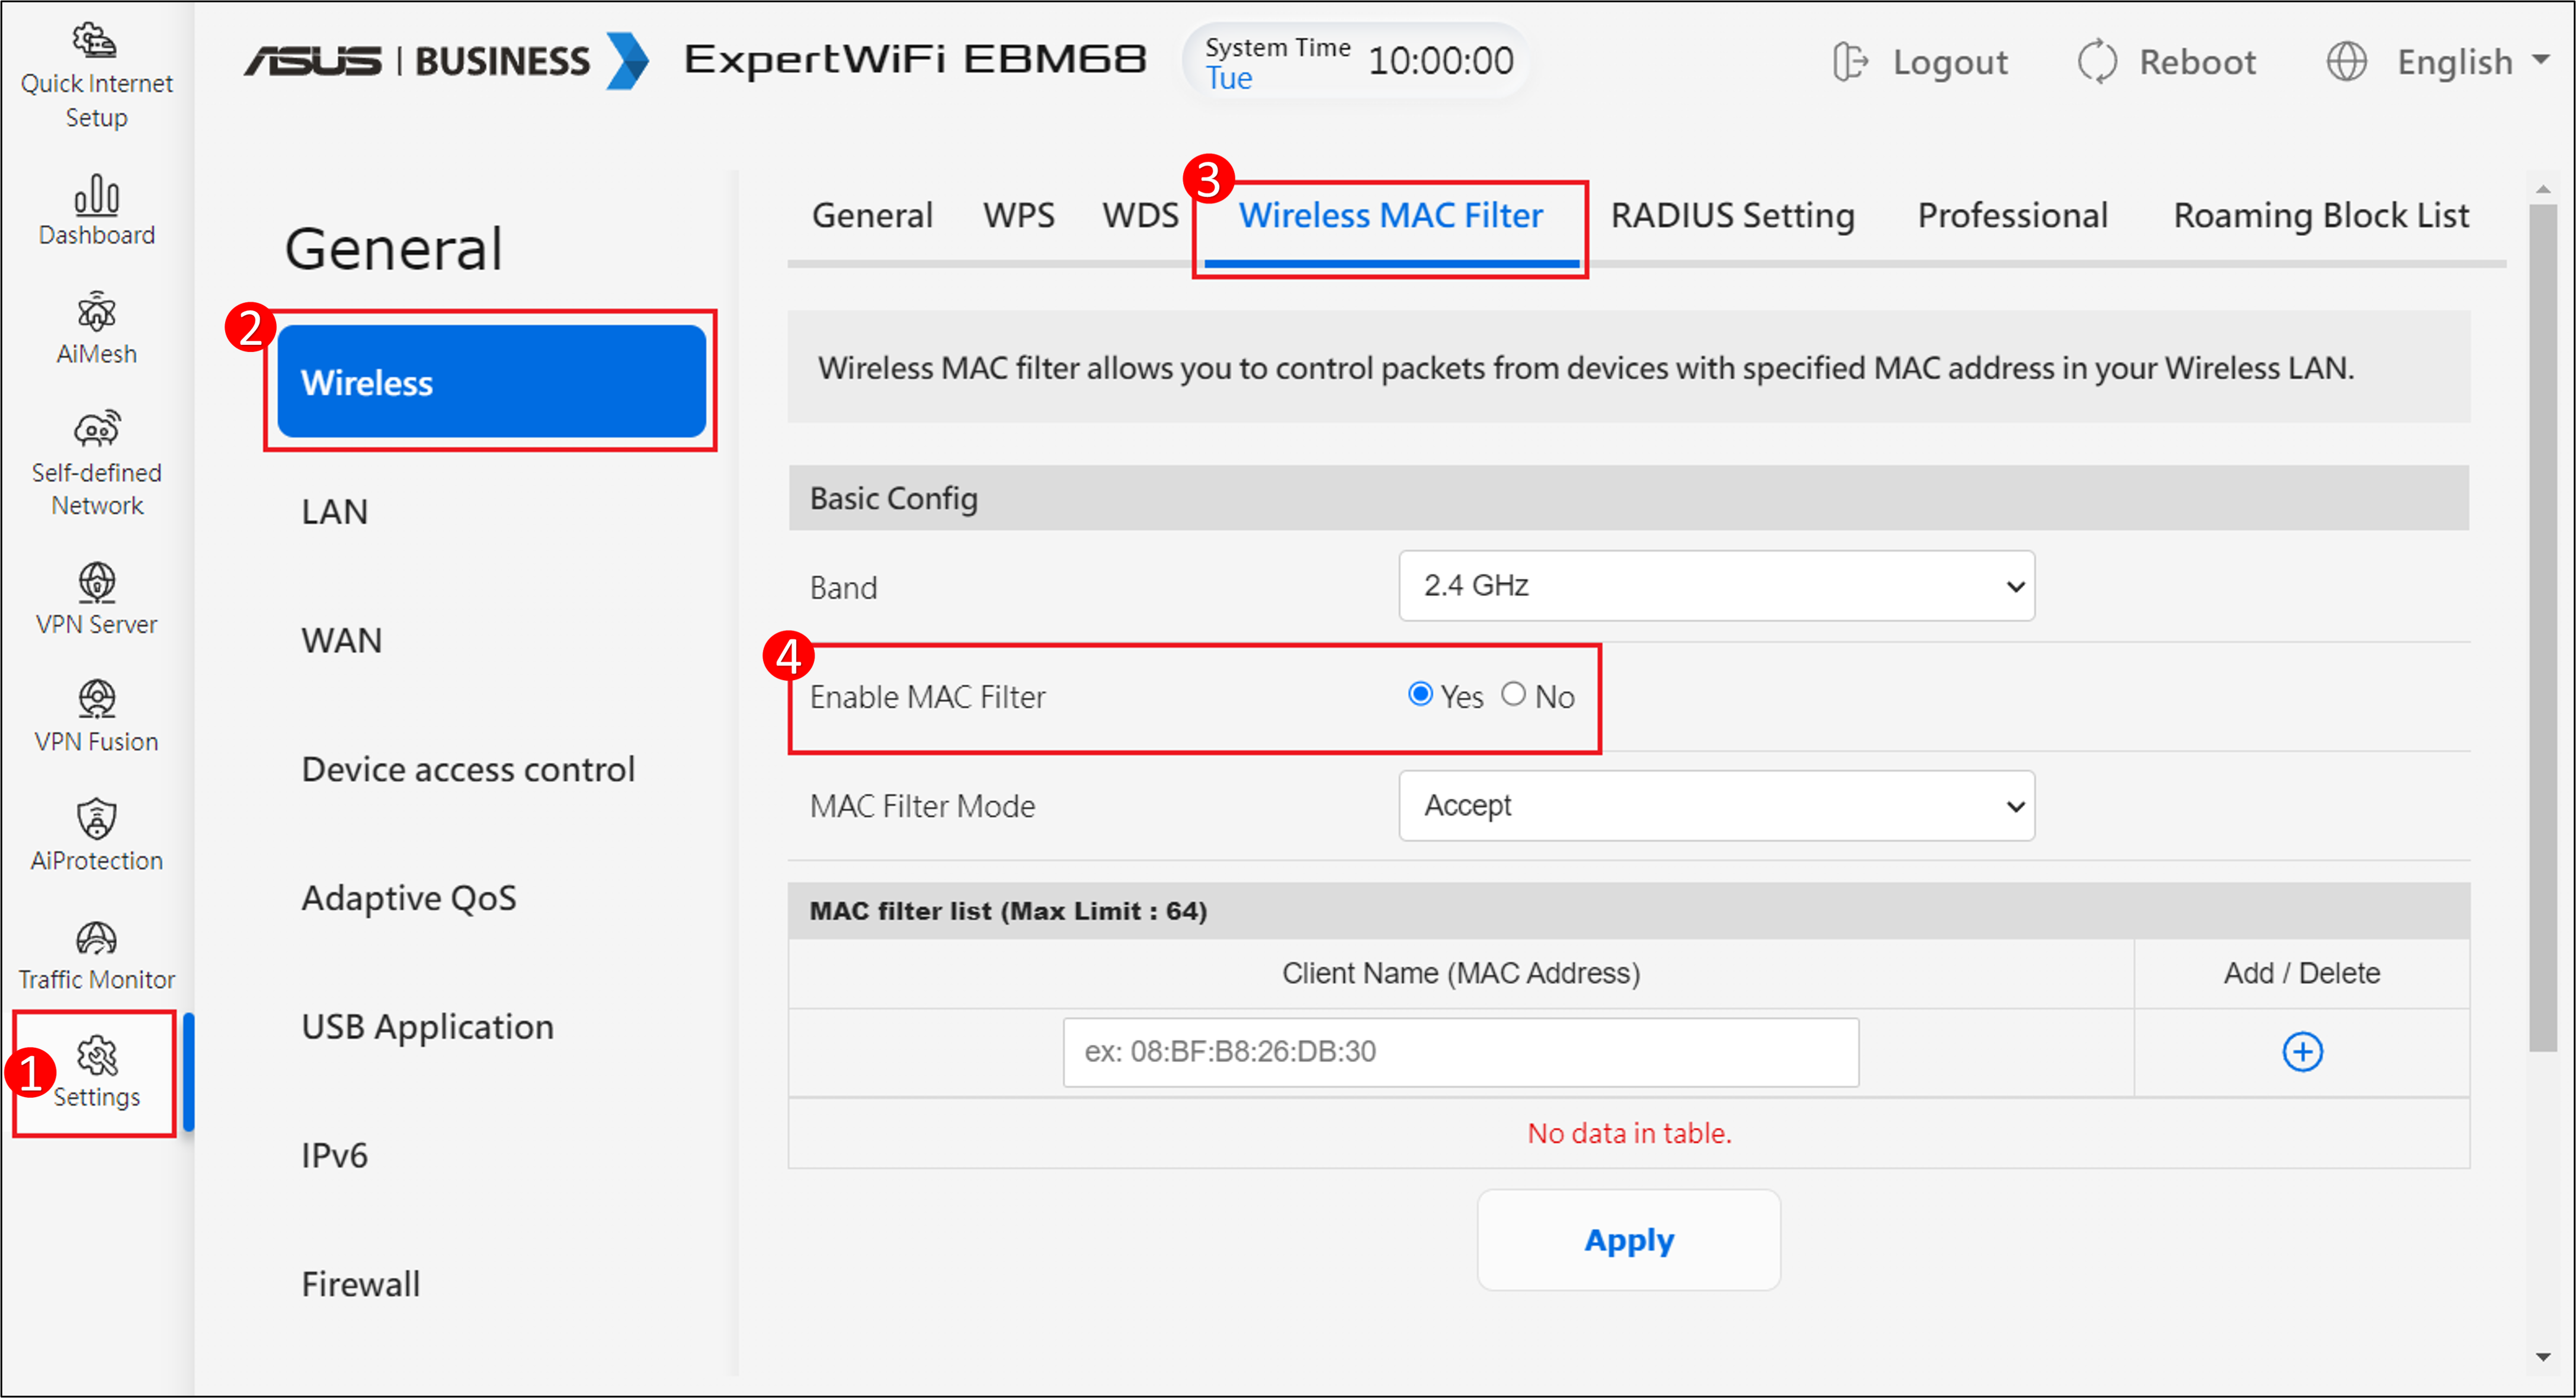
4. Wireless MAC filter provides control over packets transmitted to a specified MAC (Media Access Control) address on your wireless network.
MAC Filter Mode:
[Accept] : Select Accept to allow devices in the MAC filter list to access to the wireless network.
[Reject] : Select Reject to prevent devices in the MAC filter list to access to the wireless network.
For example, a mobile phone supports 2.4GHz and 5 GHz bands. If you only want this phone to connect to 5GHz WiFi signal, you can set different bands respectively, select the wireless device to be controlled [Band] and then select [MAC Filter Mode]. Add the wireless device to the list and click [Apply] to complete the setting.
Note: ASUS wireless routers have different functions depending on the model. Please check ASUS product specifications to confirm that your router supports bands.
(1) Select the WiFi [band] : The below takes [5GHz] as an example.
(2) Select [MAC Filter Mode] : The below takes [Accept] as an example.
(3) Select your wireless device from the client name (MAC Address) drop-down menu.
(4) Click to  add this device to the list.
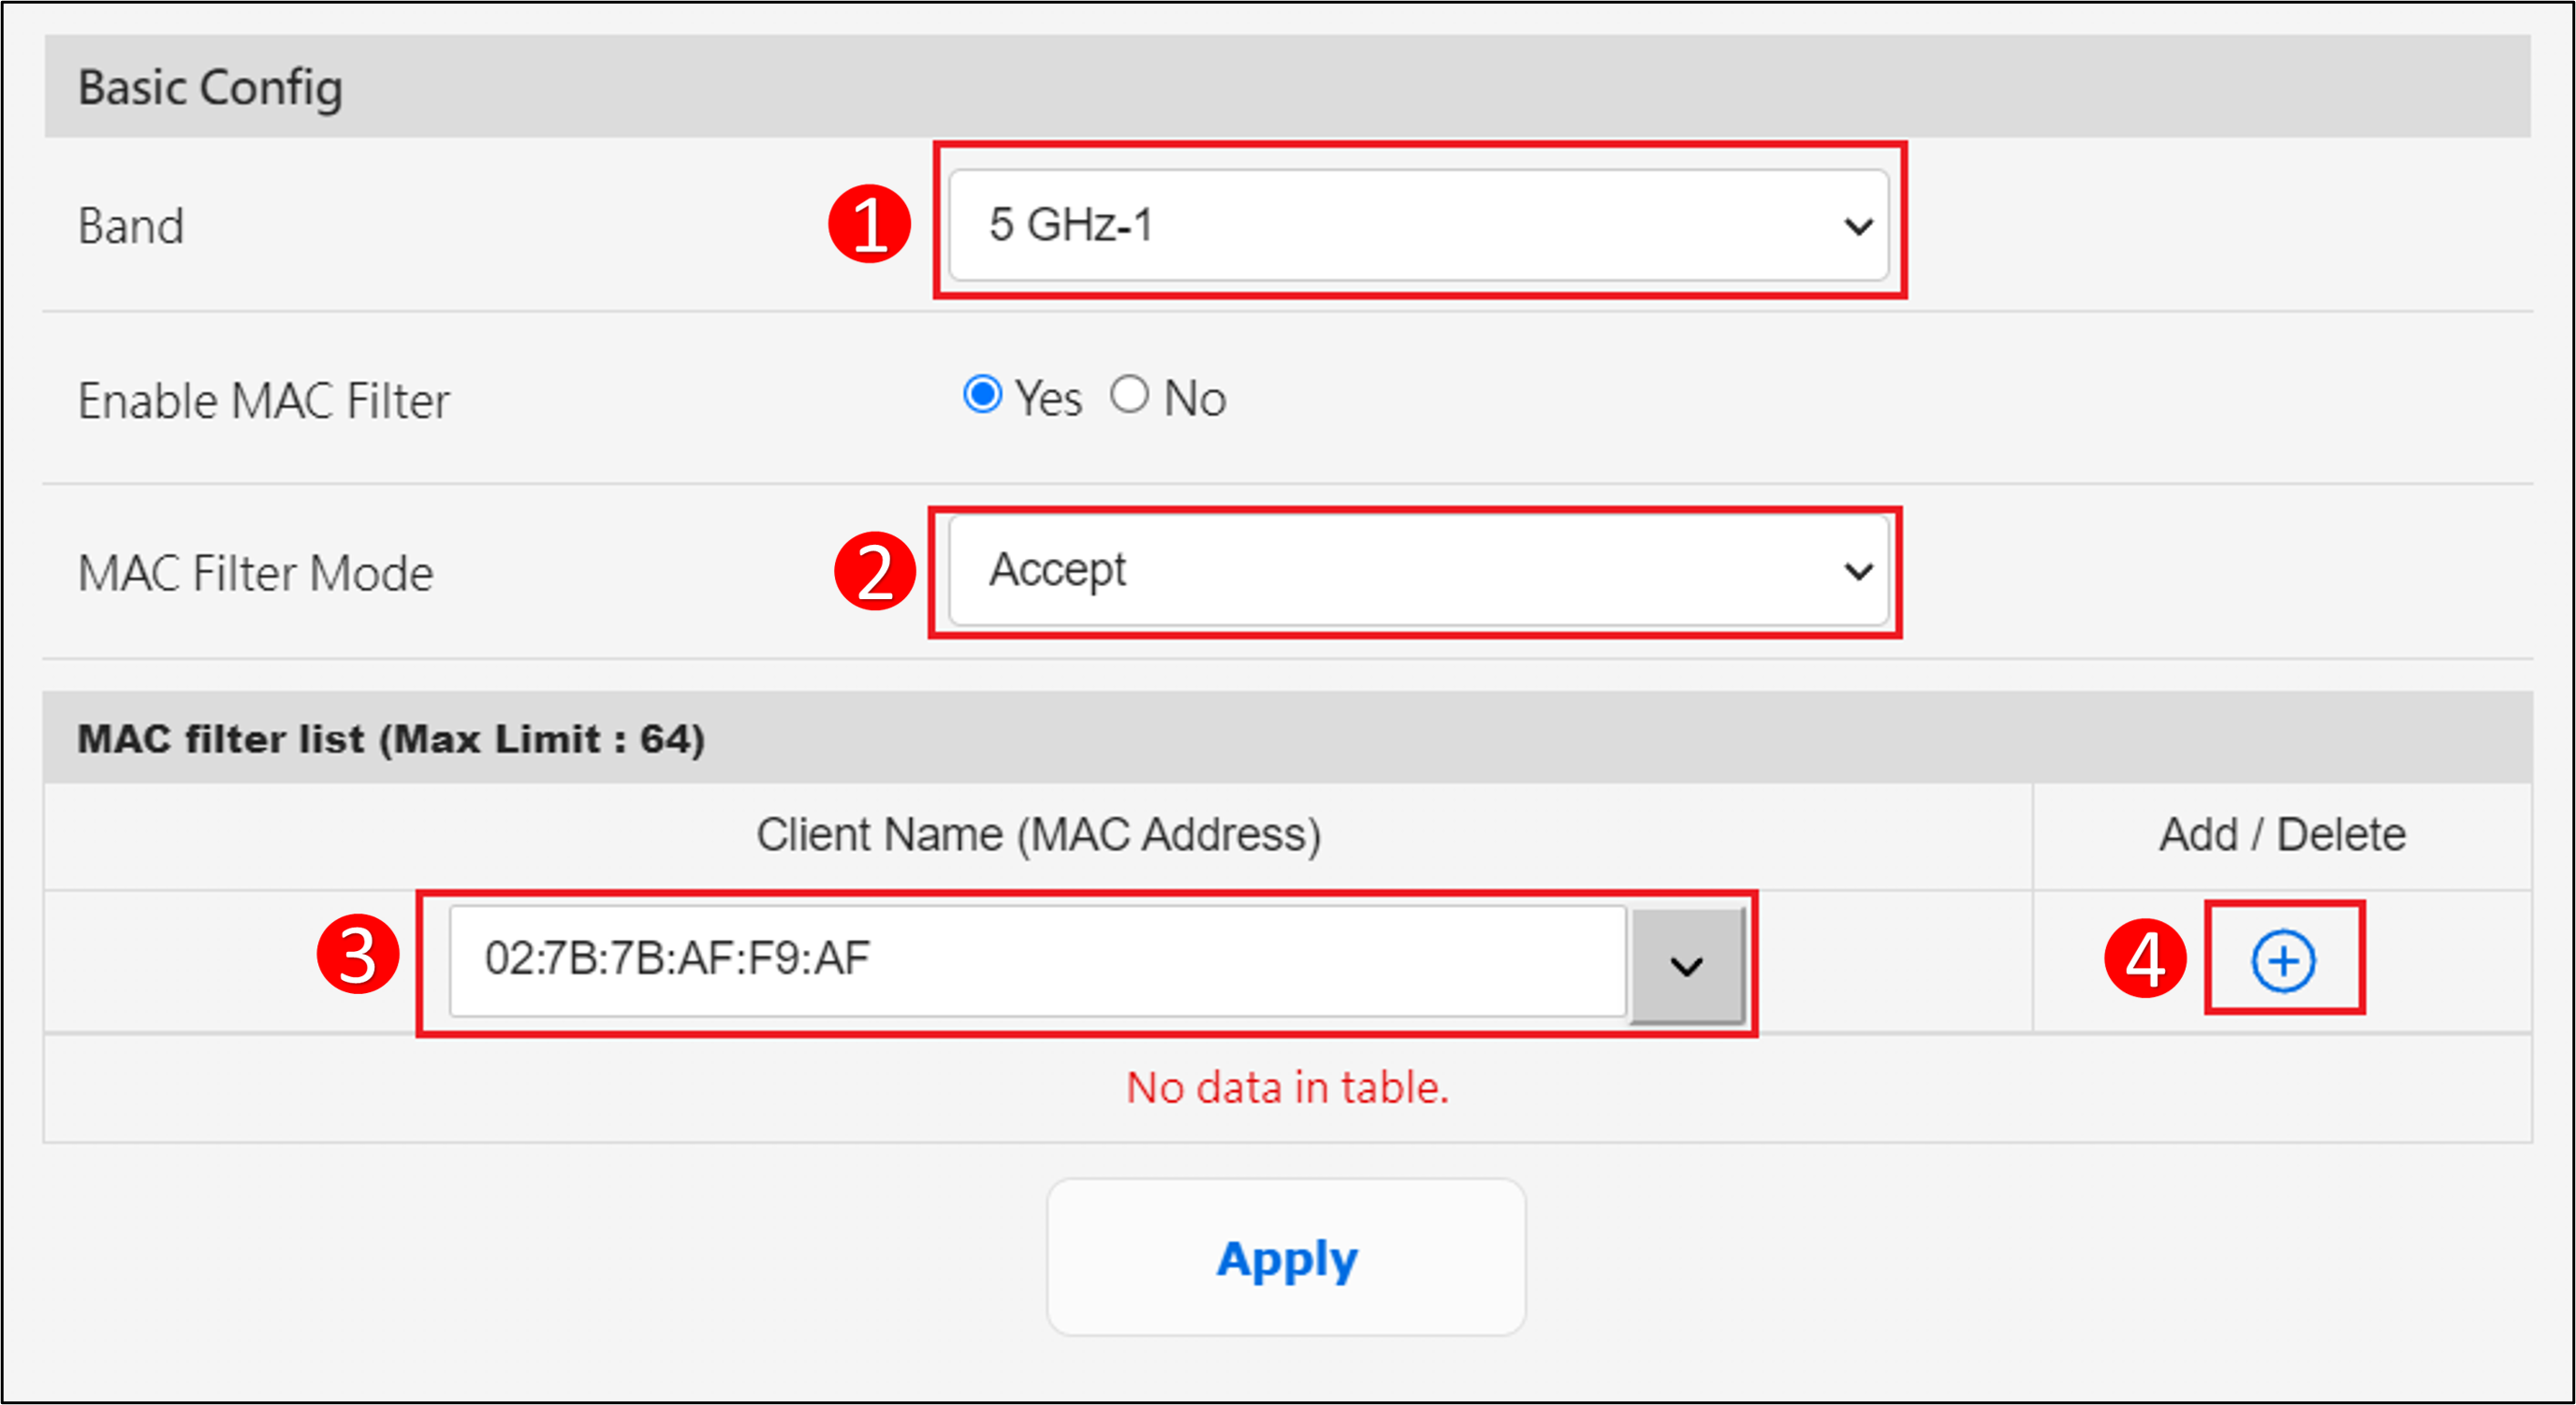
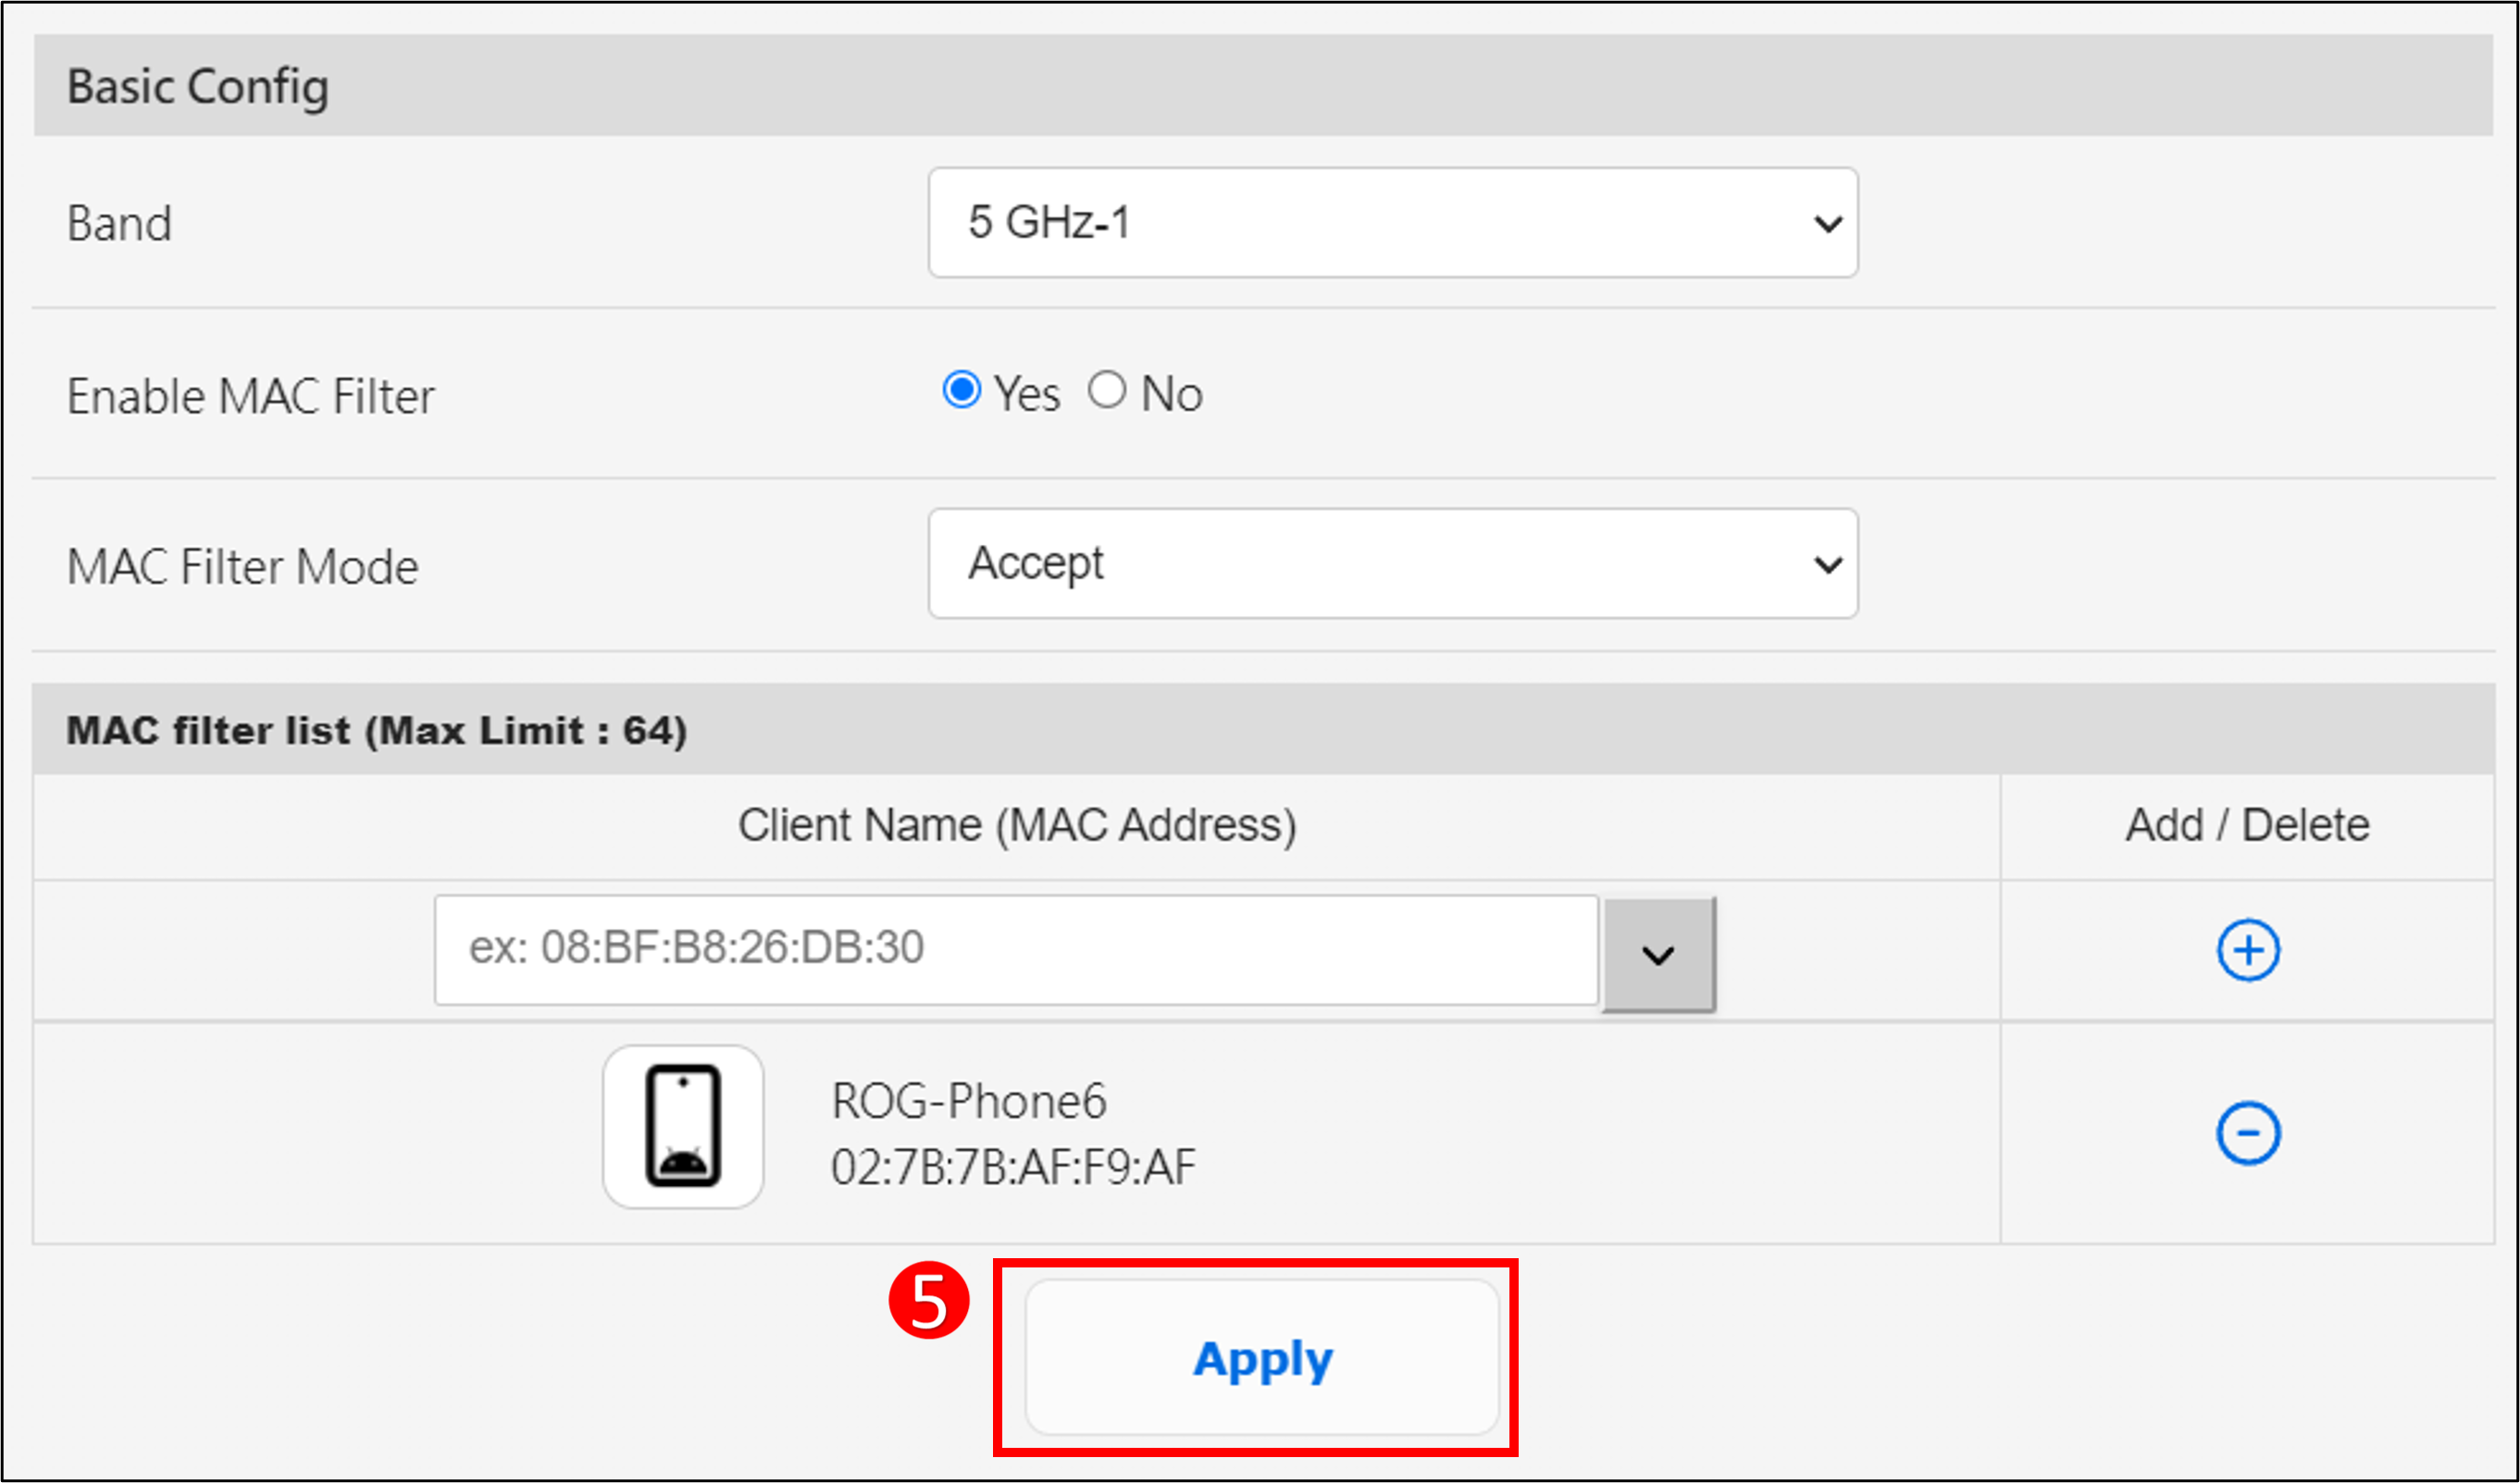
(5) Click [Apply] to save the settings.
To remove a device from the list, click on  the icon and click [Apply] to save the settings and complete the deletion.
FAQ
1. How to block specific devices from accessing specific/malicious websites?
ASUS routers currently do not support website blocking on specific devices(e.g. phone, laptop).
If the specific device you want to set up is a Windows device or a Chromebook, please refer to the FAQ below.
[Windows 11/10] Microsoft Family Safety - Parental Control settings | Official Support | ASUS Global
[Chromebook] Manage your child's account on Chromebook | Official Support | ASUS Global
How to get the (Utility / Firmware)?
You can download the latest drivers, software, firmware and user manuals in the ASUS Download Center.
If you need more information about the ASUS Download Center, please refer this link.