[Commercial Series] ASUS AI ExpertMeet - Introduction
ASUS AI ExpertMeet
AI Meeting Minutes - Capture all important moments in meetings using local AI intelligence, and automatically translate meeting content. This ensures your data is securely stored on your laptop. It can also recognize content in files and provide you with the most valuable insights through Transcript and Summary.
AI Translated Subtitles - Not just translation, it also provides local AI intelligence translation. Worried about privacy issues? AI intelligent translation subtitles use local AI models, allowing you to translate content without any internet connection.
Webcam Watermark - With a Webcam Watermark, your future partners can simply scan a QR code to get your contact information or add you as a friend.
Screen Watermark - Worried about your computer being secretly photographed and leaking information? With a Screen Watermark, secret photography is impossible.
1. Supported Products and System Requirements
• 3.1 Media Recognition
• 3.2 Transcript
• 3.3 Summary
• 3.4 Translation
• 3.5 Export
• 3.6 Edit the Transcript
• 3.7 Recording
• 3.8 Recording Settings
7. How to Download and Update AI Expert Smart Meetings
1. Supported Products and System Requirements
• AI ExpertMeet requires an operating system of Windows 11 or higher.
• Memory (DDR) needs to be above 12G.
• AI ExpertMeet is currently available on ASUS Commercial series PCs. For more details, please visit ASUS Global.
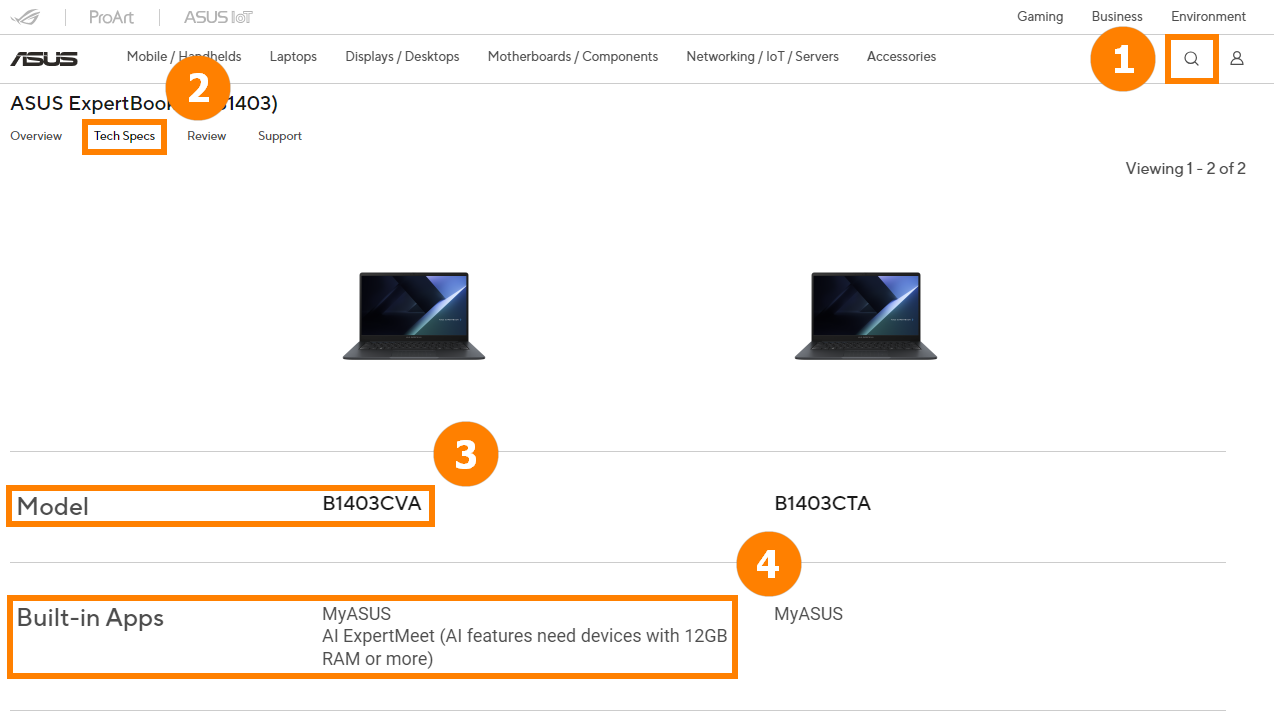
On the ASUS official website, enter your model name in ①[Search], click ②[Tech Specs], find ③[Model], and check in ④[Built-in Apps] whether the model supports AI ExpertMeet.
※ The Screen Watermark feature is currently not supported on Desktop computers.
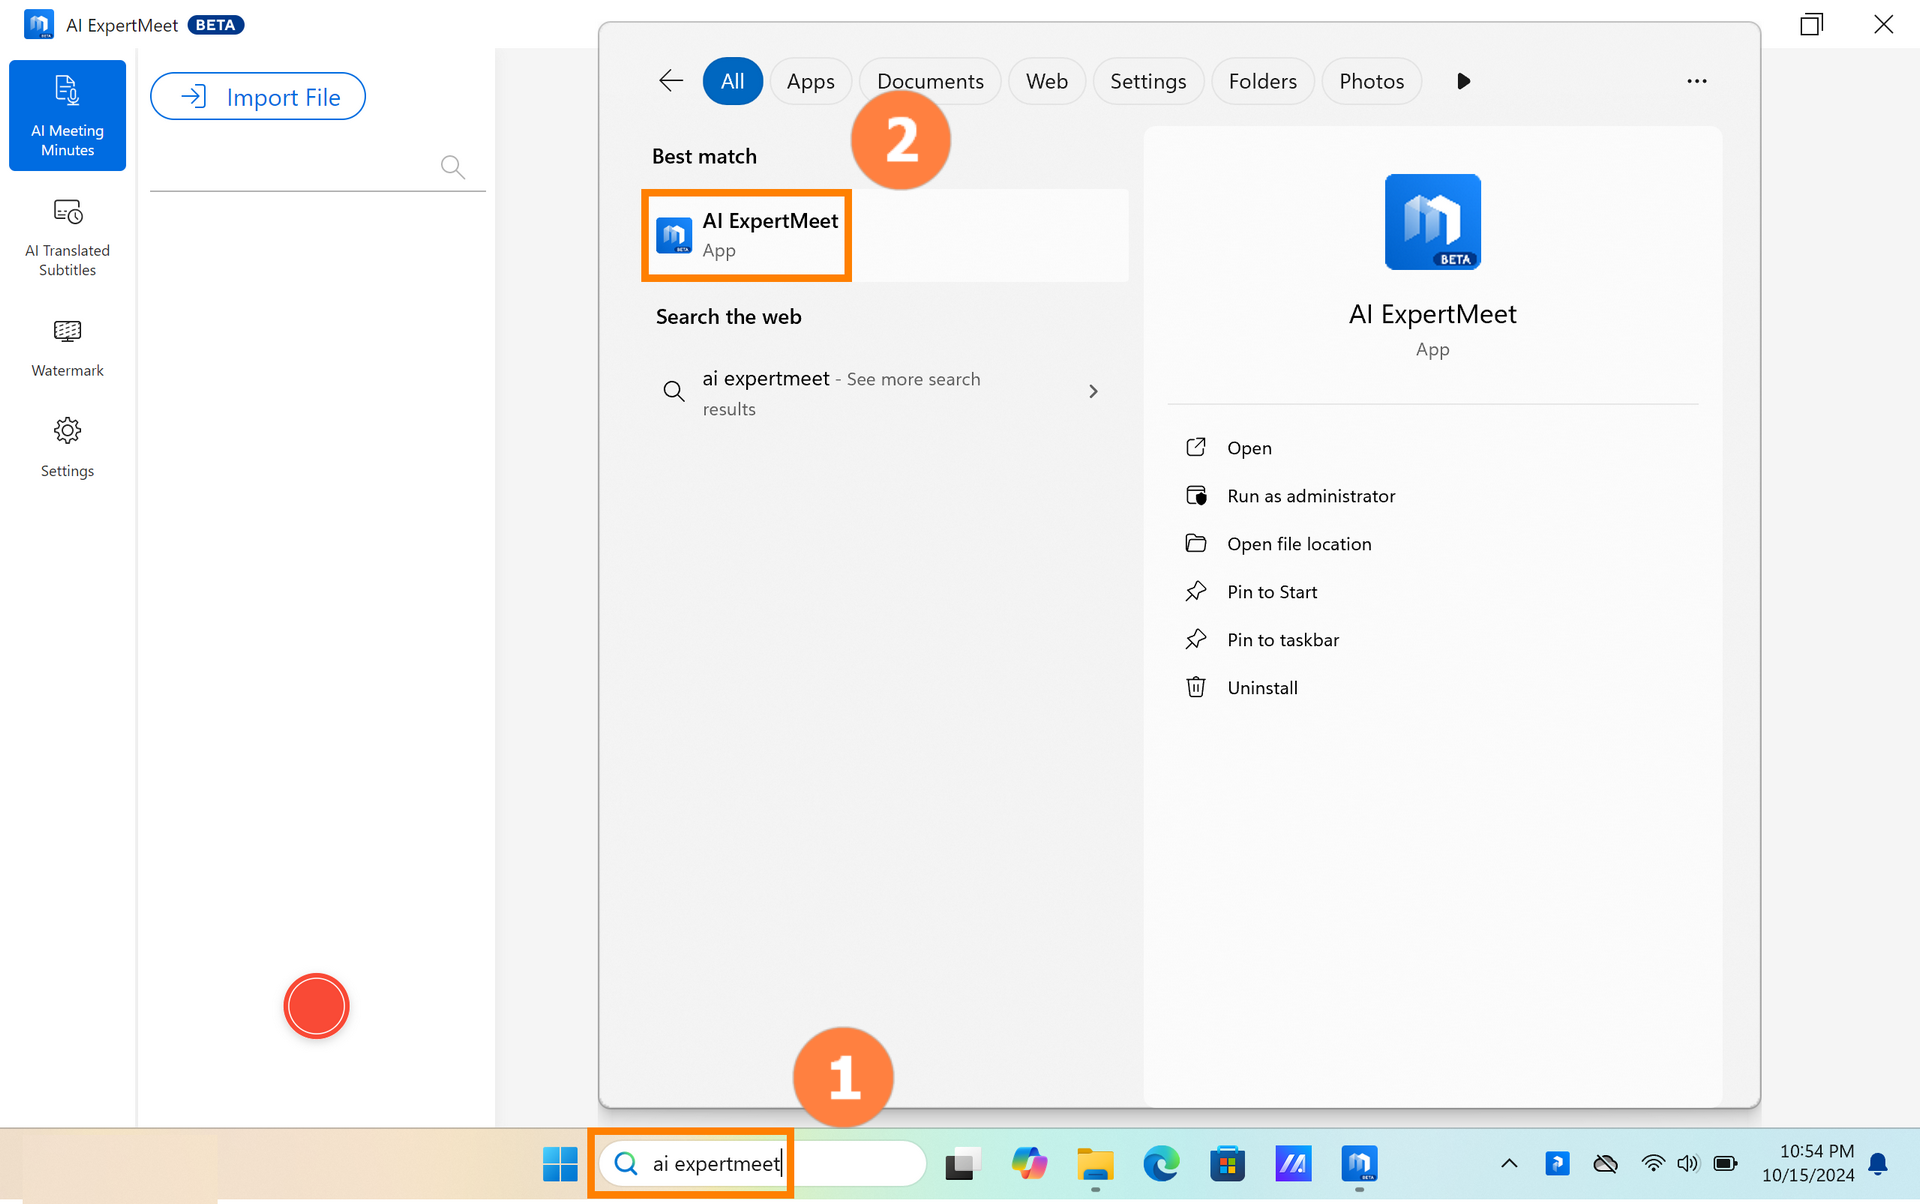
Enter [AI ExpertMeet] in the desktop ①[Search Bar], then click ②[AI ExpertMeet] to open it.
Import File supported Formats
Audio Files: [“.mp3”, “.wav”, “.flac”, “.wma”, “.m4a”]
Video Files: [“.mp4”, “.avi”, “.mkv”]
※ Import File has no size or length restrictions on supported files, but the longer the file, the longer the transcription will take.
※ AI Meeting Minutes support Audio Recording. For detailed information, please refer to 3.7 Recording.
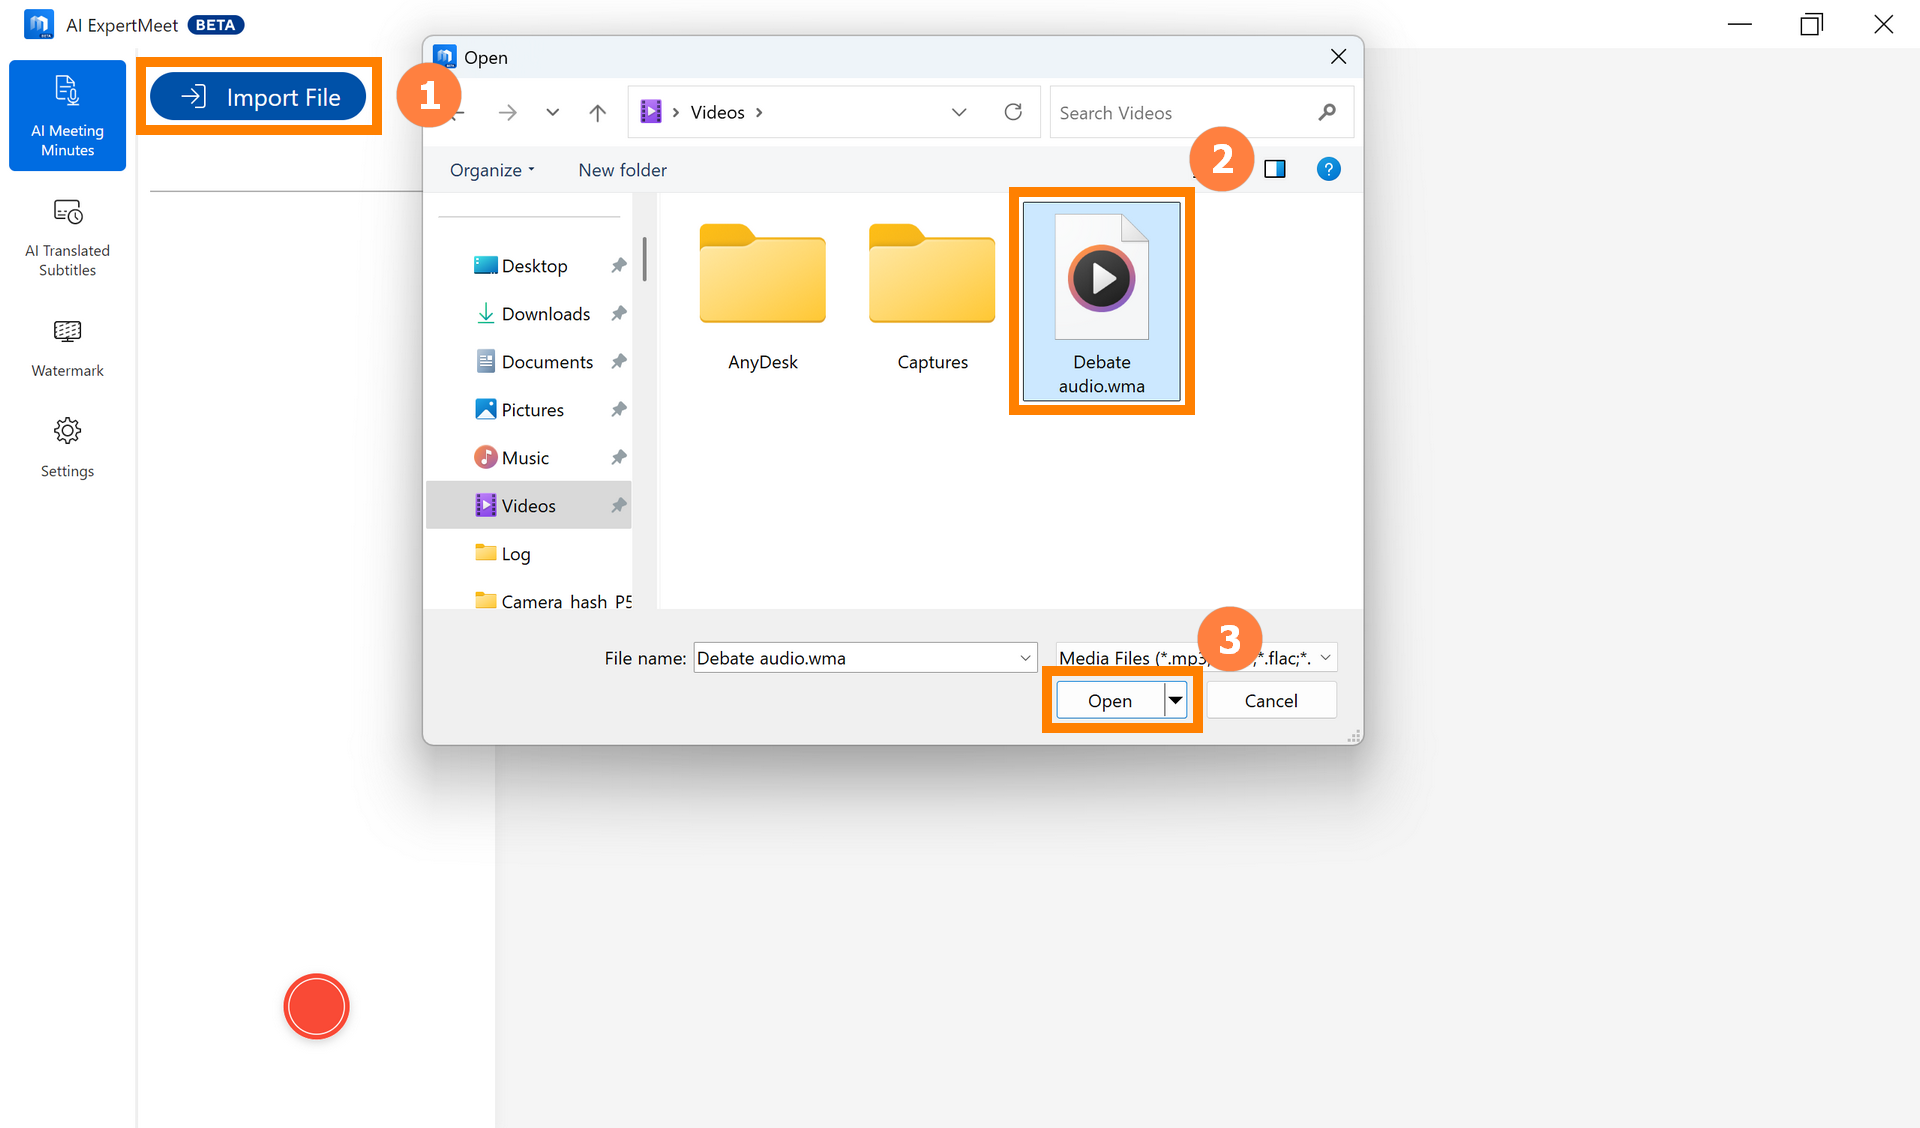
(1) Click ①[Import File], select ②[Media], and click ③[Open].
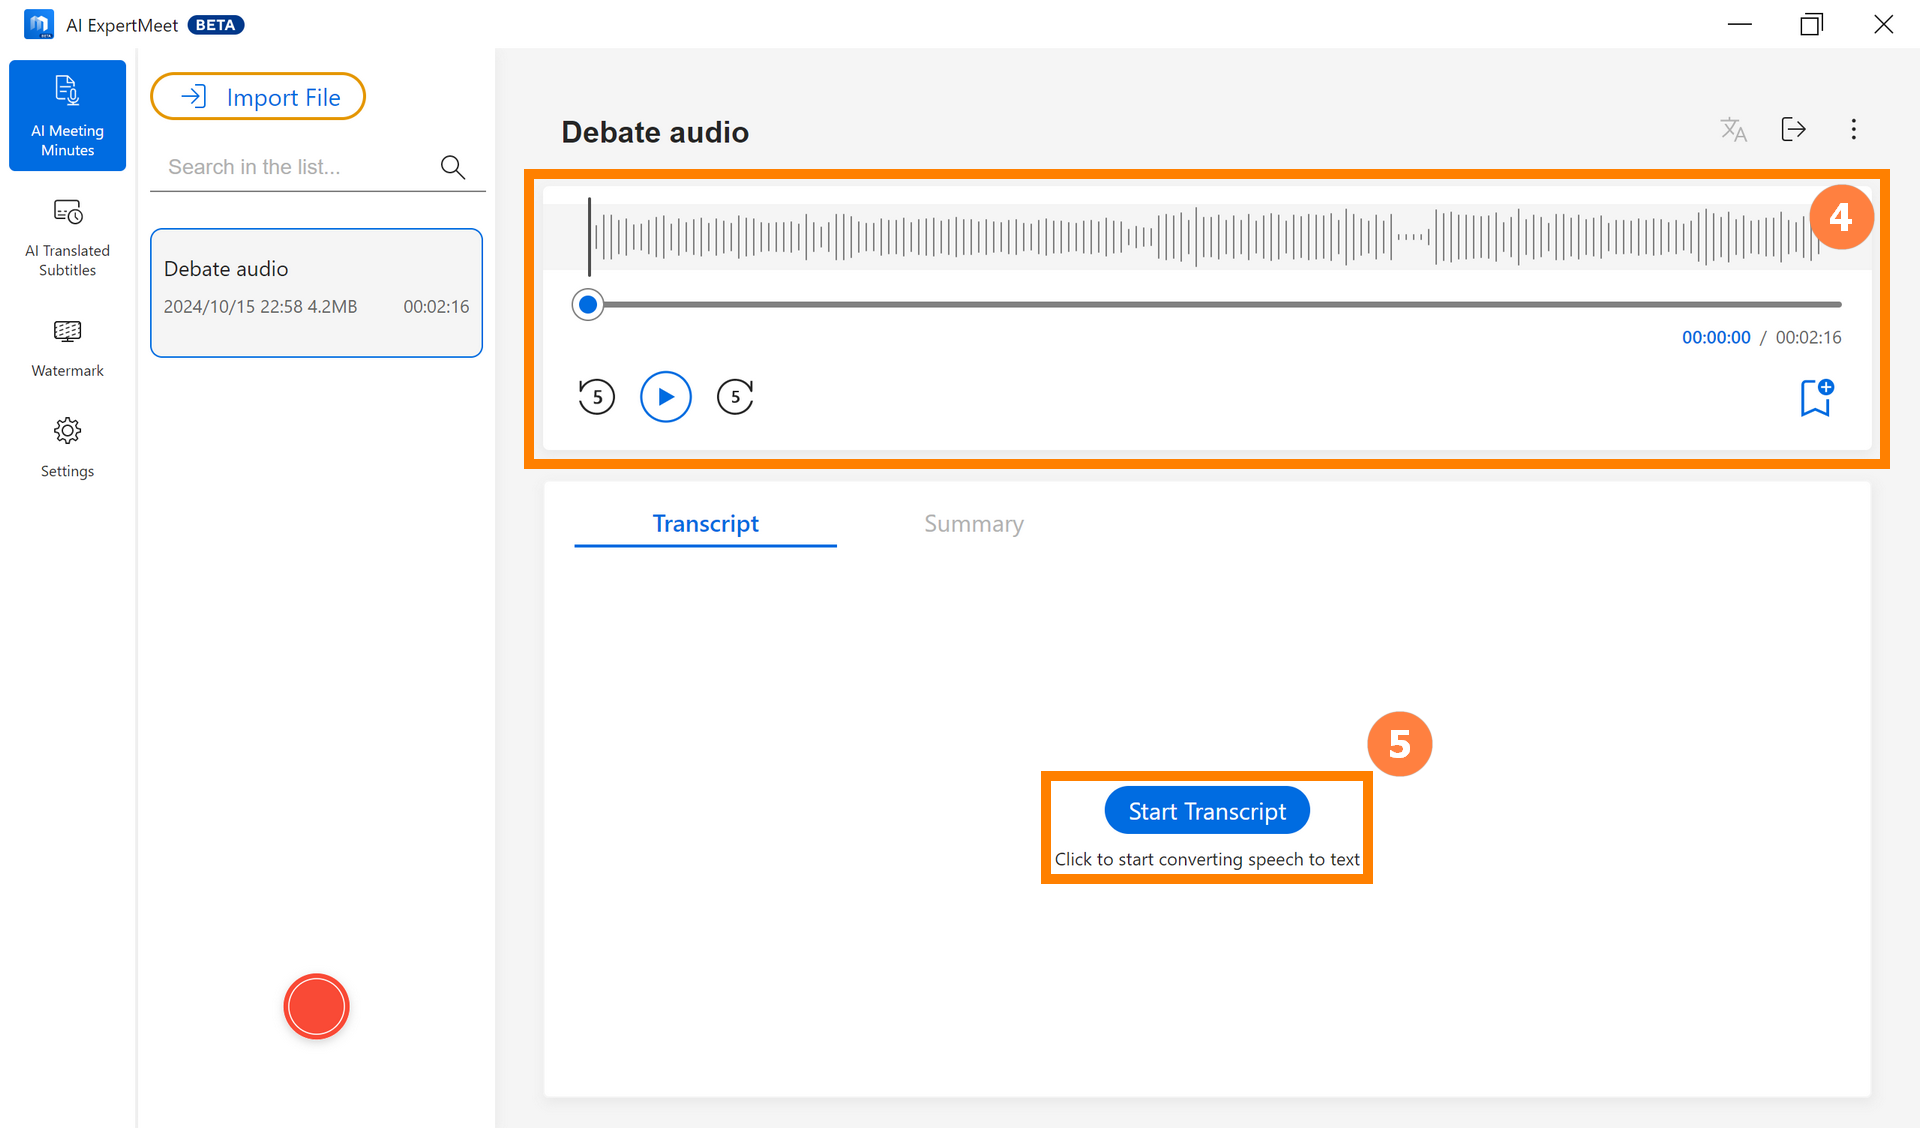
(2) In the ④[Preview] area, you can listen to the audio or mark segments multiple times. Click ⑤[Start Transcript] to convert speech to text.
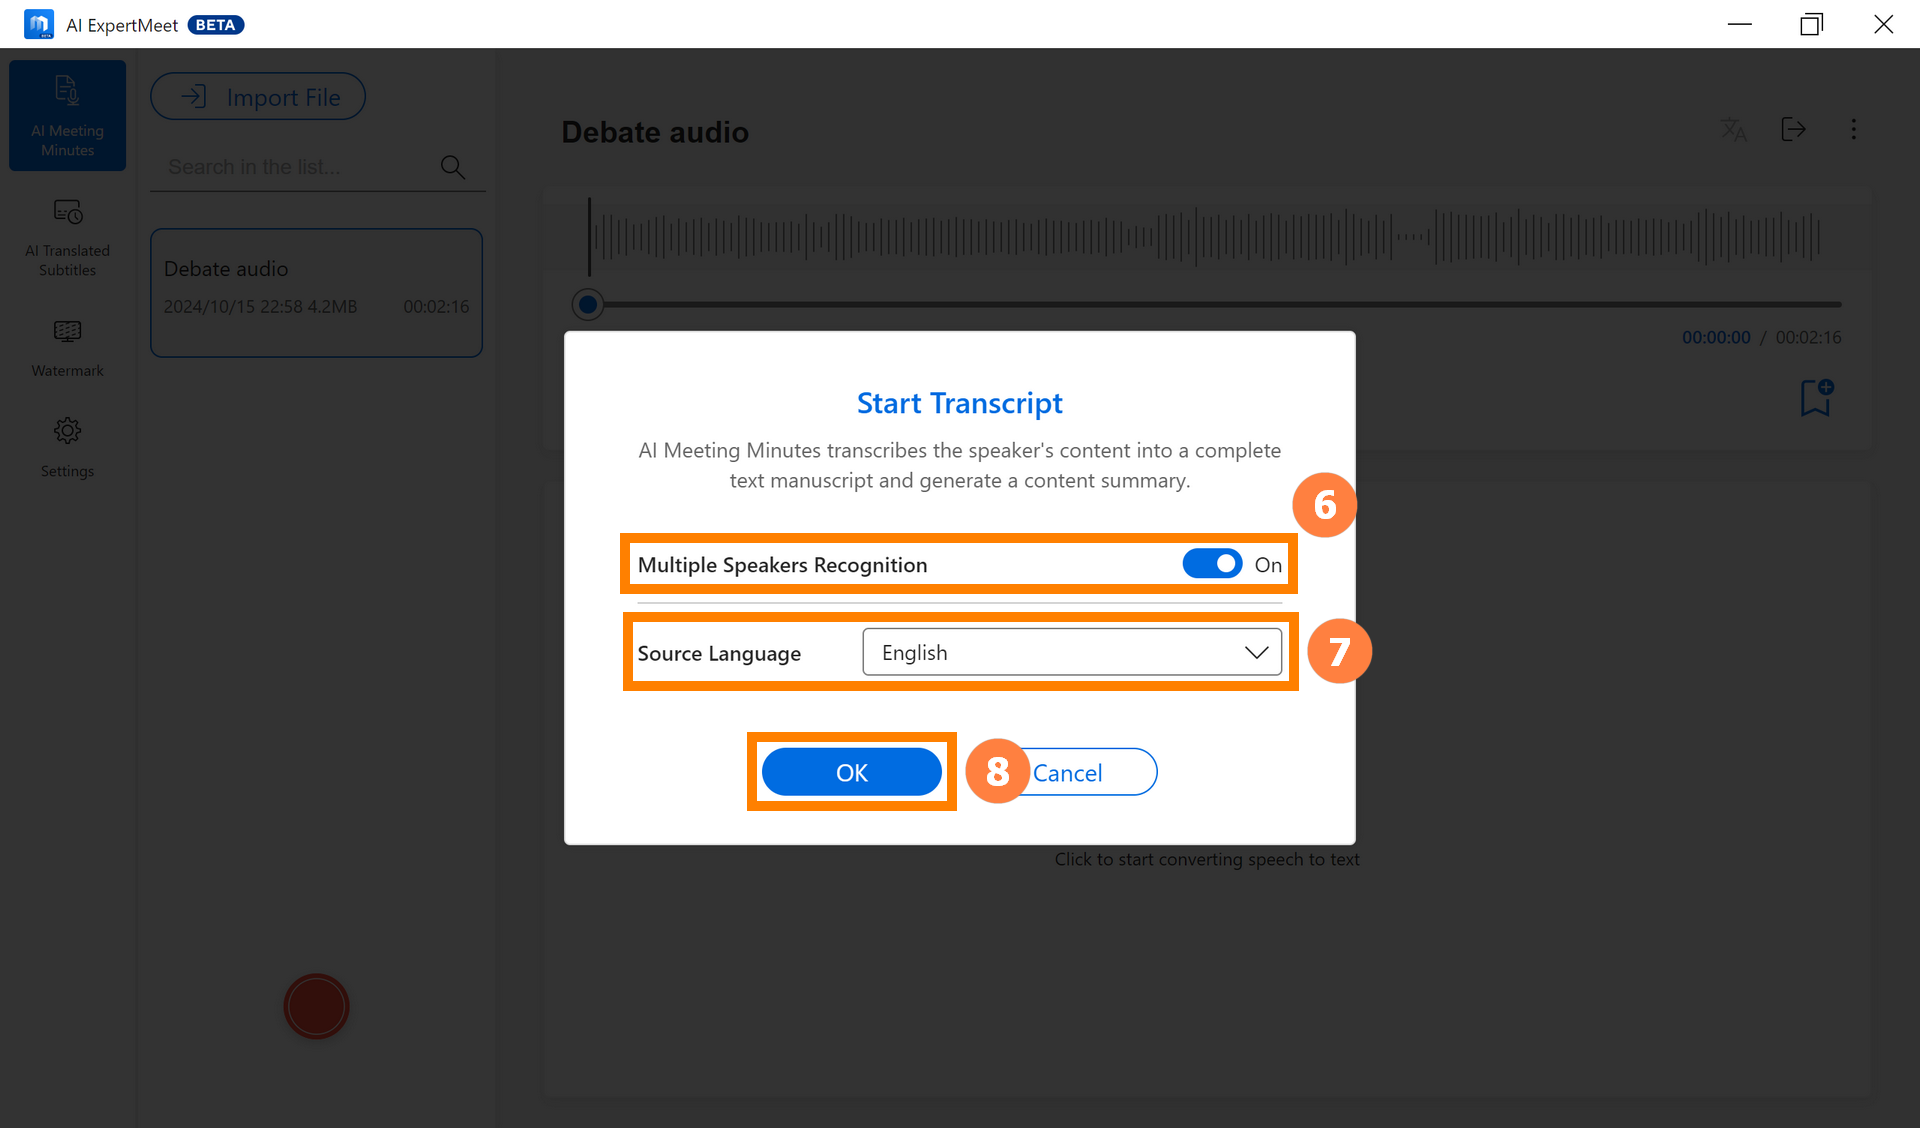
(3) If your audio has multiple speakers, select ⑥[Multiple Speakers Recognition] to enable it. Choose ⑦[Source Language]; selecting the correct language source helps improve recognition accuracy. Click ⑧[OK] to start recognition.
※ Multiple Speakers Recognition is disabled by default because it takes up more computer system resources. If there are multiple speakers, you can enable it manually.
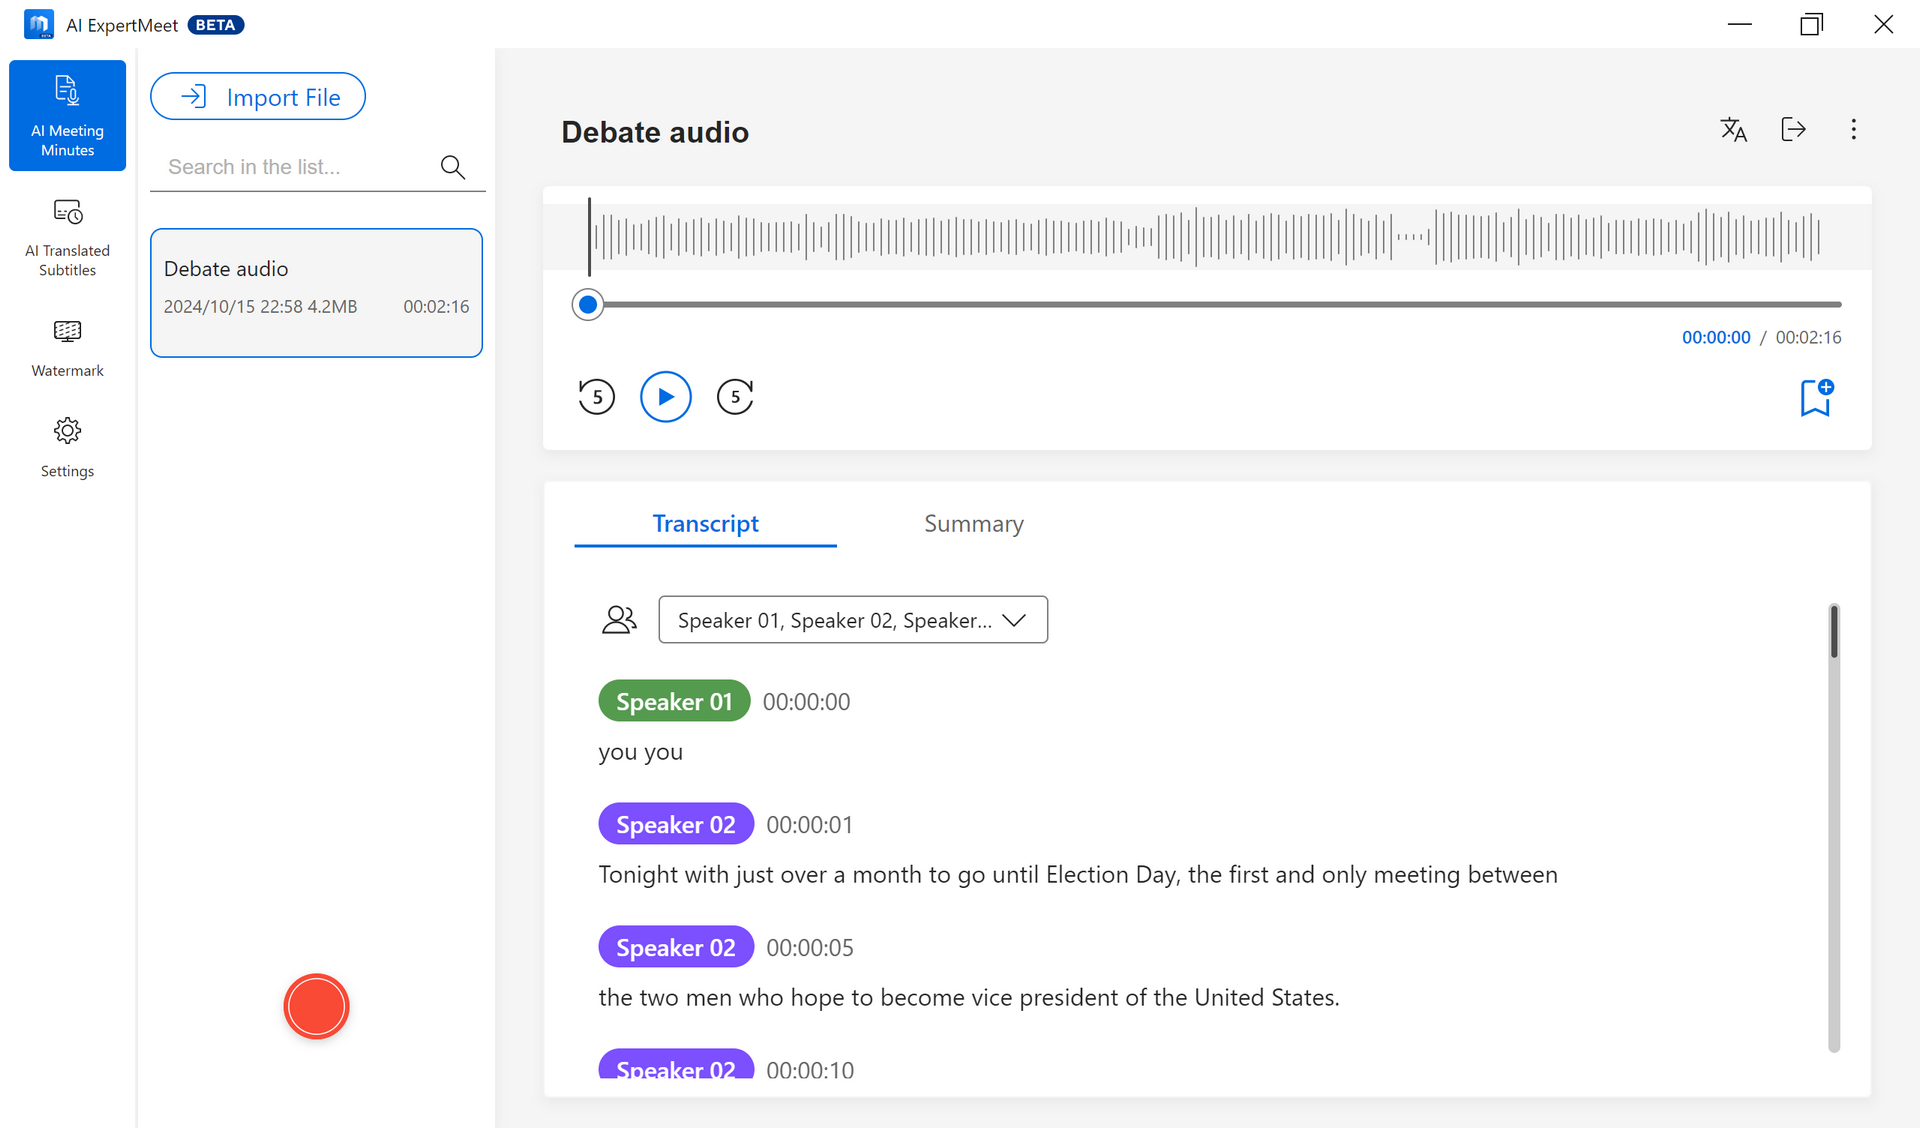
(4) The recognition is completed.
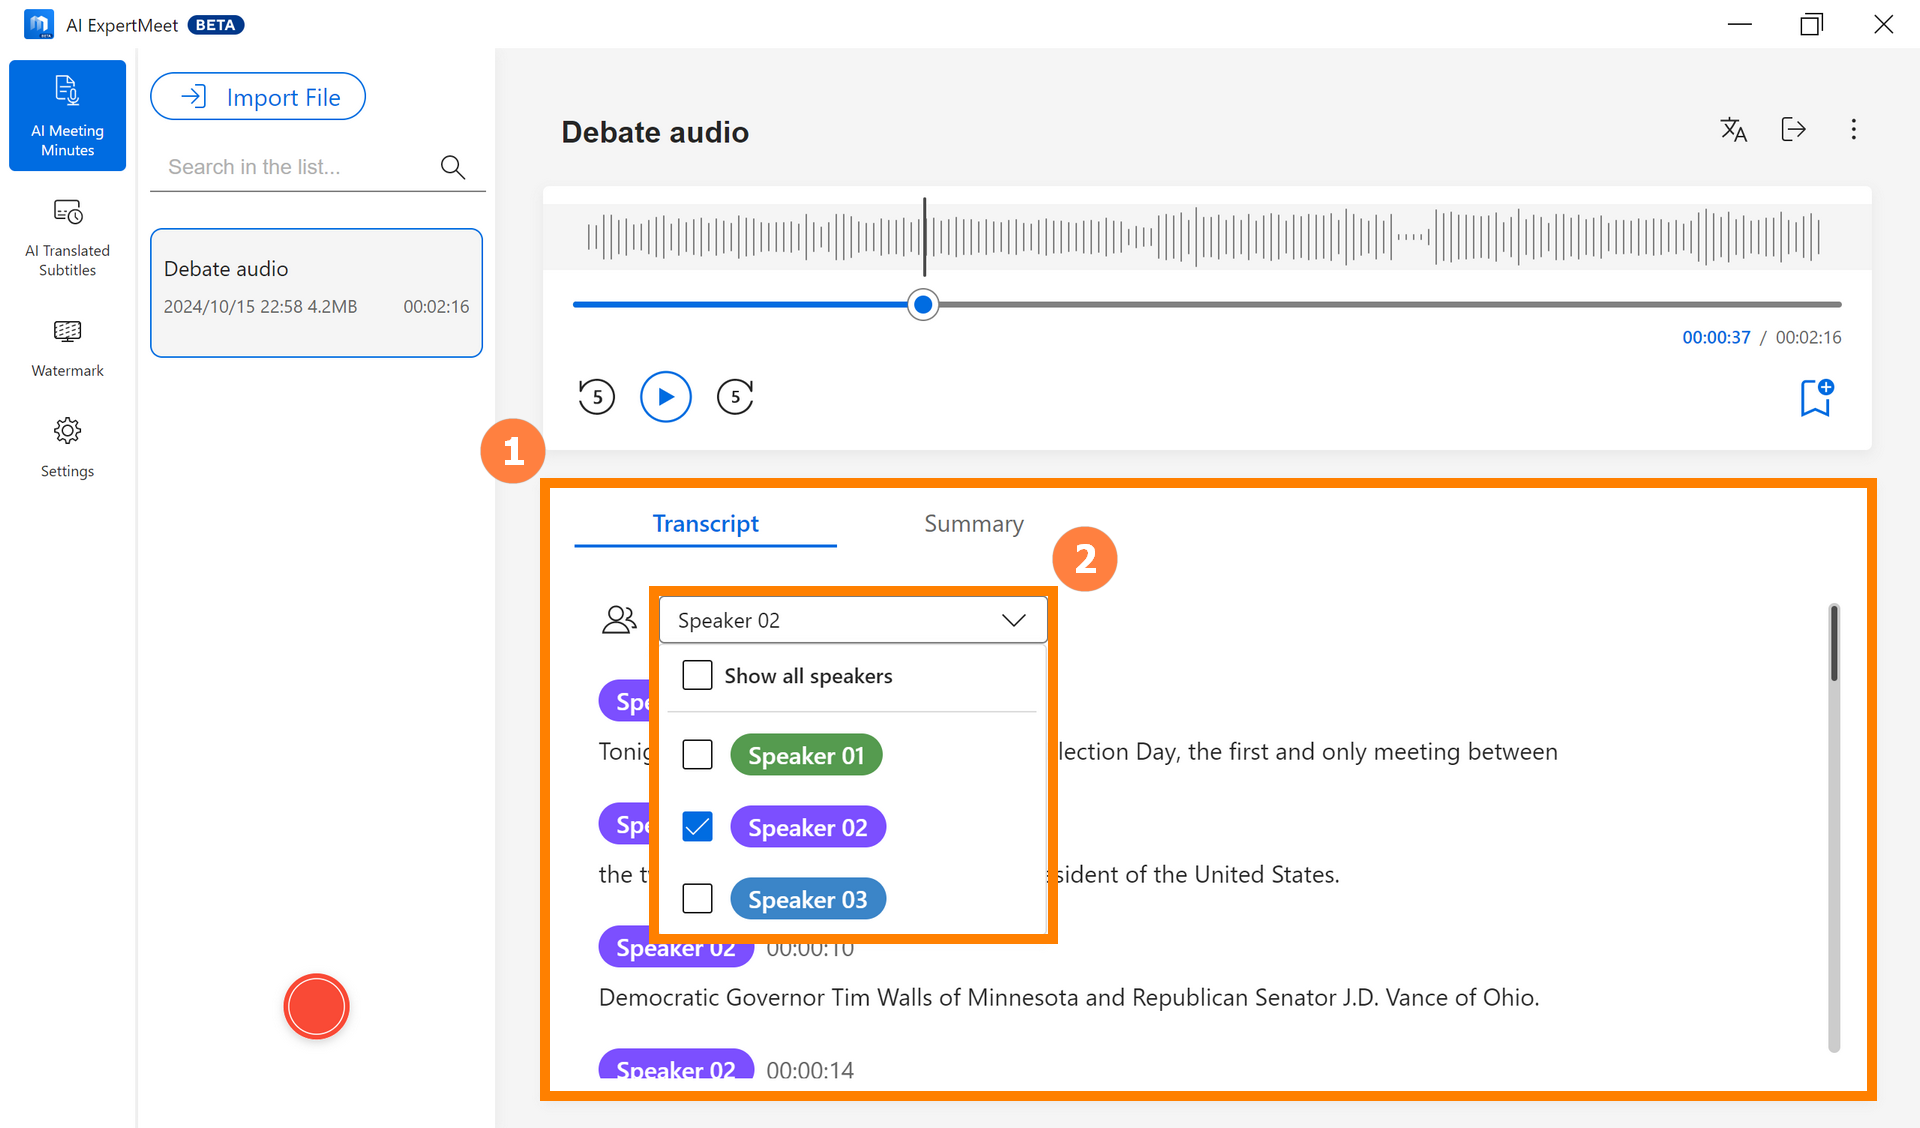
①[Transcript] recognition is complete, you can manually select content with the mouse to copy it. Transcript supports multi-speaker recognition, and you can manually select ②[Speaker].
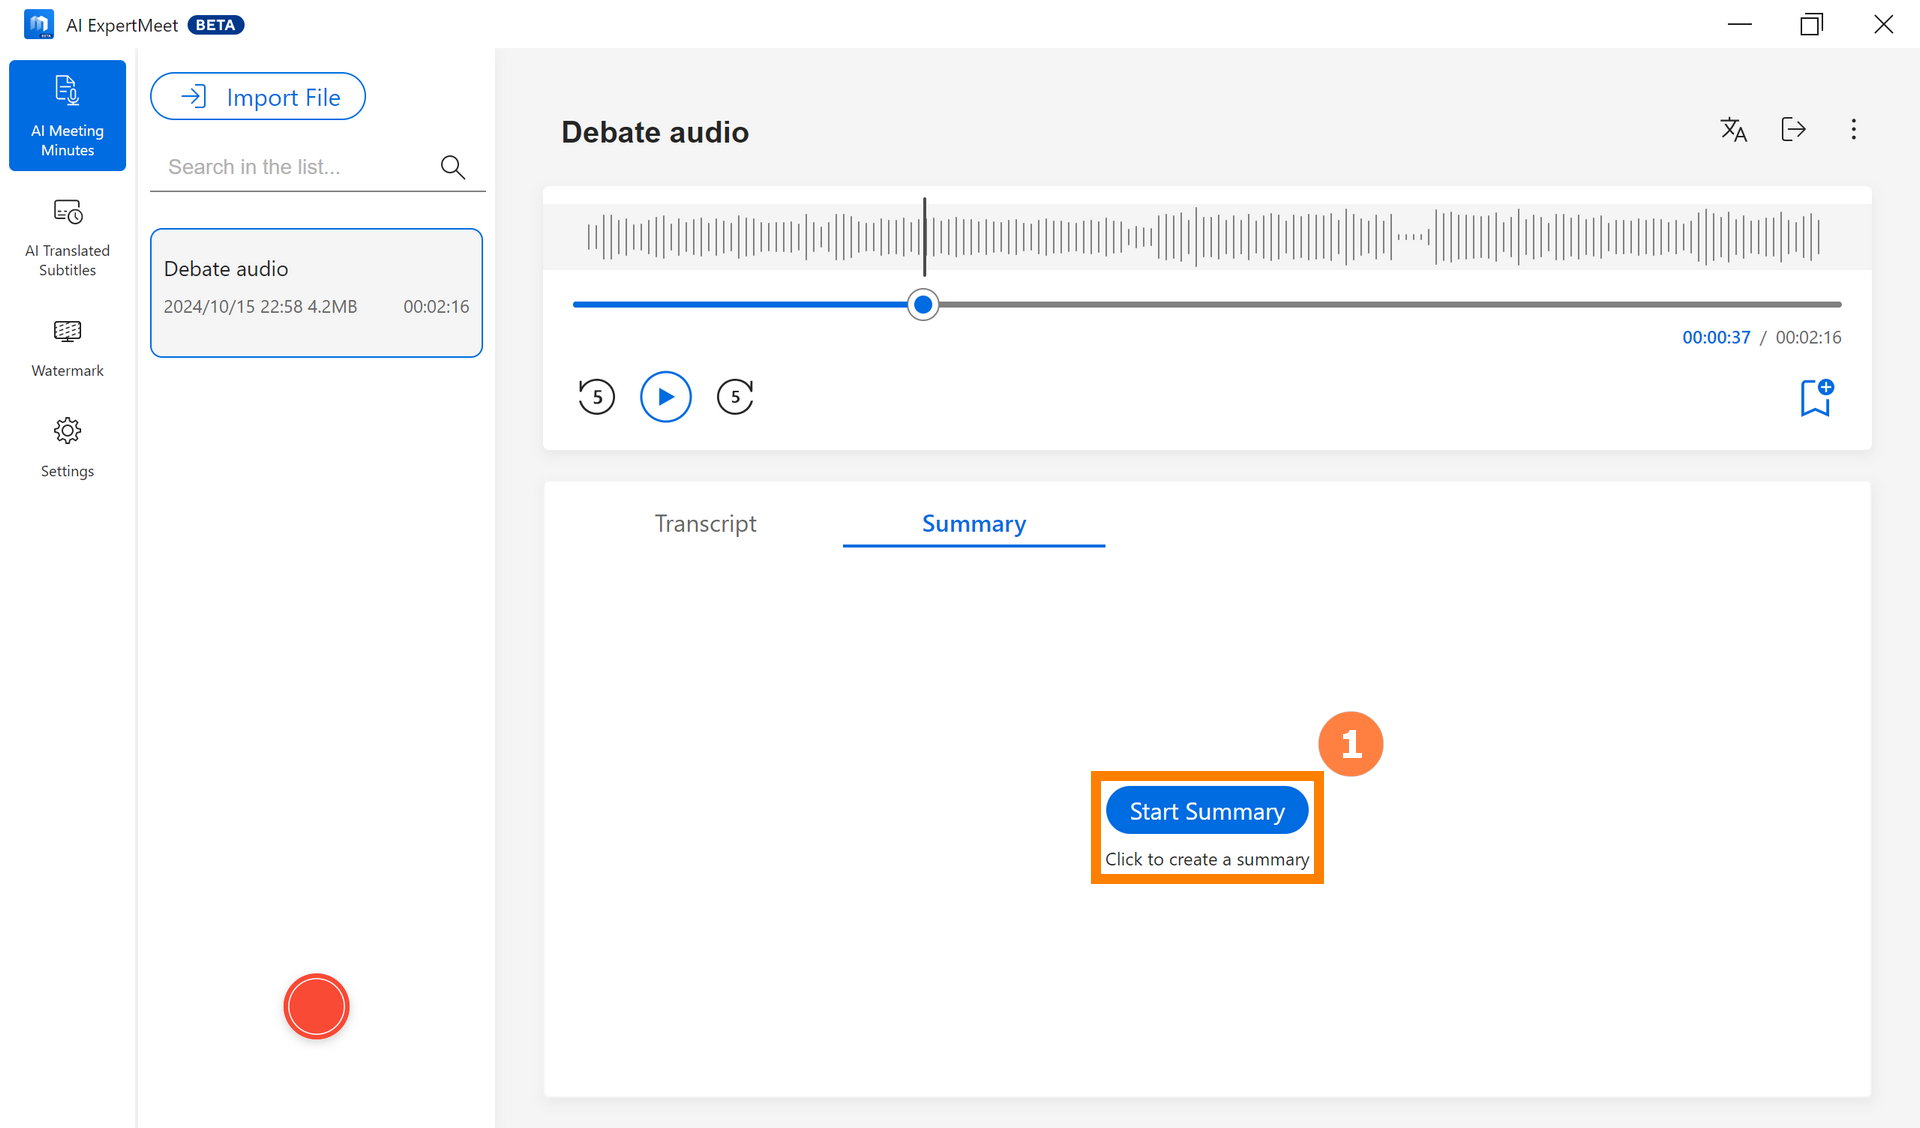
※ You need to use the Transcript function before enabling the Summary function.
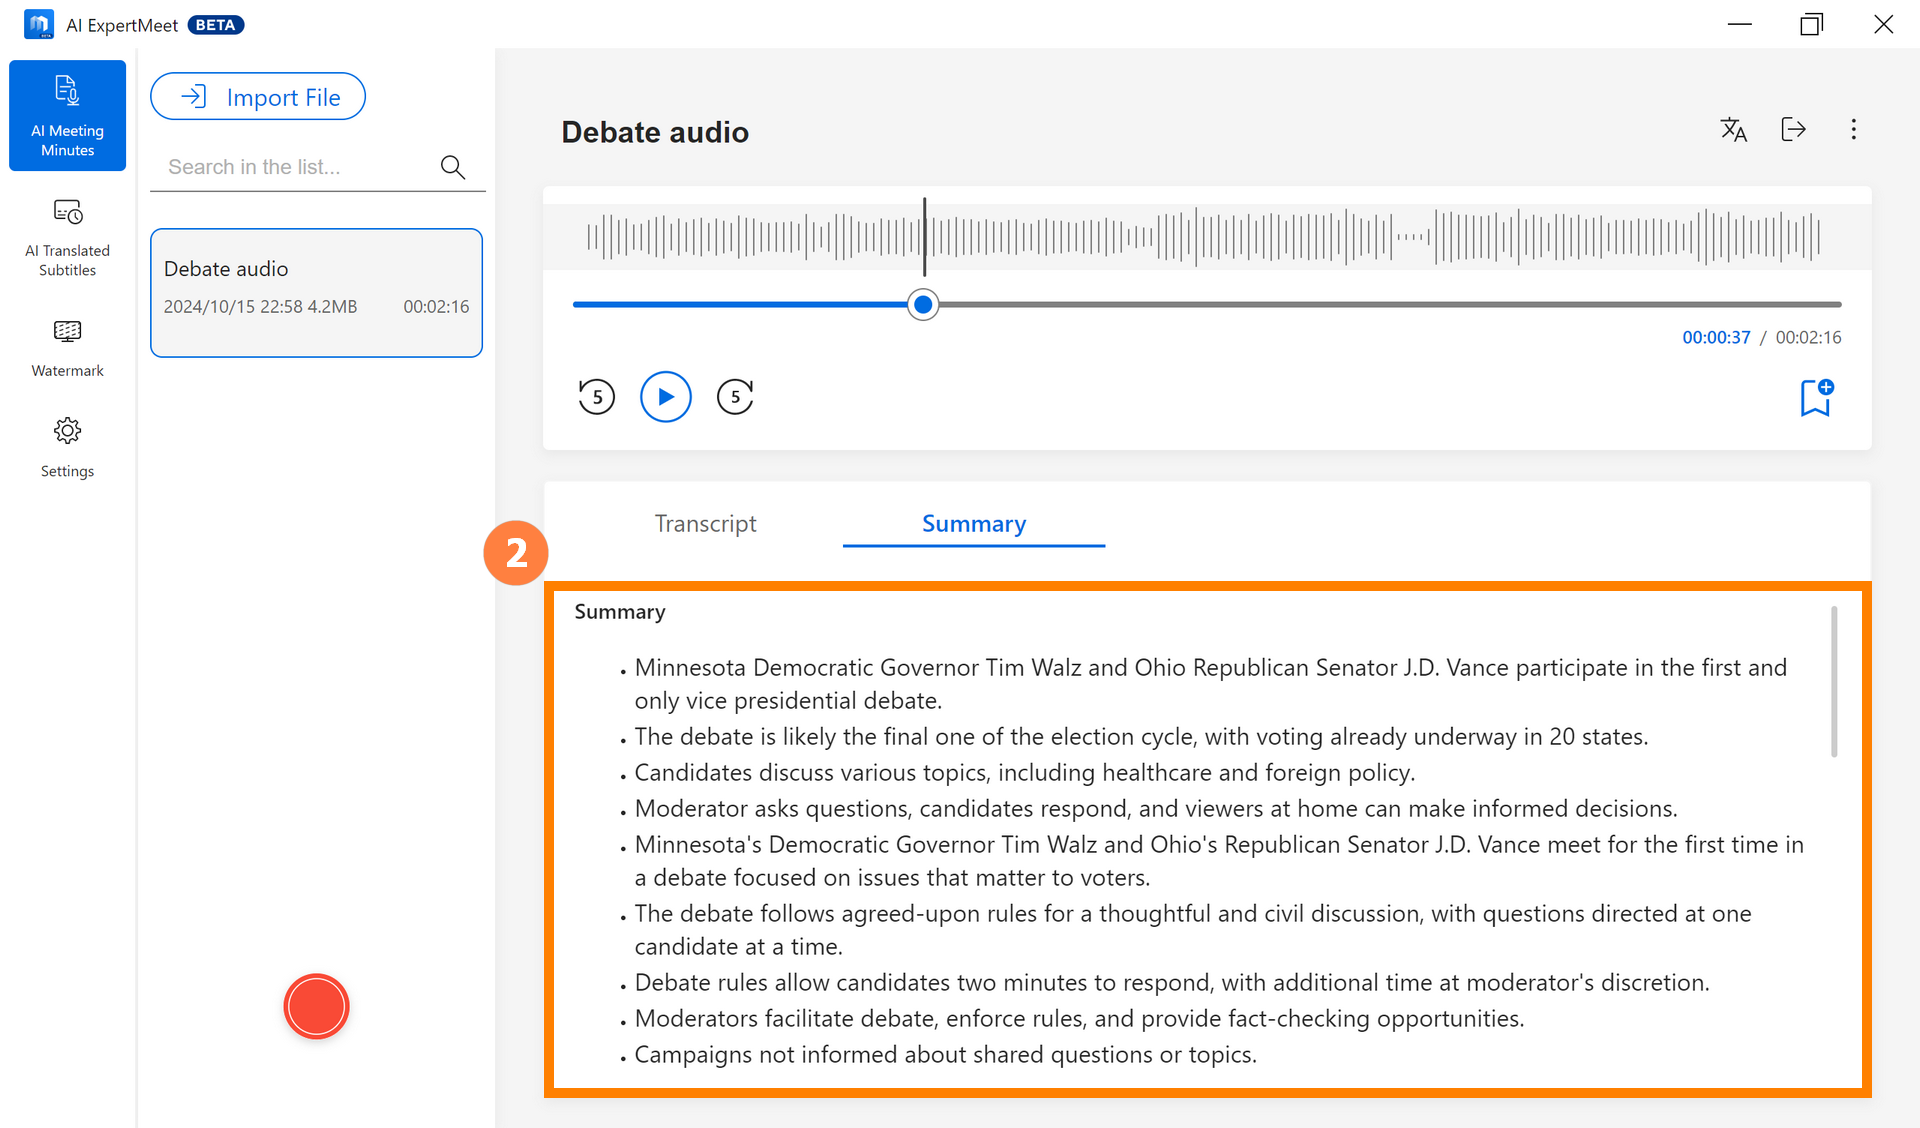
(1) Click ①[Start Summary] to generate a summary.
(2) The full summary is generated, and you can copy the ②[content] to your clipboard.
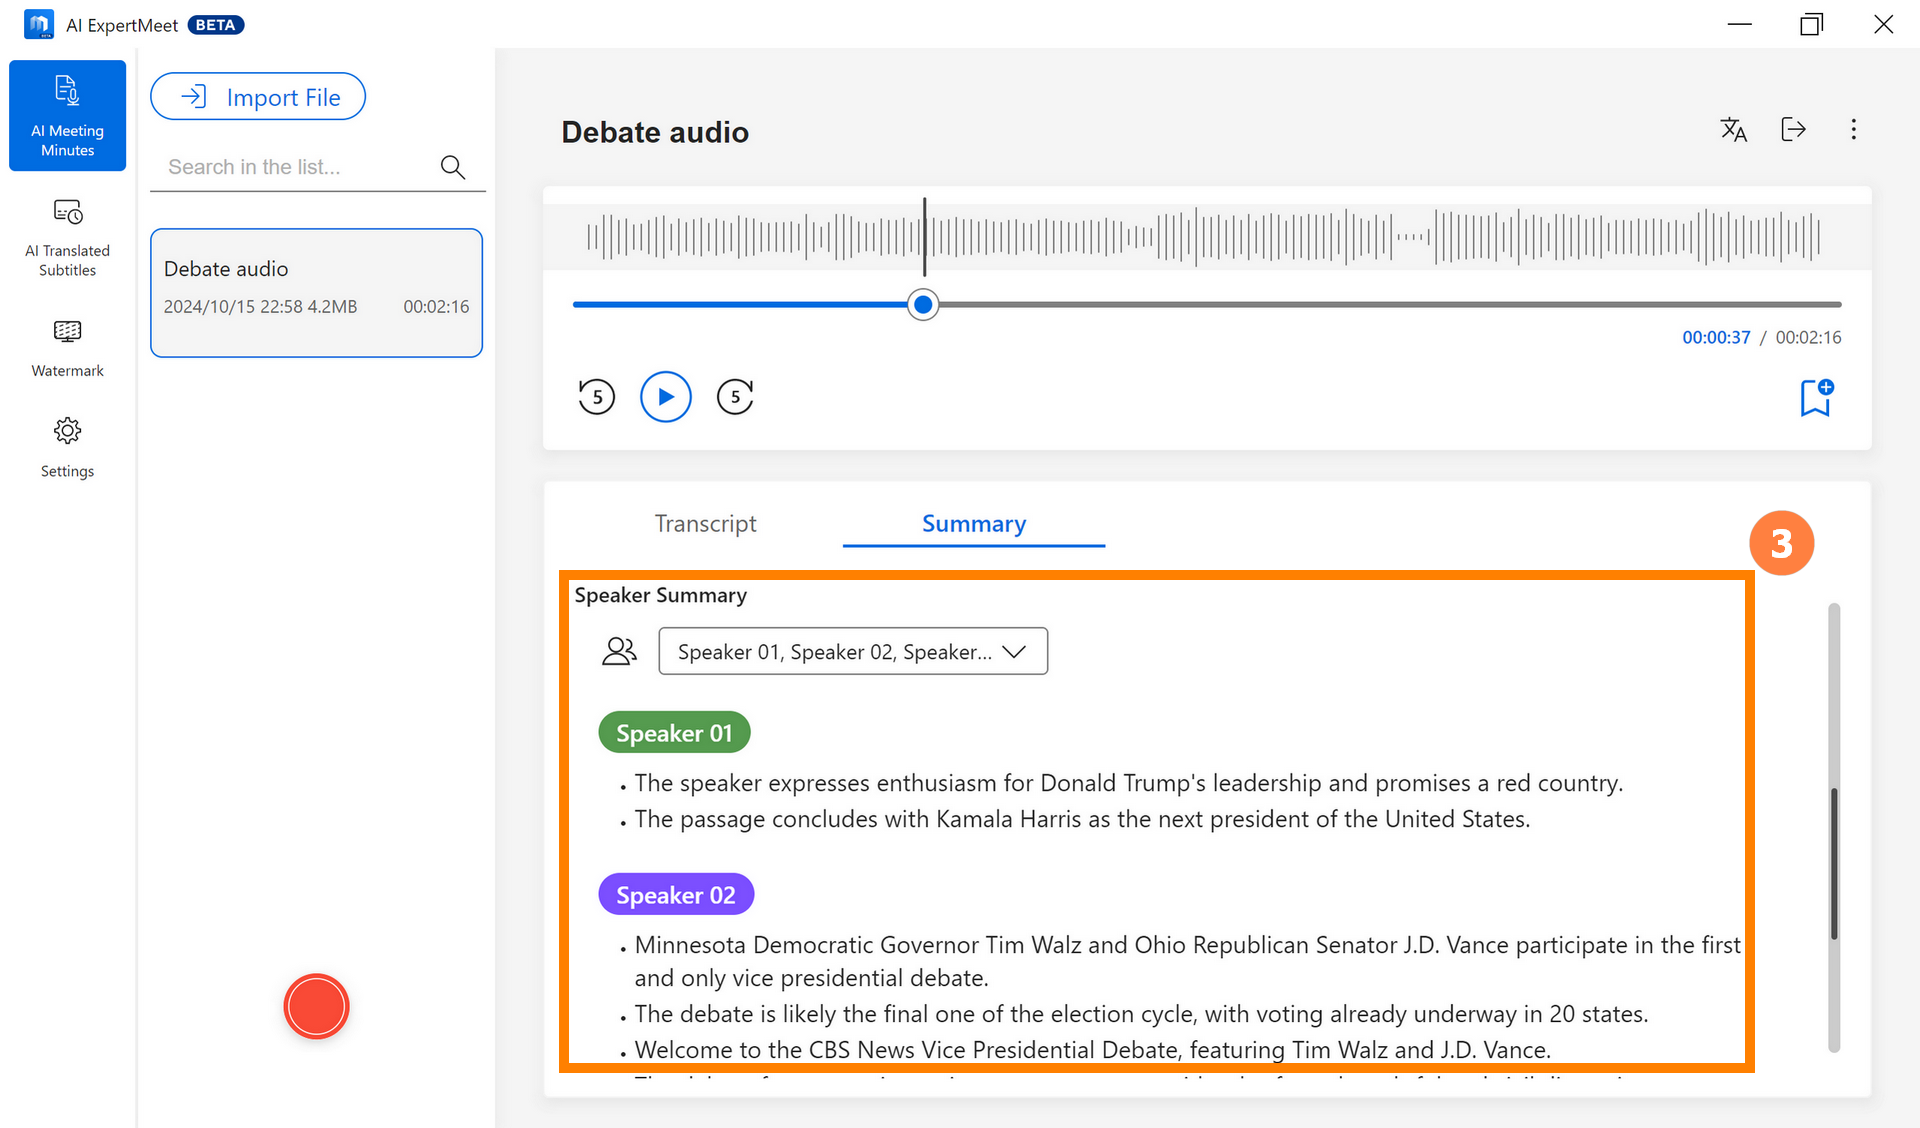
(3) Use the middle mouse button to scroll down and read each ③[Speaker Summary].
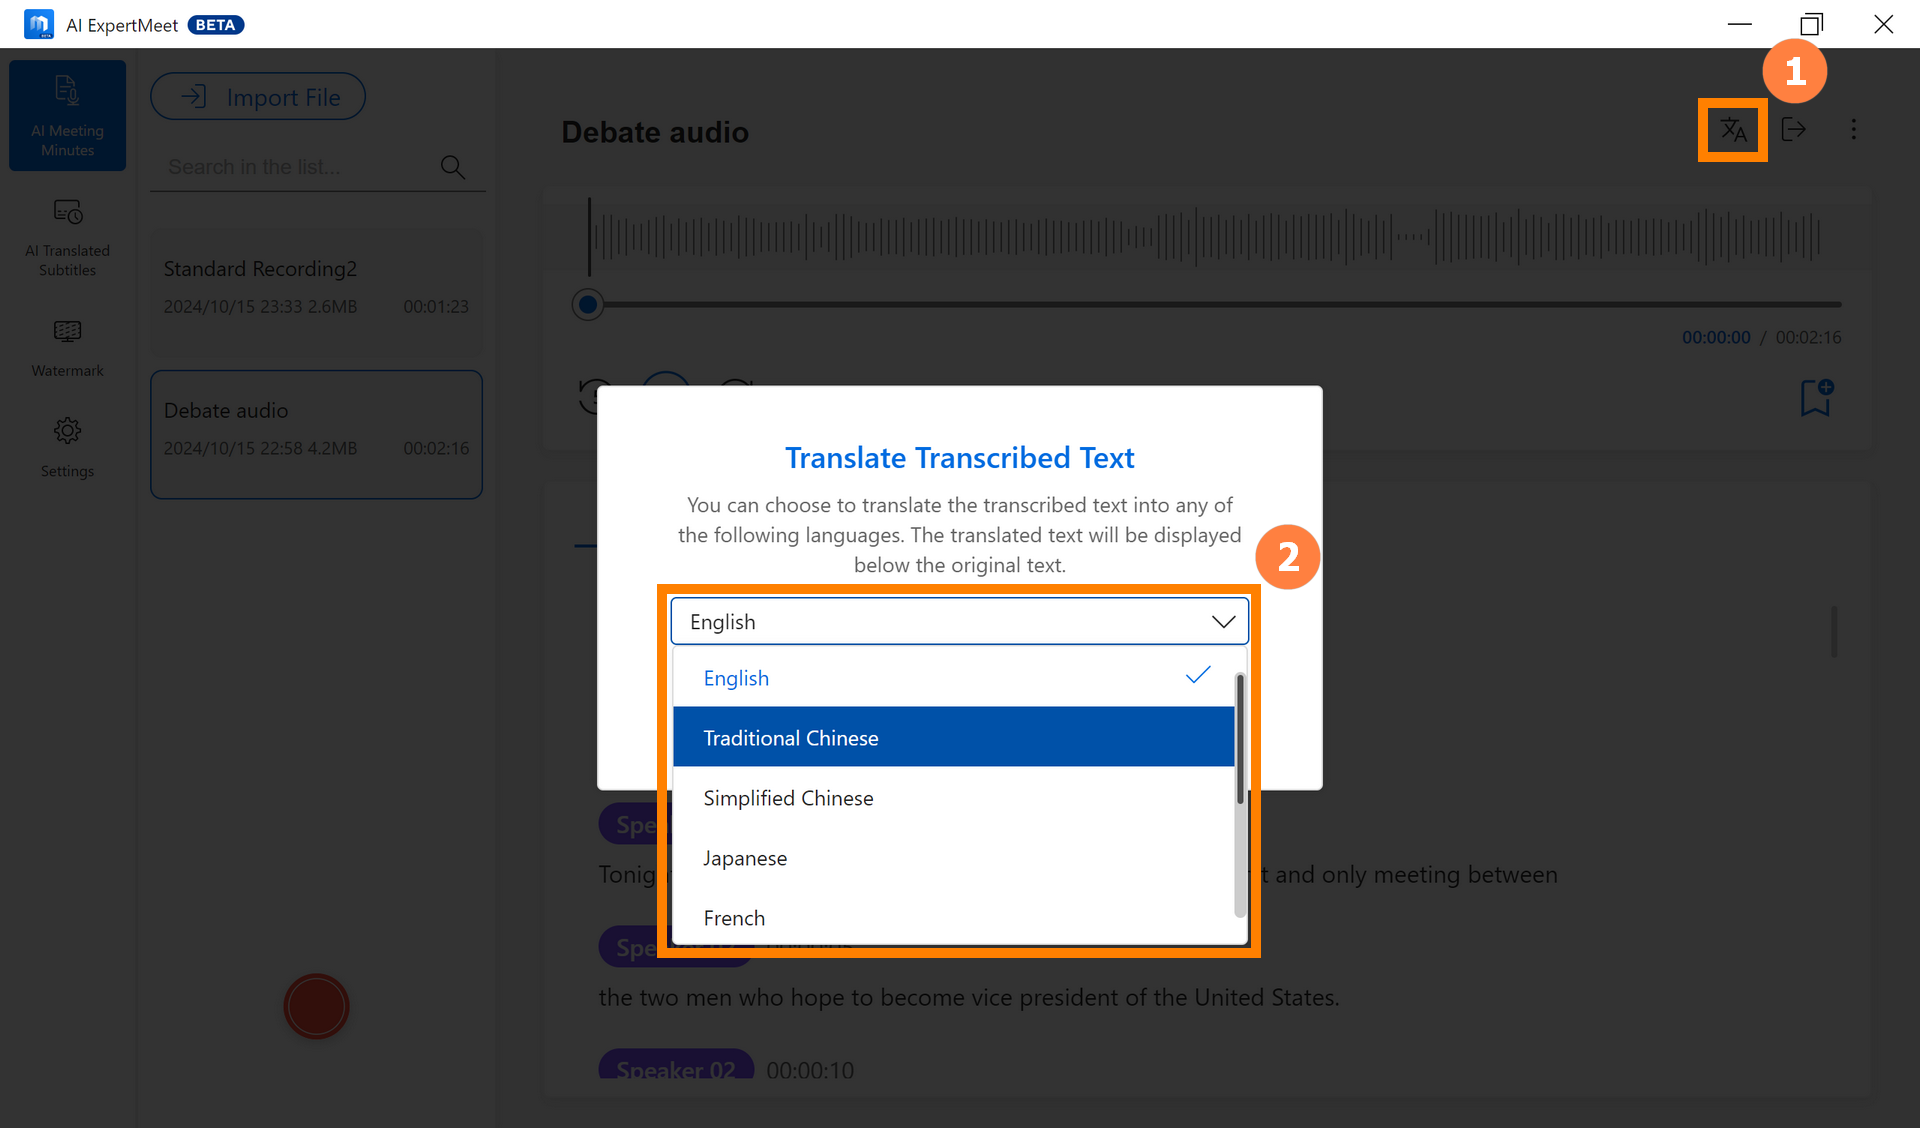
(1) Click ①[  Translate], and select the ②[Language] you need.
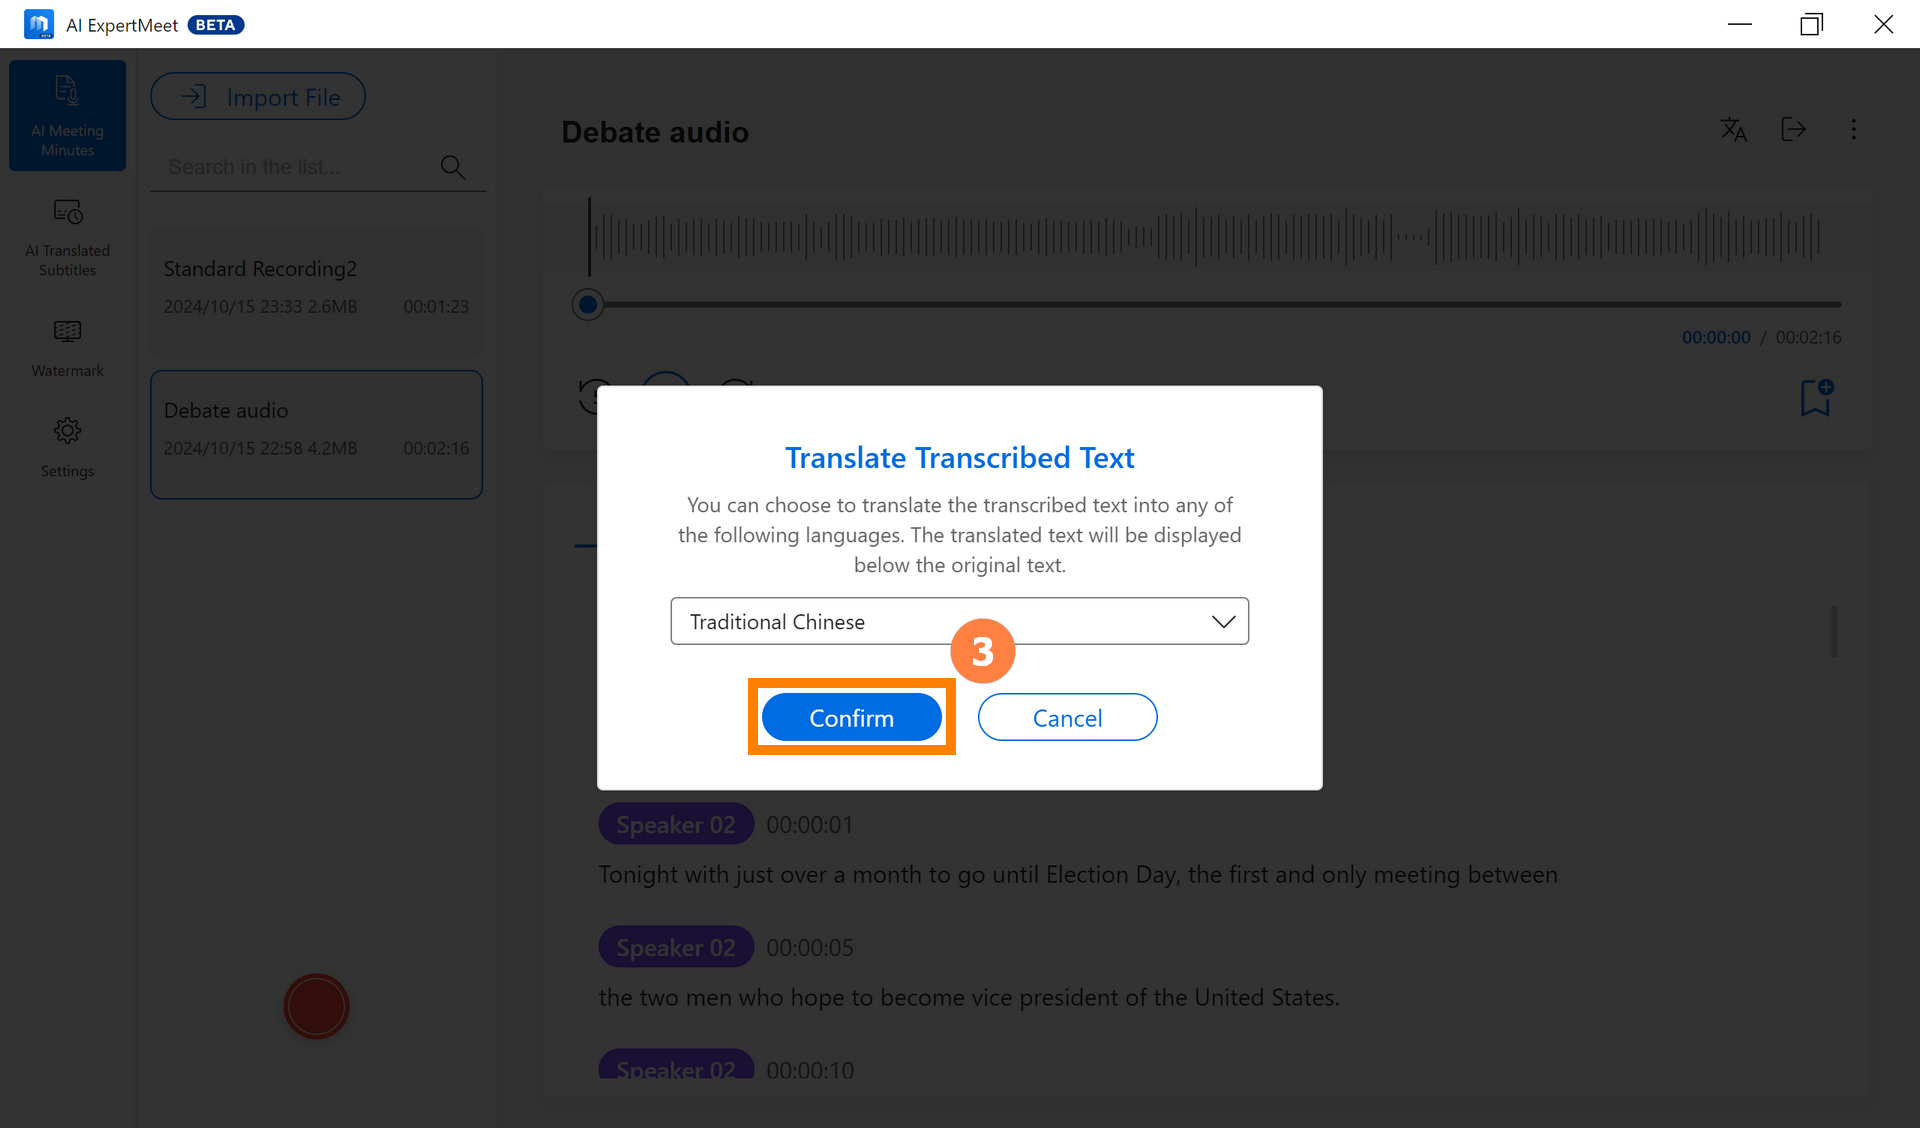
(2) Click ③[Confirm] to start translation.
(3) Once translation is complete, the ④[Translated Content] will be displayed below the recognized content.
※ The content of the summary will also be translated.
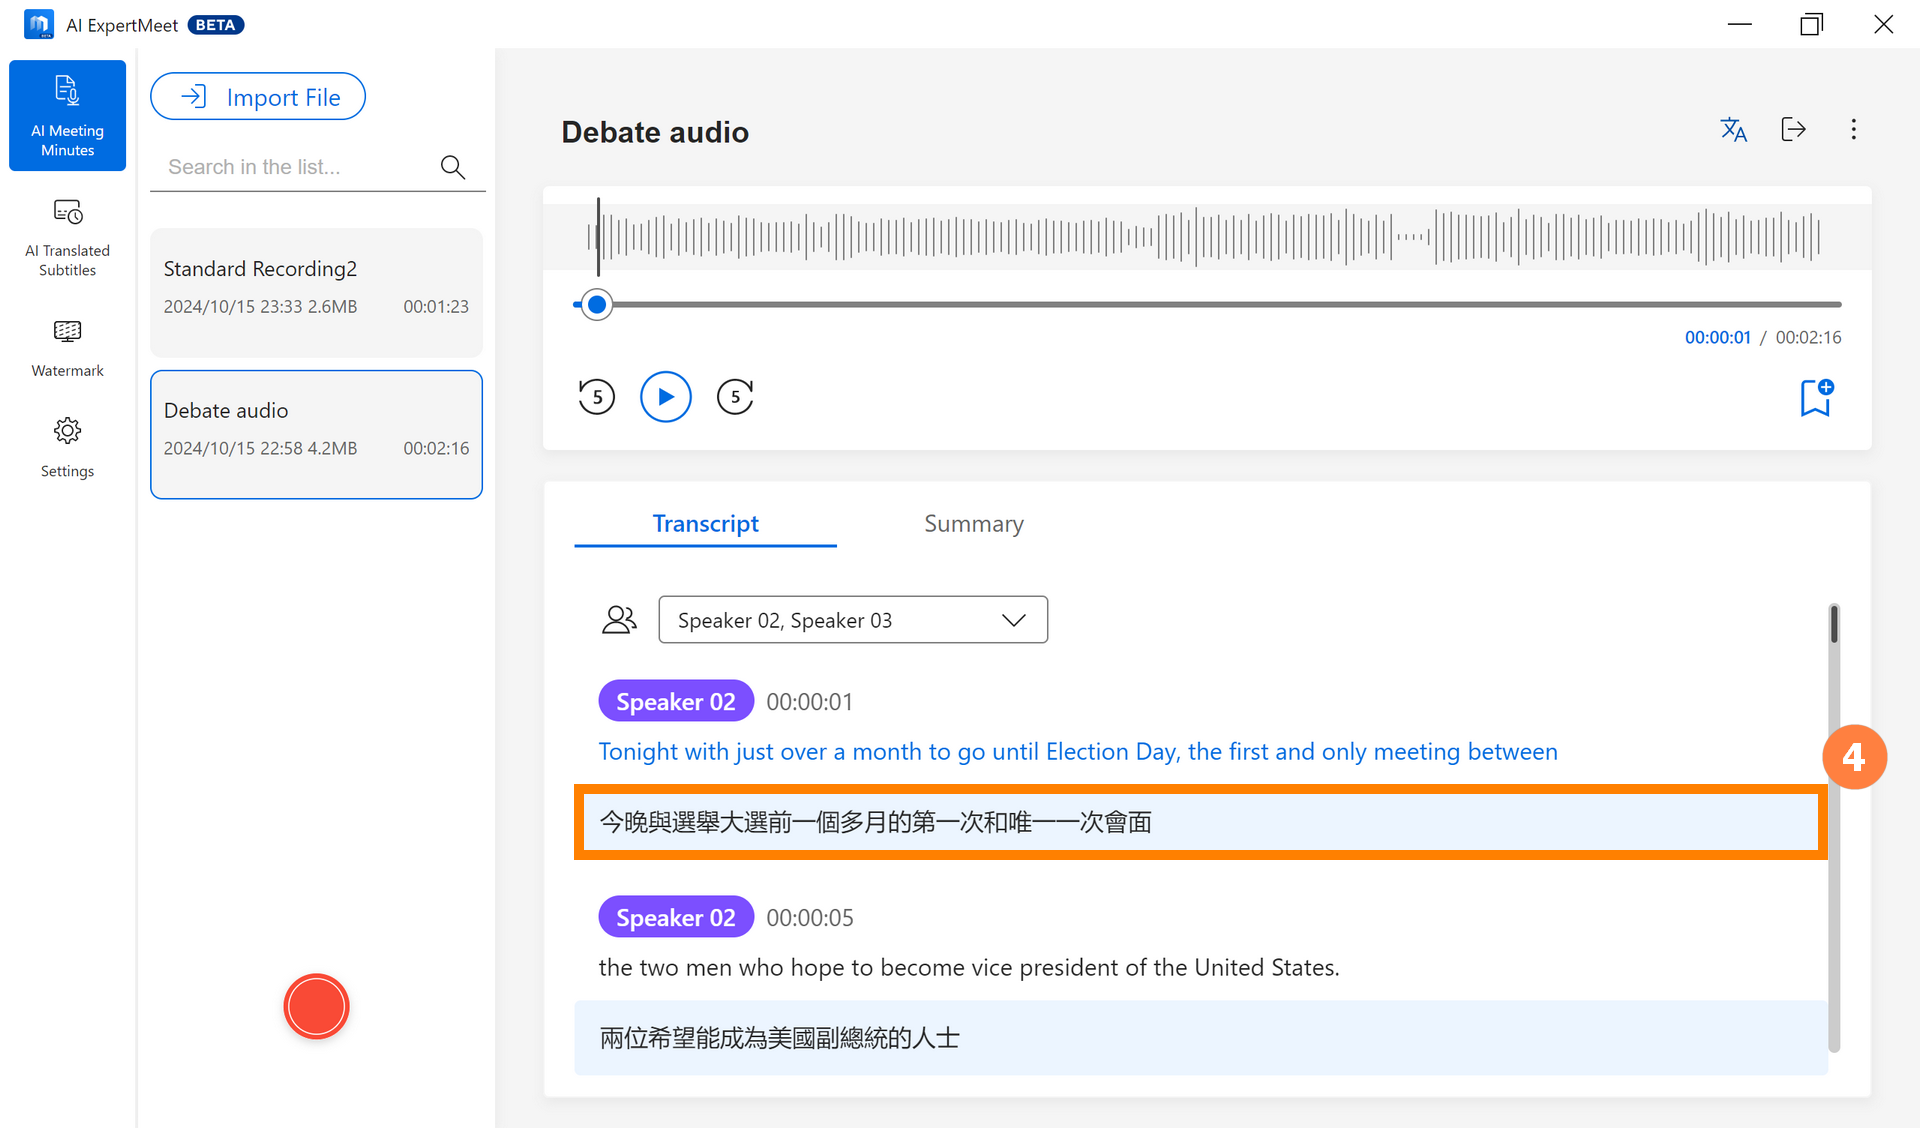
(1) Click ①[  Export], modify the ②[File Name] to be exported, select the ③[Format] you need, choose the ④[Content Options] you want, and click ⑤[Export] to export.
※ The srt format in Format is for storing subtitle information. You can directly import the video into AI ExpertMeet Minutes, recognize the video, and export it as a srt subtitle text, saving you time when creating videos.
※ The Exported Content has a Translated Text option. If you have not translated the audio, this option will be greyed out and cannot be selected.
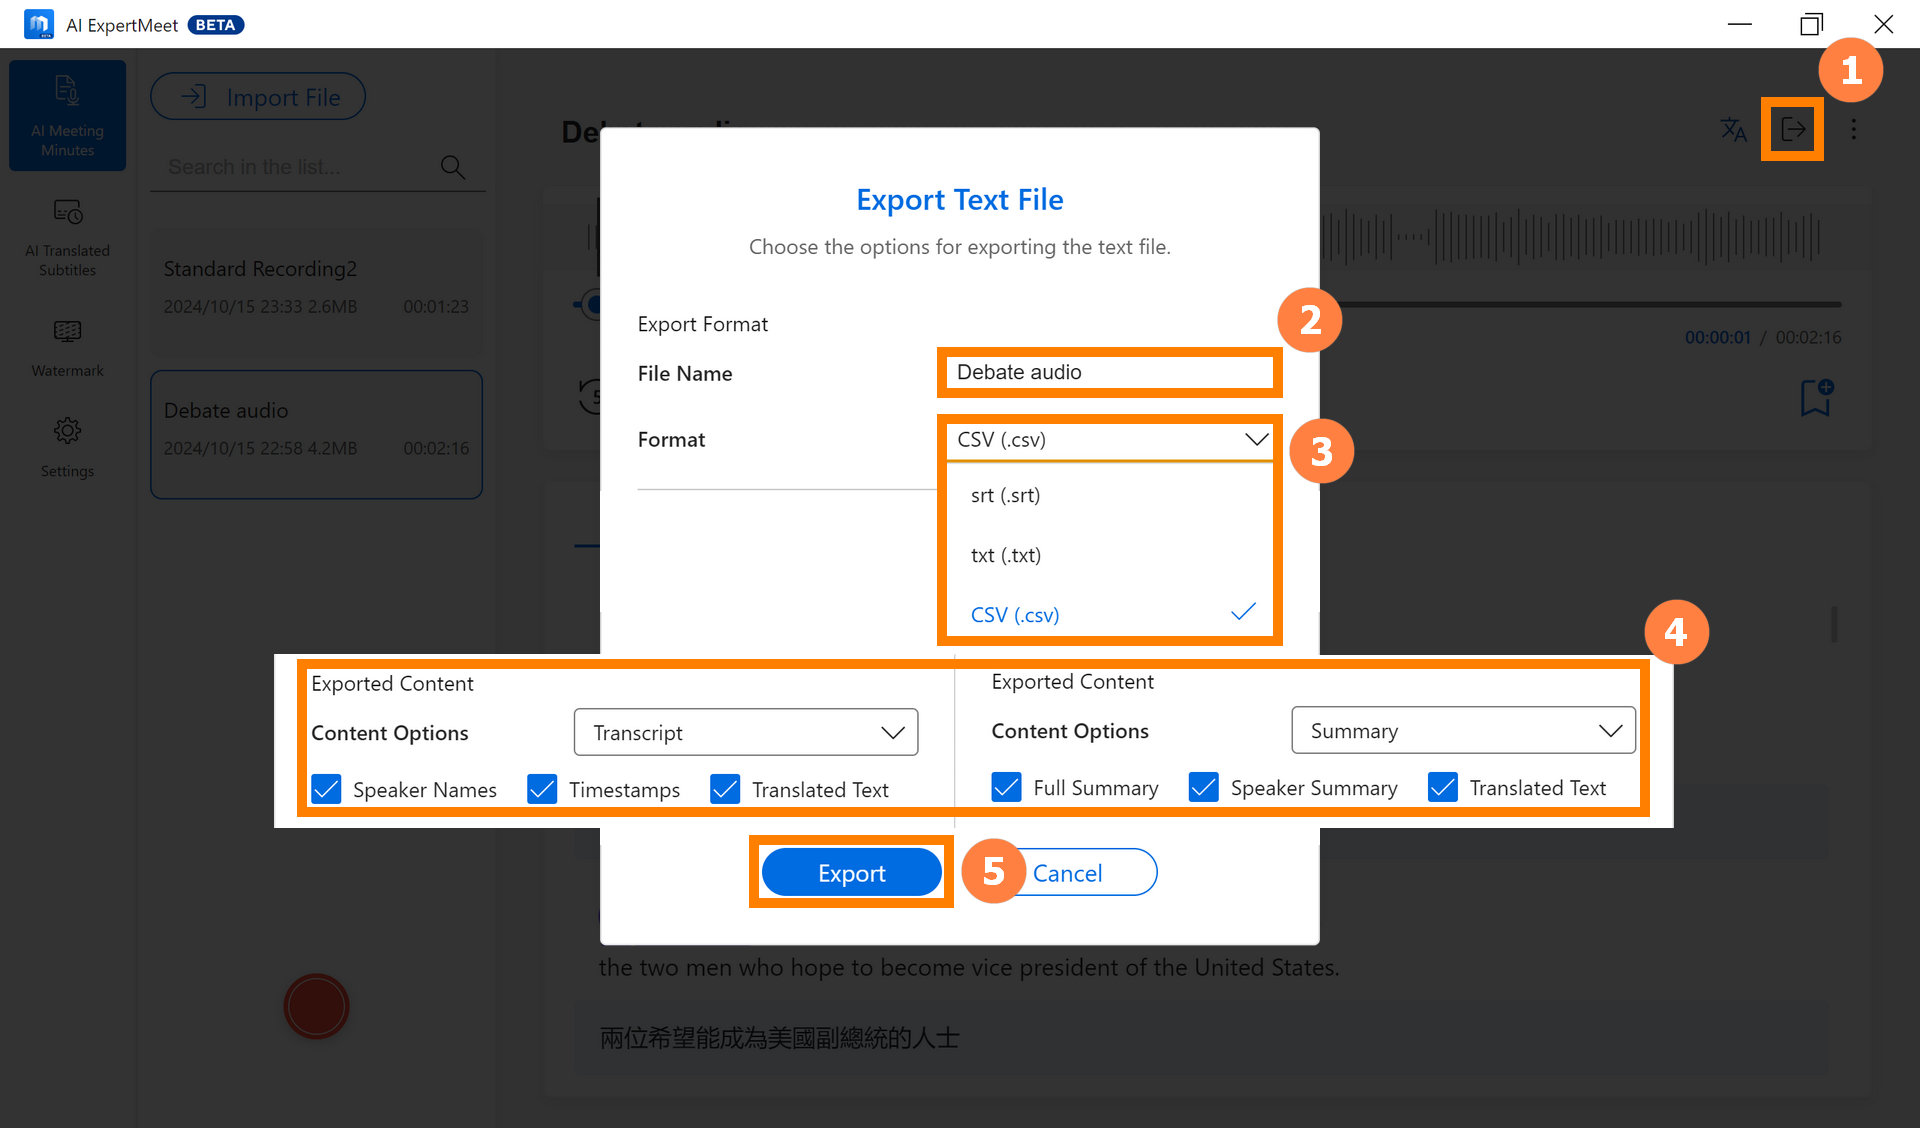
(2) Enter the ⑥[File Name], click ⑦[Save] to save. You can directly view the saved ⑧[file], or import the file into video editing software to generate subtitles.
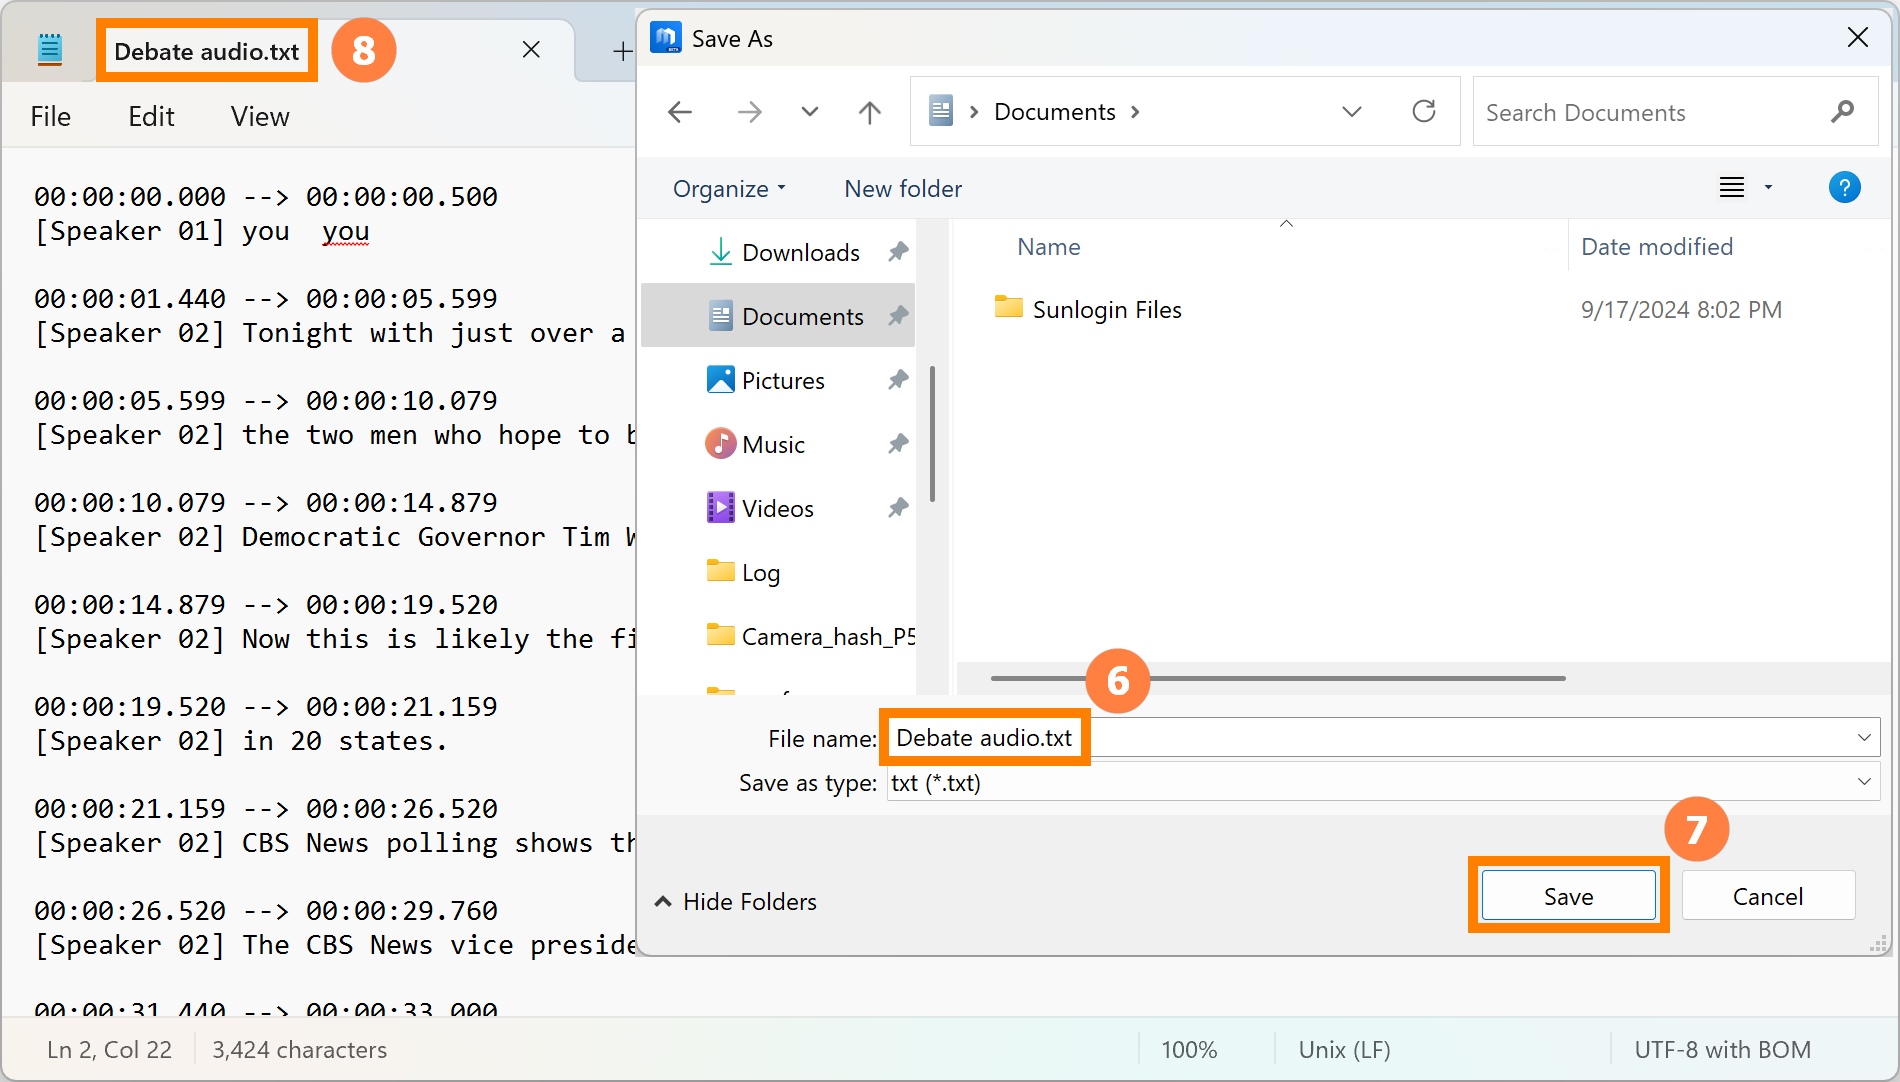
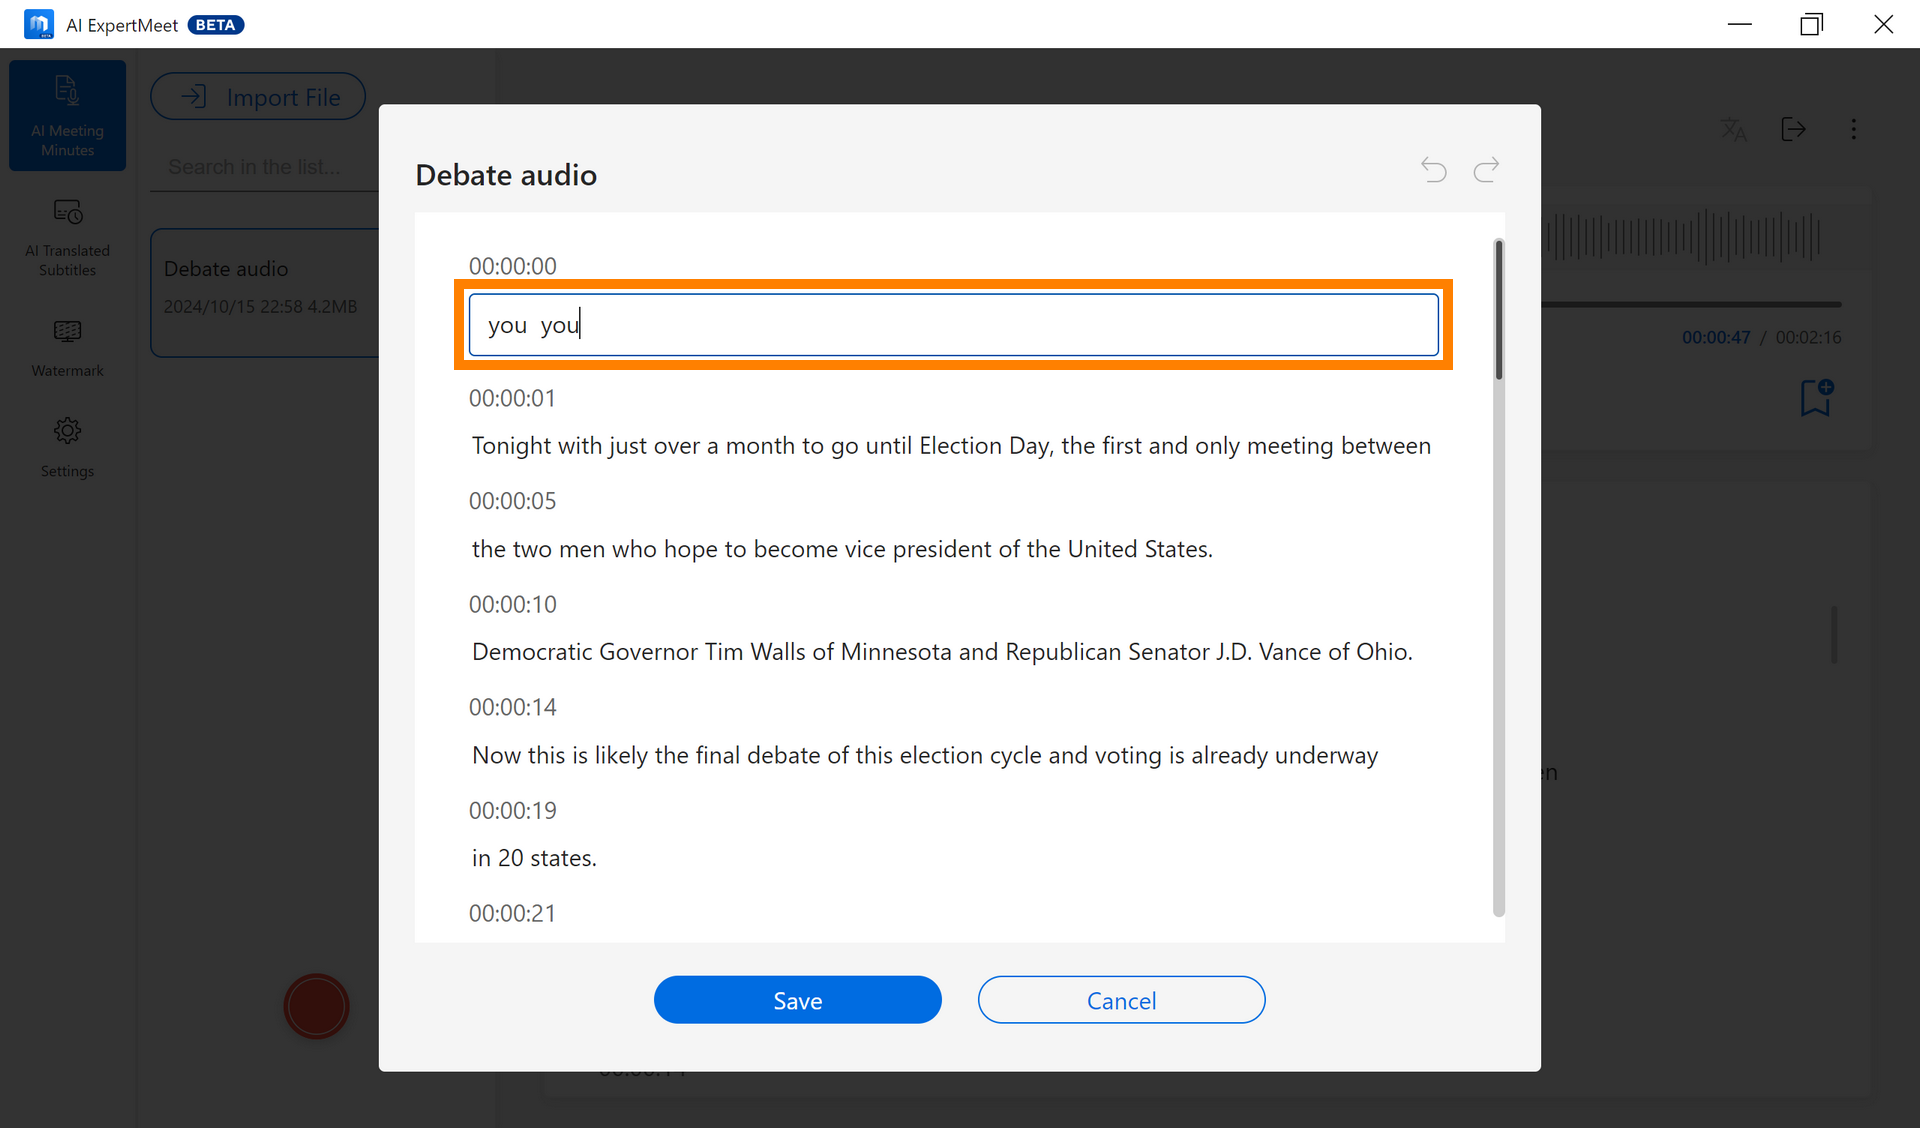
(1) Click ①[More], then click ②[Edit the Transcript].
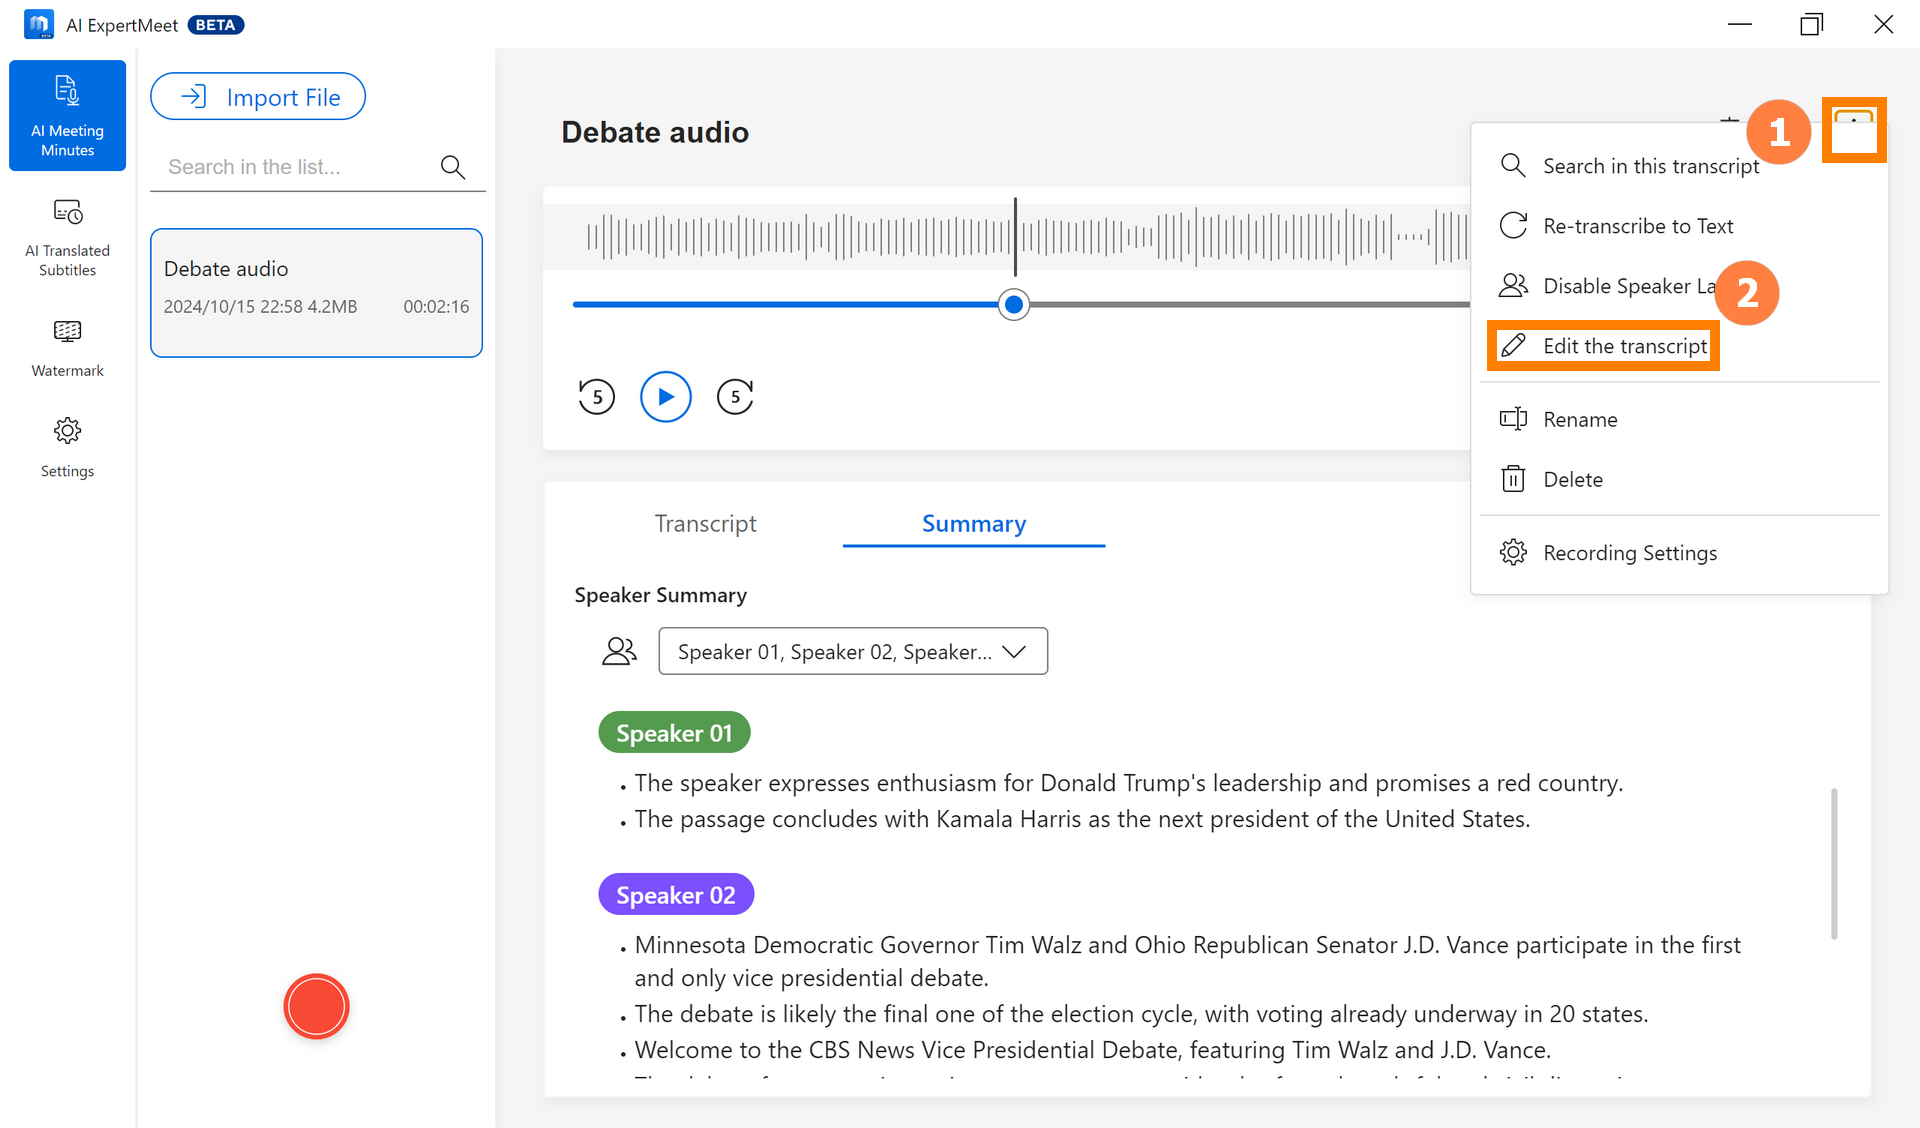
(2) You can directly modify the recognized content on this page without exporting it first.
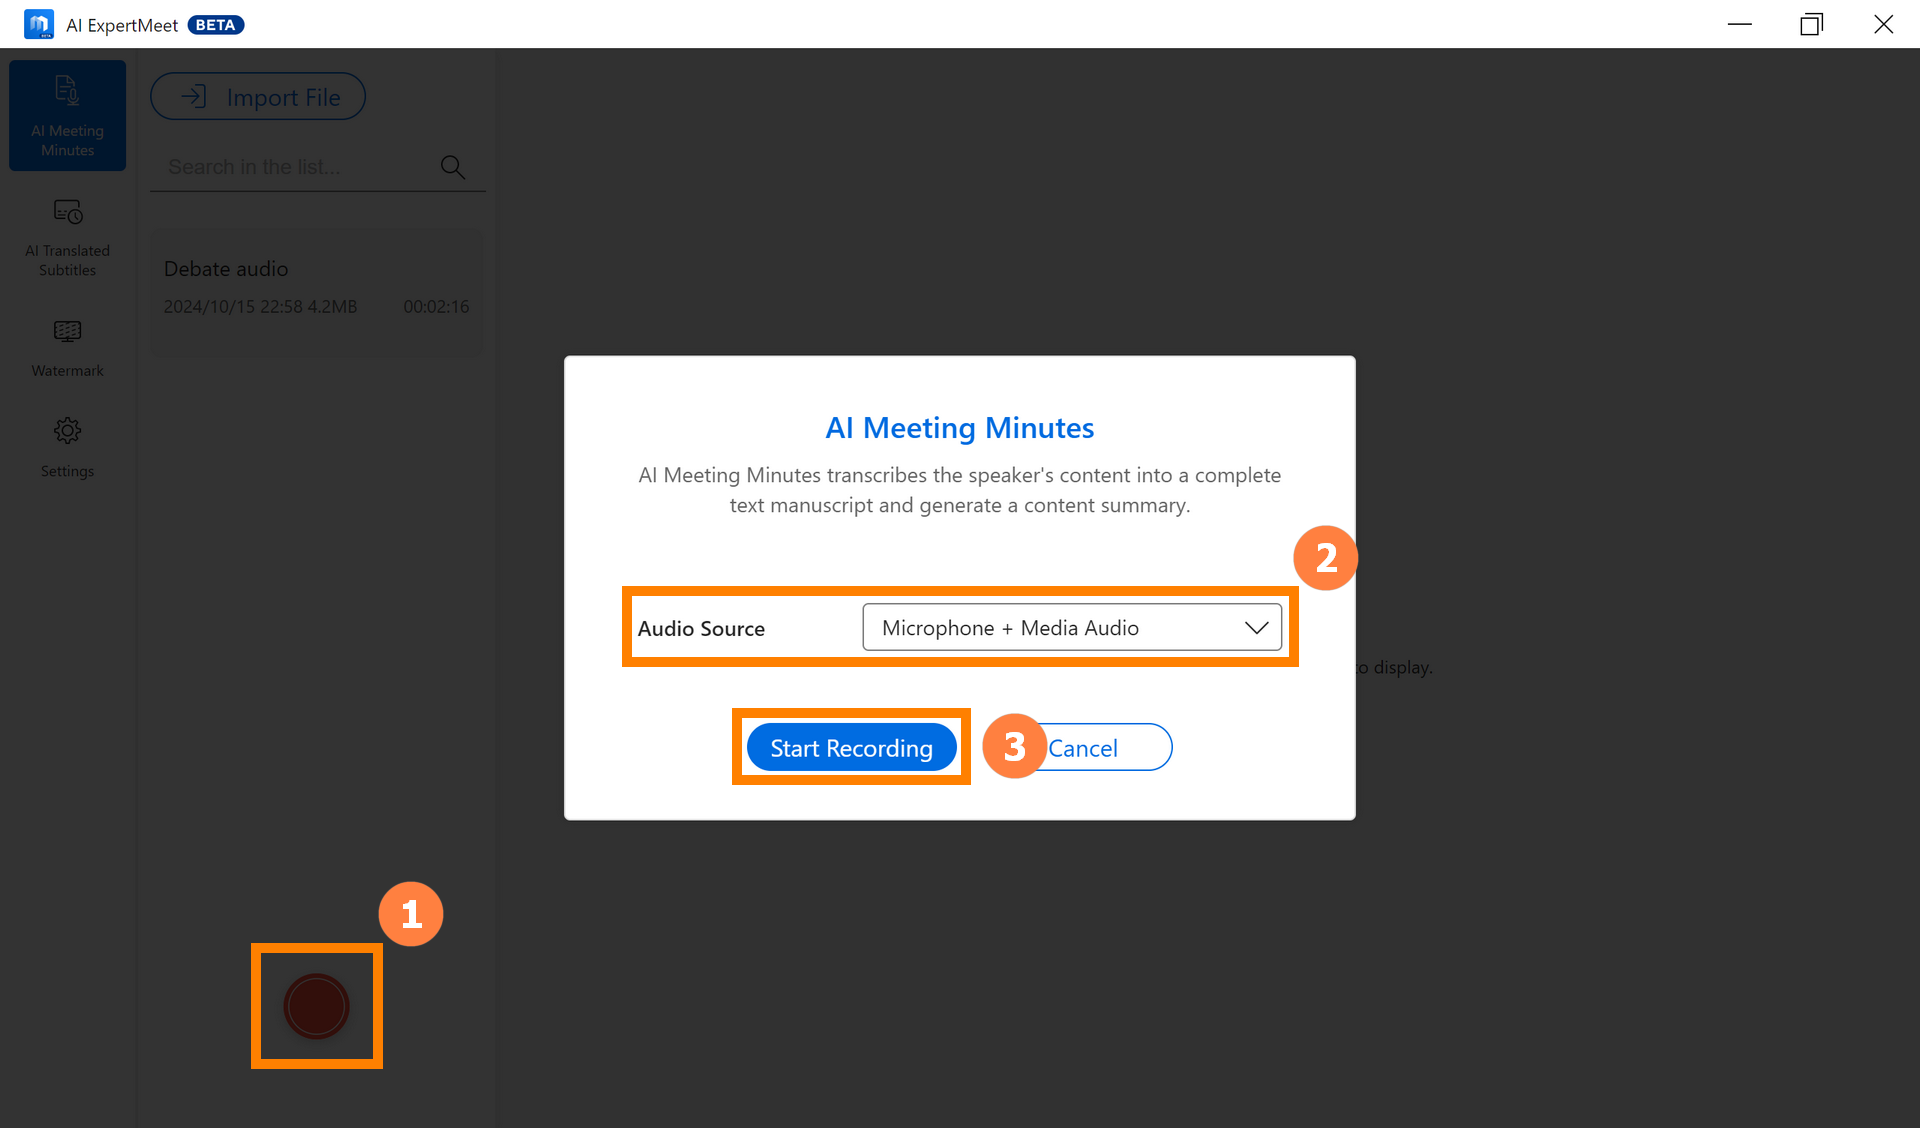
※ Recording supports recording Microphone alone, recording Media Audio alone, and recording Microphone and Media Audio simultaneously.
(1) Click ①[Recording], select ②[Audio Source], and click ③[Start Recording].
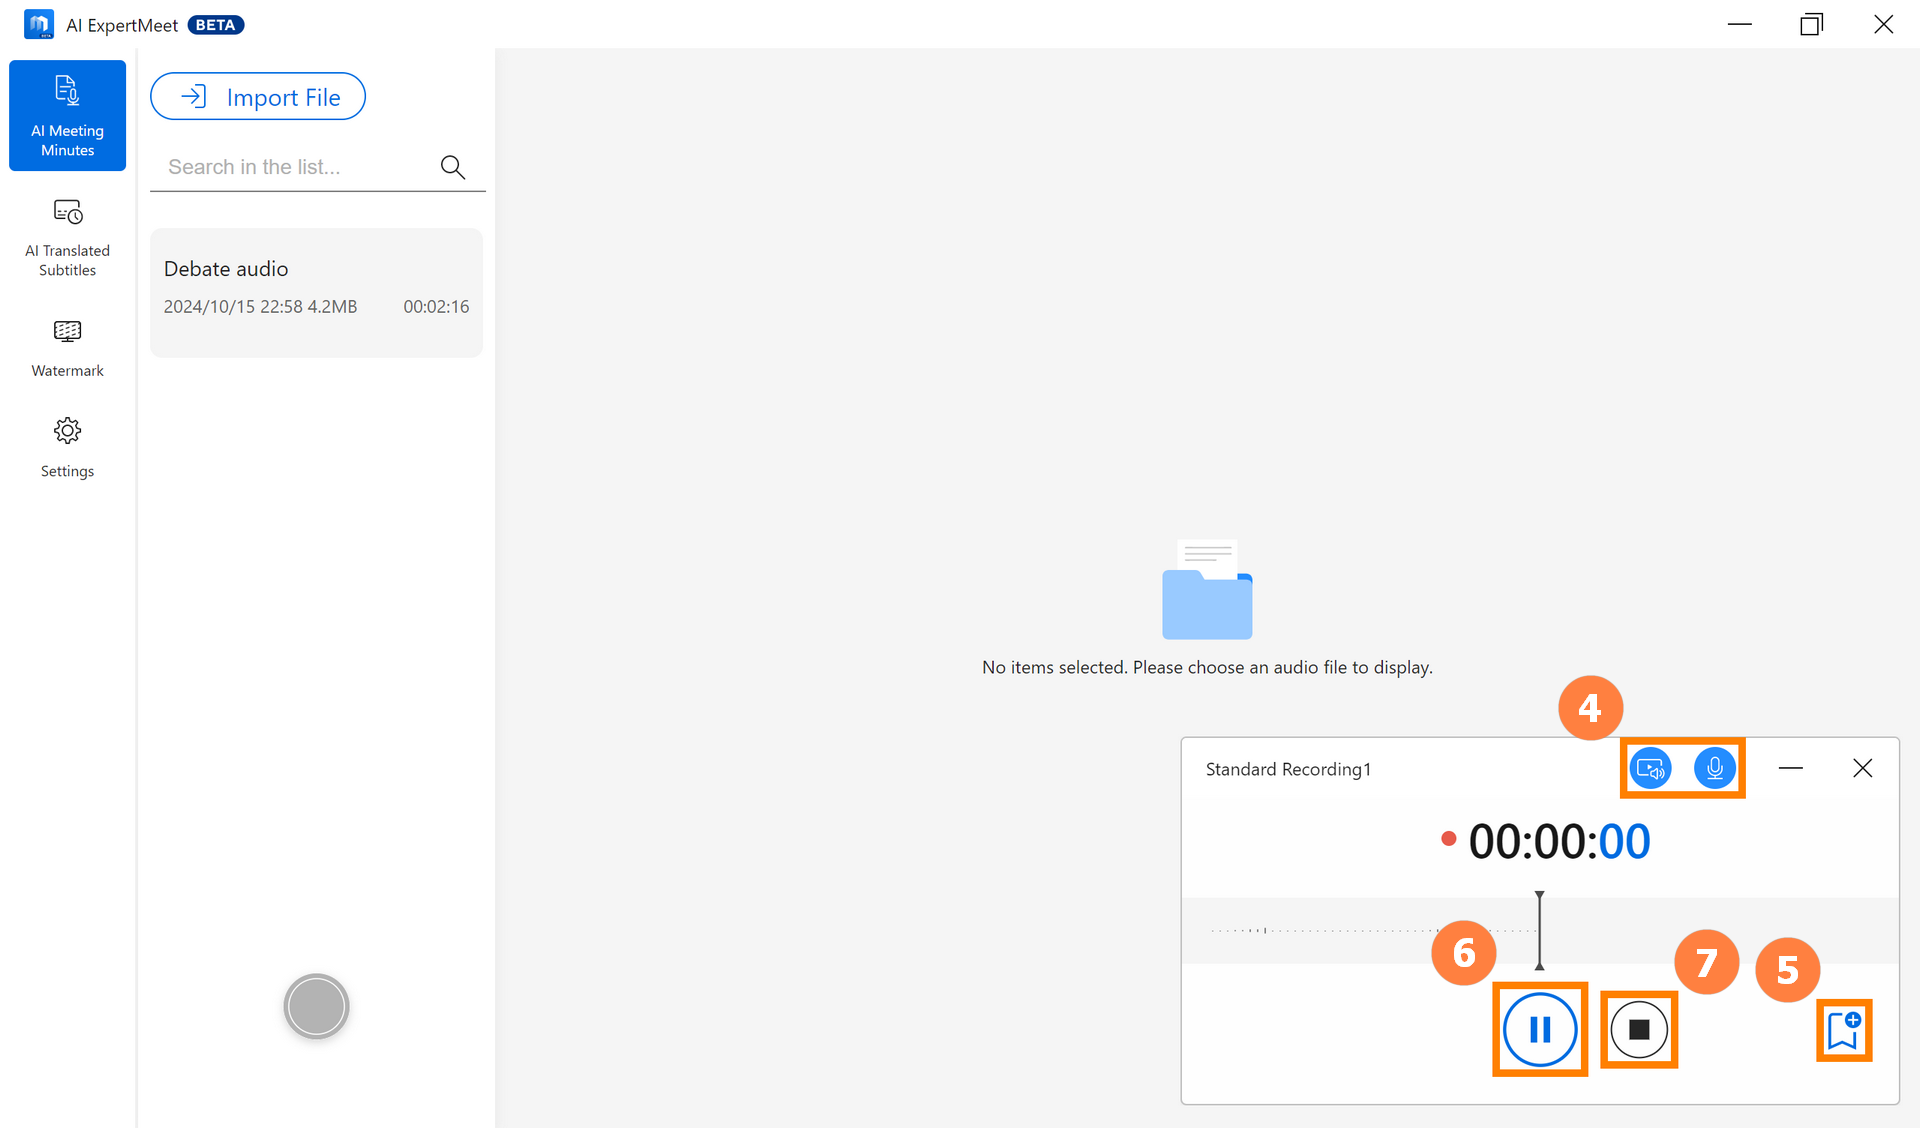
(2) During recording, you can toggle the ④[Audio Source] on or off at any time. The left side is system audio, and the right side is microphone audio. Click ⑤[Mark] to highlight important audio segments, click ⑥[Pause] to pause the current recording, and click ⑦[Stop] to save the current recording.
※ Recording supports turning off or on the recording source. For example, if you are in an online meeting with others and you turn off the Microphone button, Recording will not record your microphone sound, but others in the meeting can still hear your voice.
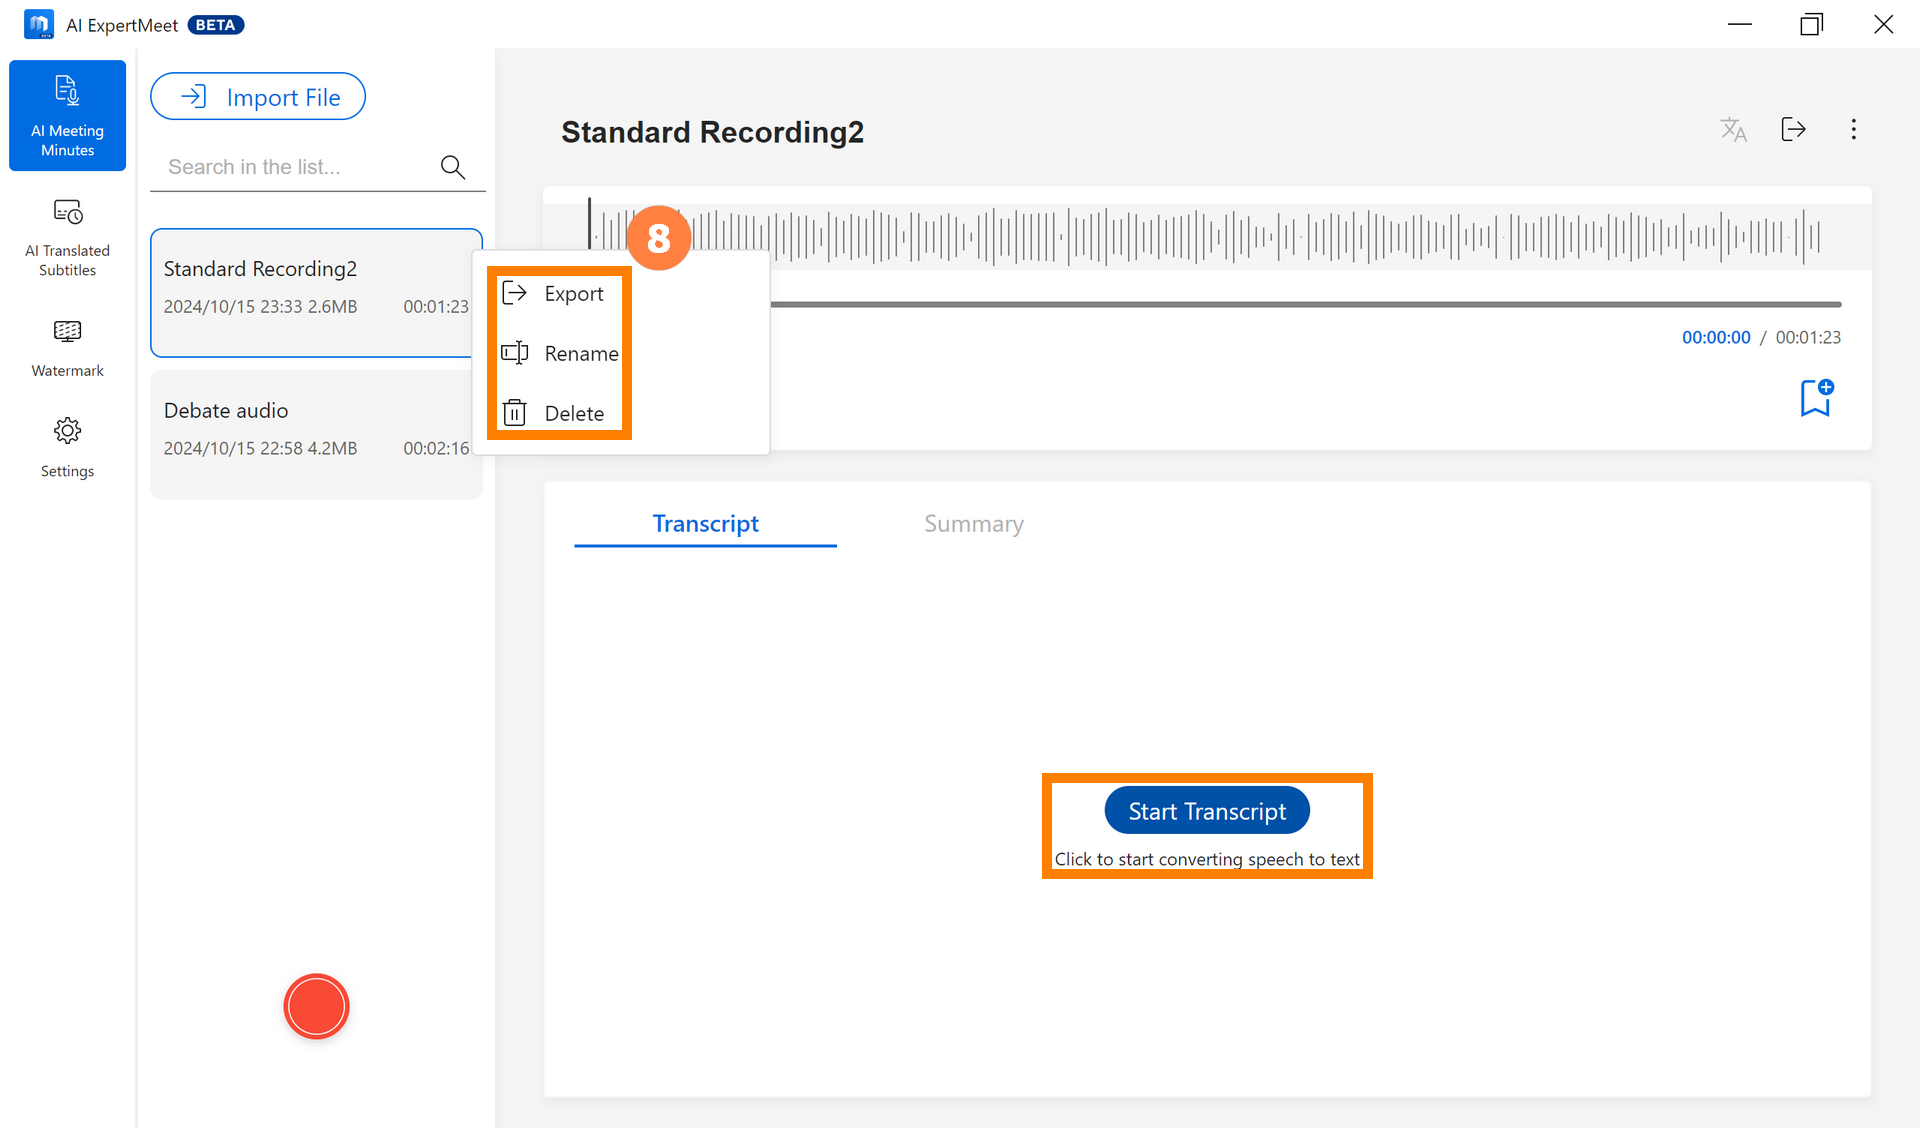
(3) Once the audio is recorded, right-click the audio to ⑧[Export, Rename, Delete] it. Click [Start Transcript] to convert the audio to text.
For detailed information on starting Transcript, please refer to 3.1 Media Recognition, and for an introduction to Transcript and Summary, please refer to 3.2 Transcript.
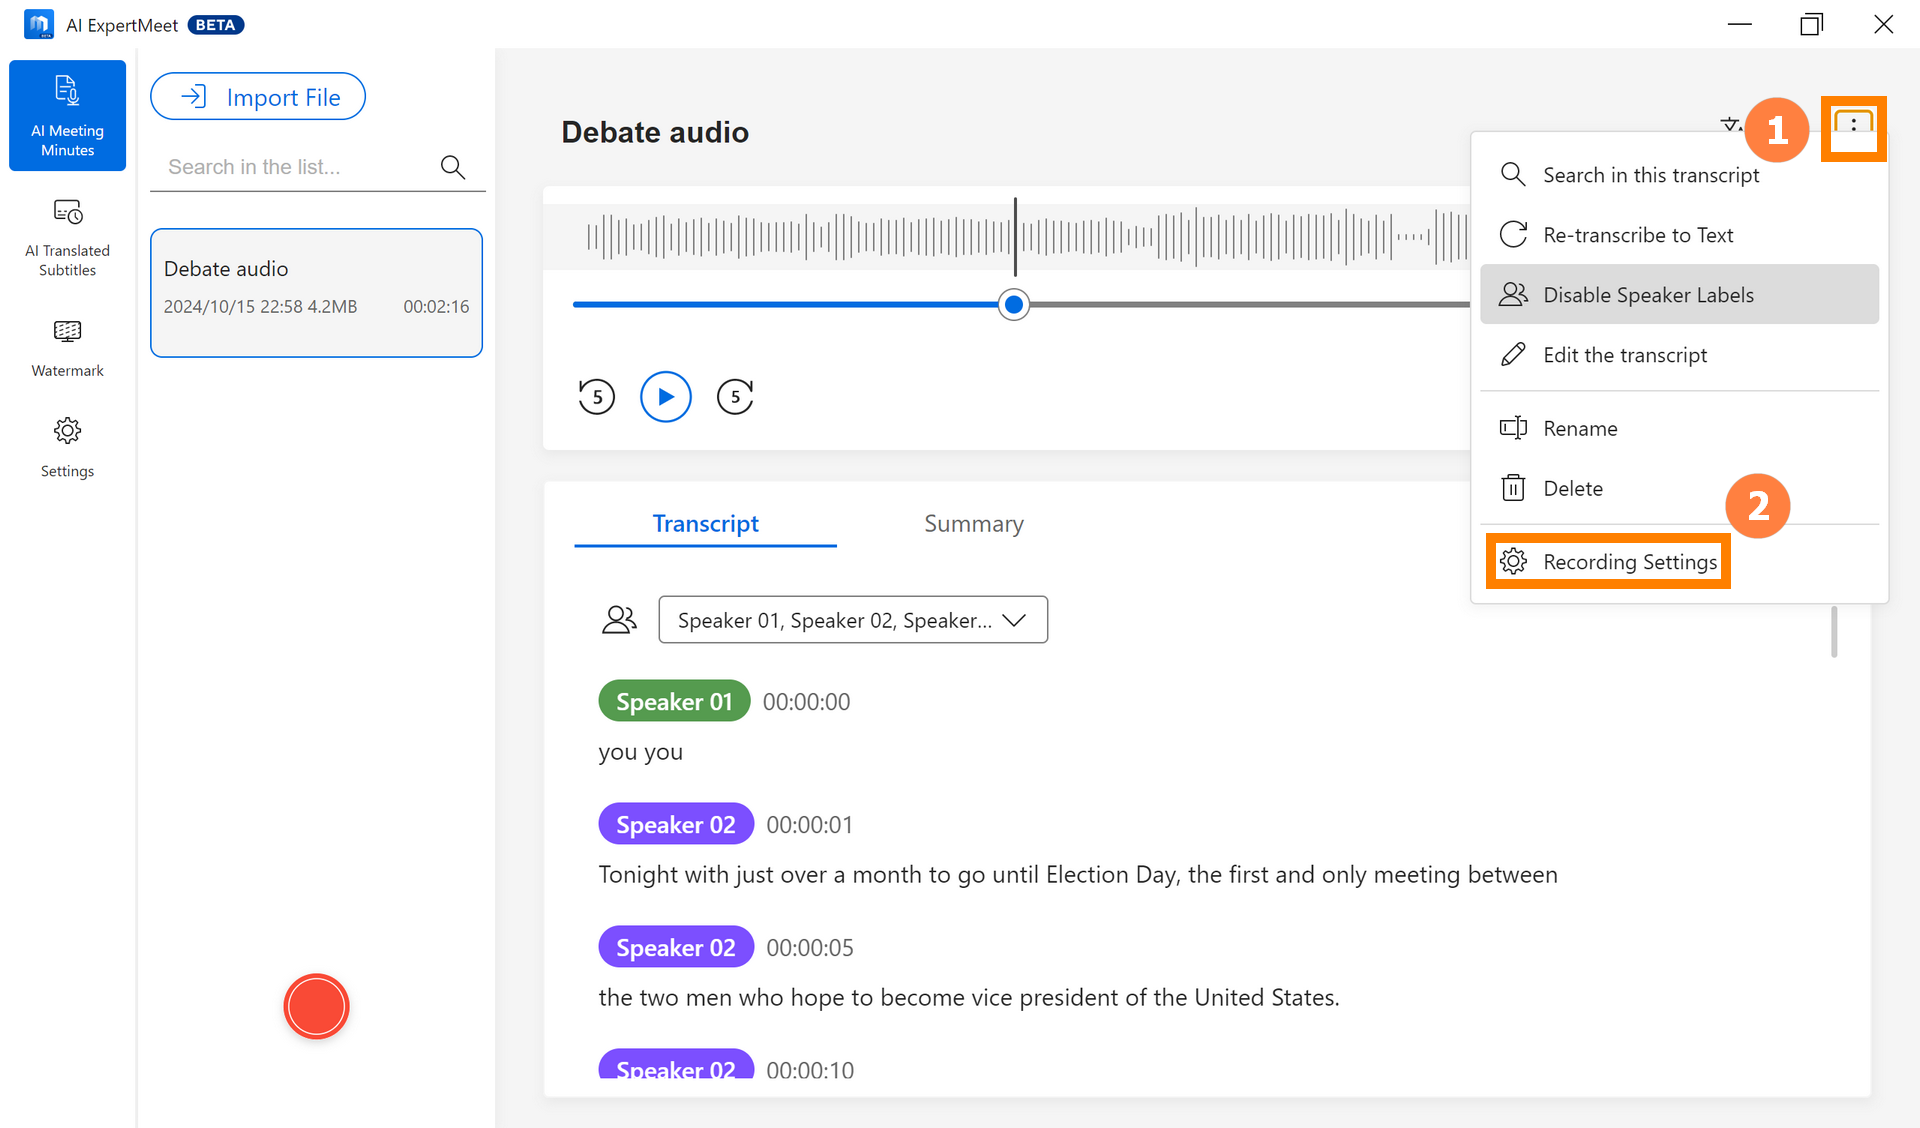
(1) Click ①[More], then click ②[Recording Settings].
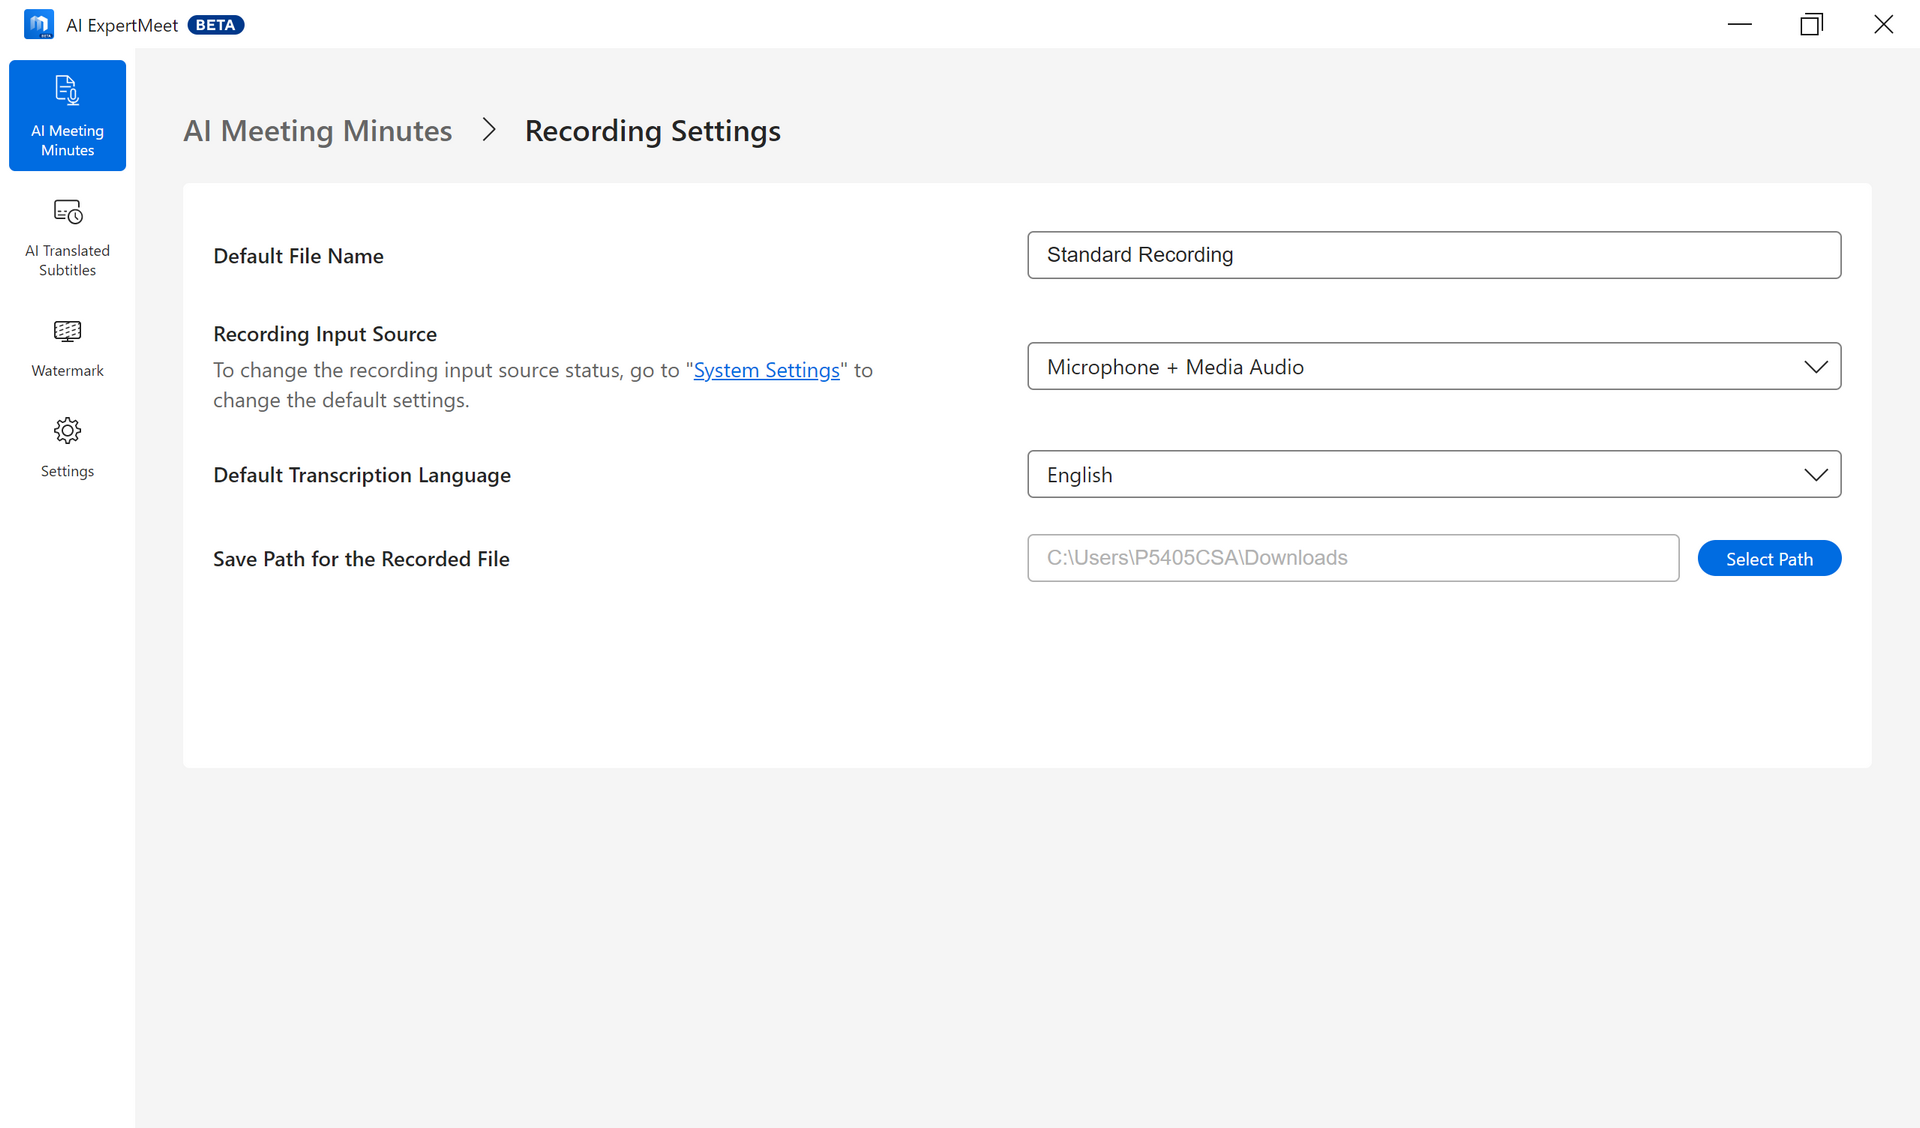
(2) You can modify the default settings for Recording here.
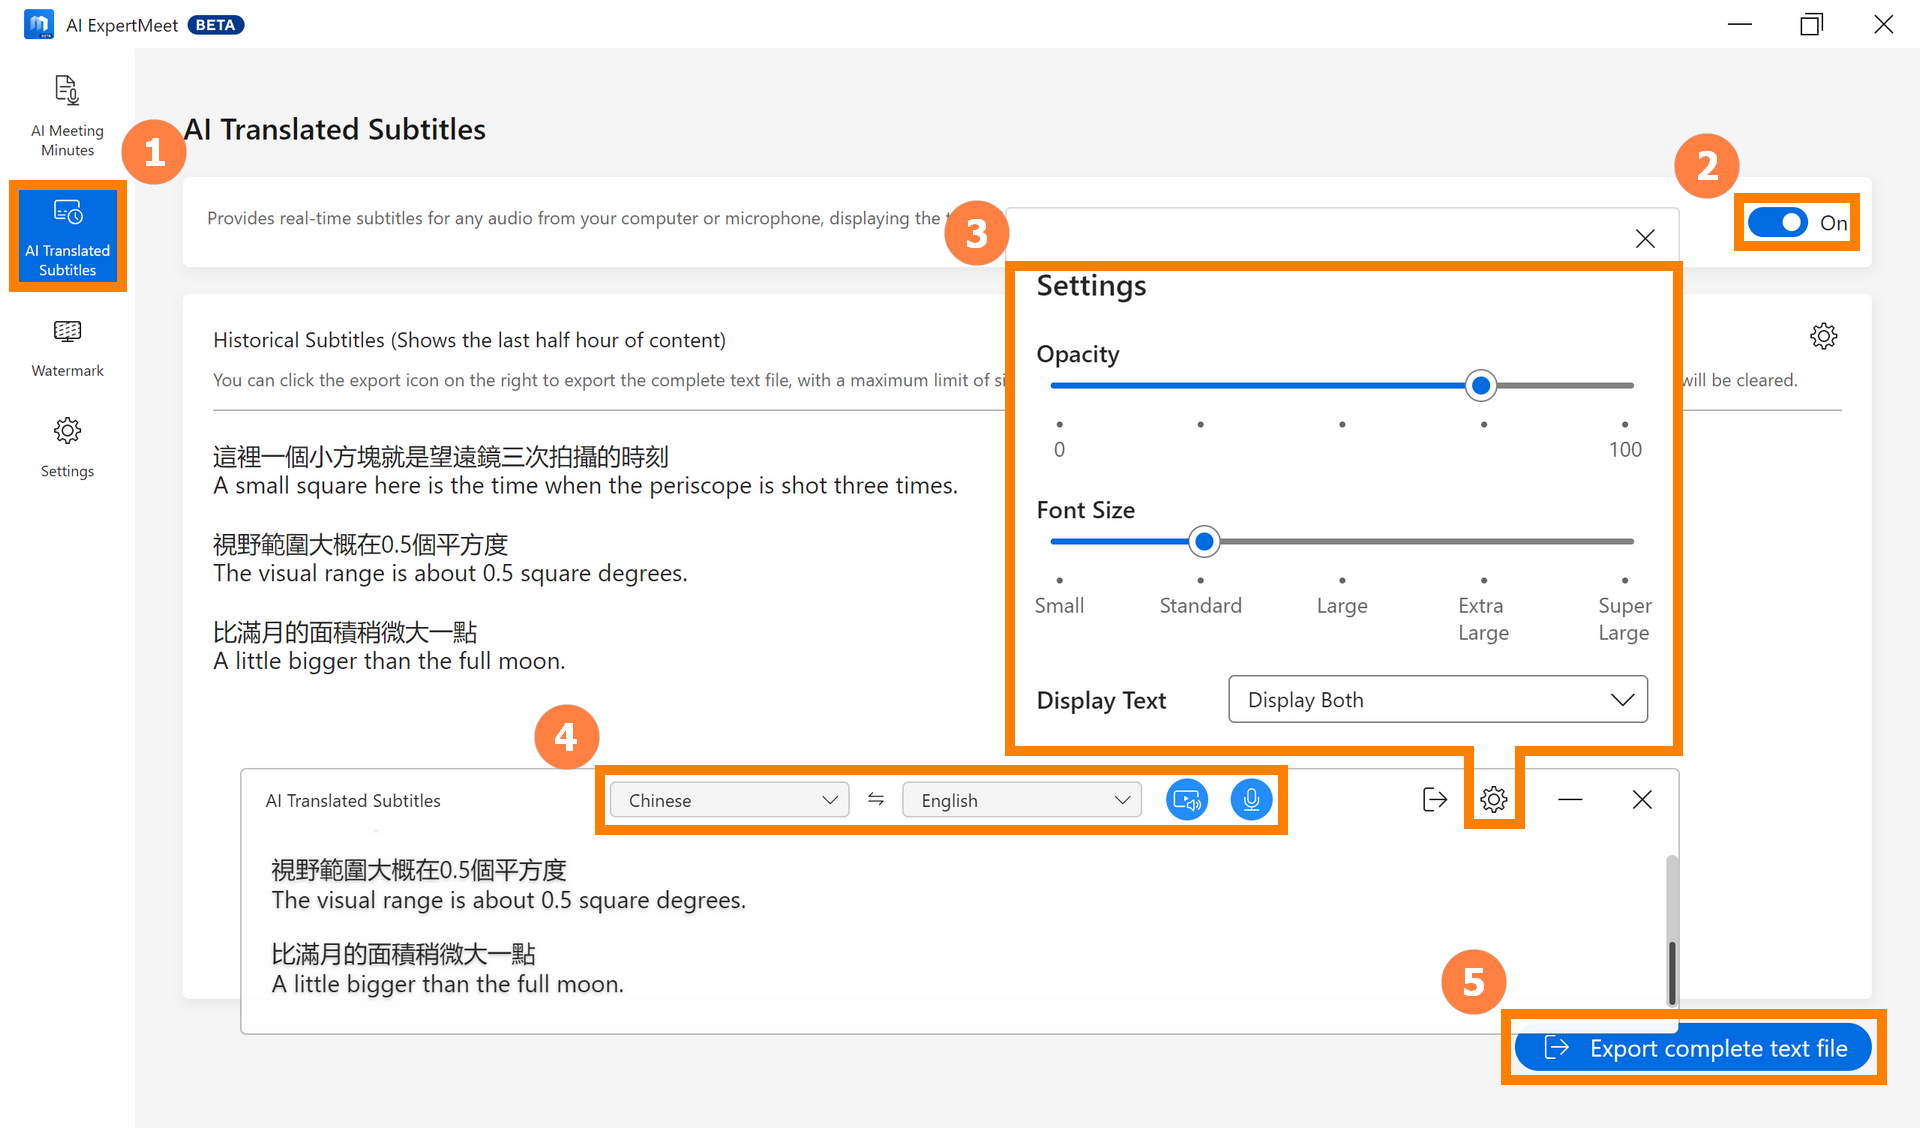
※ AI translation subtitles support real-time audio recognition. AI Translated Subtitles will recognize the system audio and microphone audio of the computer, then display it at the forefront of the computer desktop, and translate the real-time recognized content into the language you need.
Click ①[AI Translated Subtitles], select to enable the ②[AI Translated Subtitles] function, click ③[Settings] to personalize the transparency, font, and Display Text of the display board, click ④[More] to set the audio source and the language to be translated, and click ⑤[Export Complete Text File] to save the current recognized content.
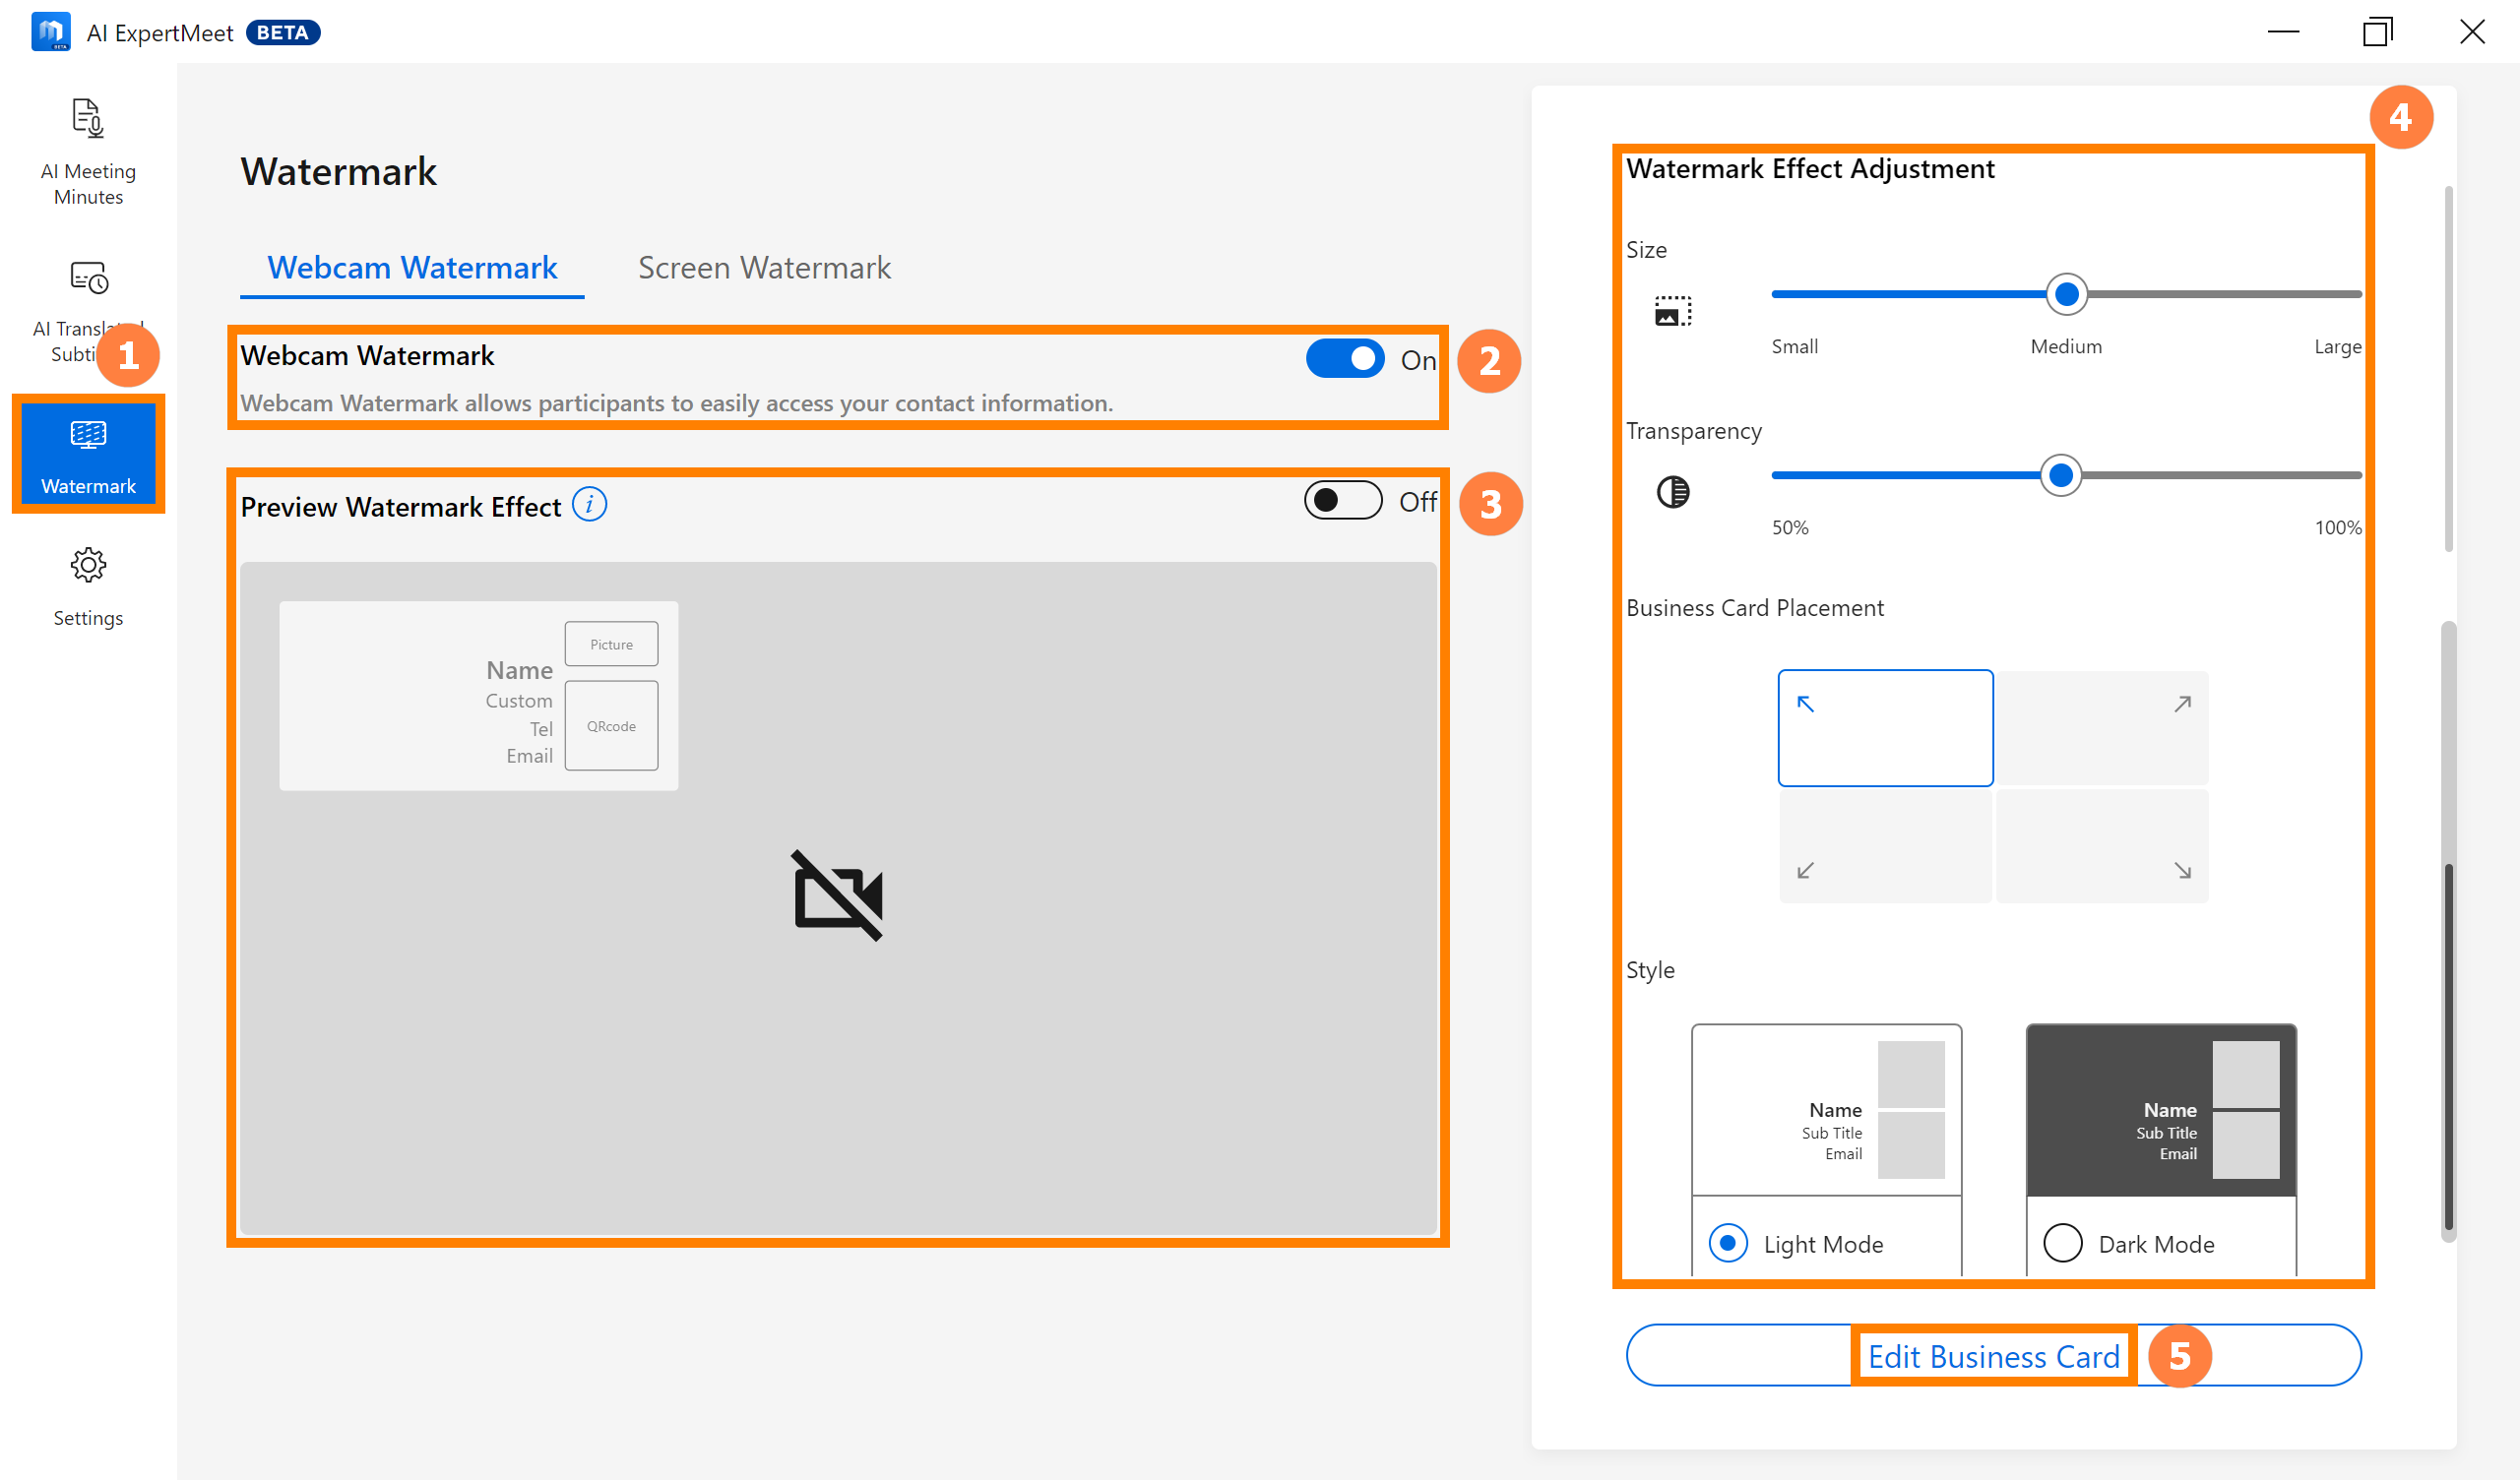
(1) Click ①[Watermark], select to enable the ②[Webcam Watermark] function, select to enable the ③[Preview Watermark Effect] function, and you can set the appearance of the watermark in ④[Watermark Effect Adjustment]. Click ⑤[Edit Business Card] to set the content of the watermark.
(2) In [Edit Business Card], you can preview the ①[Business Card] in real-time on the left side, and edit the ②[Business Card] on the right side. After entering the basic information, click [Generate QR Code] to generate a QR code corresponding to the basic information. Your clients can import your information into their contacts by scanning the QR code with their phone camera.
※ If you modify the basic information, please regenerate the QR code.
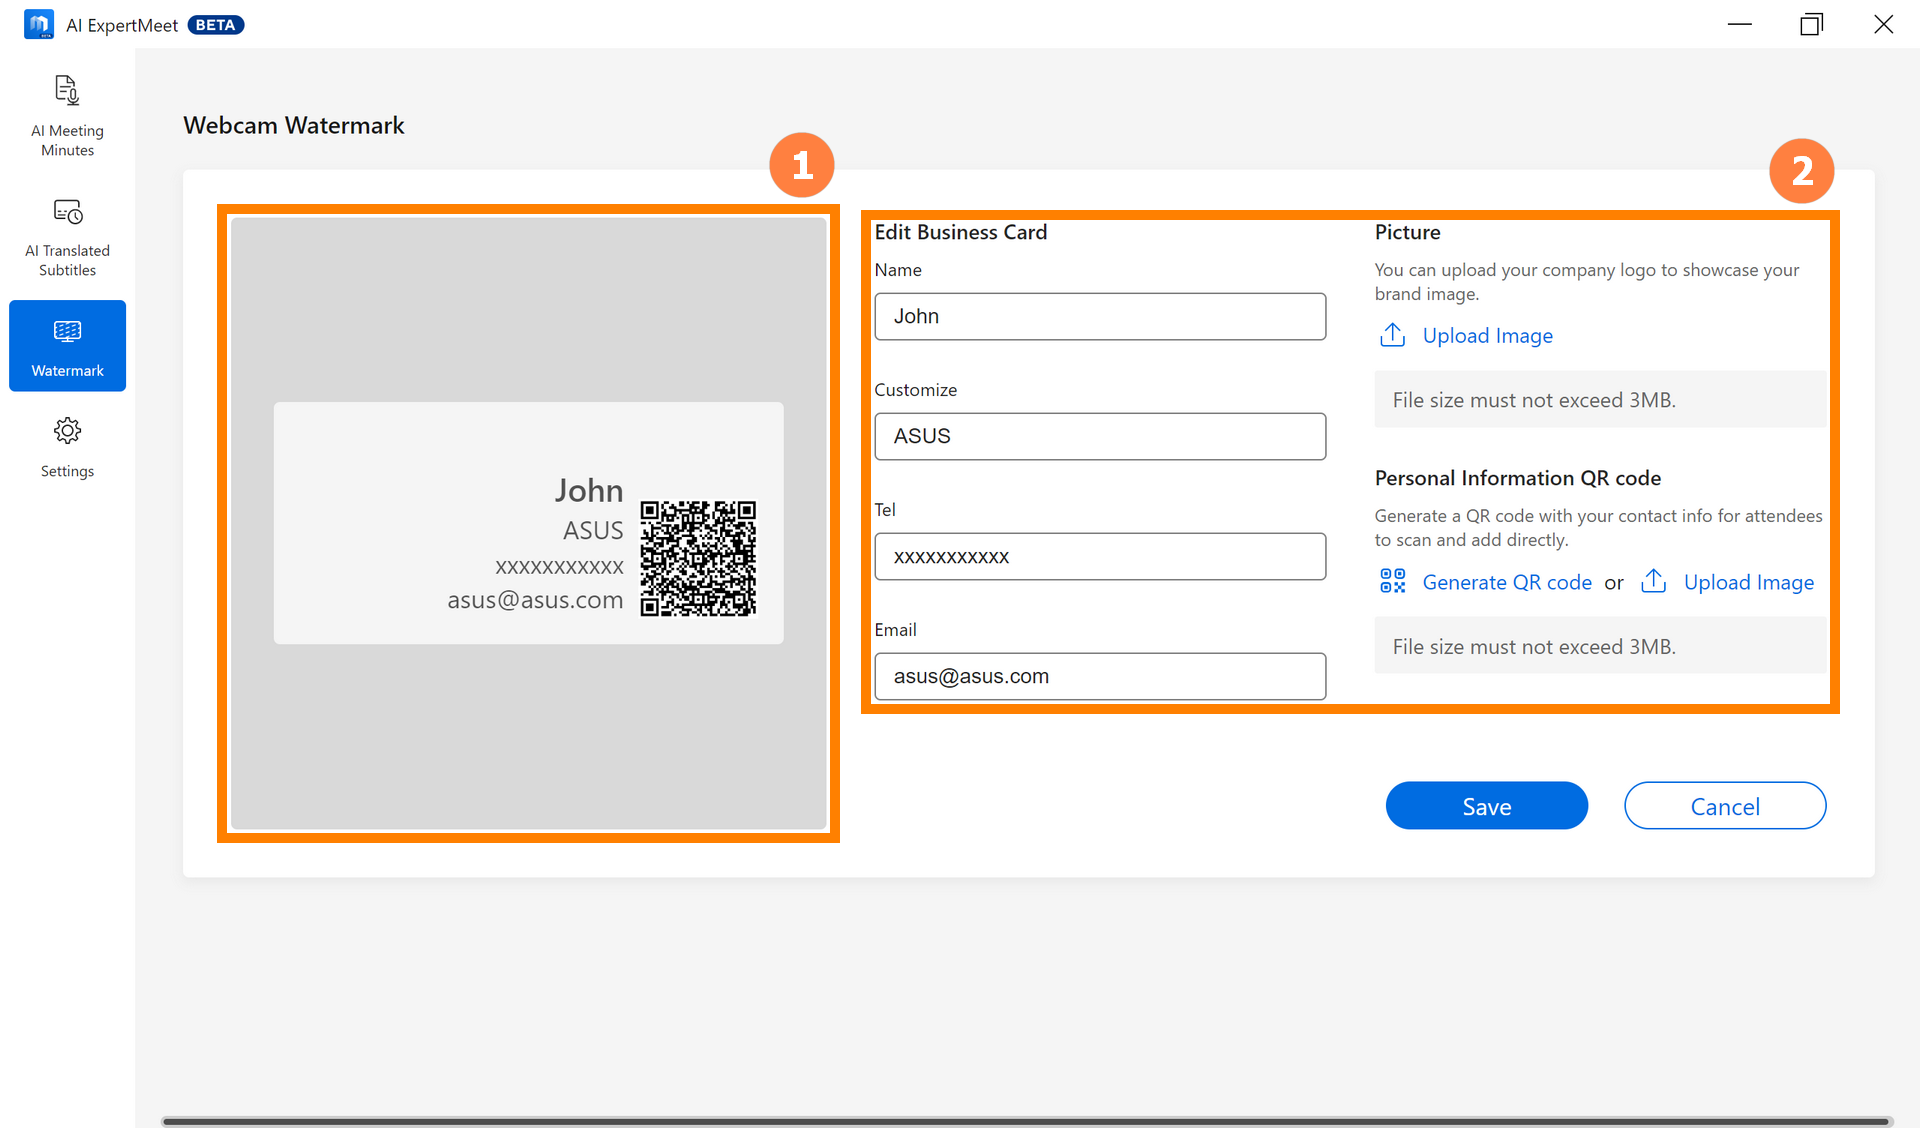
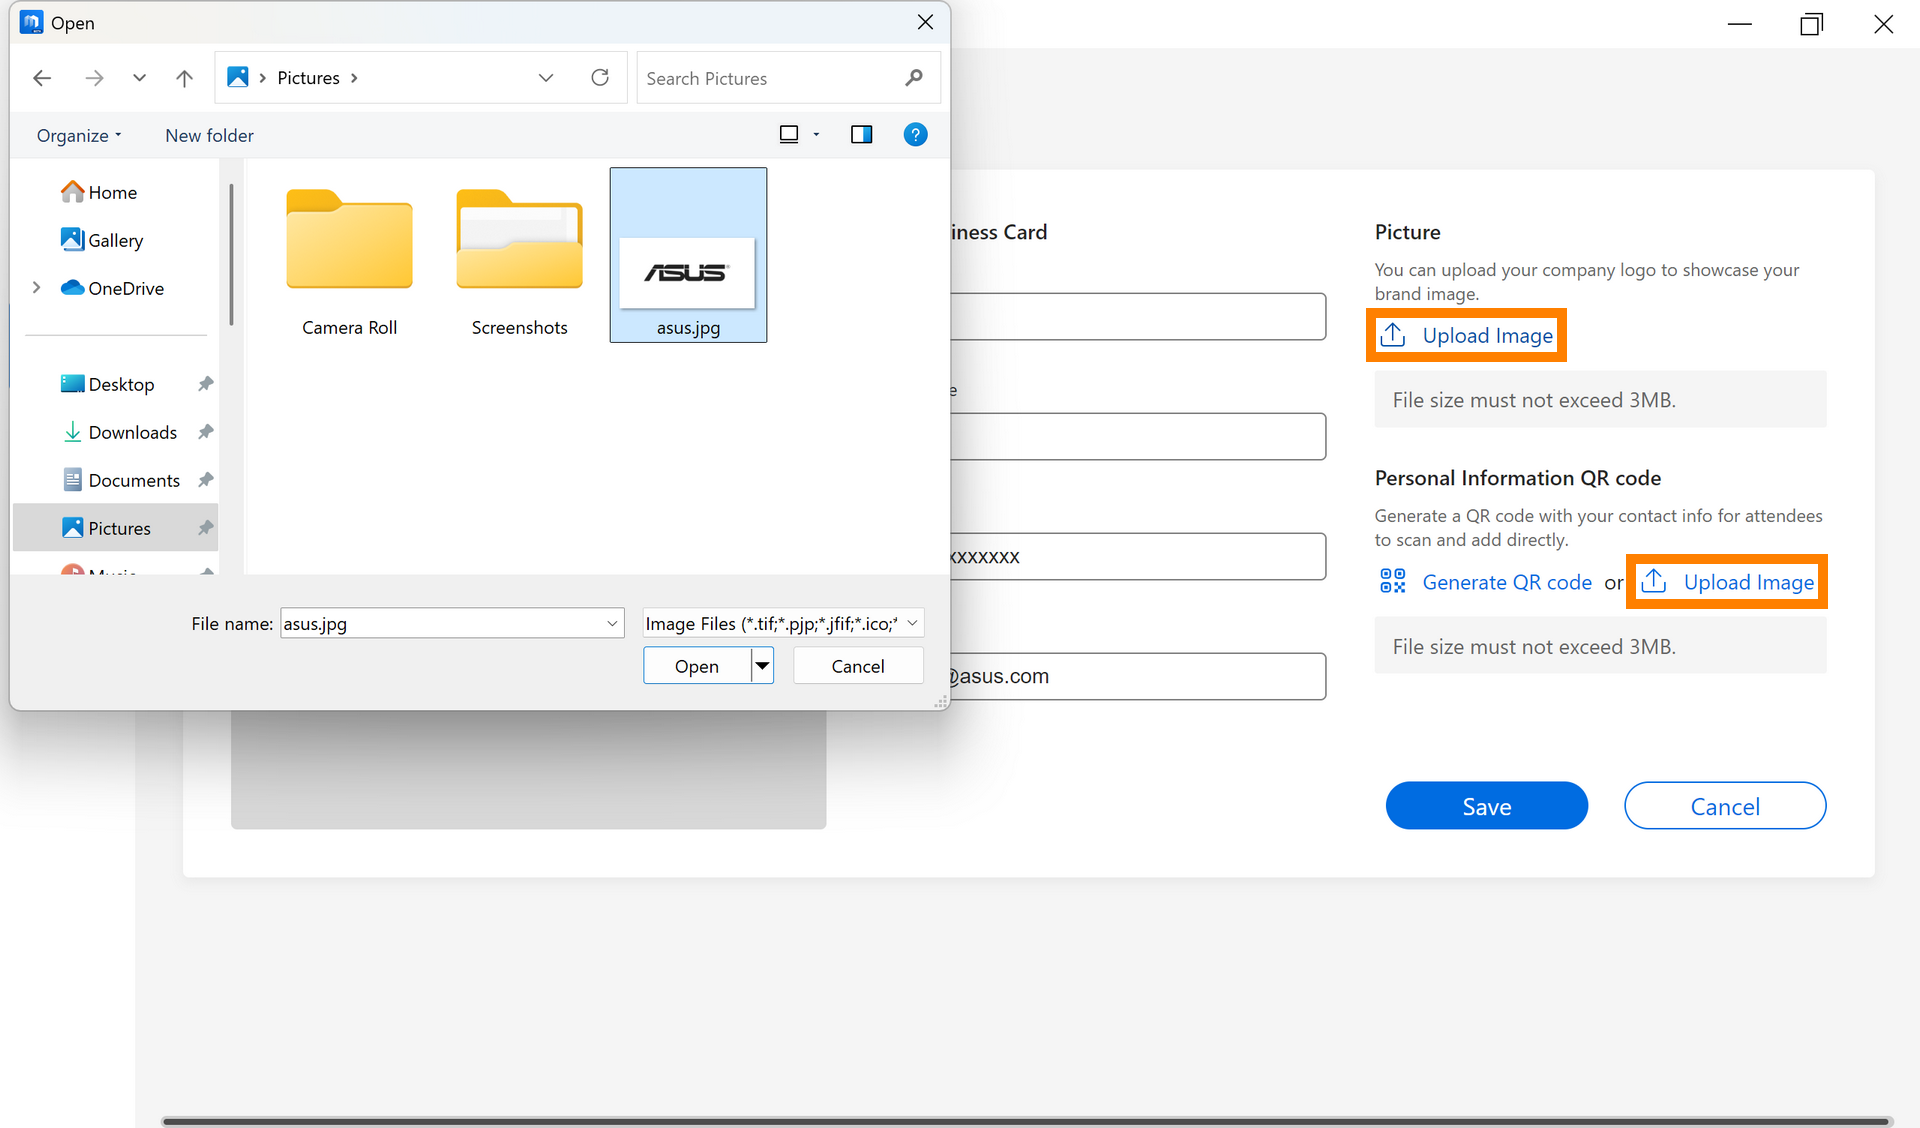
(3) If you have a QR code for contact information, such as a Line QR code, you can save it as an image, then click [Upload Image] to import your profile picture or QR code into the watermark.
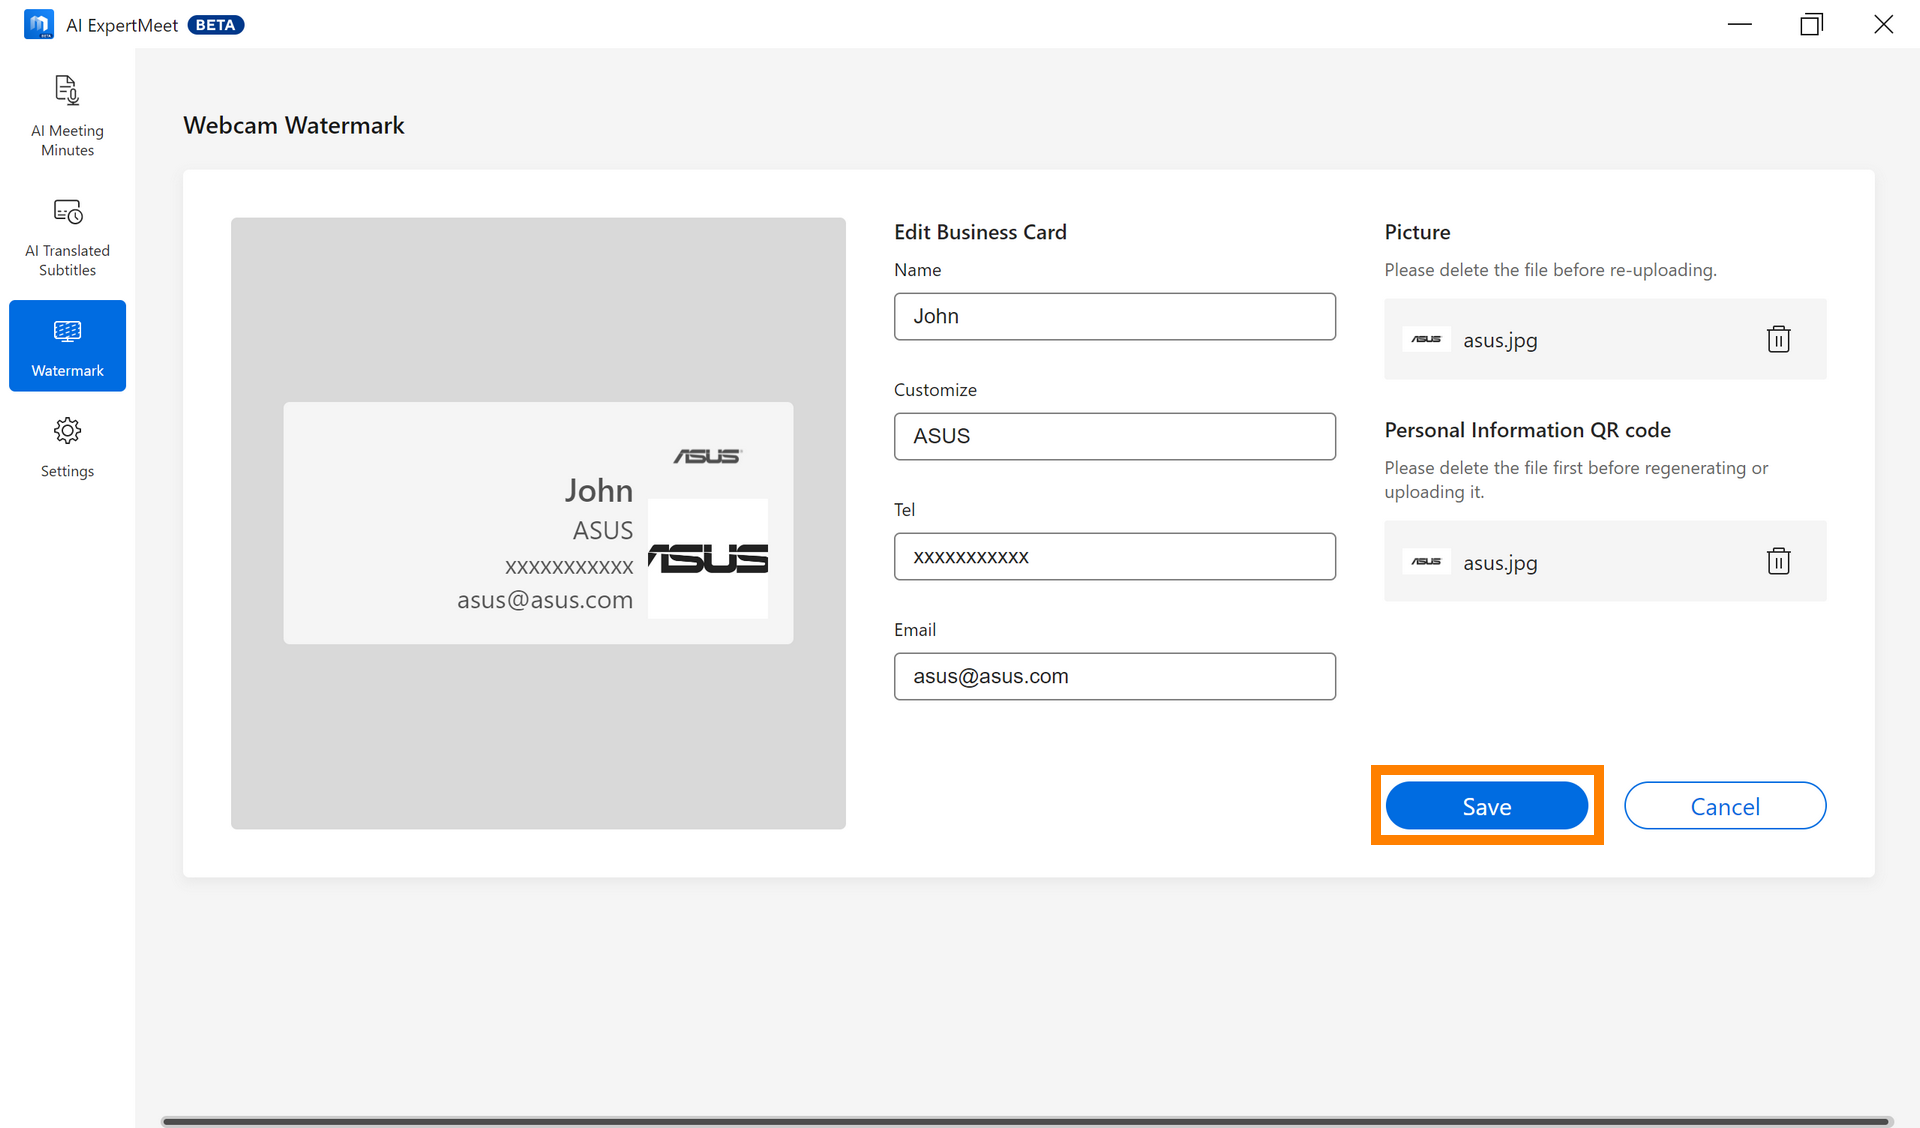
(4) After editing the [Business Card], click [Save] to save the current operation.
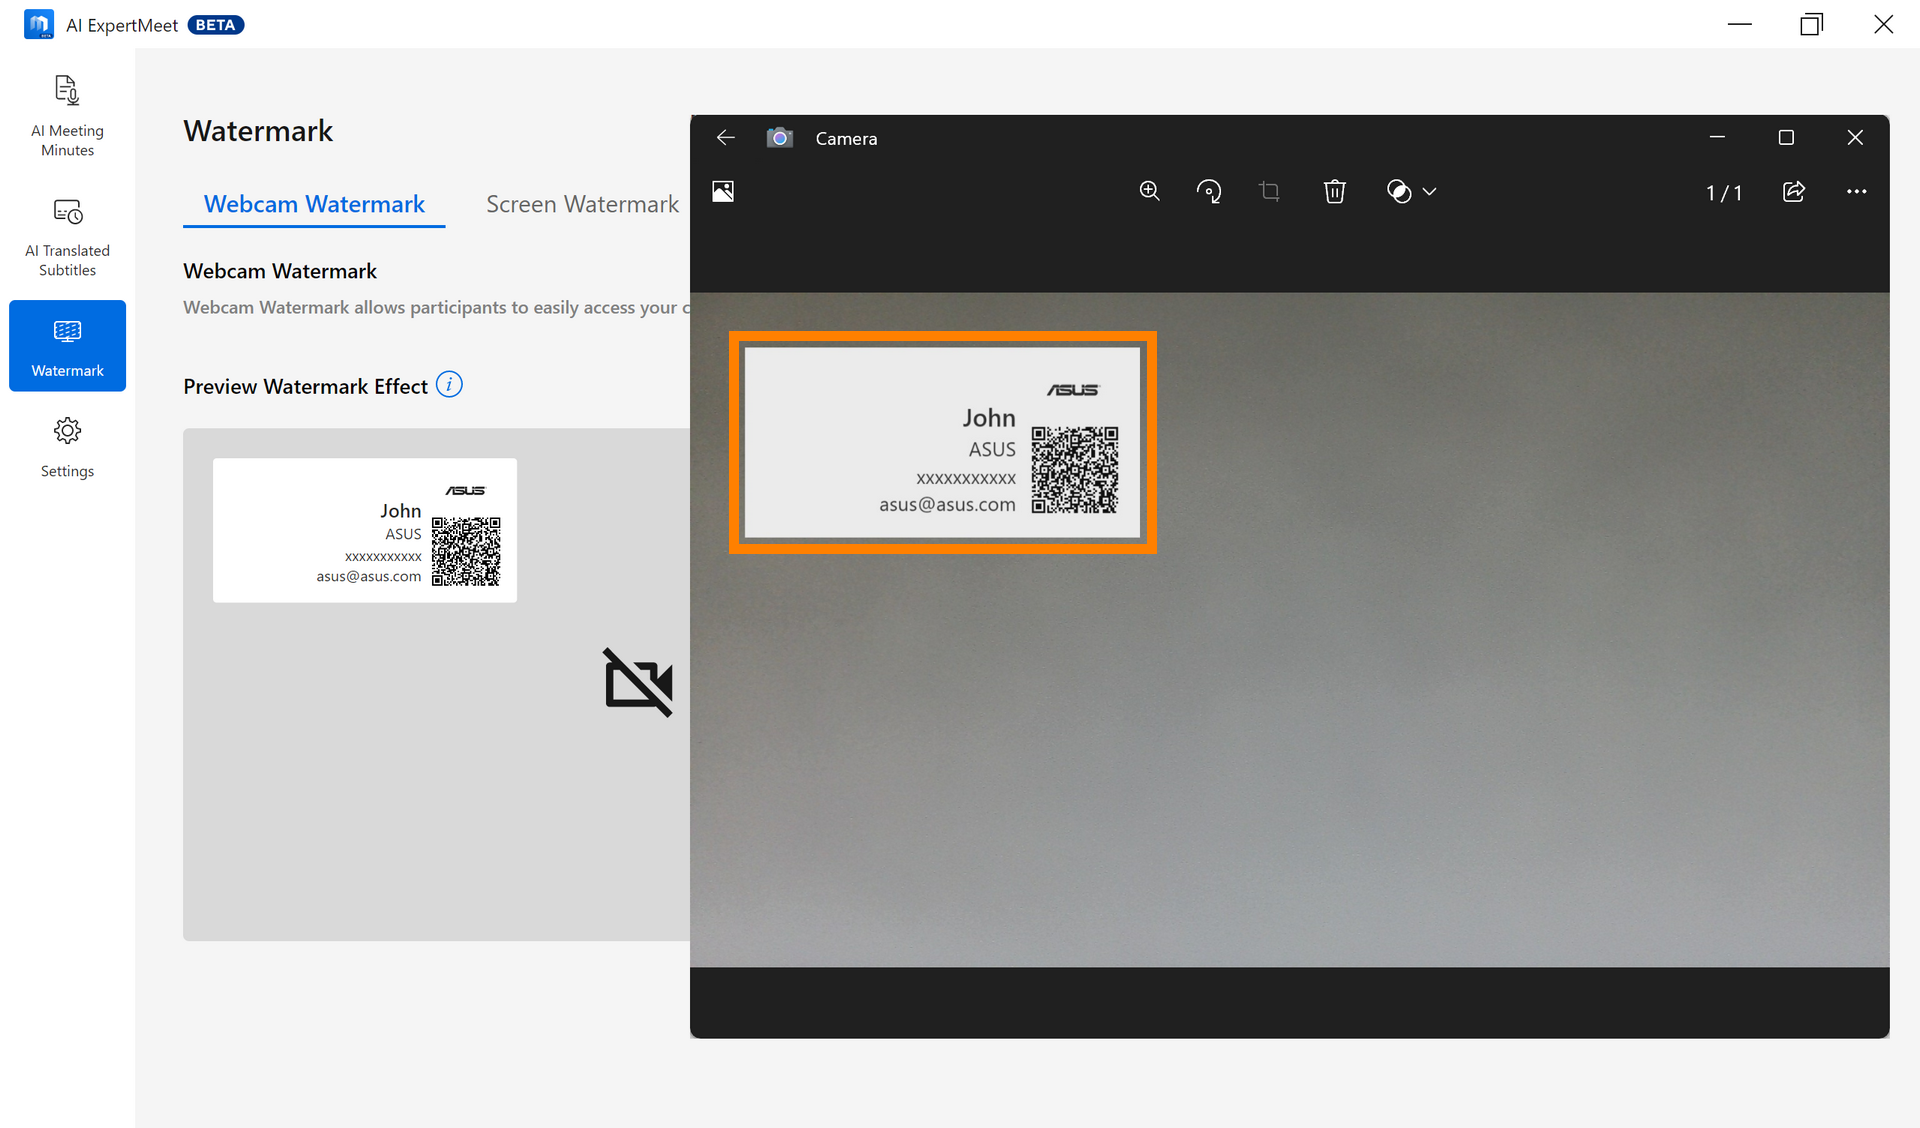
(5) Whether you are taking pictures with a computer camera or participating in a meeting with a camera, the [Business Card] will always be displayed.
※ After enabling Screen Watermark, whether taking screenshots or using a camera to capture the computer screen, there will be a watermark.
※ When enabling Screen Watermark and sharing 「window」 content (such as using Microsoft Teams meeting tools), the watermark may not display under the following circumstances:
- Windows from UWP applications.
- Certain windows running in administrator mode.
- When the DPI (dots per inch) setting of the target window is inconsistent with that of the watermark itself.
- When using Chromium-based browsers (such as Edge, Chrome) for meeting presentations, and the presentation target is a window or tab of the same browser, the watermark will not appear.
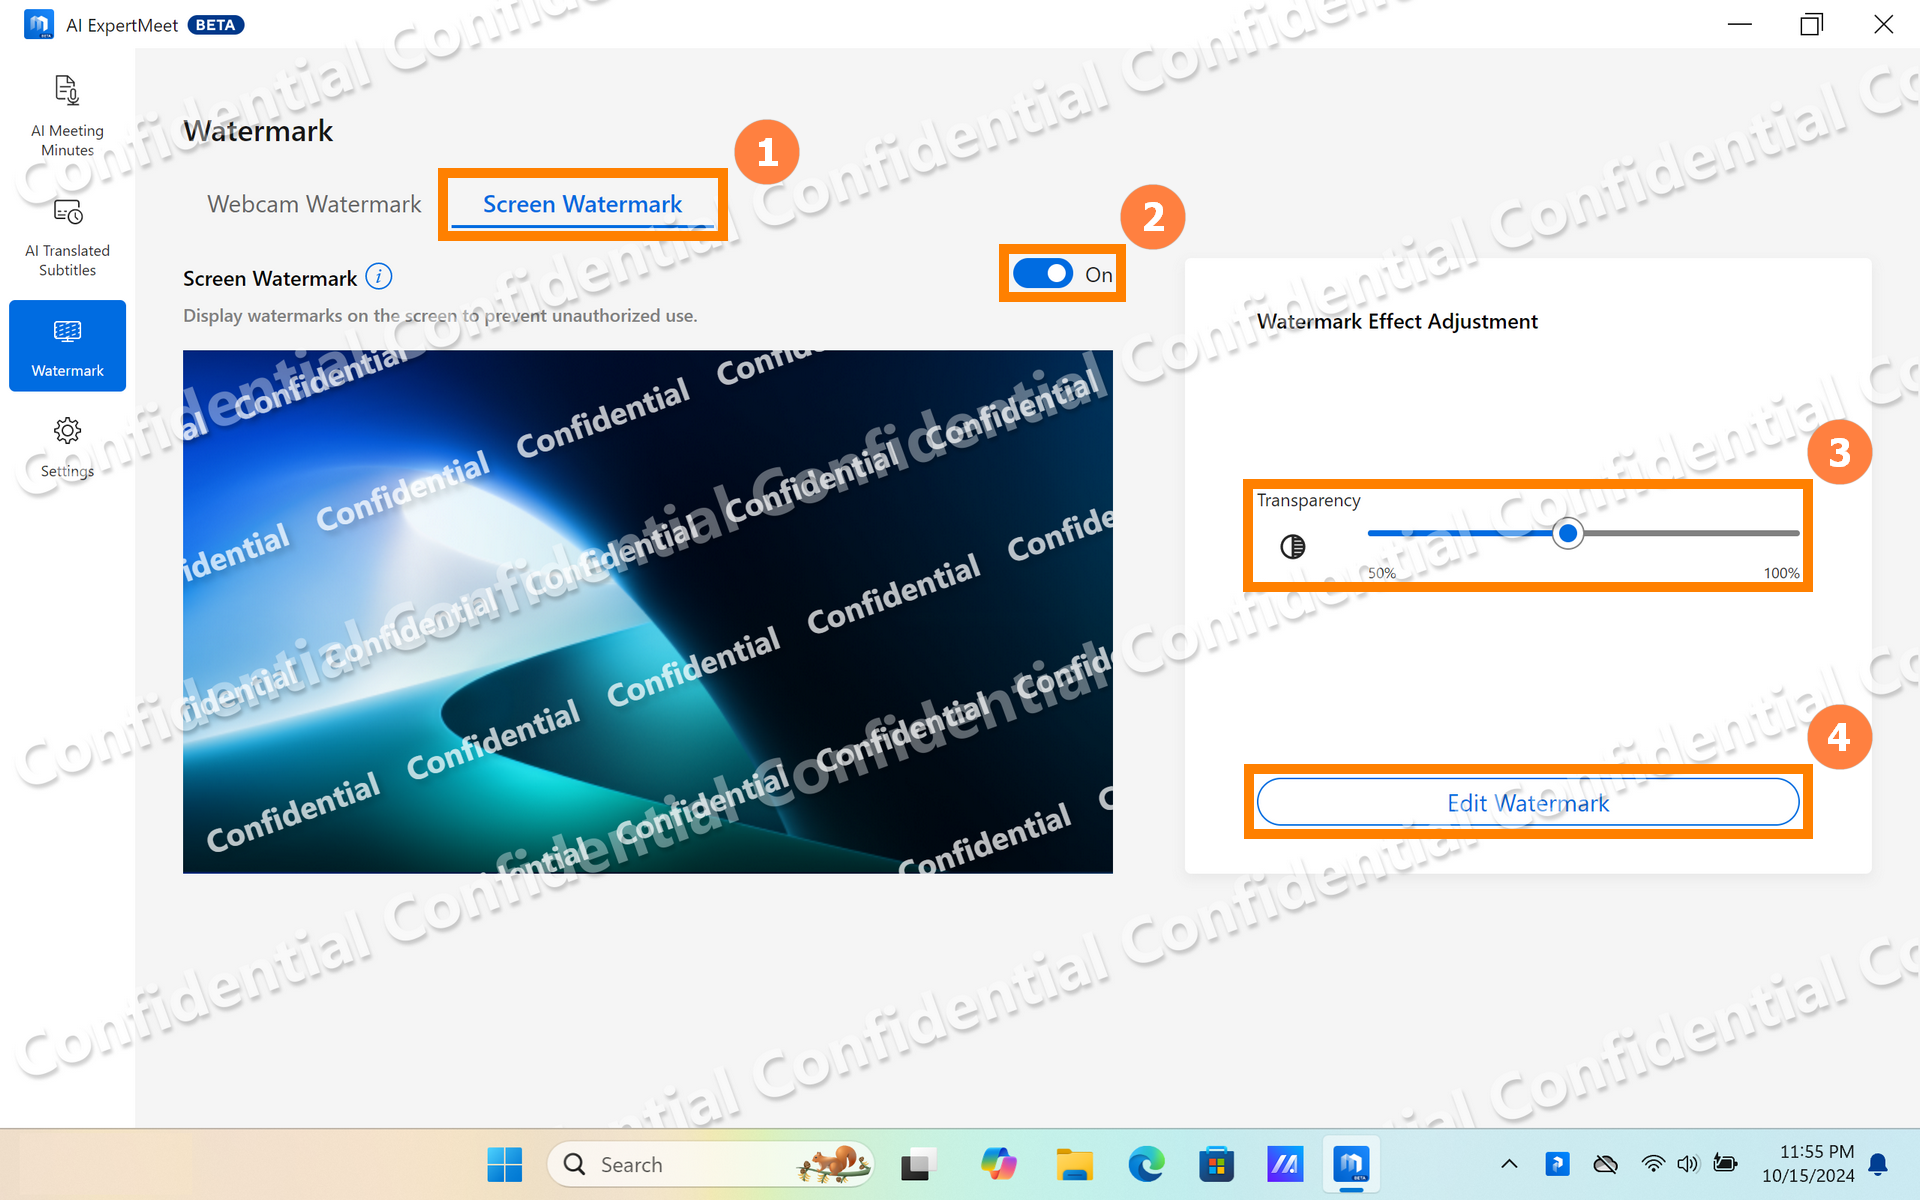
(1) Click ①[Screen Watermark], select to enable the ②[Screen Watermark], drag to adjust the ③[Transparency] on the right side, and click ④[Edit Watermark].
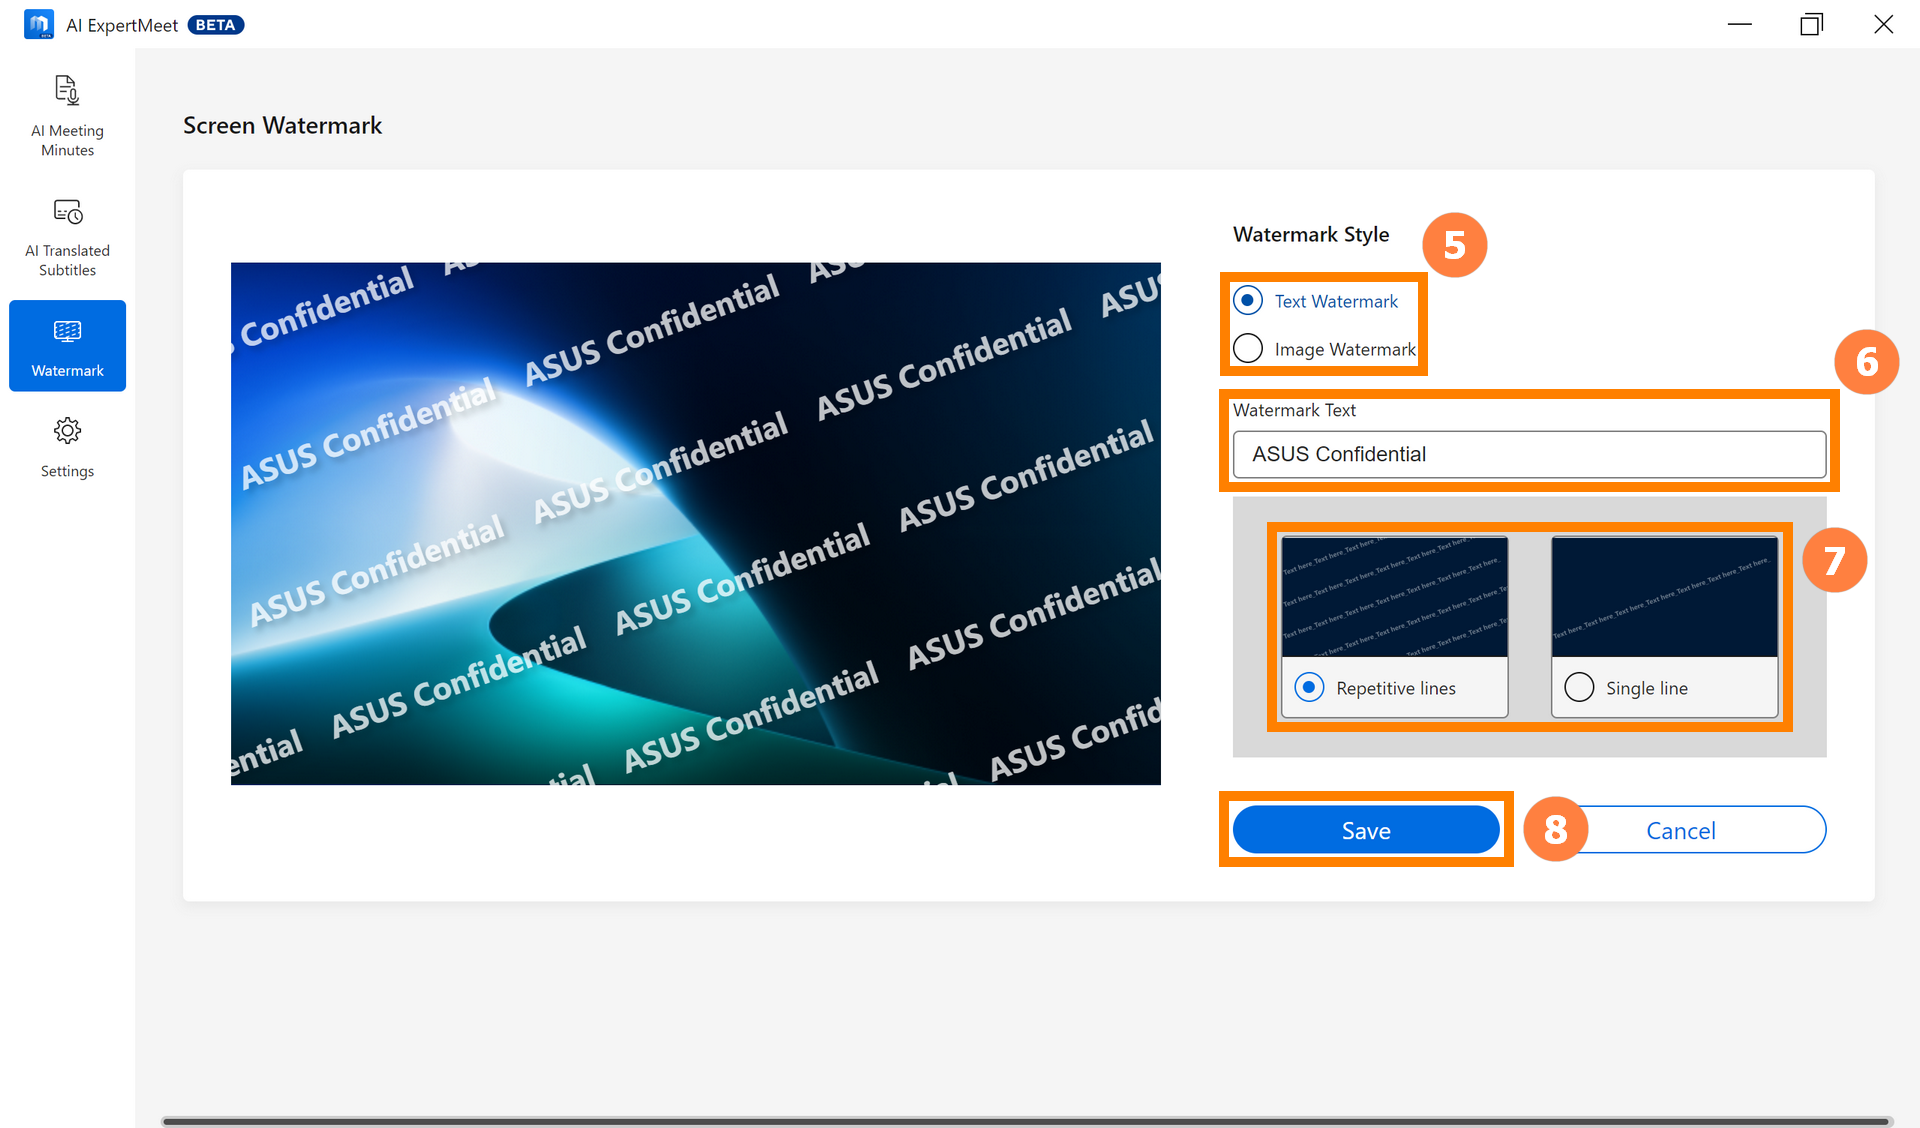
(2) In [Edit Watermark], you can choose ⑤[Text Watermark & Image Watermark], you can also modify the ⑥[Watermark Text], choose ⑦[Repetitive Lines & Single Line], and click ⑧[Save] after modification.
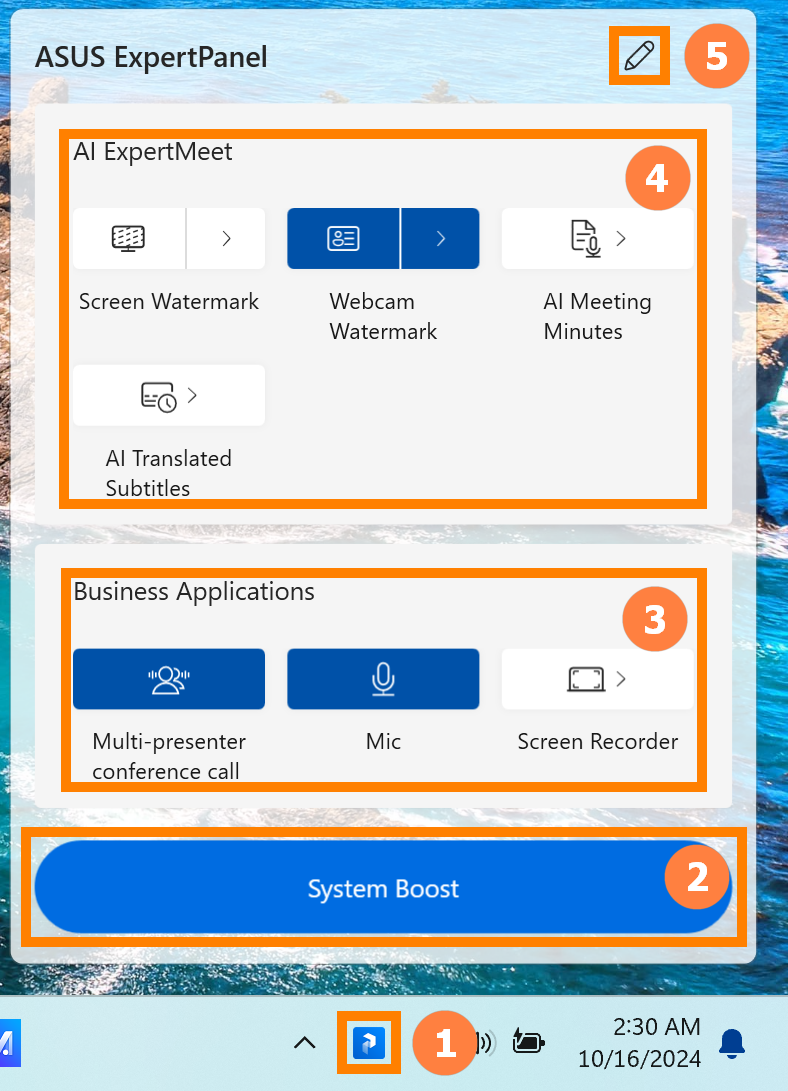
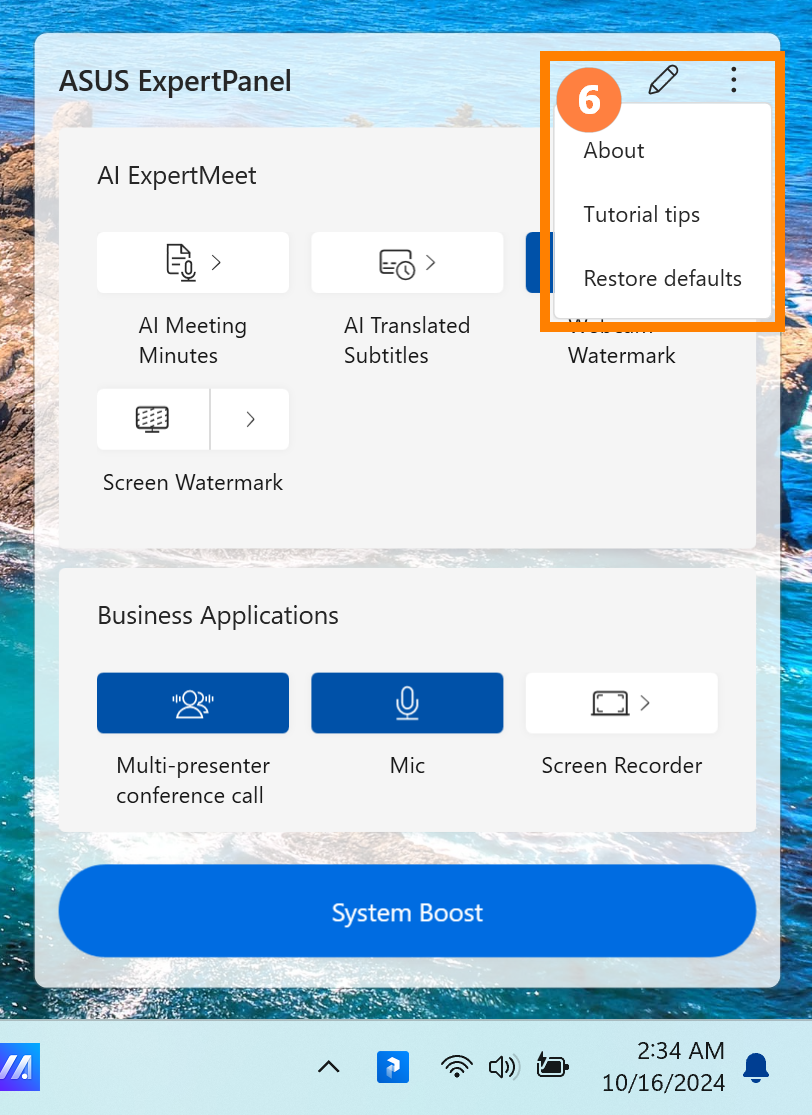
(1) Click ①[ASUS ExpertPanel] in the lower right corner of the desktop, click ②[System Boost] to clean up system junk, you can quickly enable or disable corresponding functions in ③[Business Applications], you can quickly enable or disable corresponding functions in ④[AI ExpertMeet], and click ⑤[Edit] to edit the shortcut key positions.
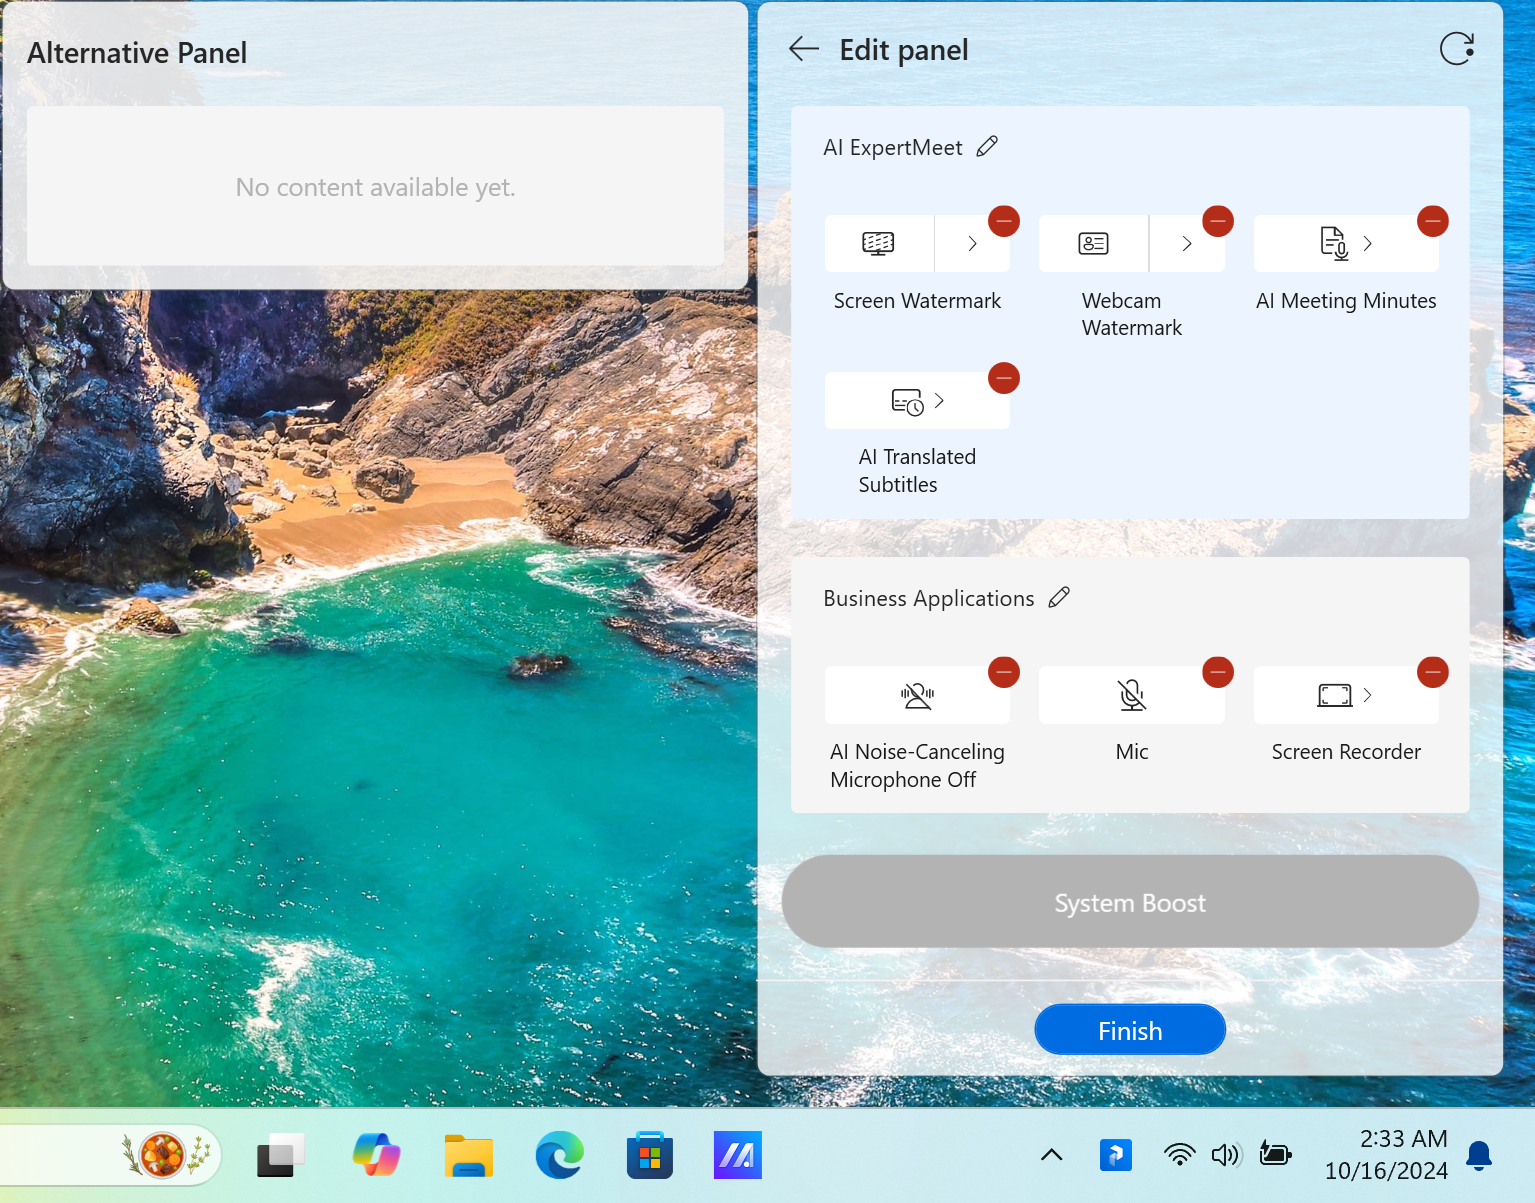
(2) You can adjust the position of the shortcut keys.
(3) Click ⑥[More - Restore defaults] to reset ASUS ExpertPanel to the default settings.
7. How to Download and Update AI Expert Smart Meetings
※ When there is an update for ASUS AI ExpertMeet, you only need to connect to the internet. Once you launch ASUS AI ExpertMeet, it will automatically update online.
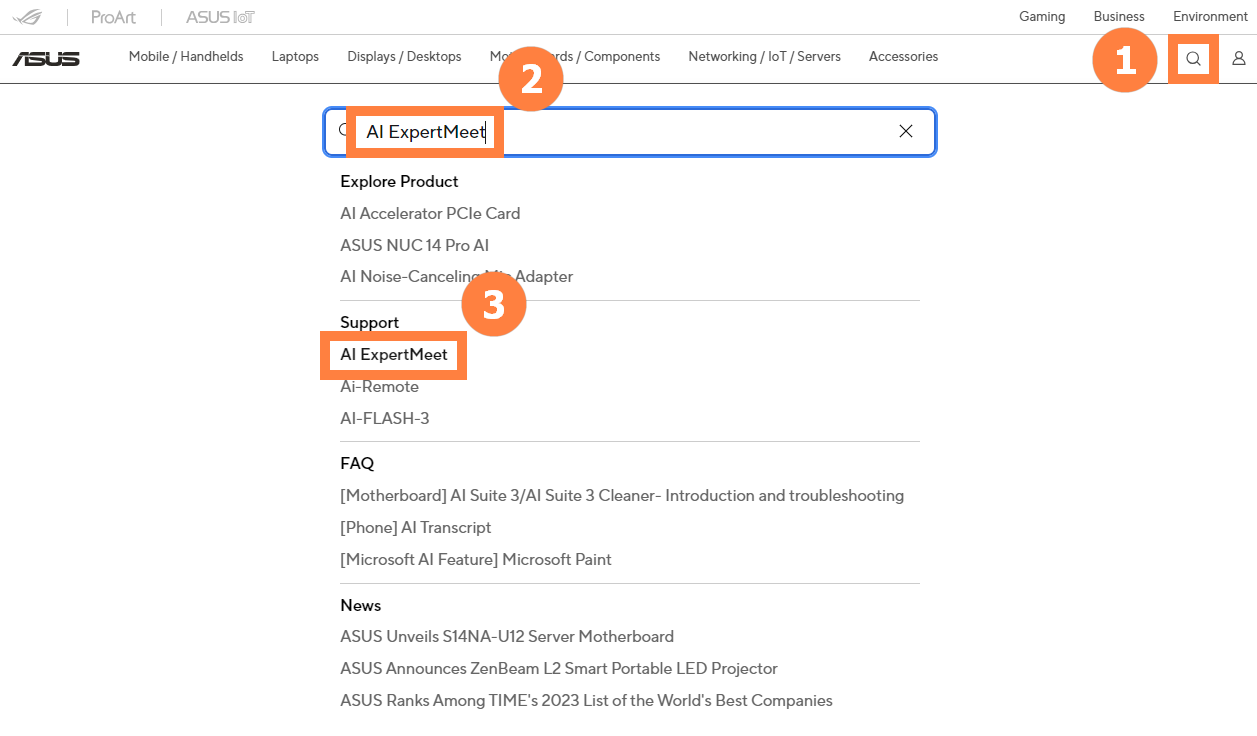
(1) If you need to install ASUS AI ExpertMeet, please visit the ASUS Global. Click on ①[Search], enter AI ExpertMeet in the ②[Search Bar], and click ③[AI ExpertMeet].
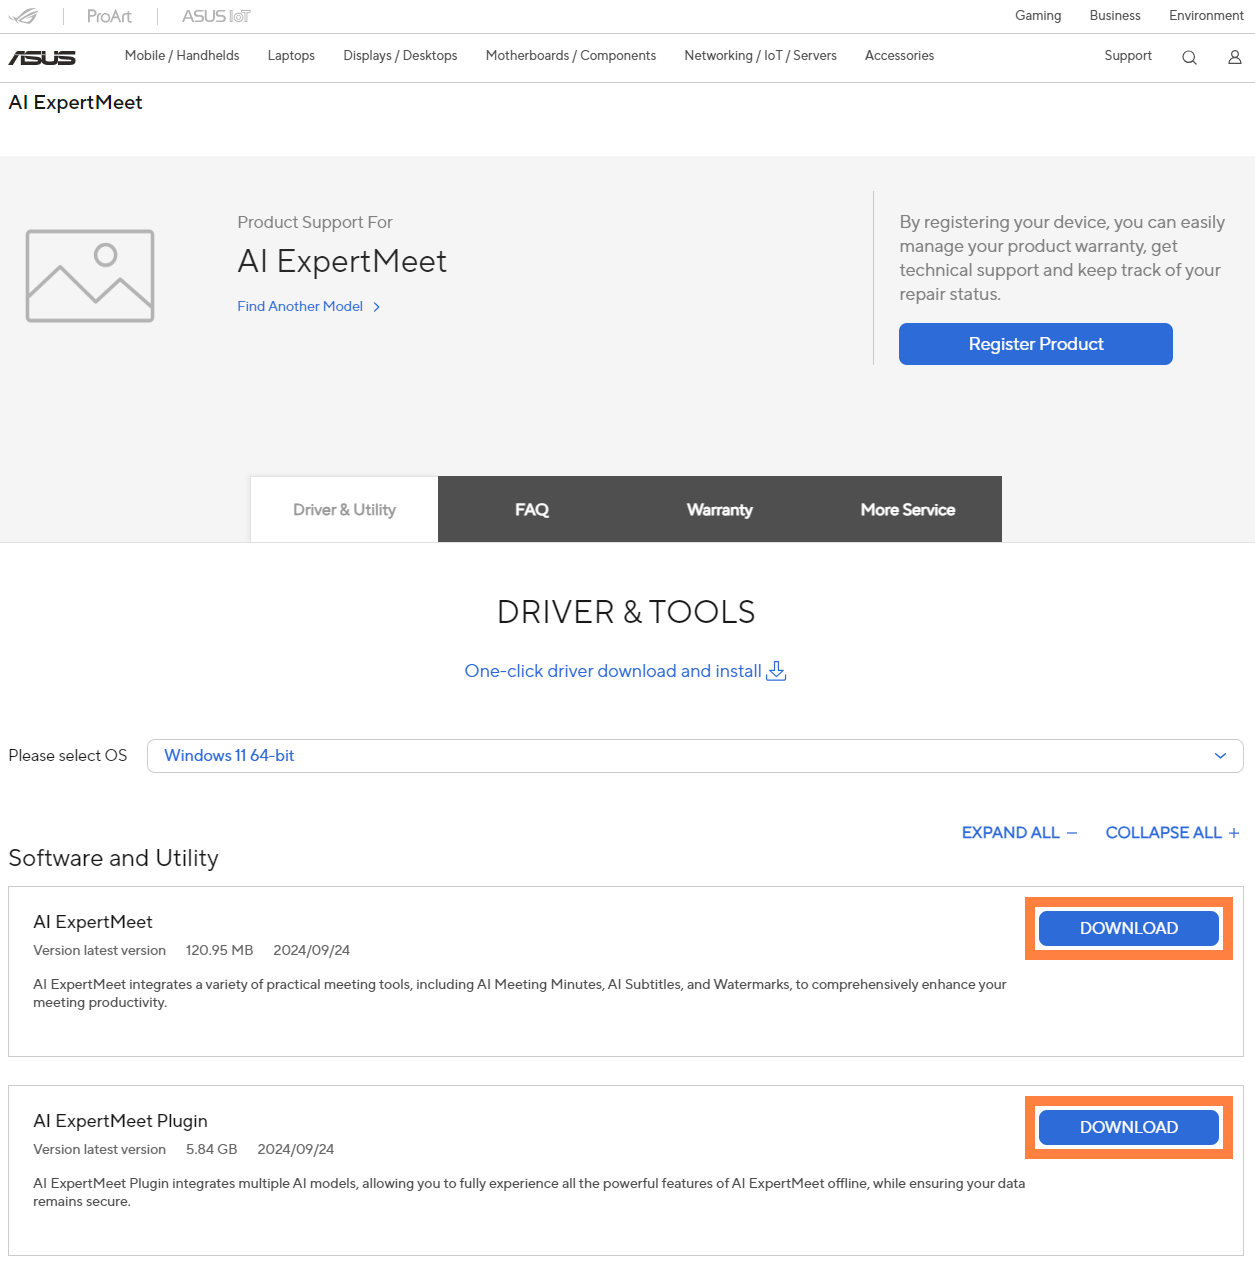
(2) Please download and install [AI ExpertMeet] and [AI ExpertMeet Plugin].
Question 1: I have turned on the watermark function. If I accidentally uninstall the AI ExpertMeet App, will there be a watermark when I use the camera?
Answer 1: There will be a watermark. If you want to disable this feature, you need to install and open the AI ExpertMeet application and turn off the watermark in the Webcam Watermark and Screen Watermark settings.
Question 2 : Why is the content identified by my AI Translated Subtitles not very accurate?
Answer 2 : AI Translated Subtitles recognition requires a quiet environment. Please move your computer to a quiet place before use.
Question 3 : Can I import a video into AI ExpertMeet and then output an audio-only file?
Answer 3 : Yes, AI ExpertMeet supports this operation.
Question 4 : Why does it take so long for AI Meeting Minutes to be successfully recognized?
Answer 4 : Make sure you have the power supply connected and high performance mode turned on. Excessively large files will also extend the recognition time. You can pre-cut large files for faster recognition.


