[Dock] How to set and enable WOL(Wake On Lan) function?
[Dock]How to set and enable WOL(Wake On Lan) function?
1. Client Side :
1.1 Before booting into the operating system, press "F2" repeatedly to enter BIOS, or access BIOS through the following link:
[Notebook/Desktop/AIO] How to enter the BIOS configuration | Official Support | ASUS Global
1.2 Then press "F7" to enter Advanced mode, navigate to the "Advanced" tab, and ensure that Wake On LAN is enabled.

2. Client Side :
2.1 Navigate to [Control Panel] > [System and Security] > [Windows Defender Firewall].
2.2 Click on "Turn Windows Defender Firewall on or off" on the left side.
2.3 Select "Turn off Windows Defender Firewall".
Note.
Both the Server and Client sides need to perform this step.
Both Server and Client need to be connected to the same WiFi AP via a network cable.


3. Client Side :
3.1 Open the [Start menu], then go to [Settings] > [System] > [About], and record the device name.
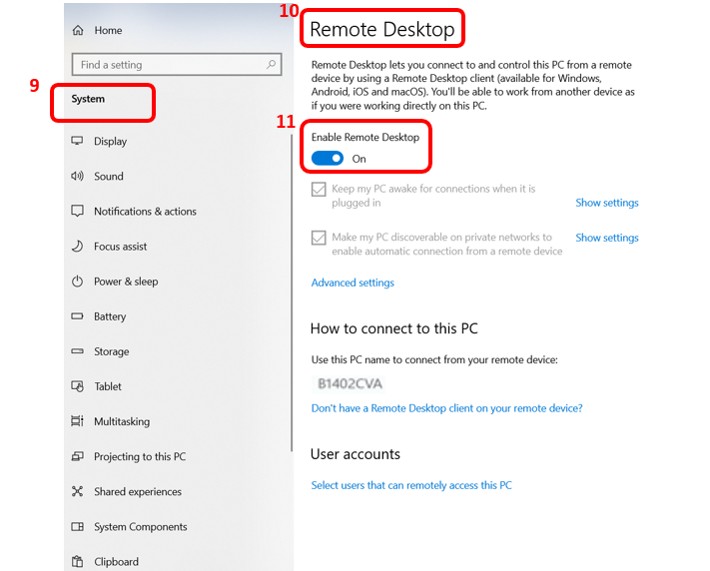
3.2 Go to [Settings] > [System] > [Remote Desktop] and enable Remote Desktop.
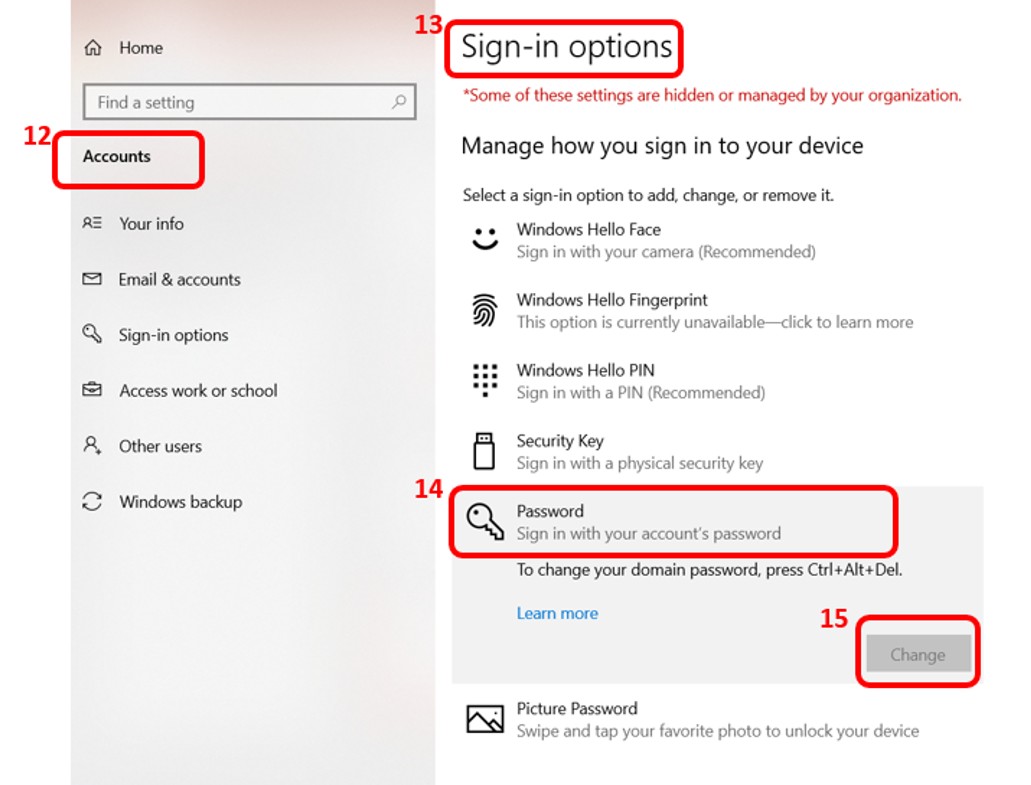
3.3 Go to [Settings] > [Accounts] > [Sign-in options] > [Password], then click "Add" to create a login password.


4. Client Side :
4.1 Open the [Start menu], then run [Power & Sleep] settings.
4.2 Choose to put the system into Modern Standby.
4.3 After a minimum of 2 minutes, wake up the system through the Server.

5. Server Side :
In the Windows search bar, type "Remote Desktop" and then run "Remote Desktop Connection".
After opening Remote Desktop Connection, enter the device name of the Client in the "Computer" field.
Click "Connect", then enter the username and password of the Client.
Click "OK" to establish the connection to the Client. At this point, the Client's screen should light up and display the login lock screen.

Note. The above steps are applicable only to models that support Modern Standby and need to be tested in AC Mode.
For more information on Modern Standby, you can refer to the following link:
[Notebook] Introduction to Modern Standby
https://www.asus.com/support/FAQ/1035447/