GlideX Frequently Asked Question (FAQ)
[Notebook/Desktop/AIO] GlideX - Introductie
Hoe u Screen Mirror PC-besturing gebruikt
[GlideX] Common GlideX subscription service problems
[GlideX] How to connect device(s) via Wi-Fi or USB cable
[GlideX] Bluetooth pairing problems
[GlideX] Common ASUS PC Friend Coupon Problem
[GlideX] How to switch from 2.4GHz to 5GHz for a better screen sharing experience?
[GlideX] How to enable USB debugging for Android devices?
[GlideX] Learn how to send feedback to GlideX
[GlideX] Common problems for Promo Codes
[GlideX] How to download and install GlideX on macOS?
[Notebook/Desktop/AIO] GlideX - Introductie
GlideX - is een oplossing voor het delen van schermen tussen verschillende apparaten. Bekabelde of draadloze verbindingen kunnen worden gebruikt om een grotere en betere ruimte te creëren om te werken of te ontspannen. GlideX optimaliseert uw workflow in een oogwenk!
Voordat je dit artikel begint te lezen, raden we je aan onze introductievideo te bekijken.
Inhoudsopgave
- Vereisten voor computers en mobiele apparaten
- Eerste lancering van de GlideX-app
- Mobiele toestemmingsvereiste
- Abonnementsservice
- Hoofdkenmerk: spiegel
- Belangrijkste functie: verlengen
- Hoofdfunctie: verenig controle
- Veelgestelde vragen en feedback
1. Vereisten voor computer en mobiele apparaten:
Computerzijde:
- Ondersteuning voor computers met Windows-besturingssysteem, LAN, Wi-Fi en USB
- Windows-besturingssysteem: Windows 10/11 64-bit (versie 1909 en hoger) (Let op: GlideX is NIET beschikbaar in Windows in S-modus)
- Grafisch stuurprogramma ondersteunt H.264-codecs.
Kant van mobiel apparaat:
- Voor iOS-apparaten is 14.0 en hoger vereist
- Android-apparaat vereist 9.0 en hoger
- Grafisch stuurprogramma ondersteunt H.264-codecs.
Eerste lancering van de GlideX-app
2.1 Computerzijde
Download GlideX voor Windows van de Microsoft Store Na installatie wordt u geadviseerd de onderstaande instructies te volgen:
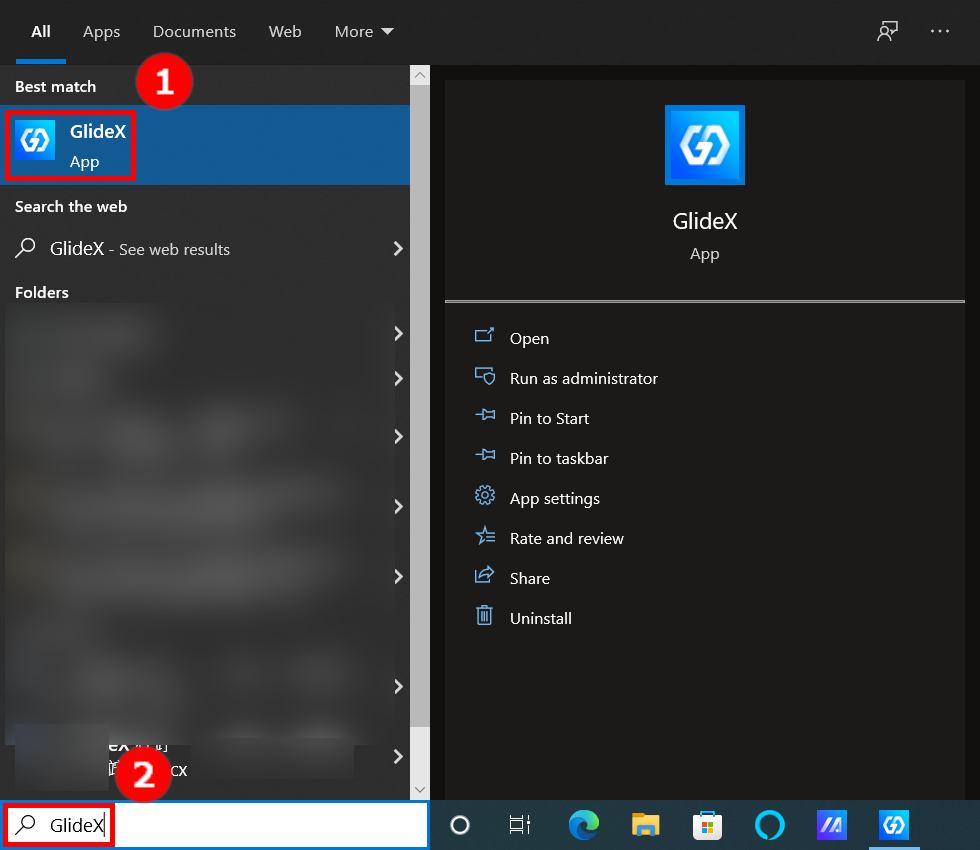
(1) Zoek naar ①[GlideX] in de zoekbalk in de linkerbenedenhoek van het bureaublad op de computer en klik vervolgens op ②[GlideX] en GlideX worden gelanceerd.
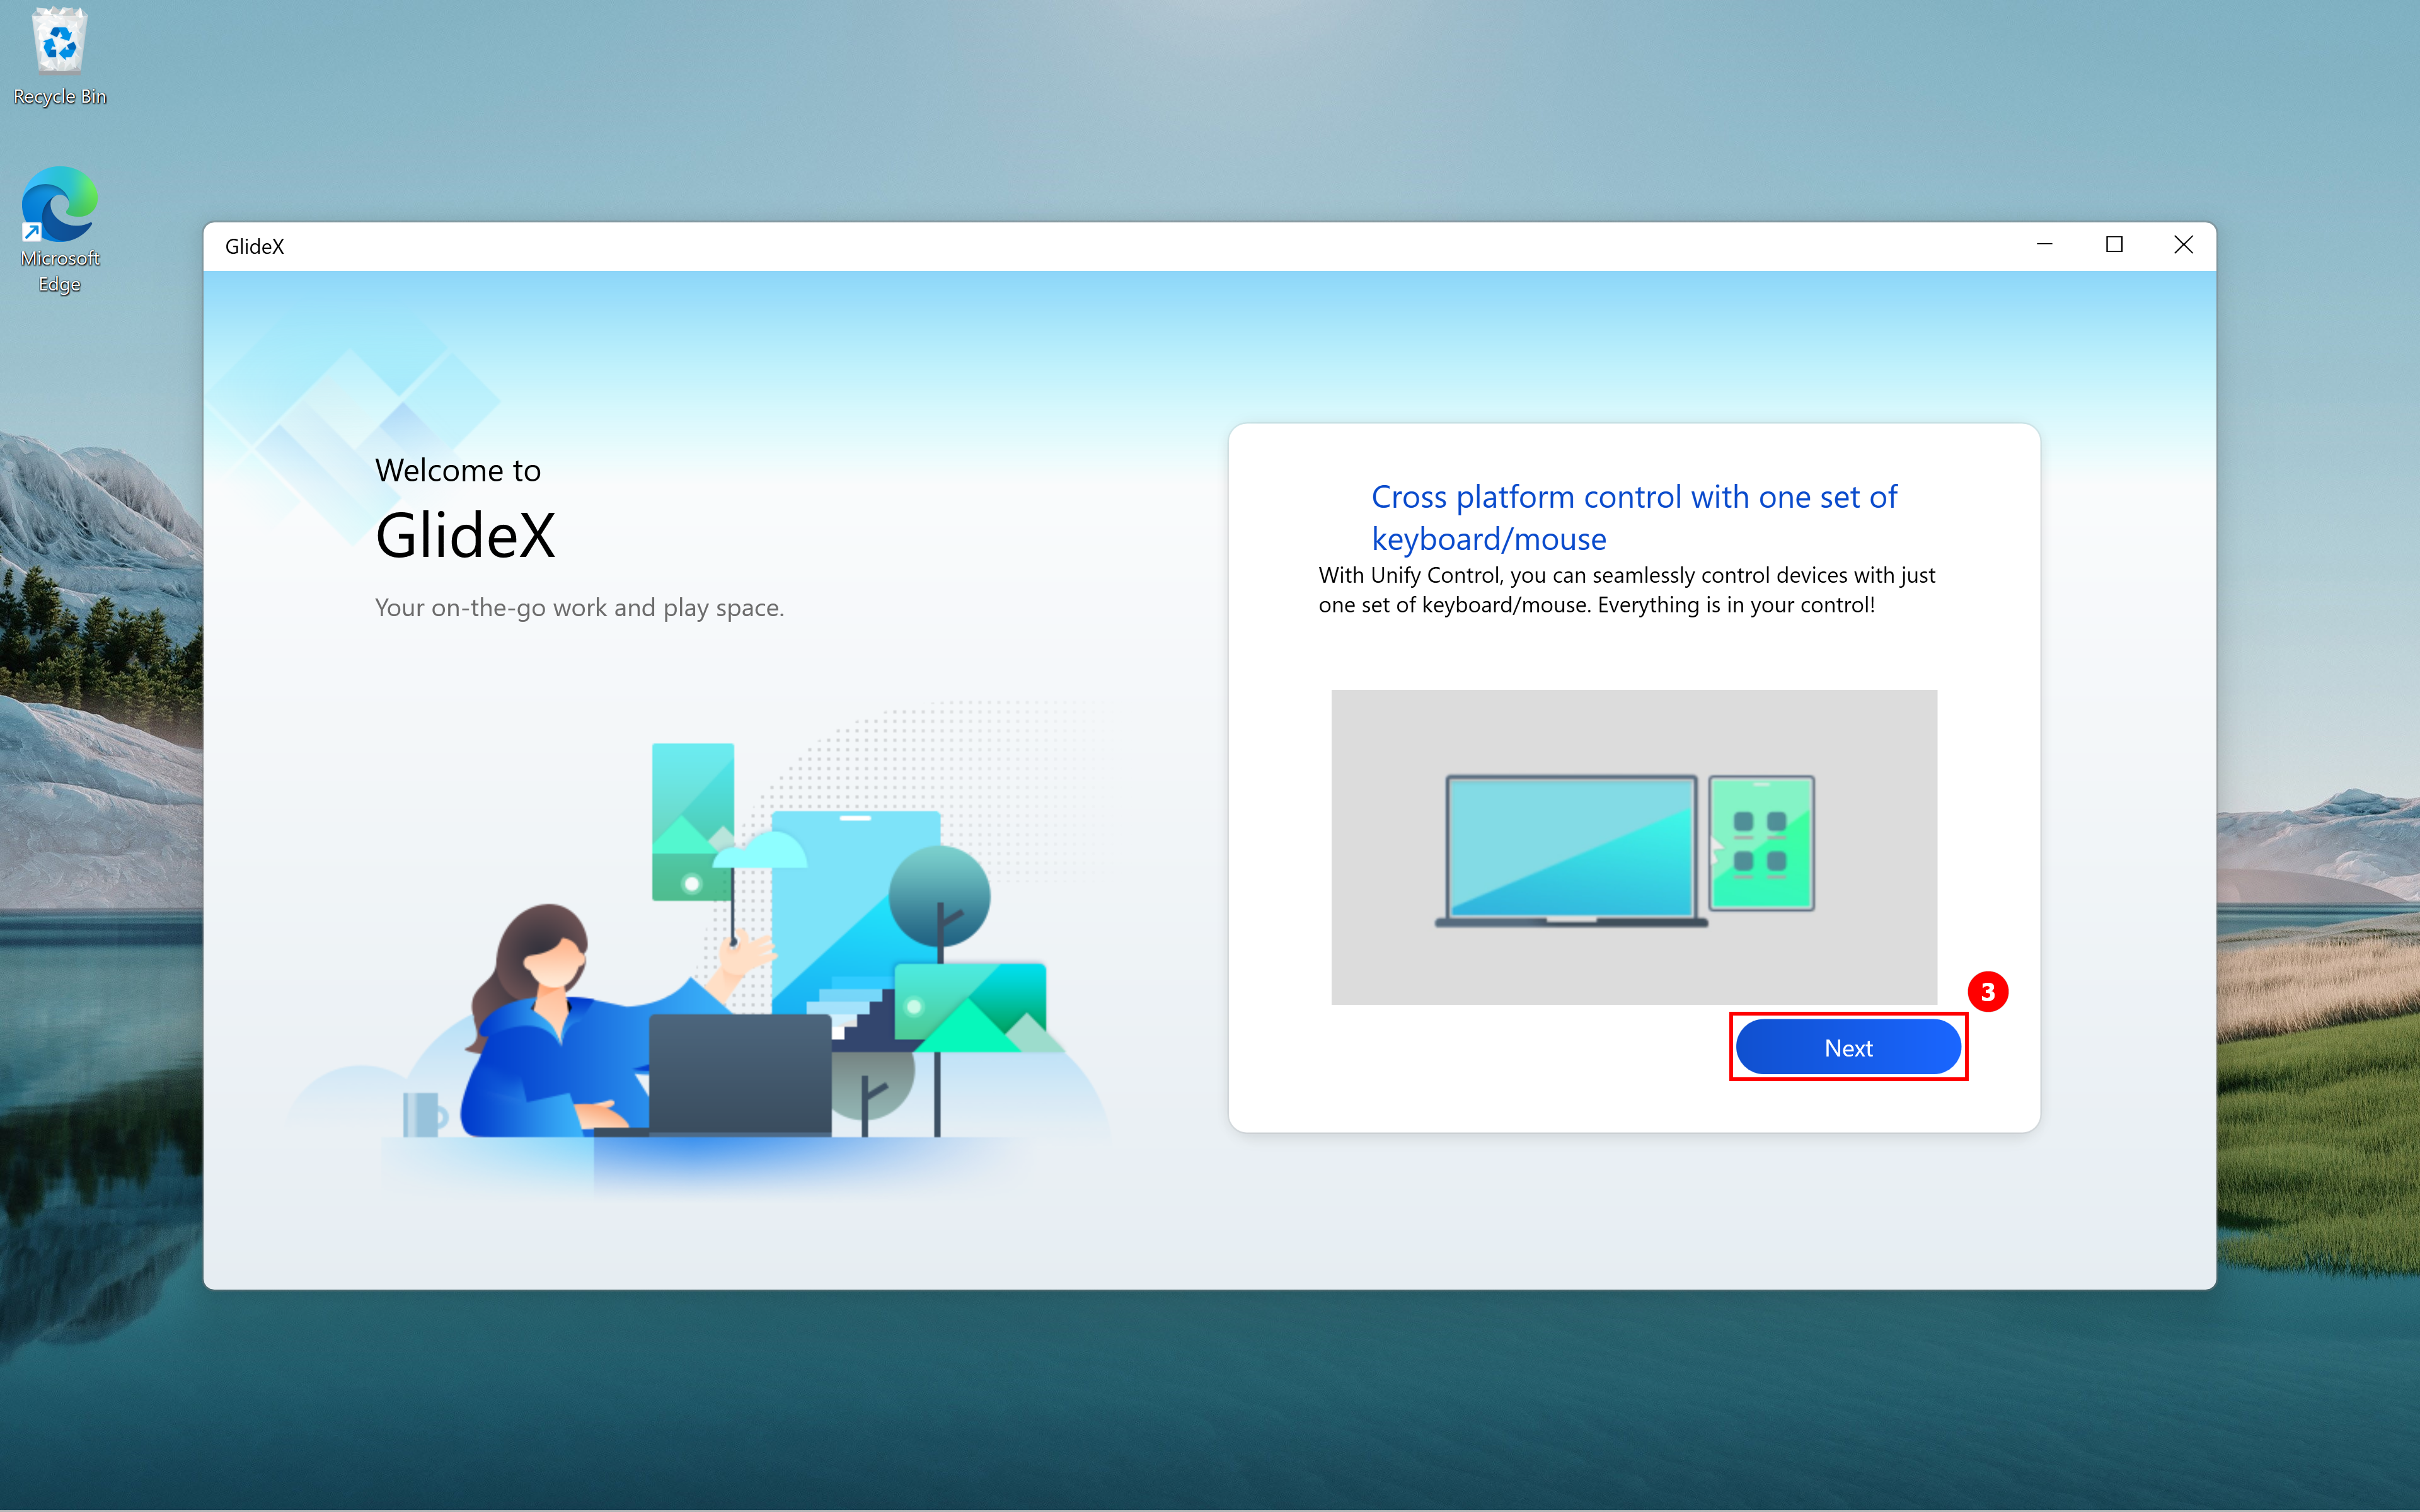
(2) Klik op de GlideX-welkomstpagina op ③[Volgende].
(3) Selecteer China of Wereldwijde service om toegang te krijgen tot het uitgebreide GlideX-servicepakket op basis van uw locatie.
- China-service: voor gebruikers in China
- Wereldwijde service: voor alle gebruikers (behalve die in China)

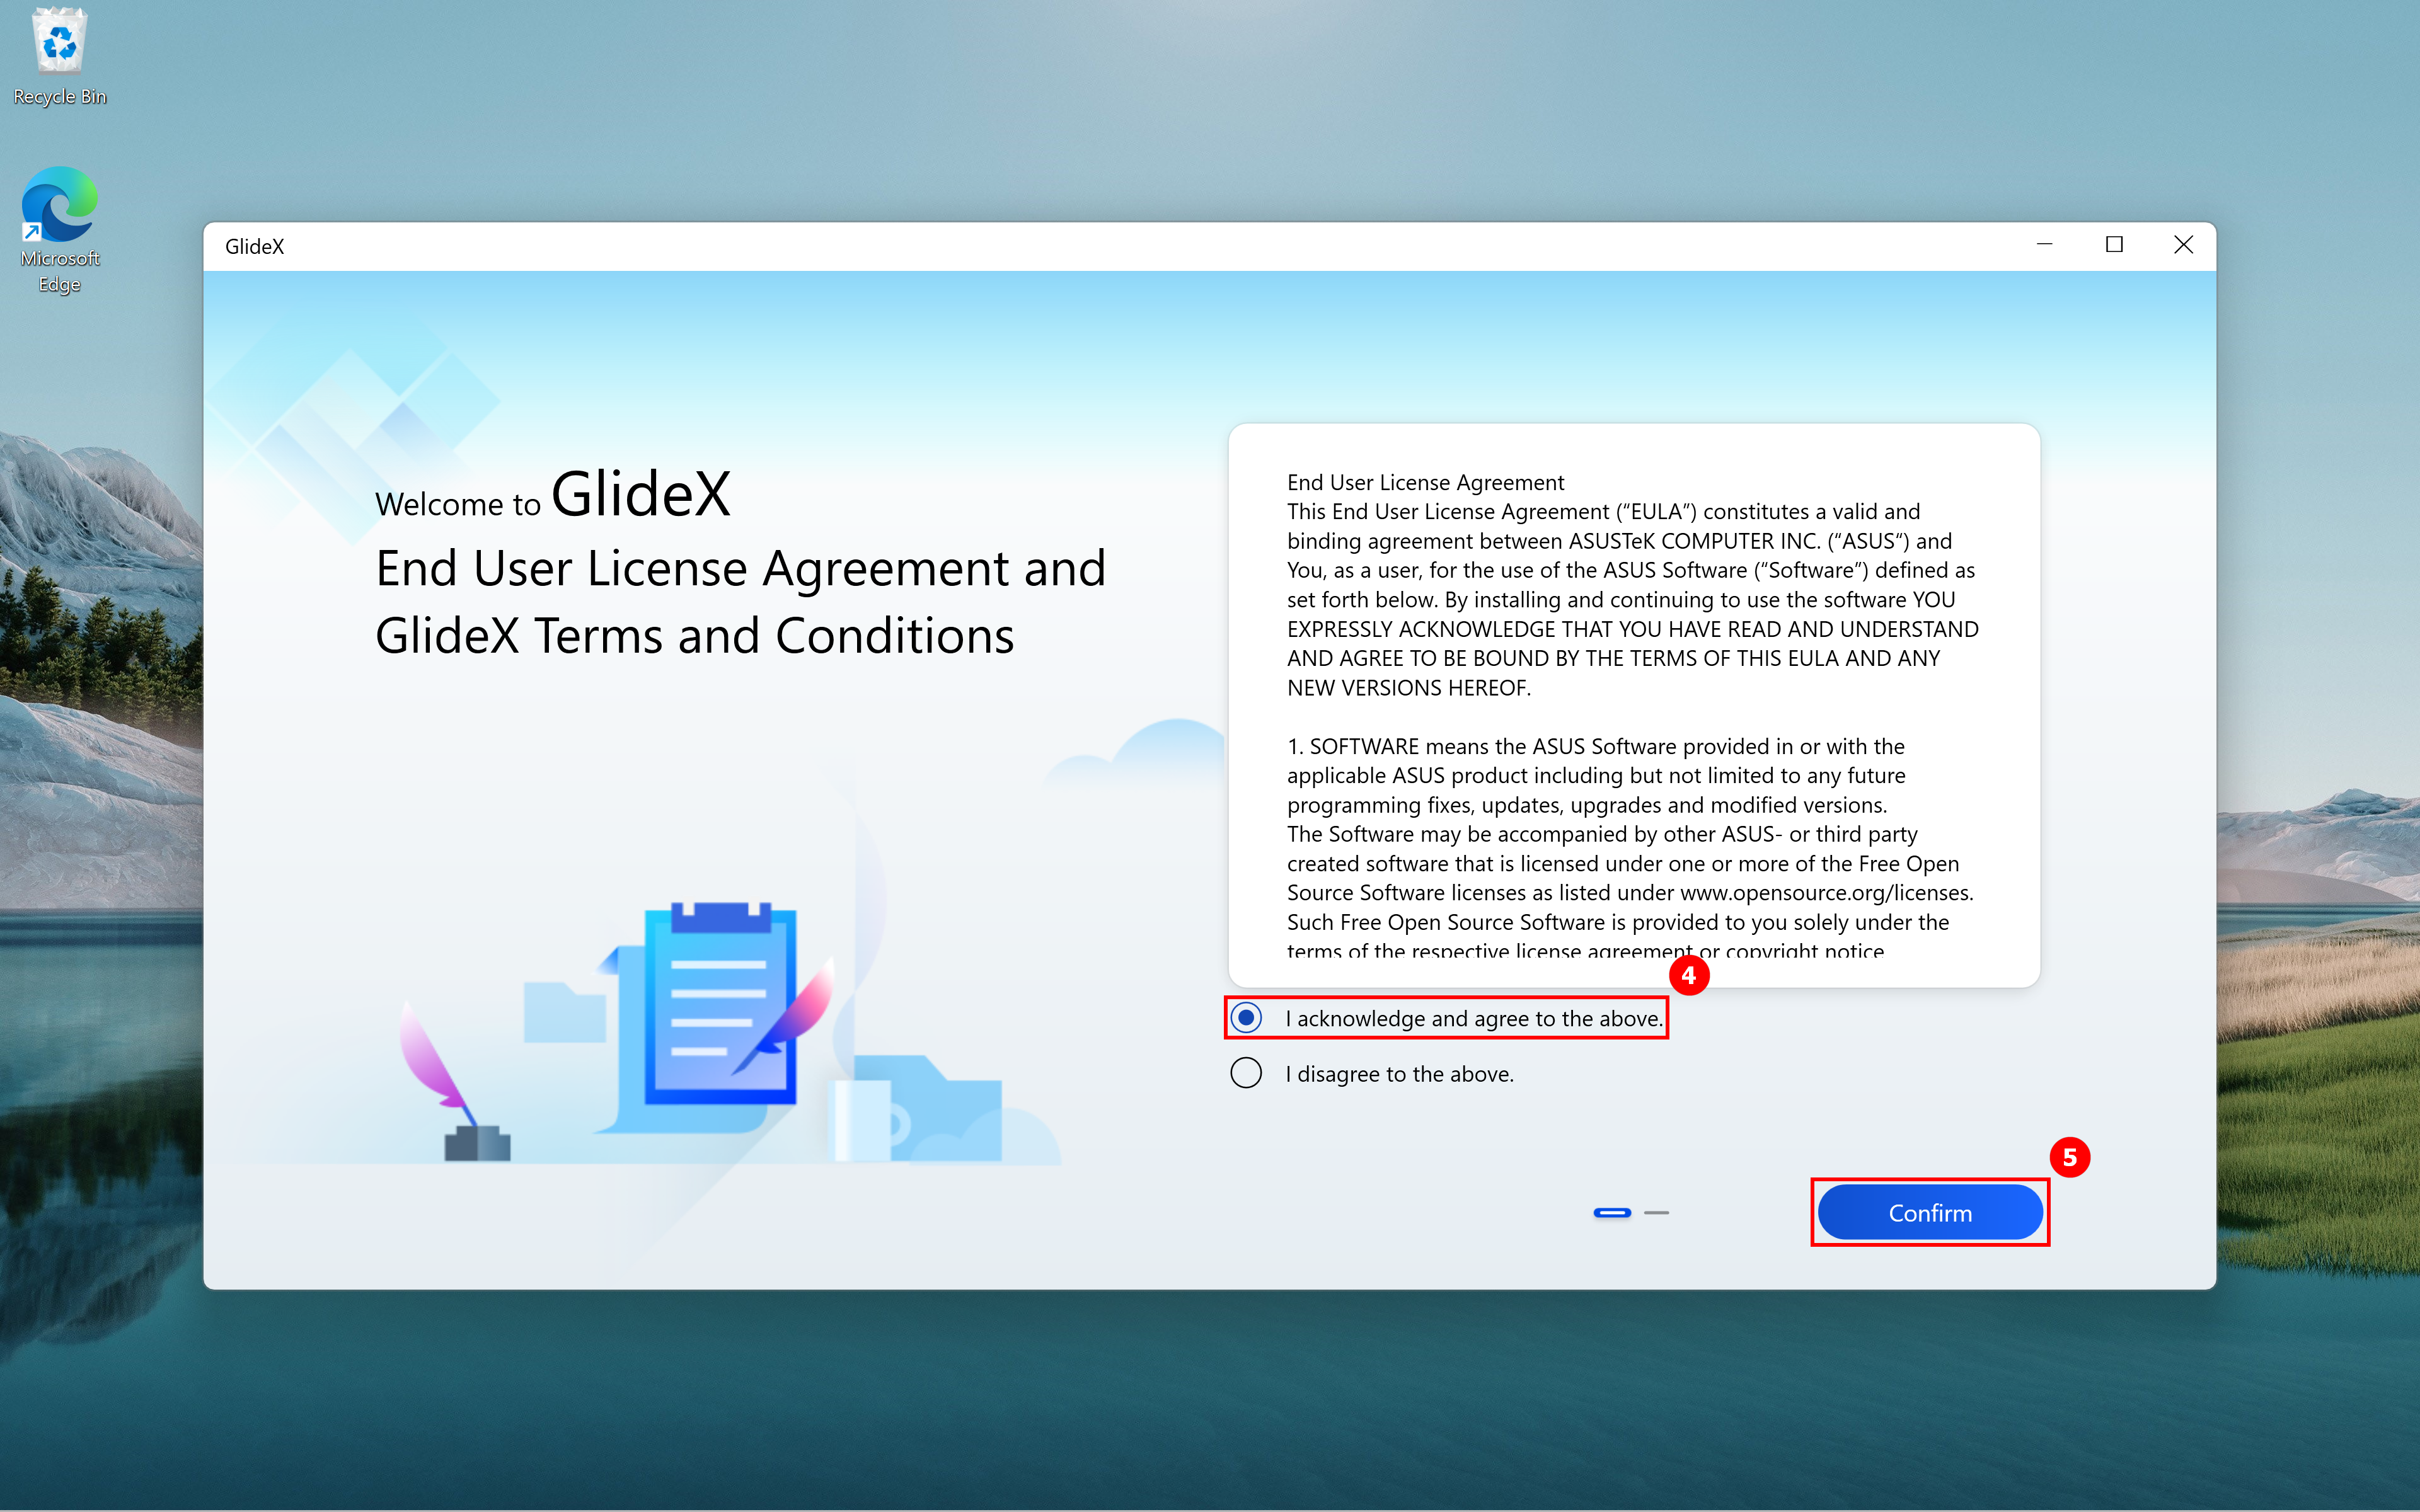
(4) Selecteer ④[I bevestigen en akkoord gaan met het bovenstaande] en klik vervolgens op ⑤[Bevestigen].
(5) Selecteer op de pagina Privacyverklaring ⑥[Ik ga akkoord] en klik op ⑦[Bevestigen ].
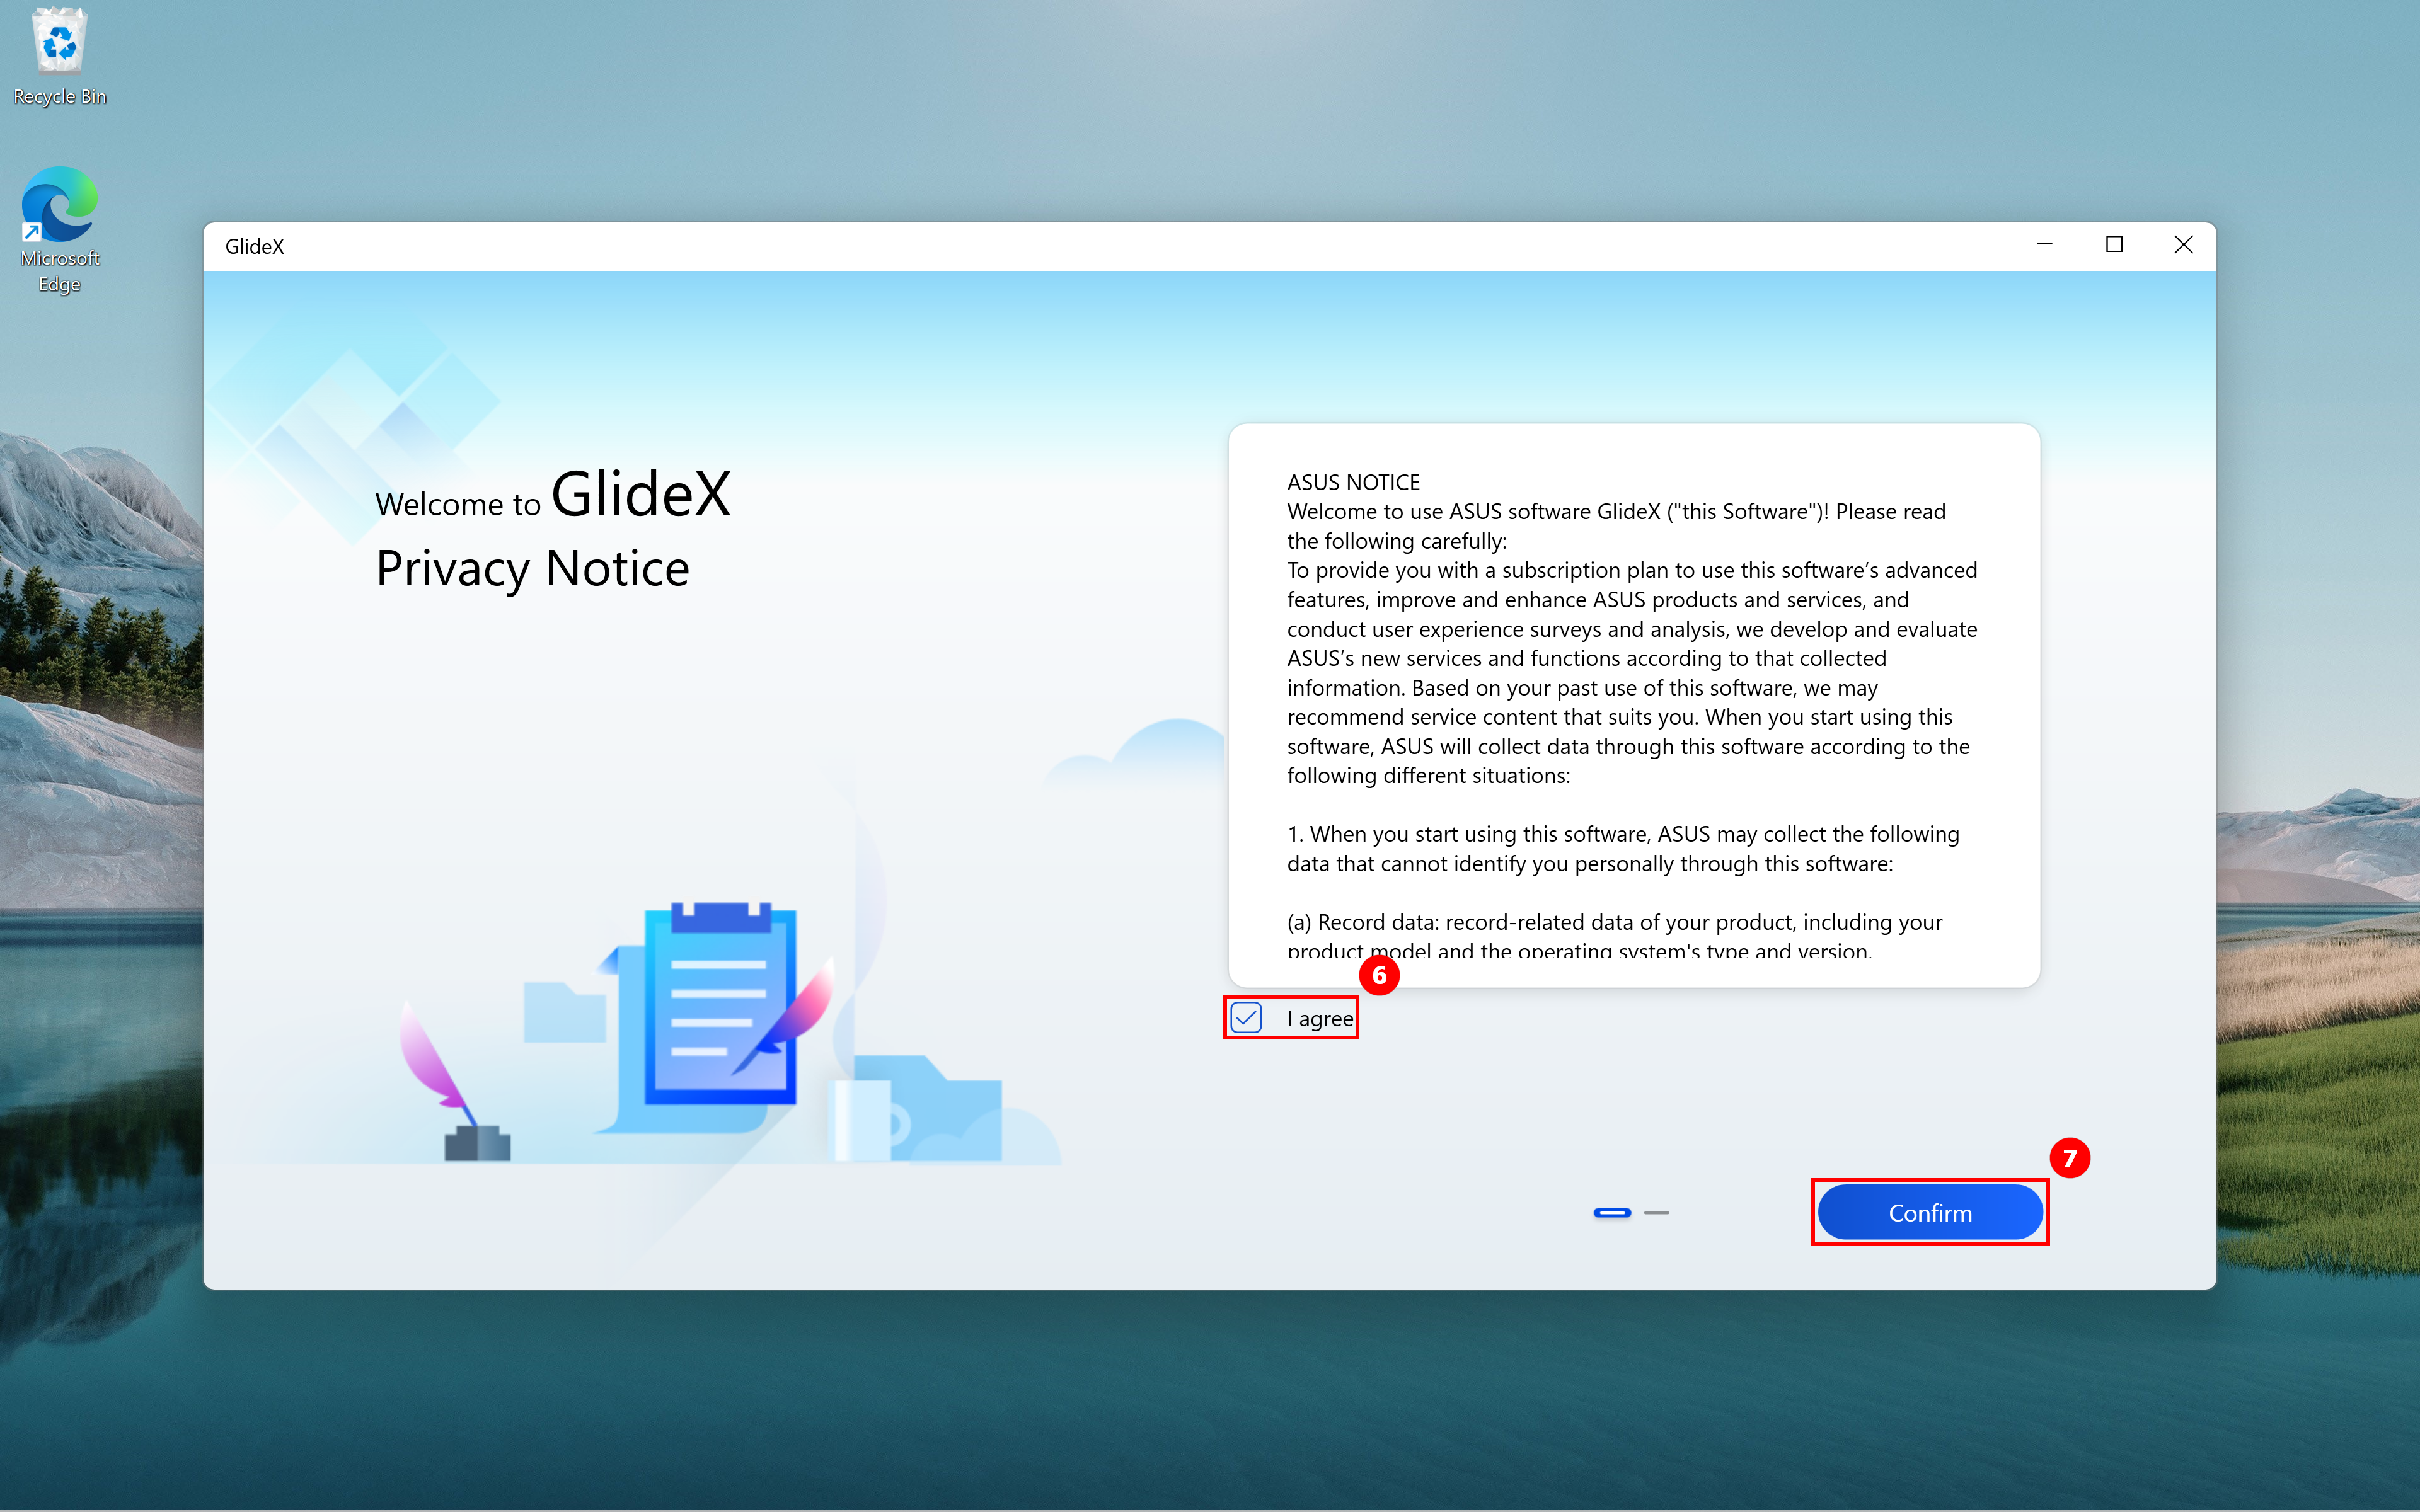
(6) Op de downloadpagina van de mobiele GlideX-toepassing staat ⑧[QR-code] in het rode vak aan de rechterkant. Als u GlideX niet op uw mobiele apparaat hebt geïnstalleerd, scan dan de QR-code met de camera van uw mobiele apparaat en download de GlideX-app. Klik na het downloaden op ⑨[Volgende].
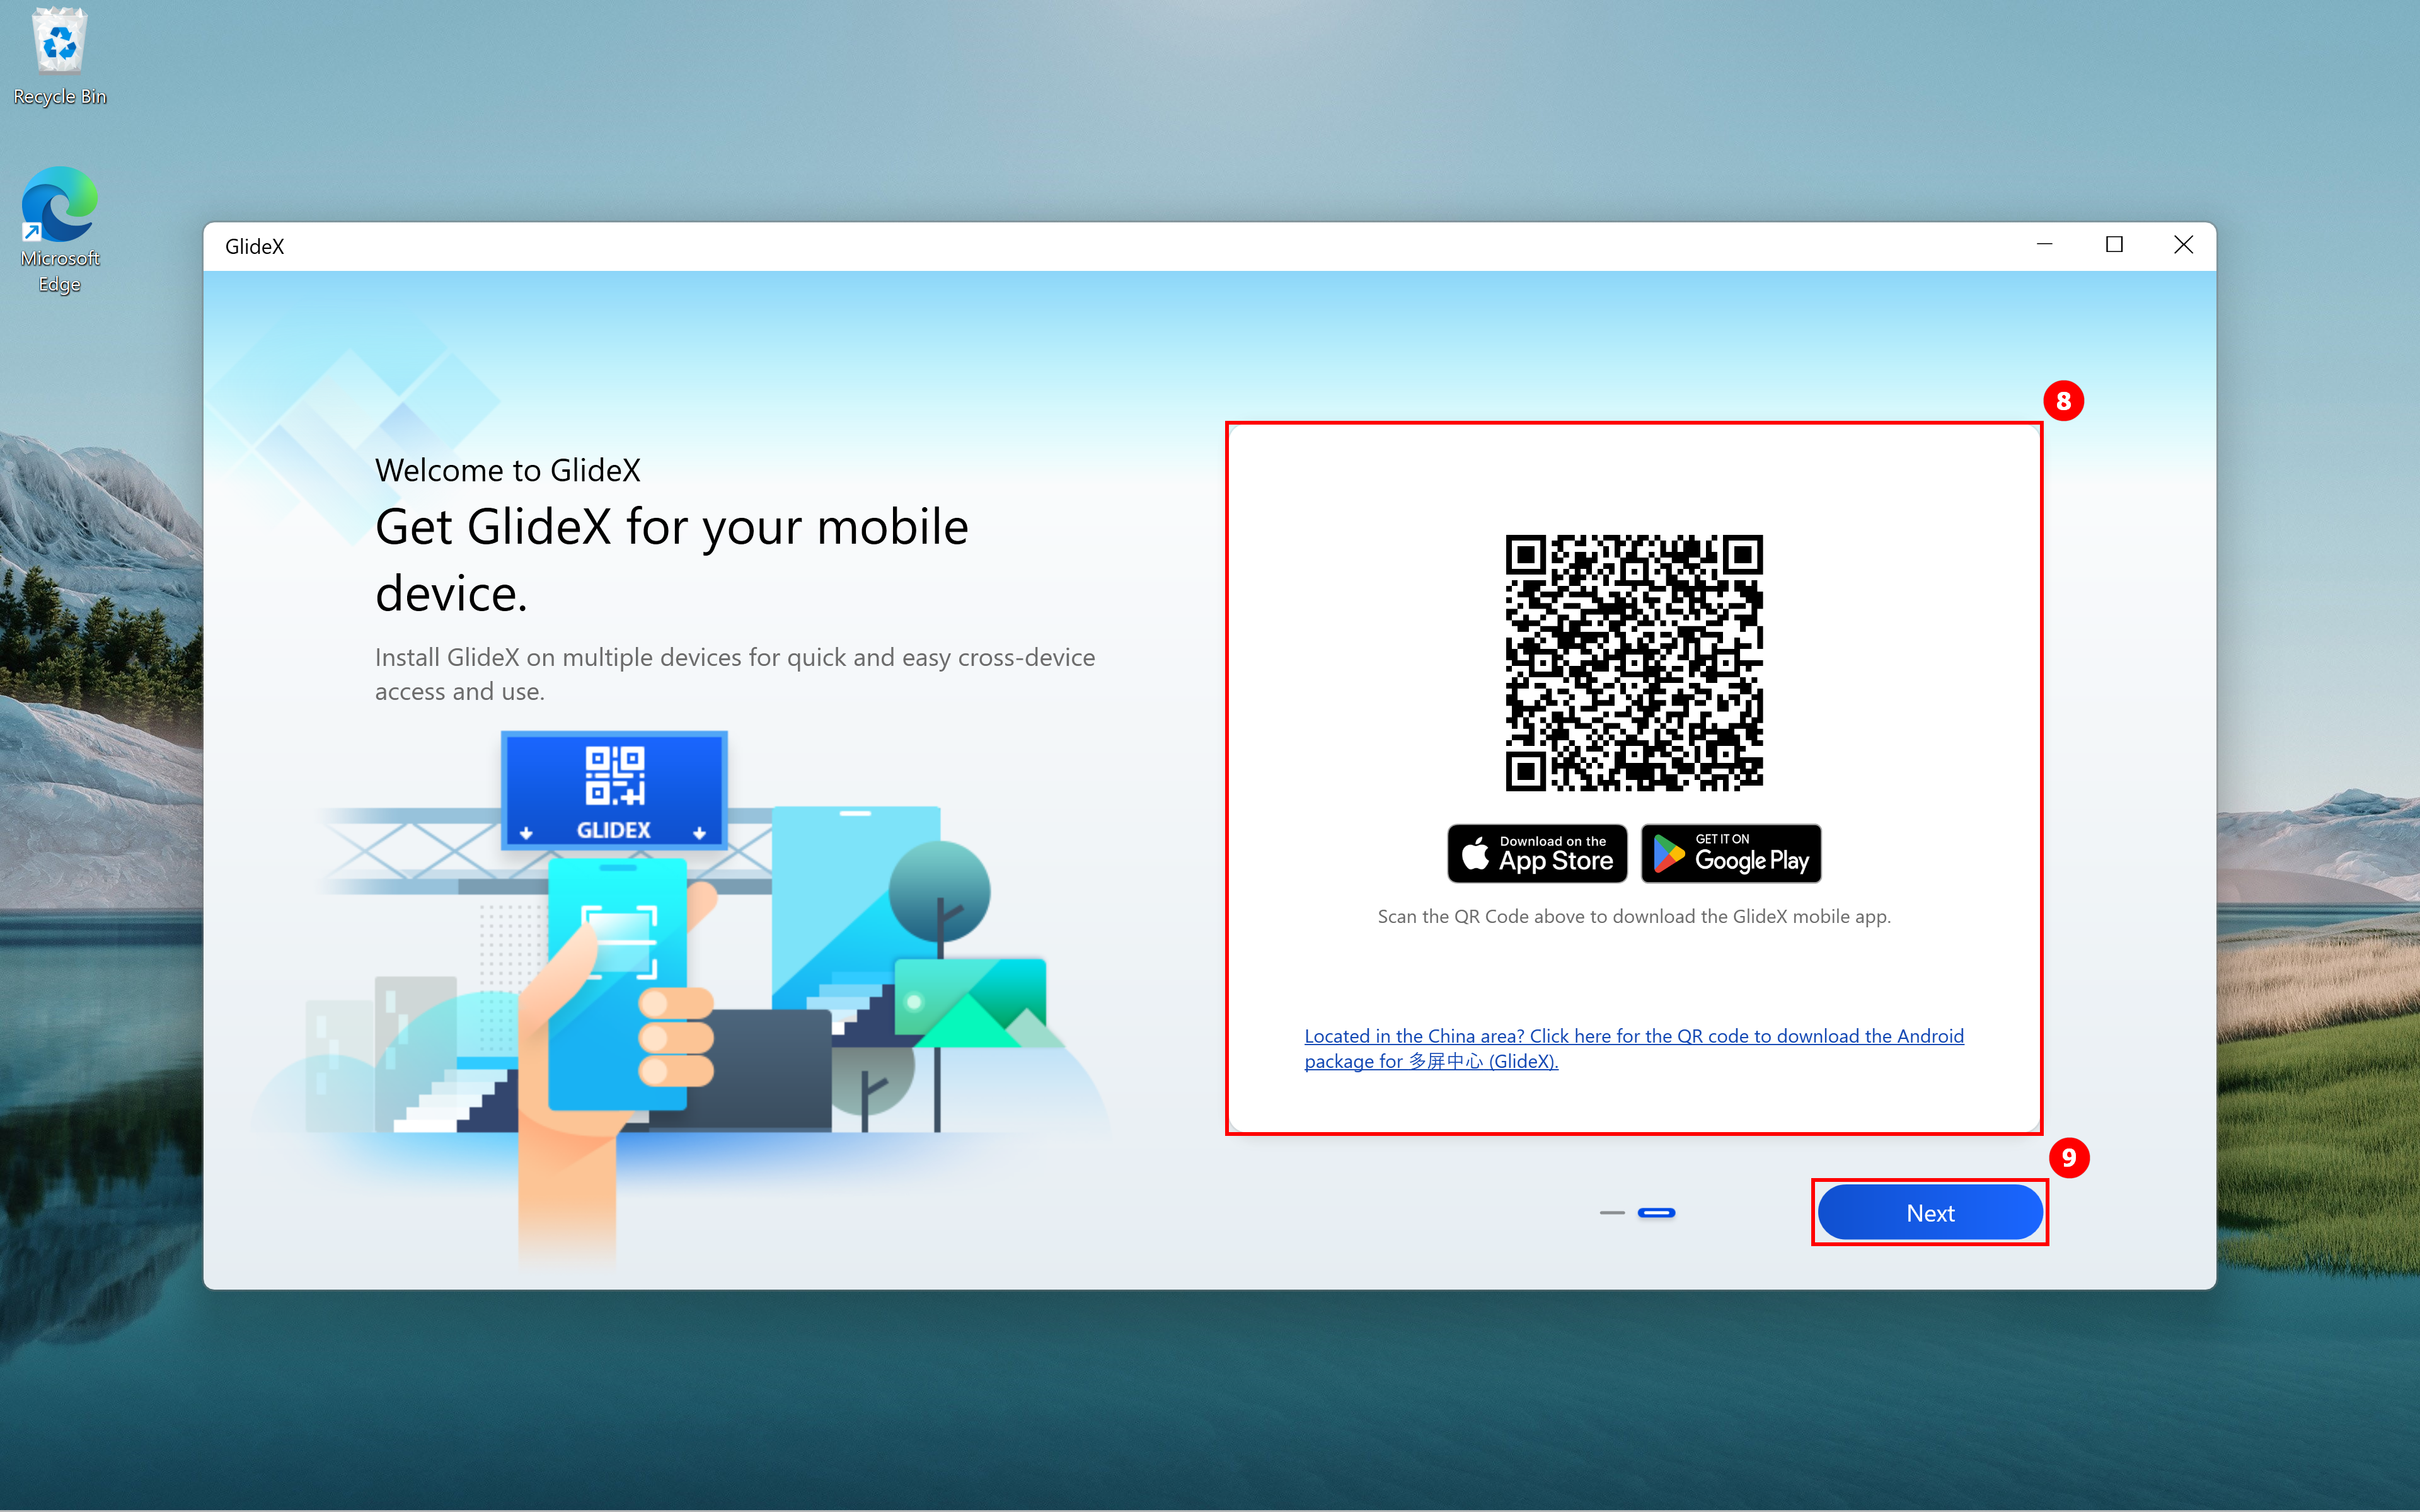
(7) U kunt de hoofdpagina van GlideX openen.

2.2 Mobiele apparaatzijde
Download GlideX van de Google Play Store of Apple App Store. Voor de Android-gebruikers zonder Google Play Store, download het Android-pakket. Na installatie wordt u geadviseerd de onderstaande instructies te volgen:
(1) Selecteer China of Wereldwijde service om toegang te krijgen tot het uitgebreide GlideX-servicepakket op basis van uw locatie. Zorg ervoor dat de service dezelfde is als die op de GlideX voor Windows-app. Tik vervolgens op ①[Ik ga akkoord] aan het einde van de gebruikerslicentieovereenkomst en de GlideX Algemene voorwaarden, en tik vervolgens op ②[OK]. Tik op ③[Ik ga akkoord] bij Privacyverklaring en tik vervolgens op ④[OK]. Tik op ⑤[Doorgaan om advertenties van derden te zien] op de pagina GlideX-services en -advertenties en tik op ⑥[OK]. Op de volgende pagina wordt voorgesteld om de GlideX-toepassing op uw computer te downloaden. Als uw computer het nog niet heeft gedownload, tikt u op ⑦[link] om naar de Microsoft Store te gaan om te downloaden. Als u GlideX al hebt geïnstalleerd, tikt u op ⑧[Geïnstalleerd]. Vervolgens navigeert u naar de hoofdpagina van GlideX.


3. Machtigingen vereist door GlideX
Android-apparaten
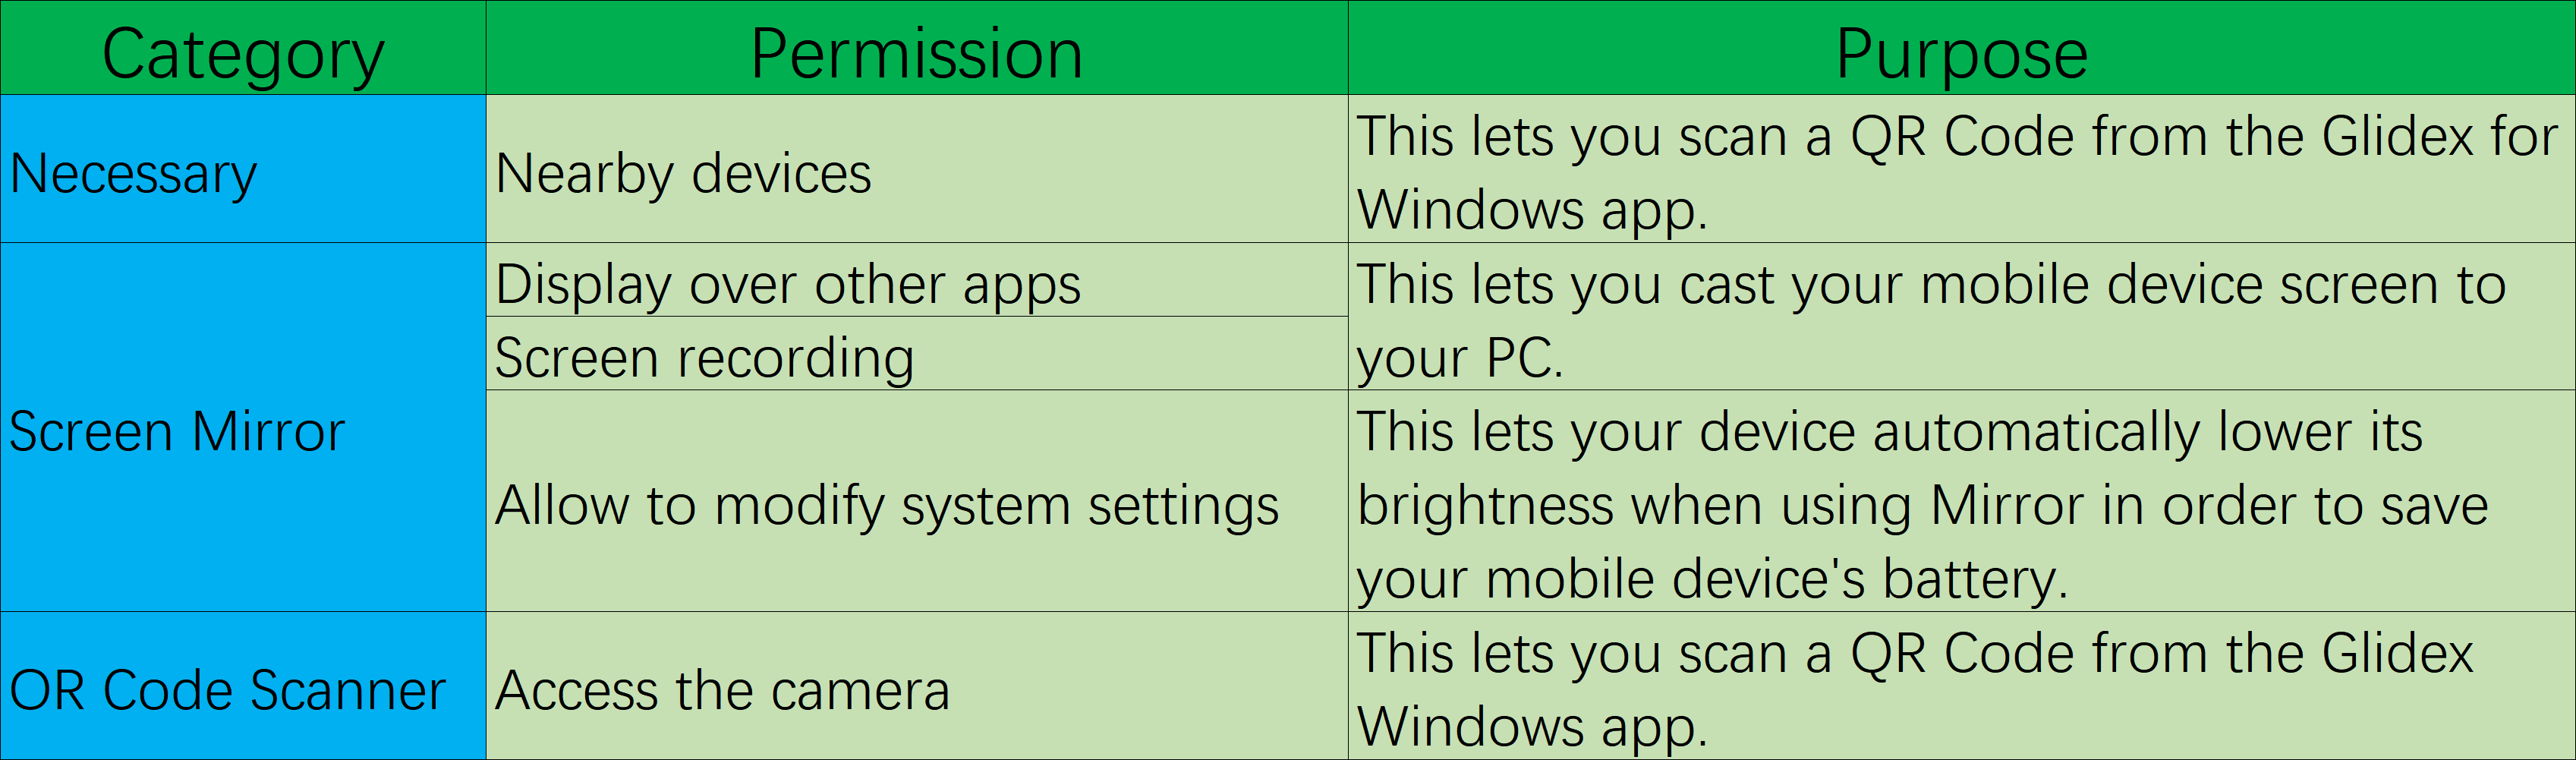
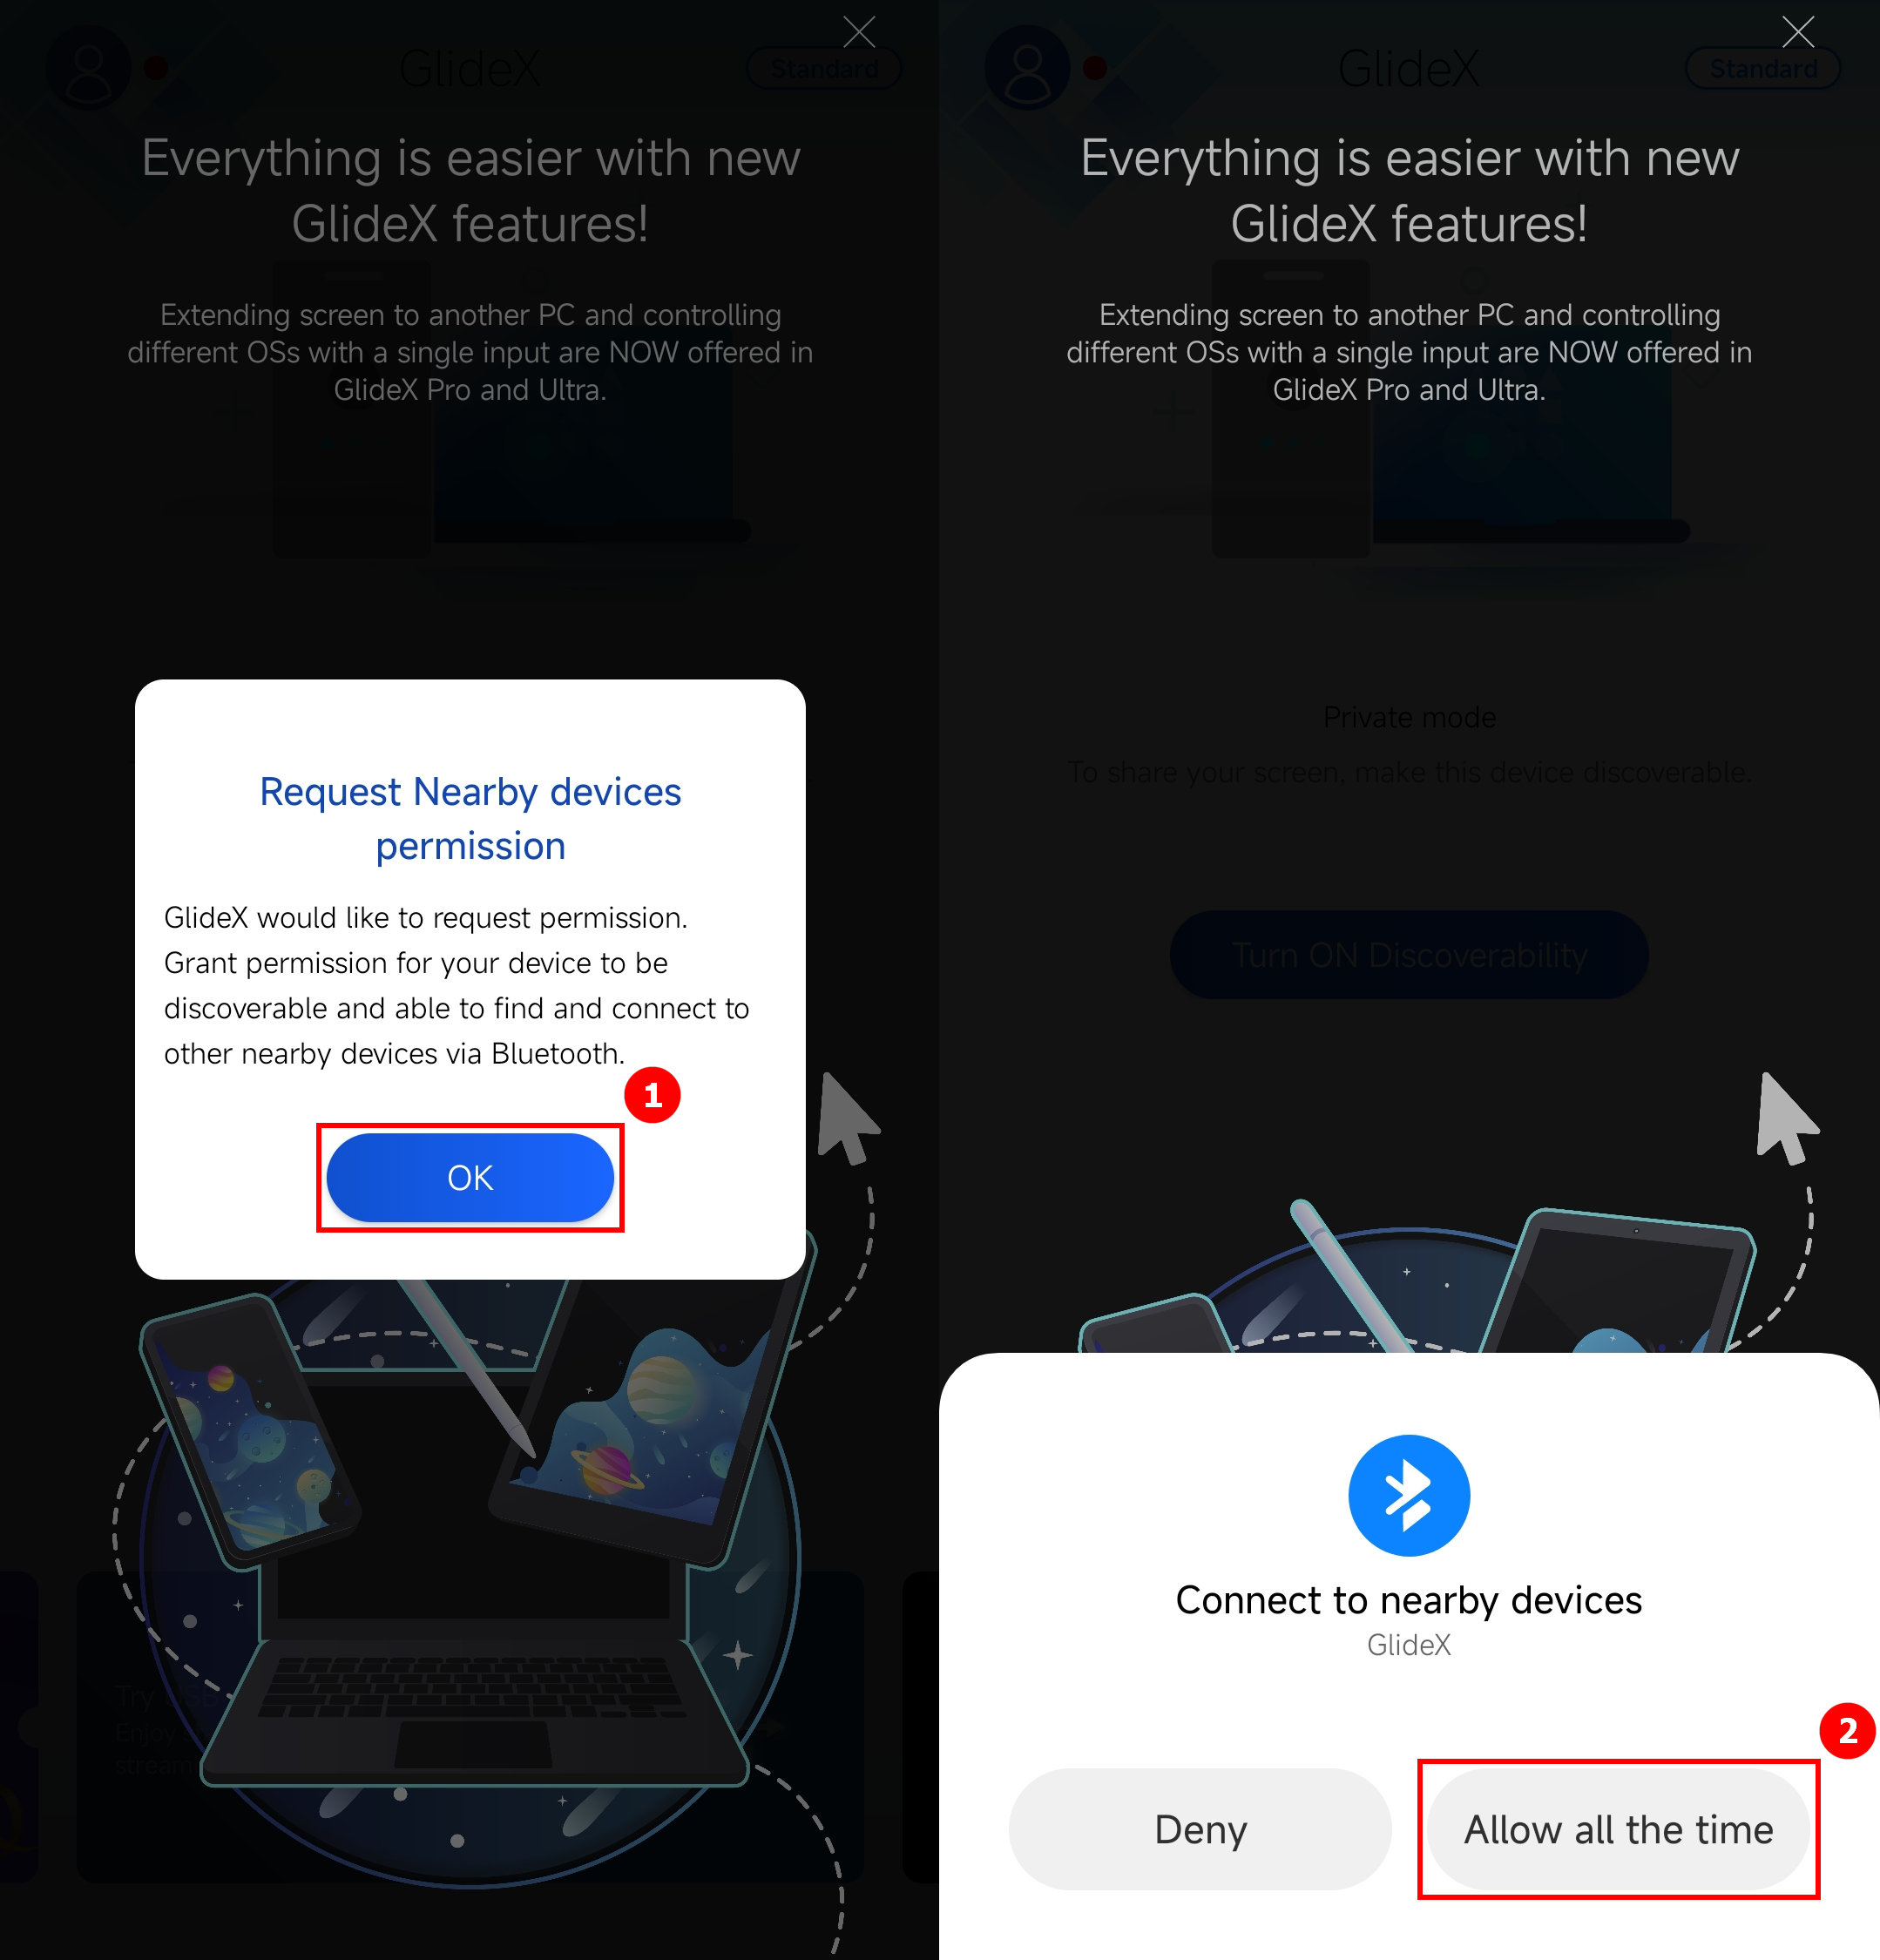
(1) Vraag toestemming voor apparaten in de buurt
Wanneer u de mobiele app voor het eerst opent, wordt u in een pop-upvenster gevraagd machtigingen voor apparaten in de buurt aanvragen in te schakelen, op ①[OK] te tikken en vervolgens tik op ②[Altijd toestaan].
(2) Toestemming weergeven over andere apps
Open de zijbalk aan de linkerkant van de hoofdpagina van de app op mobiele apps, tik op ①[Permission Management], tik op ②[Weergeven over andere apps], zoek en tik op ③[GlideX], tik om ④[Toestaan andere apps weergeven].
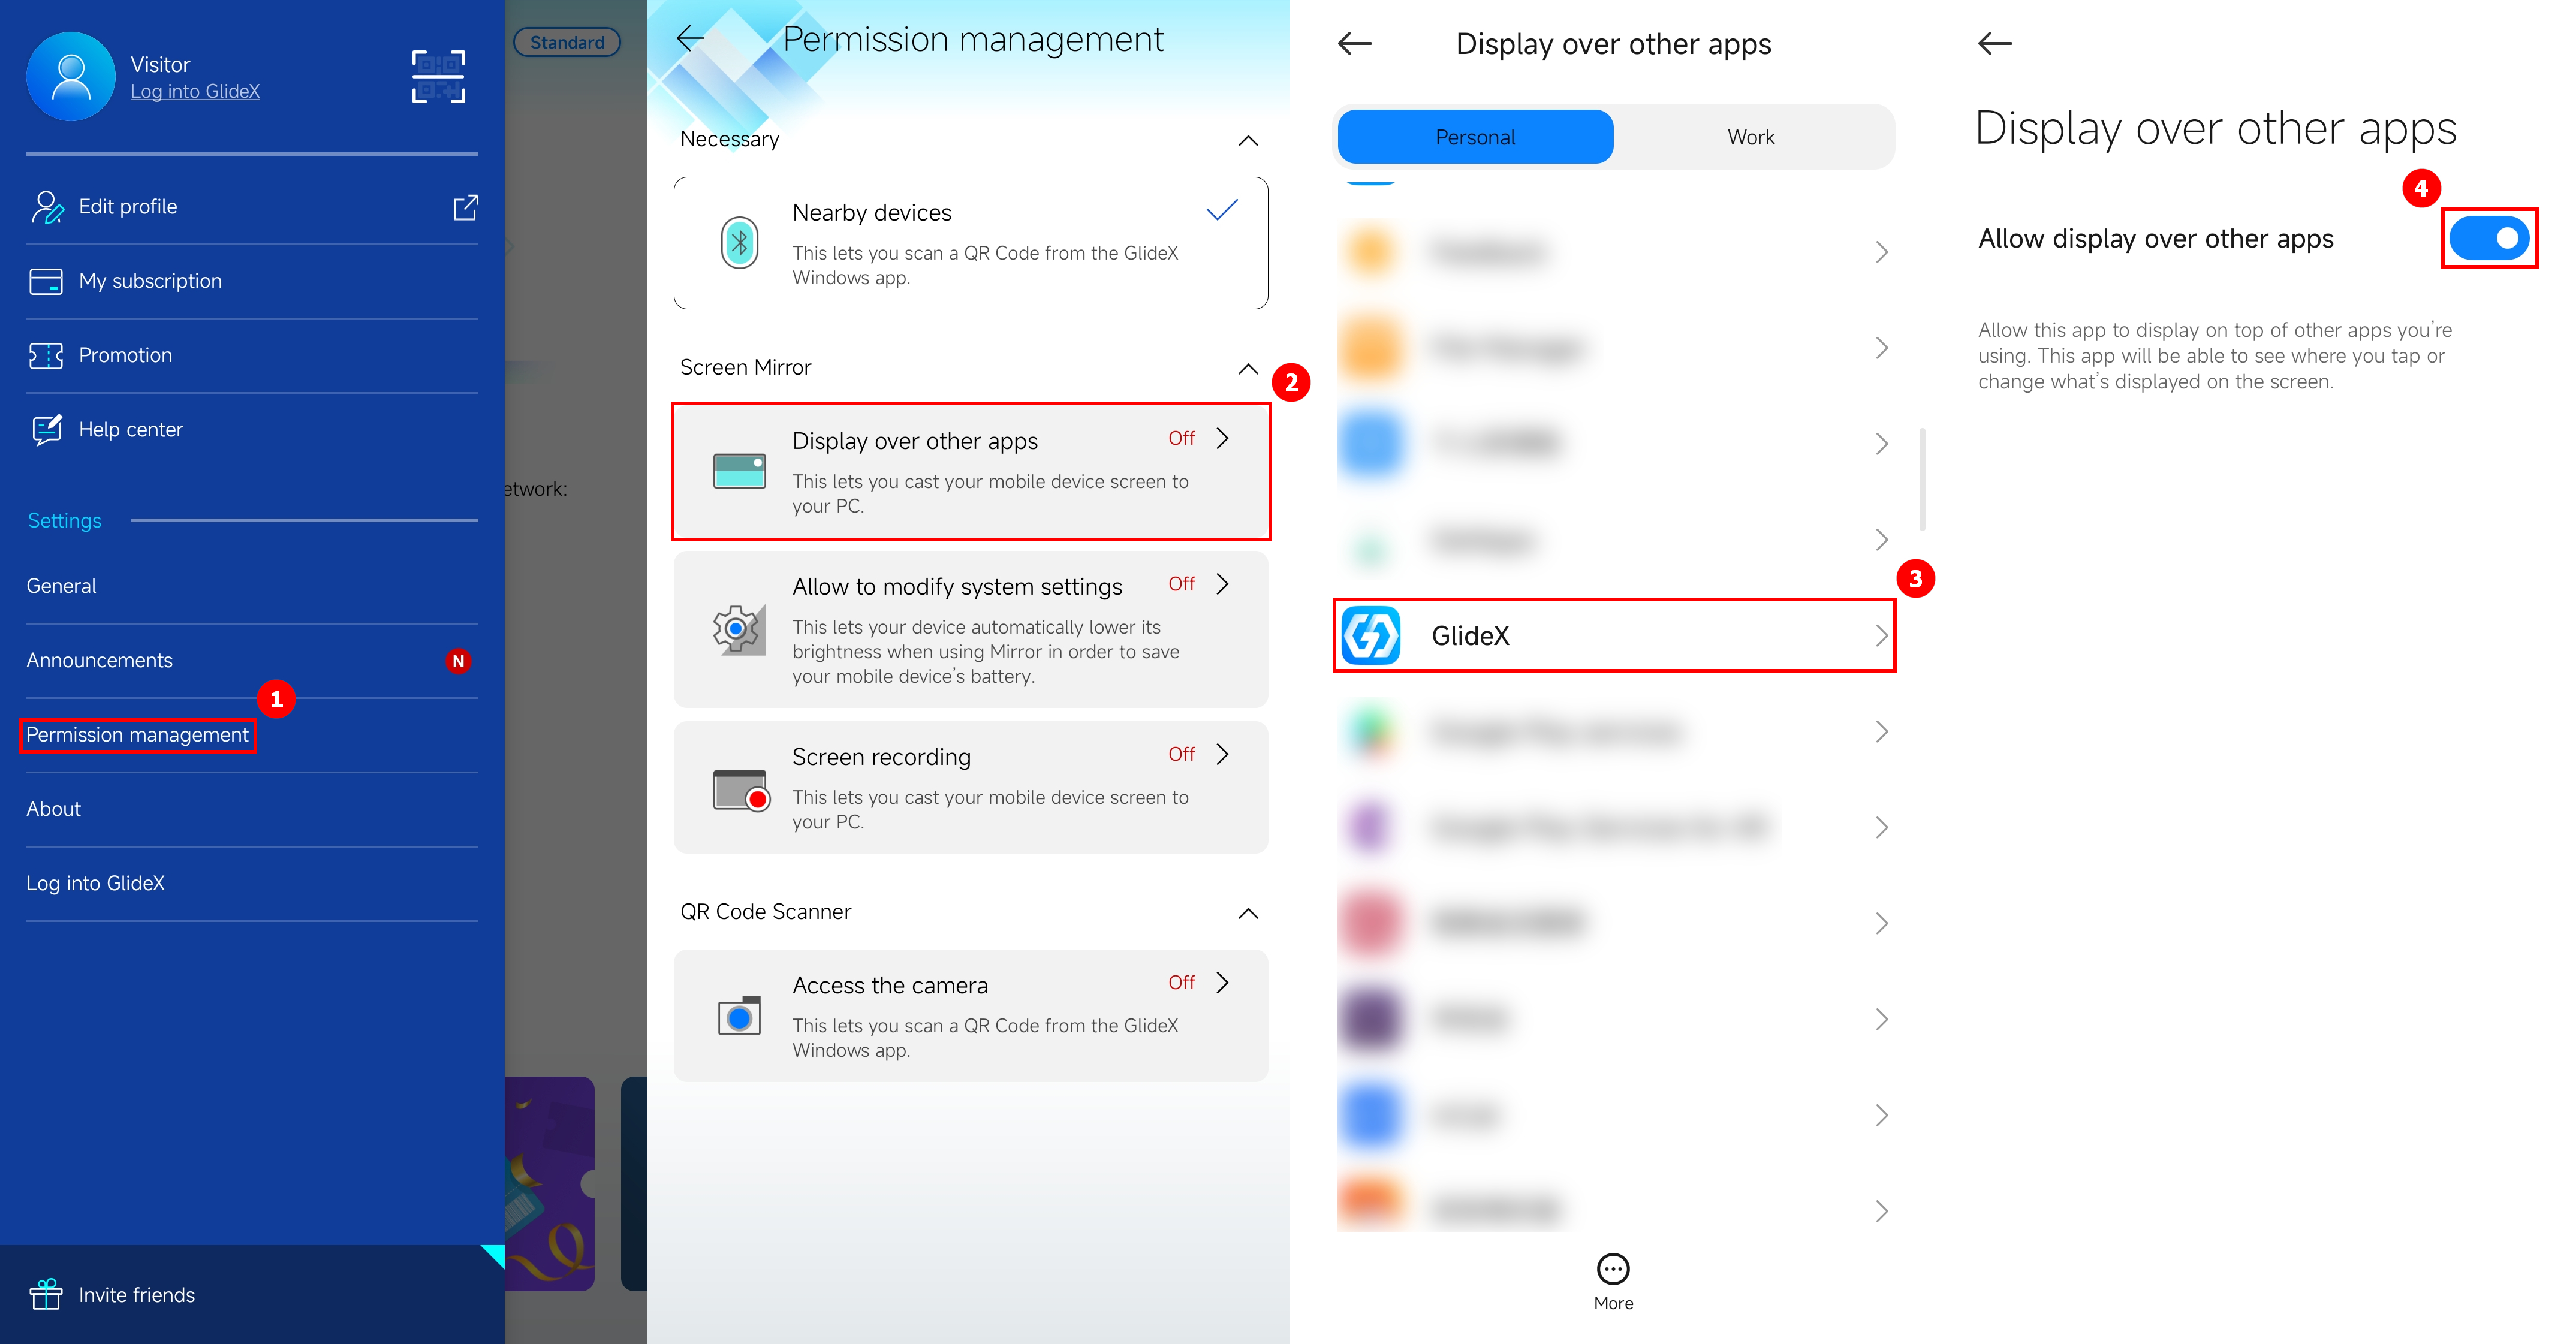
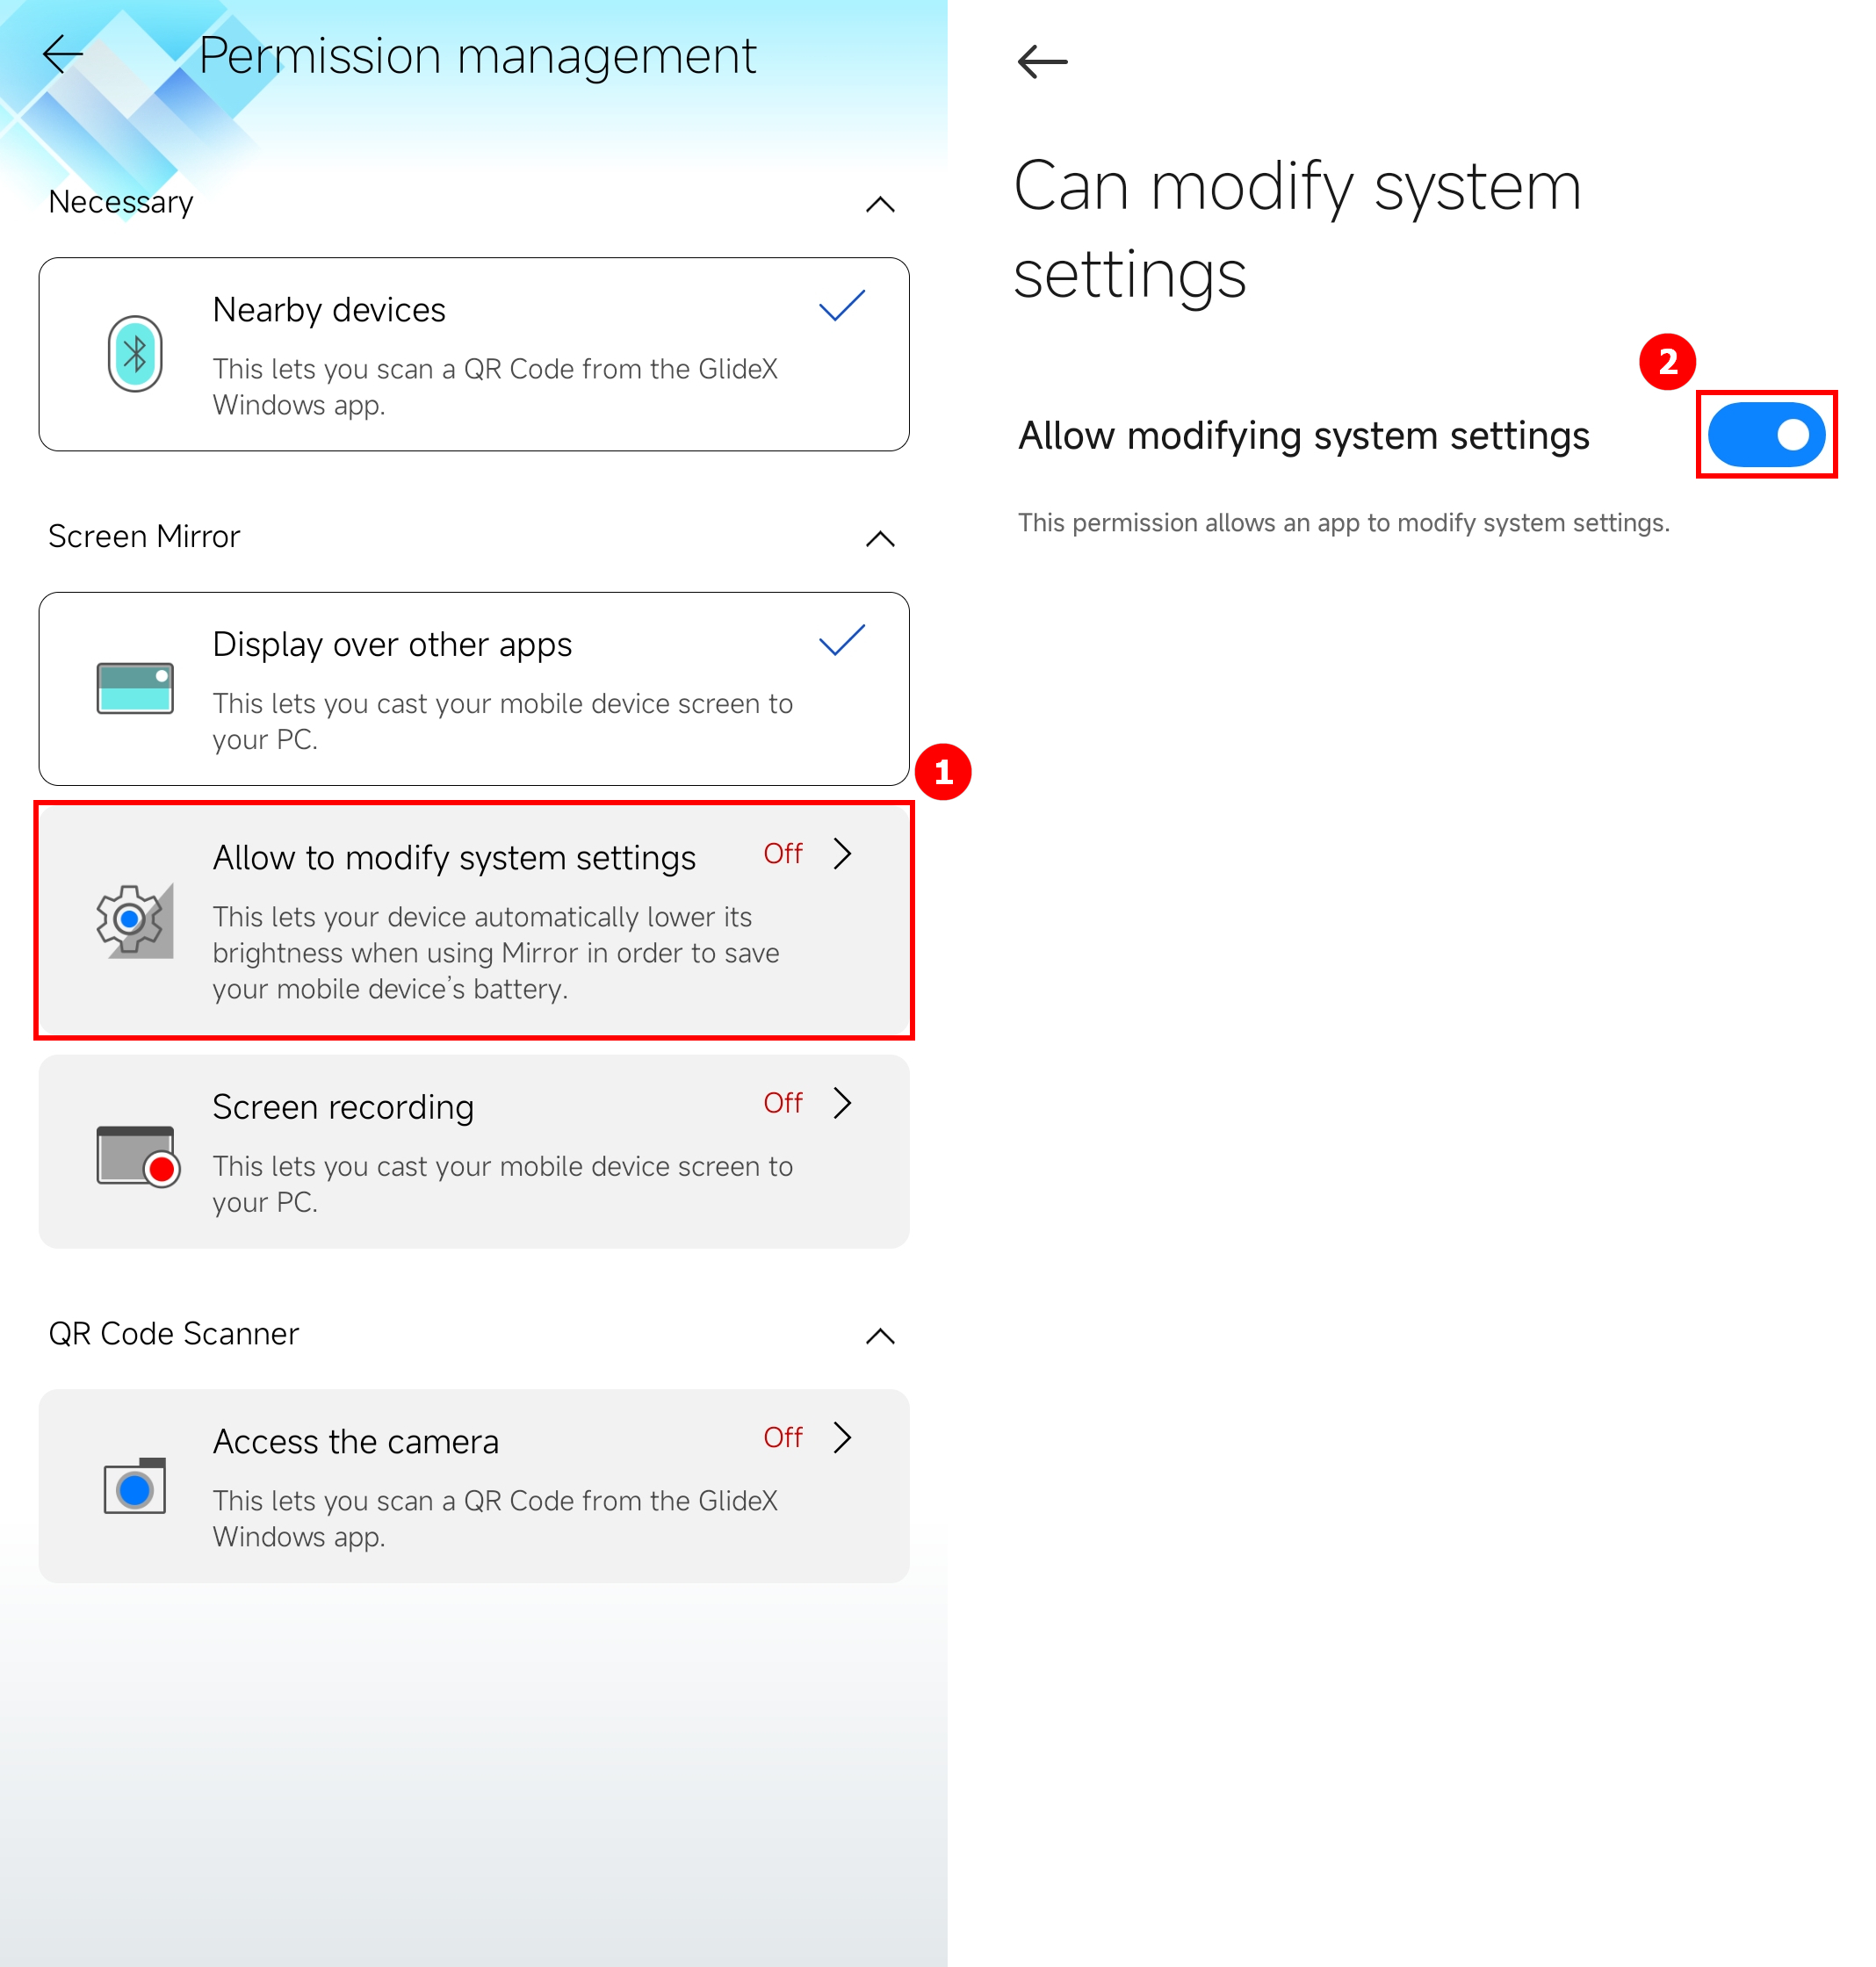
(3) Toestemming om systeeminstellingen te wijzigen
Keer terug naar de machtigingsbeheerpagina, tik op ①[Toestaan om systeeminstellingen te wijzigen], tik om in te schakelen②[Sta toe systeeminstellingen te wijzigen].
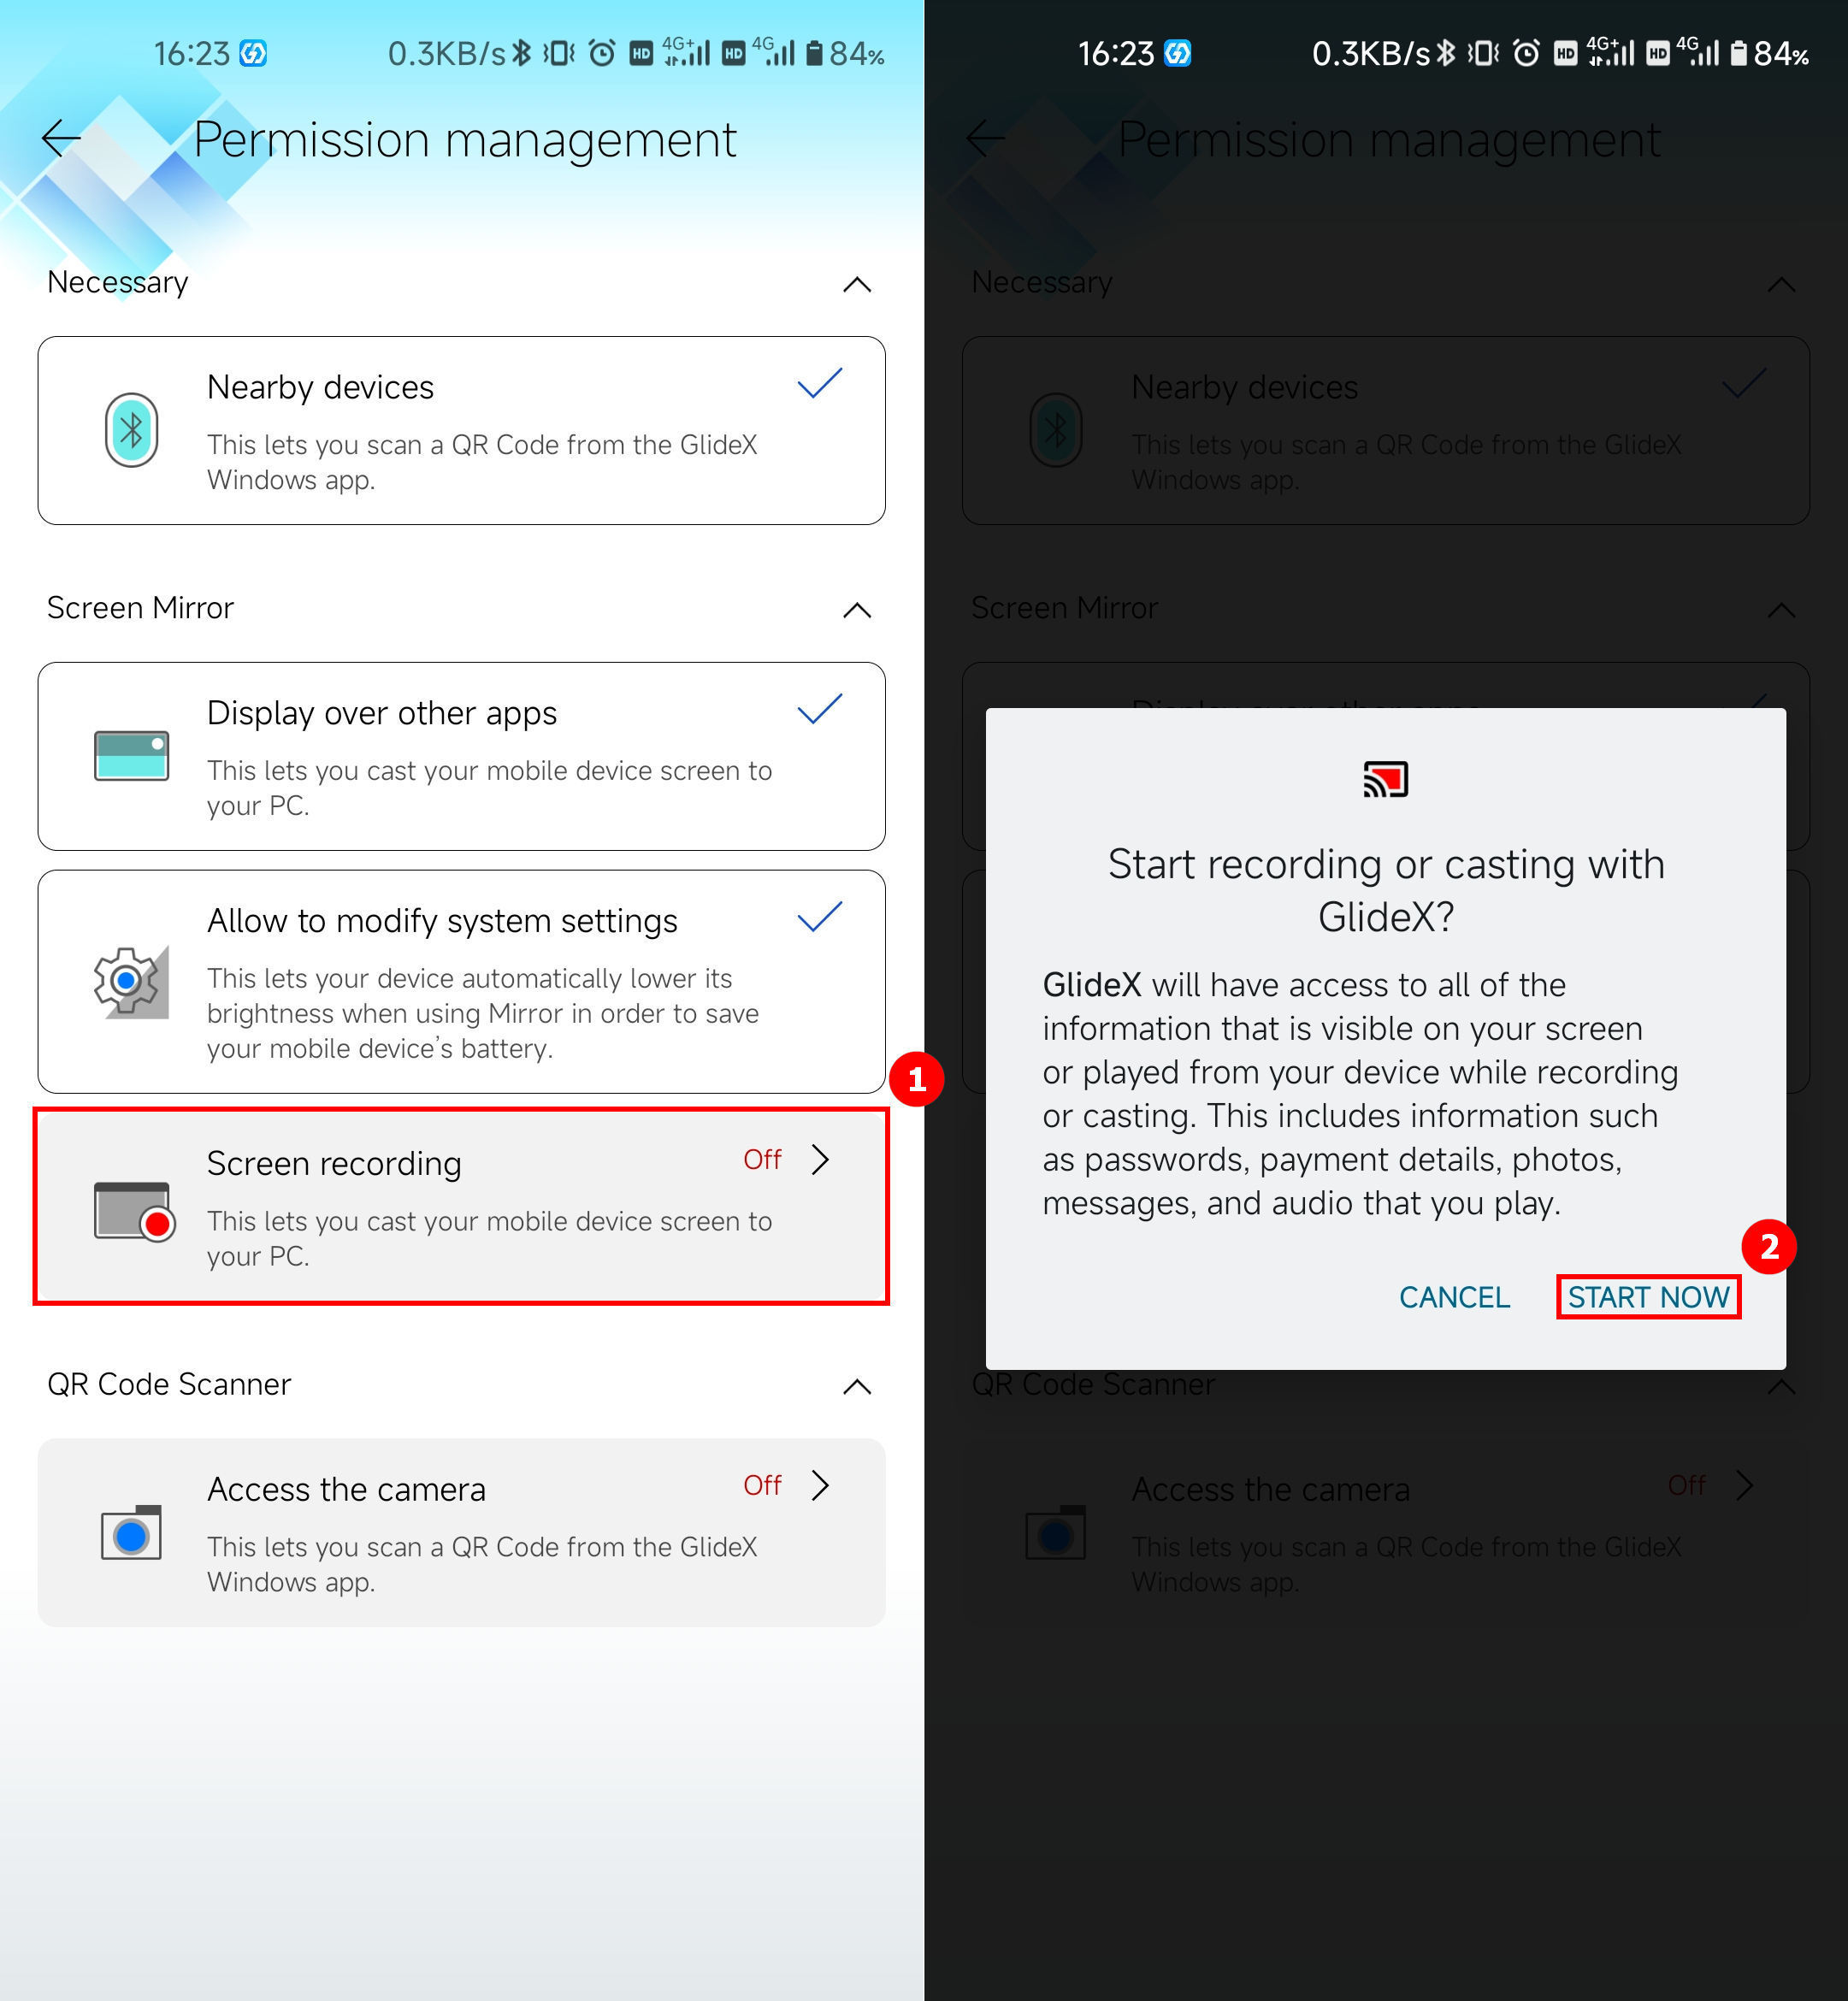
(4) Toestemmingen voor schermopnamen
Keer terug naar de pagina voor toestemmingsbeheer, tik op ①[Schermopname], tik op ②[Nu starten].
(5) Toegang tot de cameratoestemming
Keer terug naar de toestemmingsbeheerpagina, tik op ①[Toegang tot de camera], tik om in te schakelen ②[Alleen toestaan bij gebruik van de app]. De machtigingen die nodig zijn om GlideX correct te gebruiken, zijn ingeschakeld.

iOS-apparaten

Tik op ①[OK] om de lokale netwerktoegang van GlideX toe te staan. Vervolgens kunt u ervoor kiezen om op ②[OK] om Bluetooth-machtigingen te krijgen, dan kunt u ervoor kiezen om op ③[Toestaan]< te tikken om machtigingen voor meldingen te krijgen. Om de QR-code van de GlideX-app op uw computer te scannen, opent u het zijmenu > [Permissiebeheer]. Tik vervolgens op [Toegang tot de camera] en tik op ④[OK] om machtigingen toe te staan.

4. Abonnementsservice
GlideX biedt momenteel abonnementsdiensten voor gebruikers in de volgende regio's op basis van het platform voor mobiele apparaten dat door leden is geregistreerd. Als u problemen ondervindt bij het inschakelen van de abonnementsservice, controleer dan:[GlideX] Algemene GlideX-abonnementsserviceproblemen
(1) Om u te abonneren op de GlideX-service, logt u in op hetzelfde account op de Windows- en mobiele apps. Klik op ①[Gebruikerscentrum] in het zijmenu van de Windows-app en vervolgens op ②[Voer uw account en wachtwoord] en klik vervolgens op ③[Inloggen]. Tik aan de mobiele kant op ④[Inloggen op GlideX] en vervolgens op ⑤[Toets uw account in en wachtwoord] en tik vervolgens op ⑥[Inloggen].

(2) Nadat het inloggen op het account is voltooid, kunt u elk abonnement kiezen op de mobiele app > Zijmenu > [Mijn abonnement].

*Selecteer de gewenste resolutie en vernieuwingsfrequentie. Houd er rekening mee dat de werkelijke prestaties afhangen van uw netwerk en hardwaremogelijkheden.
** Afhankelijk van uw netwerk en hardwarecapaciteit, zouden de resolutie en verversingssnelheid van native kwaliteit in werkelijkheid hoger zijn dan 2K60.
5. Spiegelen
Met Spiegelfunctiekunt u het scherm van uw apparaat op een pc projecteren voor eenvoudiger toetsenbordinvoer en meer schermruimte. Gebruik uw Android- of iOS-apps via Windows in de productieve ruimte van uw pc!
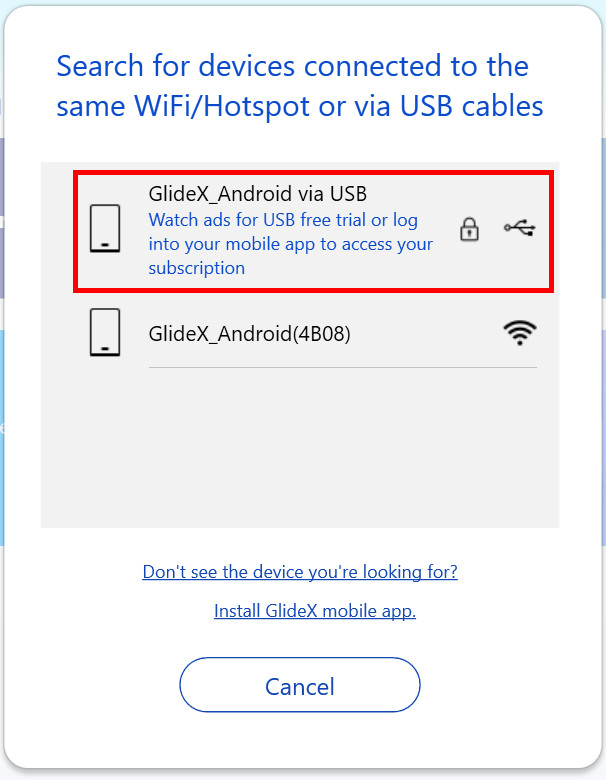
(1) Klik op de hoofdpagina van GlideX op ①[Verbinden], klik op uw ②[mobiel apparaat]. Er verschijnt een melding in de mobiele app, tik op ③[Accepteren] .
Als u uw mobiele apparaat niet kunt vinden of andere problemen ondervindt, raadpleeg dan: [GlideX] How to sluit apparaat(en) aan via Wi-Fi of USB-kabel
Als u een Android-apparaat gebruikt om verbinding te maken met een computer via een USB-kabel, moet u eerst de instellingen voor USB-foutopsporing inschakelen. Raadpleeg: [GlideX] USB-foutopsporing inschakelen voor Android-apparaten?
Als u verbinding maakt met de 2,4 GHz WiFi-band, raadpleegt u de volgende link voor meer informatie over het overschakelen naar 5 GHz voor een betere schermdelingservaring: [GlideX] Hoe overschakelen van 2,4 GHz naar 5 GHz voor een betere schermdelingservaring?

(2) Als u na het inschakelen van Mirror de muis of het toetsenbord aan de computerzijde wilt gebruiken om het mobiele apparaat te bedienen, of de luidspreker van de computer wilt gebruiken om het mediageluid van het mobiele apparaat af te spelen, klikt u op de ④[PC Control] knop en klik vervolgens op ⑤[Start Bluetooth Pairing].
Als u problemen ondervindt met Bluetooth-koppeling, raadpleeg dan: [GlideX] Bluetooth-koppelingsproblemen

(3) Er verschijnt een pop-upvenster aan de kant van het mobiele apparaat, dat aangeeft dat [GlideX] 120 seconden nodig heeft om te worden ingeschakeld voordat andere Bluetooth-apparaten kunnen detecteren uw telefoon, klik op ⑥[Toestaan]. Bevestig dat de ⑥[koppelingscode] op de computer en mobiele apparaten hetzelfde zijn en klik vervolgens op ⑦[Koppelen] op zowel computer als mobiele apparaten. Als het koppelen mislukt, koppelt u beide kanten los en koppelt u elkaar vervolgens handmatig op de Bluetooth-koppelingspagina.

(4) Nadat de computer met succes is gekoppeld, wordt het volgende pop-upvenster weergegeven.

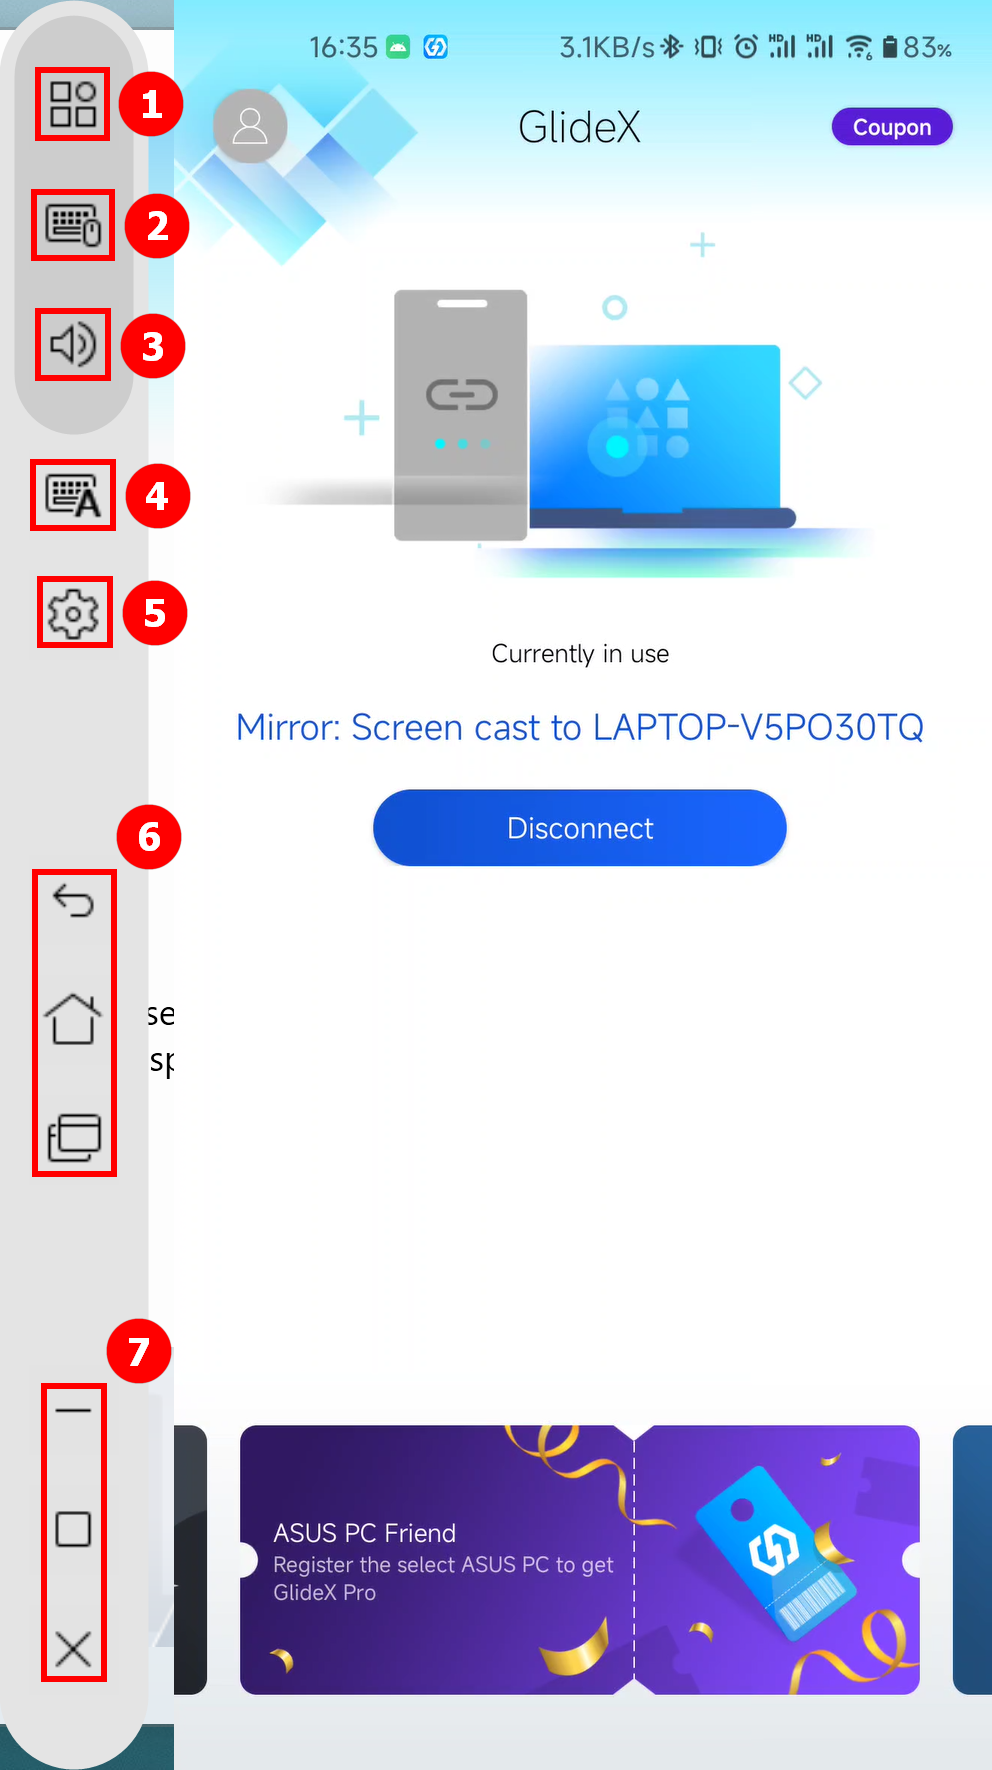
(5) Nadat de pc-besturingsfunctie is ingeschakeld, zijn er in het spiegelmenu de ①[pc-besturing]-functies, waaronder ②[Toetsenbord & Muis] schakelknop, ③[Audio] schakelknop, ④[Sneltoets invoermethode], ⑤[Instellingen] knop, ⑥[Mobiele apparaatbediening] knop, en ⑦[Control] knop.
Wanneer u de functie [PC Control] van de spiegelfunctie gebruikt en u problemen ondervindt, raadpleegt u: [GlideX] Screen Mirror PC-bediening gebruiken
Toetsenbord & Muis - Om het pc-toetsenbord te gebruiken om te typen op het aangesloten mobiele apparaat, varieert de sneltoets op de mobiele systemen:
- Android-apparaten: van taal wisselen (druk op Shift + spatiebalk) & Wissel van invoermethode (druk op Shift + Alt-toets), die beschikbaar is op het Google-toetsenbord en het Samsung-toetsenbord.
- iOS-apparaten: van taal wisselen (druk op Ctrl+spatiebalk)
Om de muis van de pc op het mobiele apparaat* te gebruiken, schakelt u over naar de spiegelmuismodus door op het gespiegelde scherm te klikken. Om die modus te verlaten, drukt u op Esc. Bovendien kunt u de snelheid van uw aanwijzer aanpassen op basis van op de mobiele systemen:
- Android-apparaten: Klik op de knop [Instellingen] om de snelheid aan te passen.
- iOS-apparaten: Ga naar uw mobiele apparaat [Instellingen] > [Algemeen] > [Trackpad & Muis]. We raden u aan de schuifregelaar 'Trackingsnelheid' naar de laagste stand te slepen. Schakel tegelijkertijd de instelling [Natuurlijk scrollen] uit om uw scrollgedrag op de computer te behouden.
* Ga naar je mobiele apparaat [Instellingen] > [Toegankelijkheid] > [Aanraken] > Schakel [AssistiveTouch] in of vraag Siri om [AssistiveTouch] in te schakelen.
Audio - Deze functie vereist pc later dan 20H1-apparaten. Als het een lagere versie is, is het raadzaam om het besturingssysteem voor deze functie te upgraden. Momenteel ondersteunt GlideX het streamen van stereomuziek.
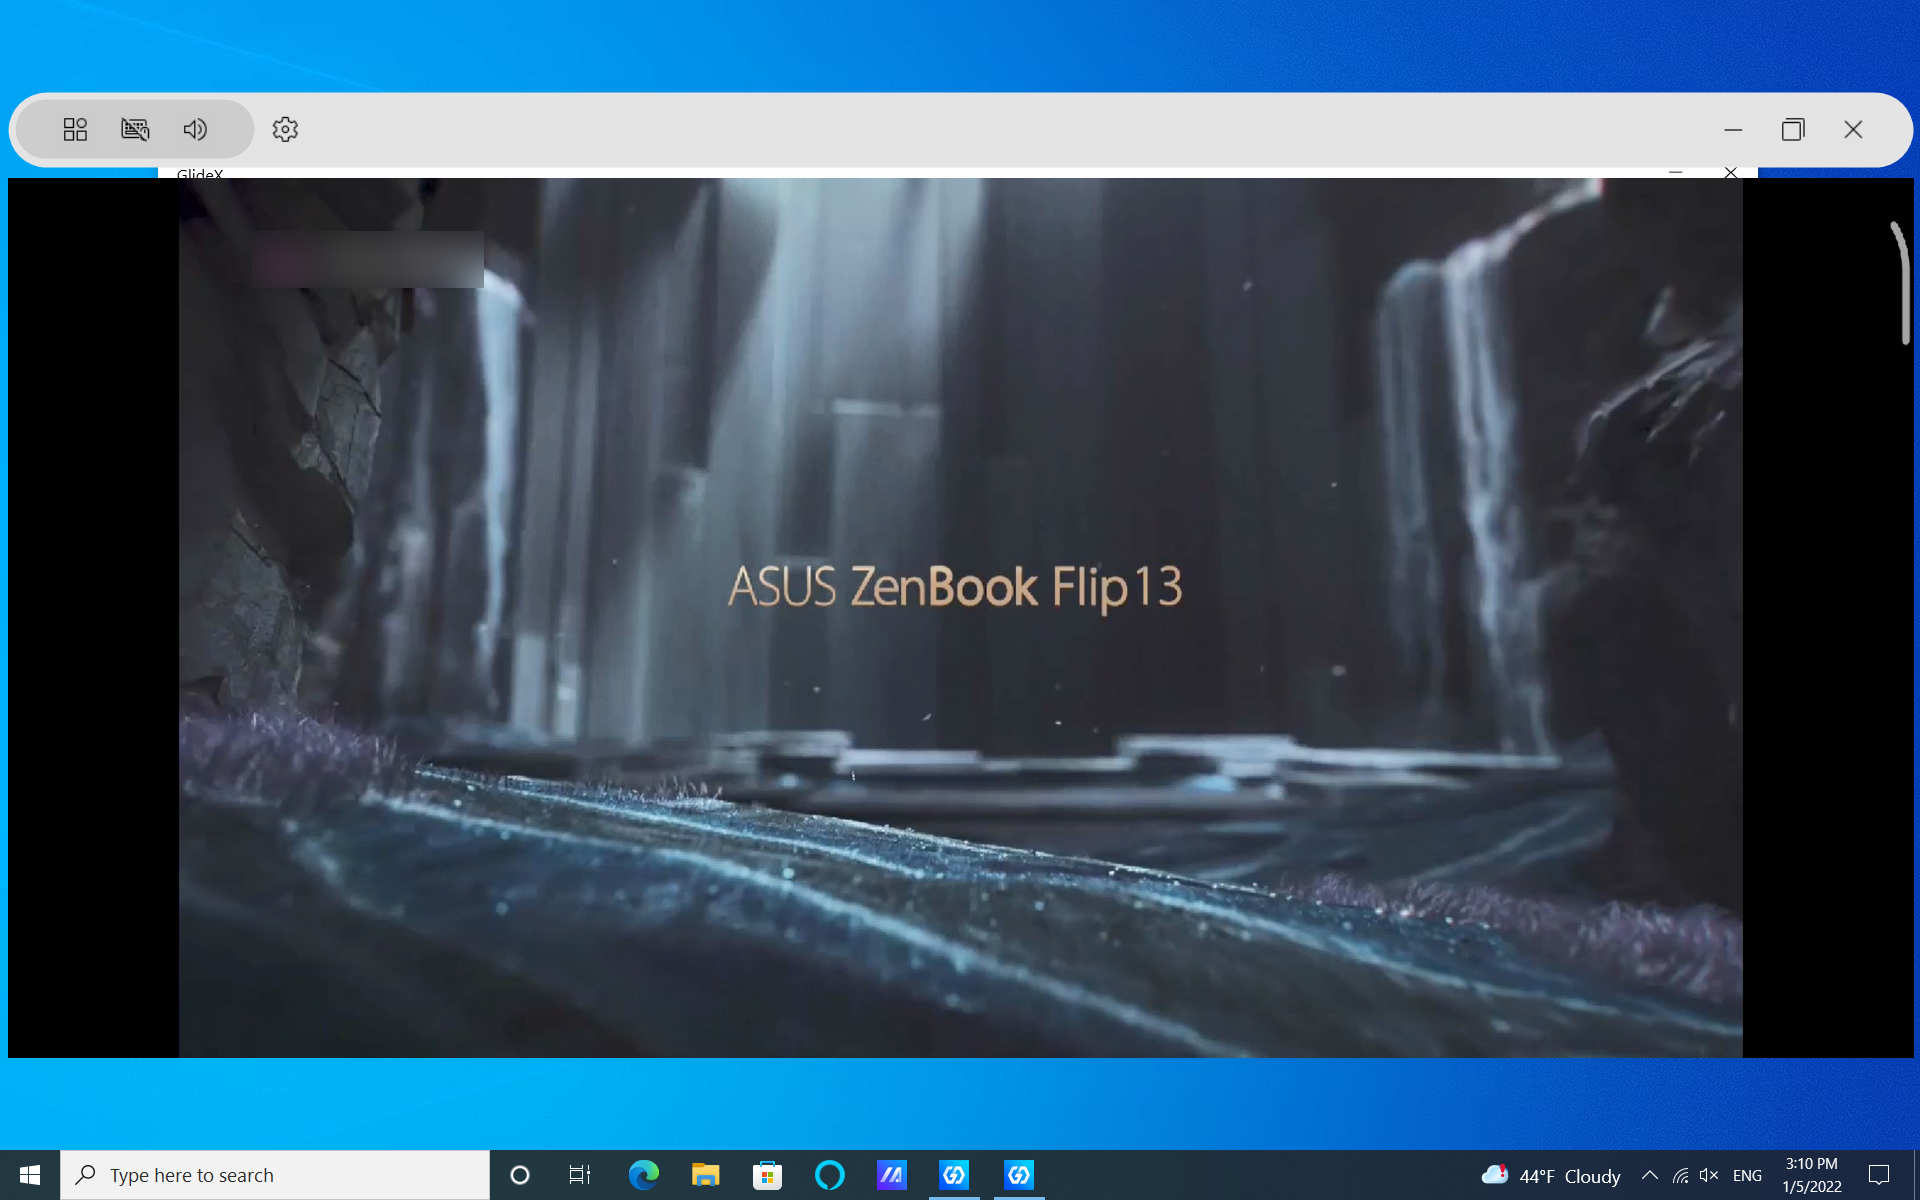
(6) Wanneer uw mobiele apparaat liggend wordt weergegeven (bijvoorbeeld als u een video bekijkt), wordt de Window pagina van uw computer ook horizontaal weergegeven.
(7) Hoe verander ik de kwaliteit van de schermstreaming voor Mirror?
Als je netwerk onstabiel is, raden we je aan over te schakelen naar 5 GHz wifi, of op ①[Instellingen] te klikken om je te abonneren om [Dynamische modus] te ontgrendelen in ②[Streamingkwaliteit] of maak verbinding met een USB-kabel voor een betere ervaring.

(8) U kunt de Mirror-functie ook gebruiken door een USB-verbinding te gebruiken, zoals weergegeven in de volgende afbeelding.
Wanneer u een USB-verbinding gebruikt, moet u eerst de machtigingen van het mobiele apparaat openen. Raadpleeg de verbinding:[GlideX ] Hoe schakel ik USB-foutopsporing in voor Android-apparaten? | Officiële ondersteuning | ASUS wereldwijd

6. Verlengen
(1) Klik op ①[Verbinden].

(2) Ultra-gebruikers kunnen twee apparaten verbinden, klik op ②[Apparaten] om de verbindingsstappen aan de kant van het mobiele apparaat zijn vergelijkbaar met die hierboven beschreven. Hieronder worden de stappen beschreven die u moet nemen wanneer het aangesloten apparaat een pc is.

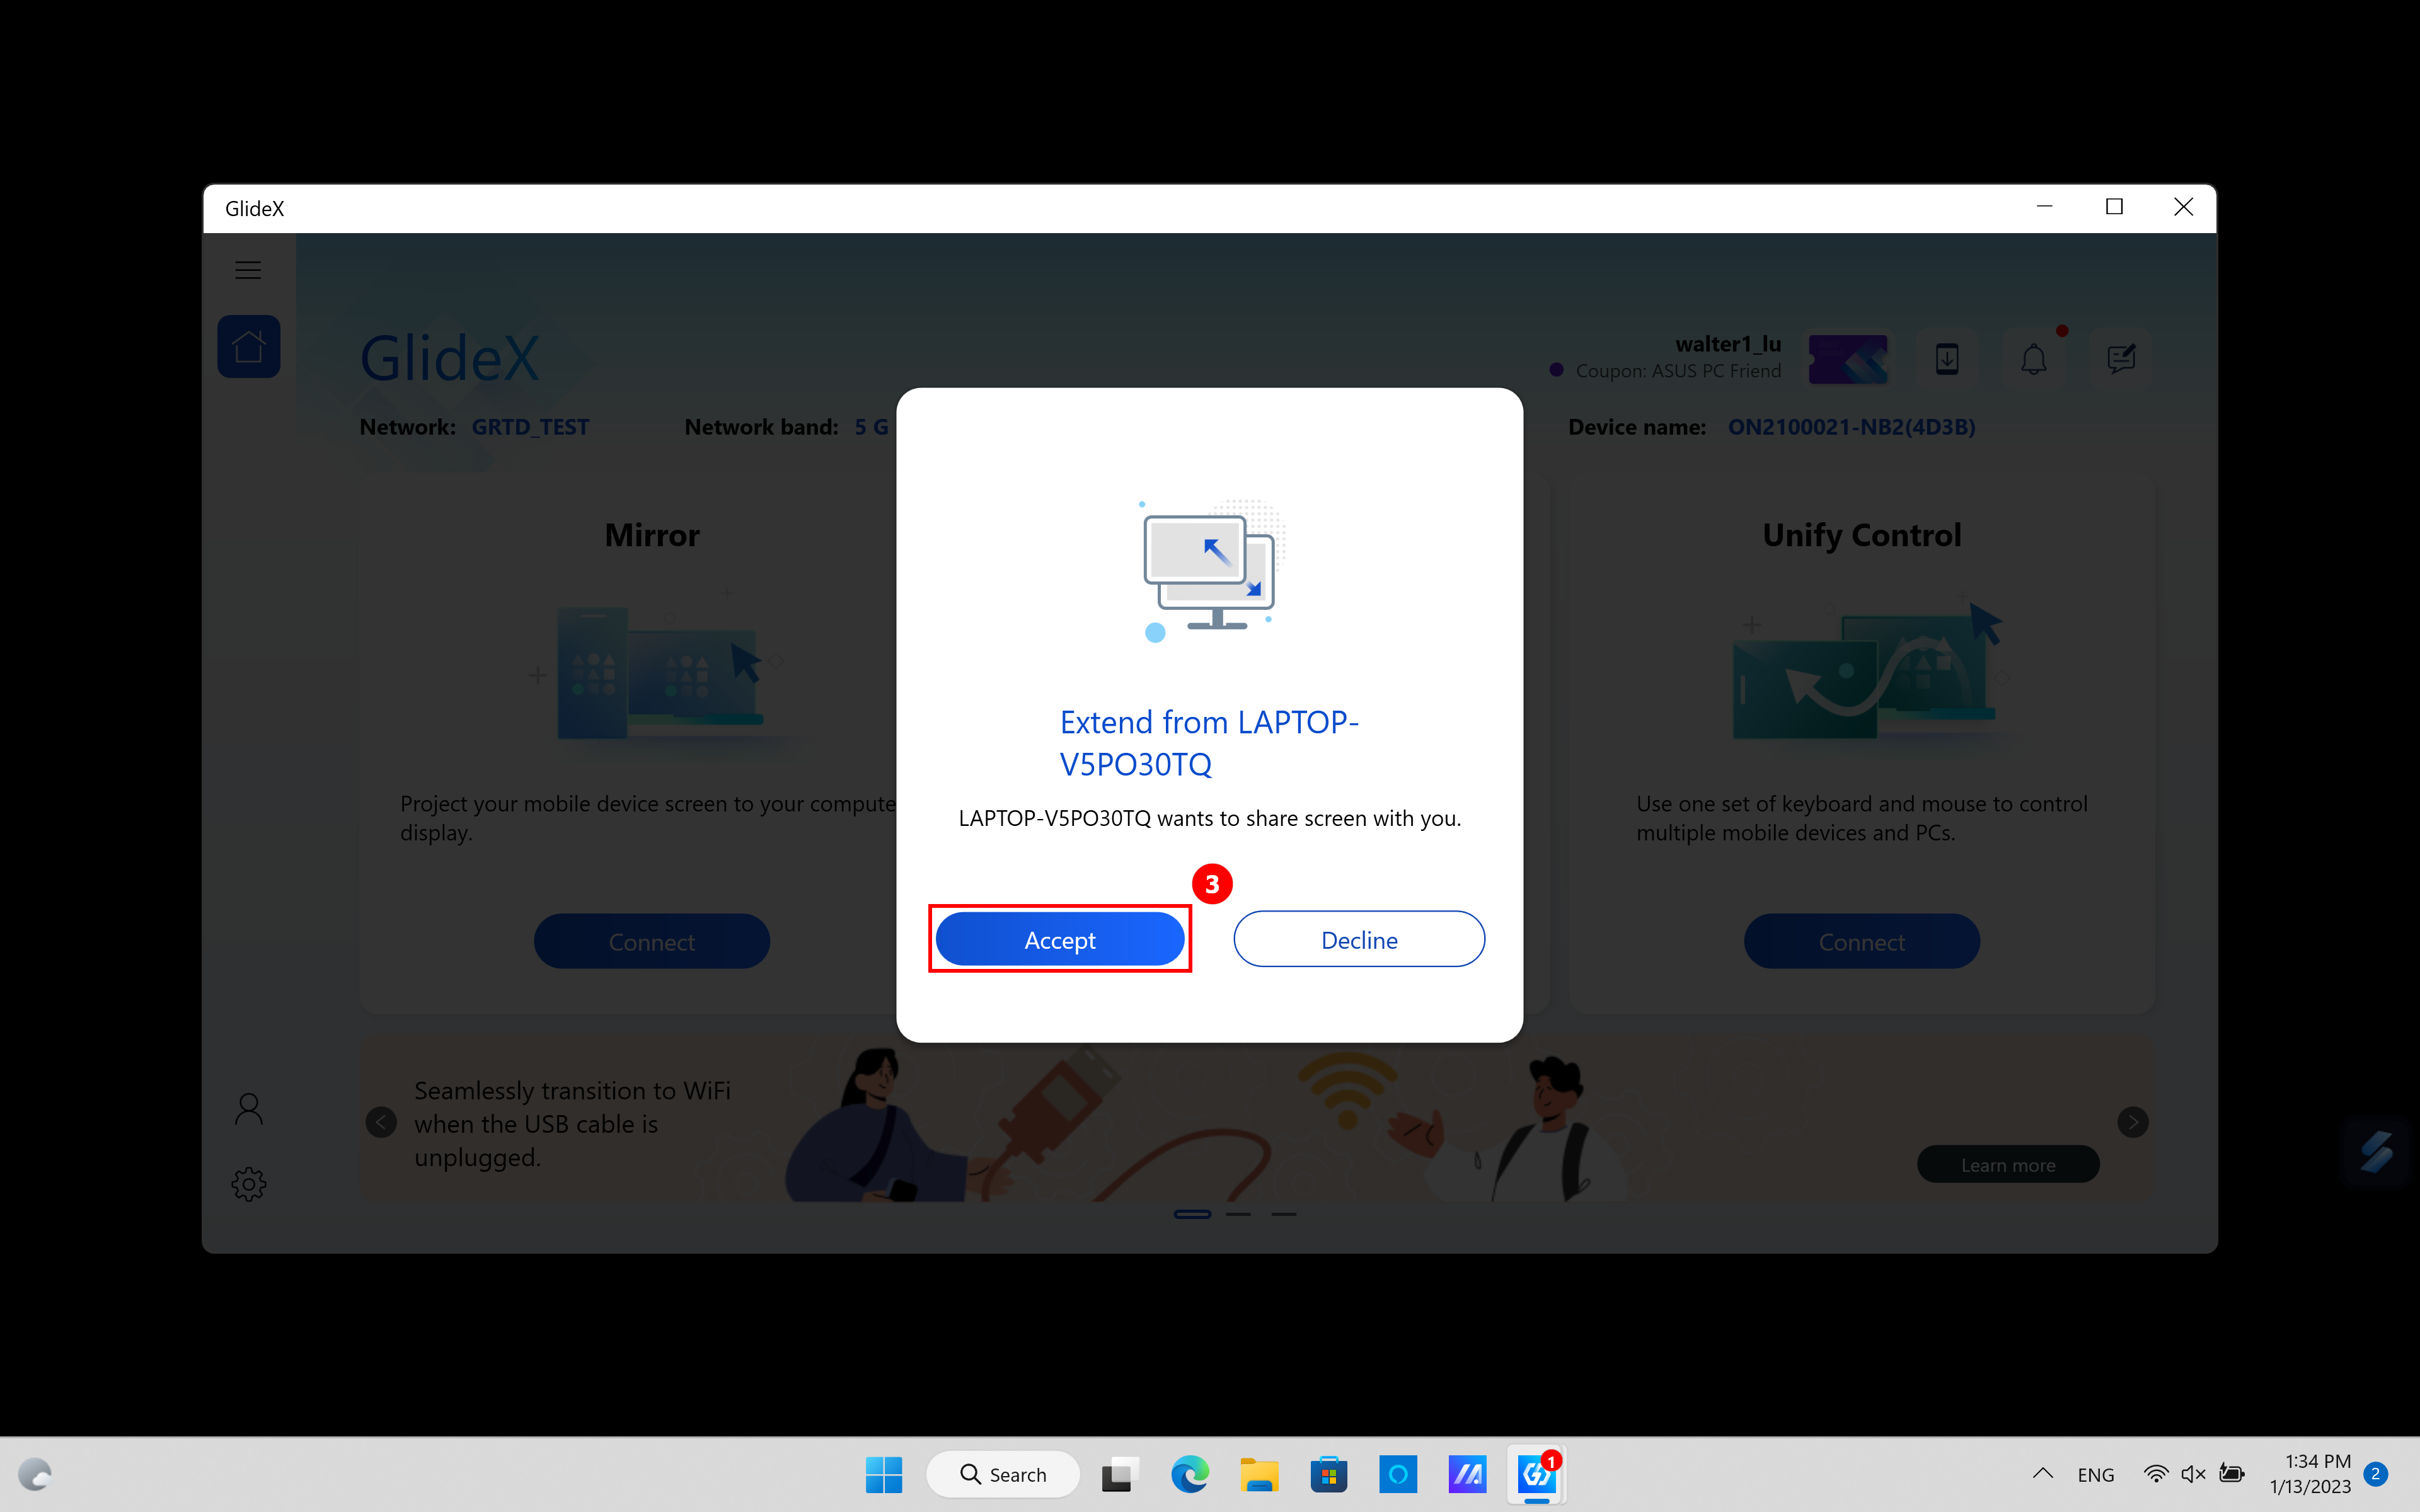
(3) Er verschijnt een pop-upprompt in de GlideX-app op een andere computer, klik op ③[Accepteren].
(4) Het volgende scherm verschijnt op de tweede computer, klik op ④[Volledig scherm] om het scherm van de eerste computer volledig scherm te maken op de tweede computer.
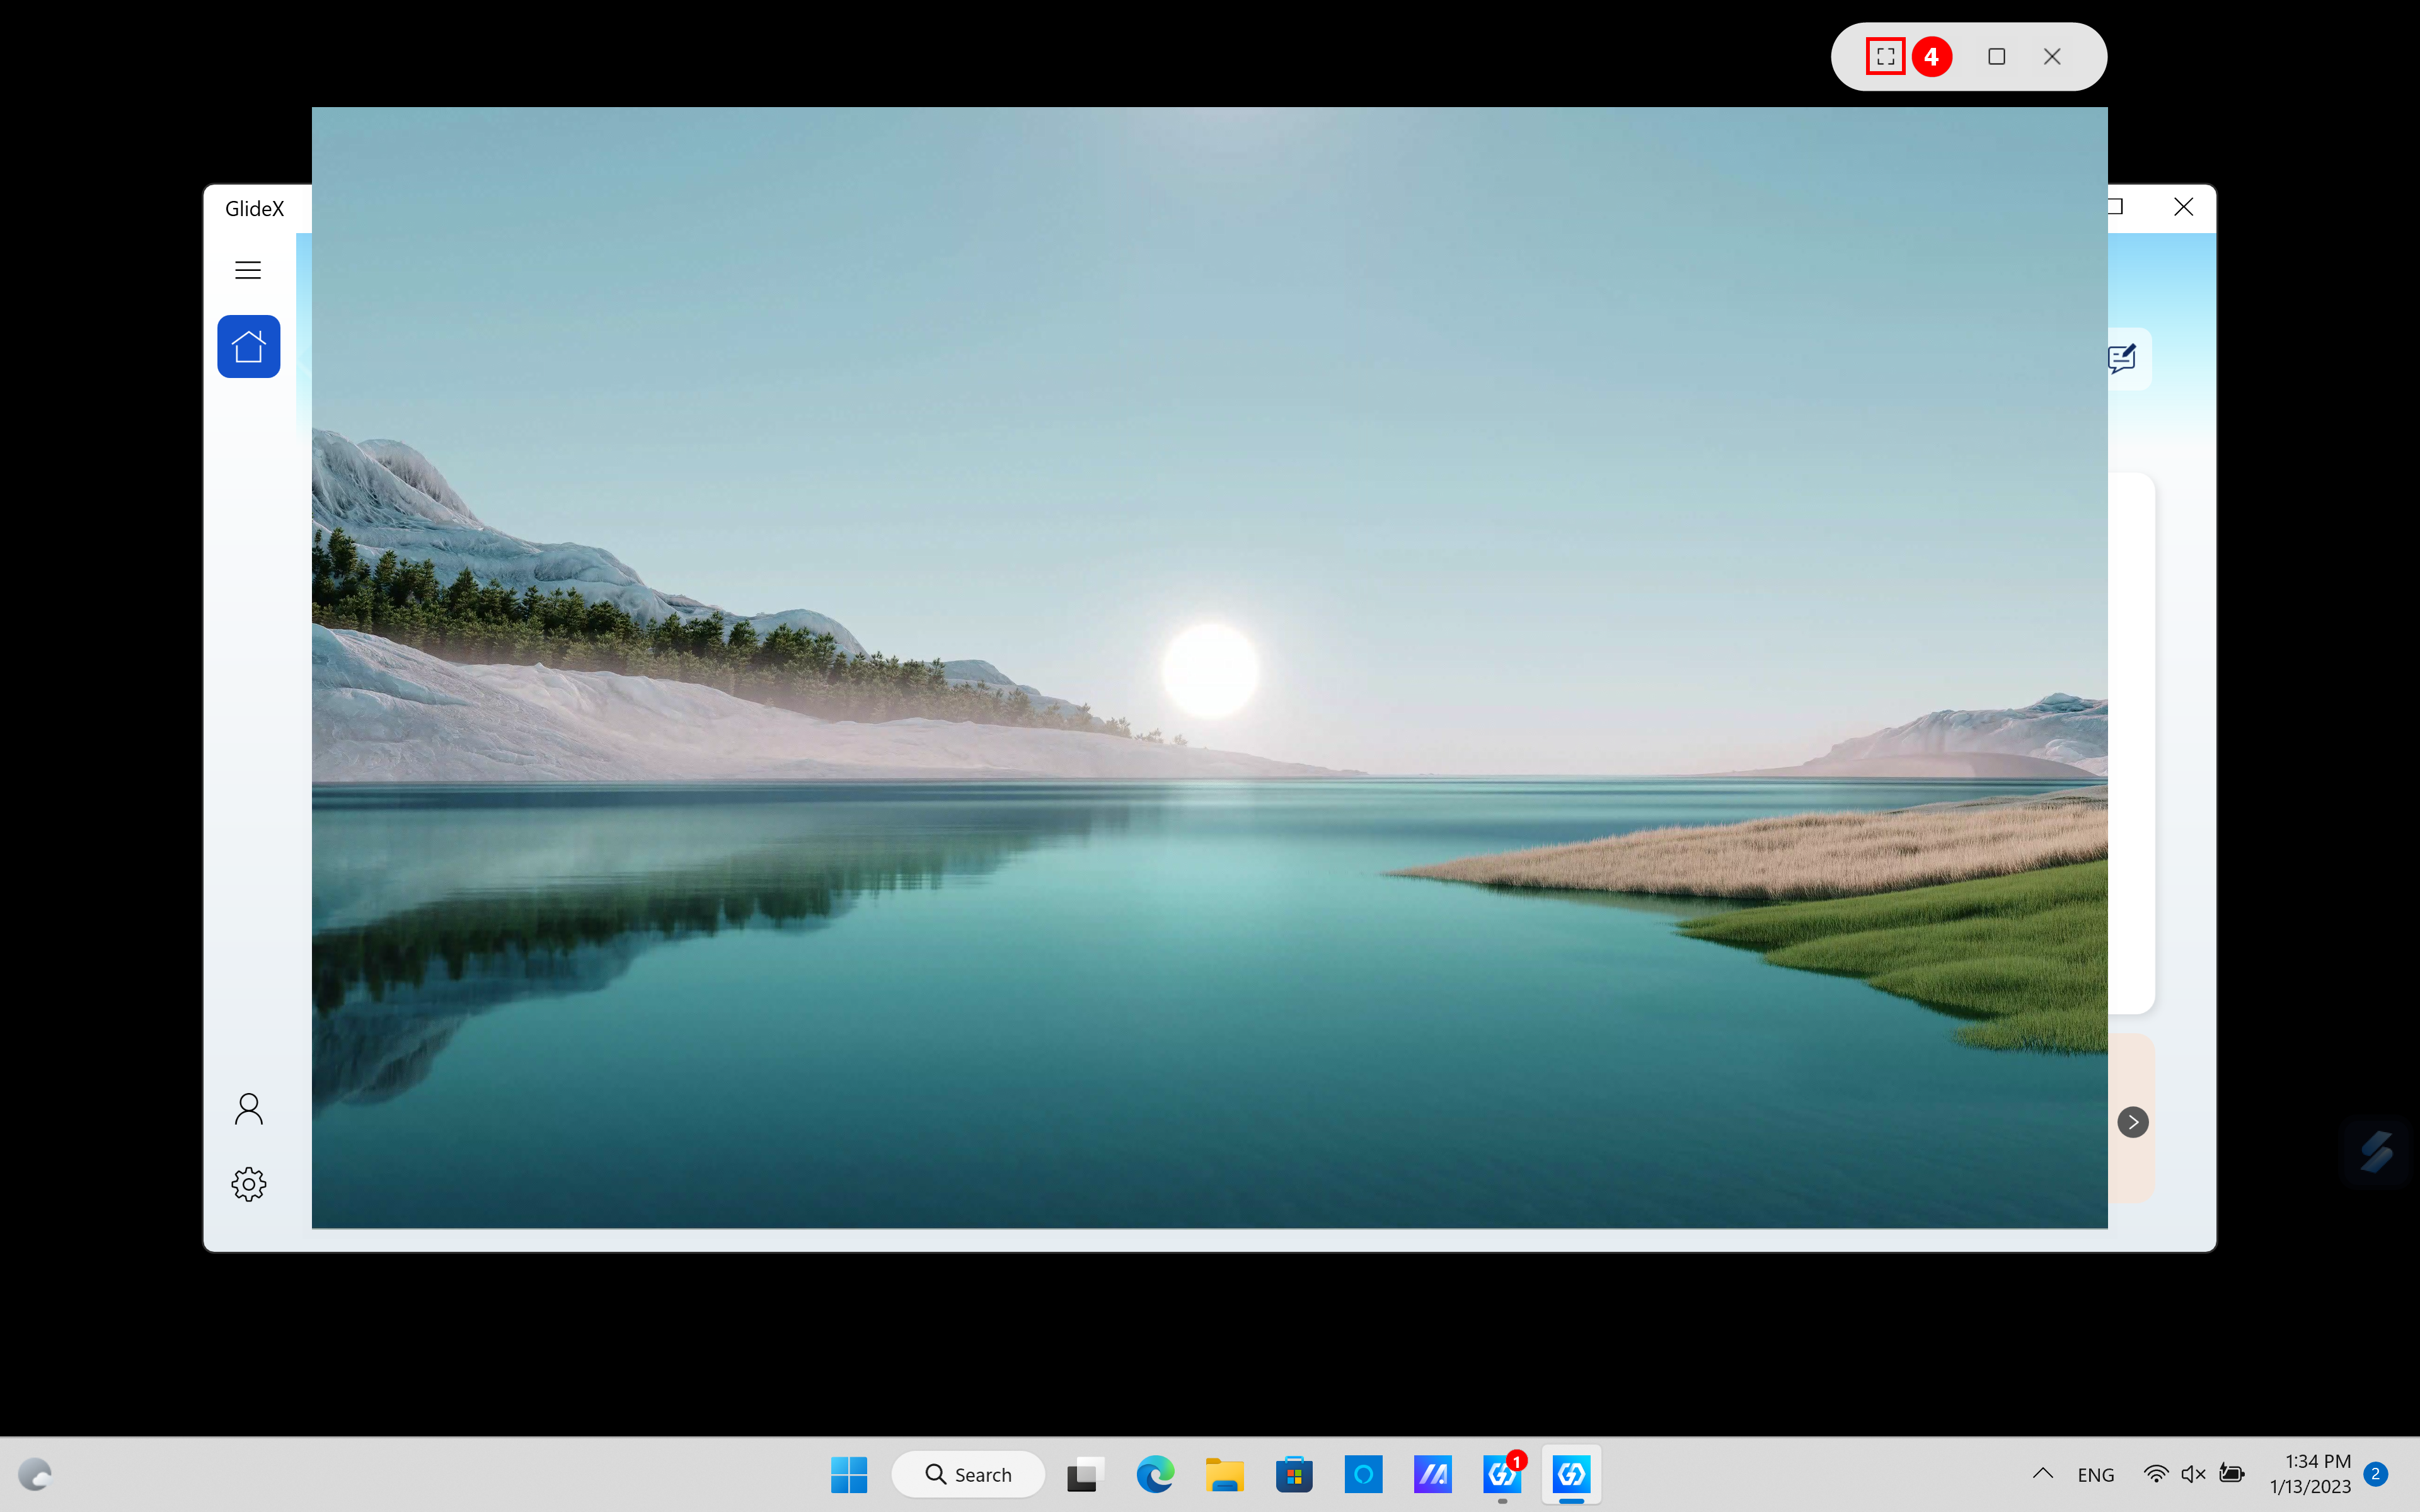
(5) Op dit moment wordt het uitgebreide scherm van de eerste computer op het volledige scherm weergegeven op de tweede computer en kunt u de modus Volledig scherm verlaten door op [ESC ] toets van de tweede computer.

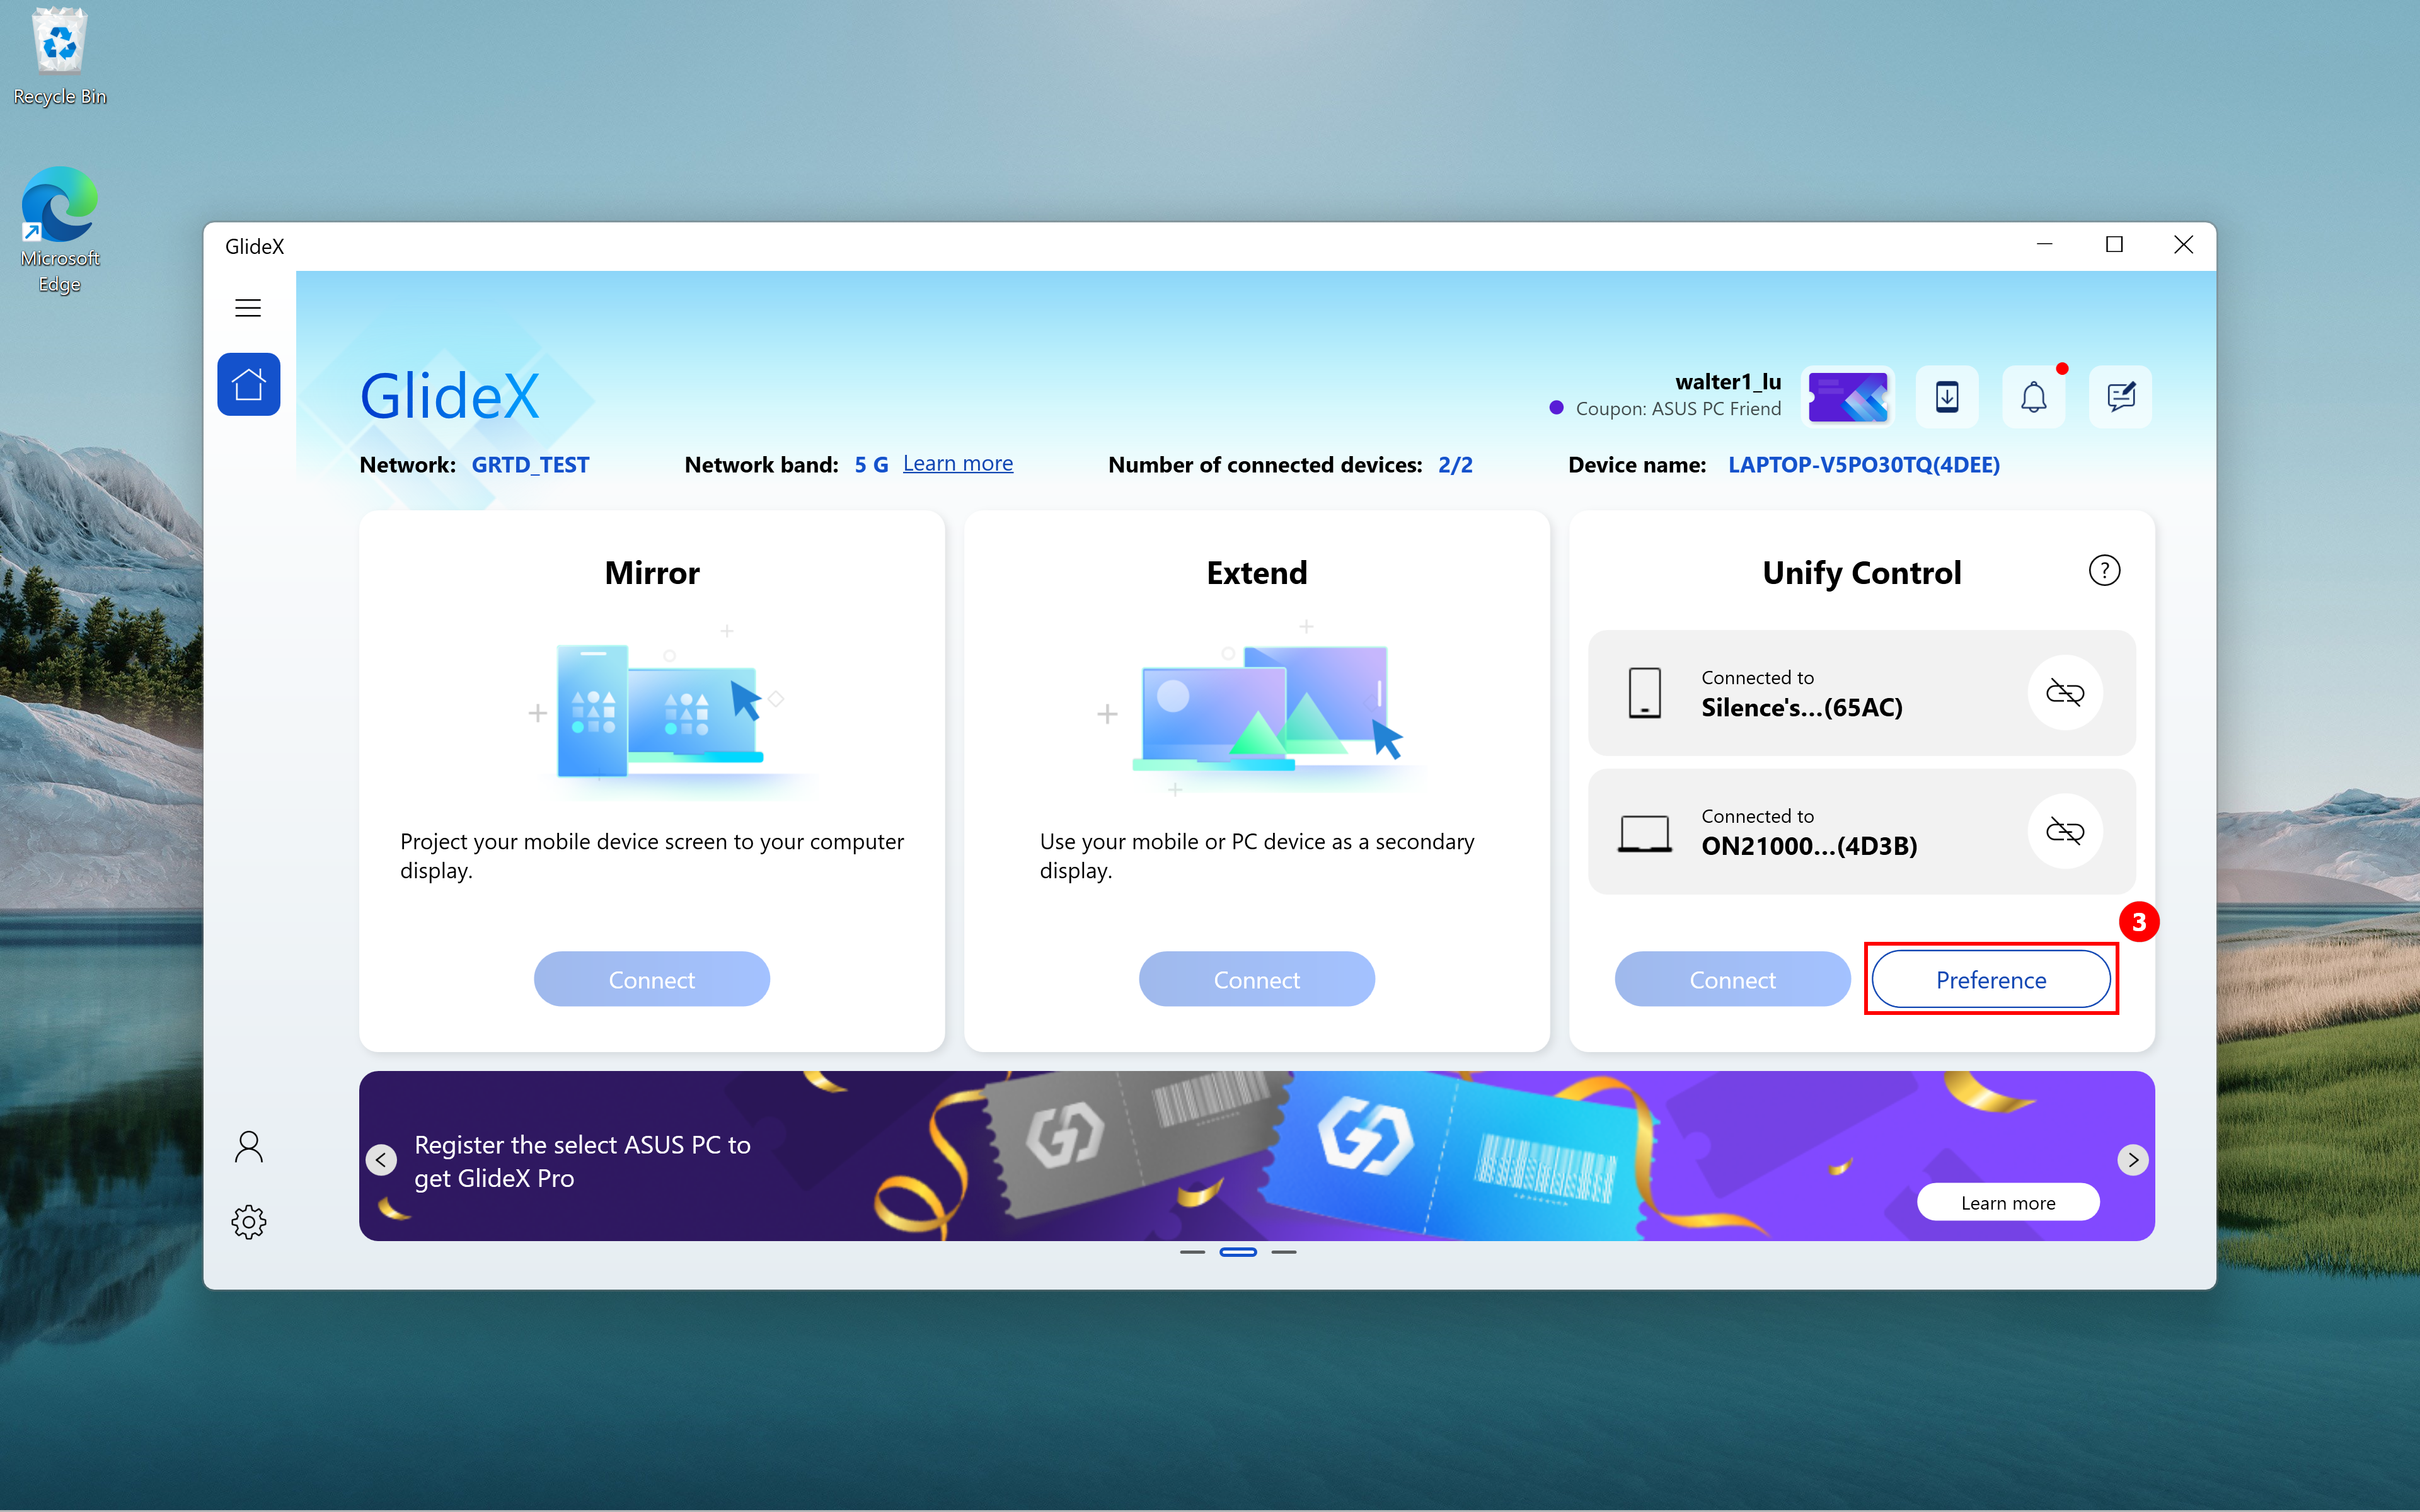
(6) Ga terug naar de GlideX-app van de eerste computer, je kunt zien dat ⑤[Twee apparaten] zijn gebruikt als uitgebreide schermen, klik op ⑥[Voorkeur].

(7) In ⑦[Display/Device Herschikking] aan de linkerkant kunt u de relatieve positie van het scherm instellen. In ⑧[StreamingQuality] aan de rechterkant kun je de kwaliteit van de twee uitgebreide schermen instellen.

7. Verenig controle
(1) Klik op ①[Verbinden].

(2) Selecteer uw ②[Apparaten] en maak verbinding.

(3) Nadat de apparaatverbinding is voltooid, klikt u op ③[Preference] op het volgende scherm.
(4) Pas de relatieve positie van de monitor en het apparaat aan in ④[Display/Device Rearrangement].

(5) Wanneer u de Unify Control-functie gebruikt, kunt u problemen tegenkomen, zoals het niet kunnen vinden van de muis. Klik op ⑤[Instellingen], klik op ⑥[Algemeen] en pas de aanwijzer of het toetsenbord aan schakelopties in ⑦[Besturingstoetsenbord- en cursoropties samenvoegen].
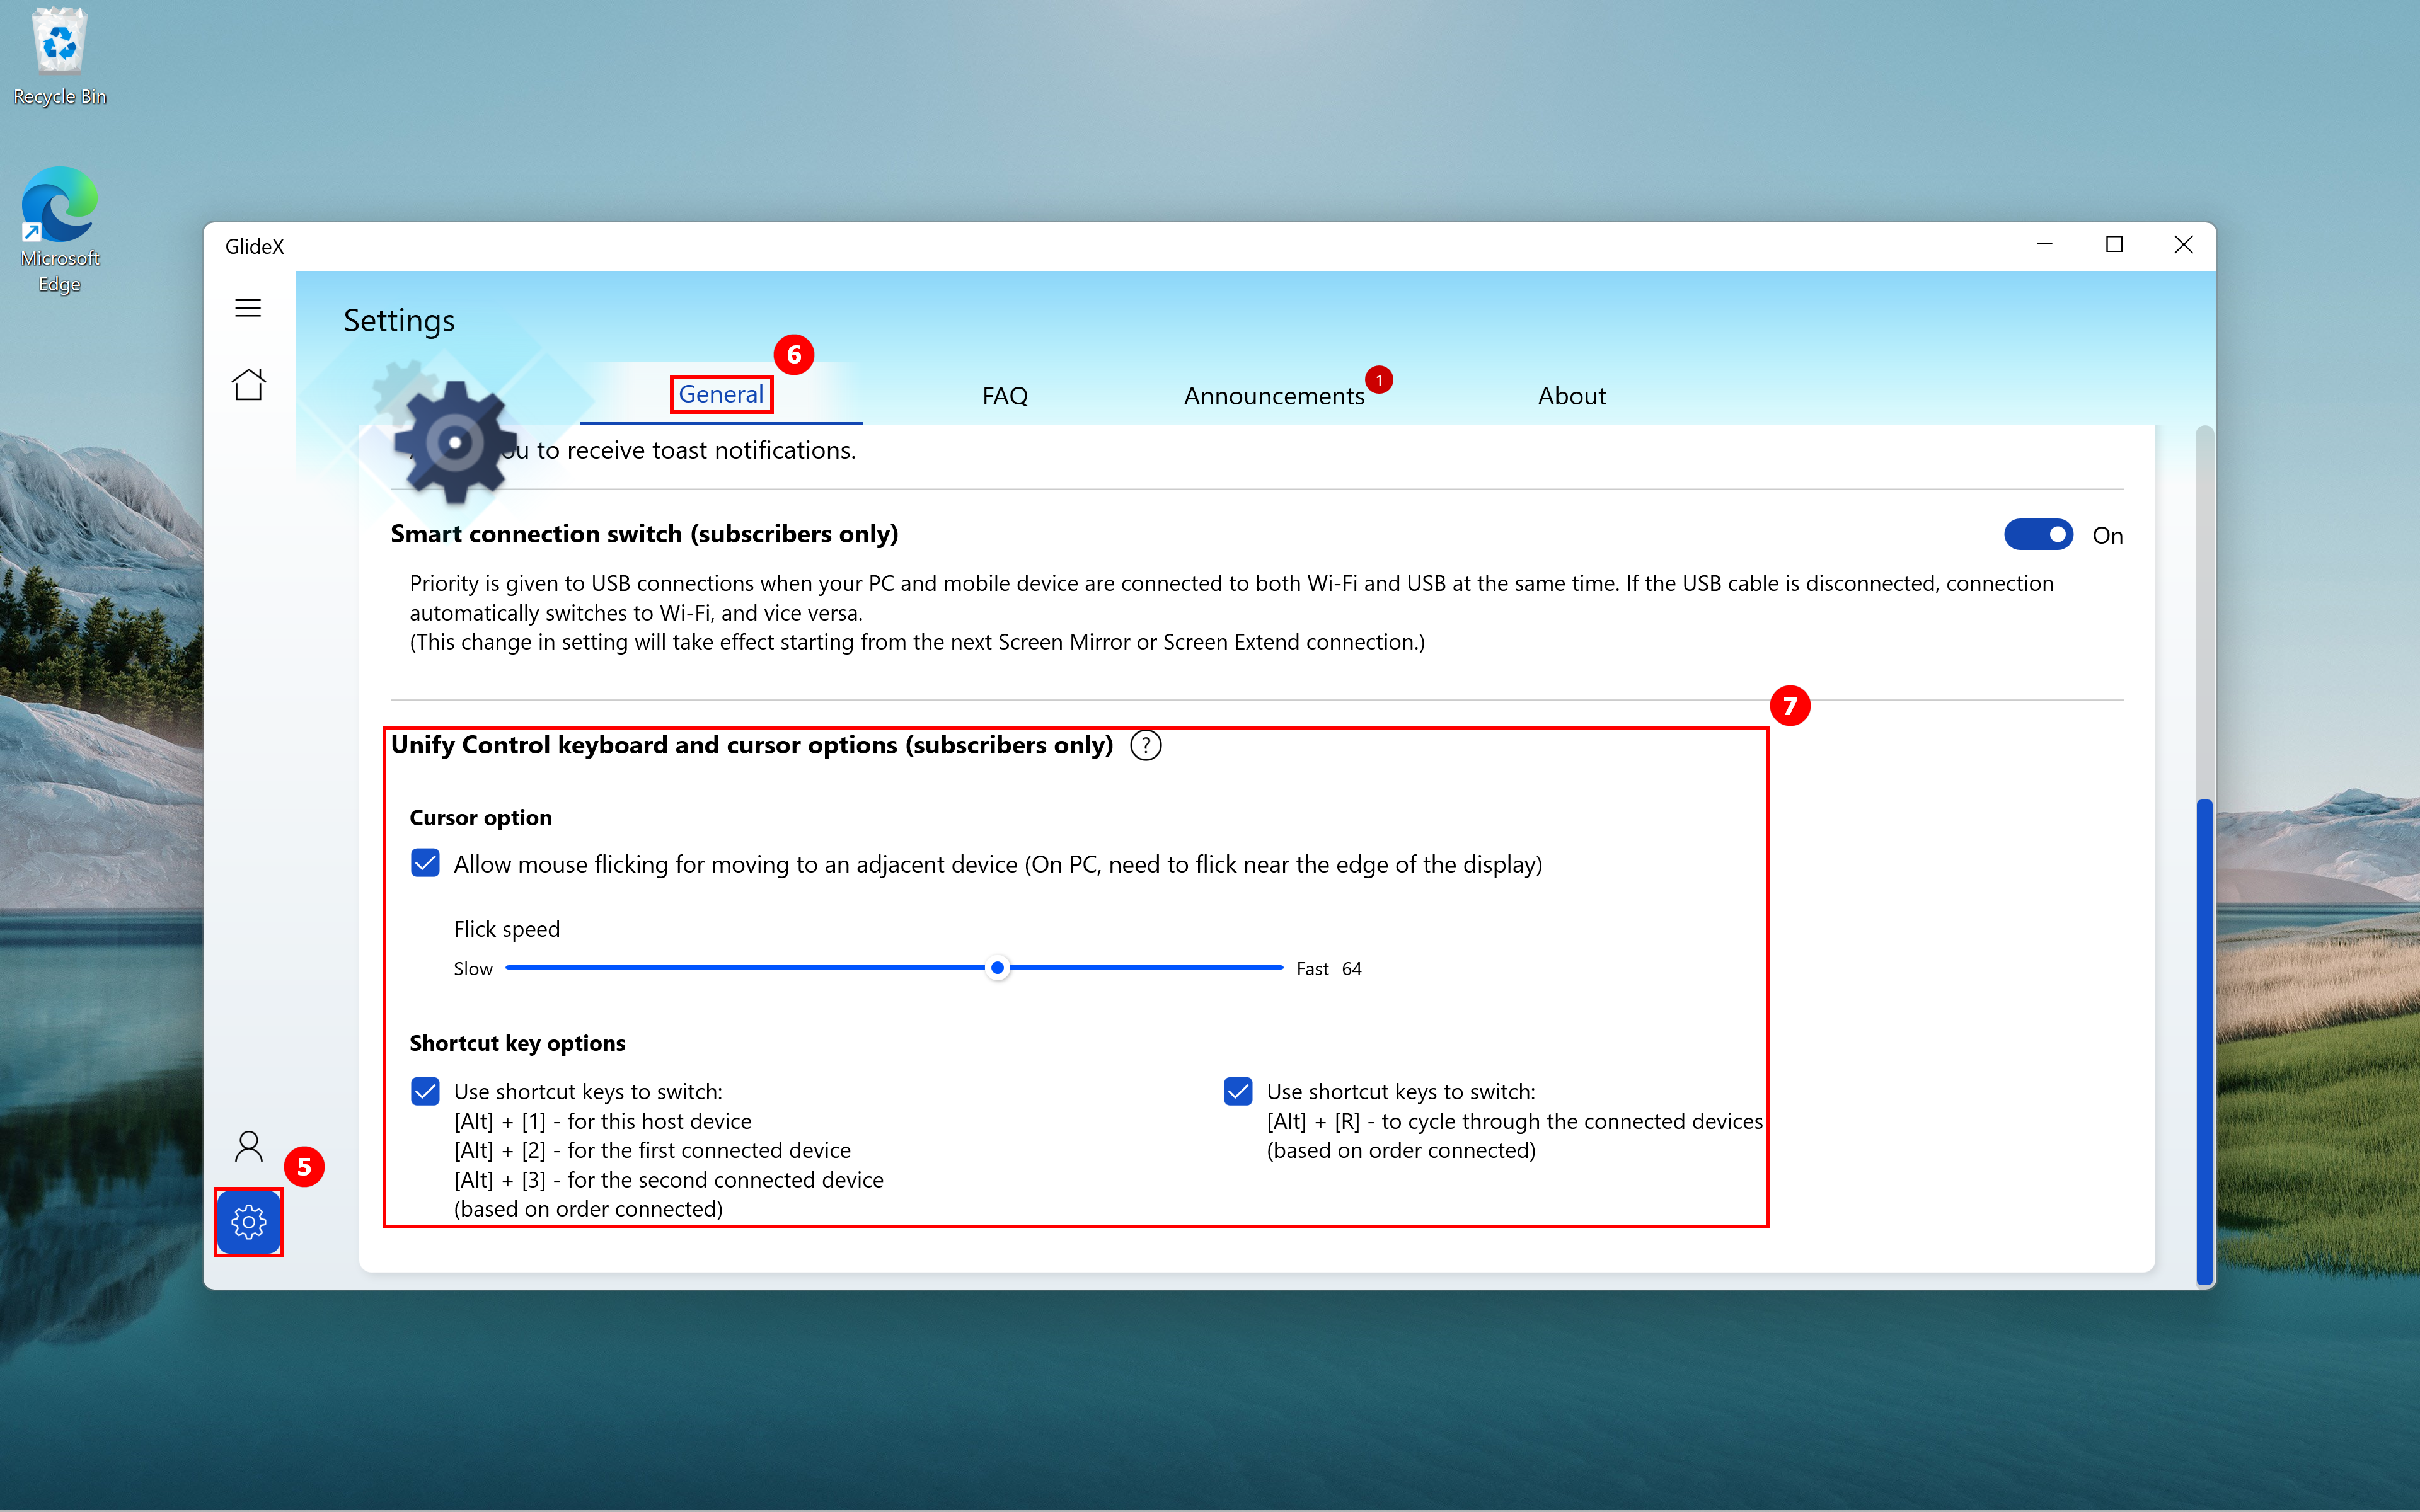
(6) Sluit één apparaat aan om de Unify Control-functie te gebruiken, en u kunt ook een ander apparaat aansluiten om de Mirror-functie of Extend -functie te gebruiken, zoals hieronder weergegeven. Je kunt de relatieve positie van apparaten aanpassen in ⑧[Display/Apparaatherschikking], en je kunt snel de kwaliteit van communicatie aanpassen in ⑨[Streamingkwaliteit].

8. Veelgestelde vragen en feedback
Als u problemen ondervindt of feedback heeft over GlideX, geef dan feedback via GlideX voor Windows en de mobiele app. Raadpleeg voor relevante instructies:[GlideX] Leer hoe u feedb verzendtterug naar GlideX | Officiële ondersteuning | ASUS wereldwijd
Hoe u Screen Mirror PC-besturing gebruikt
De “PC-besturing” functie van de Screen Mirror stelt gebruikers in staat om de computermuis te gebruiken om het mobiele apparaat op de computer te bedienen, het toetsenbord te gebruiken voor invoer en ook om het geluid van het mobiele apparaat uit te voeren via de luidspreker op de computer. Als u problemen ondervindt, kunt u de probleemoplossing zoeken op basis van het type apparaat dat u gebruikt.
- De “PC-besturing” functie vereist uw computer met Bluetooth 3.0 of hoger, en deze wordt ingeschakeld nadat de Bluetooth van uw mobiele apparaat en pc is gekoppeld.
- Een van de pc-besturingsfuncties, “audio” functie, vereist het besturingssysteem van uw computer 20H1 of hoger. Als het een lagere versie is, is het raadzaam om het besturingssysteem te upgraden om deze functie te gebruiken. Momenteel ondersteunt GlideX het streamen van stereomuziek.
Problemen oplossen voor gebruikers van iOS-apparaten
Problemen oplossen voor gebruikers van Android-apparaten
Problemen oplossen voor gebruikers van iOS-apparaten
1. Functieverbinding mislukt
Als u de [PC-besturing ] functiepagina, laat het zien dat de functieverbinding is mislukt
 , klik dan op de [Opnieuw proberen] knop van de spiegelvensterfunctie. Als de verbinding nog steeds niet is gelukt, probeer dan de apparaten te koppelen' Bluetooth opnieuw.
2. Gebruik de muis om het mobiele apparaat op de computer te bedienen
2.1 [AssistiveTouch] inschakelen - Om de cursor op het gespiegelde venster weer te geven, gaat u naar uw mobiele apparaat [Instellingen] > [Toegankelijkheid] > [Aanraken] > Schakel [AssistiveTouch] in of vraag Siri om [AssistiveTouch in te schakelen].
2.2 Pas de snelheid van de Trackpad & Muis - Voor een betere gebruikerservaring gaat u naar uw mobiele apparaat [Instellingen] > [Algemeen] > [Trackpad & amp; muis], raden we u aan de "Volgsnelheid" schuif naar de laagste. Schakel tegelijkertijd de instelling [Natuurlijk scrollen] uit om uw scrollgedrag op de computer te behouden.
2.3 Bevestig om de [schermoriëntatie] te ontgrendelen - Om te voorkomen dat de muis onverwachts wordt bediend, moet u ervoor zorgen dat de “schermoriëntatie” wordt ontgrendeld. U kunt vanuit de rechterbovenhoek van het scherm naar beneden vegen om "Control Center" en tik op de knop [schermoriëntatie] om te bevestigen dat de functie is ontgrendeld.
3. Gebruik het toetsenbord om in te voeren
Het computertoetsenbord is het Bluetooth-toetsenbord van uw mobiele apparaat. Als u de sneltoets wilt gebruiken om van taal te wisselen, kunt u op de toetsen [Ctrl + Spatie] drukken om te wisselen. Als u snel terug wilt naar de startpagina van uw mobiele apparaat, kunt u op de [Ctrl + H]-toetsen drukken of op de startknop in het zijmenu van het gespiegelde venster klikken.
Problemen oplossen voor gebruikers van Android-apparaten
1. Functieverbinding mislukt
Als u de [PC-besturing] functiepagina, laat het zien dat de functieverbinding is mislukt, voer de [Bluetooth]-instellingen van het mobiele apparaat in, selecteer de huidige naam van het [gekoppelde apparaat], voer de [Instellingen] van het apparaat in en schakel de overeenkomstige [Audio] of [Invoerapparaat] toestemming en klik vervolgens op de knop [Opnieuw proberen] op de [PC Control] functiepagina van het gespiegelde venster. Als de verbinding nog steeds niet lukt, probeer dan de apparaten te koppelen’ Bluetooth opnieuw.
2. Gebruik de muis om het mobiele apparaat op de computer te bedienen
Om de aanwijzersnelheid aan te passen, klikt u op de knop [PC-besturing] in het zijmenu van het gespiegelde venster en klikt u op de knop [Aanwijzersnelheid] [Instellingen] op het [Toetsenbord & Muis ] om de systeempagina van het mobiele apparaat [Muis- en trackpadsnelheid] te openen, kunt u de snelheid aanpassen aan uw persoonlijke voorkeur.
3. Gebruik het toetsenbord om in te voeren
Het computertoetsenbord is het Bluetooth-toetsenbord van uw mobiele apparaat. Als u de sneltoets wilt gebruiken om van taal te wisselen
[GlideX] Common GlideX subscription service problems
GlideX is a download free cross-device, cross-platform screen-sharing, and screen-control solution. We aim to provide users with a good user experience by continuously being updated. Besides, we provide users in certain regions with in-app purchase on mobile to enjoy advanced features.
What are included in GlideX different paid package?
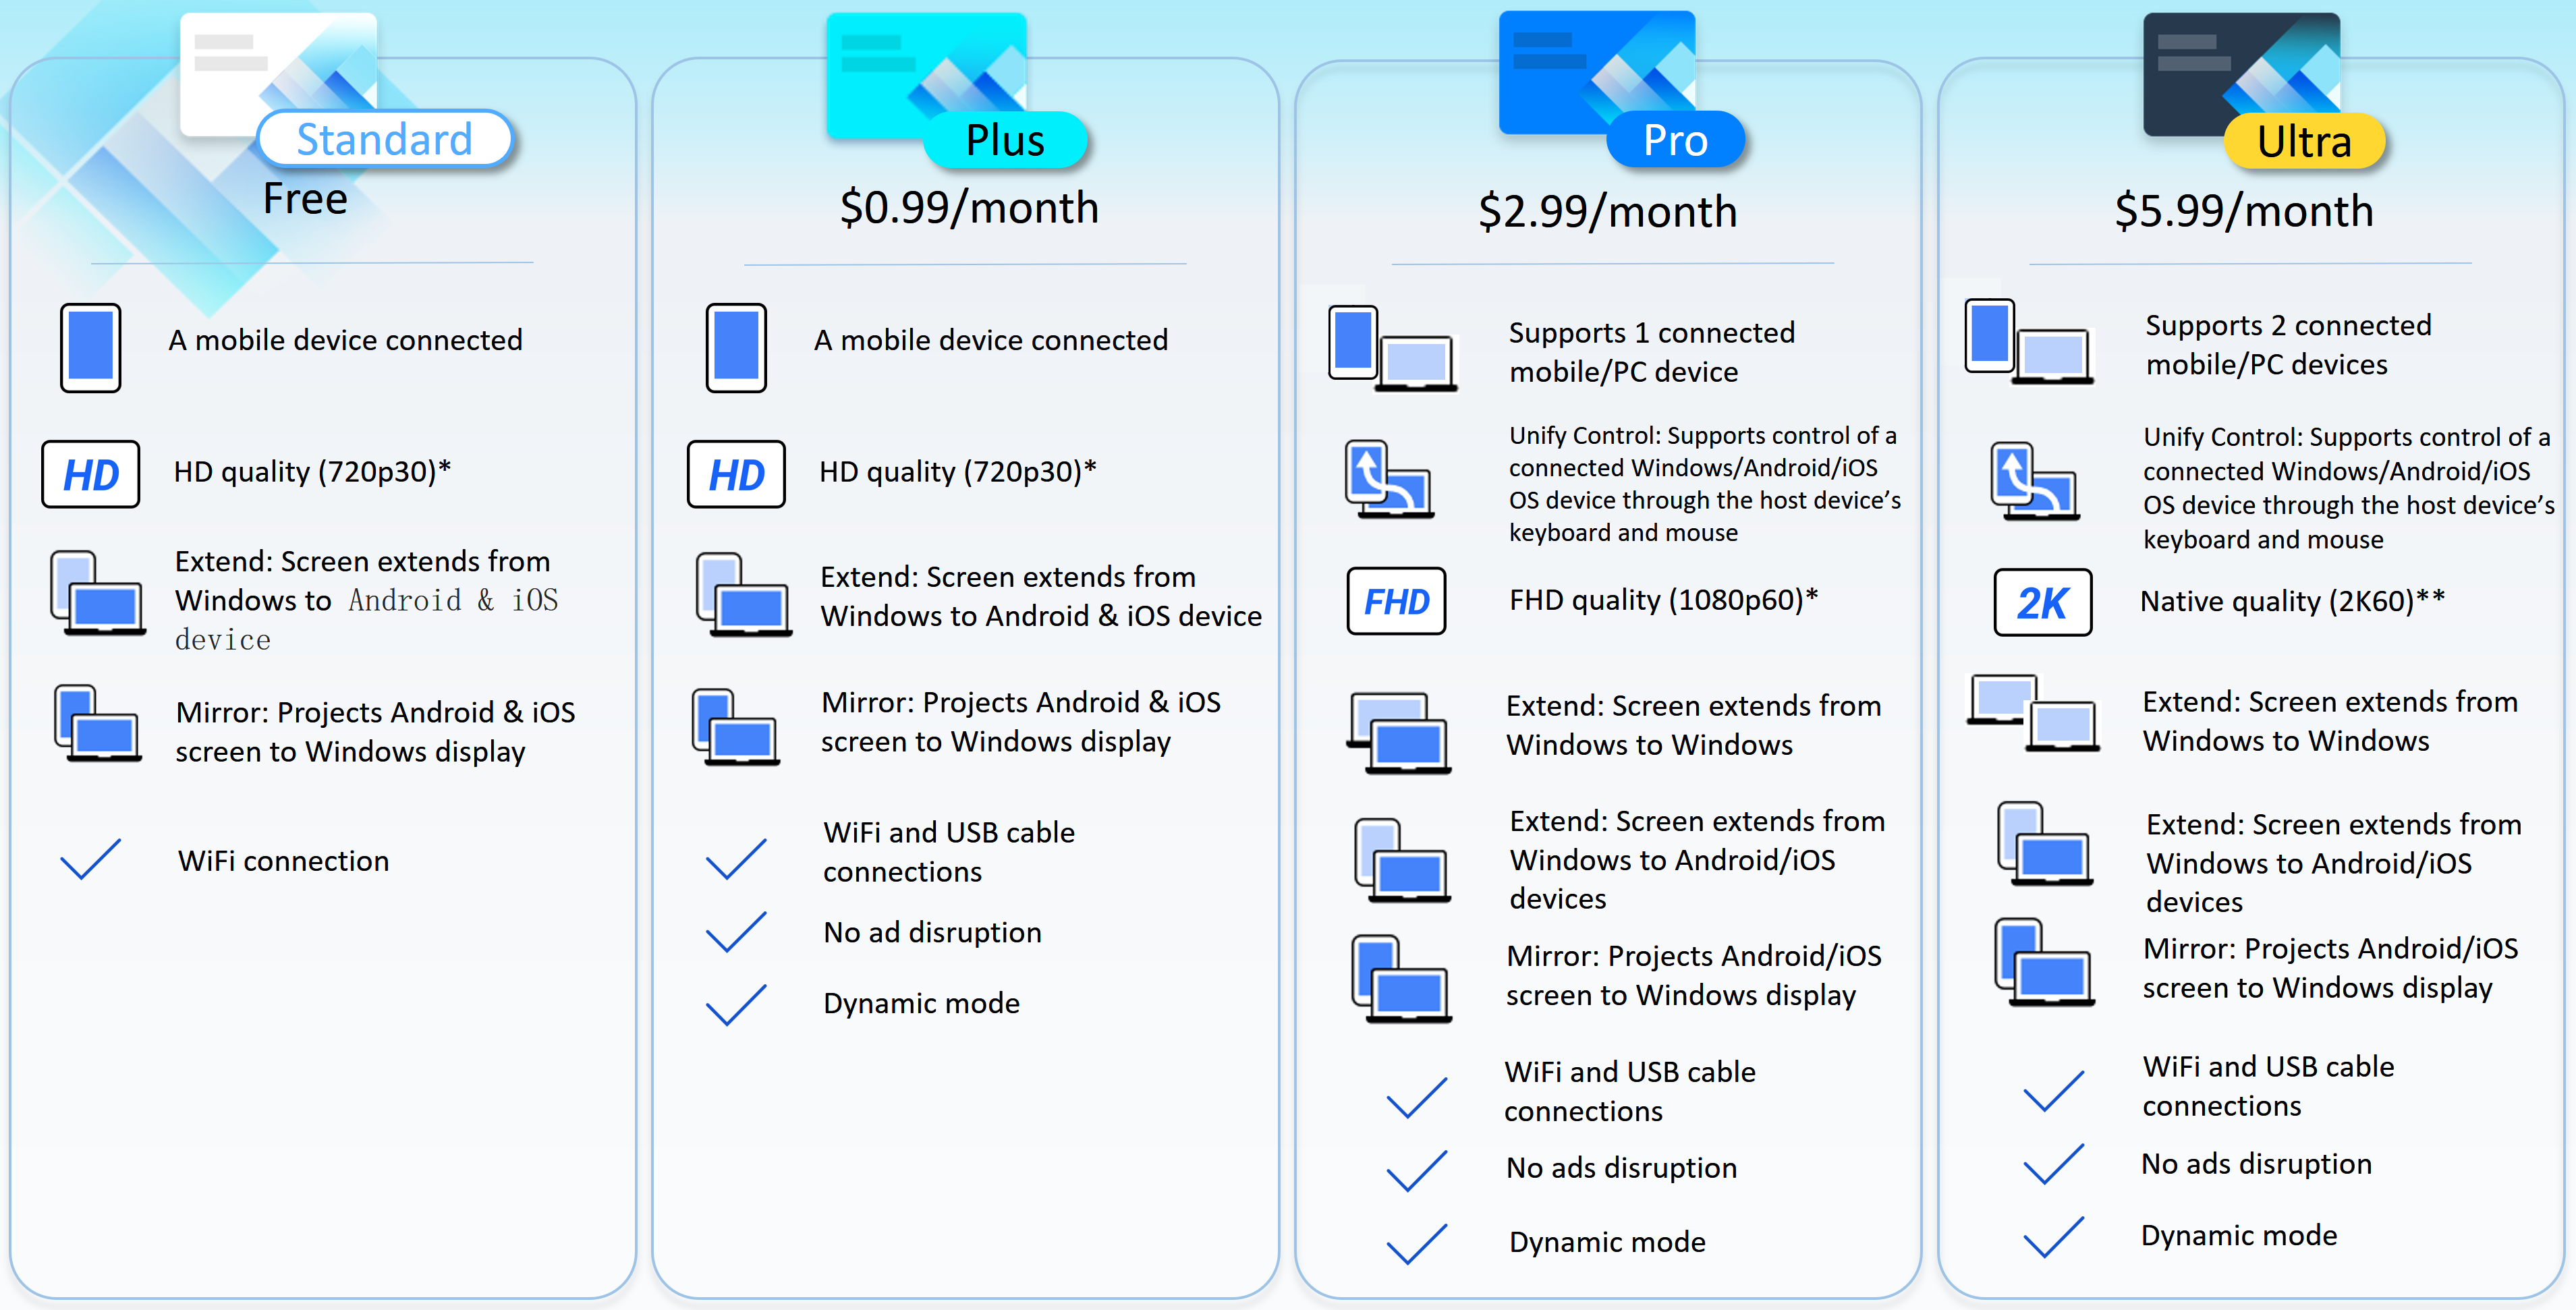
*Select the desired resolution and refresh rate. Please note that the actual performance will depend on your network and hardware capability.
** Depend on your network and hardware capability, the resolution and refresh rate of native quality would actually be higher than 2K60.
Where can I use GlideX subscription service?
GlideX currently provides subscription services for users in the following regions based on the mobile device platform registered by members.
1. If you use Google Play Store, users in the following regions have GlideX subscription service:
Albania, Australia, Austria, Bahrain, Belarus, Belgium, Bulgaria, Canada, Chile, Croatia, Czech Republic, Denmark, Estonia, Finland, France, Germany, Greece, Hungary, India, Indonesia, Ireland, Italy, Latvia, Liechtenstein, Luxembourg , Malaysia, Malta, Morocco, Netherlands, New Zealand, Norway, Poland, Portugal, Romania, Russia, Saudi Arabia, Serbia, Singapore, Slovakia, Slovenia, South Korea, Spain, Sweden, Taiwan, Türkiye, United Arab Emirates, United States, Morocco, Liechtenstein, Mexico.
2. If you use Apple App Store, users in the following regions have GlideX subscription service:
Albania, Armenia, Australia, Austria, Bahrain, Belarus, Belgium, Bosnia and Herzegovina, Bulgaria, Canada, Chile, Colombia, Croatia, Cyprus, Czech Republic, Denmark, Estonia, Finland, France, Germany, Greece, Hungary, Iceland, India , Indonesia, Ireland, Italy, Kosovo, Latvia, Lithuania, Luxembourg, Malaysia, Malta, Mexico, Moldova, Netherlands, New Zealand, Norway, Poland, Portugal, Romania, Russia, Saudi Arabia, Serbia, Singapore, Slovakia, Slovenia, South Africa, South Korea, Spain, Sweden, Switzerland, Taiwan, Turkey, United Arab Emirates, United Kingdom, United States, Uzbekistan.
How to get a GlideX subscription plan?
To subscribe log into GlideX, please register and log in as a GlideX international version member*, then go to the GlideX mobile device app, expand the side menu > enter "My Subscription", and subscribe in-app through Google Play Store or Apple App Store. GlideX members who have successfully subscribed are asked to log in with the same account on other personal devices to enjoy the subscription functions.
* (GlideX) Chinese version members are not available for subscription service.
How to confirm the success of subscribing to the GlideX plan?
Please log in to the GlideX member who enjoys the subscription plan on your any device
- Windows app> Side menu> "User Center" to confirm your plan.
- Mobile app> Side menu> "My Subscription" to confirm your plan.
If you have subscribed but the plan is not valid in the app, please go to GlideX mobile app> Side menu> "My subscription" > tap the more icon in the upper right corner of the page> tap "Restore purchase" to try to take the plan effect.
How to renew the plan? How to cancel the plan?
According to the regulation of the Google Play Store or Apple App Store, unless you cancel the subscription of the purchased item on the Google Play Store or Apple App Store before the last day of the monthly billing cycle, the third party that you purchased will charge you after the end of the subscription period, and the plan will be automatically renewed.
You can also cancel the subscription at any time. Your subscription will be canceled at the end of the current billing cycle and will be downgraded to the GlideX standard.
Why are the prices different in different regions?
The price of packages purchased in GlideX will be displayed in local currency as set by you in your Google Play Store or Apple App Store account. Please note that the final billing amount may differ depending on the location that you selected on Google Play Store or Apple App Store.
How to change the plan?
The GlideX app provides program upgrades. You can upgrade from a lower-level program to a higher-level program. The programs from low to high are: Plus, Pro, and Ultra. Once you confirm to upgrade the plan, the new plan will take effect immediately.
How often will I be charged?
Currently, Plus, Pro, Ultra subscribers will be charged monthly. You may cancel your subscription at any time and your subscription will remain active for the duration of the period for which you have paid.
How can I unsubscribe?
- If you are an Android user, please refer to Google Play Help: Cancel, pause, or change a subscription on Google Play - Android - Google Play Help
- If you are an iOS user, please refer to Apple support: If you want to cancel a subscription from Apple - Apple Support
If I want to get a refund for the subscription, is this possible?
- If you are an Android user, please refer to Google Play Help: Request your Google Play refund - Google Play Help
- If you are an iOS user, please refer to Apple support: Request a refund for apps or content that you bought from Apple – Apple Support (AU)
[GlideX] How to connect device(s) via Wi-Fi or USB cable
To enable Screen Mirror and Screen Extend, connect to your mobile device from a PC that is on the same Wi-Fi network or using a USB cable. Please be noted that the connection via the same Wi-Fi is limited in some network environment, for example, office or school environment using public hotspot. We suggest you use the trusted Wi-Fi.
Troubleshooting for iOS device users
Troubleshooting for Android device users
Troubleshooting for iOS device users
Please make sure iOS device meets the requirements below:
(1) The discoverability for Screen Mirror and Screen Extend is turned on.
(2) Your GlideX mobile app is enabled so that it is visible to PC, and that the screen of the mobile device is not locked.
Choose the connection method
1. Connect a device from a PC that is on the same Wi-Fi
You can connect to your iOS device directly.
2. Connect a device from a PC using a USB cable.
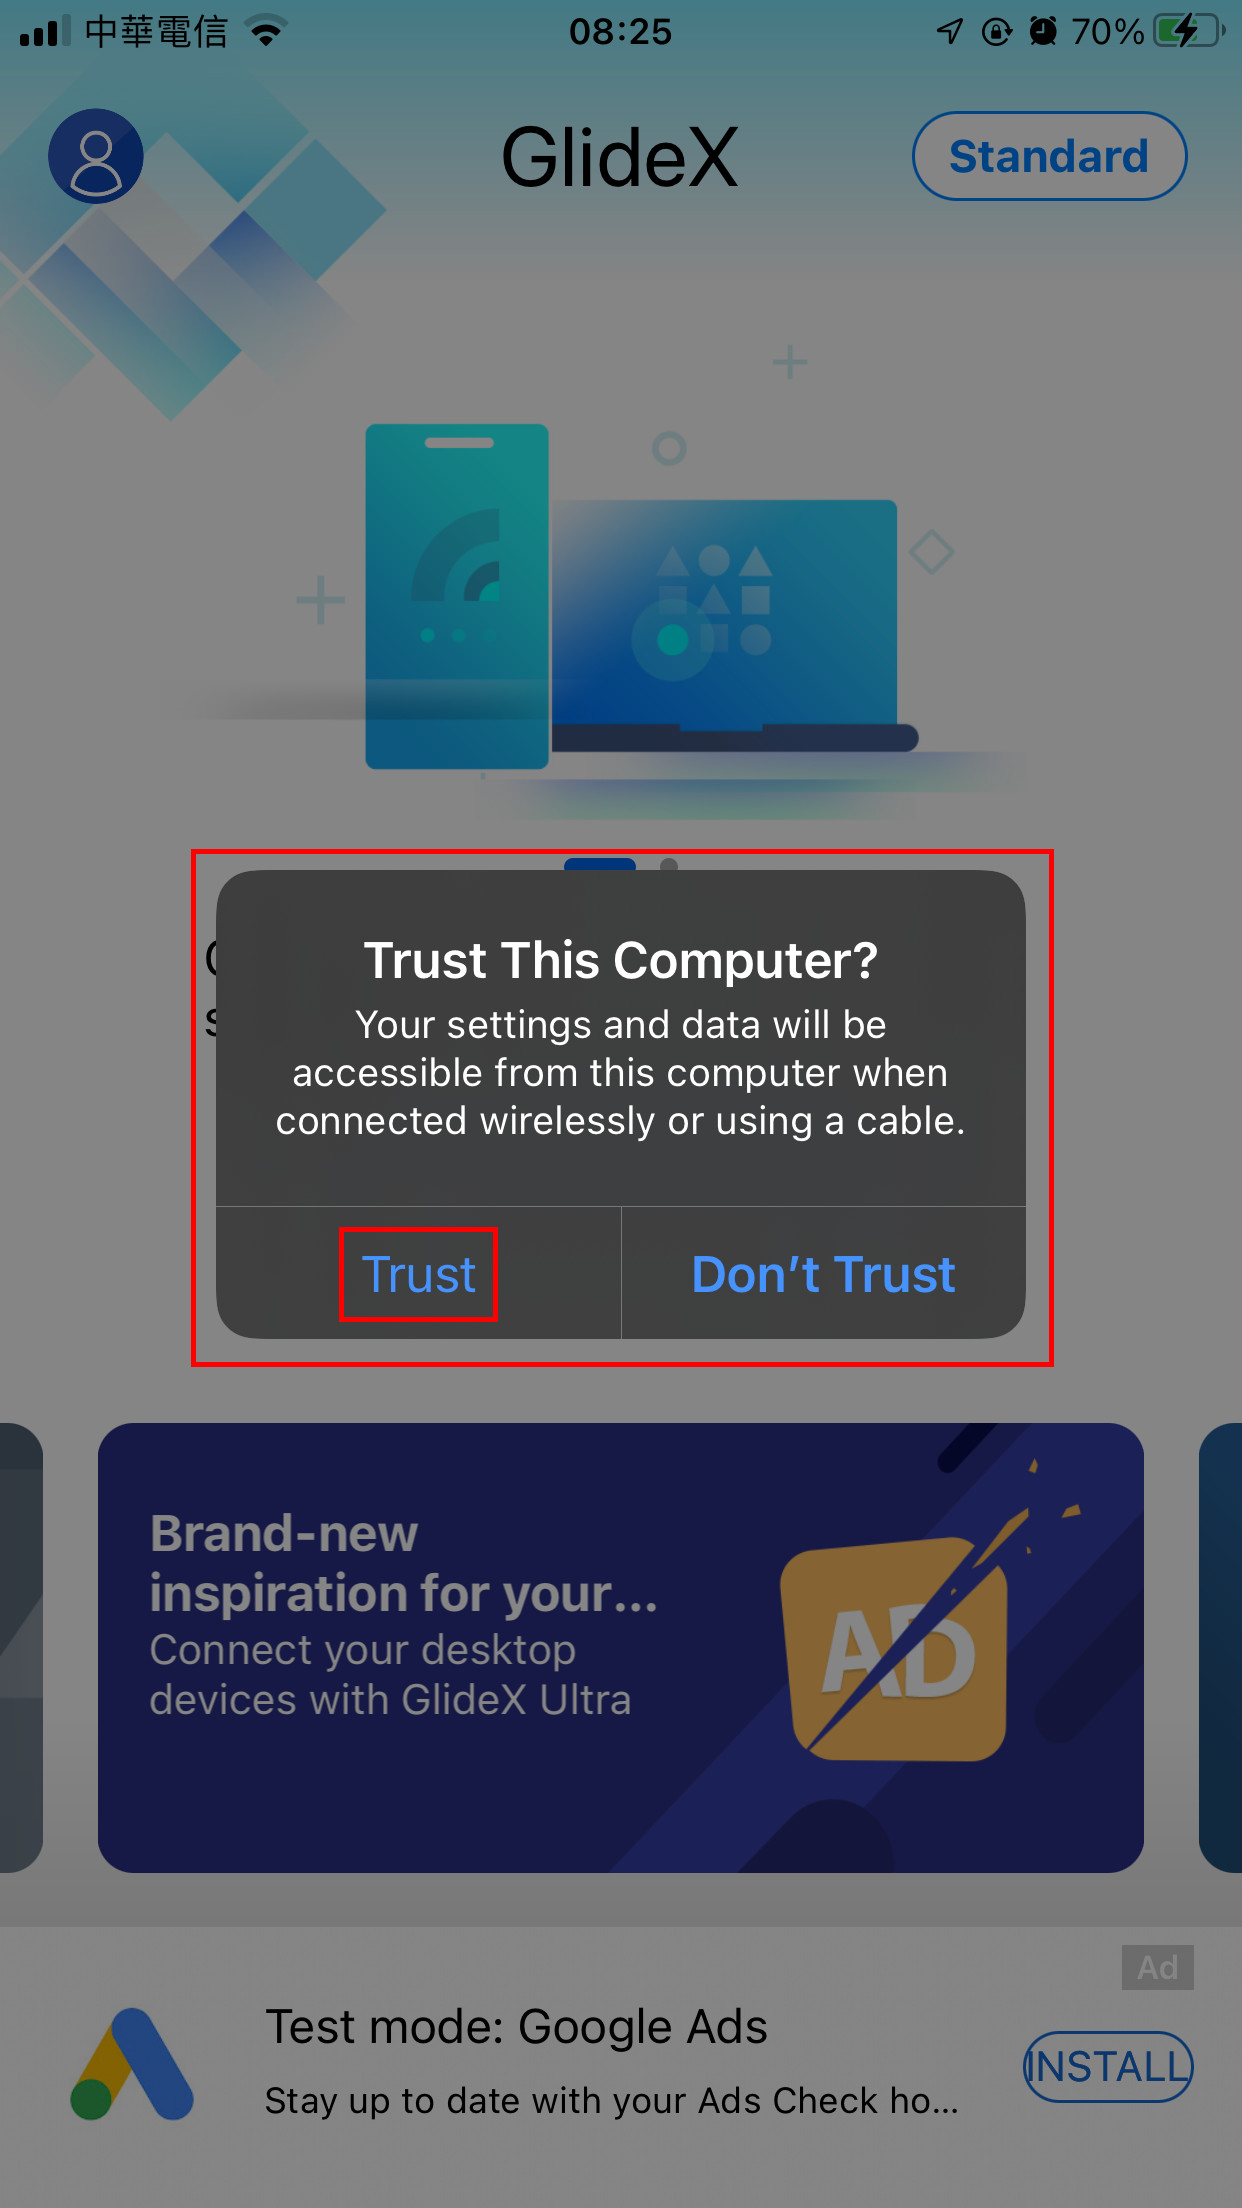
Download and install iTunes (Windows 64 bit) on your computer. You must use Apple or MFi-certified Lightning Cable to connect an Apple iPhone or iPad to your PC. Please make sure that your iPhone or iPad is recognized in iTunes on Windows. (If you are stuck at this step, please refer to Apple support for help and restart AMDS accordingly.) And then, tap [Trust] on the [Trust This Computer?] dialog.
When you connect your mobile device to the GlideX on your computer, your mobile device is displayed and a USB-connected icon appears.
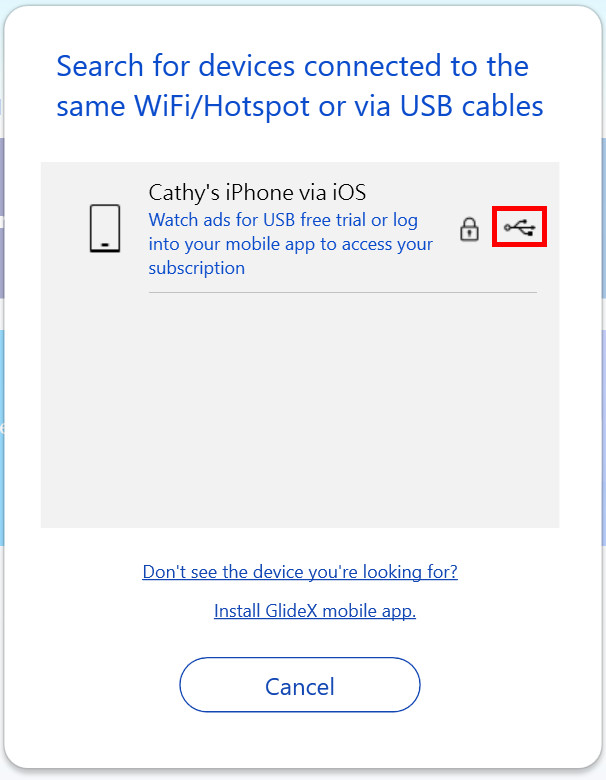
2. Troubleshooting for Android device users
Please make sure you meet the requirements below:
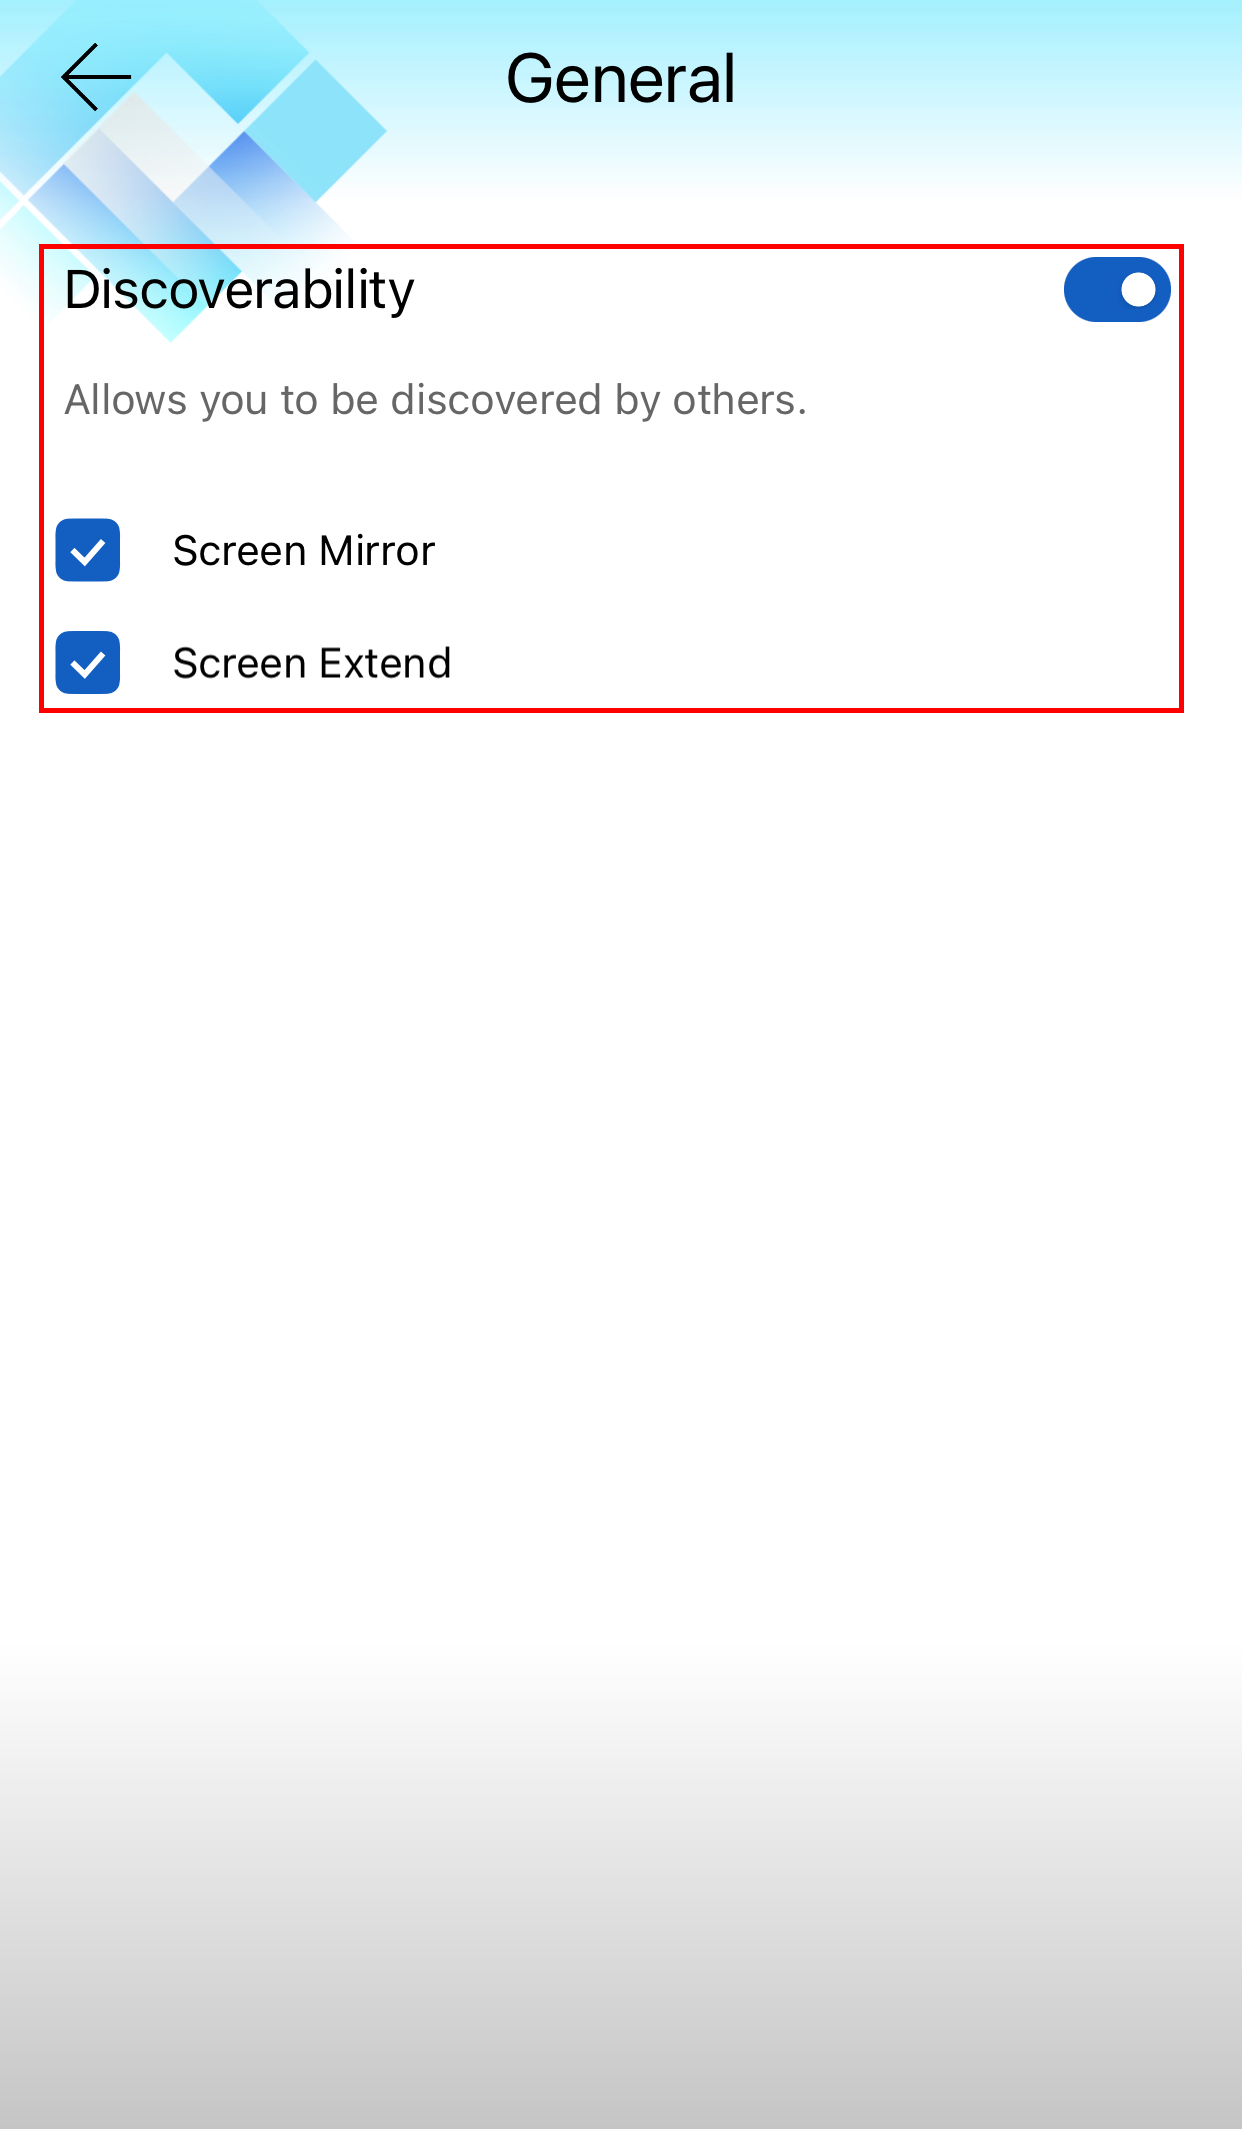
(1) The discoverability for Screen Mirror and Screen Extend is turned on. Open the side pull bar on the left side of the mobile app. Tap [General]①, tap on the [Discoverability]② function, and turn on the [Screen Mirror & Screen Extend]③ function.
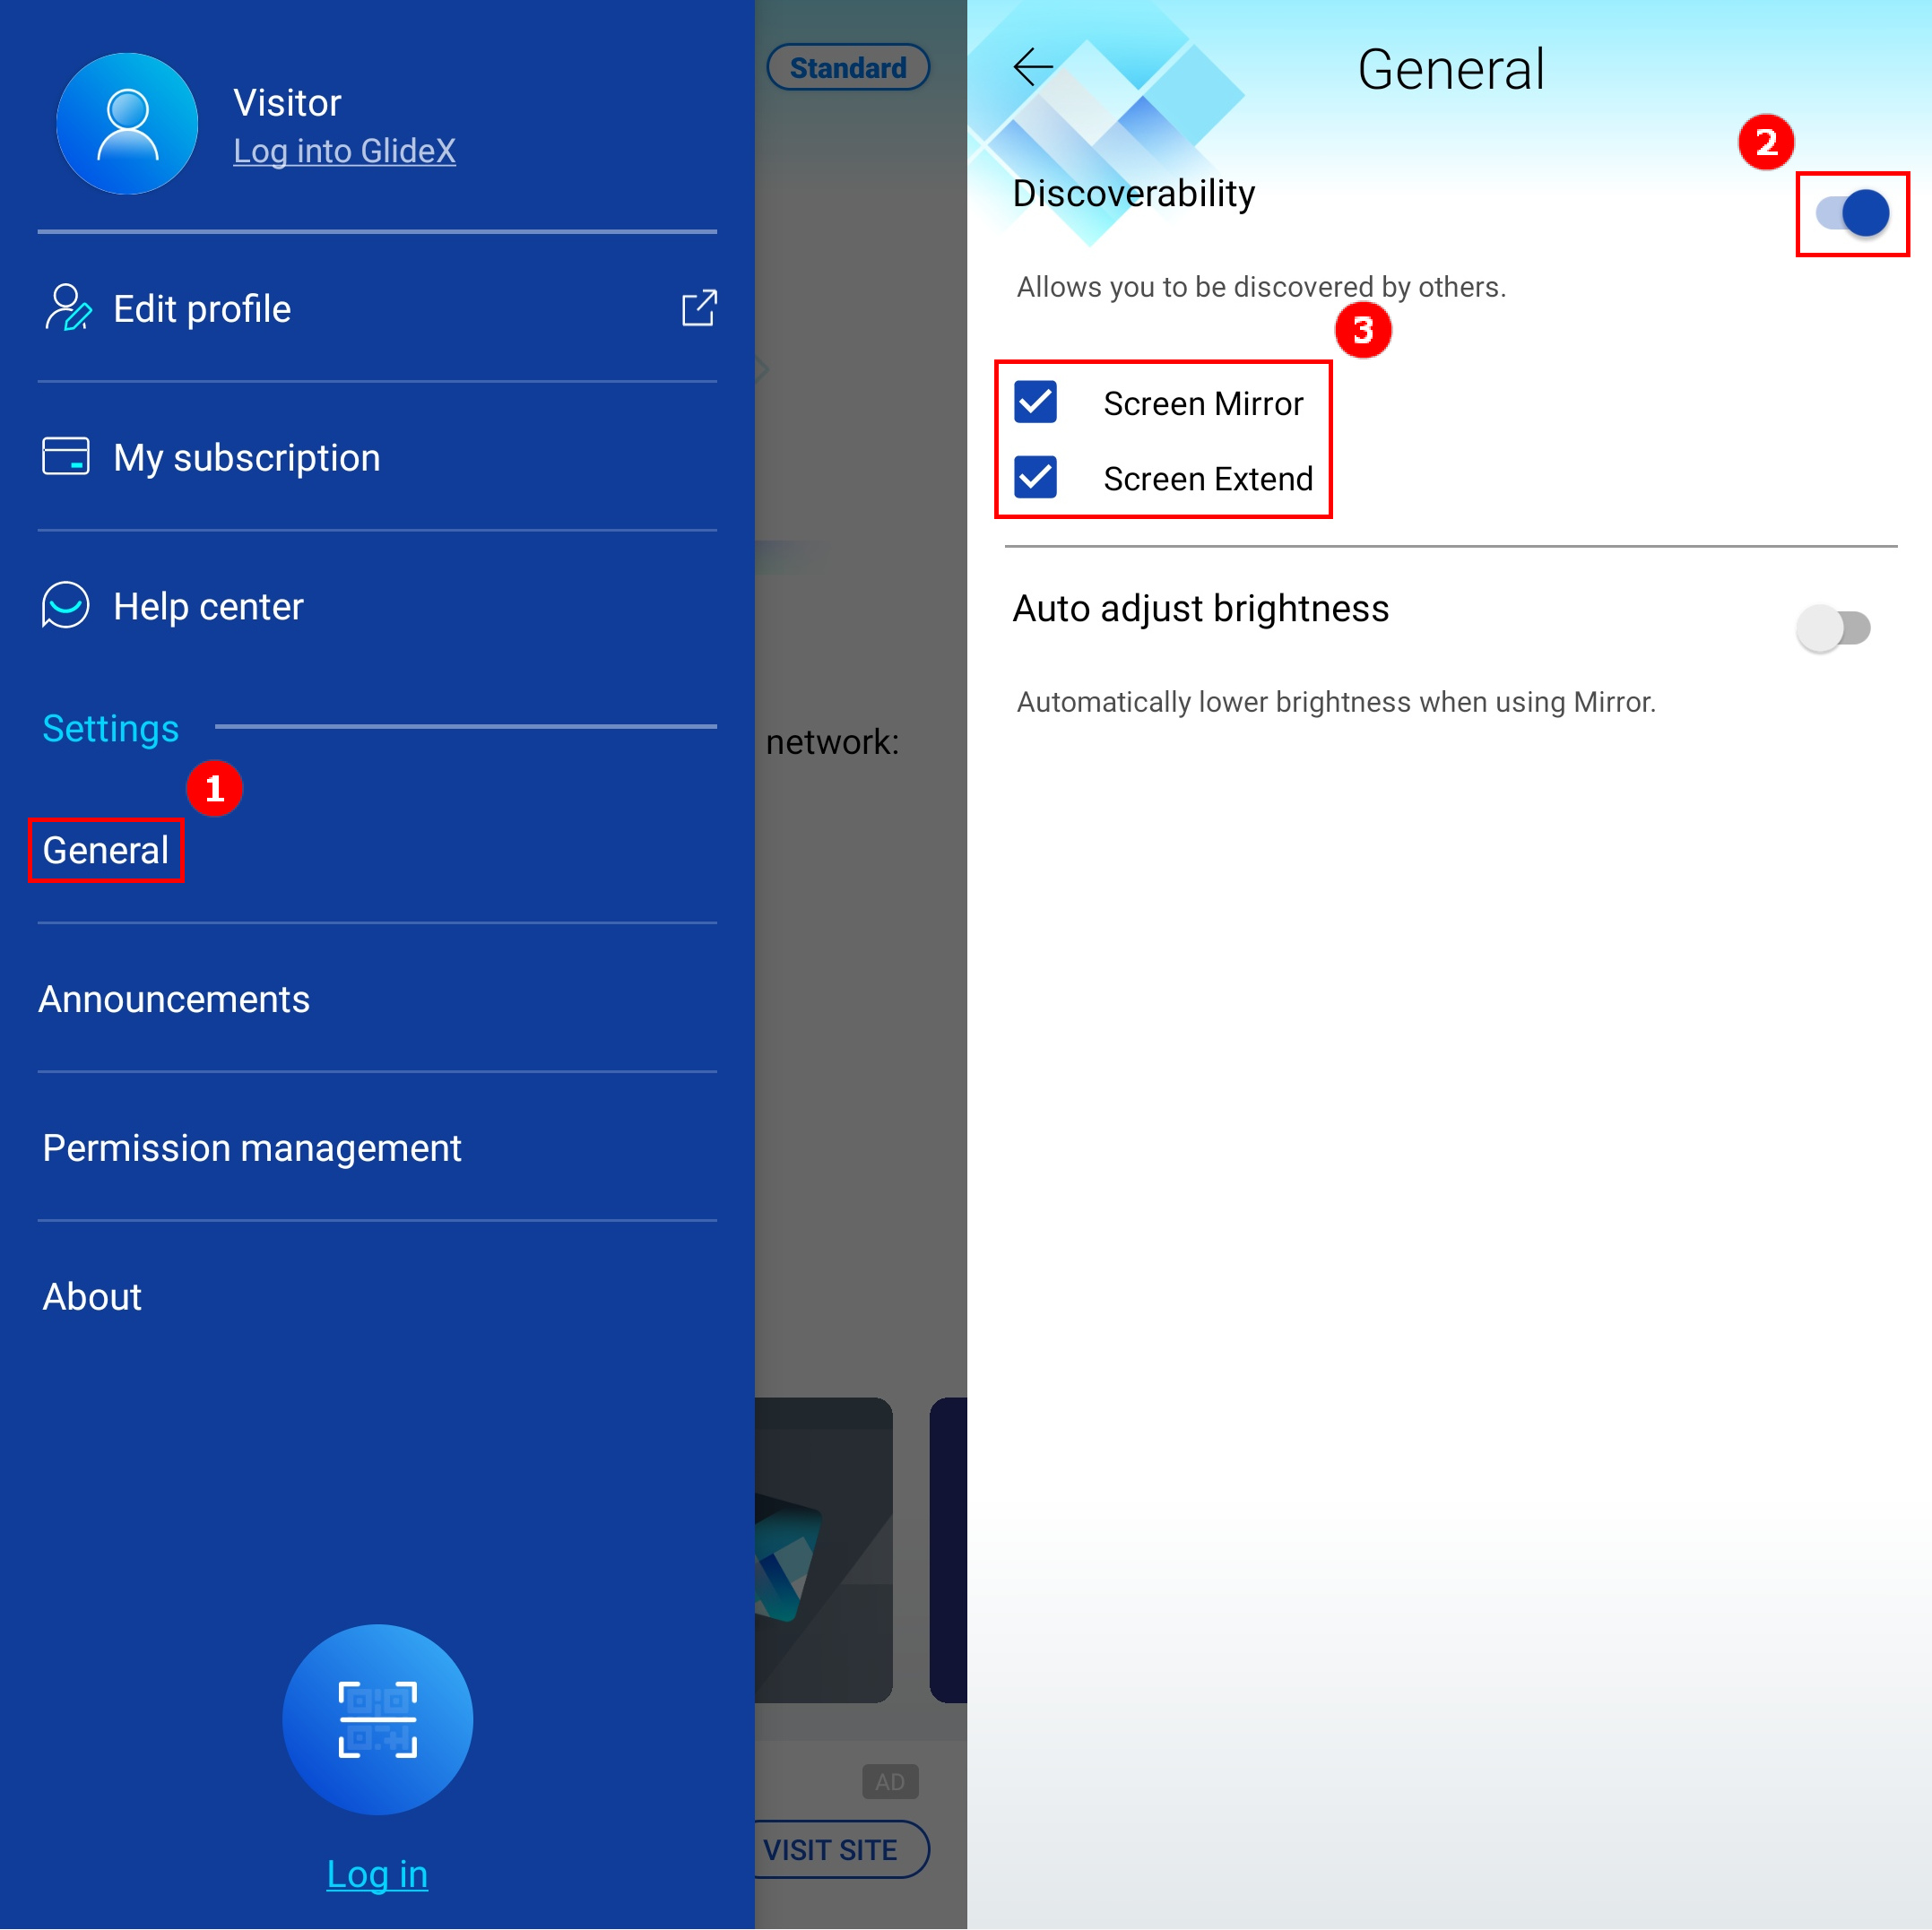
(2) Your GlideX mobile app is open so that it is visible to PC, and that the screen of the mobile device is not locked.
Choose the connection method
1. Connect a device from a PC that is on the same Wi-Fi
You can connect to your Android device directly.
2. Connect a device from a PC using a USB cable.
Make sure that the developer options and USB debugging of your mobile device have been configured, and you allow USB debugging after plugging in the USB cable.
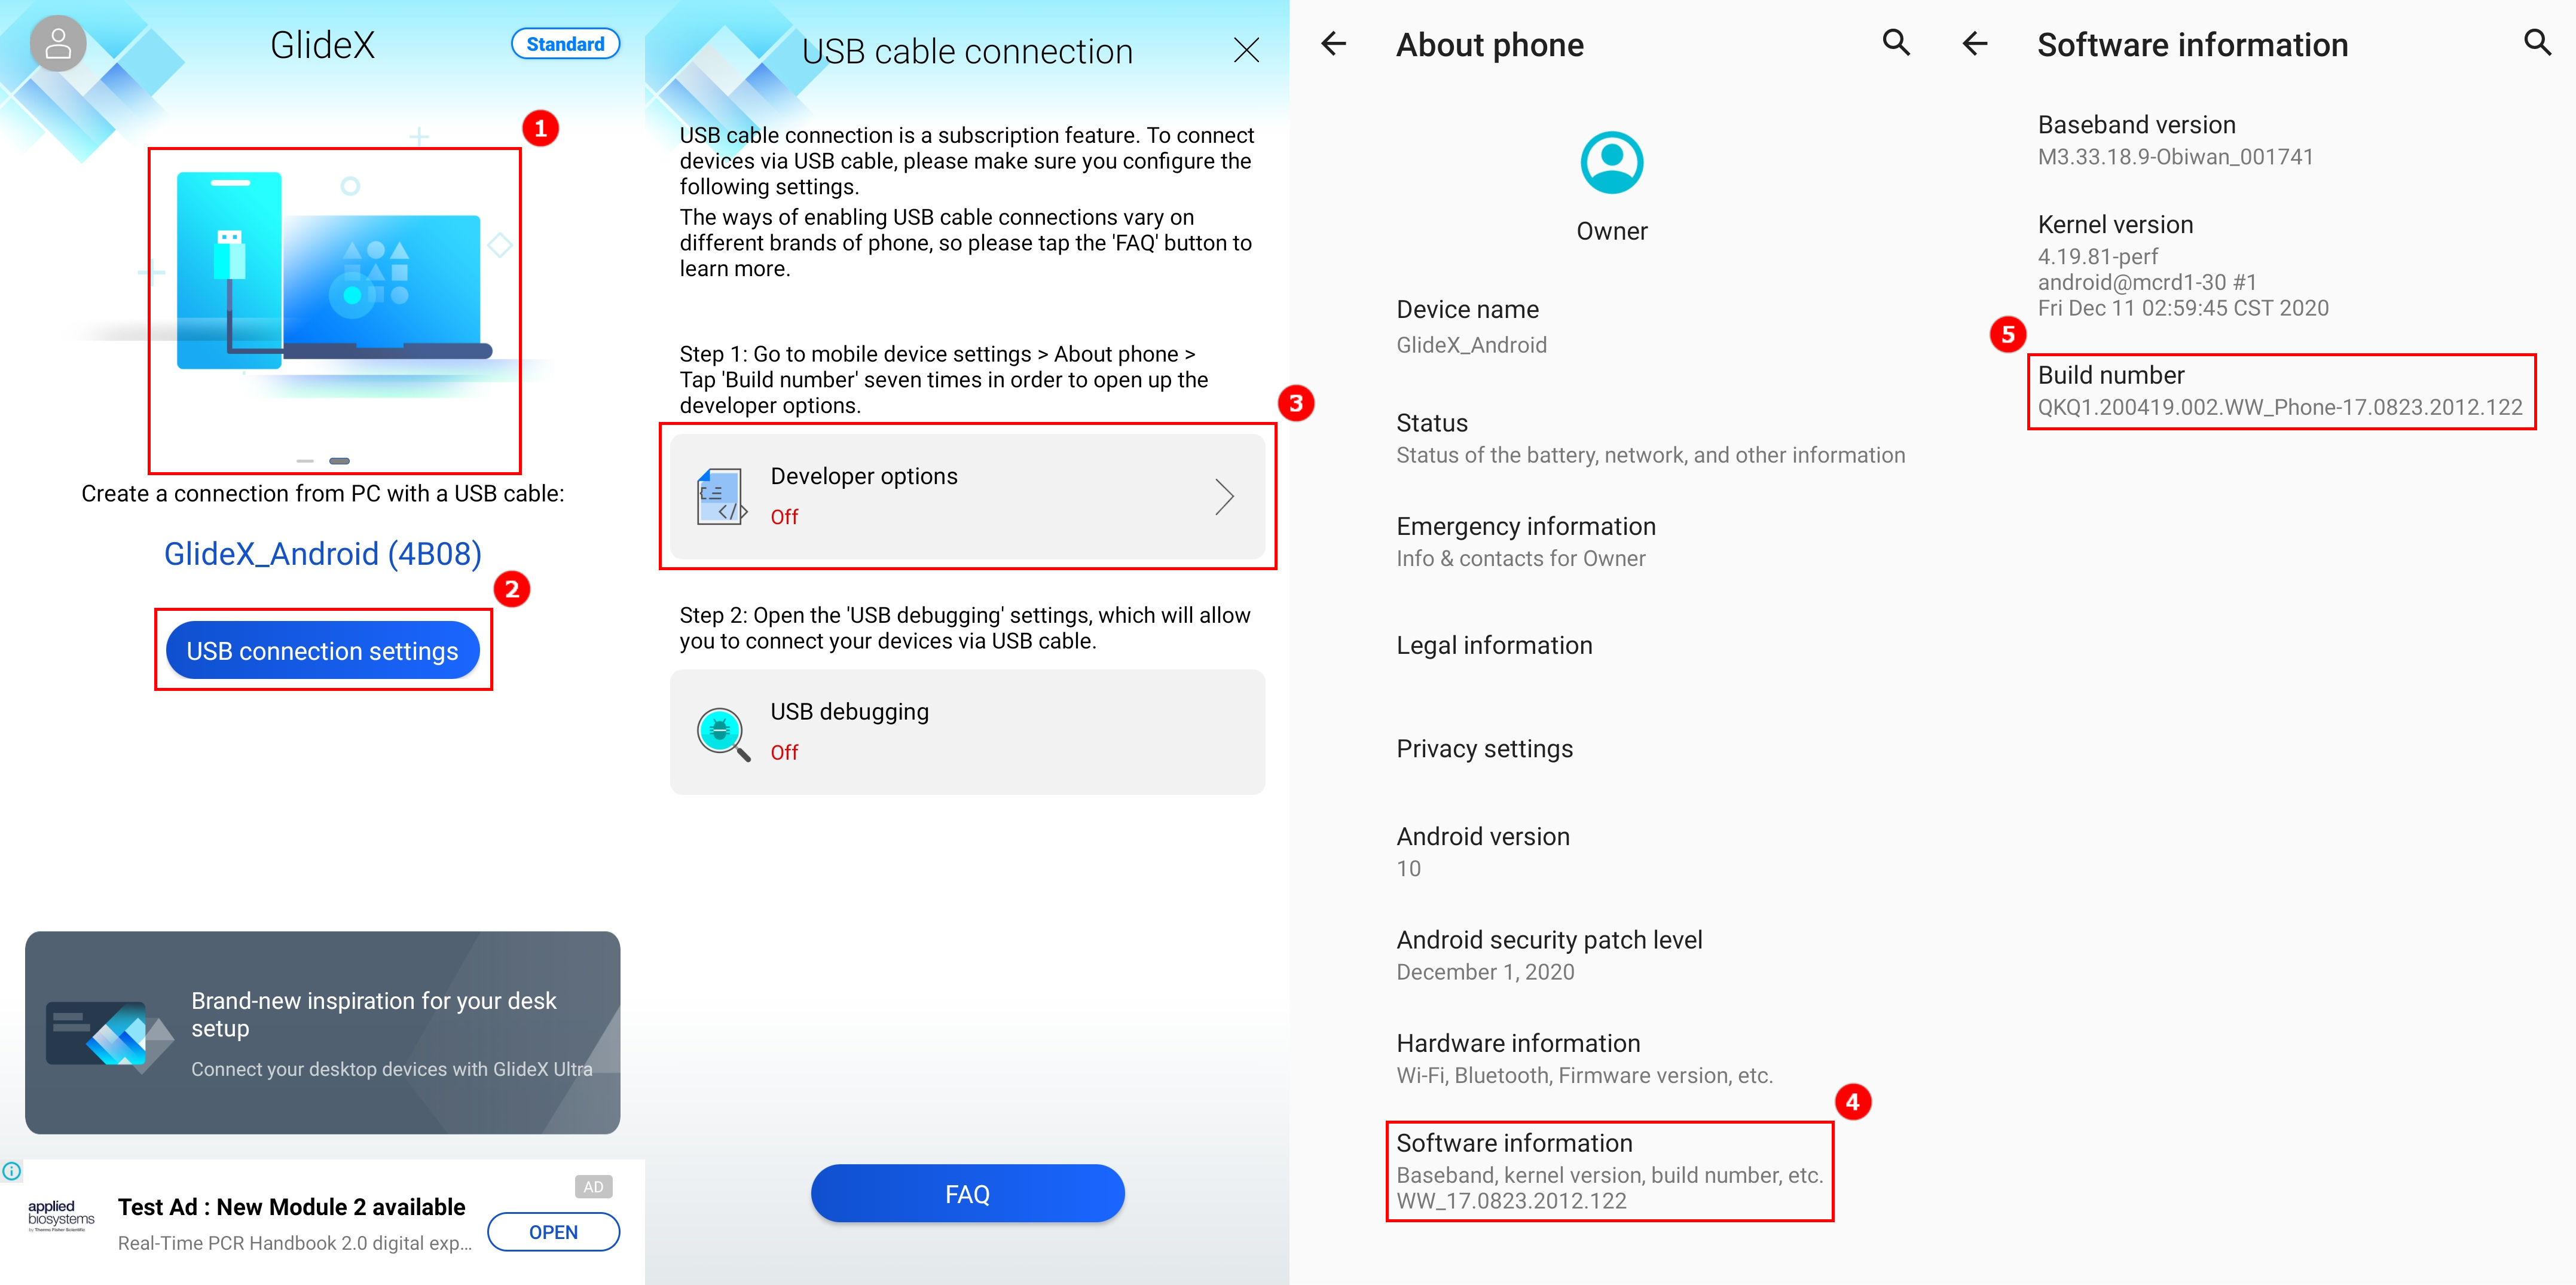
Swipe left on GlideX [Home]①, tap on [USB Connection Settings]②, tap on the [Developer Options]③ will be directed to the mobile device's [About Mobile] page. Tap on [Software Information]④, and tap on [Build Number]⑤ seven times in a row to turn on the developer options (Opening the "Developer options" varies from mobile device to mobile device, search the web for how your mobile device opens or click here.).
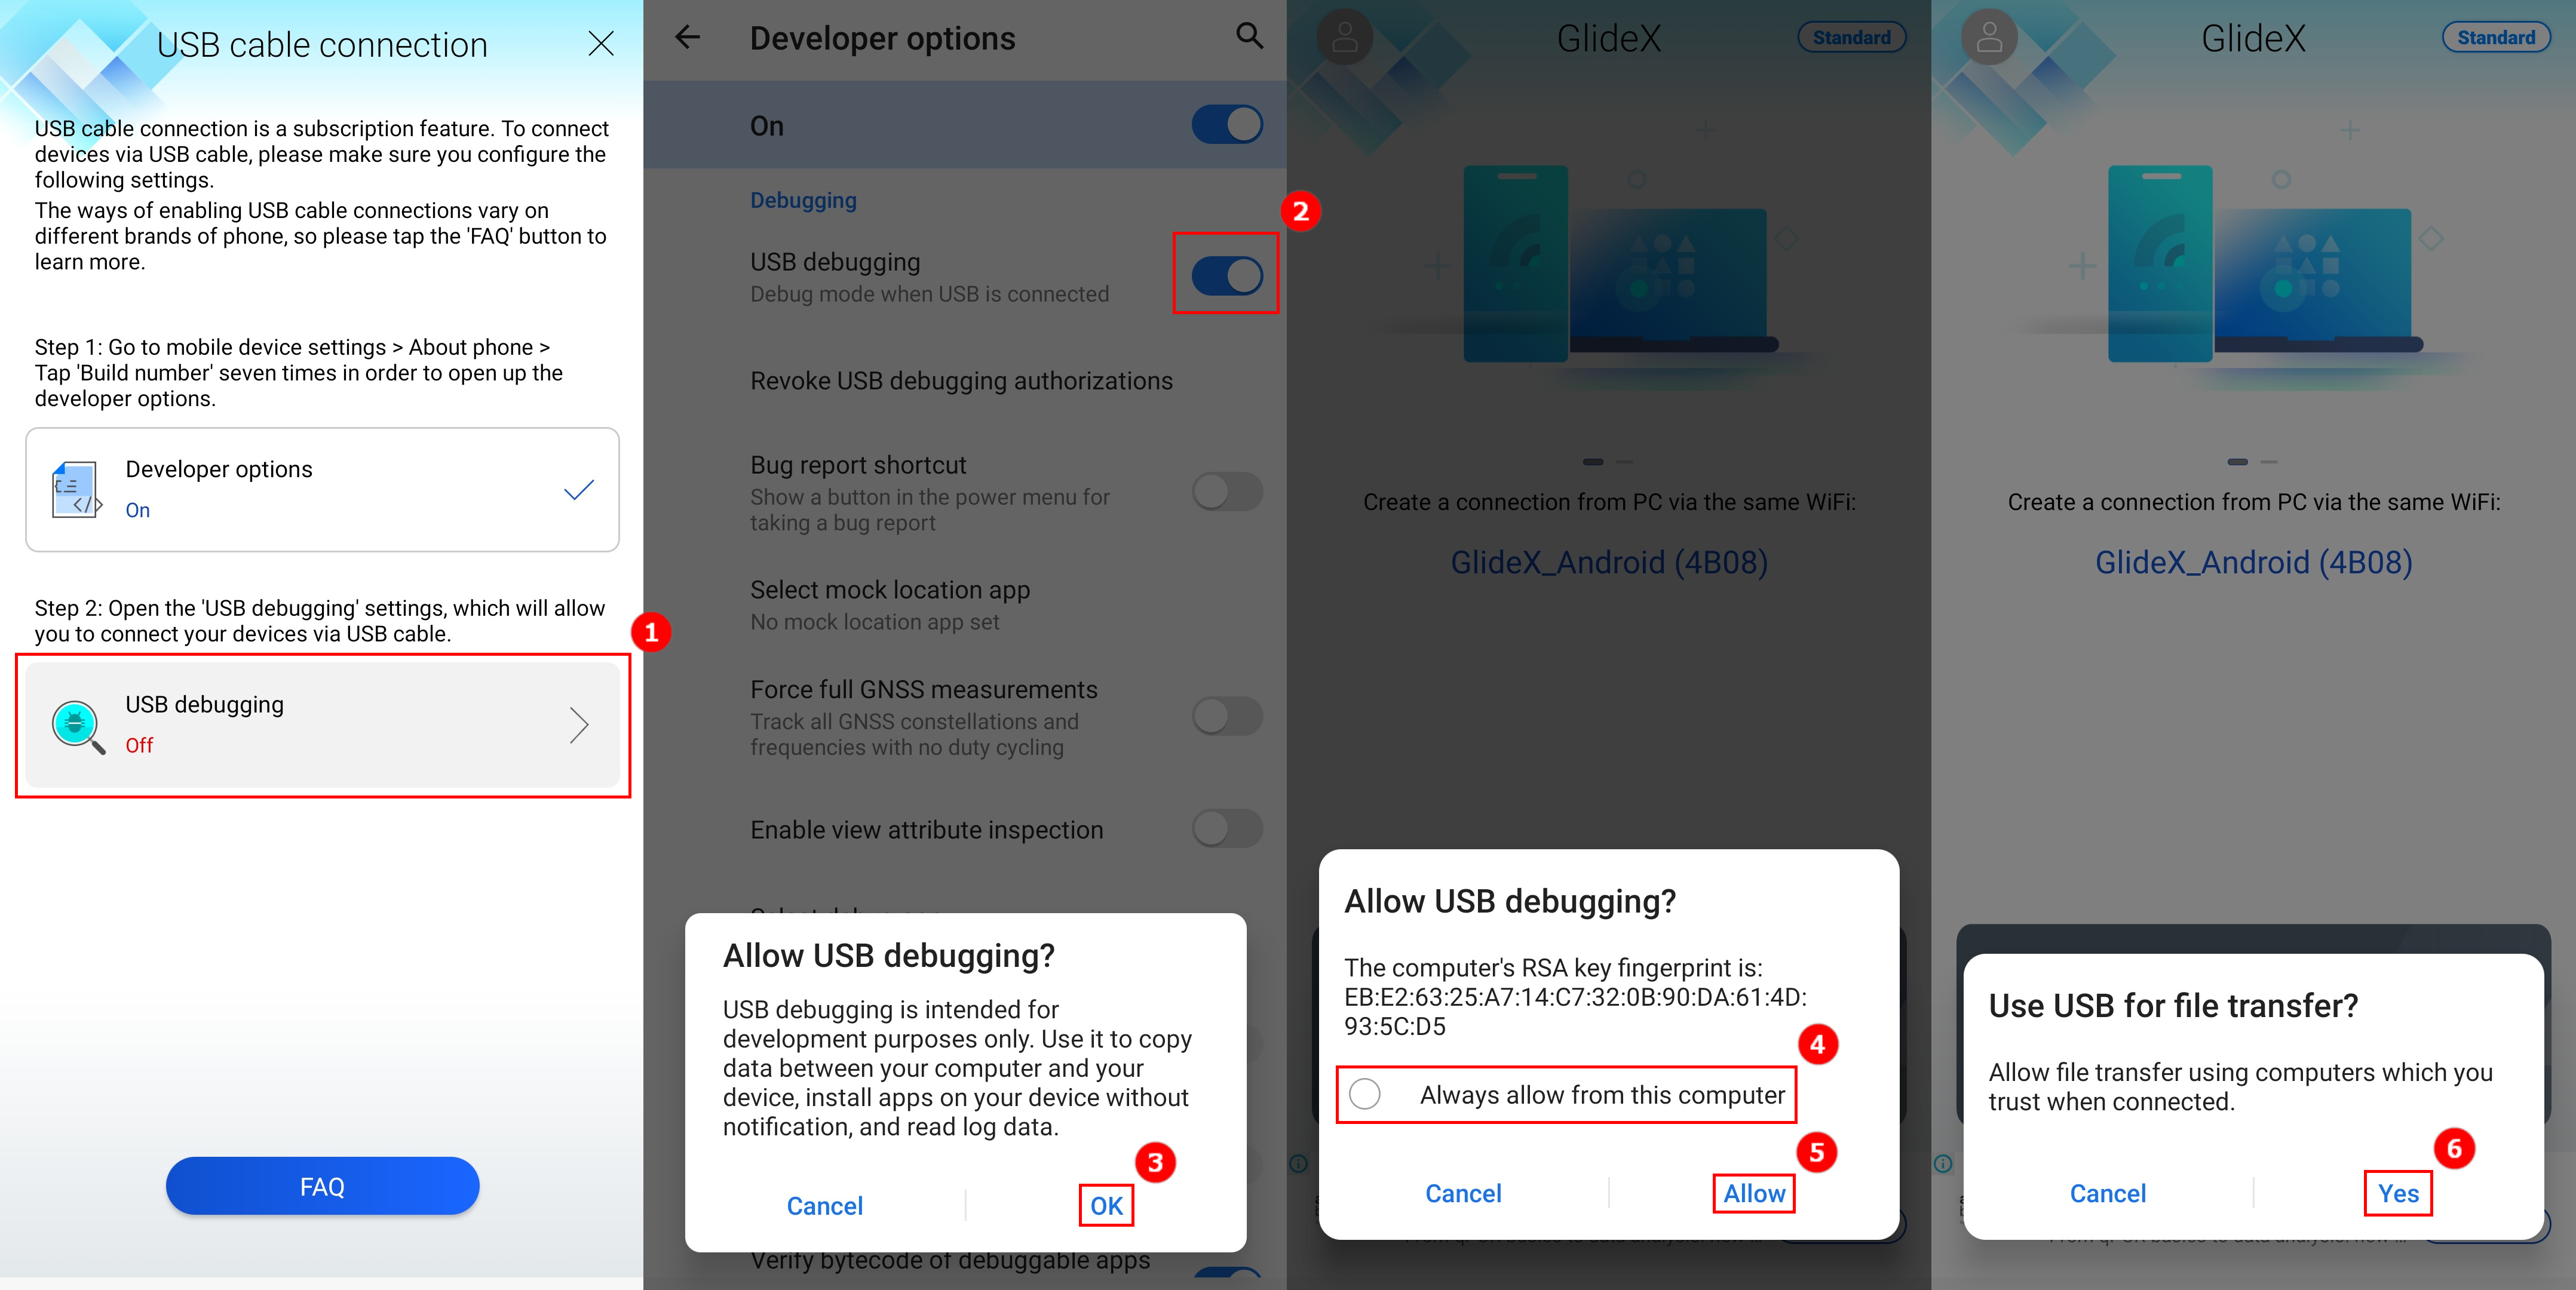
When the developer options is turned on, go back to the USB cable connection page. Tap on [USB debugging]①, or in [Developer options] and tap on [USB Debugging]②, a pop-up window will appear, tap on [OK]③, and USB Debuging detection will turn on. Connect your computer and mobile device by using a USB cable, and a pop-up window will appear on the mobile device, tap on [Always allow from this computer]④, then tap [Allow]⑤, and then tap [Yes]⑥ to connect your computer and mobile device.
When you connect your mobile device to the GlideX on your computer, your mobile device is displayed and a USB-connected icon appears.
[GlideX] Bluetooth pairing problems
If you want to use the GlideX Screen Mirror [PC Control] function, please make sure that your devices are connected successfully. If not, please try to follow below instructions.
1. Pair devices in the correct way to pair device's Bluetooth.
After enabling Screen Mirror, select [PC Control ] button > click [Start Bluetooth Pairing] button to connect devices; if you have successfully paired the devices via Bluetooth, please also click [Start Bluetooth Pairing] button to enable function connection.
1.1 If you are an Android user
- Make sure you allow your mobile devices to be visible to other devices during the pairing process.
- If you failed to pair, please go to mobile device [Settings] > [Bluetooth] device list, and make sure that the PC device you are going to pair is showed. Then, tap the device to trigger the connection with the PC.
1.2 If you are an iOS user
- Make sure you open and stay on the Bluetooth Settings screen until you complete the steps to pair your PC.
- If you failed to pair, please go to mobile device [Settings] > [Bluetooth] device list, and make sure that the PC device you are going to pair is showed. Then, tap the device to trigger the connection with the PC
If the screen shows the “Keyboard & Mouse” and “Audio” functionalities, that means the Bluetooth paired successful.

2. You have paired devices successfully before, but cannot paired them again?
Please go to Bluetooth system page on the PC and mobile device to remove the devices. After completely removing, try to pair them again. Please refer to the steps below:
2.1 PC Side - Remove the device in the Settings: Select [Start], then select [Settings] > [Devices] > [Bluetooth & other devices]. In Bluetooth, select the device you’re having problems connecting to, and then select [Remove device] > [Yes].
2.2 Mobile device side - Remove the device in the Settings: Go to the Bluetooth Settings page on mobile > Tap the connected PC > Tap [Unpair]. After removing the Bluetooth device, then pair devices again
2.3 Confirm that there is no paired device you had problems connected to on the Bluetooth setting page of the PC and the mobile device side, which means that the Bluetooth pairing is completely done. Please try to pair the devices again.
3. When Bluetooth does not work, or Bluetooth is lost
- Reset Bluetooth settings: Turn off your PC's and Mobile's Bluetooth settings, and turn them on again.
- Make sure airplane mode is off: Select [Start], then select [Settings] > [Network & Internet] > [Airplane mode]. Make sure “Airplane mode” is turned off. Then, turn Bluetooth on: Select [Start], then select [Settings] > [Devices] > [Bluetooth & other devices].
- Make sure Bluetooth works: Please check in the taskbar and select [action center] in the bottom right corner or go to [Settings] to ensure that your PC supports Bluetooth, and that Bluetooth is not missing. If the Bluetooth button is missing, please try to update to the latest driver or restart your PC.
- If you encounter the notification request of Bluetooth pairing repeatedly pops up, please restart your PC and try again.
*For more information about the Bluetooth problem, please refer to Microsoft official information to repair Bluetooth device.
[GlideX] Common ASUS PC Friend Coupon Problem
What is ASUS PC Friend Coupon?
ASUS PC Friend Coupon, which is exclusively offered to ASUS Member, is issued by ASUSTeK COMPUTER INC. from time to time. To get ASUS PC Friend Coupon for GlideX, please refer to Terms and Conditions.
How and where to get the ASUS PC Friend Coupon for GlideX?
ASUSTeK COMPUTER INC. is giving out GlideX Pro 1-year (365 days) free trial coupons, named ASUS PC Friend, to ASUS members who have purchased and registered the selected ASUS products (please refer to the section at the bottom of the page) that are still within the warranty period.
Step 1: ASUS members who meet the conditions can obtain and activate the coupon in the MyASUS for Windows app from [User Center] > log in and click [Member exclusive coupons].
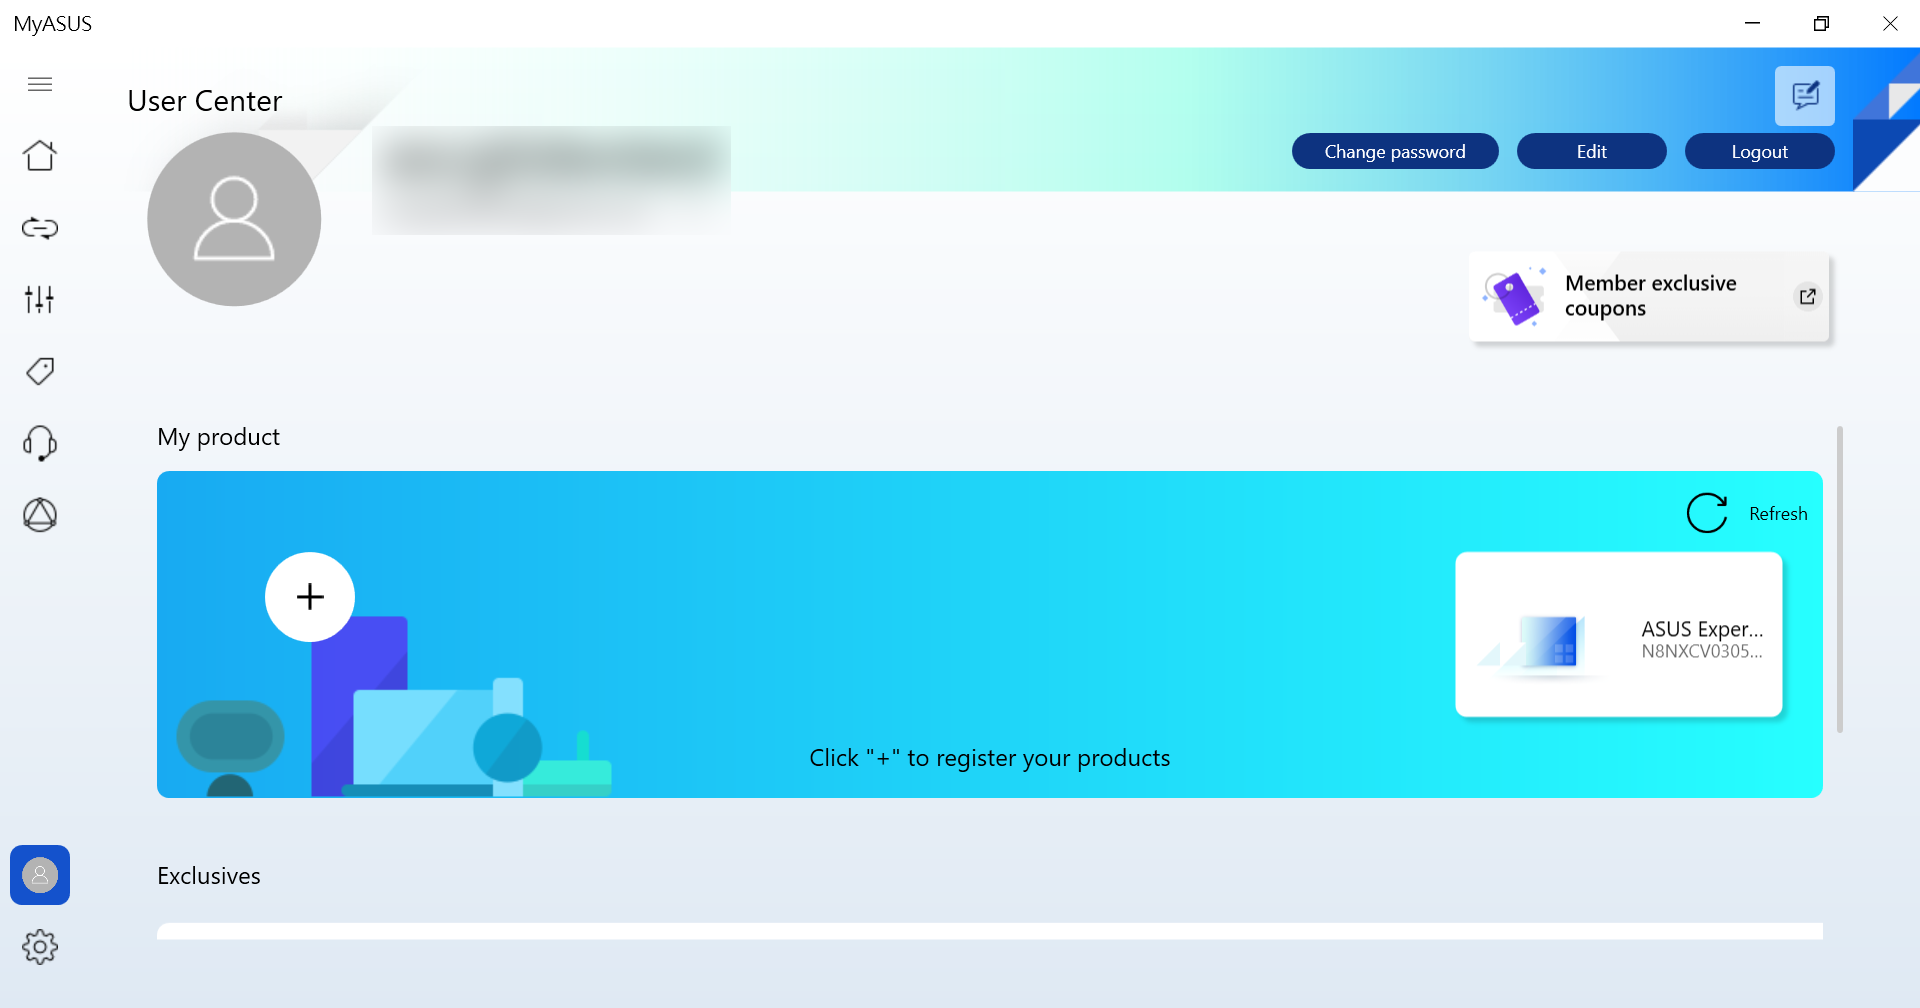
*If there is no coupon for your account, you will see “There are no coupons associated with this account”, it means that you are not currently eligible for redemption.
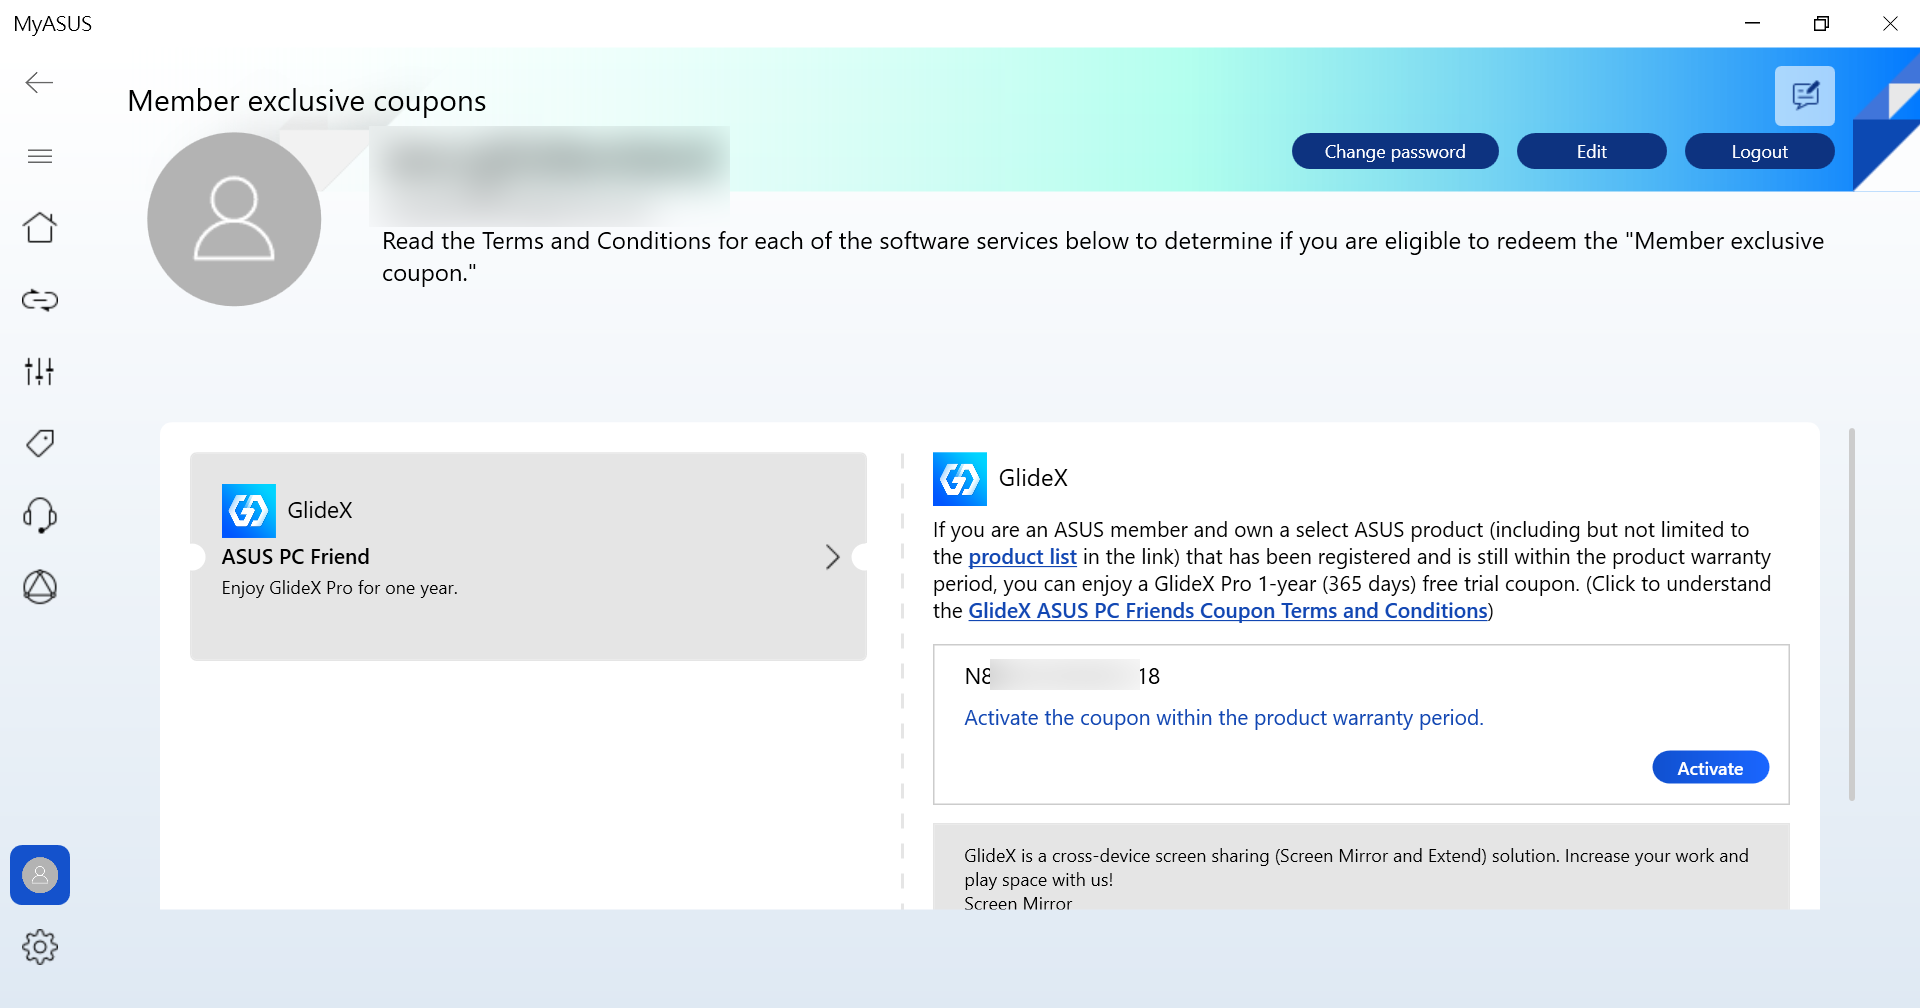
Step 2: Click [Activate]. After activating the coupon, ASUS members can log into GlideX using the same account with an active coupon.
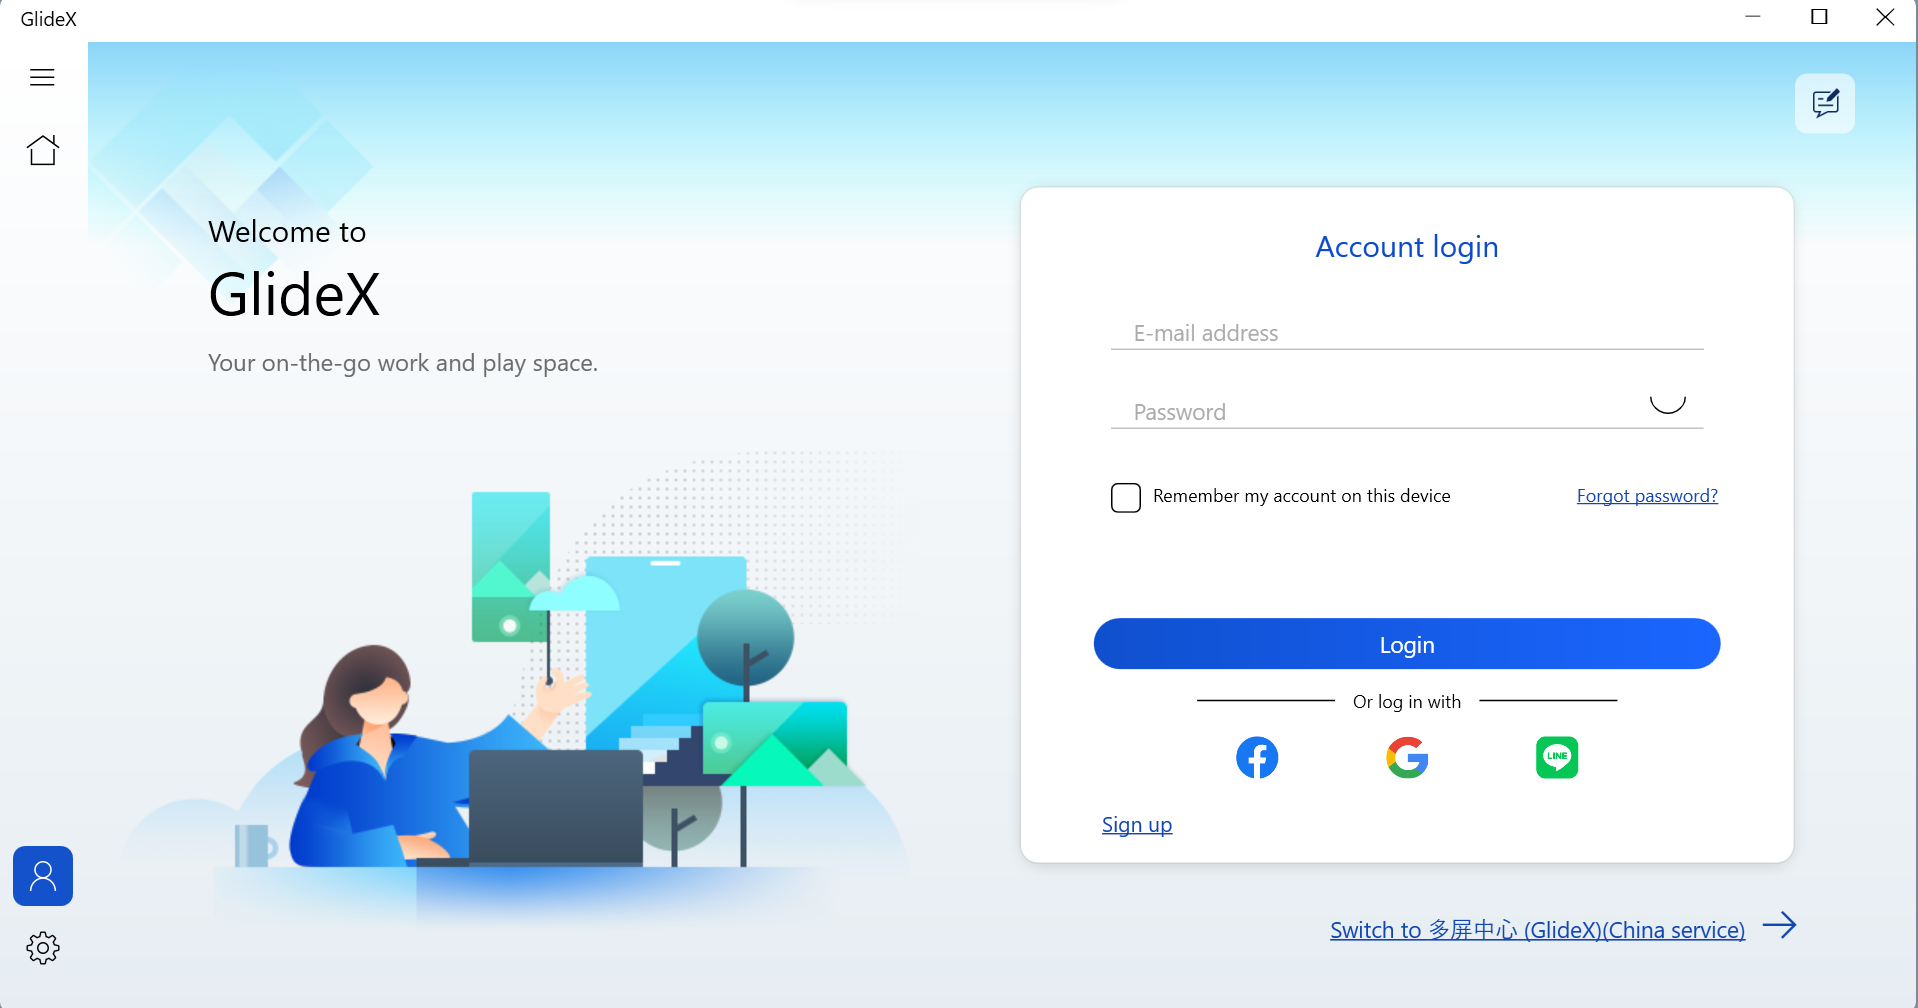
Step 3: After logging into GlideX using the same account with an active coupon. You can find the coupon in the [Current plan details].
Which regions are eligible for the promotion?
The ASUS PC Friend Coupon for GlideX from ASUS is available in regions where ASUS makes MyASUS for Windows and GlideX available to end users. This means registration of eligible products in regions where MyASUS for Windows and GlideX is not available do not qualify for this coupon.
If I already have an existing GlideX subscription, can I activate the coupon?
If you already have an existing subscription through Google Play or Apple App Store for GlideX, the activation of the coupon is unavailable. To protect your right to use the subscription items you have paid for, it is recommended that you go to the corresponding subscription platform to cancel the subscription. When the plan level turns to the GlideX Standard, you can activate the coupons you have obtained.
What happens if I purchased and registered multiple eligible devices? And what happens if I activate those coupons?
A user can get the same number of coupons according to the eligible registration products. For example, if a member owns 4 eligible devices, then he/she will get 4 coupons. However, only one coupon is allowed to be activated at a time and cannot be used in conjunction with other GlideX coupons. That is, if you have two coupons, and you activated them; then the first coupon got ineffective once you activate the second coupon. Besides, once a coupon is activated, cancellation will not be accepted.
What happens if I subscribed through Google Play or Apple App Store after I have activated a coupon?
If you subscribe to GlideX through Google Play Store or Apple App Store, the existing active coupon will immediately become ineffective, and any unused time cannot be retained or redeemed for cash. On the contrary, if the member currently has an active subscription through Google Play Store or Apple App Store, the coupon cannot be activated for use.
Where can I find more information about GlideX?
For more introduction or answers to frequently asked questions, please visit the GlideX webpage or User guide.
What happens when the coupon ends?
At the end of the coupon term, users may continue to access GlideX with the Standard (free) version. If you wish to continue to use GlideX Pro, please see GlideX FAQ.
Who can I contact if I encounter any problems when claiming the offer?
Please visit our support page at Contect us-Email | ASUS and fill in the form. An ASUS customer support representative will then contact you.
Eligible model list for acquiring ASUS PC Friend Coupon:
Including but may not limited to ASUS, ROG laptops and desktops, excluding Chromebooks, mini desktops, DIY desktops.
[GlideX] How to switch from 2.4GHz to 5GHz for a better screen sharing experience?
Differences between 2.4GHz and 5GHz networks
Note: Channels supported by 2.4GHz and 5GH vary according to regional/national regulatory restrictions.
By distance comparison, the transmission distance of 2.4GHz signal is farther than 5GHz, but the speed is slower than 5GHz, and although the signal transmission distance is short, it can be faster. In terms of frequency band usage, in addition to WiFI will use 2.4 GHz band, Bluetooth, home wireless phones are in use, some household appliances such as flulights, microwave ovens, refrigerators may be in this band, and thus produce interference to wireless channels, so the connection in the 2.4GHz band, network transmission is unstable or vulnerable to interference leading to poor quality of the connection. Routers and personal hotspots are therefore recommended to use a 5GHz network.
The WiFi router
1. Check whether your router supports 5GHz.
2. Set up 5GHz as instructed by your router's user manual.
3. Connect your computer and mobile device to the 5GHz band of your set-up router, and your computer and mobile device will have better speed, better characterization, and better screen sharing when connected to the same WiFi network and using 5GHz. (compared to 2.4 GHz WiFi network)
Turn on and set up the computer's 5GHz hotspot
If your computer supports WiFi and has 5GHz hotspot sharing, you can share it through your computer's 5GHz hotspot, so that your mobile device can connect to your computer hotspot.
(At this point, the mobile device will use the computer's network, please note the network traffic consumption).
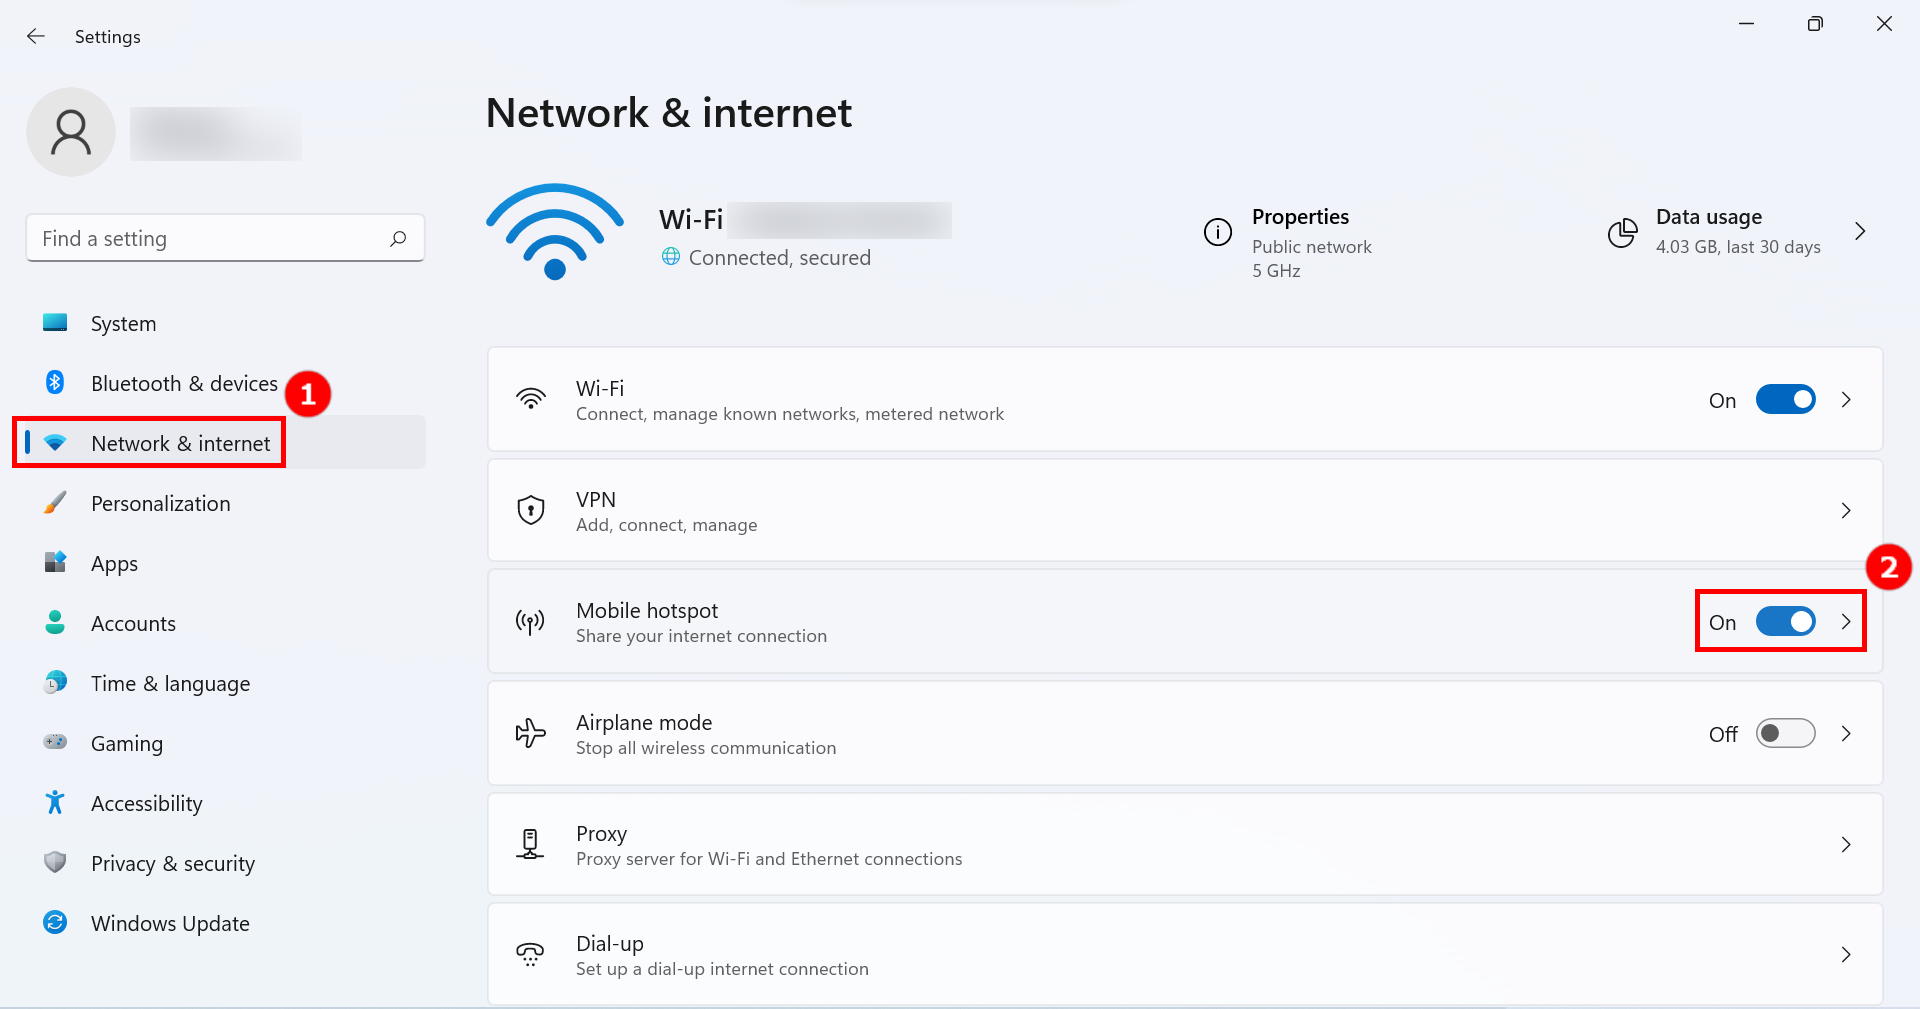
1. Click on the [Start]① icon at the bottom of your desktop and click on [Settings]②.

2. Click on [Network & Internet]① on the left side of the settings page, switch on the [Mobile Hotspots]② toggle, and then click on the small arrow on the right side of the [toggle] to open the Mobile Hotspot Settings page.
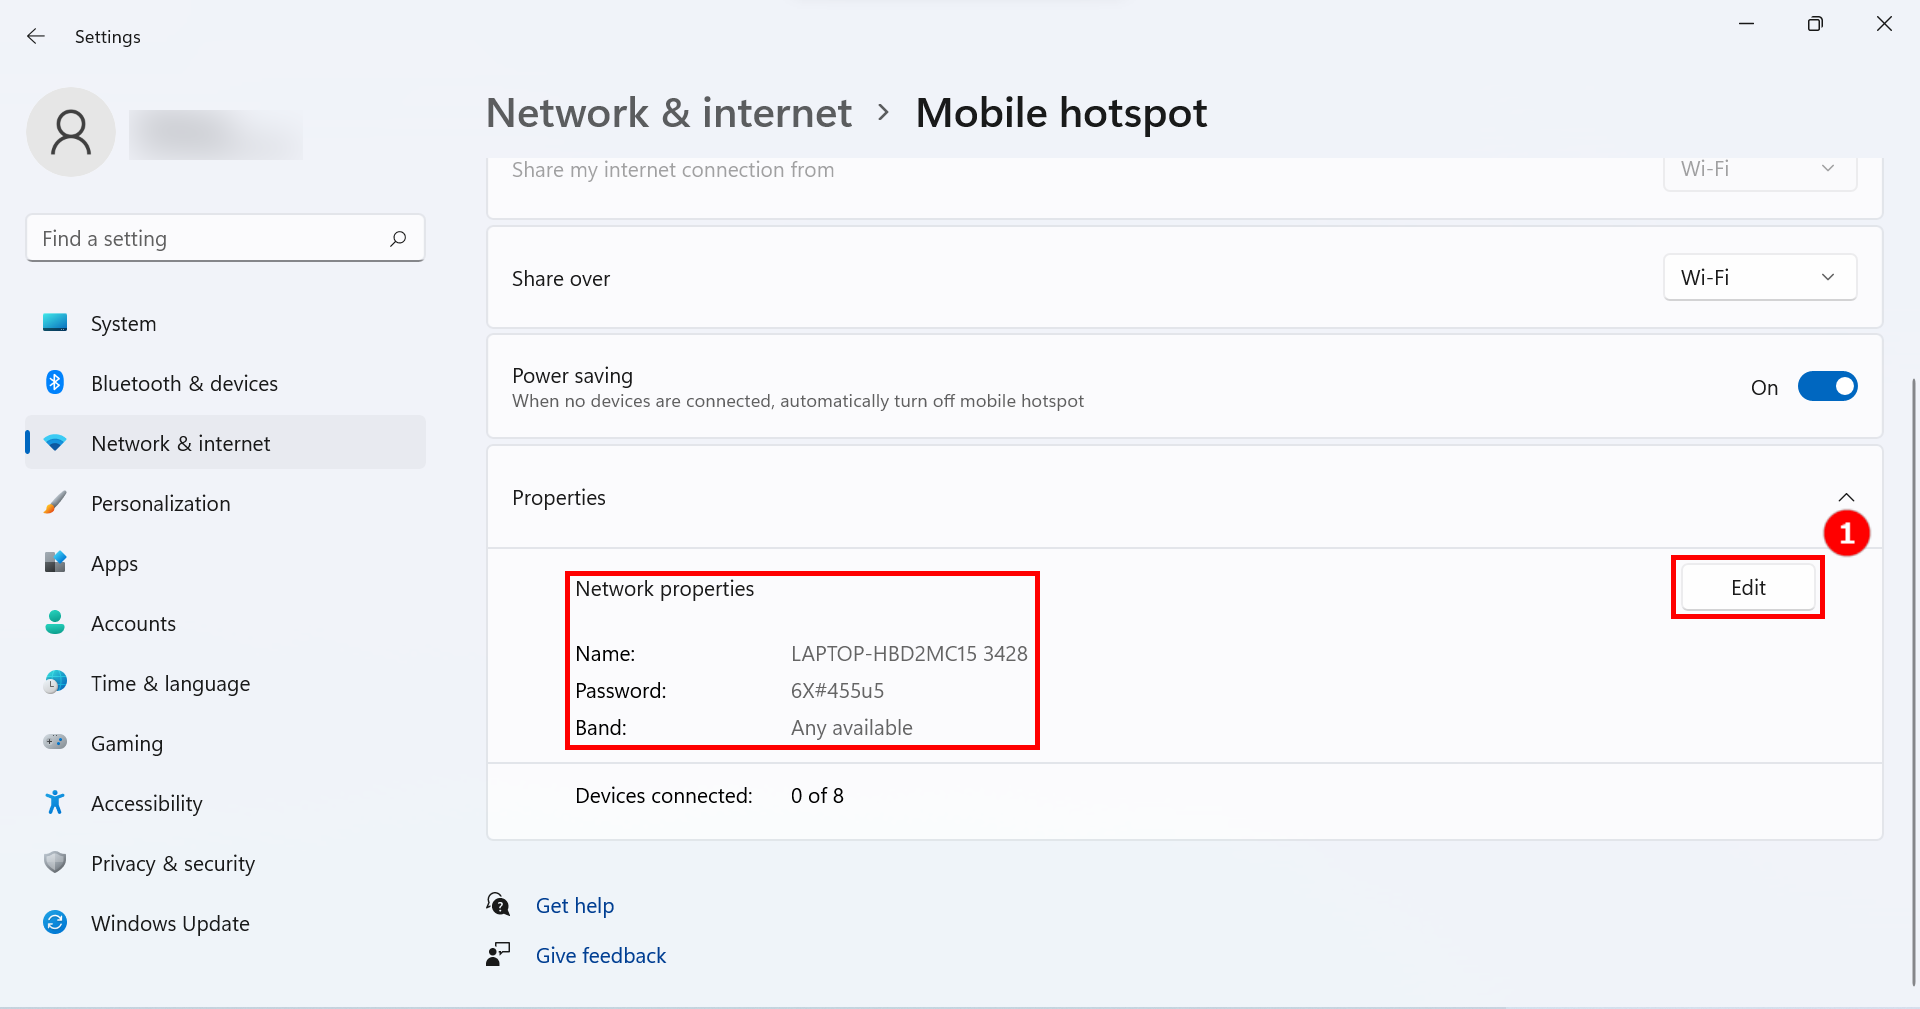
3. Click [Edit]① at the bottom of the mobile hotspot page.
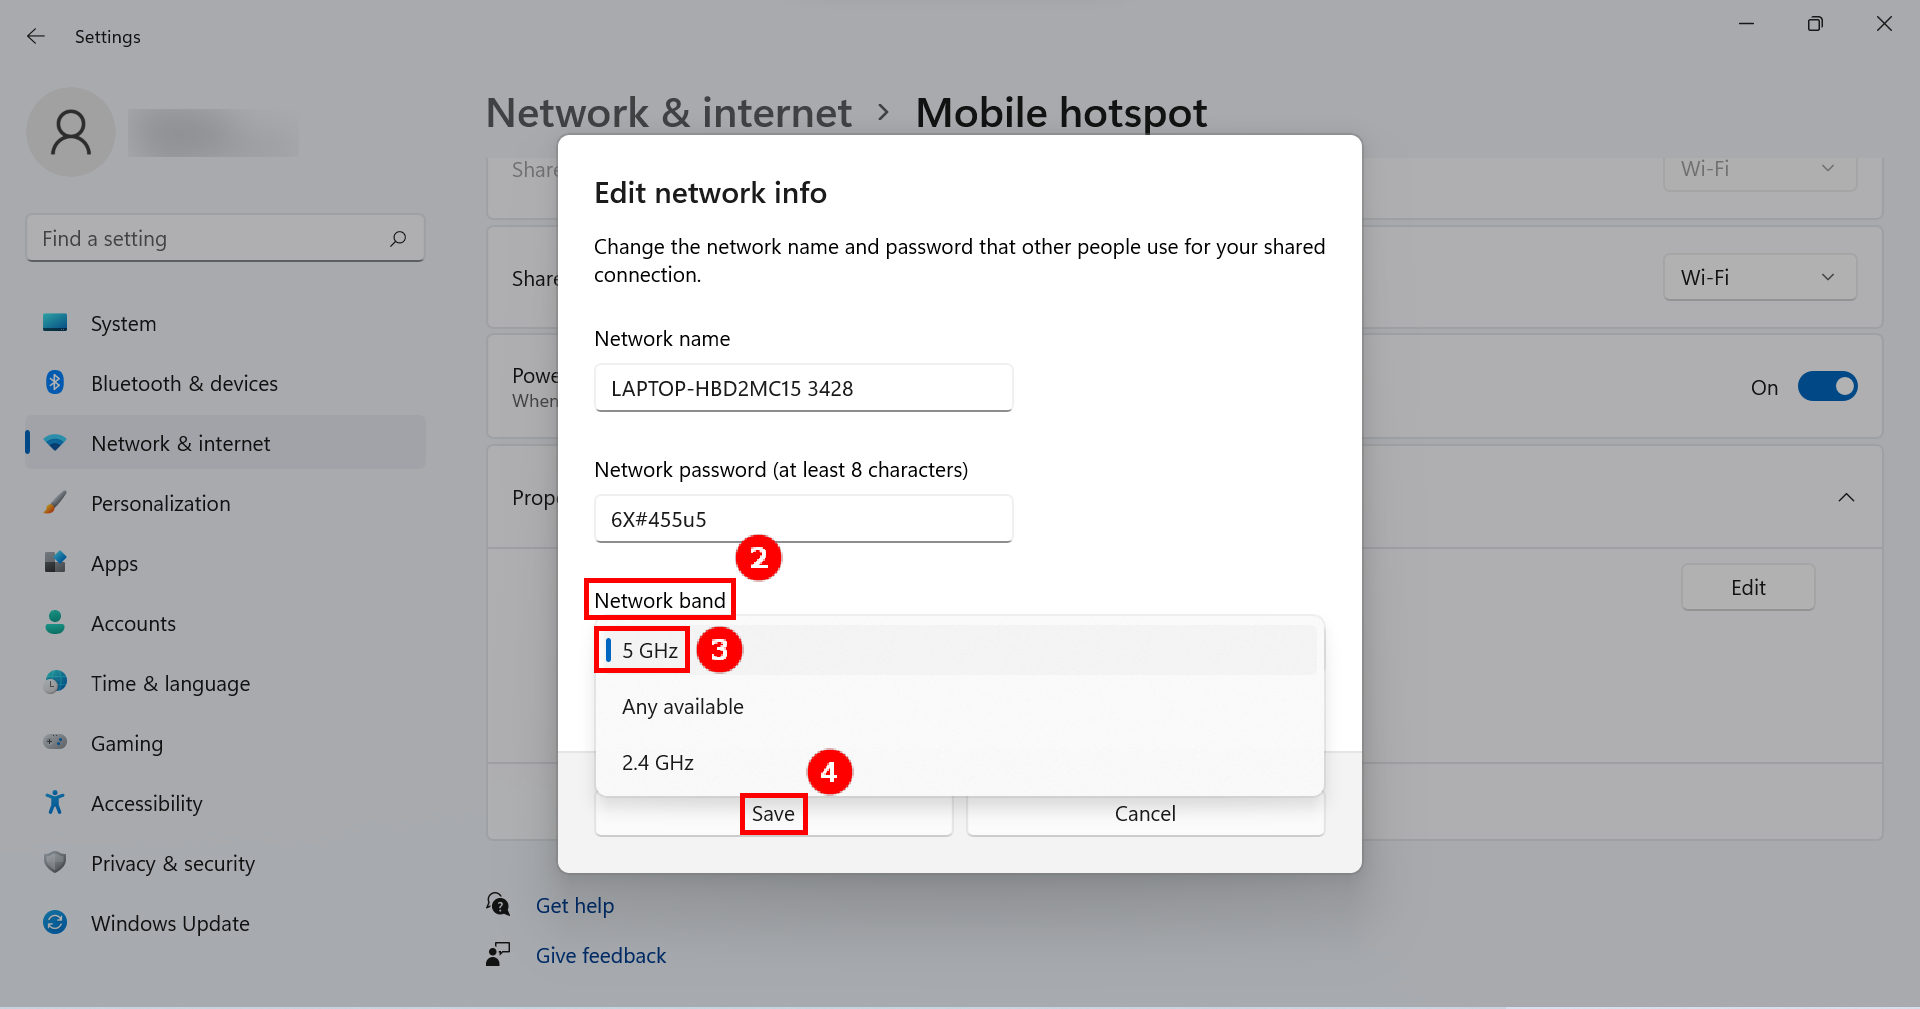
4. Click on the [Network Band]①, click on [5 GHz]③ and click on [Save]④ to complete the modification.
5. On your mobile device, select the 5GHz hotspot sharing connection you just set up on your computer. At this point, operating the computer side of the GlideX connected mobile device for Screen Mirror & Screen Extend, there will be better connection speed, better stability, better screen sharing experience.
Turn on and set up the 5GHz hotspot on the mobile device side
If your mobile device supports 5GHz hotspot sharing, you can connect your PC to your mobile device hotspot through your mobile device's 5GHz hotspot sharing.
(At this point, the computer will use the mobile device's network, please note the network traffic consumption).
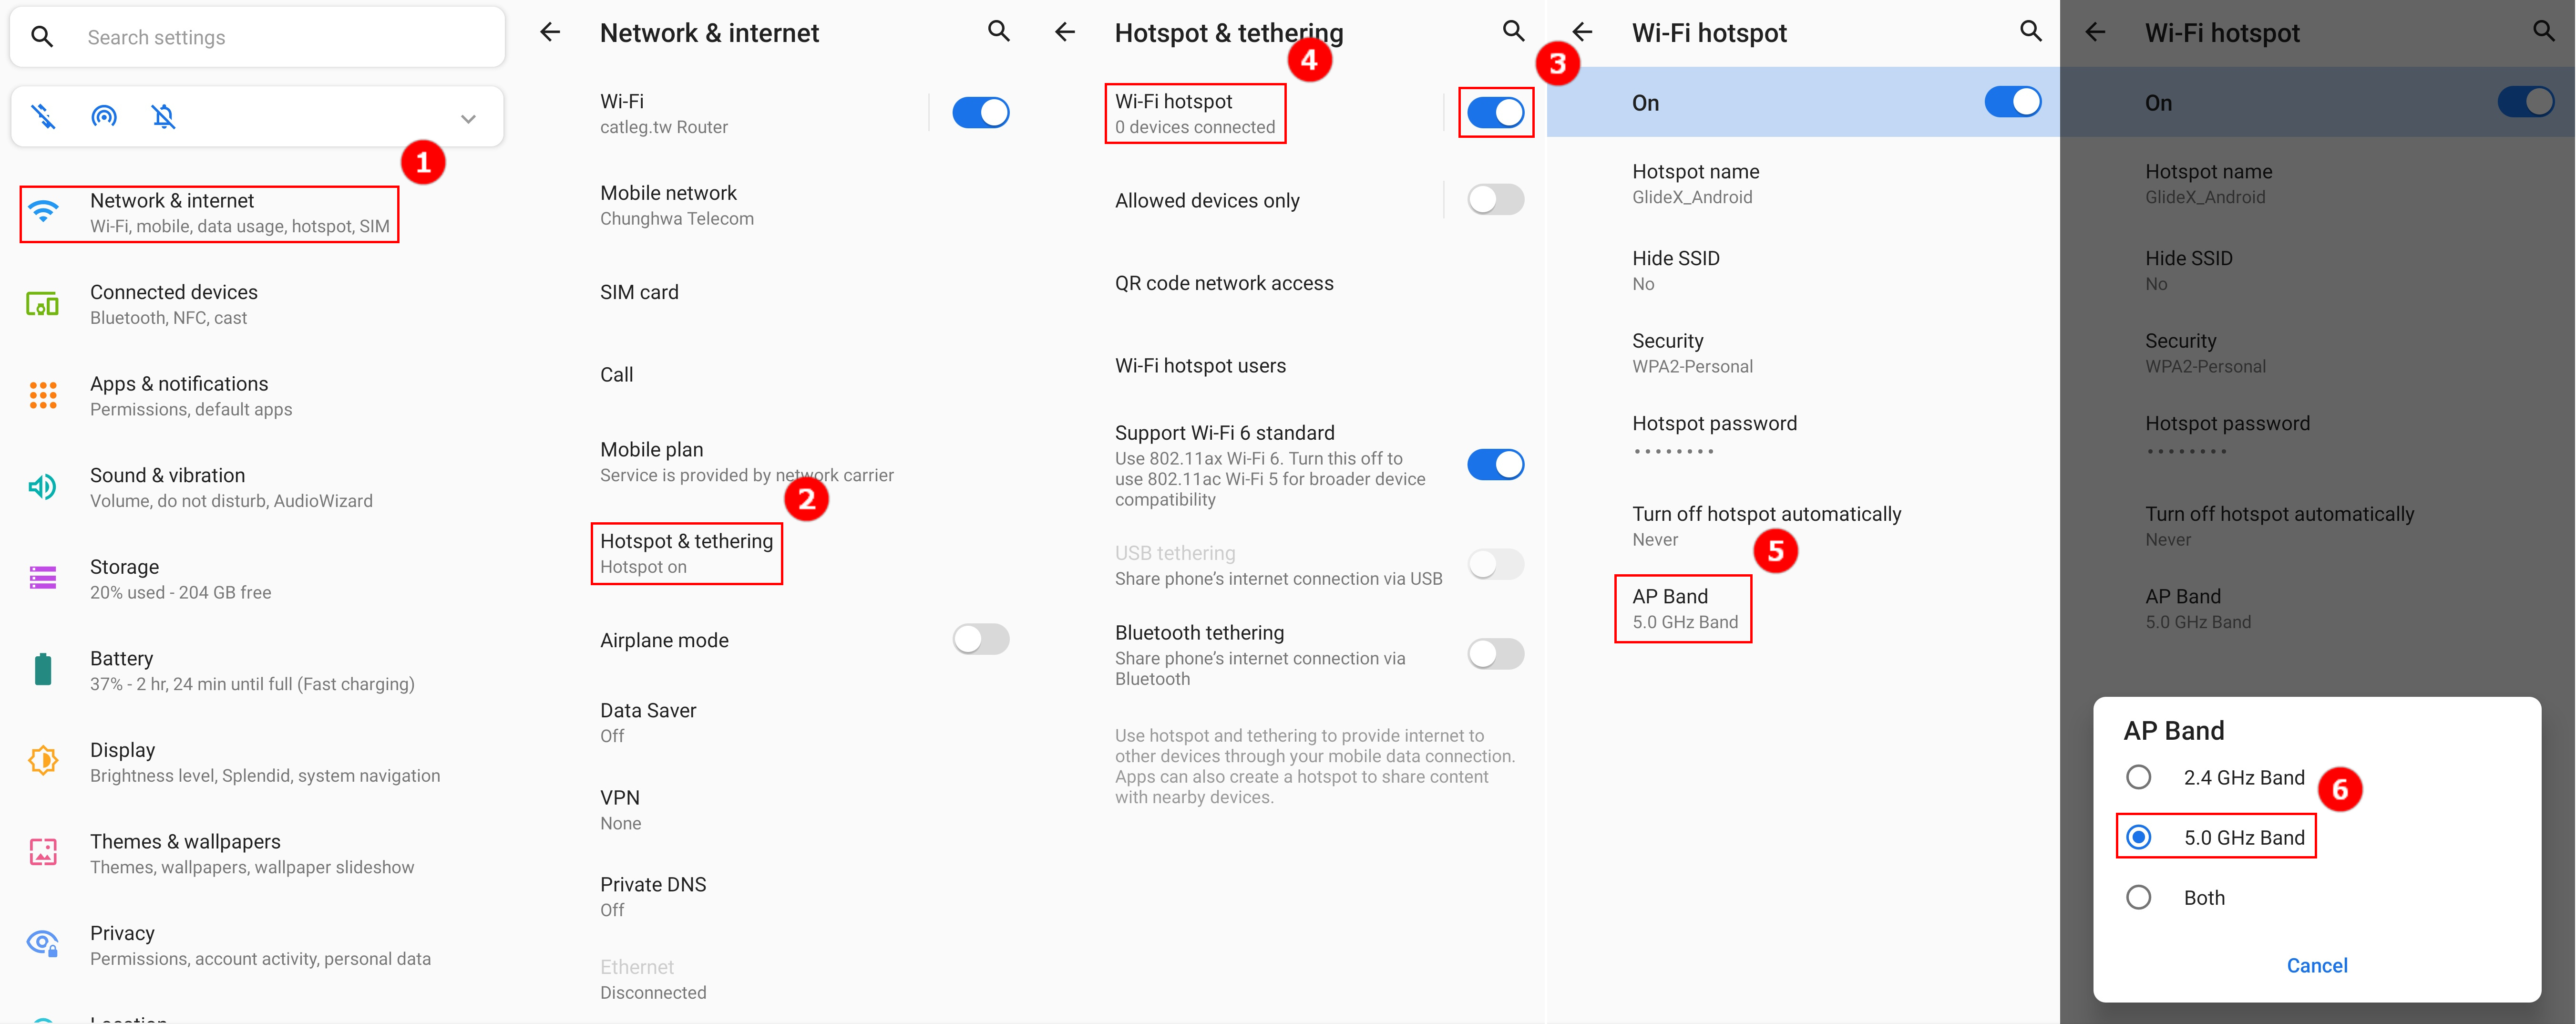
1. On the mobile device settings page, tap [Network & Internet]①, tap on [Hotspot & Tethering]②, tap[toggle]③ to turn on Wi-Fi hotspot, tap on [Wi-Fi hotspot]④, tap [AP band]⑤, select the [5.0 GHz band]⑥ in the bottom pop-up window.
2. On your computer, select the 5GHz hotspot sharing connection just set up by your mobile device. At this point, operating the computer side of the GlideX connected mobile device for Screen Mirror & Screen Extend, there will be better connection speed, better stability, better screen sharing experience.
[GlideX] How to enable USB debugging for Android devices?
To connect your Android mobile device and your personal computer with a USB cable, please make sure you complete the following steps:
- Enable the [Developer option]
- Enable the [USB debugging settings]
- Allow [USB debugging] when plugging in the USB cable
Steps required to enable USB cable connection vary depending on the brand of your device.
- Samsung, Google, Sony, OnePlus: Go to Settings > Tap About Phone > Tap Build number 7 times to enable Developer options. Then go to System > Developer options > Turn on USB debugging, and tap OK on the Allow USB debugging pop-up dialog.
- Huawei: Go to Settings > Tap About Phone > Tap Build number 7 times to enable Developer options. Then go to System & updates > Developer options > Turn on USB debugging. And turn on the Allow USB debugging pop-up dialog after plugging your phone with USB cable.
- Mi: Go to Settings > Tap My device > Tap All specs > Tap MIUI version 7 times and go back. Then go to Additional Settings > Developer options, and turn on Developer options > Turn on USB debugging. And tap Accept for the pop-up dialog after counting. Turn on Install via USB and USB debugging (Security settings), and tap Next step after counting > Tap Accept after counting.
- Oppo: Go to Settings > Tap About Phone > Tap Build number 7 times to enable Developer options. Then go to Additional Settings > Developer options, and turn on USB debugging, and tap OK on the Allow USB debugging pop-up dialog.
- Realme: Go to Settings > Tap About Phone > Tap Version > Tap Build number 7 times to enable Developer options. Then go to Additional Settings > Developer options > Turn on USB debugging, and tap OK on the Allow USB debugging pop-up dialog.
- Vivo: Go to Settings > Tap More settings > Tap About phone > Tap Software version 7 times. Then go to Developer options > Turn on Developer options and tap OK for development settings. Next, turn on USB debugging, and tap OK on the Allow USB debugging pop-up dialog.
- LG: Ensure the developer menu is enabled in system About phone > Software info and tap Builder number for several times. And ensure USB debugging is enabled in the developer menu. Then go to Settings > Tethering & networks and switch on USB tethering.
In the following, take ASUS Zenfone for example:
Note: Mobile devices need to be connected to your computer using USB cable.
1. Swipe left on GlideX [Home]①, tap on [USB Connection Settings]②, tap on the [Developer Options]③ will be directed to the mobile device's [About Mobile] page, tap on [Software Information]④, and tap on [Build Number]⑤ seven times in a row to turn on the developer options.
2. When the developer options is turned on, go back to the USB cable connection page, tap on [USB debugging]①, or in [Developer options] and tap on [USB Debugging]②, a pop-up window will appear, tap on [OK]③, and USB Debuging detection will turn on. Connect your computer and mobile device using a USB cable, and a pop-up window will appear on the mobile device, tap on [Always allow from this computer]④, then tap [Allow]⑤, and then tap [Yes]⑥ to connect your computer and mobile device.
[GlideX] Learn how to send feedback to GlideX
If you find any problems or have any feedback to GlideX, please give feedback to GlideX via Windows app and mobile app by following the below instructions, so that GlideX Team can analyze the error message:
Give feedback to GlideX via Windows app
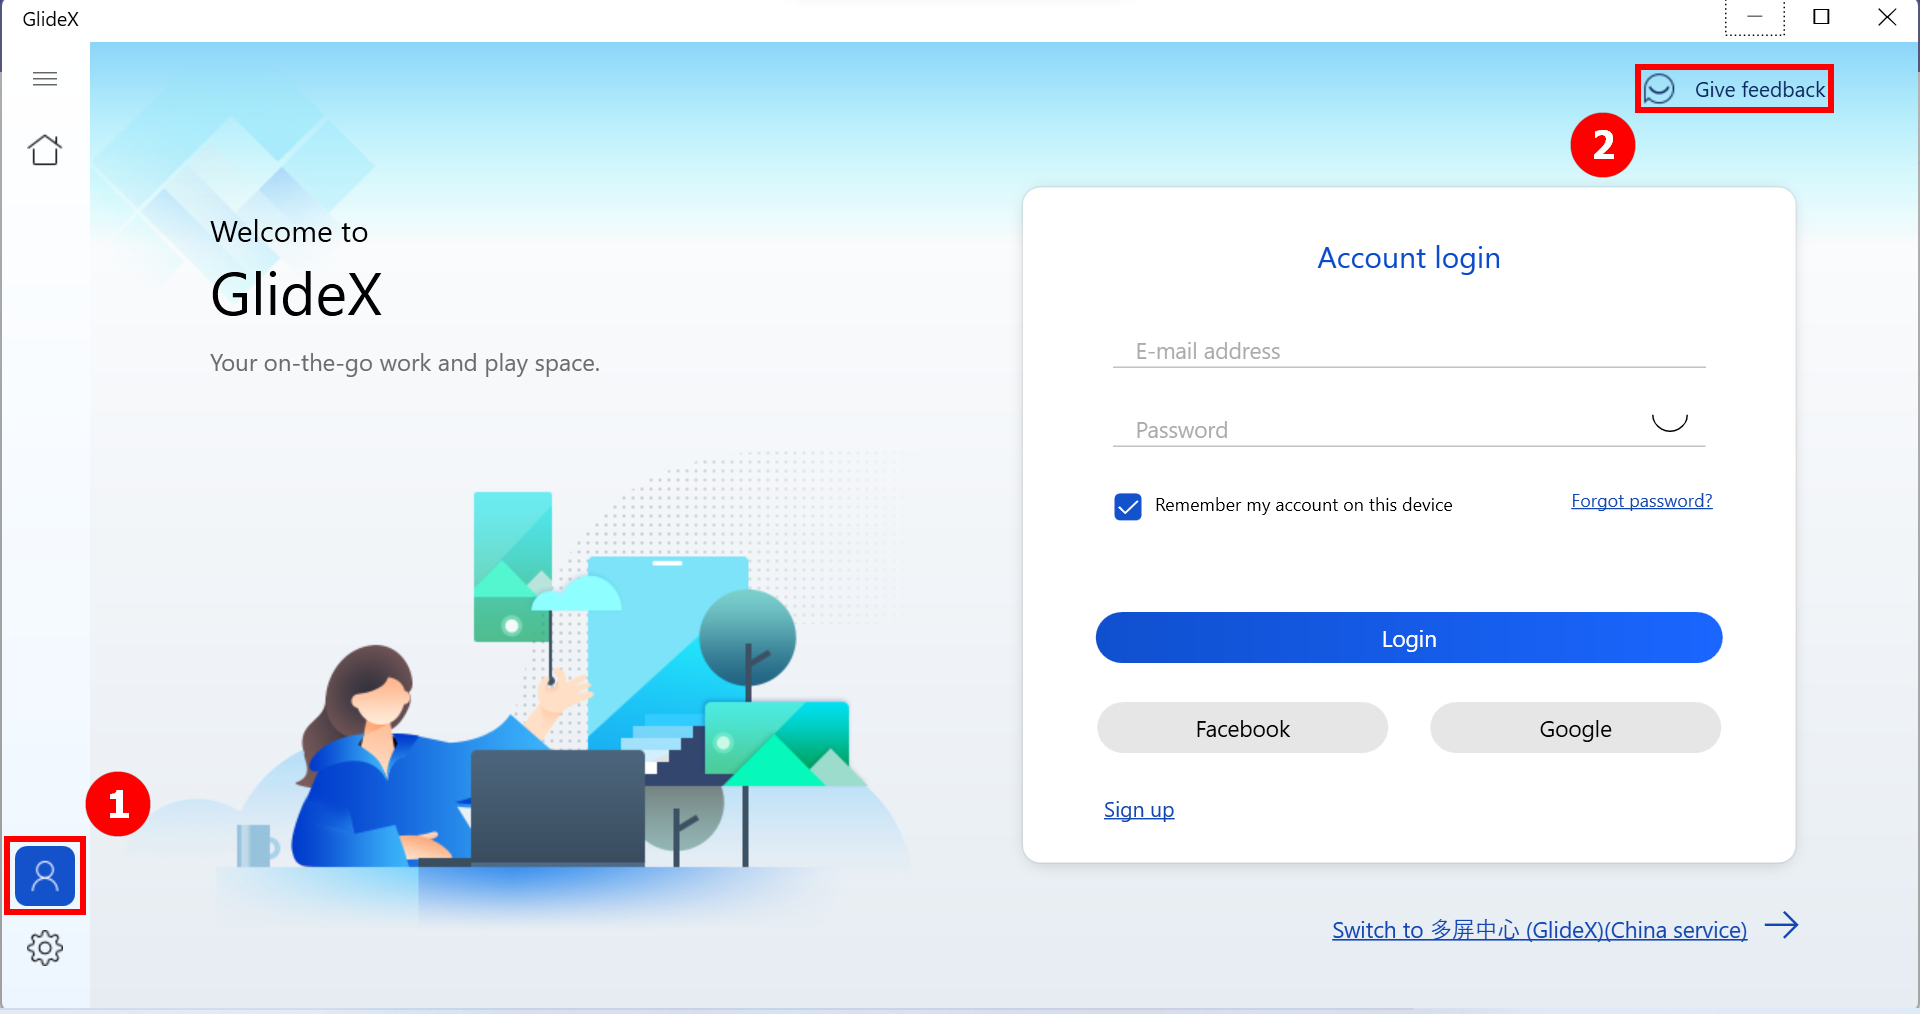
1. Enter ①[User Center] and click ②[Give feedback] at the upper right corner.
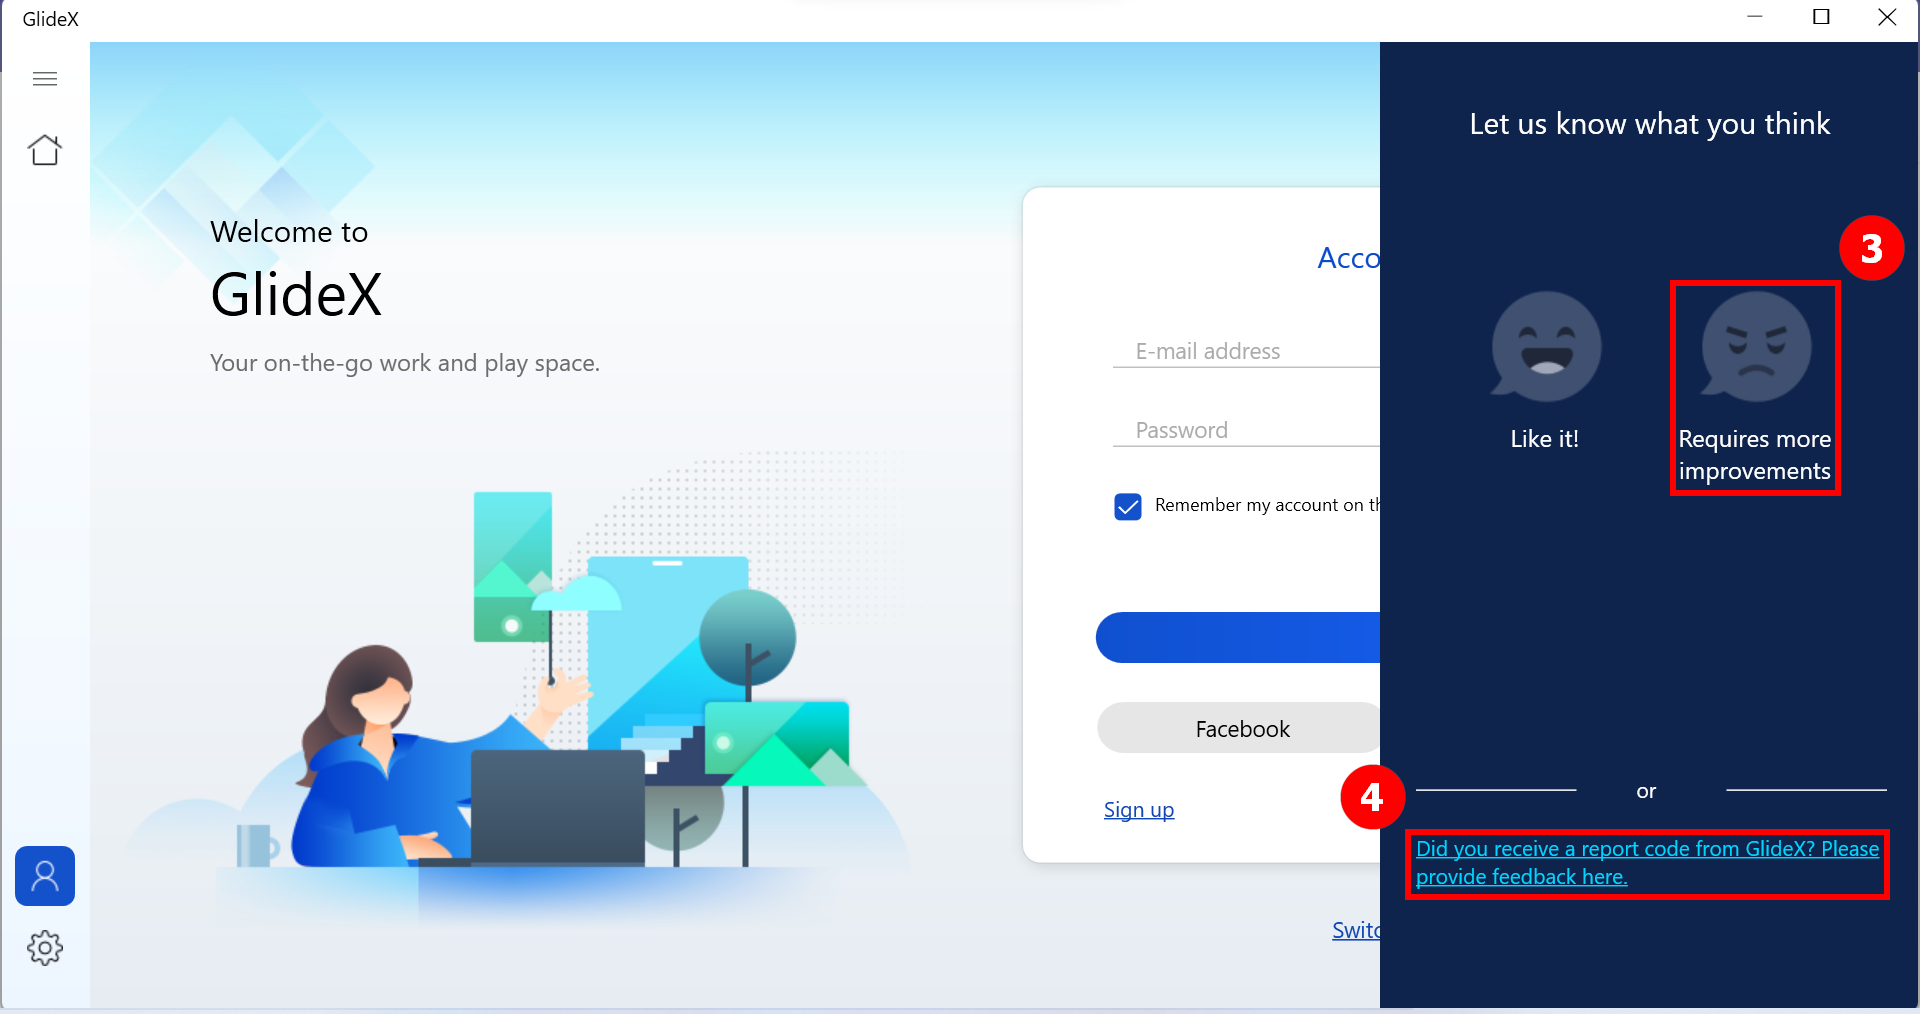
2. Select ③[Requires more improvements] if you didn't receive a report code from GlideX mobile app. Otherwise, please select ④[Did you receive a report code from GlideX? Please provide feedback here.]
* Submitting feedback via report code is supported by the following versions and later: GlideX Windows version 1.0.13.0, Android version 1.0.13.0, iOS version 1.0.9
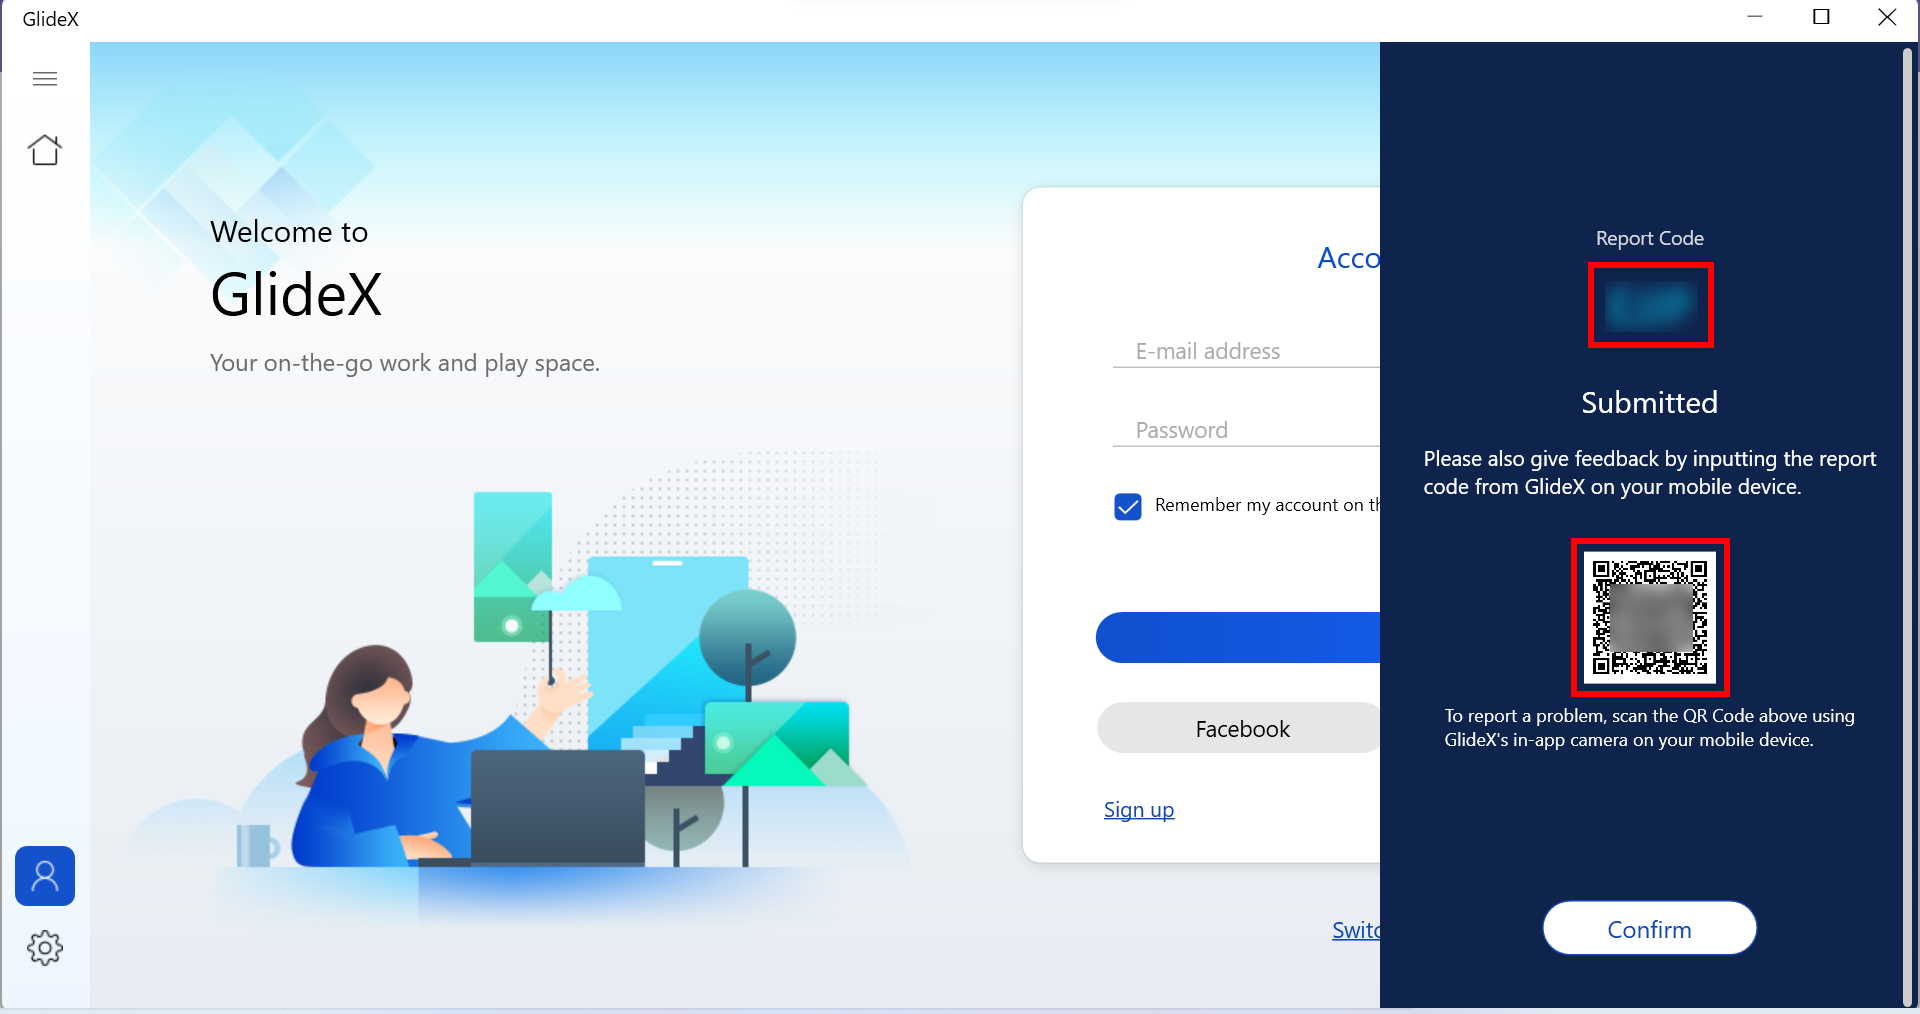
2-1 Fill in ⑤[Area], select ⑥[Privacy Notice], and finally click ⑦[Submit]. Then you will receive a report code. Please turn to GlideX mobile app to send back the information on your mobile device to us.

Meanwhile, you can also scan the QR Code by using GlideX in-app camera on the mobile device, and it will direct you to the mobile's report page.
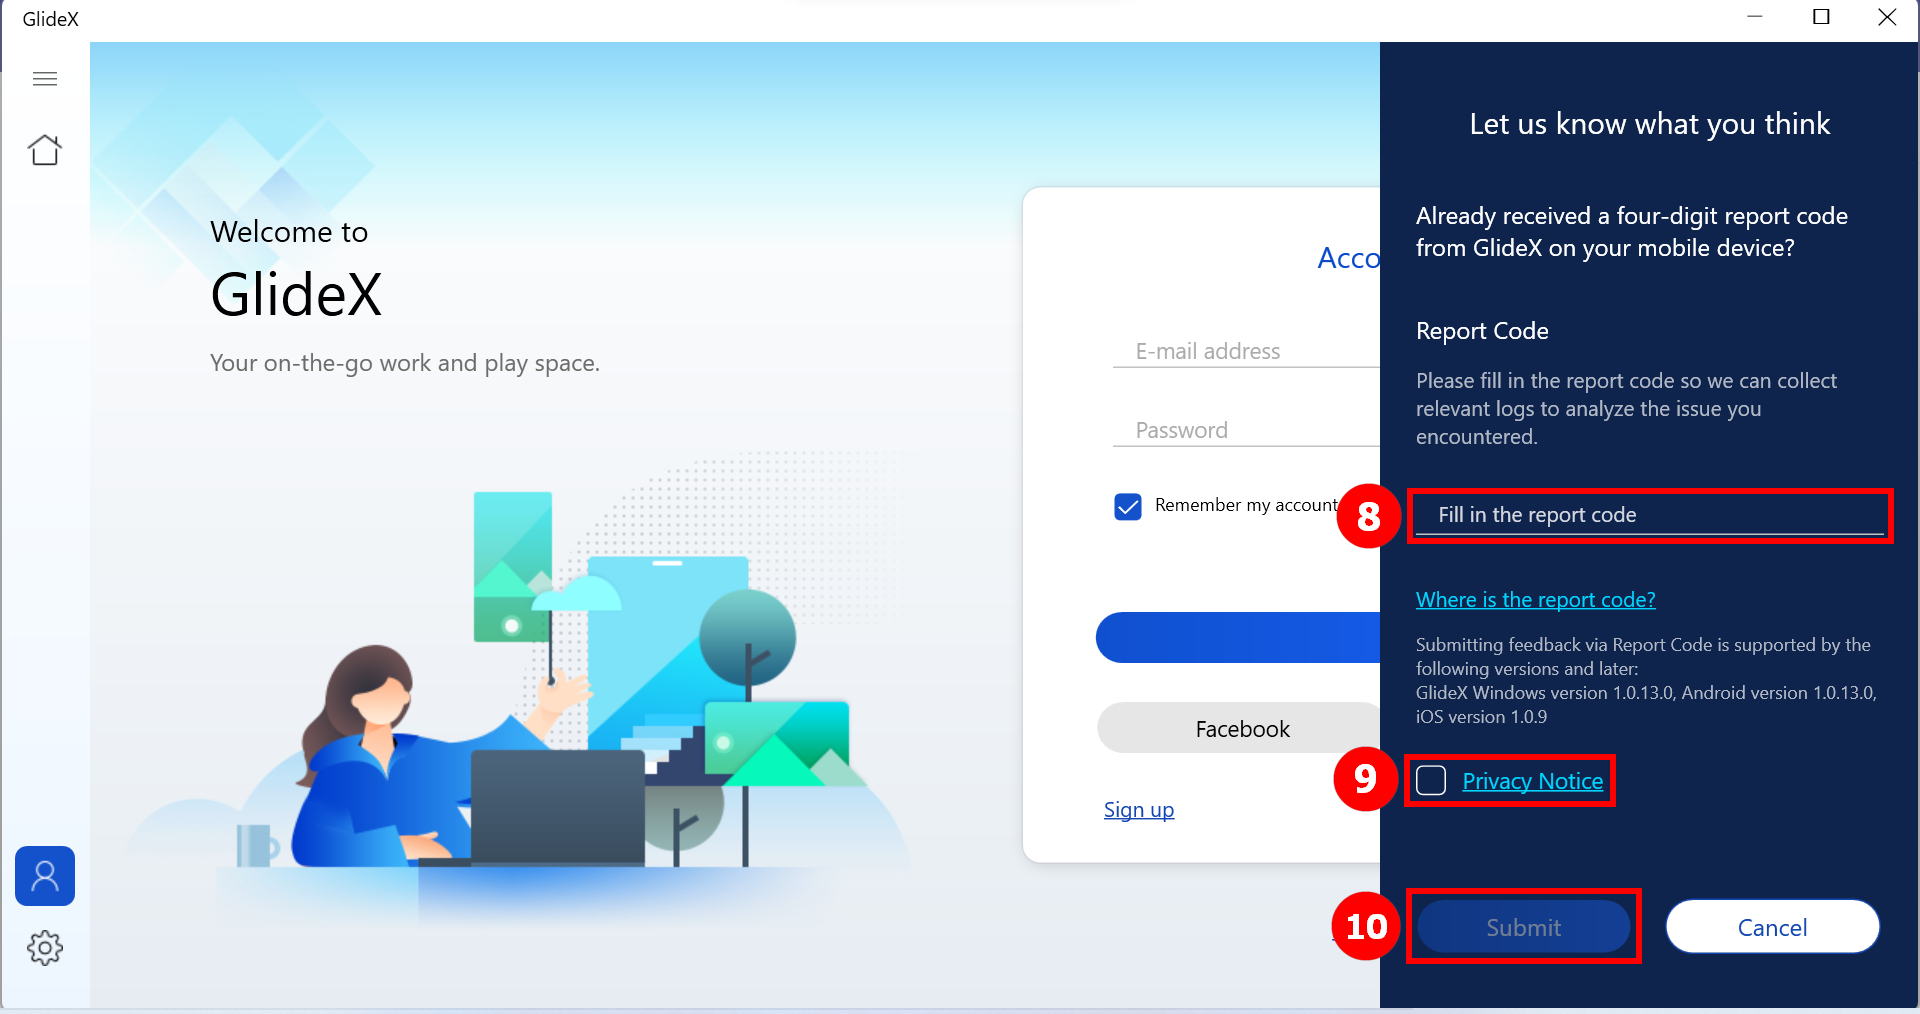
2-2 Fill in ⑧ [the report code] you got from the mobile app, select ⑨ [Privacy Notice], and finally click ⑩ [Submit].
Give feedback to GlideX via mobile app
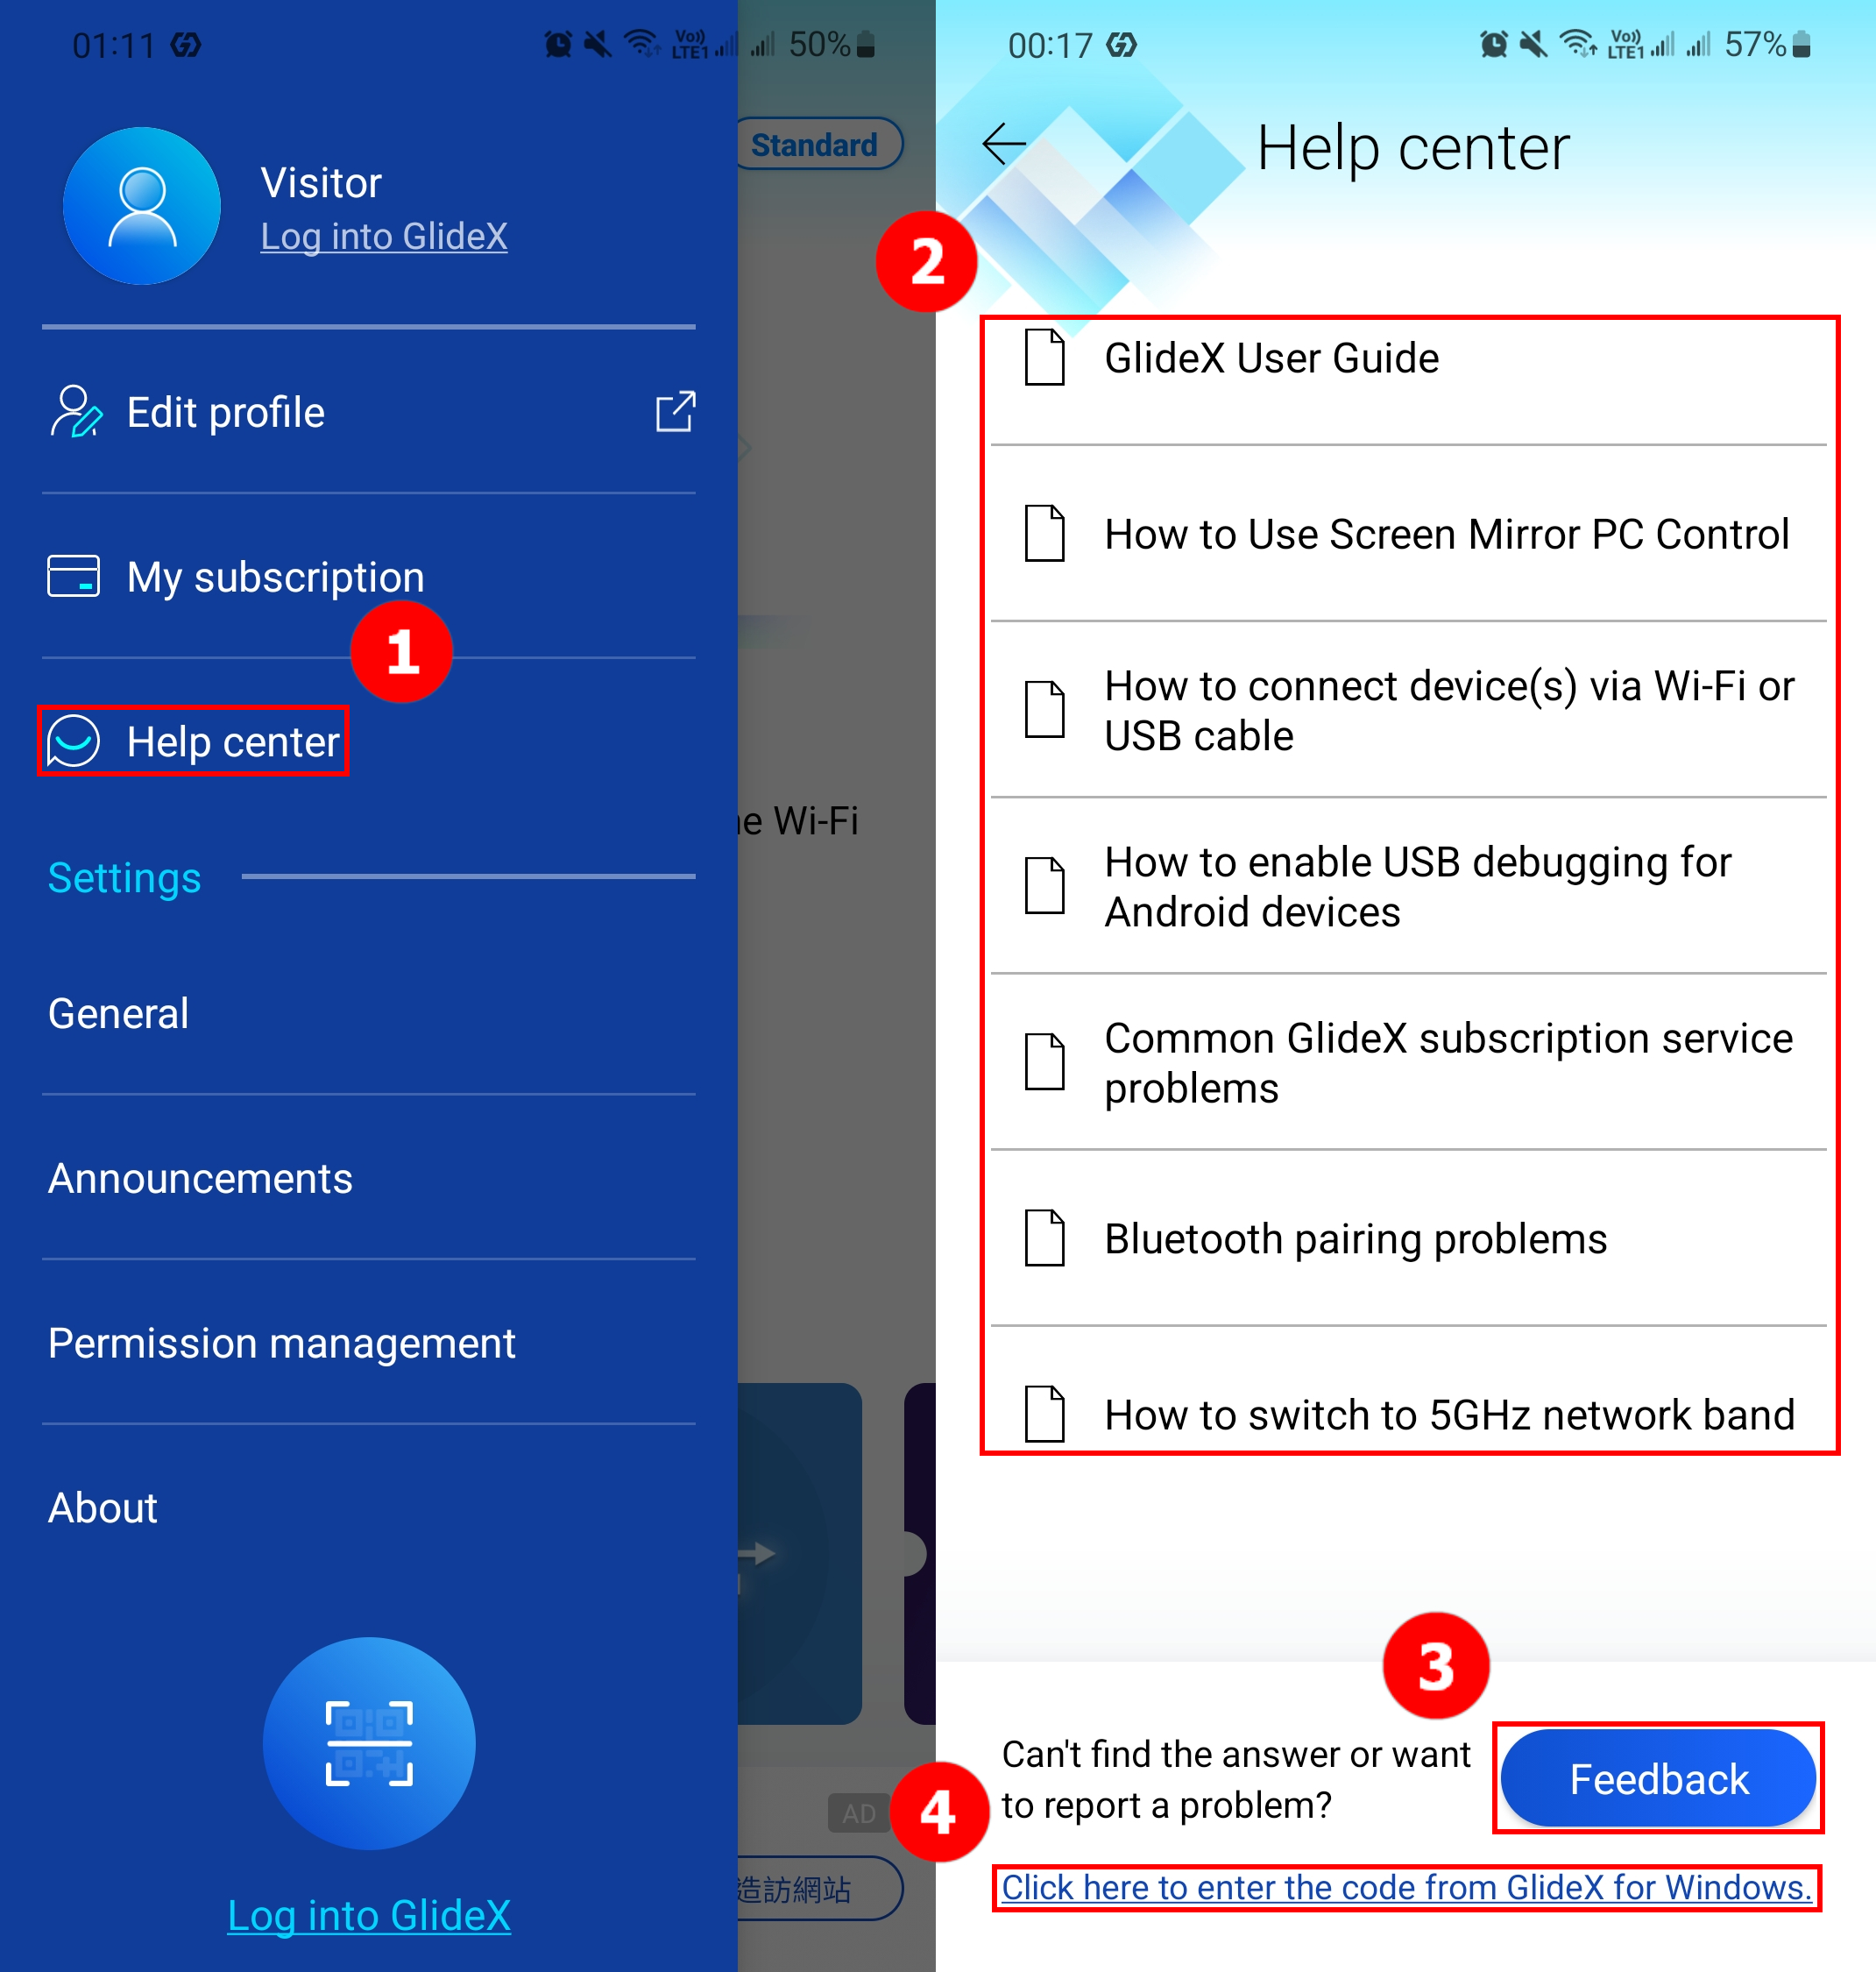
1. Open the side menu and click ①[Help Center], then you can see common ②[FAQ] solution of GlideX.
2. If your issue is still not resolved, tap ③[Feedback] if you didn’t receive a report code from GlideX for Windows app. Otherwise, please select ④[Click here to enter the code from GlideX for Windows.]
*Submitting feedback via report code is supported by the following versions and later: GlideX Windows version 1.0.13.0, Android version 1.0.13.0, iOS version 1.0.9
2-1 Fill in your question or suggestion in ⑤[Area]. Then enter your ⑥[Email], select ⑦[Agree to ASUS Privacy Notice], and finally tap ⑧[Submit]. Then you will receive a report code. Please turn to GlideX for Windows app to send back the information on your PC to us.
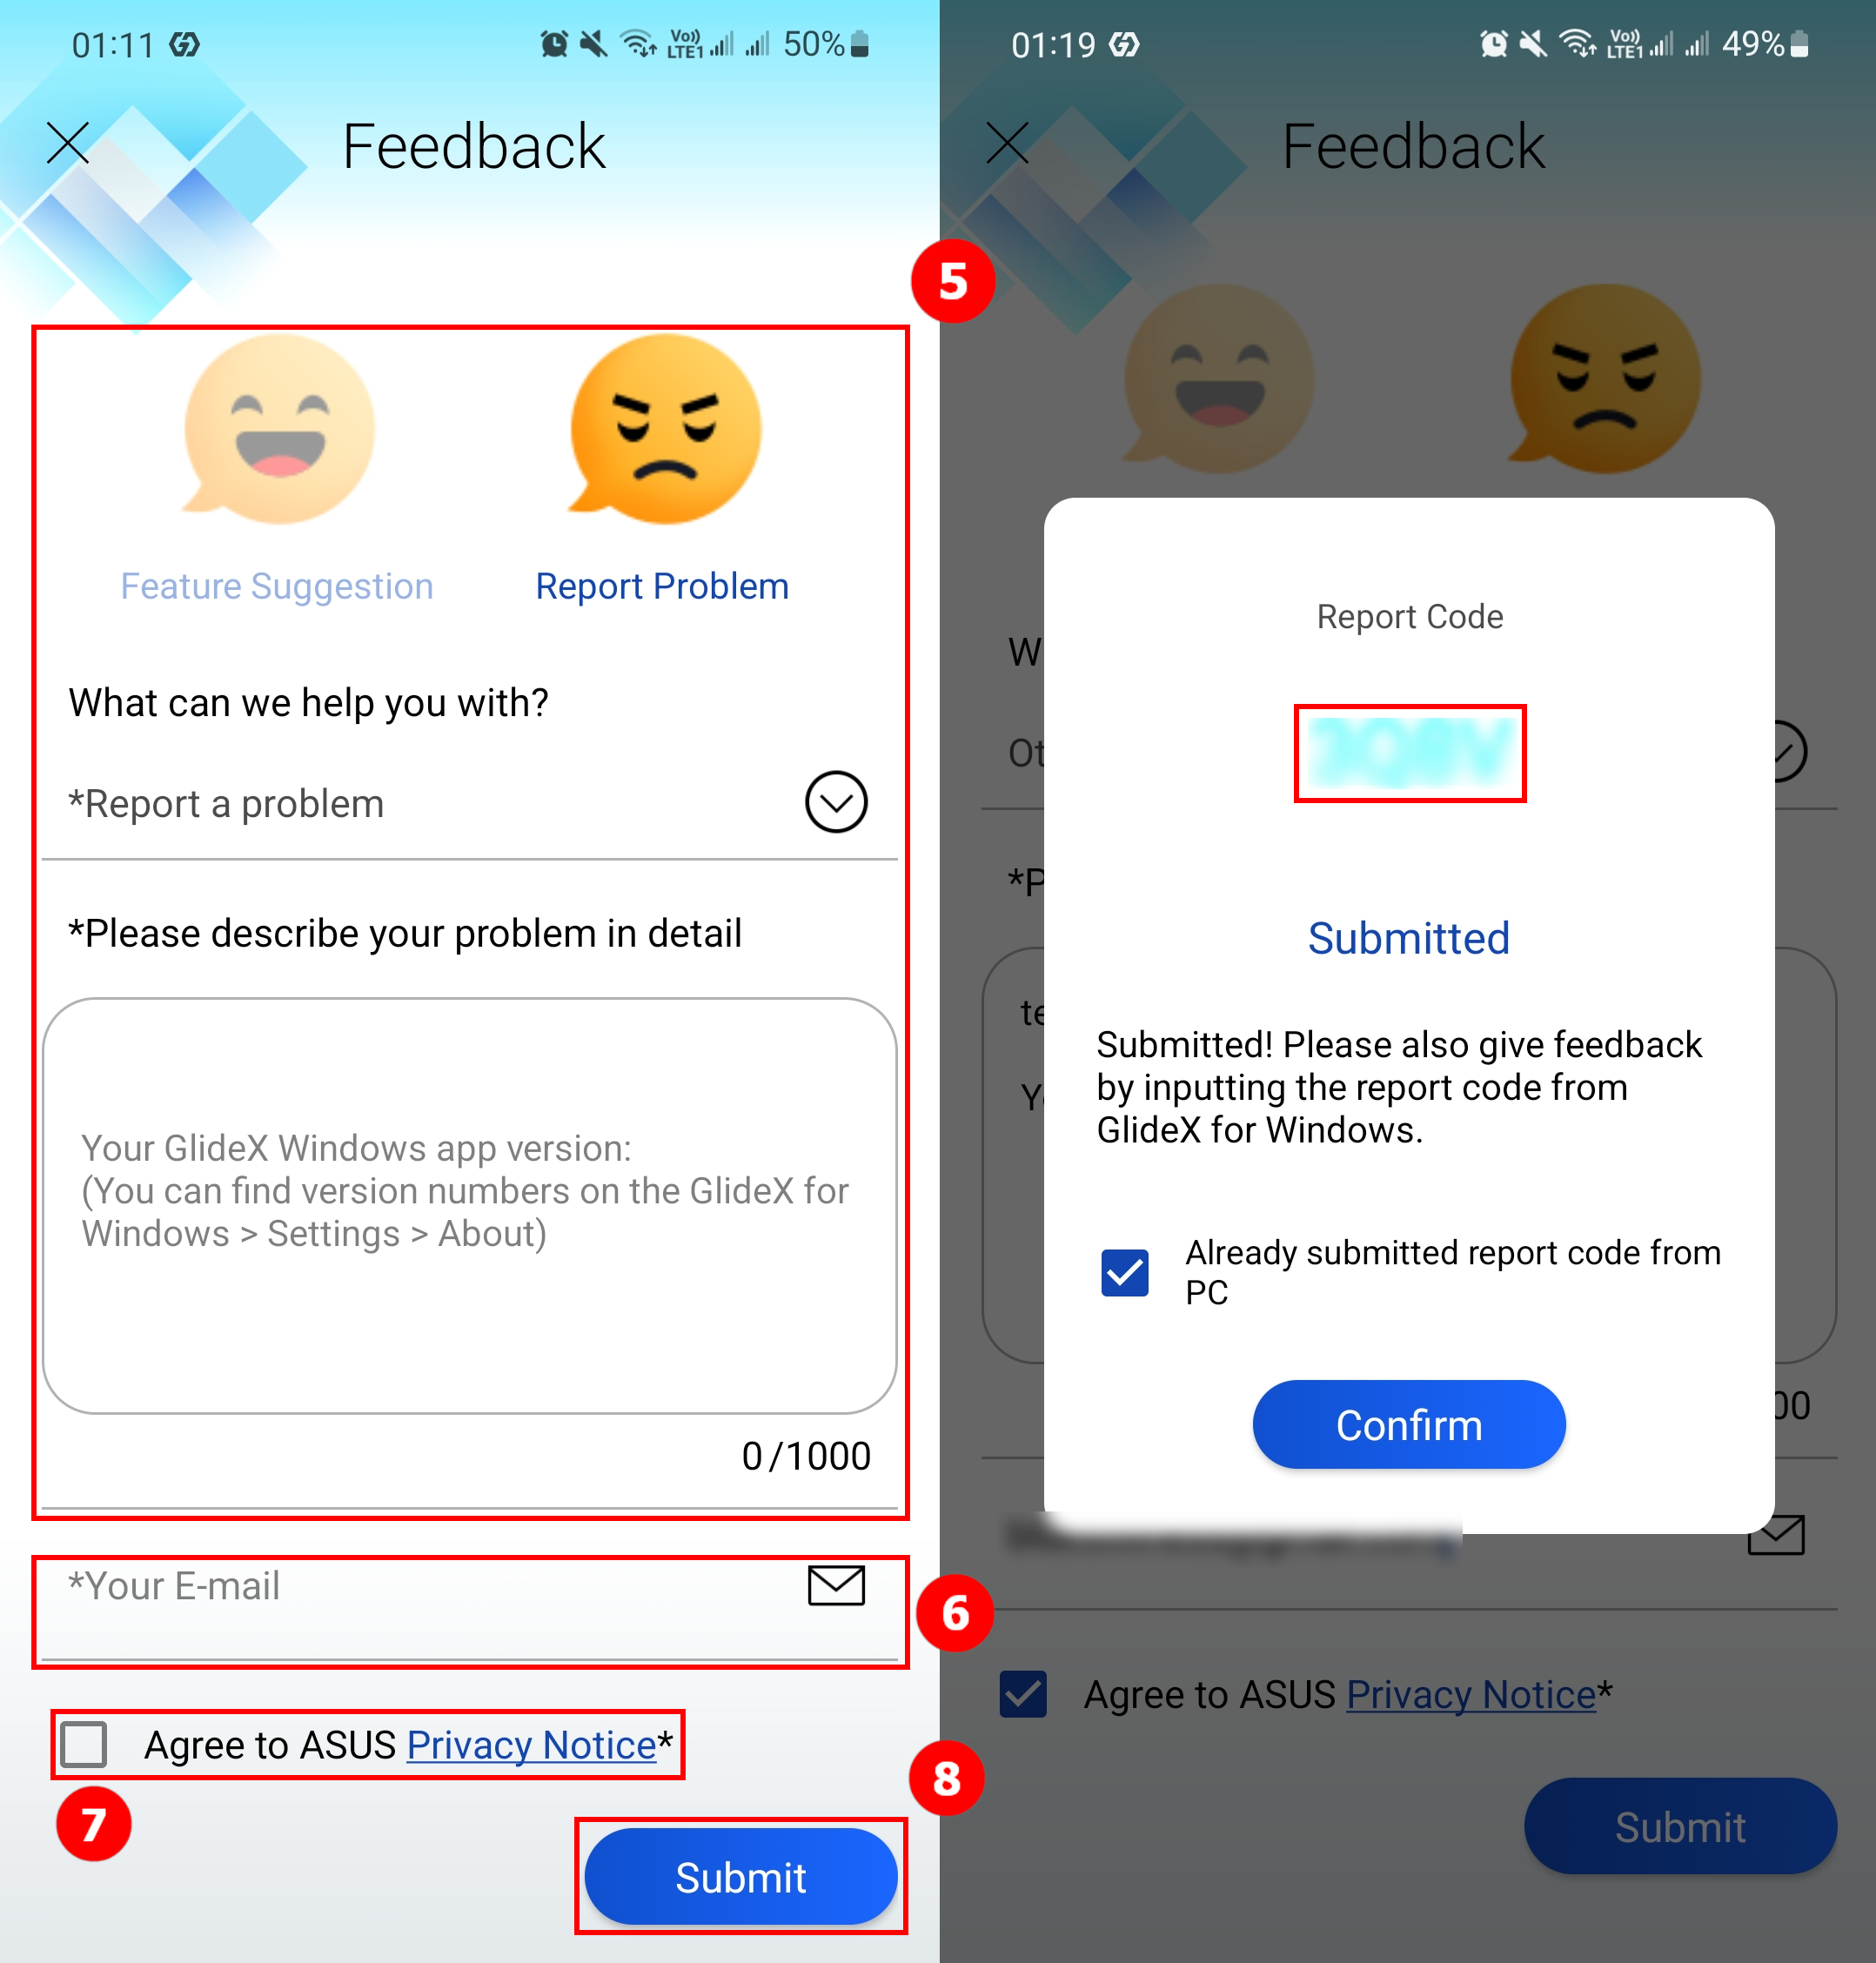
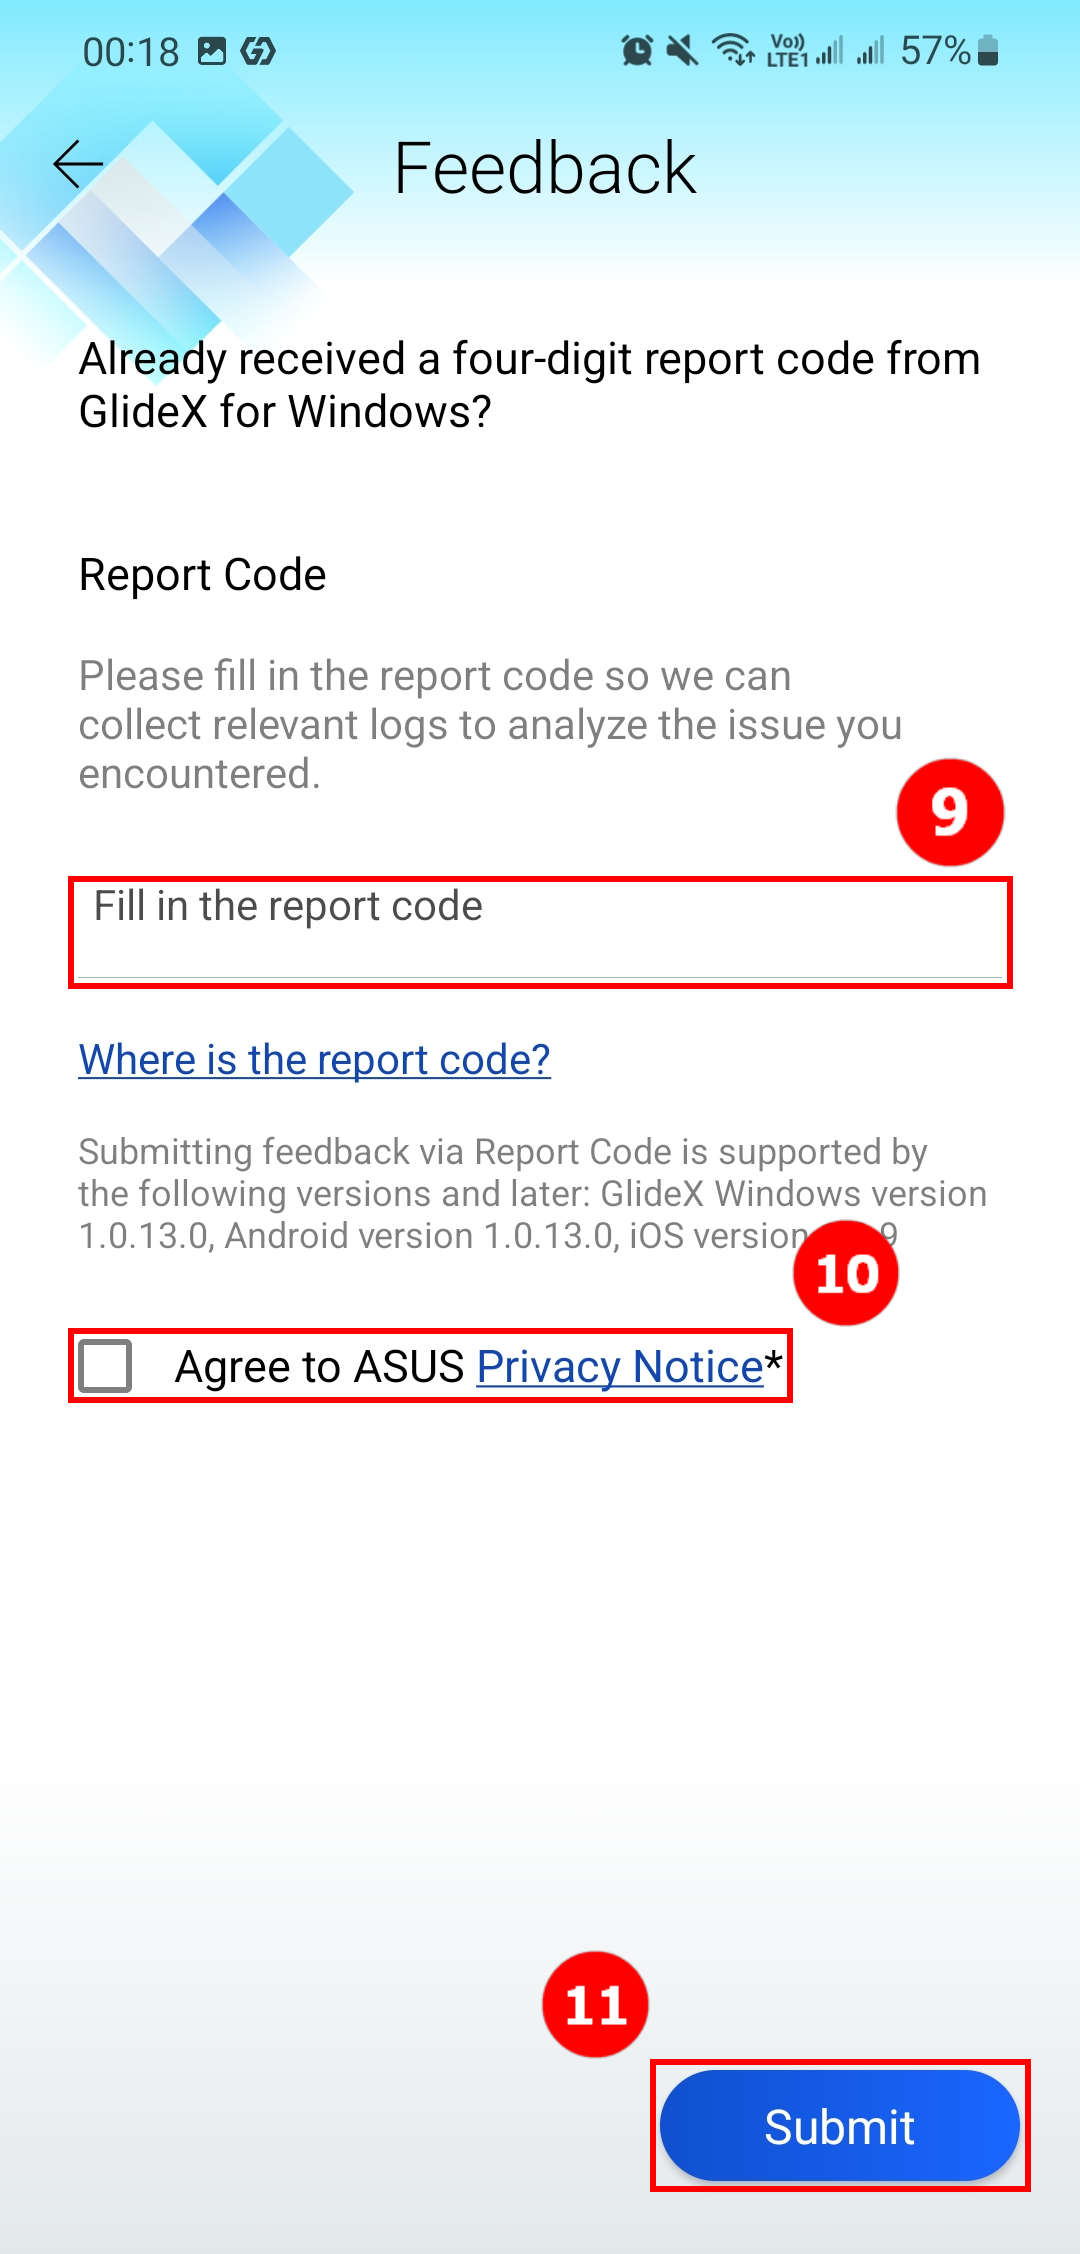
2-2. Fill in ⑨[the report code] you got from the Windows app, and select ⑩[Agree to ASUS Privacy Notice], and finally click ⑪[Submit].
[GlideX] Common problems for Promo Codes
1. What is GlideX Promo Code and where to get it?
ASUSTEK COMPUTER INC. provides GlideX Promo Codes in its campaigns and promotional activities from time to time. Users can find Promo Codes via GlideX for Windows app [User Center] > [Promotion], or other GlideX related campaign exposure channels. The eligibility of obtaining GlideX Promo Codes varies by different rules governing each Campaign.
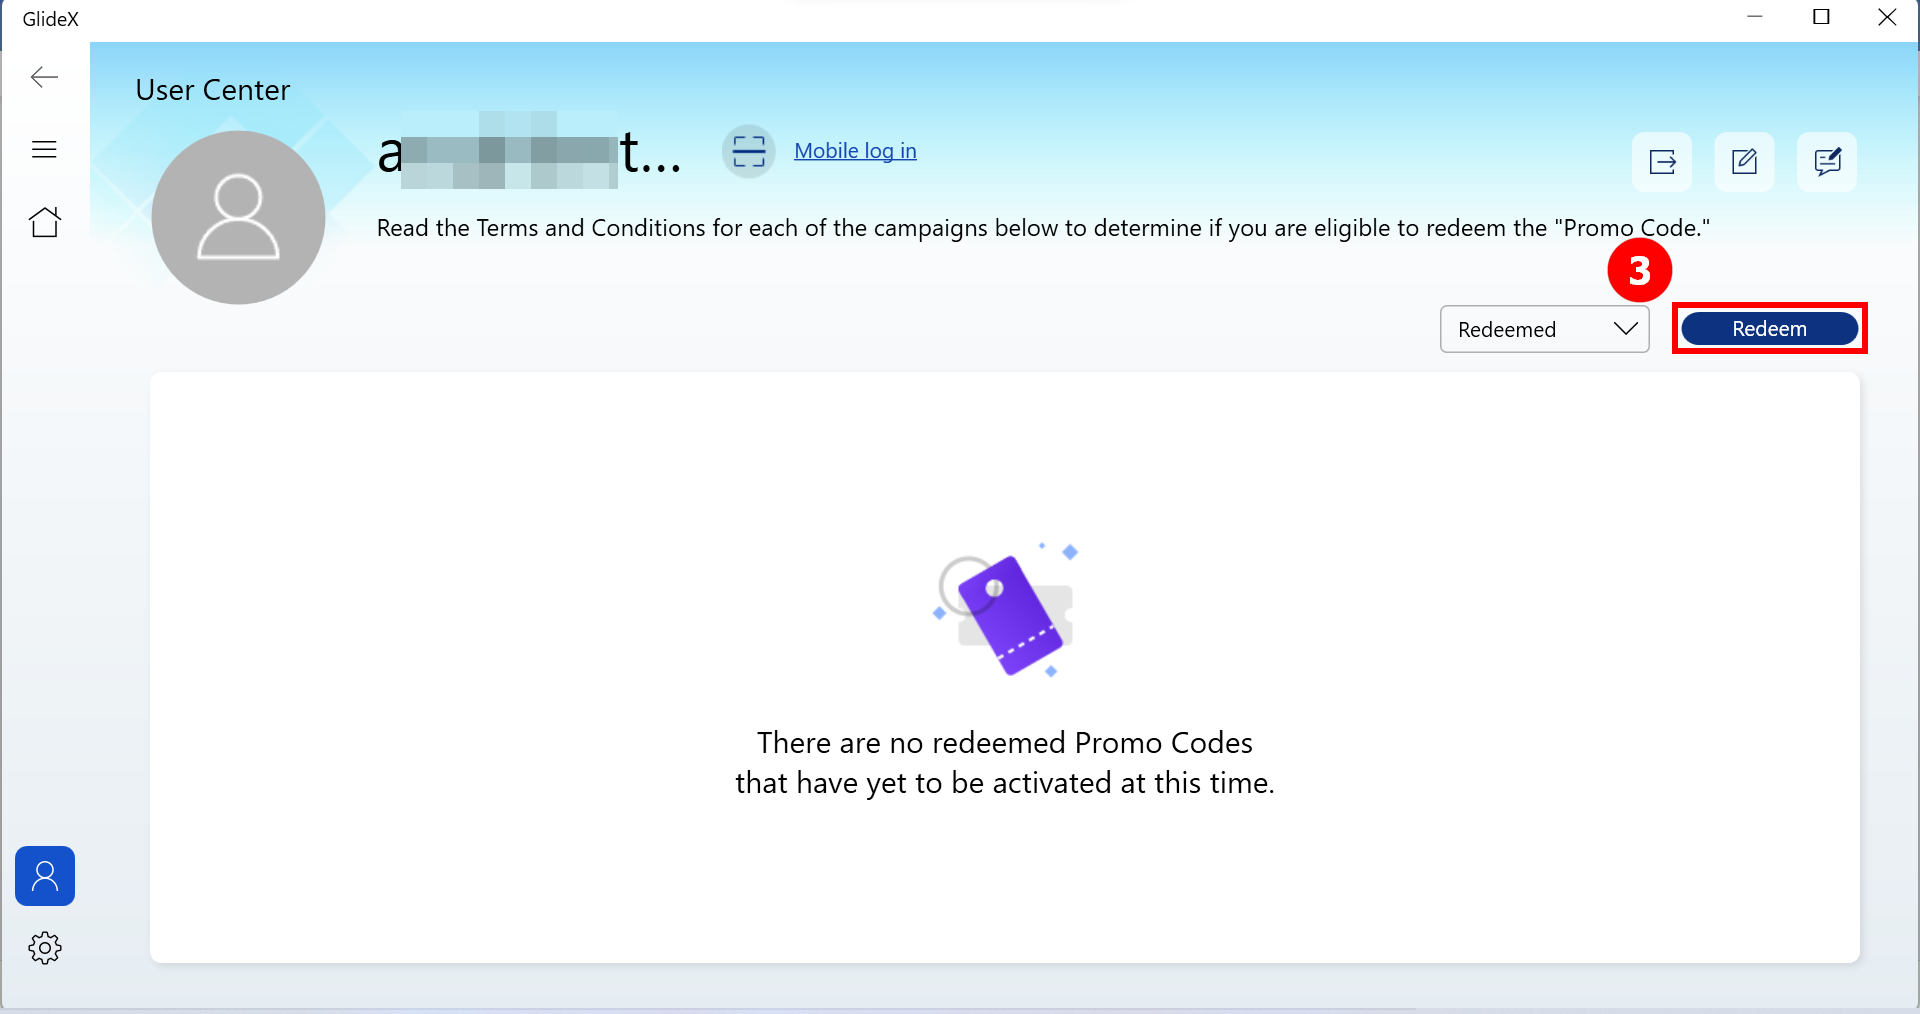
2. Where and how to redeem a Promo Code?
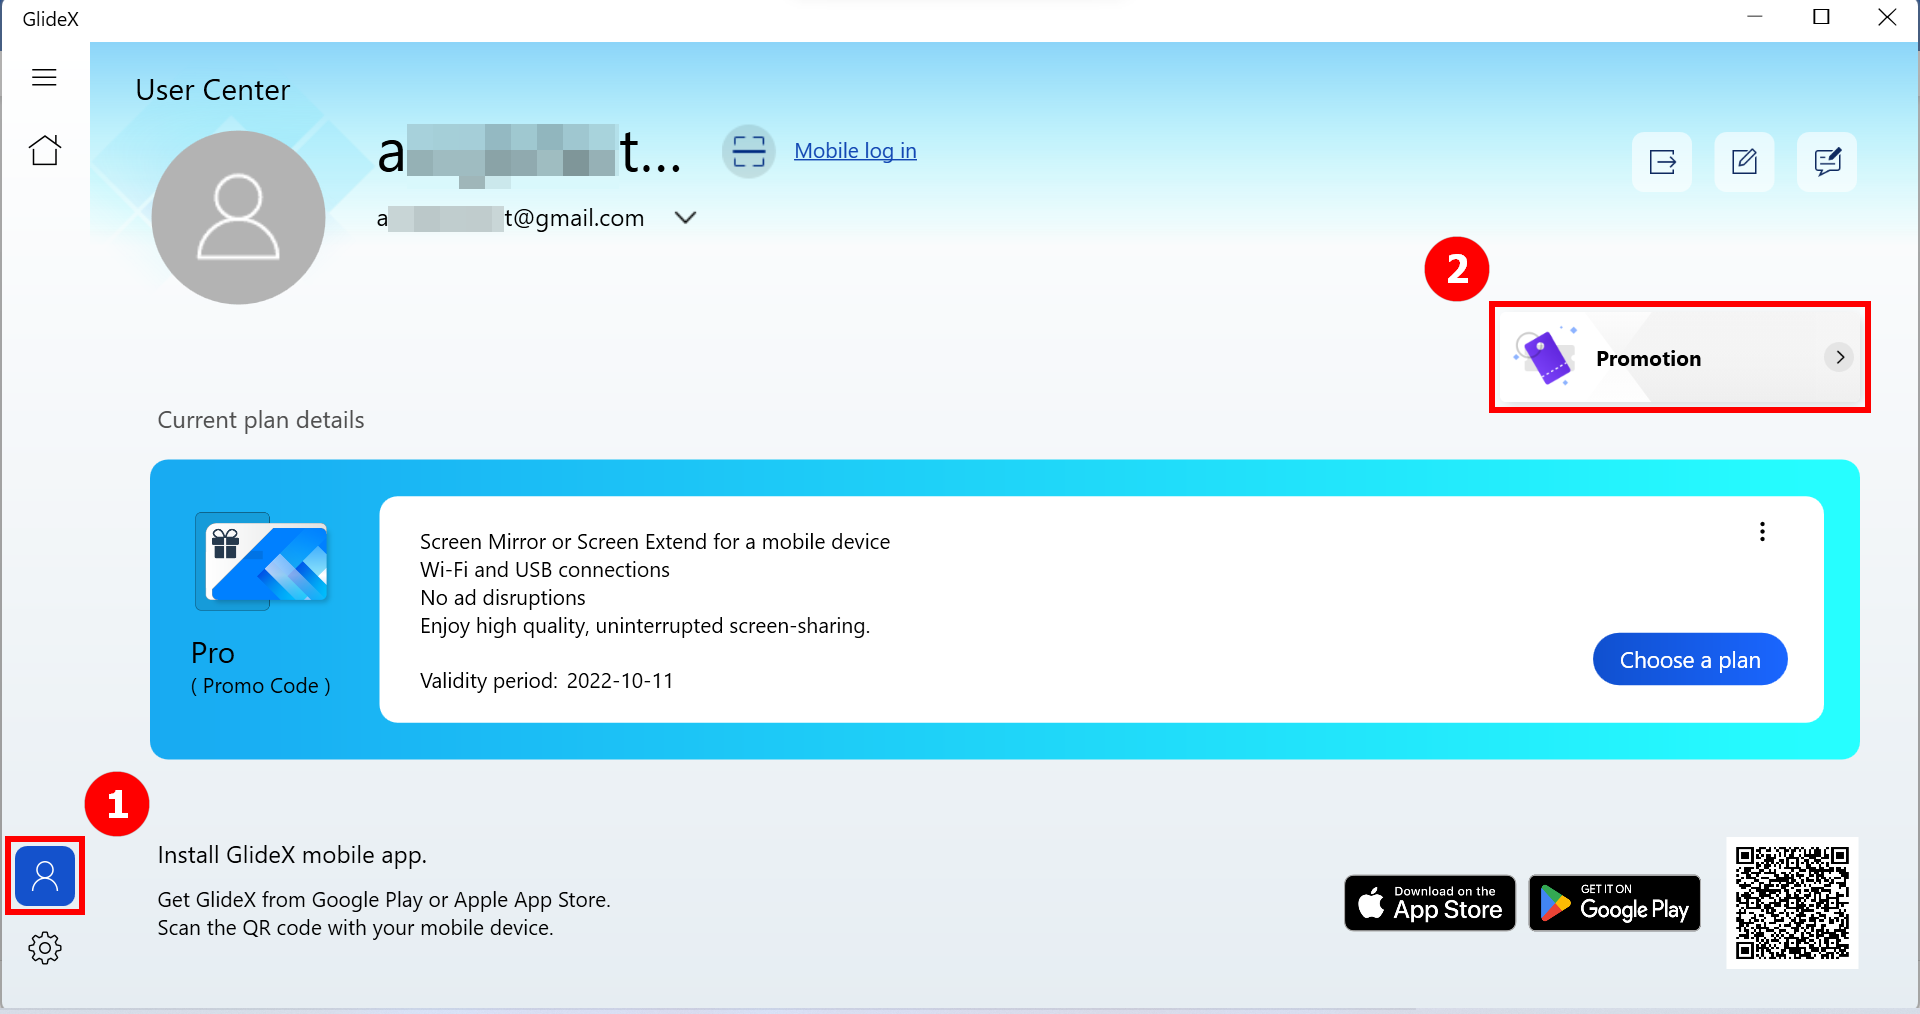
If you have installed GlideX for Windows app, you can go to ①[User Center] and login to your GlideX account. Click ②[Promotion], and click ③[Redeem] to start the redemption process. Otherwise, you can go to redeem site as well. To redeem Promo Codes, please refer to Terms and Conditions.
3. Why can't I redeem a Promo Code?
In the following are the reasons that users cannot redeem:
- Invalid Promo Code: The Promo Code you entered is not correct.
- You are not eligible for this event: The eligibility of obtaining GlideX Promo Codes varies by different rules governing each Campaign or event. Please check the rules of the campaign.
- This event has expired: Each Promo Code is required to be redeemed in the redemption period as announced by their corresponding Campaign(s). Please check the rules of the campaign.
- All Promo Codes for this event have been redeemed: The number of each Promo Code for redemption may be limited by its corresponding Campaign(s), and even if you redeem the GlideX Promo Codes before the end of the redemption period, the GlideX Cards may not be successfully redeemed.
- You have redeemed this Promo Code: Users are allowed to redeem a Promo Code by its corresponding campaign once.
4. If I've already subscribed to GlideX service via Google Play or Apple App Store, can I redeem a Promo Code?
Yes, you can redeem a Promo Code and it will be deposited to your GlideX account after you successfully redeem. It is not suggested you activate it since you have an active subscription plan. If you wish to activate it, your account should be without subscription. Please note that you are required to activate the Promo Code in the activation period according to the rules governing each Campaign.
5. If I've already activated a Coupon or Promo Code, can I redeem a Promo Code?
Yes, you can either redeem the Promo Code which will be deposited into your account, or you can activate it immediately which will replace your existing Coupon or Promo Code.
6. If I have a non-activated Promo Code which is deposited in my account, where and how to activate it?
Go to GlideX for Windows app, log into your GlideX account in [User Center]. Click [Promotion], and select "Redeemed" condition to filter your Promo Codes. Then you can see the [Activate] button in each deposited Promo Code.
[GlideX] How to download and install GlideX on macOS?
GlideX is a convenient cross-device, cross-platform screen-sharing, and screen-control solution. It gives you more space to work — or play! — using wired or wireless connections between your devices, and you can control all your devices with a single keyboard and mouse.
GlideX supports Windows, Mac, Android, and iOS systems. This article is the download and installation process for macOS. If you do not have a Mac system, please go to the corresponding platform to download Microsoft Store, Google Play Store, Android APK, and Apple App Store (GlideX mobile devices).
Download GlideX for macOS
First, click this link to download the GlideX mac installer (about 22 MB) to your macOS. After the download is complete, you will see the file GlideX-Mac_x.x.x(x).dmg1.
Note1: x.x.x.(x) in the file name will display the latest version number of the current GlideX application.
Install GlideX for macOS
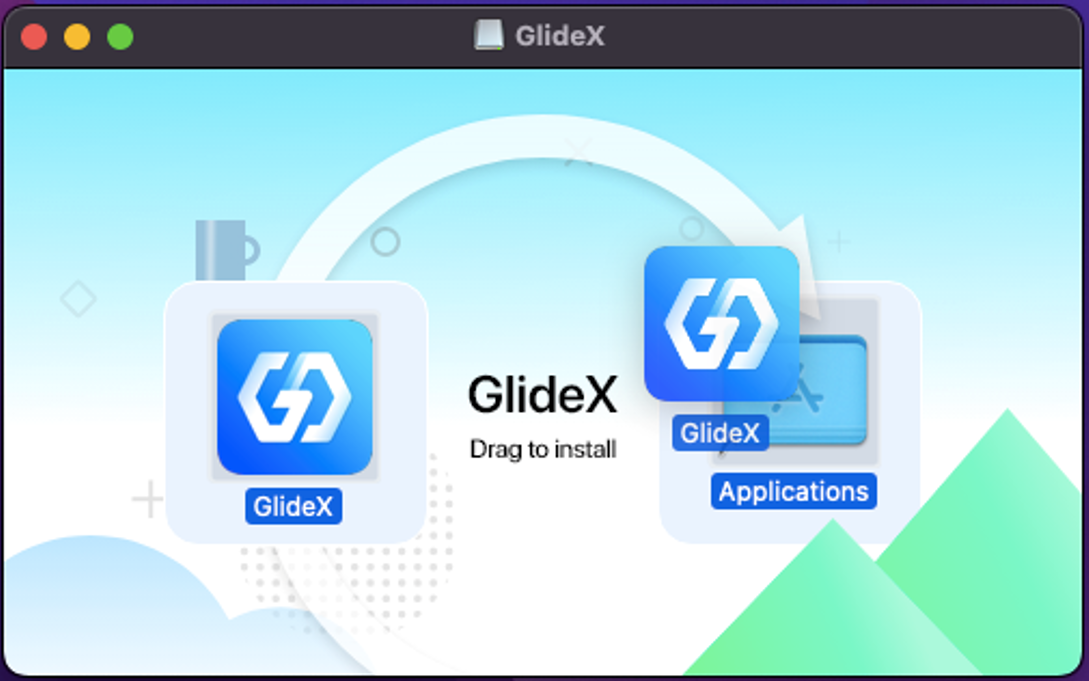
Double-click the downloaded GlideX-Mac_x.x.x(x).dmg file in the download path, you will see the (Figure 1) window; then, drag GlideX to the application folder (Figure 2) to complete the installation process.
(Figure 1)
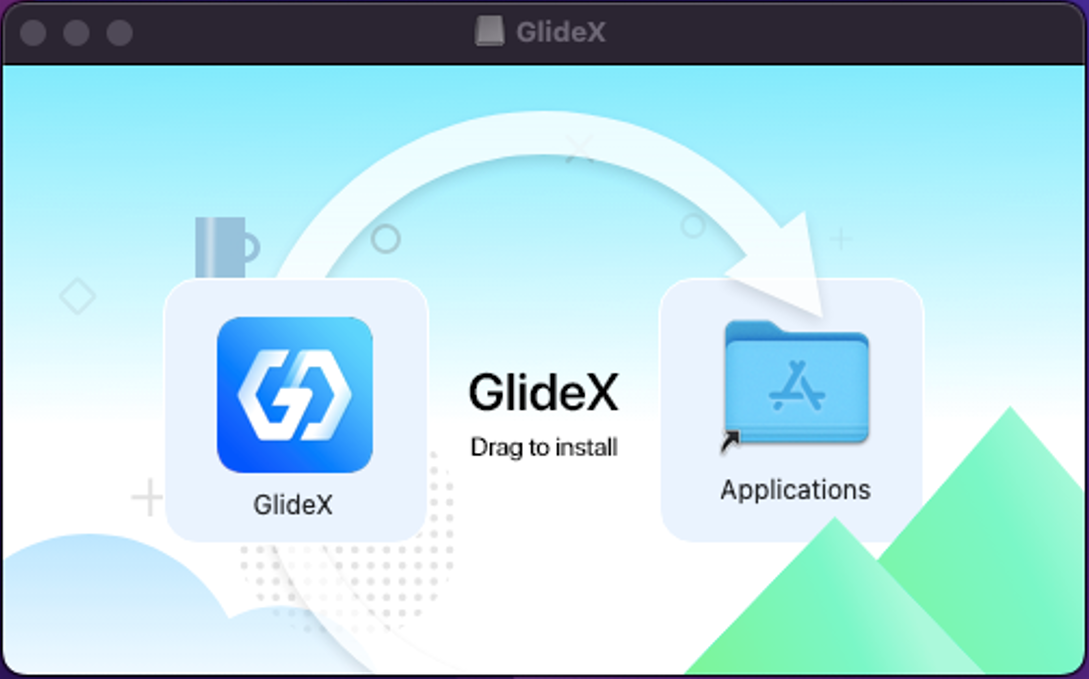
(Figure 2)