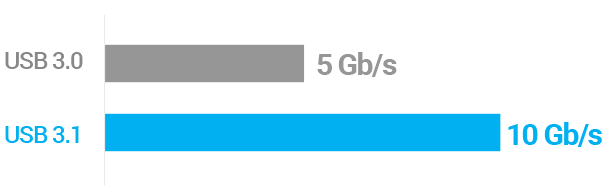
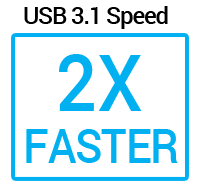
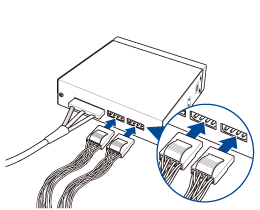
USB 3.1 UPD PANEL
Compare
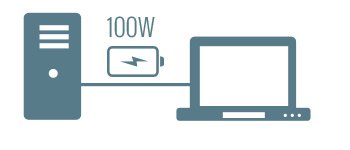 * Ensure the device you wish to charge

NEW
- Matrix absorption structure: Increased drop protection
- Transparent design: Highlights Zenfone 12 Ultra’s sleek aesthetics
- Aluminum-alloy buttons and decoration: Sleek and durable accents
- Antibacterial materials: SGS verified antibacterial
NEW
- Matrix absorption structure: Increased drop protection
- Magnetic ring design: Enables strong and reliable magnetic attachment
- Transparent design: Highlights Zenfone 12 Ultra’s sleek aesthetics
- Aluminum-alloy buttons and decoration: Sleek and durable accents
- Antibacterial materials: SGS verified antibacterial
NEW
- Works with magnetic ring accessories
- Premium ShockSpread™ material for ultimate protection
- Innovative design boosts impact absorption by 10%
- Raised edges for added screen and camera protection
- Lightweight, thin, and easy to hold
NEW
- Premium ShockSpread™ material for ultimate protection
- Innovative design boosts impact absorption by 10%
- Raised edges for added screen and camera protection
- Lightweight, thin, and easy to hold
NEW
- 9H hardened glass
- 2.5D full coverage
- 99% antimicrobial
- 92% transmittance
- Vibrant System Lighting
- Magnetic Design
- Up to 20,000 Hours of Durability
- Aura Sync
- Black and white
- Extra-thick 28mm frame
- Hydraulic Bearing
- PWM control
- Aura Sync compatible
- Hidden Connectors
- Broad Compatibility
- Standoff-mounted tempered-glass front panel
- Ample cable management space
- Dual Chamber Chassis
- Panoramic View
- Front Panel High-Speed USB Type-C
- Tool-Free Side Panels
- Aura Sync
- Dual Chamber Chassis
- Panoramic View
- Front Panel High-Speed USB Type-C
- Tool-Free Side Panels
- Aura Sync
- Advanced FDB bearing with 76 CFM high airflow
- Double layer LED array
- Black and white editions
- 2mm anti-vibration pads
- Aura Sync
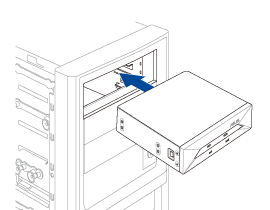
- 8X Portable DVD Writer
- M-DISC Support
- Windows and Mac OS Compatible
- USB Type-C