MyASUS – Device Settings
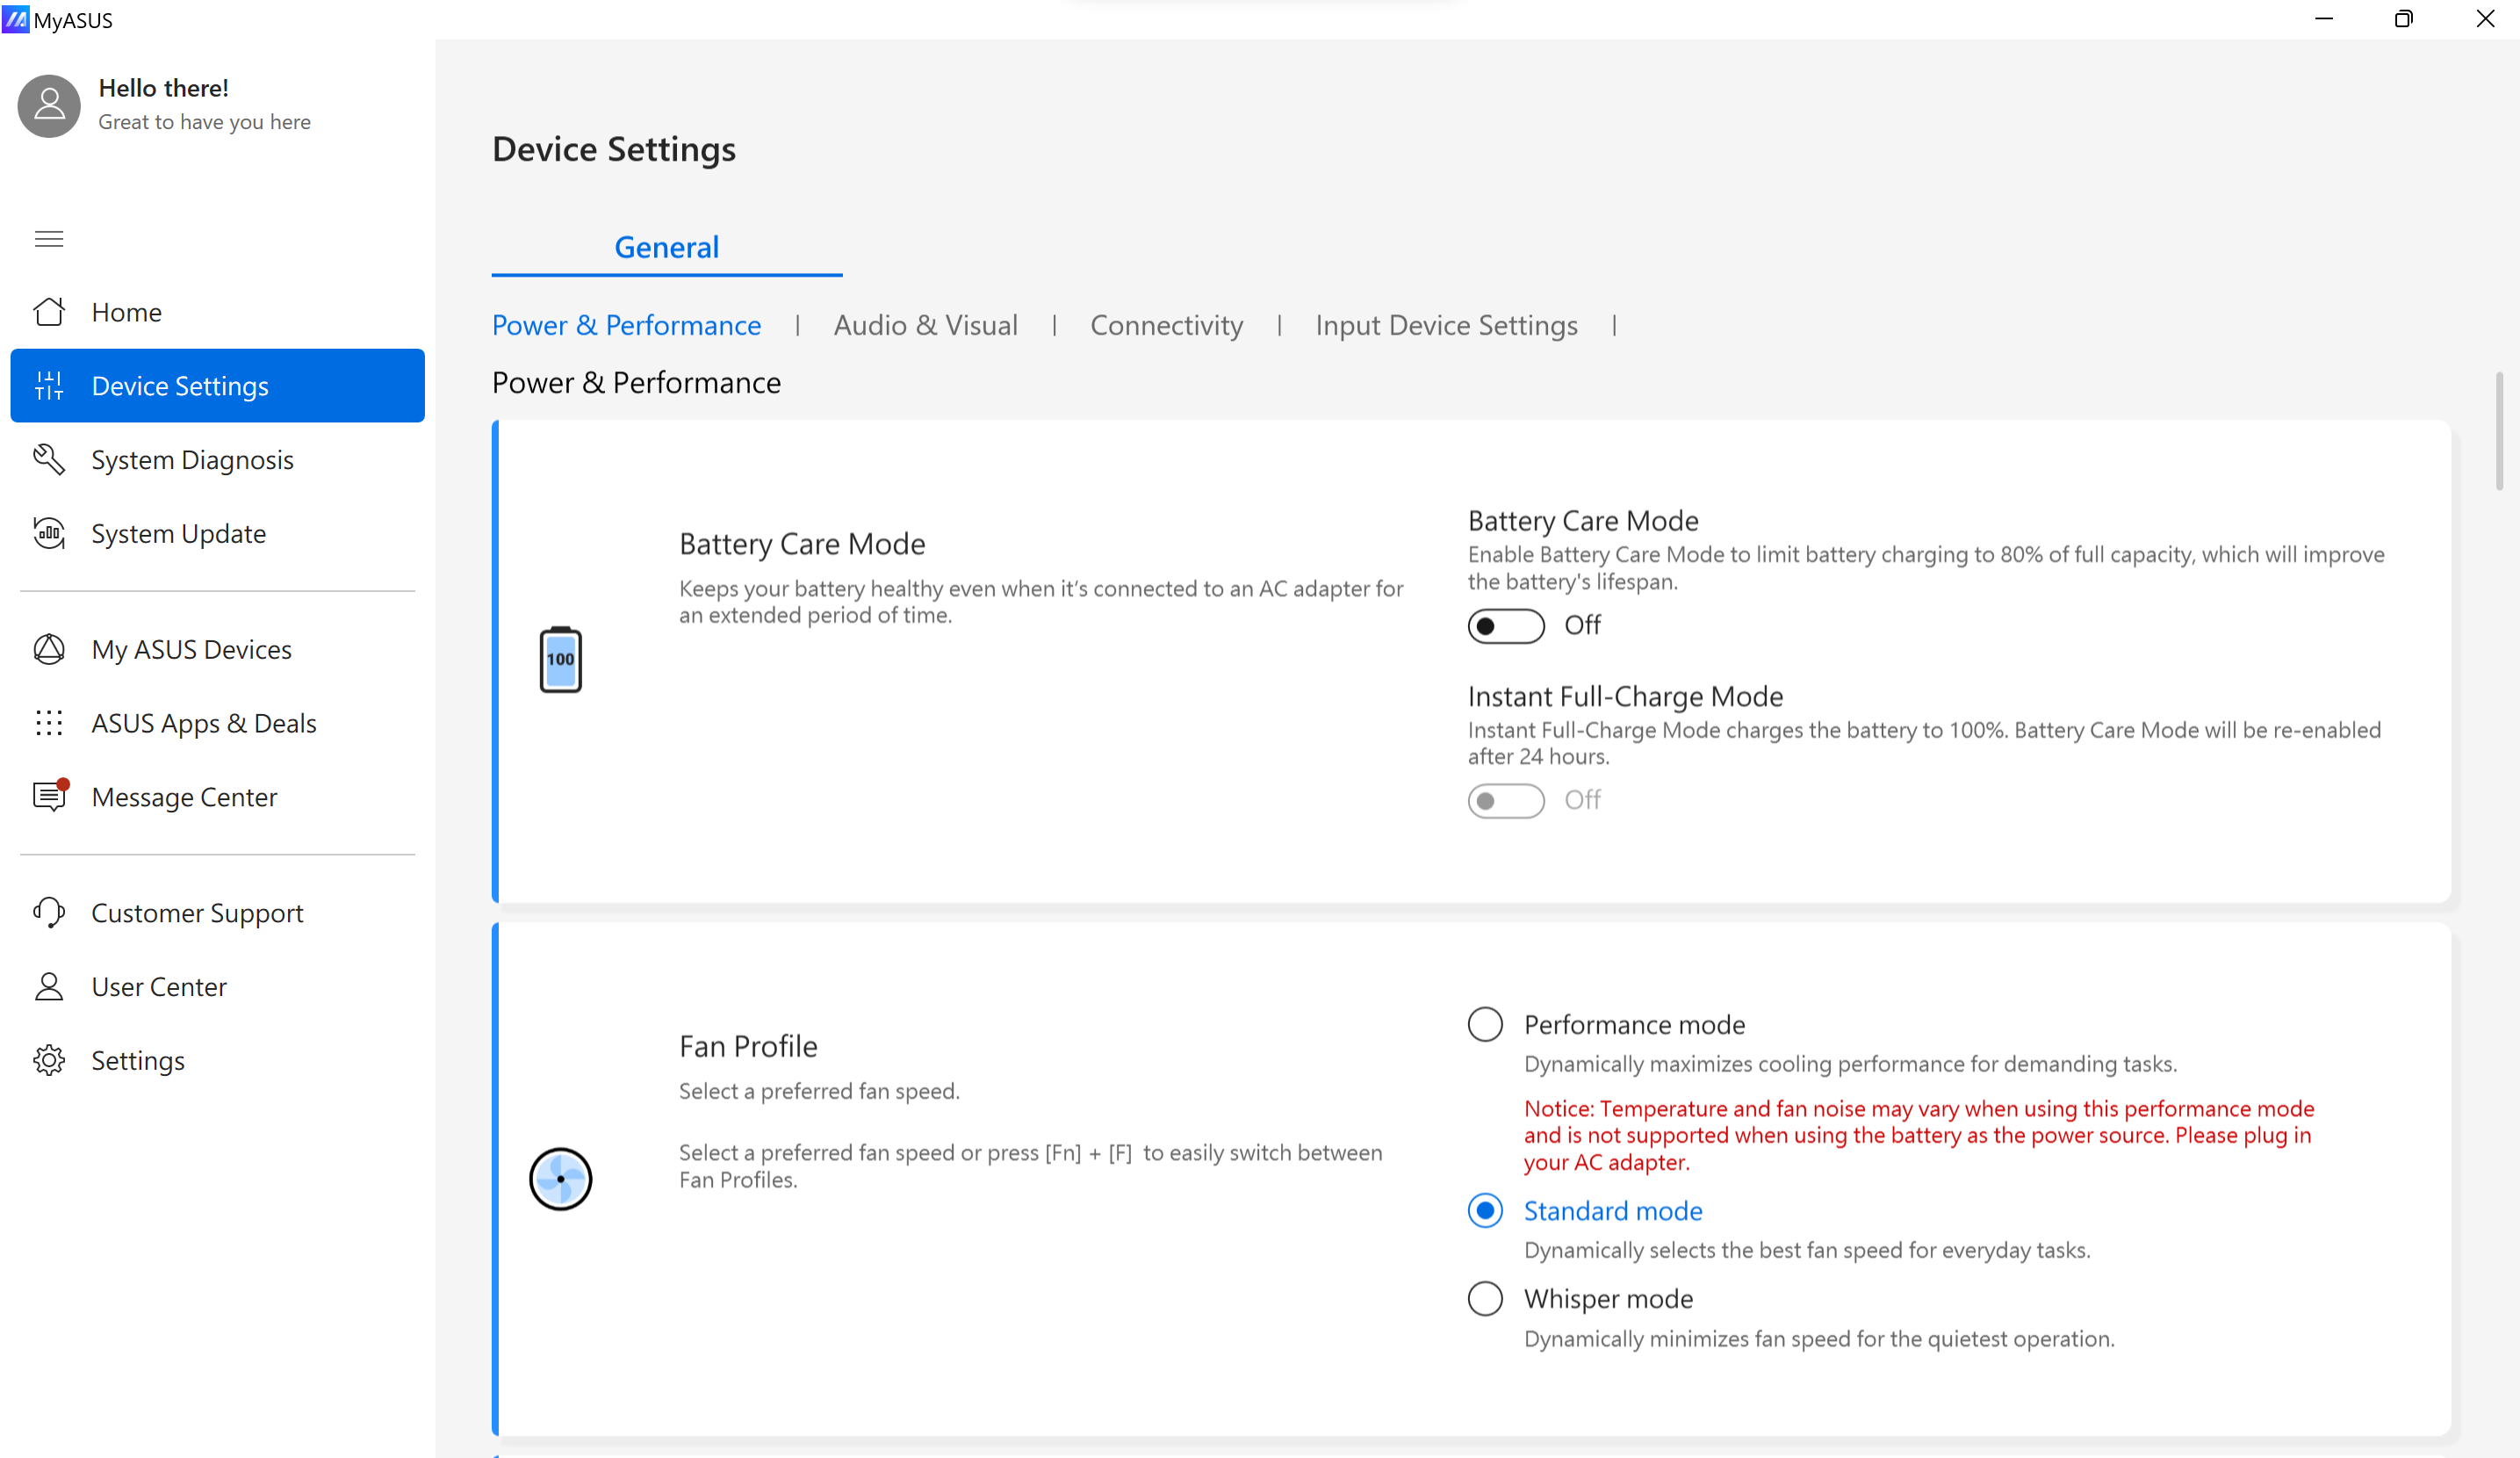
According to the users' scenarios, MyASUS separates functions into different groups in Device Settings page.
General
Exclusives
These groups help you quickly find the items to customize your device settings depending on various using scenarios.
You can click  to go to [Device Settings] in MyASUS.
* Note: The features supported in [Device Settings] will vary by model. The following options may not be supported/available in every model.
(Gaming Notebook only support some of the features below. )
Battery Care Settings/Battery Care Mode (Battery Health Charging)
Models released in 2026 introduce adaptive learning technology, which analyzes usage patterns to help improve battery lifespan.

Overcharging a laptop may degrade the battery, resulting in a shorter lifespan, or even swelling due to oxidation.
You can choose to turn on Battery Care Mode, so that the battery can be charged to 80% to improve its lifespan.
When Battery Care Mode is enabled, this mechanism will smartly adjust the recharge trigger point to protect the battery when AC power is connected all the time.
If you need to recharge to 80% immediately, please unplug and plug AC power to fulfill this demand.
If there is a need for using it on-the-go, you can switch on Instant Full-Charge Mode for a one-time full (100%) charge. The system will turn back to the limit charging state after 24 hours. 
With the CPU models before Intel Alderlake or AMD Rembrandt, you could choose to limit the charges to 60%, 80%, or 100% to prolong battery lifespan and reduce the chance of damage from battery swelling.
According to how the notebook is being used, you can choose : Full capacity mode, Balanced mode, and Maximum Lifespan mode
*If you experience the problem which is the battery stop being charged after the battery level is charged to 60% or 80%, please check if you set up charging mode in Battery Health Charging.
(Balance Mode: The battery can be charged up to 80%, Maximum lifespan mode: The battery only allows being charged up to 60%)
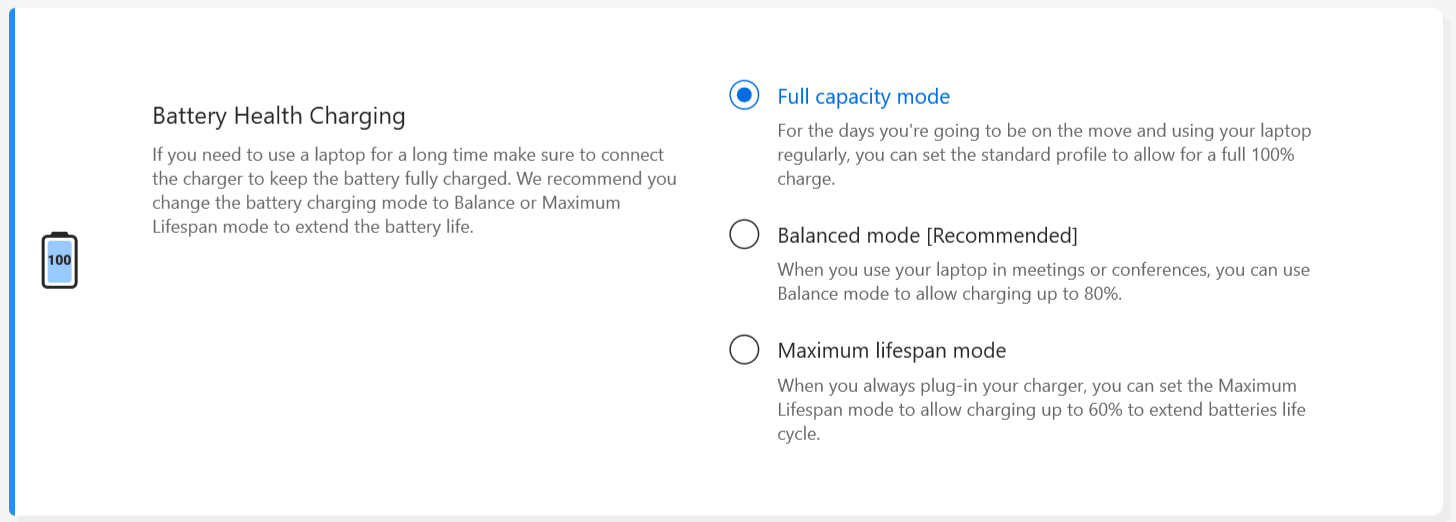
Full capacity mode : When you use the laptop regularly, you can set the standard profile to allow for a full 100% charge.
Balanced mode: When using the laptop in meetings, you can use Balanced mode to allow charging up to 80%.
Maximum Lifespan mode: When you always plug-in your charger, you can set the Maximum Lifespan mode to allow charging up to 60% to extend batteries life cycle.
Note:Battery care/battery health charging behavior will maintain charging limit during sleep/shutdown.
When booting, the BIOS will reset the charge limit back to 100%. After entering Windows, the service will determine the charge limit based on the user settings.
Therefore, the period when the upper limit is exceeded and still charging is from turning on the unit to about when you see the Window login screen.
Fan Profile *The features supported will vary by model.
Fan profile is the setting that allows users to customize fan speed for different workloads on selected models with an ultra-slim chassis.
There are three modes to choose from. With this feature selected, you can have a quiet operating environment through a balance between temperature and performance
Standard mode -- Dynamically selects the best fan speed for everyday tasks
Whisper mode -- Dynamically minimizes fan speed for the quietest operation
Performance mode -- Dynamically maximizes cooling performance for demanding tasks
*The modes in Fan Profile may vary by model.

*If your laptop supports AIPT, you will see AIPT in Device Settings instead of Fan Profile.

ASUS Intelligent Performance Technology (AIPT) is the solution that allows users to have maximized CPU performance at 28W TDP for heavy workloads on selected models with a chassis providing more room for thermals.
Performance Mode: Maximizes performance and thermal for heavy workloads (This let you play a game or use Premiere Pro more smoothly)
Balanced Mode: Intelligently optimizes performance, thermal, and power parameters for everyday tasks
Whisper Mode: Cool and quiet power-saving operation (To get all day long battery life, please choose this mode)
For more introduction about AIPT, please refer to here.
*For the 2024 new models, Full-speed mode will be supported to provide the ultimate performance.(It is supported starting with models with Intel MTL or AMD HawkPoint/StrixPoint platform. You can go to ASUS website to check the CPU platform of your device.)

*For the 2025 new models, Fan profile settings in battery mode and charging mode will be separated to provide a better using experience. Also a switch will be added to let you decide whether to synchronize fan profile with Windows power mode.
Pluggged in

On Battery

When the Power Mode Synchronization switch is enabled, the adjustments will be as below.
dGPU sku(DC/AC):
Whisper mode: Balanced
Standard / Performance/ Full speed mode: Best performance
UMA sku(DC/AC):
Whisper / Standard mode: Balanced
Performance / Full speed mode: Best performance
MUX Switch *The features supported will vary by model.(Note: After using this function to switch GPU performance, it may cause PIN login failure. Click here to check the solution.)
MUX switch microchip allows the dedicated GPU to bypass the CPU and push its frames directly to the display, reducing latency and boosting framerates.
When battery life is crucial, your machine will act accordingly. But in a competitive game where every millisecond counts, you can enable a direct GPU mode in MyASUS to get the best gaming performance possible.
MSHybrid: The MSHybrid mode dynamically switches between the discrete and integrated graphics for a significantly longer battery life.
Discrete GPU: The Discrete GPU mode offers an optimized experience on gaming and other intensive tasks with the lowest button-to-pixel latency possible. This is the best option when the system is on AC power.

*Notice:
1. The mode can't be adjusted or reset to default if you remove MyASUS.
2. Please close Bitlocker before setting this control.
*For the 2024 new models, GPU Mode will be supported to fulfill different using scenarios.

Hibernate Helper *The features supported will vary by model.
To avoid system abnormalities that may cause the device to press the power button, close the lid, or idle in battery mode, and not properly enter the modern standby mode, resulting in power consumption and system heating.

Notice:
1. Support need: MyASUS 3.1.22.0 + ASUS System Control Interface 3.1.16.0(or above)
2. It is default on.
Memory Allocated to GPU *The features supported will vary by model.
Not enough GPU may lead to lag on graphic intensive tasks such as playing games. Gamers can dynamically assign the system memory to the GPU that suits their needs.

Notice:
1. Support need: MyASUS 4.0.3.0 + ASUS System Control Interface 3.1.23.0(or above)
2. Default memory will be set to Auto.
When GPU memory capacity is insufficient, the graphics card may experience latency under heavy workloads such as gaming.
To improve performance, gamers can dynamically adjust how much system memory is allocated to the GPU based on actual usage needs.
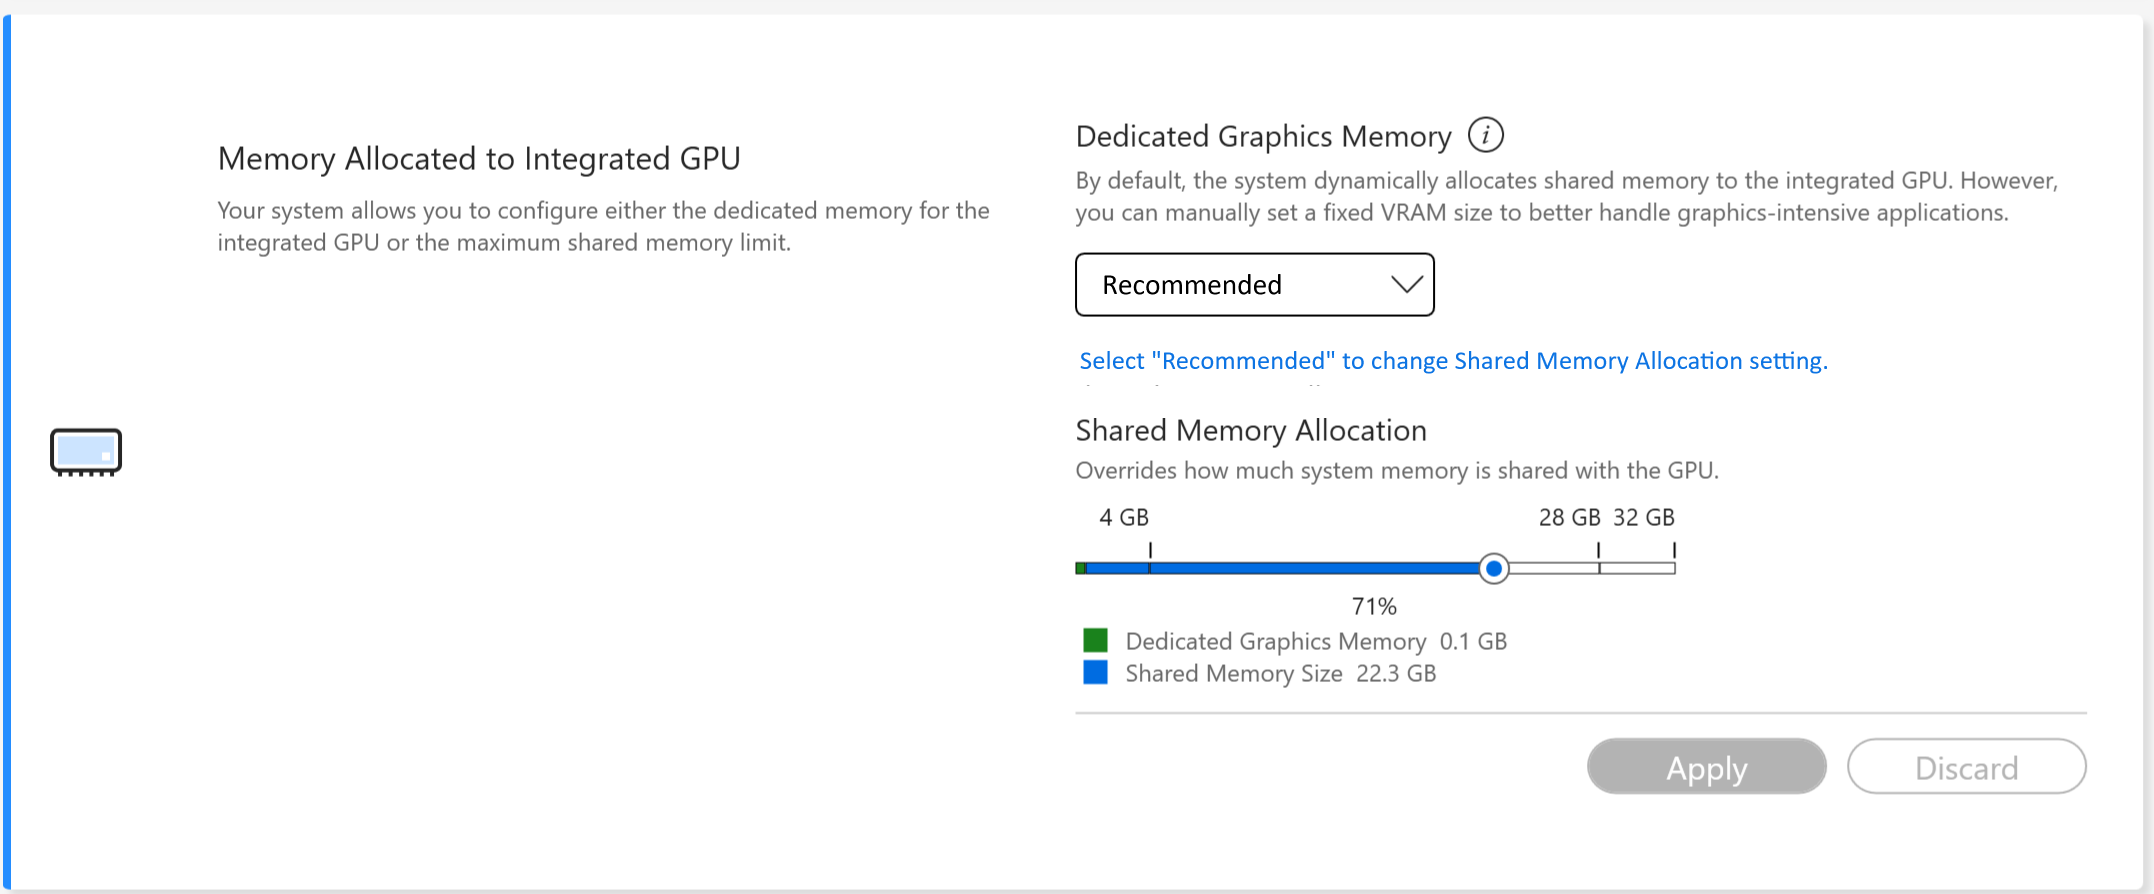
Starting from 2026 models, a new Shared Memory Allocation feature is introduced, allowing the system to dynamically adjust the memory size assigned to the integrated GPU (iGPU).
 Notice:
1. Support need: MyASUS 4.0.51.0 + ASUS System Control Interface 3.1.49.0 (or above)
2. For Qualcomm platform, only shared memory is supported
3. Dedicated memory needs to set to “Recommended” before setting Shared Memory
In general:
--Dedicated Memory refers to memory that is exclusively used by a discrete GPU. It offers higher bandwidth and stable performance, making it ideal for large-scale 3D gaming and high-performance computing.
--Shared Memory refers to system RAM shared by the integrated GPU (iGPU). This approach allows flexible use of memory resources and is suitable for scenarios such as video editing, AI image processing, and multi-display setups—effectively enhancing graphics performance and overall system smoothness.
Note: Starting with Intel Panther Lake platform (2026) models, Intel memory interface options will be disabled by default. Users can adjust memory allocation directly through MyASUS if needed.
AI Noise-Canceling Microphone *It is supported starting models with Intel Tiger Lake / AMD Lucienne platform. You can go to ASUS website to check the CPU platform of your device.(For Comet Lake platform, only support X409FAC/X509FAC/UX535LH/UX535LI)
AI Noise-Canceling Microphone feature allows users to filter out ambient noise and normalize all individual voices from different positions for optimum group conference-call quality.
Single-Presenter mode: AI noise canceling that filters ambient noise and other voices. This mode allows only the voice of the person in front of the PC to be heard clearly.
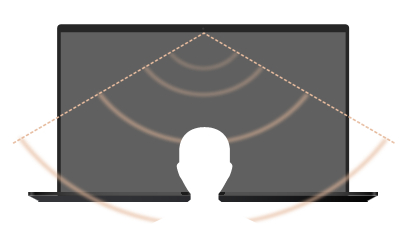
Multi-Presenter mode: AI noise canceling that filters ambient noise whilst identifying multiple voices from varying directions and distances and normalizes voices by adjusting all voices to the same volume level.
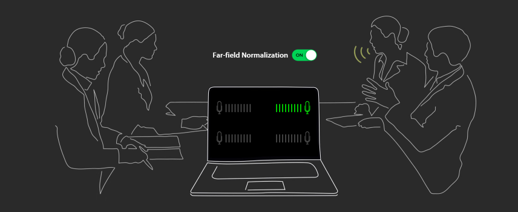
*The quality of AI Noise Canceling-Microphone depends on different applications.
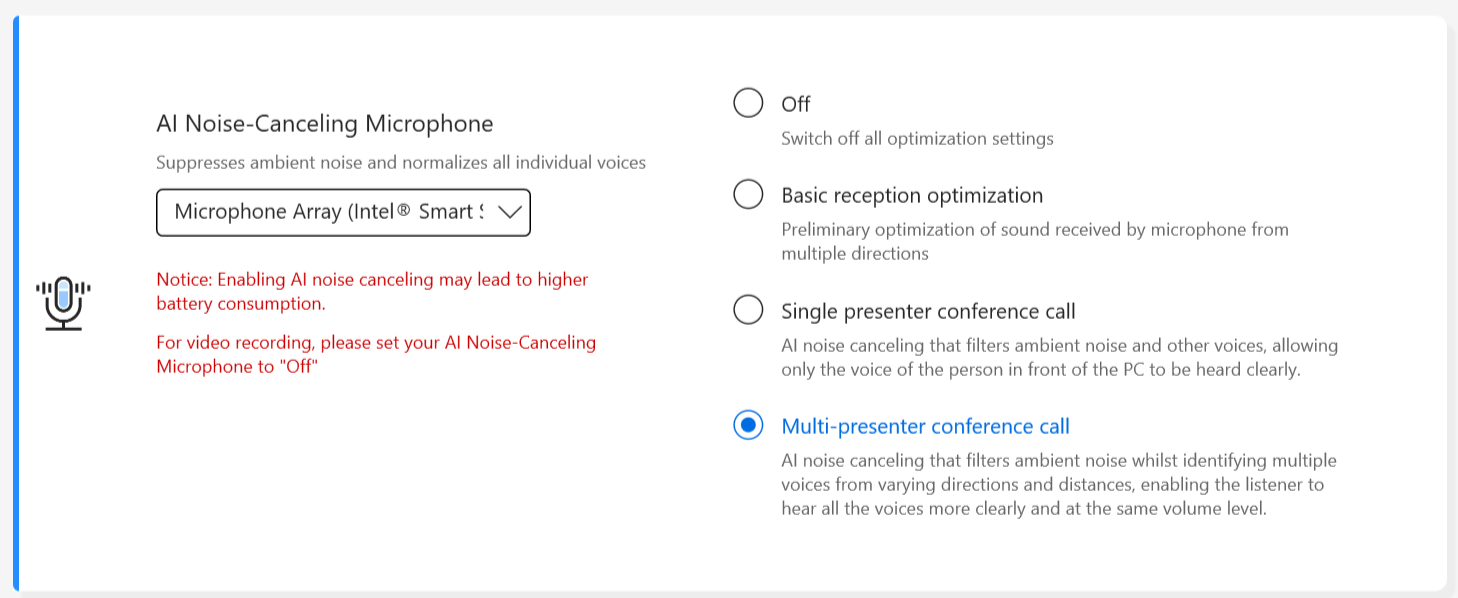
For the product produced after 2023, you may see the AI Noise-Canceling Microphone user interface shows as below. You could adjust it depends on the circumstances (Studio-quality or Conference call)
Besides, Target Speaker Tracking function could be set to on under Single presenter conference call. This features could targets and tracks new talker to improve the signal-to-noise ratio and enhance recording quality.
*Small core CPU DO NOT support Target Speaker Tracking
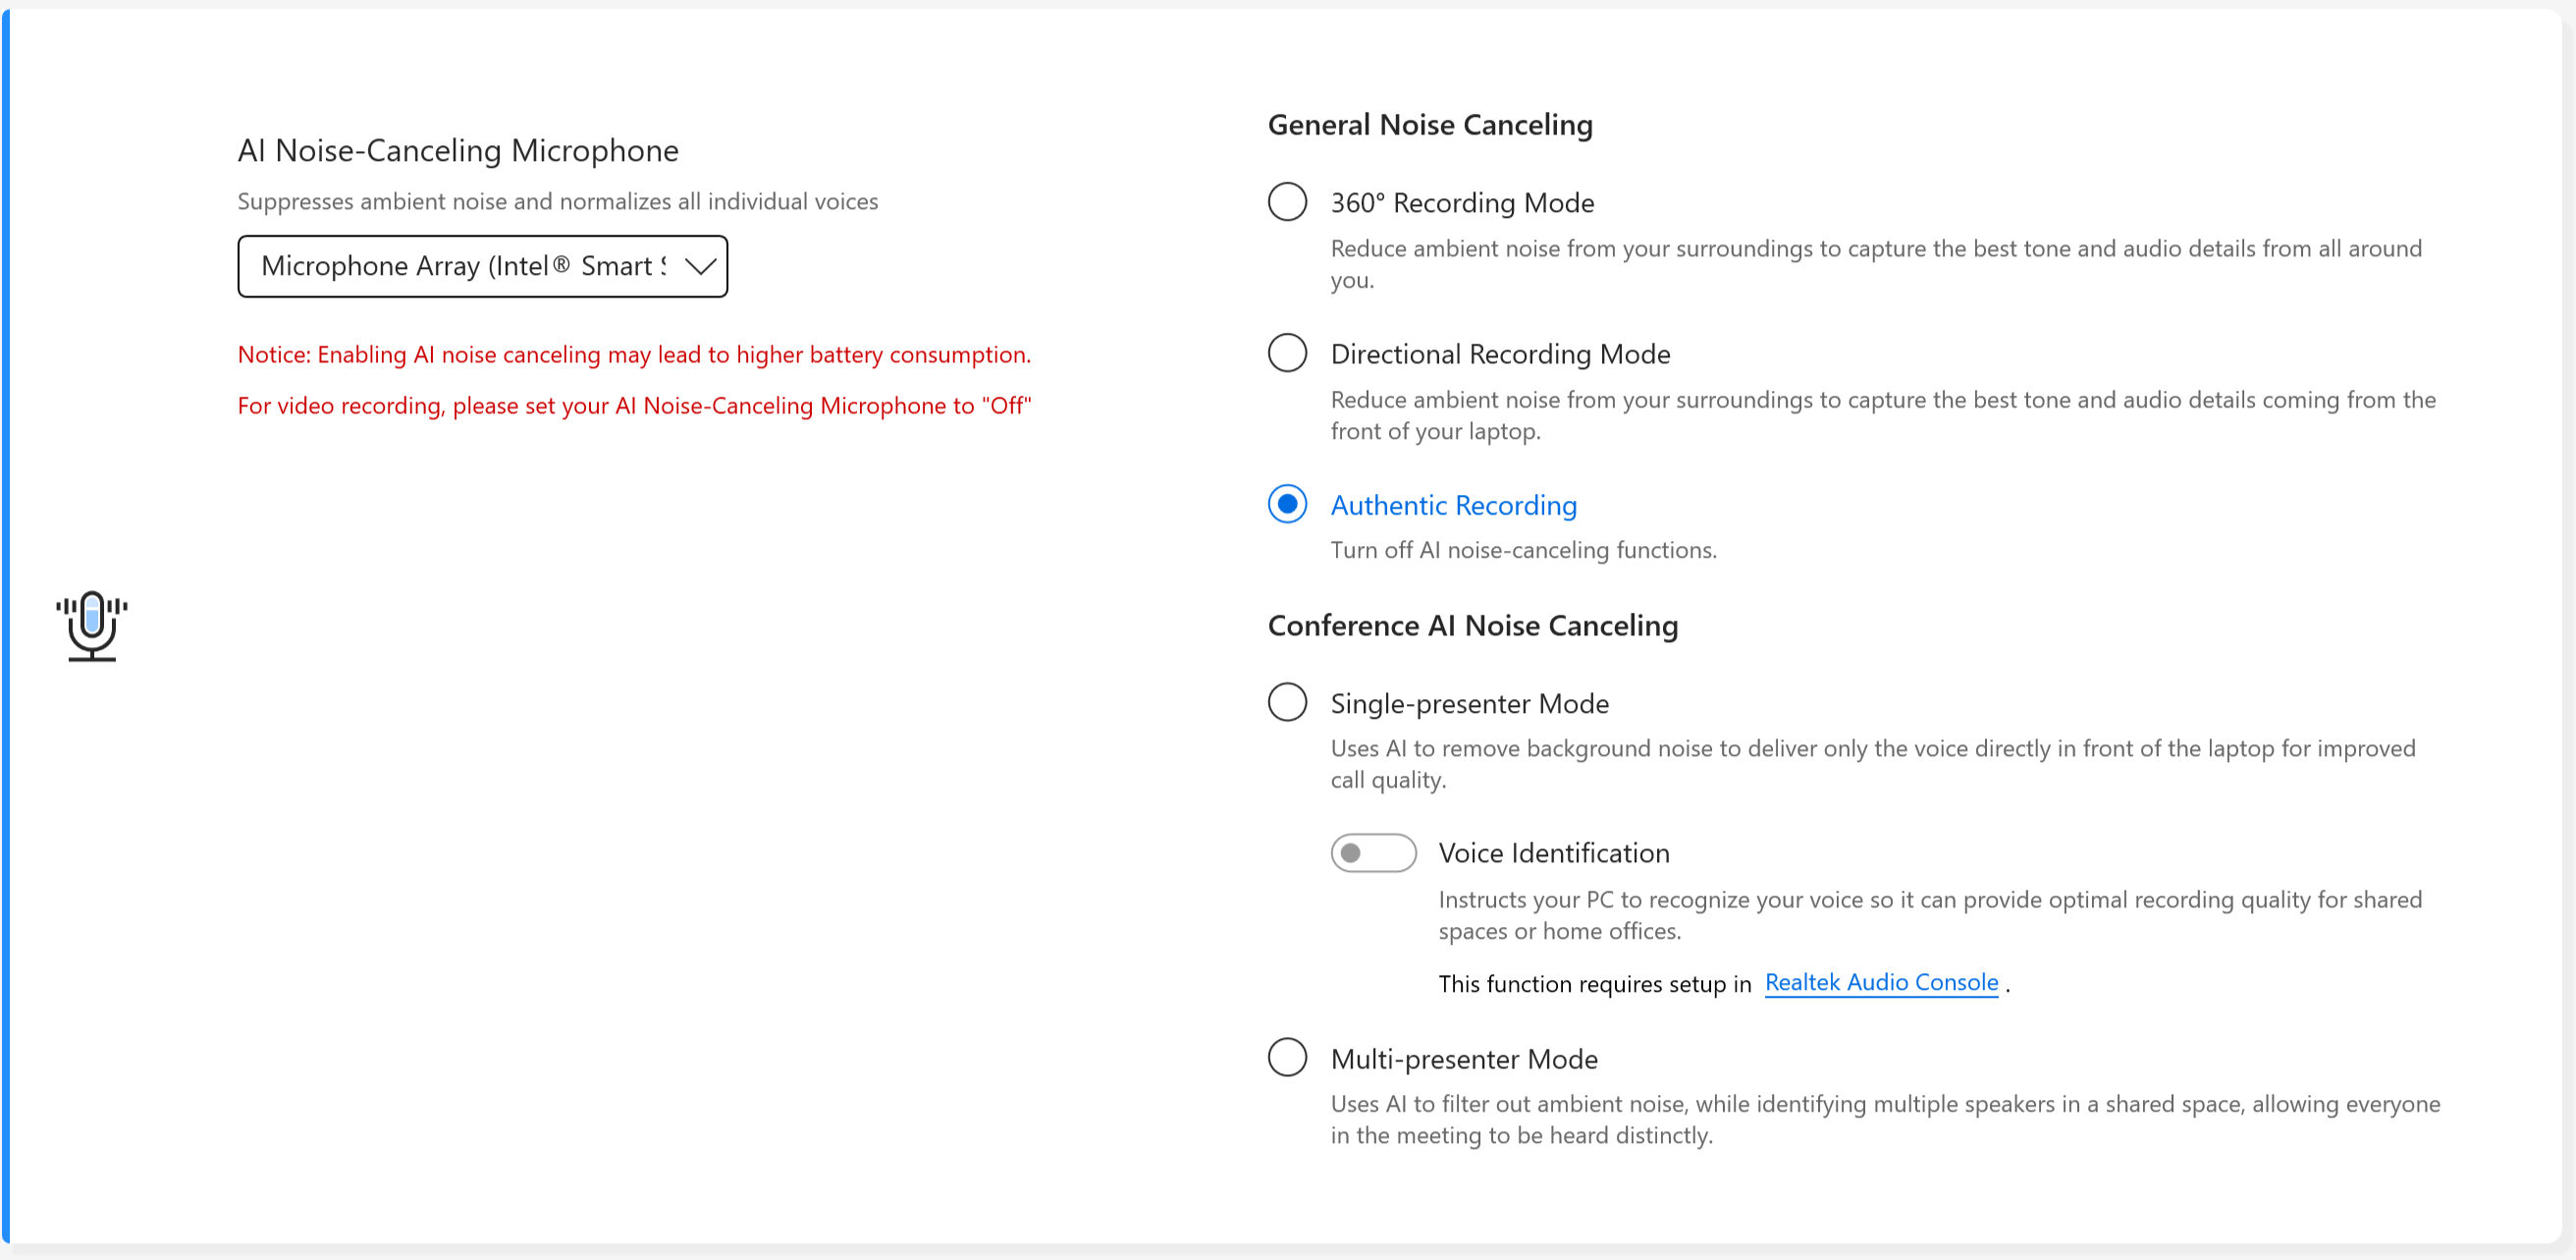
General Noise Canceling
360° Recording Mode: Reduce ambient noise from your surroundings to capture the best tone and audio details from all around you.
Directional Recording Mode: Reduce ambient noise from your surroundings to capture the best tone and audio details coming from the front of your laptop.
Authentic Recording: Turn off AI noise-canceling functions.
Conference AI Noise Canceling
Single-presenter Mode: Uses AI to remove background noise to deliver only the voice directly in front of the laptop for improved call quality.
Voice Identification: Instructs your PC to recognize your voice so it can provide optimal recording quality for shared spaces or home offices.
Muti-presenter Mode: Uses AI to filter out ambient noise, while identifying multiple speakers in a shared space, allowing everyone in the meeting to be heard distinctly.
For products produced in 2026, the AI Noise-Canceling Microphone will be shown as below.

What to do when the AI noise-canceling microphone's pickup range falls short of expectations? Please refer here.
AI Noise-Canceling Speaker *It is supported starting with models with Intel Tiger Lake/AMD Lucienne platform. You can go to ASUS website to check the CPU platform of your device.
(For Comet Lake platform, only support X409FAC/X509FAC/UX535LH/UX535LI)
AI Noise-Canceling Speaker filters out all noise except for human voices coming out from the laptop speaker.
Therefore, even if the person on the other side of the voice call is in a noisy environment, the user can still hear their voice clearly.

*Why doesn't it work even if AI Noise Canceling-Microphone or AI Noise Canceling-Speaker is turned on? Please refer to here.
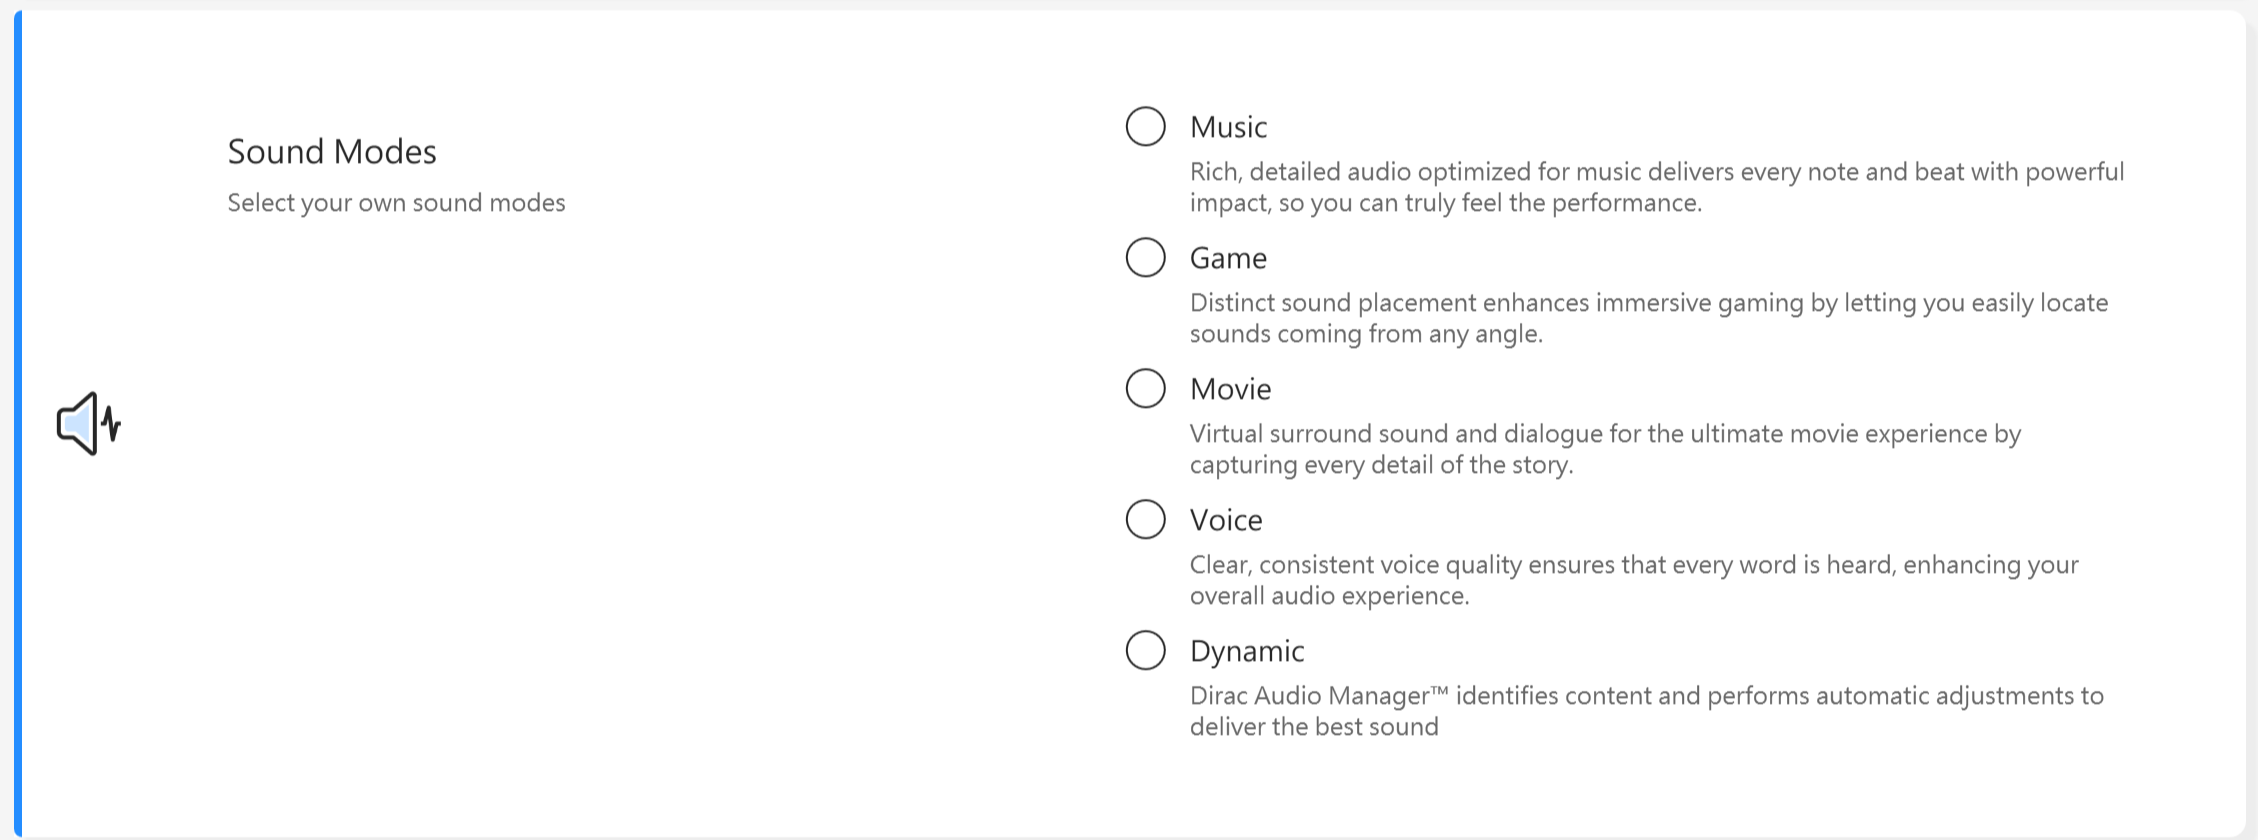
Sound Modes
Select the sound modes you’d like to apply to enhance the audio experience.
If your device is equipped with Dolby Atmos, there will be customized functions for you to adjust in Dolby control panel. 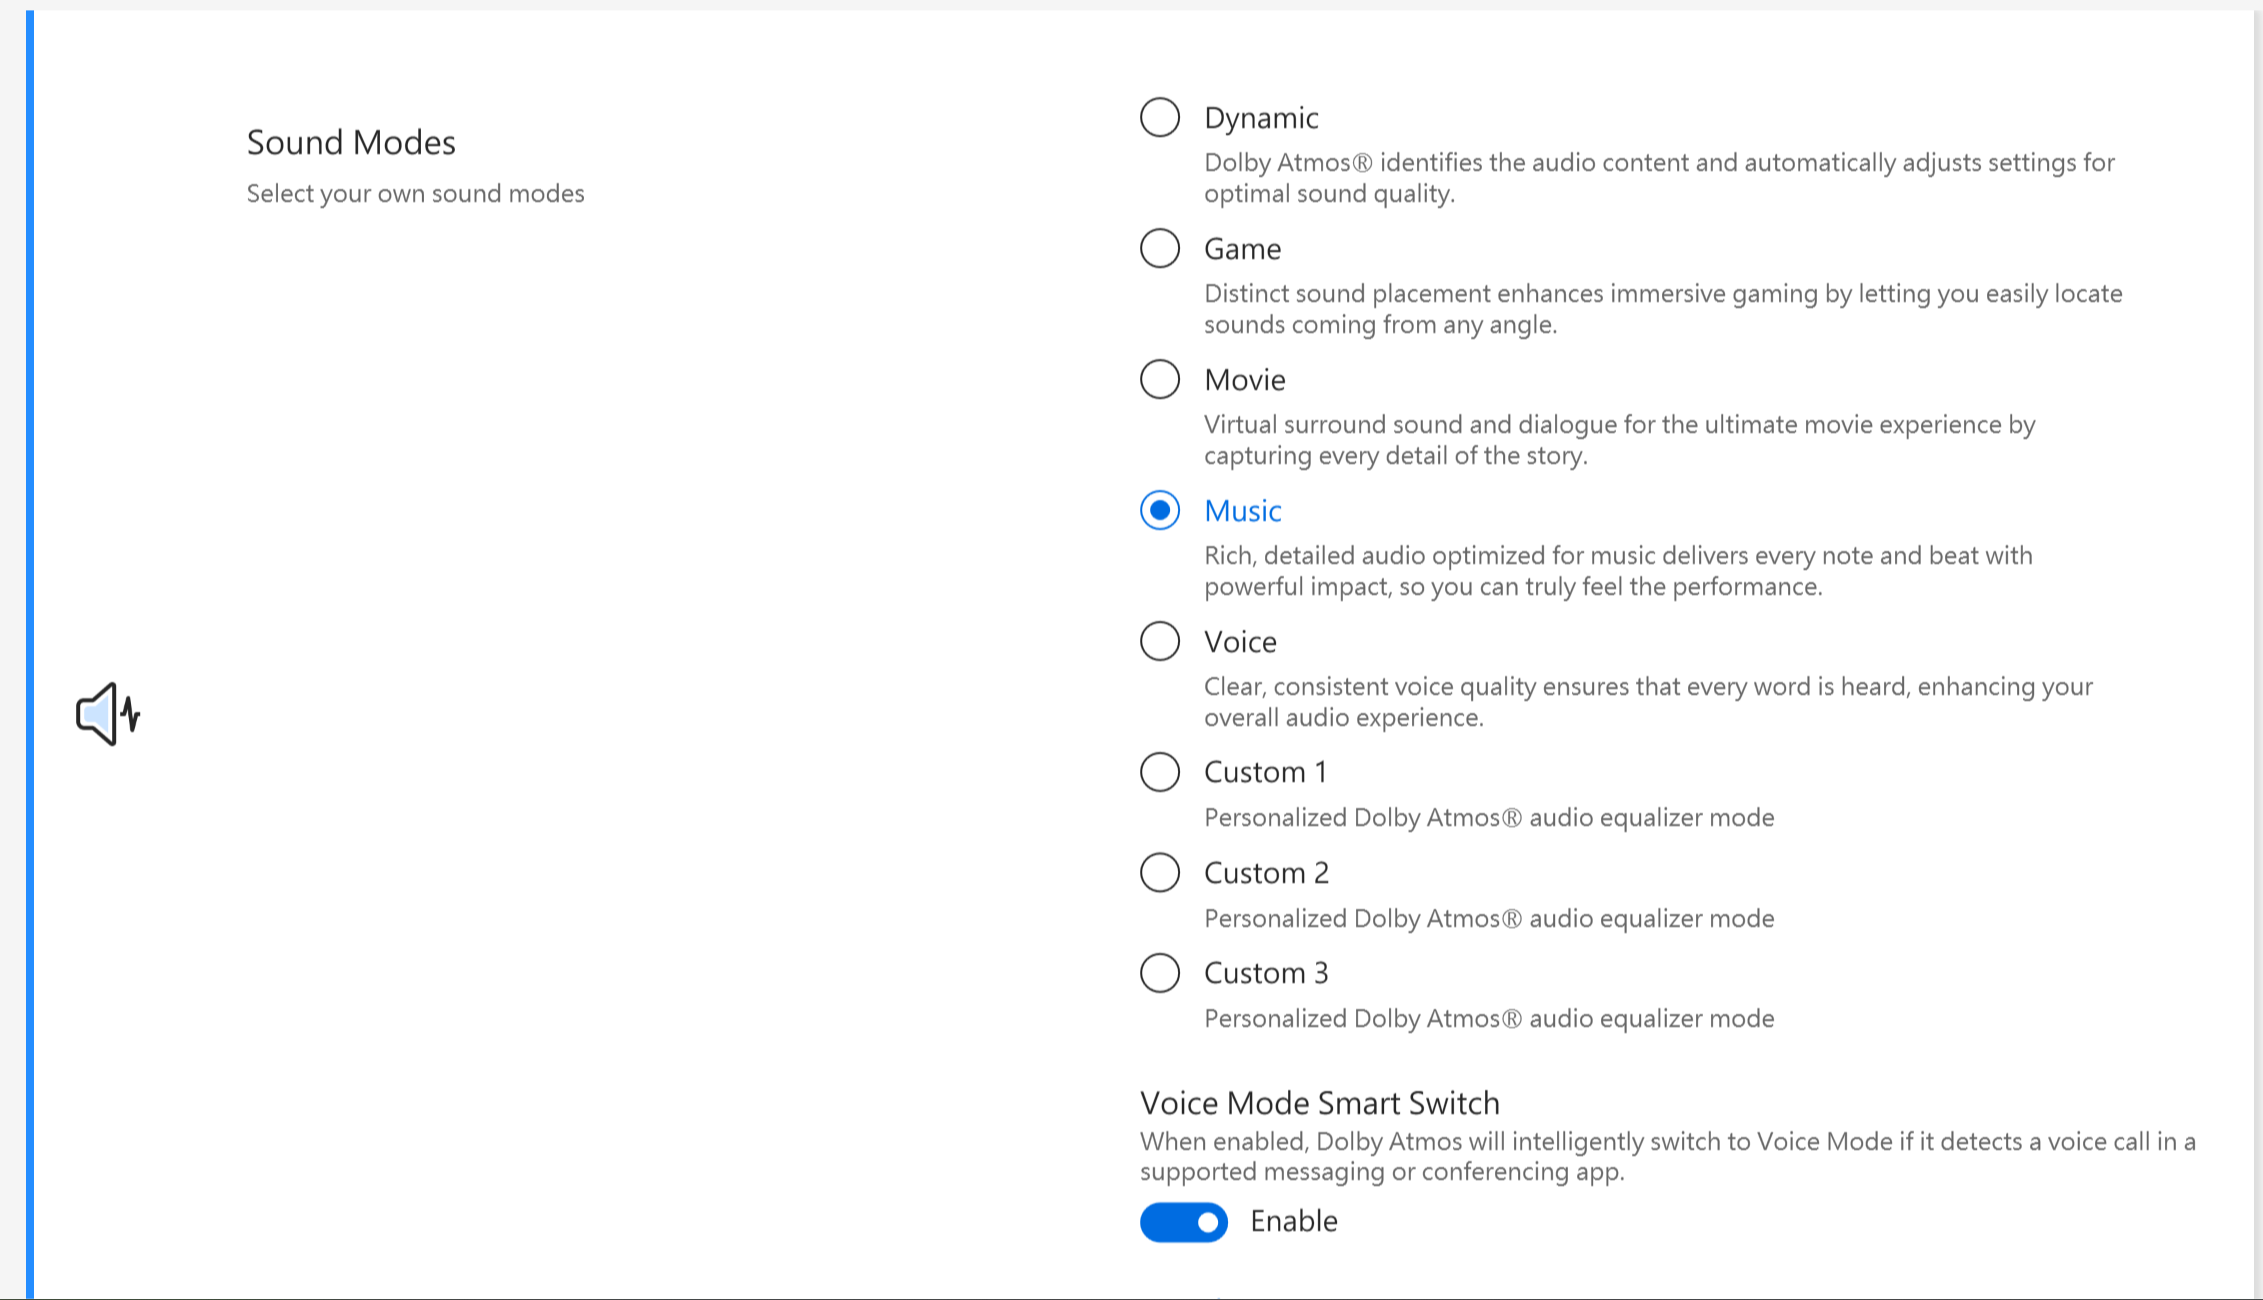
If your device is equipped with Dirac solution, the control panel will be shown like below.
Volume Booster
Makes all the sounds on your device much louder, with minimum distortion.

Splendid
Optimize the color of your screen with Gamma and fine-tuning the color temperature. By default, ASUS Splendid panels are set up to show the most accurate colors possible for the best viewing experience. However, sometimes users might want to make adjustments to color. For this reason, we've included three additional modes beyond Normal mode: Vivid mode, Eye Care mode, and Manual mode.
*If your device is connected to an external display and the multiple displays set as "Show desktop only on 2" or "Clone mode", ASUS Splendid is automatically disabled to avoid any problems or conflicts.
Splendid options
Normal: Through Gamma and Color temperature correction, the image output from the panel is as close as possible as what your eye can naturally see.
Vivid: Adjusts the saturation of the image making it more vivid and vibrant.
Manual: You can easily adjust the color temperature value to your personal needs, ranging from -50 to +50.
Eye Care: Eye Care mode reduces blue light emission by up to 30% helping protect your eyes. (Blue light reduction varies based on your LCD panel)
E-Reading: Switches the display to black and white to minimize color impact, enhance readability, and reduce eye strain during prolonged reading sessions.
Color Gamut *The features supported will vary by model.
The display's color gamut can be quickly and easily switched for different tasks or preferences. On top of the ultravivid native color setting, choose sRGB for creating web content or browsing, DCI-P3 for cinema content, or Display P3 for movie-grade colors finessed to fit everyday viewing in the real world.
Default Display Settings *The features supported will vary by model.
This feature allows you to restore the display settings to the original default ones.

If your laptop has screenpad or screenpad plus, the option for Splendid is shown as below.

Tru2Life *The features DO NOT support on device with AMD and Intel JasperLake CPU.
ASUS Tru2Life Video is an exclusive video enhancement technology that's similar to that found in high-end TVs. It uses intelligent software algorithms to optimize the brightness and sharpness of every video frame, improving contrast by up to 200%. As a result, video imagery looks more colorful, more vivid and sharper with incredible contrast.

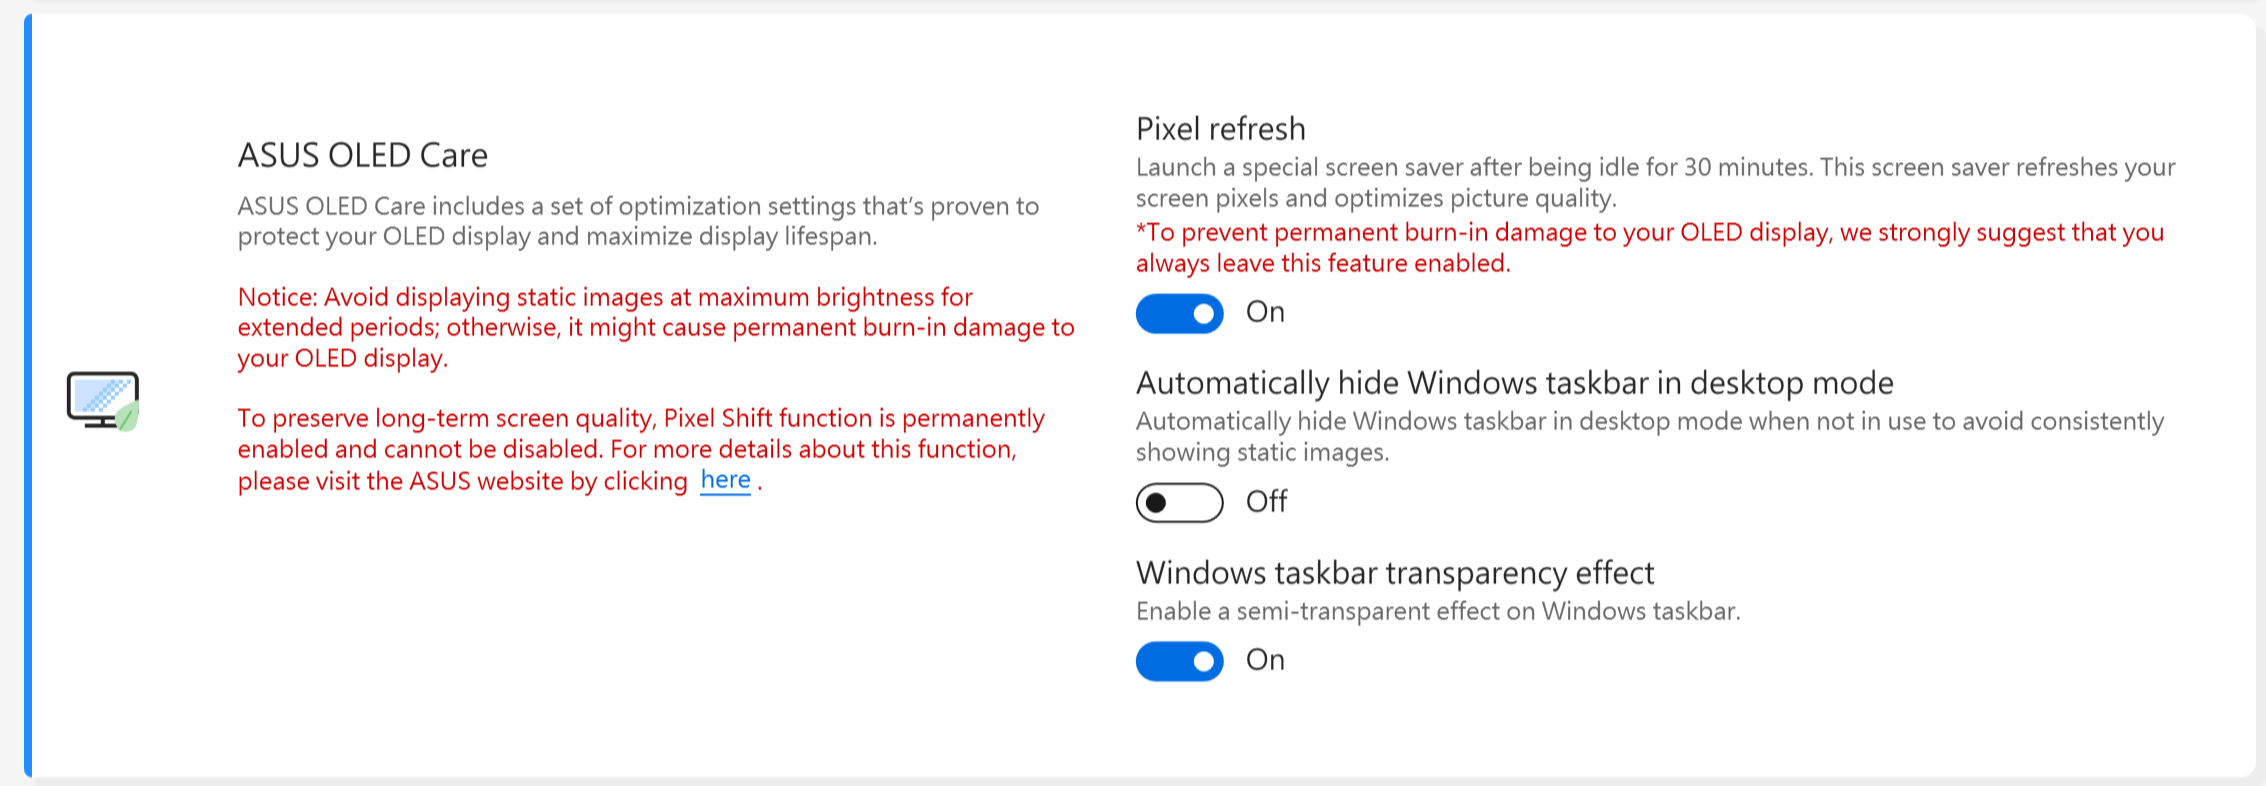
ASUS OLED Care *It supports some models with OLED panel.
ASUS OLED Care includes a set of optimization settings that's proven to protect your OLED display and maximize display lifespan.
Pixel refresh: Launch a special screen saver after being idle for 30 minutes. This screen saver refreshes your screen pixels and optimizes picture quality.
Pixel shift: Your displayed pixels would move slightly to avoid consistently showing static images on your desktop. The shifting effect is barely visible and wouldn't affect usage.
Automatically hide Windows taskbar in desktop mode: Automatically hide Windows taskbar in desktop mode when not in use to avoid consistently showing static images.
Windows taskbar transparency effect: Enable a semi-transparent effect on Windows taskbar.
Notice:
1. Avoid displaying static images at maximum brightness for extended periods; otherwise, it might cause permanent burn-in damage to your OLED display.
2. You can only manage it in MyASUS. If you remove MyASUS, you can't manage ASUS OLED Care anymore (turn on/off it).
3. Here you can learn more about The related settings of screen saver/maintenance, which also helps to avoid causing the "burn-in" symptom.
4. If the Windows taskbar transparency effect couldn't apply accordingly, please press winkey to solve it.
Target Mode
When enabled, the brightness of the active window will remain unchanged, thereas non-active areas will be dimmed for power saving.

Notice:
1. Support need: MyASUS 3.1.0.0 + ASUS System Control Interface 3.1.0.0(or above)
2. Only for OLED models.
3. It is default off.
4. This feature only supports the main screen and cannot be applied to external screens.
Adaptive Edge Brightness
Automatically adjust the brightness and contrast of your screen‘s edge to extend battery life.

Notice:
1. Support need: MyASUS 4.2.13.0 + ASUS System Control Interface 3.2.28.0(or above)
2. Only for ARM models (e.g. S5507 & HT5306).
AMD Fluid Motion Frames (AFMF)
AMD Fluid Motion Frames (AFMF) is a frame generation technology designed to increase frame rates and smooth movement for game-winning performance.

Notice:
1. Support need: MyASUS 4.0.18.0 + ASCI 3.1.33.0 (or above)
2. Only AMD Hawkpoint/Strixpoint and later platform supports this function, but also need specific AMD driver support.
3. It is default off.
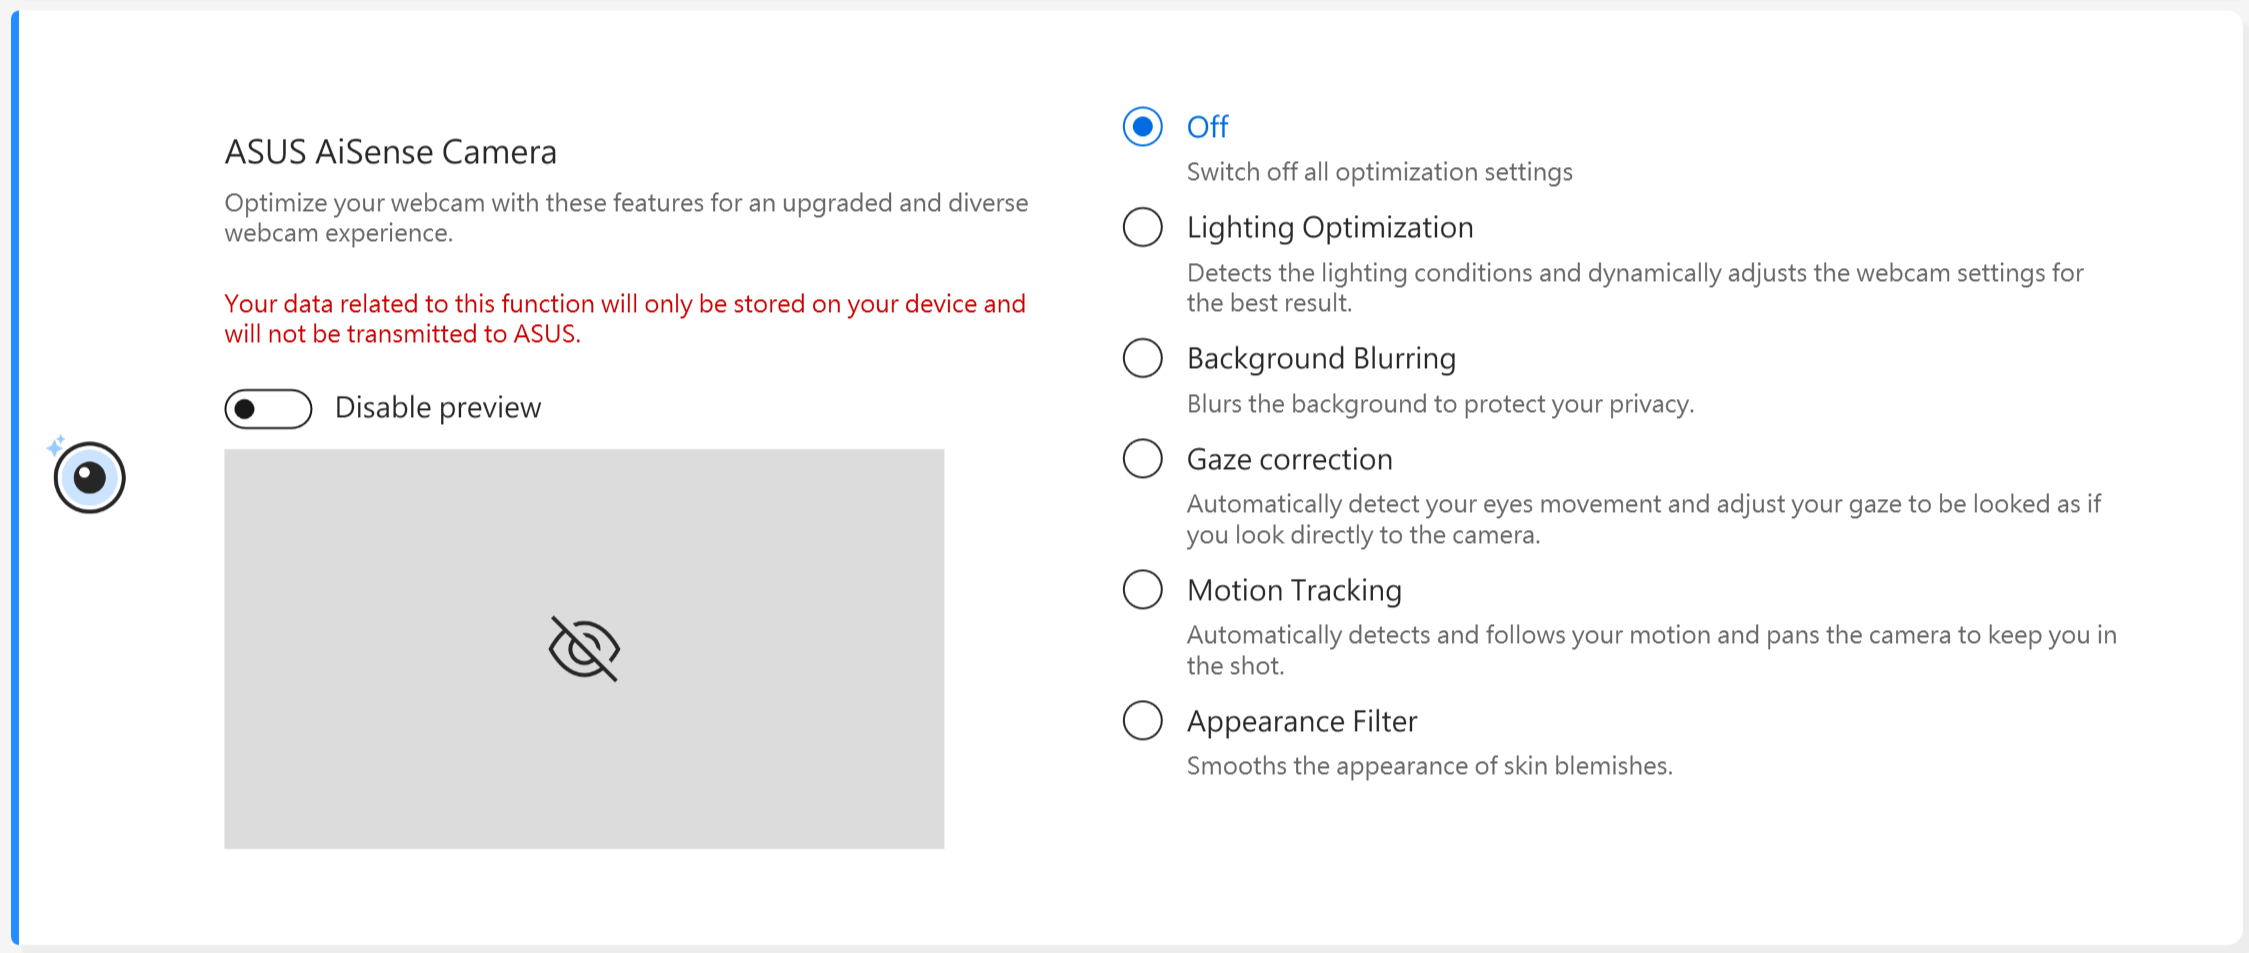
AiSense Camera (There won't be this item in MyASUS for models which support NPU, you can refer to here to check how to set up AiSense Camera)
Optimize your webcam with these features for an upgraded and diverse webcam experience.
Lighting Optimization: Detects the lighting conditions and dynamically adjusts the webcam settings for the best result.
Background Blurring: Blurs the background to protect your privacy.
Gaze correction: Automatically detect your eyes movement and adjust your gaze to be looked as if you look directly to the camera.
Motion Tracking: Automatically detects and follows your motion for a better webcam experience while you are moving around.
Notice:
1. Support need: MyASUS 3.0.34.0 + ASUS System Control Interface 3.0.19.0(or above)
2. Only for special camera module, need to install specific camera driver .
3. It is default off.
4. Gaze correction supported will vary by model.
OLED Flicker-Free Dimming *The features only support devices equipped with OLED panel.
Some users may notice a slight OLED flickering at lower brightness values.
To reduce this effect, MyASUS integrate an OLED Flicker-Free DC Dimming technology to adjust panel brightness, reducing the flash and protect your eyesight.

Display refresh rate * The features only support devices equipped with OLED panel and IPS panels for 2025 models.
Display refresh rate feature offers the options for users to choose and optimize the graphic performance. Fixed refresh rate / Adaptive refresh rate

TaskFirst * It is supported starting version V2.2.34.0 of MyASUS and version V2.2.26.0 of ASUS System Control Interface V2
With TaskFirst, user can personalize the distribution of internet connection's available bandwidth.
Users can distribute throughput evenly among all tasks, or prioritize data to particular activities for the smoothest possible performance.

Notice: If Intel connectivity performance suite or Intel connectivity network service (Intel Evo) is supported, taskfirst and WiFi smartconnect will hide to prevent mutual interference.
WiFi SmartConnect *Only supports products which shipped after 2019/ November.
When moving between different meeting rooms with a laptop, the WiFi signal can become unstable. With ASUS Smart WiFi, your laptop will automatically connect to the router with the best available signal in your current environment.
It also memorizes the mobile hotspots you connect to and prioritizes connections to them when they're detected.

Notice: If Intel connectivity performance suite or Intel connectivity network service (Intel Evo) is supported, taskfirst and WiFi smartconnect will hide to prevent mutual interference.
WiFi Rangeboost Sensor *The features supported will vary by model.
WiFi RangeBoost Sensor is an environment-detection sensor. The user can enable and disable the sensor to dynamically adjust signal strength for maximum WiFi coverage.
When the sensor detects the PC is placed on a stable surface, the signal will be strengthened to ensure better WiFi connectivity.

Function key *The features supported will vary by model. *Only supports laptops with ASUS System Control Interface V2. (Gaming- series Laptops don't support)
Function Key Lock allow users to adjust keyboard workflow with ease. Either choose the traditional way of pressing the Fn key along with the keyboard function keys, or use the new method of accessing the function keys directly without the Fn key. Choose the following way to switch function keys according to your habits :
1) Locked Fn key : Press F1-F12 to initiate the specified hotkey function.
2) Normal Fn key : Press F1-F12 to initiate the F1-F12 function defined by your system or a specific app.

NumberPad
Click to lock the NumberPad function on the touchpad to prevent accidentally activating.

Notice:
1. Support need: MyASUS 3.0.34.0 + ASUS System Control Interface 3.0.19.0(or above), Touchpad driver:17.0.0.5 or above.
2. Only lock the NumberPad function on the touchpad not for external digital keyboard.
3. It is default unlock.
4. It doesn't support gaming NB.
Automatic keyboard backlight * The features supported will vary by model.
Brightens or dims the automatic keyboard backlight according to the current light conditions using the built-in Ambient Light Sensor.
Auto-brighten: The keyboard backlight turns on when the light conditions change from bright to dark.
Auto-dim: The keyboard backlight turns off when the light conditions change from dark to bright.
*This function is unavailable when battery level is under 20% and the Windows battery saving mode is activated.

Touchpad *The features supported will vary by model. (Only supports laptops with ASUS System Control Interface V2/V3.)

Notice:
1. Requirement: MyASUS 3.1.18.0 + ASUS System Control Interface 3.1.14.0(or above)
2. Default setting is based on Microsoft's setting.
3. Models with screenpad don't support this function.
4. When Internal Point Device is disabled in BIOS, MyASUS will hide this item.
5. When the Touchpad Lock is enabled, NumberPad Lock of MyASUS will be grey out at the same time.
Touchpad with stylus support *The features supported will vary by model.

Notice:
1. Requirement: MyASUS 3.1.18.0 + ASUS System Control Interface 3.1.14.0(or above)
2. Default setting is based on Microsoft's setting.
3. Models with screenpad don't support this function.
4. When disable Internal Point Device in BIOS setting menu, MyASUS will hide this item.
Smart Gestures *The features supported will vary by model.

Notice:
1. Requirement: MyASUS 4.0.9.0 + ASUS System Control Interface 3.1.25.0(or above).
2. Disable Smart Gestures is set by default.
3. Function introduction:
a. Slide one finger along the left edge to adjust system volume.
b. Slide one finger along the right edge to adjust panel brightness
c. Slide one finger across the top edge to forward or rewind the video
d. Swipe in from the top-right corner with one finger to launch ASUS ScreenXpert app
Keyboard backlight sleep mode * The features supported will vary by model.
Automatically turns off the keyboard backlight based on your preferences. You can set the idle time for the backlight to turn off when running on battery or running either on battery or AC power.
Do nothing: Keep the keyboard backlight always on
While on battery or on AC power: Select the idle time before the keyboard backlight turns off while on battery or AC power
While on battery power only: Select the idle time before the keyboard backlight turns off while on battery power

Auto-lock keyboard and touchpad * This feature is only supported on convertible models released in 2026.
When this feature is disabled, the keyboard and touchpad will remain functional even when the screen is flipped.
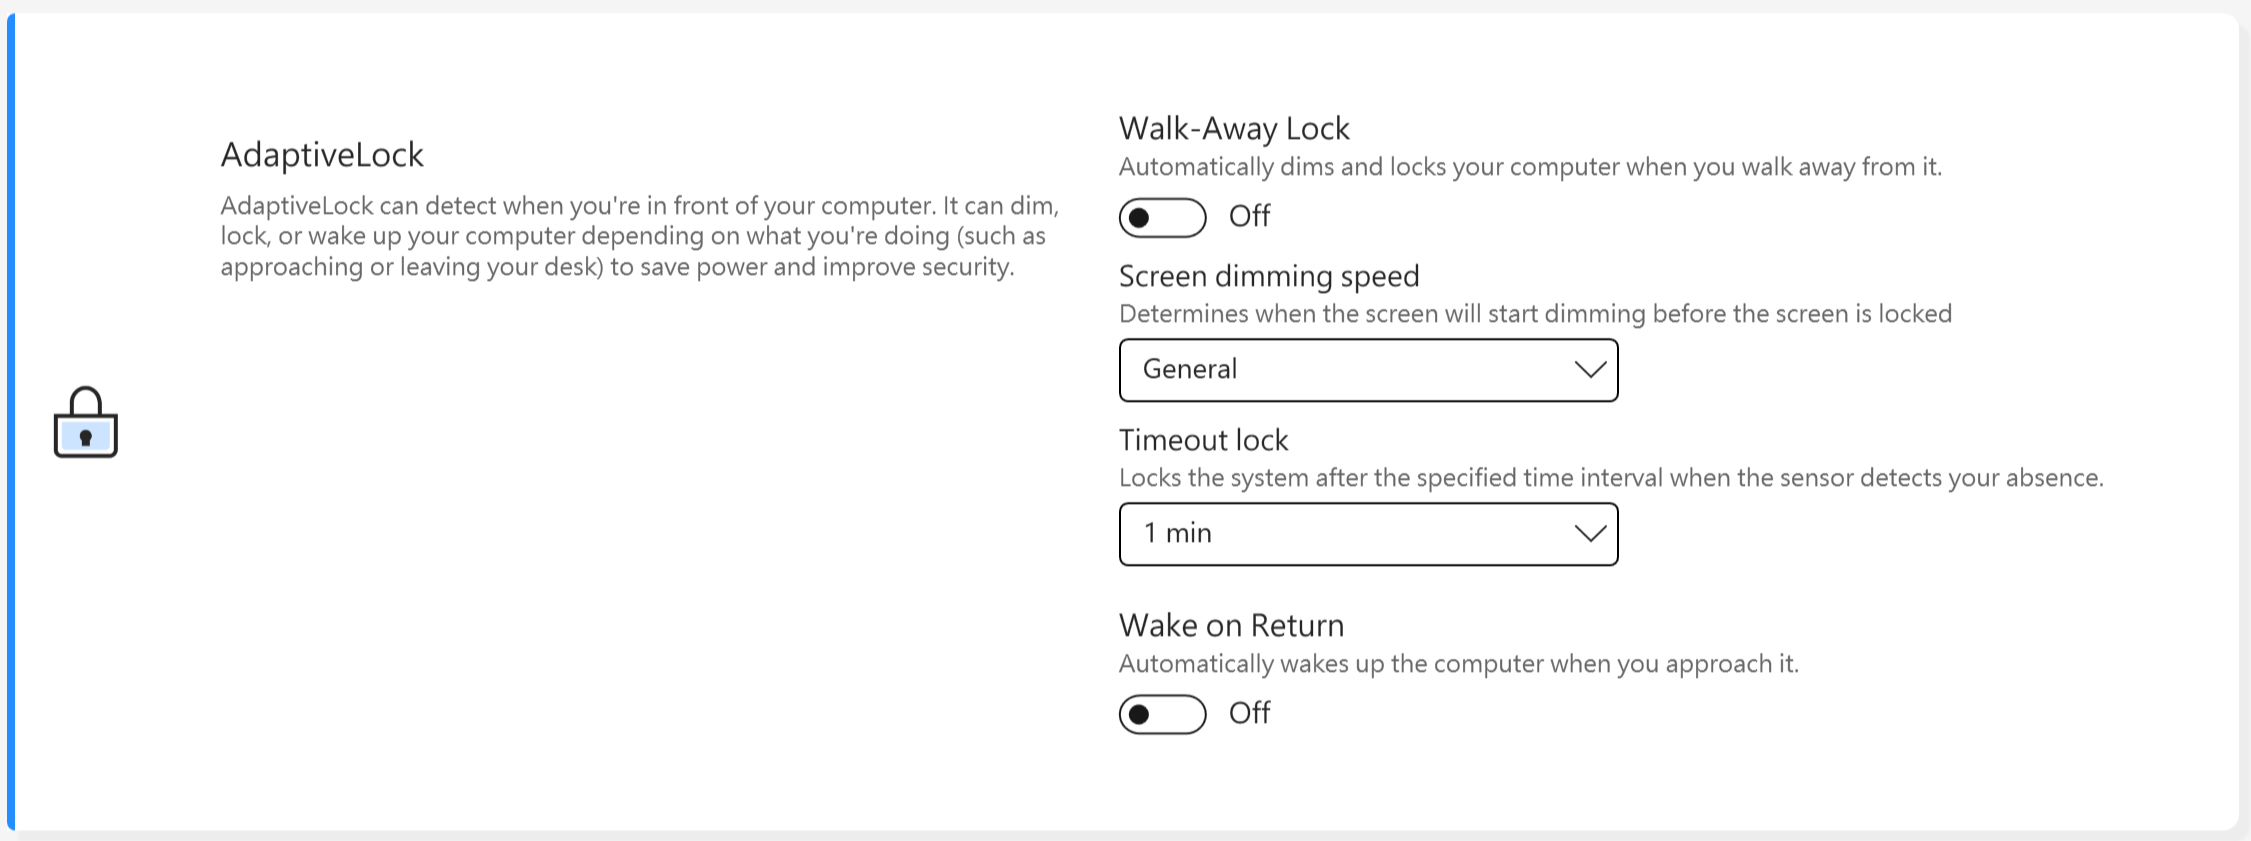
AdaptiveLock
AdaptiveLock uses a proximity sensor to detect whether the user is in front of the PC.
[Supported on selected models of NB for work]
Lock the system upon leaving: Users can turn on Walk-Away Lock to enhance security and save battery, locking the PC when the user walks away from the device.
Screen dimming speed: Set the time to start dimming before the screen is locked.
Time out lock: When it is detected that you are not near the computer, lock the system after the specified time interval.
Wake up the system after returning: The system can also log back in and resume once detected the user's return.
[Supported on selected models of NB for home]
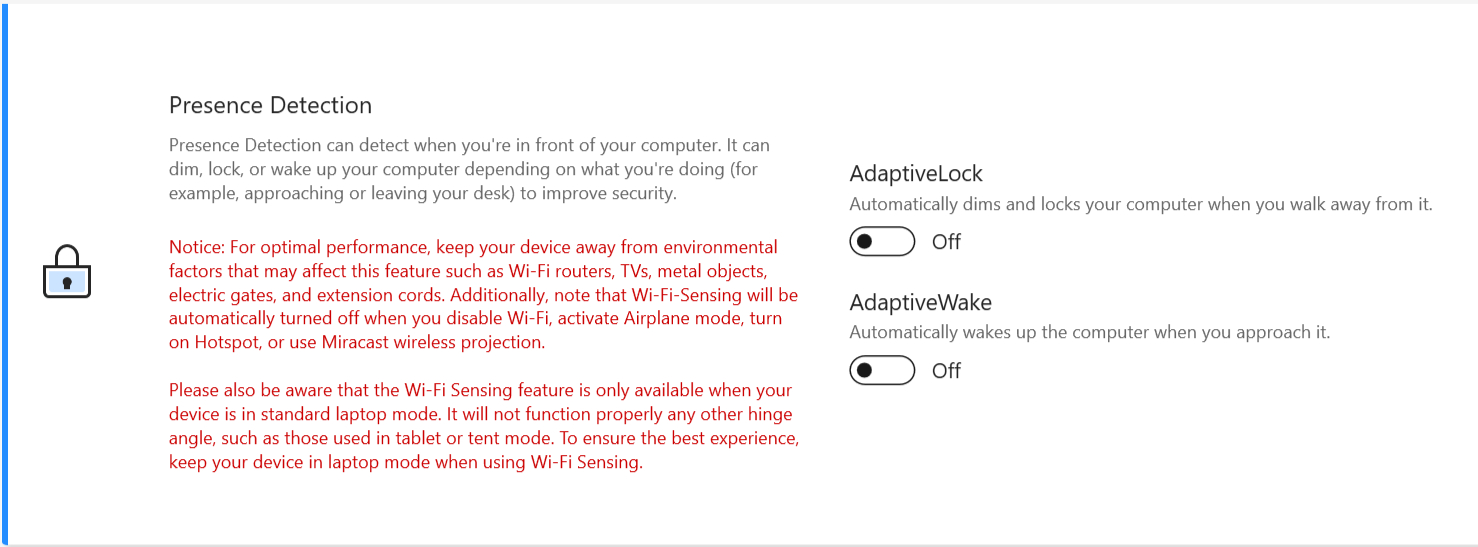
Presence Detection
Lock the system upon leaving: Users can turn on Walk-Away Lock to enhance security and save battery, locking the PC when the user walks away from the device.
Wake up the system after returning: The system can also log back in and resume once detected the user's return.
Screen brightness decreases when the line of sight leaves: Automatically adjust the screen brightness depending on where you're facing.

*This feature only supports main screen locking and wake-up, and cannot be applied to external screens.
For devices support WiFi sensing techniques, the UI will be shown as below.
* The features supported will vary by model.
Though MyASUS Exclusives feature, users can customize RGB lighting on LCD cover or keyboard for their own device.
*The features supported will vary by model.
[Vivobook Pro 16 AURA version]
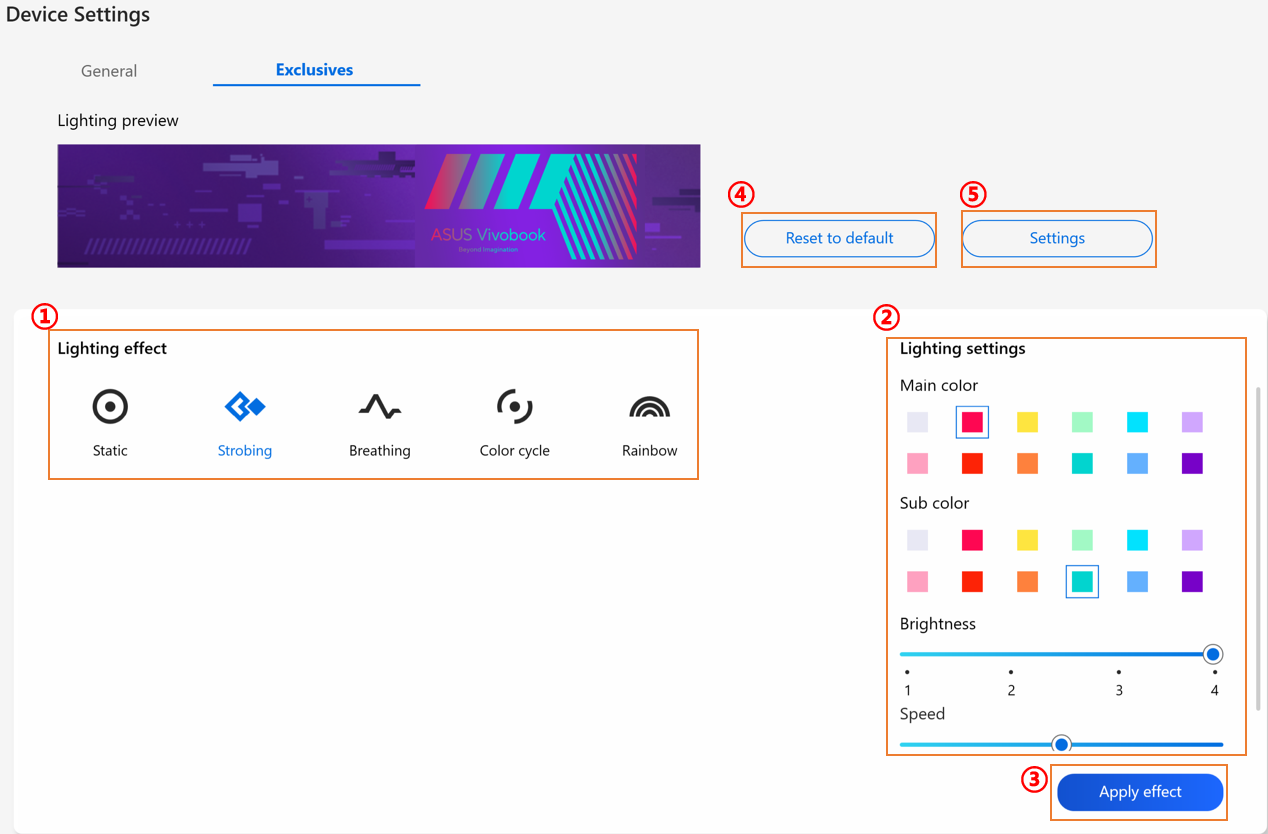
① Lighting effect: To select your device lighting effects.
② Lighting settings: According to the lighting effects selection, user can setup color、speed and brightness of lighting effect.
③ Apply effect: To apply a selected lighting effect on device.
④ Reset to default: To select “Reset to default”, all lighting settings will return to the default.
⑤ Settings: To select Settings* to get into Setting page, and user can turn on/off each functions.
*Settings
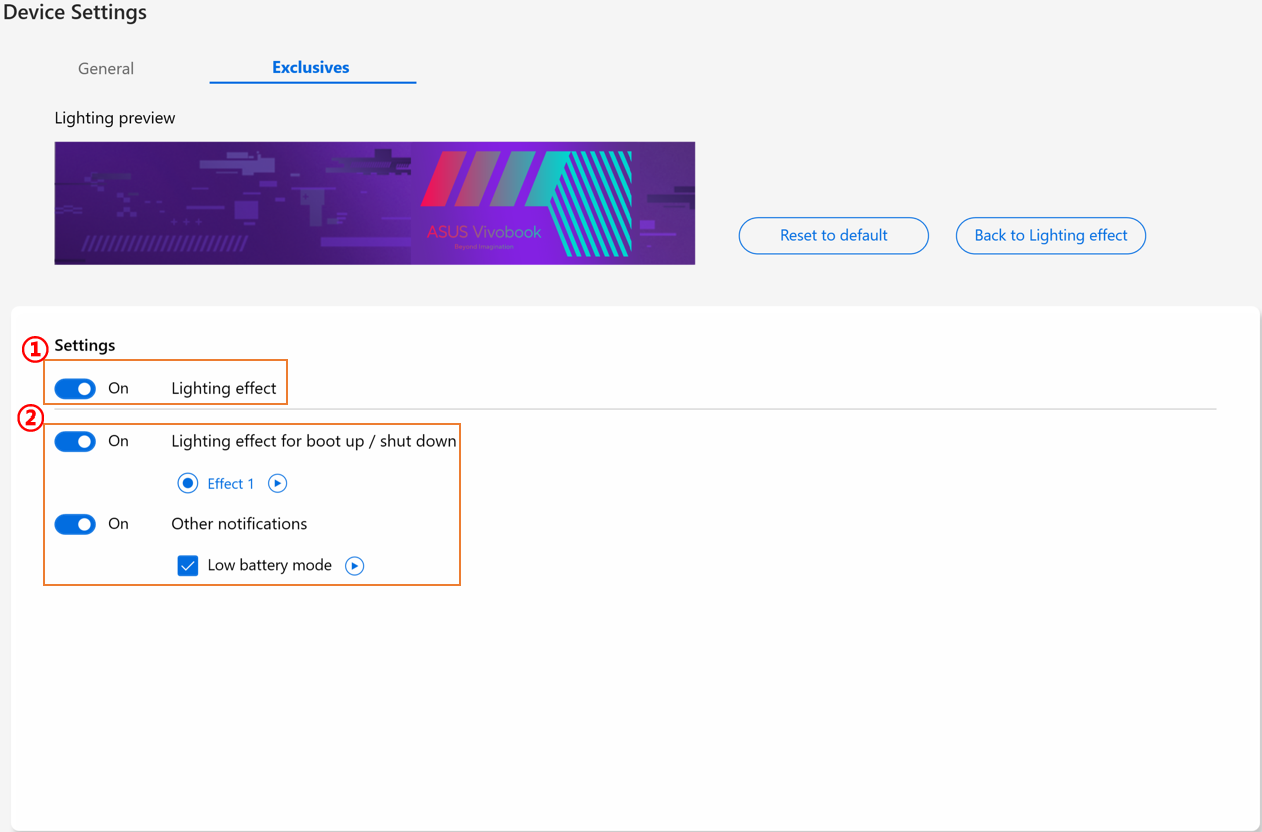
① Lighting settings: To turn on/off the lighting effects.
② Lighting effects: Through clicking  , user can preview utility preset lighting effects, and through each on/off switch, user can turn on/off for each preset lighting effects.
[Zenbook Pro 15 Flip]
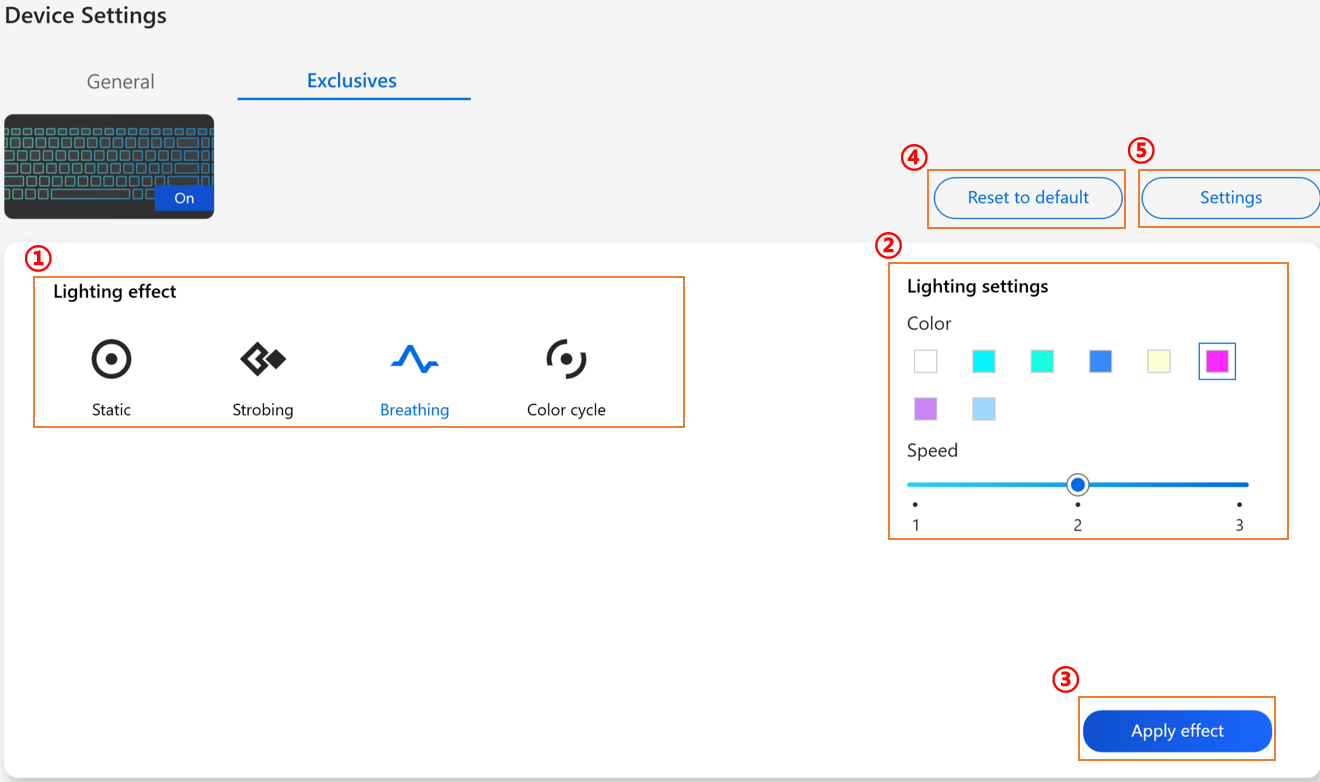
① Lighting effect: To select your device lighting effects.
② Lighting settings: According to the lighting effects selection, user can setup color、speed of lighting effect.
③ Apply effect: To apply a selected lighting effect on device.
④ Reset to default: To select “Reset to default”, all lighting settings will return to the default.
⑤ Settings: To select Settings* to get into Setting page, and user can turn on/off lighting effect.
*Settings
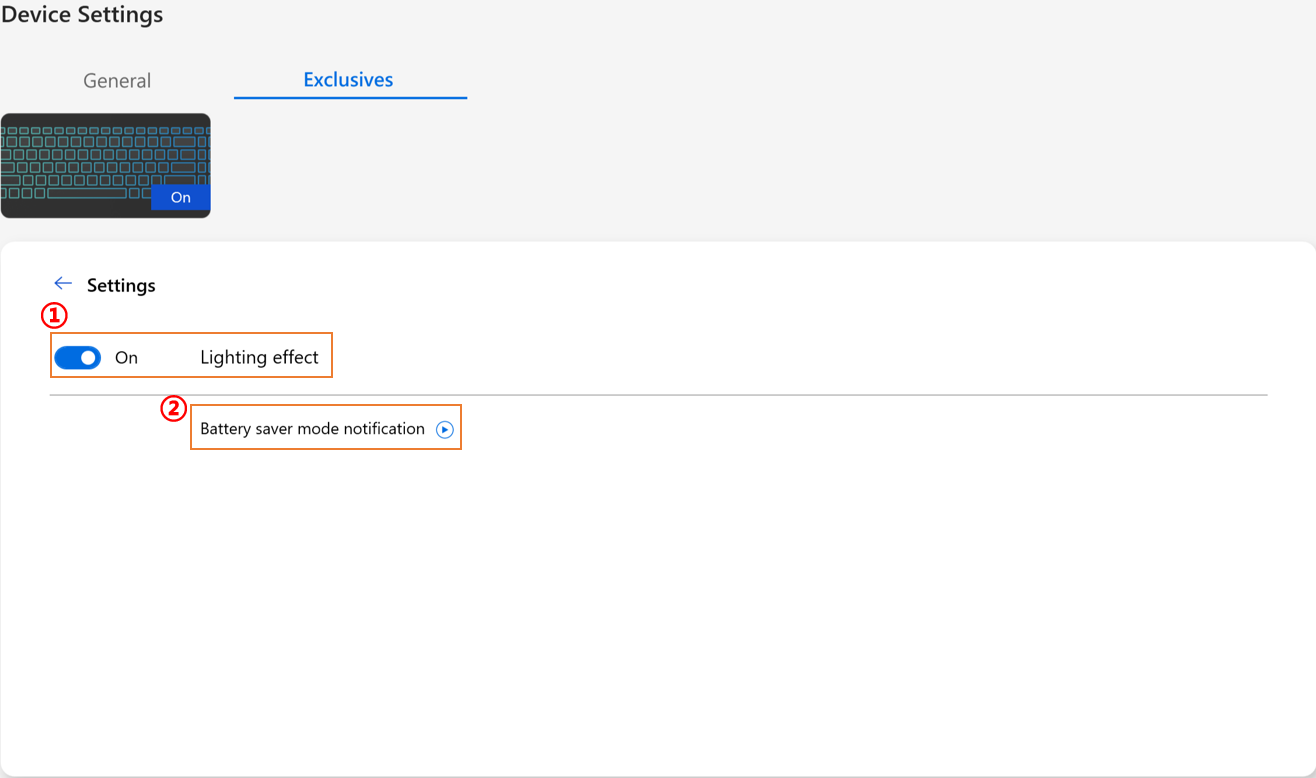
① All Lighting settings: To turn on/off the lighting effects.
② Default Lighting effects: Through clicking  , user can preview the battery saver mode effect.
[Zenbook 14X OLED Space Edition]
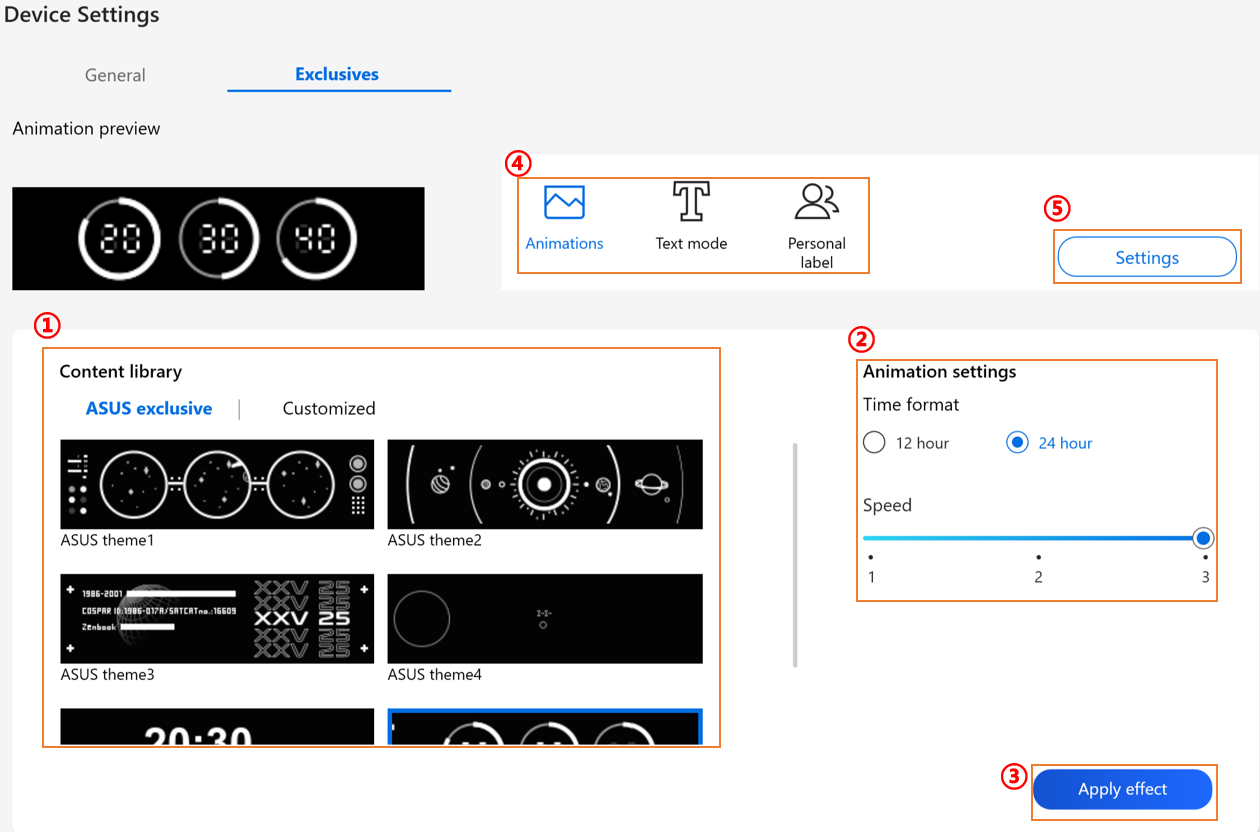
① Content library: To select the Animation effects.
② Animation settings: User can setup speed of each animation.
③ Apply effect: To apply selected effect on device.
④ Category: There are three types, Animation, Text, Personal label template to use.
⑤ Settings: To select Settings* to get into Setting page, and user can turn on/off lighting effect.
*Settings
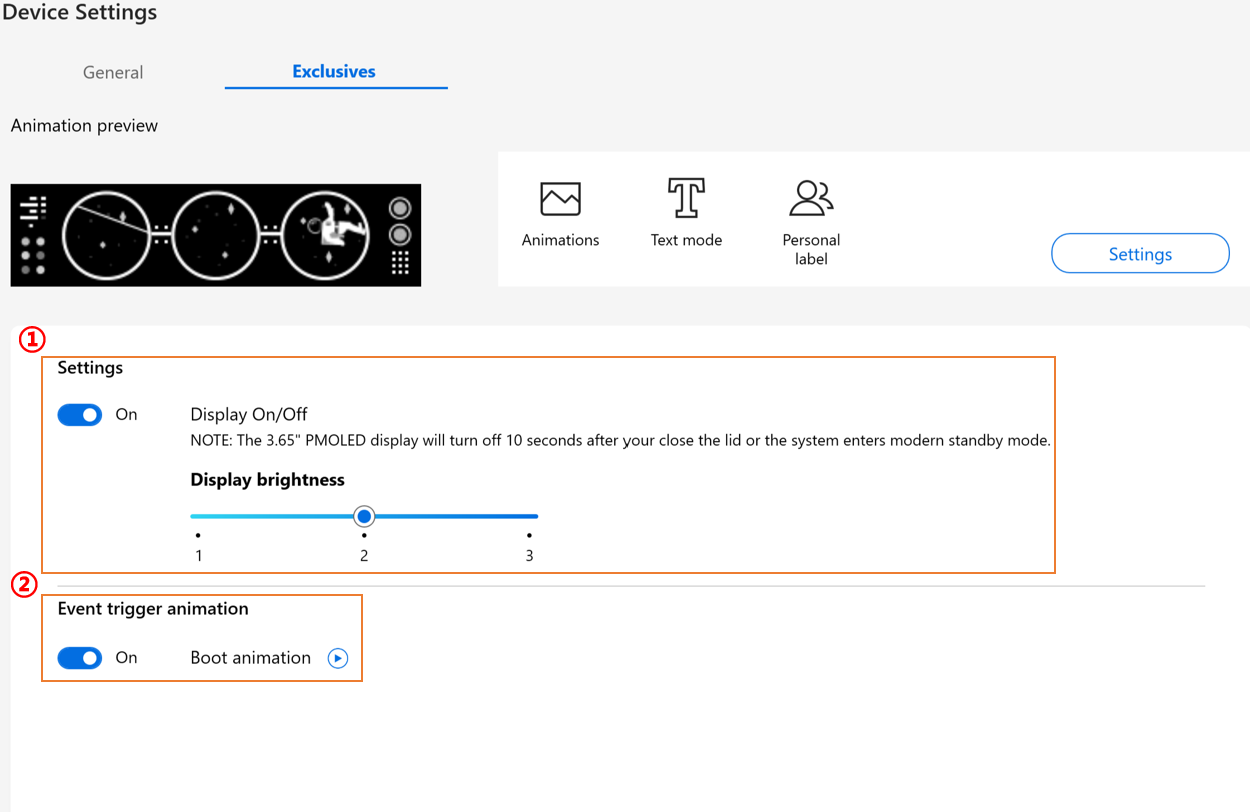
① Effect settings: To turn on/off the PMOLED display or change the brightness.
② Event trigger animation: Through clicking  , user can preview the boot animation.
[Zenbook Pro 16X OLED]
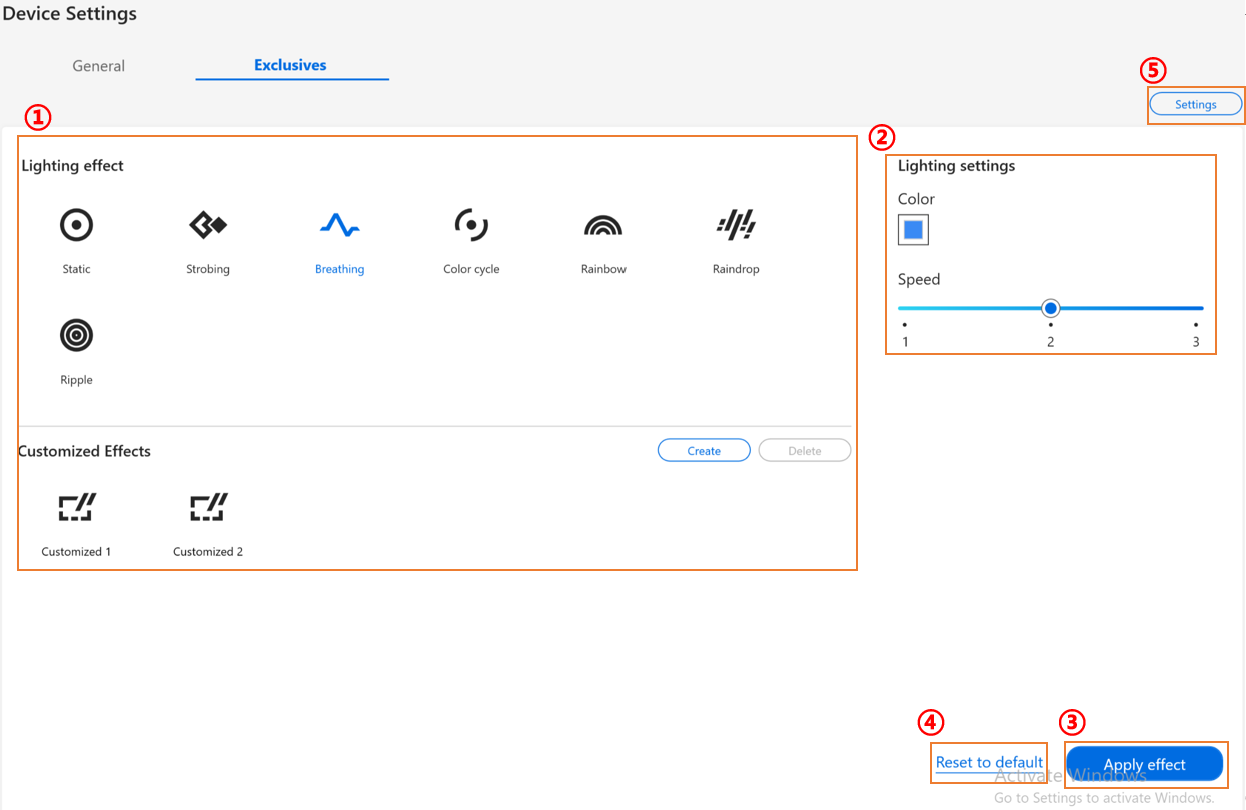
① Lighting effect: To select your device lighting effects.
② Lighting settings: According to the lighting effects selection, user can setup color、speed、direction of lighting effect.
③ Apply effect: To apply a selected lighting effect on device.
④ Reset to default: To select “Reset to default”, all lighting settings will return to the default.
⑤ Settings: To select Settings* to get into Setting page, and user can turn on/off lighting effect.
*Settings
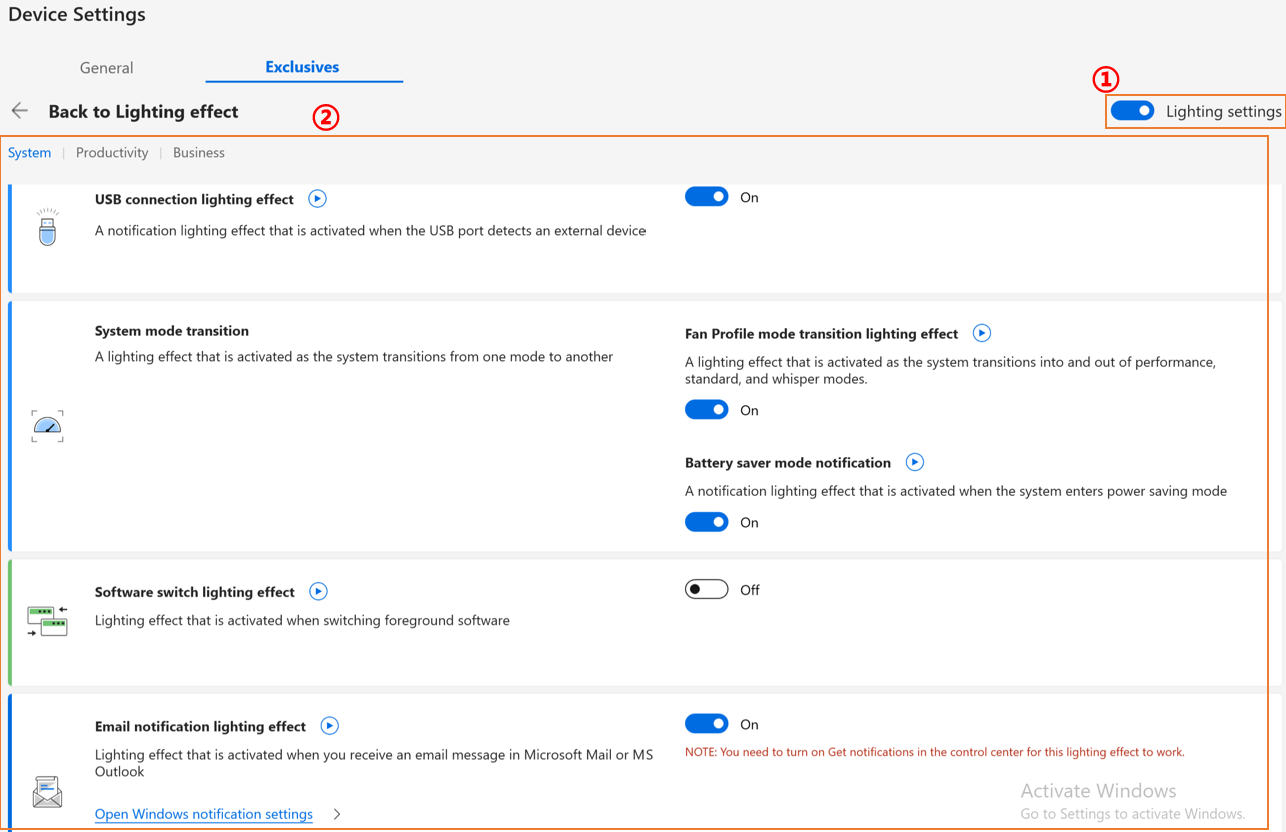
① Lighting settings: To turn on/off lighting effects.
② Default lighting effects: Through clicking  , user can preview each effects and easily opt-on by one click.
Q&A
Question 1: Why can't I find Splendid, Tru2Life and OLED Flicker-Free Dimming in Device Settings after I reinstall Windows and MyASUS?
Answer 1: Please refer to here.
Question 2: Why my MyASUS Device Settings features are little different from this article?
Answer 2: The features supported in [Device Settings] will vary by model, and not all products are with all Device Settings features.
Question 3: Why does the “dedicated memory” for the iGPU (integrated graphics) on Intel platforms not change in Task Manager after adjustment in MyASUS?
Answer 3: On certain older Intel platforms, modifying the dedicated video memory allocation via MyASUS may not be immediately reflected in the values shown in Task Manager; however, the actual memory allocation has been updated. If you have concerns about the displayed results, we recommend referring to the shared GPU memory override features and requirements for further information.

Download MyASUS now to experience perfect service. Click below !
