[Wireless Router] How to configure the Smart Connect in ASUS Router?
What is Smart Connect?
Smart Connect is a feature found in ASUS routers. Typically, users manually select the WiFi band for their devices (such as 2.4GHz or 5GHz). Enabling the Smart Connect feature allows all WiFi bands to use the same WiFi name and password. Devices (such as smartphones) will automatically connect to the most suitable WiFi band, simplifying the process of connecting devices to the wireless network (WiFi) without the need to manually choose the appropriate WiFi band for each device.
Prepare
1. Some functions of wireless will be different due to firmware version.
Interface 1: Supports routers with firmware later than 3.0.0.6.102_35404 (including), please refer to here for the setting instructions.
Interface 2: Supports routers with firmware earlier than 3.0.0.6.102_35404, please refer to here for the setting instructions.
2. Supported channels of 2.4 GHz, 5 GHz and 6 GHz WiFi differ according to each country’s local law and restrictions.
For example, your computer's network card and wireless router both support 6 GHz, but your country/region is not available for 6 GHz, you may not be able to connect.
3. Please refer to the product model list at the top of this article to make sure your router supports Smart Connect.
4. How to connect to a WiFi wireless network using your device, please refer to the following FAQ
[Windows 11/10] Connect to a Wi-Fi network
[ZenFone] How to connect to Wi-Fi Network
Note:The built-in WiFi network preferences settings on a mobile device may render the smart connect rule ineffective or lead to frequent disconnections.
5. FAQ
You can set up your ASUS router via Web GUI or ASUS Router app.
A. Use the ASUS Router APP to enable Smart Connect
1. Login to App and tap [ Settings ] > [ Network ] > [ Main network profile ].
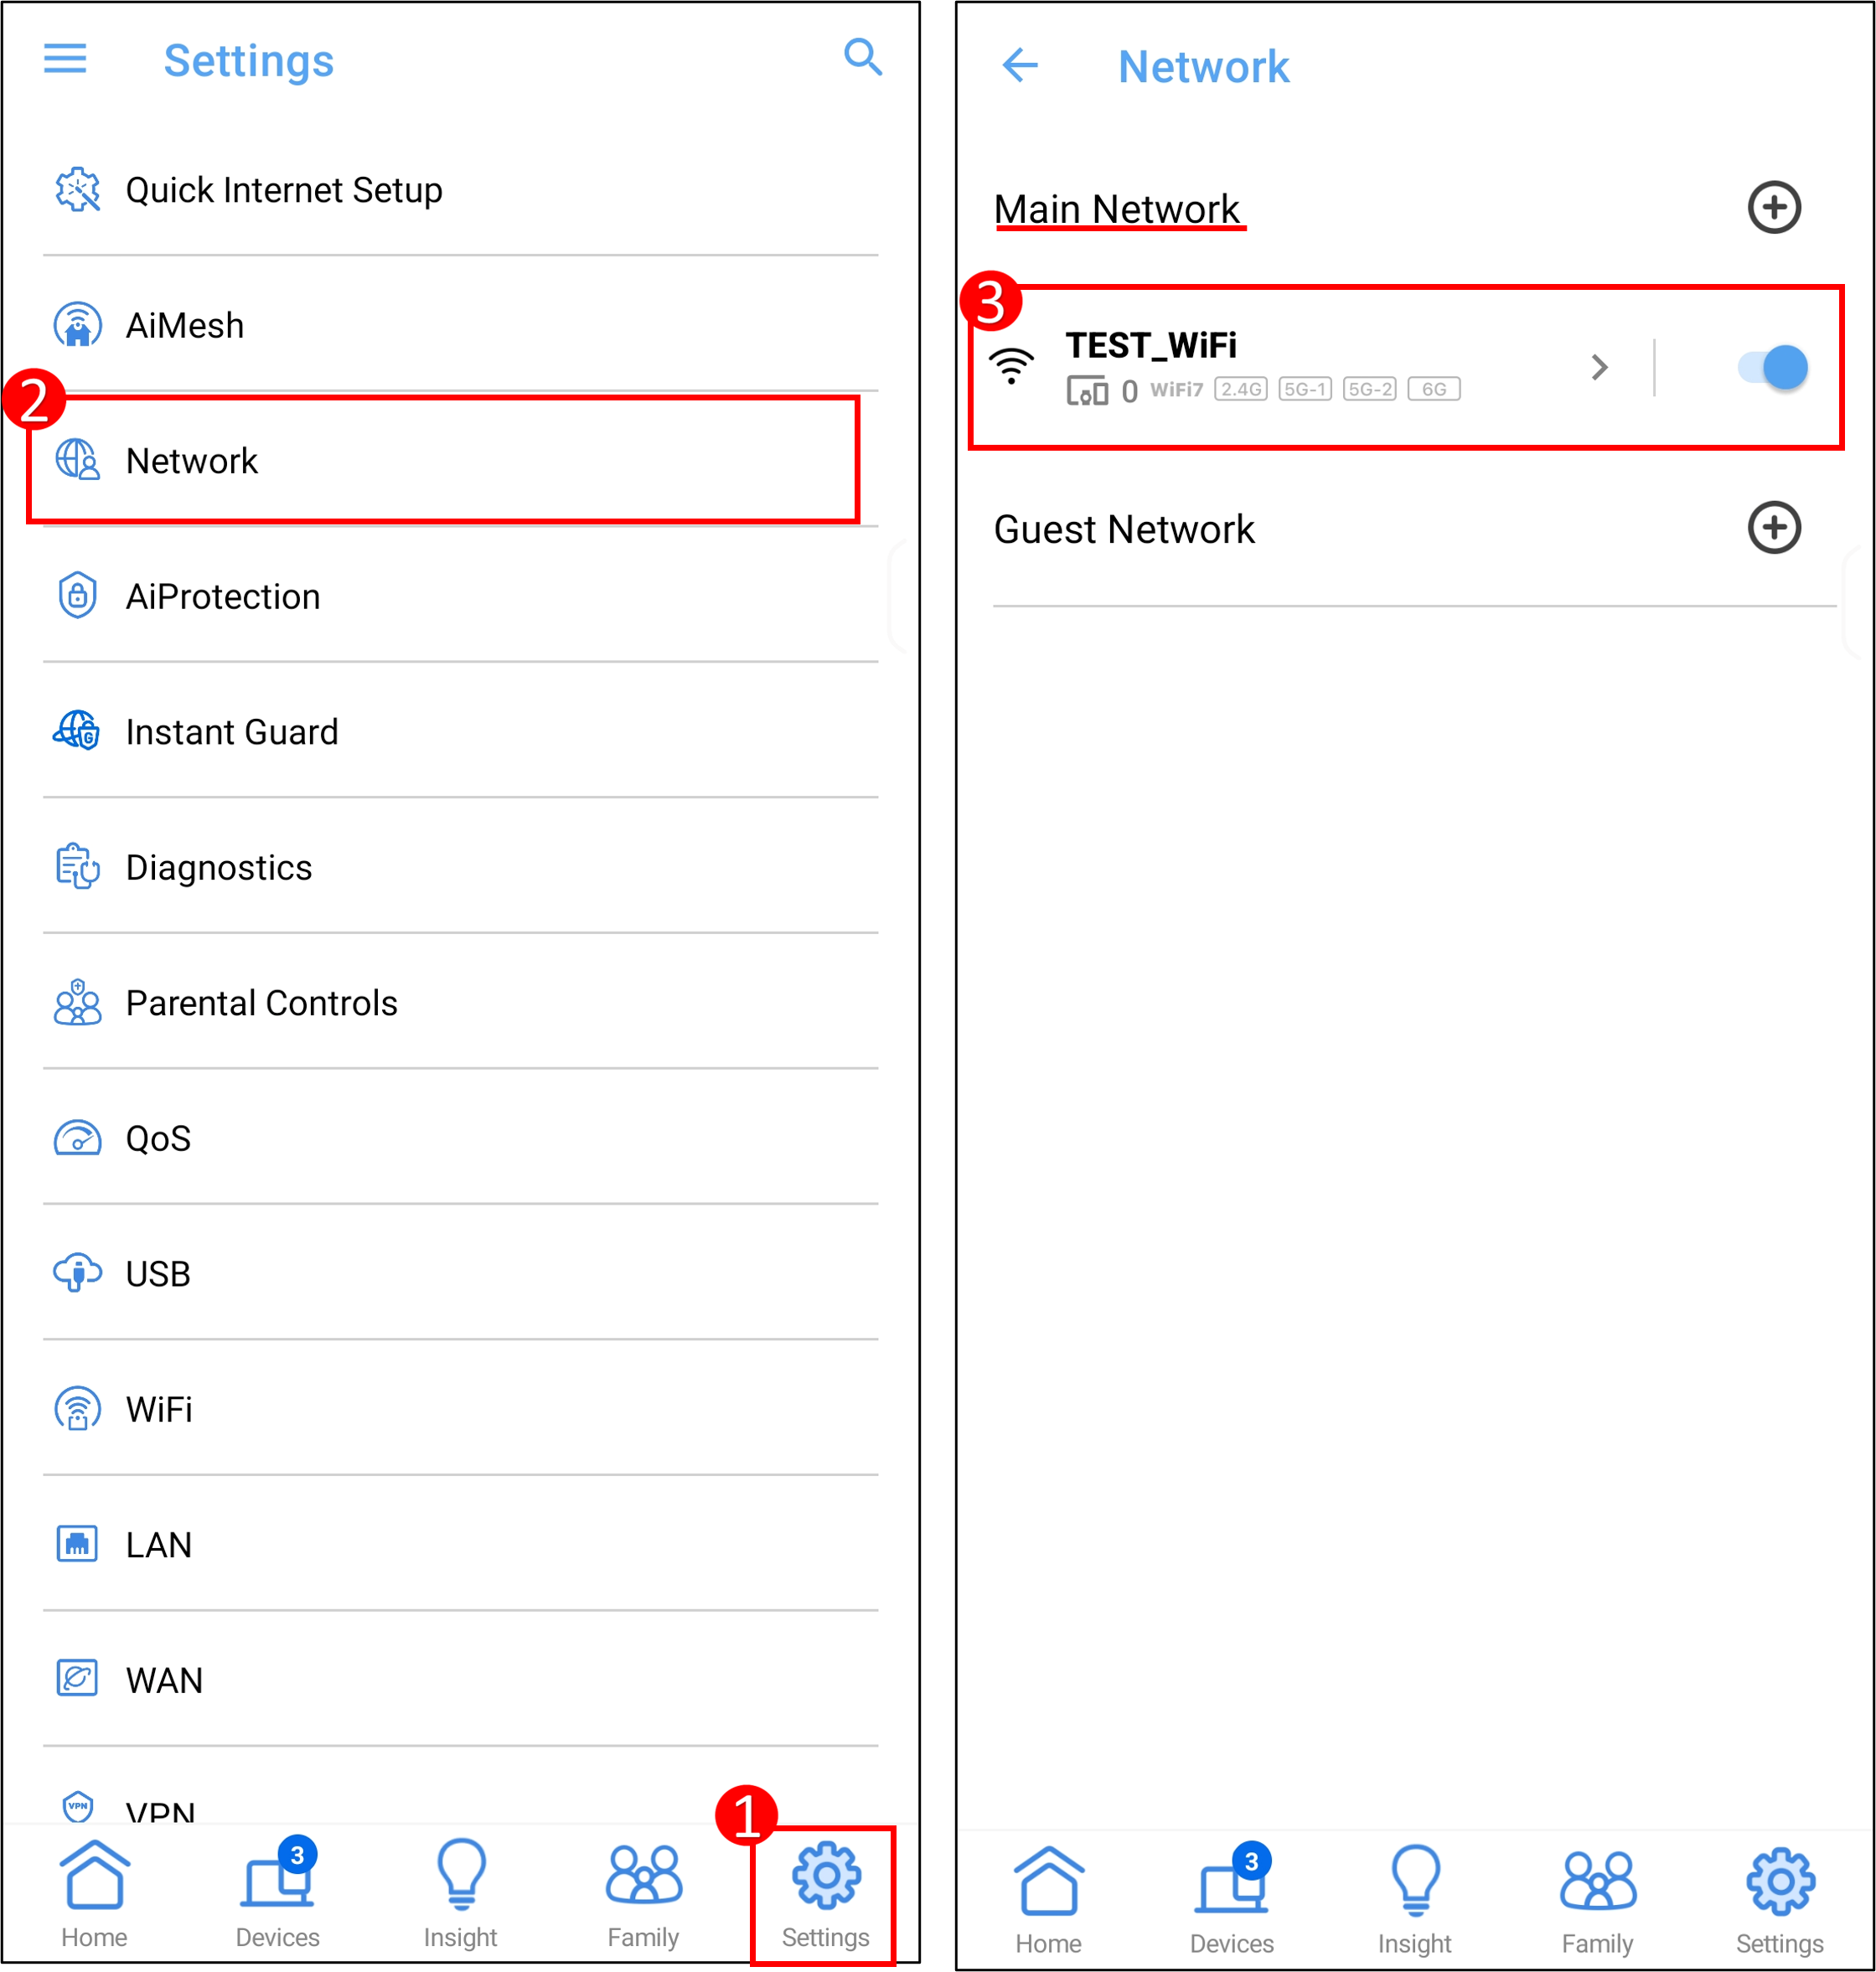
2. Select all WiFi bands, and then tap [Apply] to save the settings.
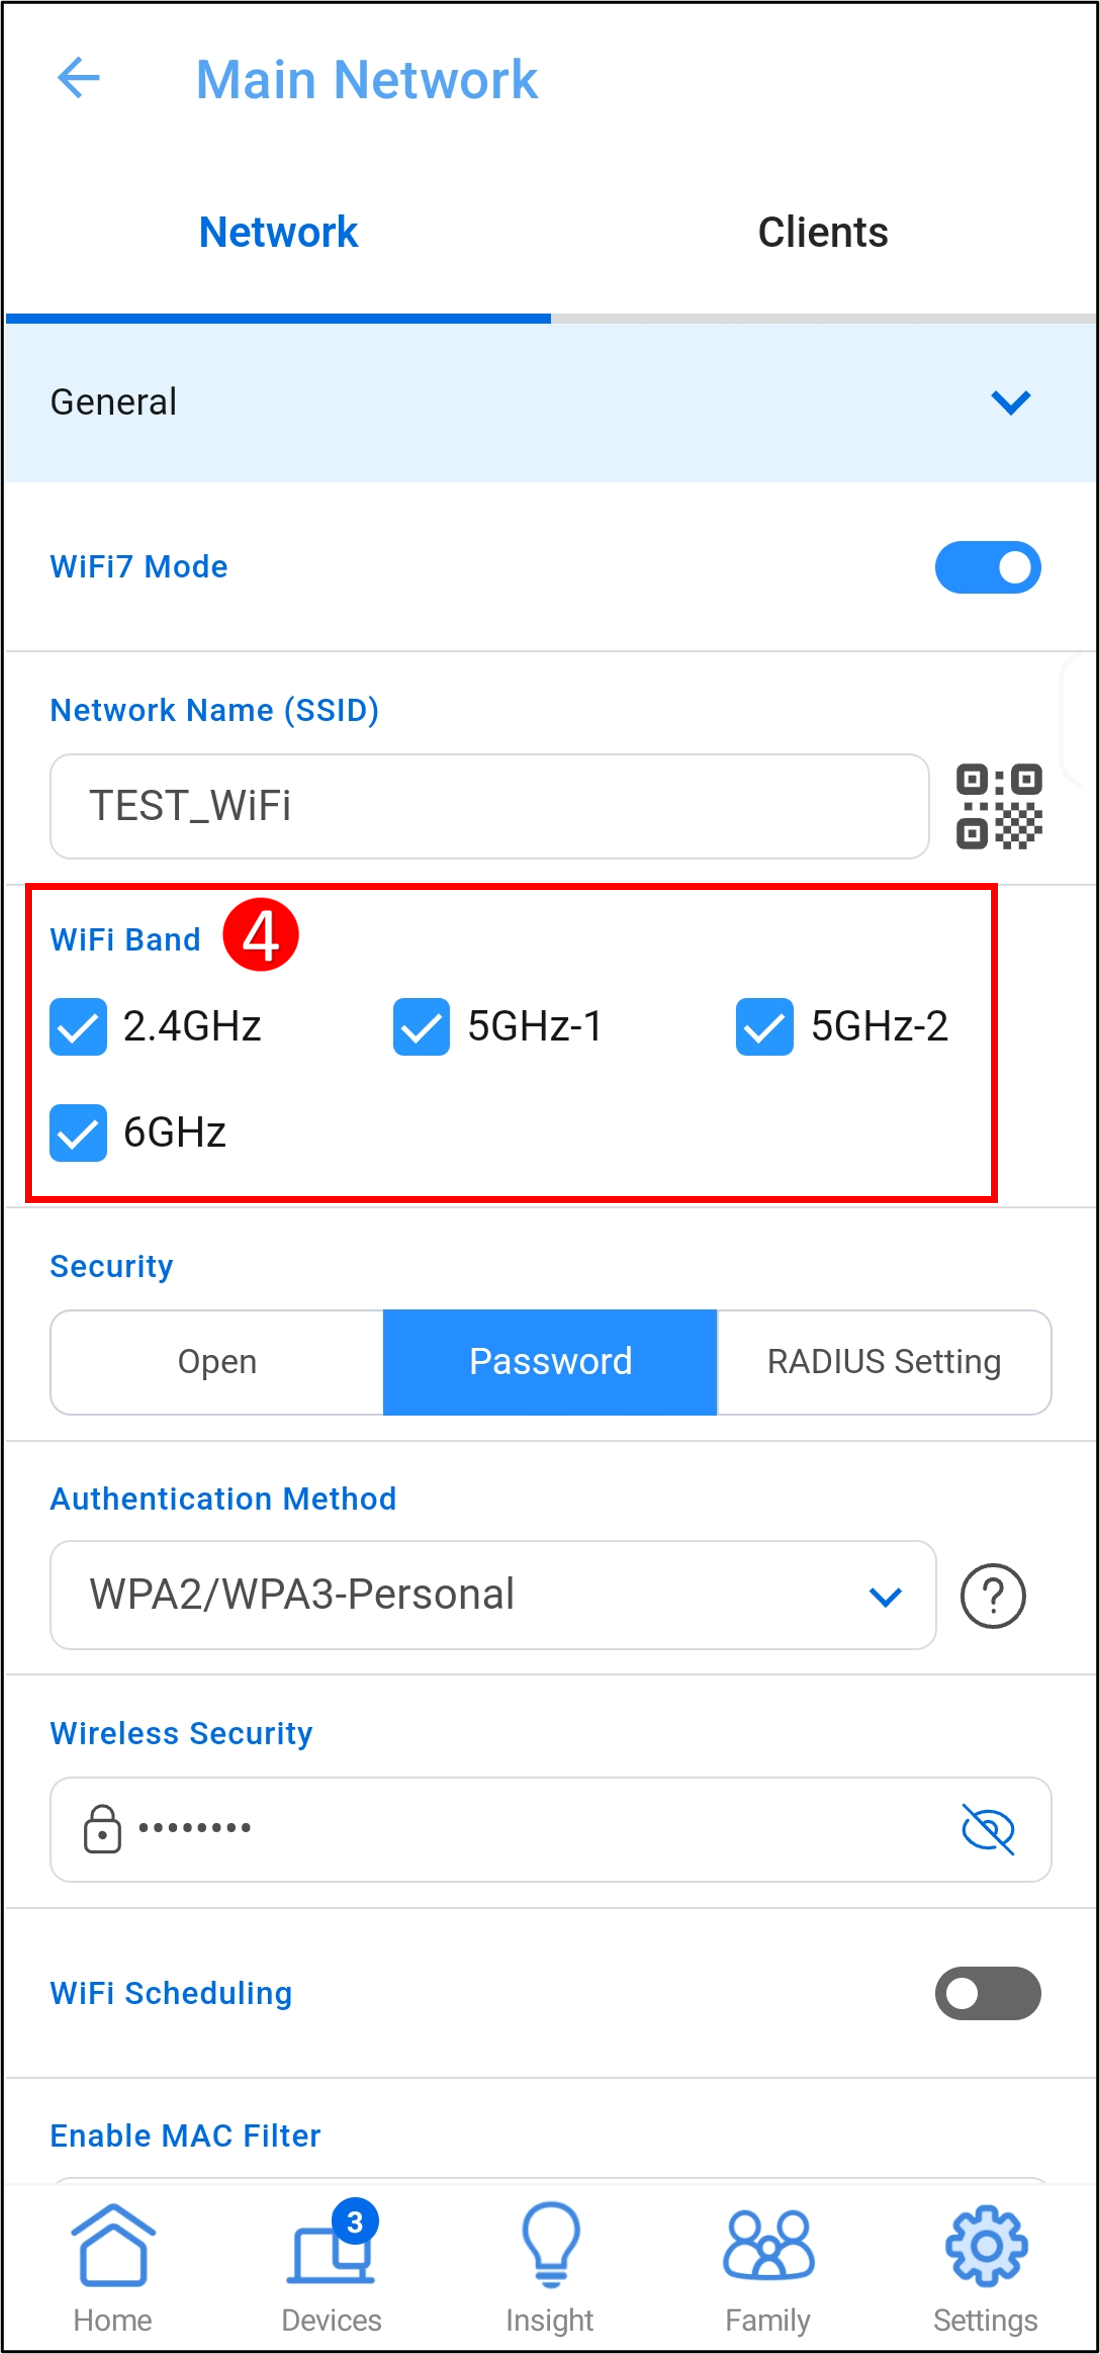
3. All WiFi bands will use the same WiFi name and password.(Smart Connect has been enabled.)
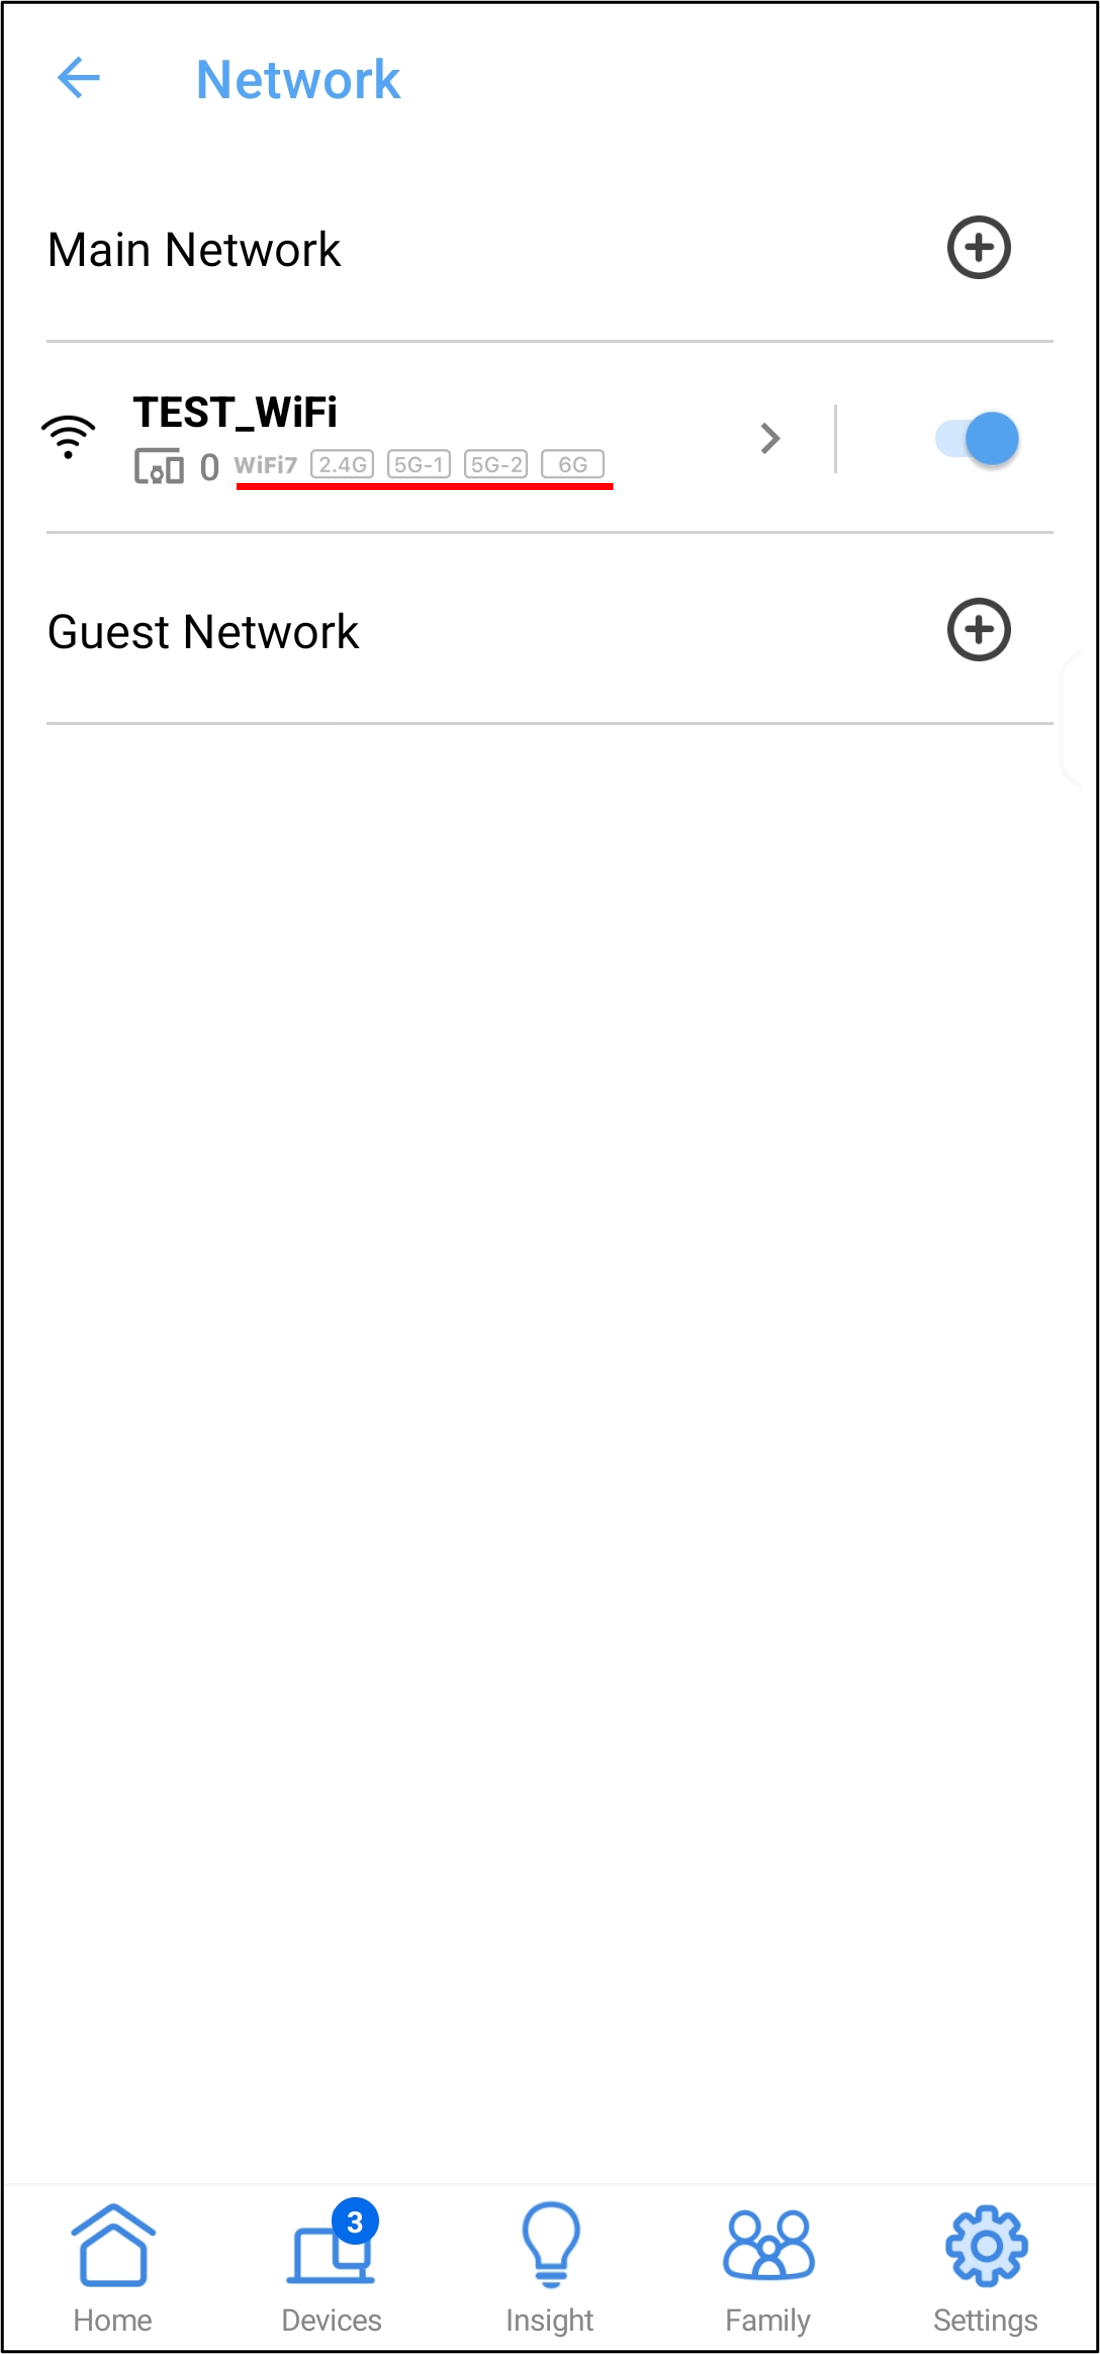
- If you need to turn off Smart Connect, you can set different WiFi names and passwords for different WiFi bands.
(1). Login to App and tap [ Settings ] > [ Network ] > [ Main network profile ].

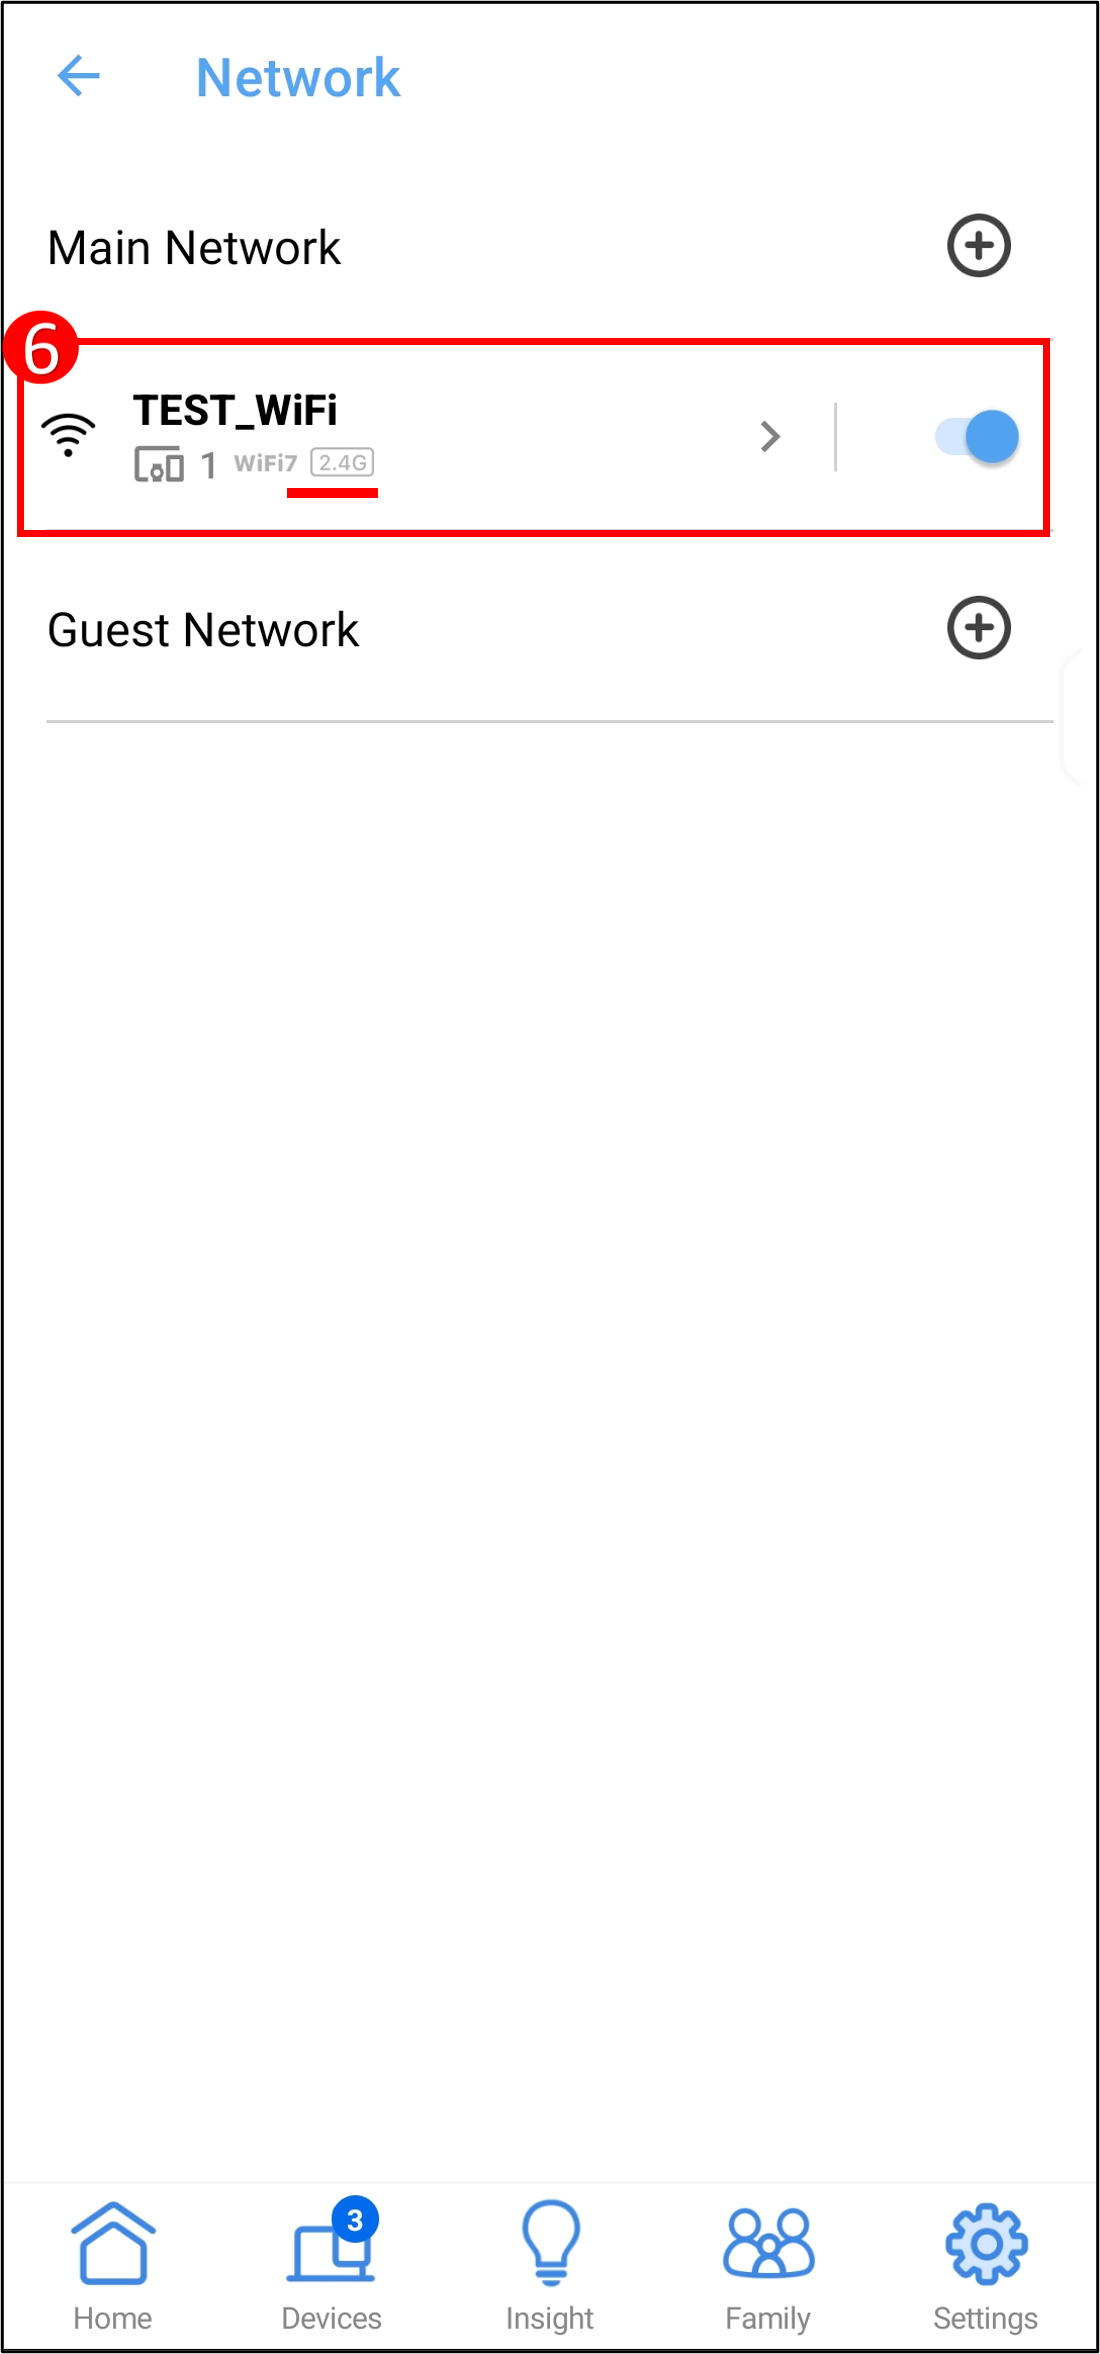
(2) For example, if you want to add a new 2.4GHz WiFi band, keep 2.4GHz, unchecked other WiFi bands, and then tap [Apply] to save the settings.
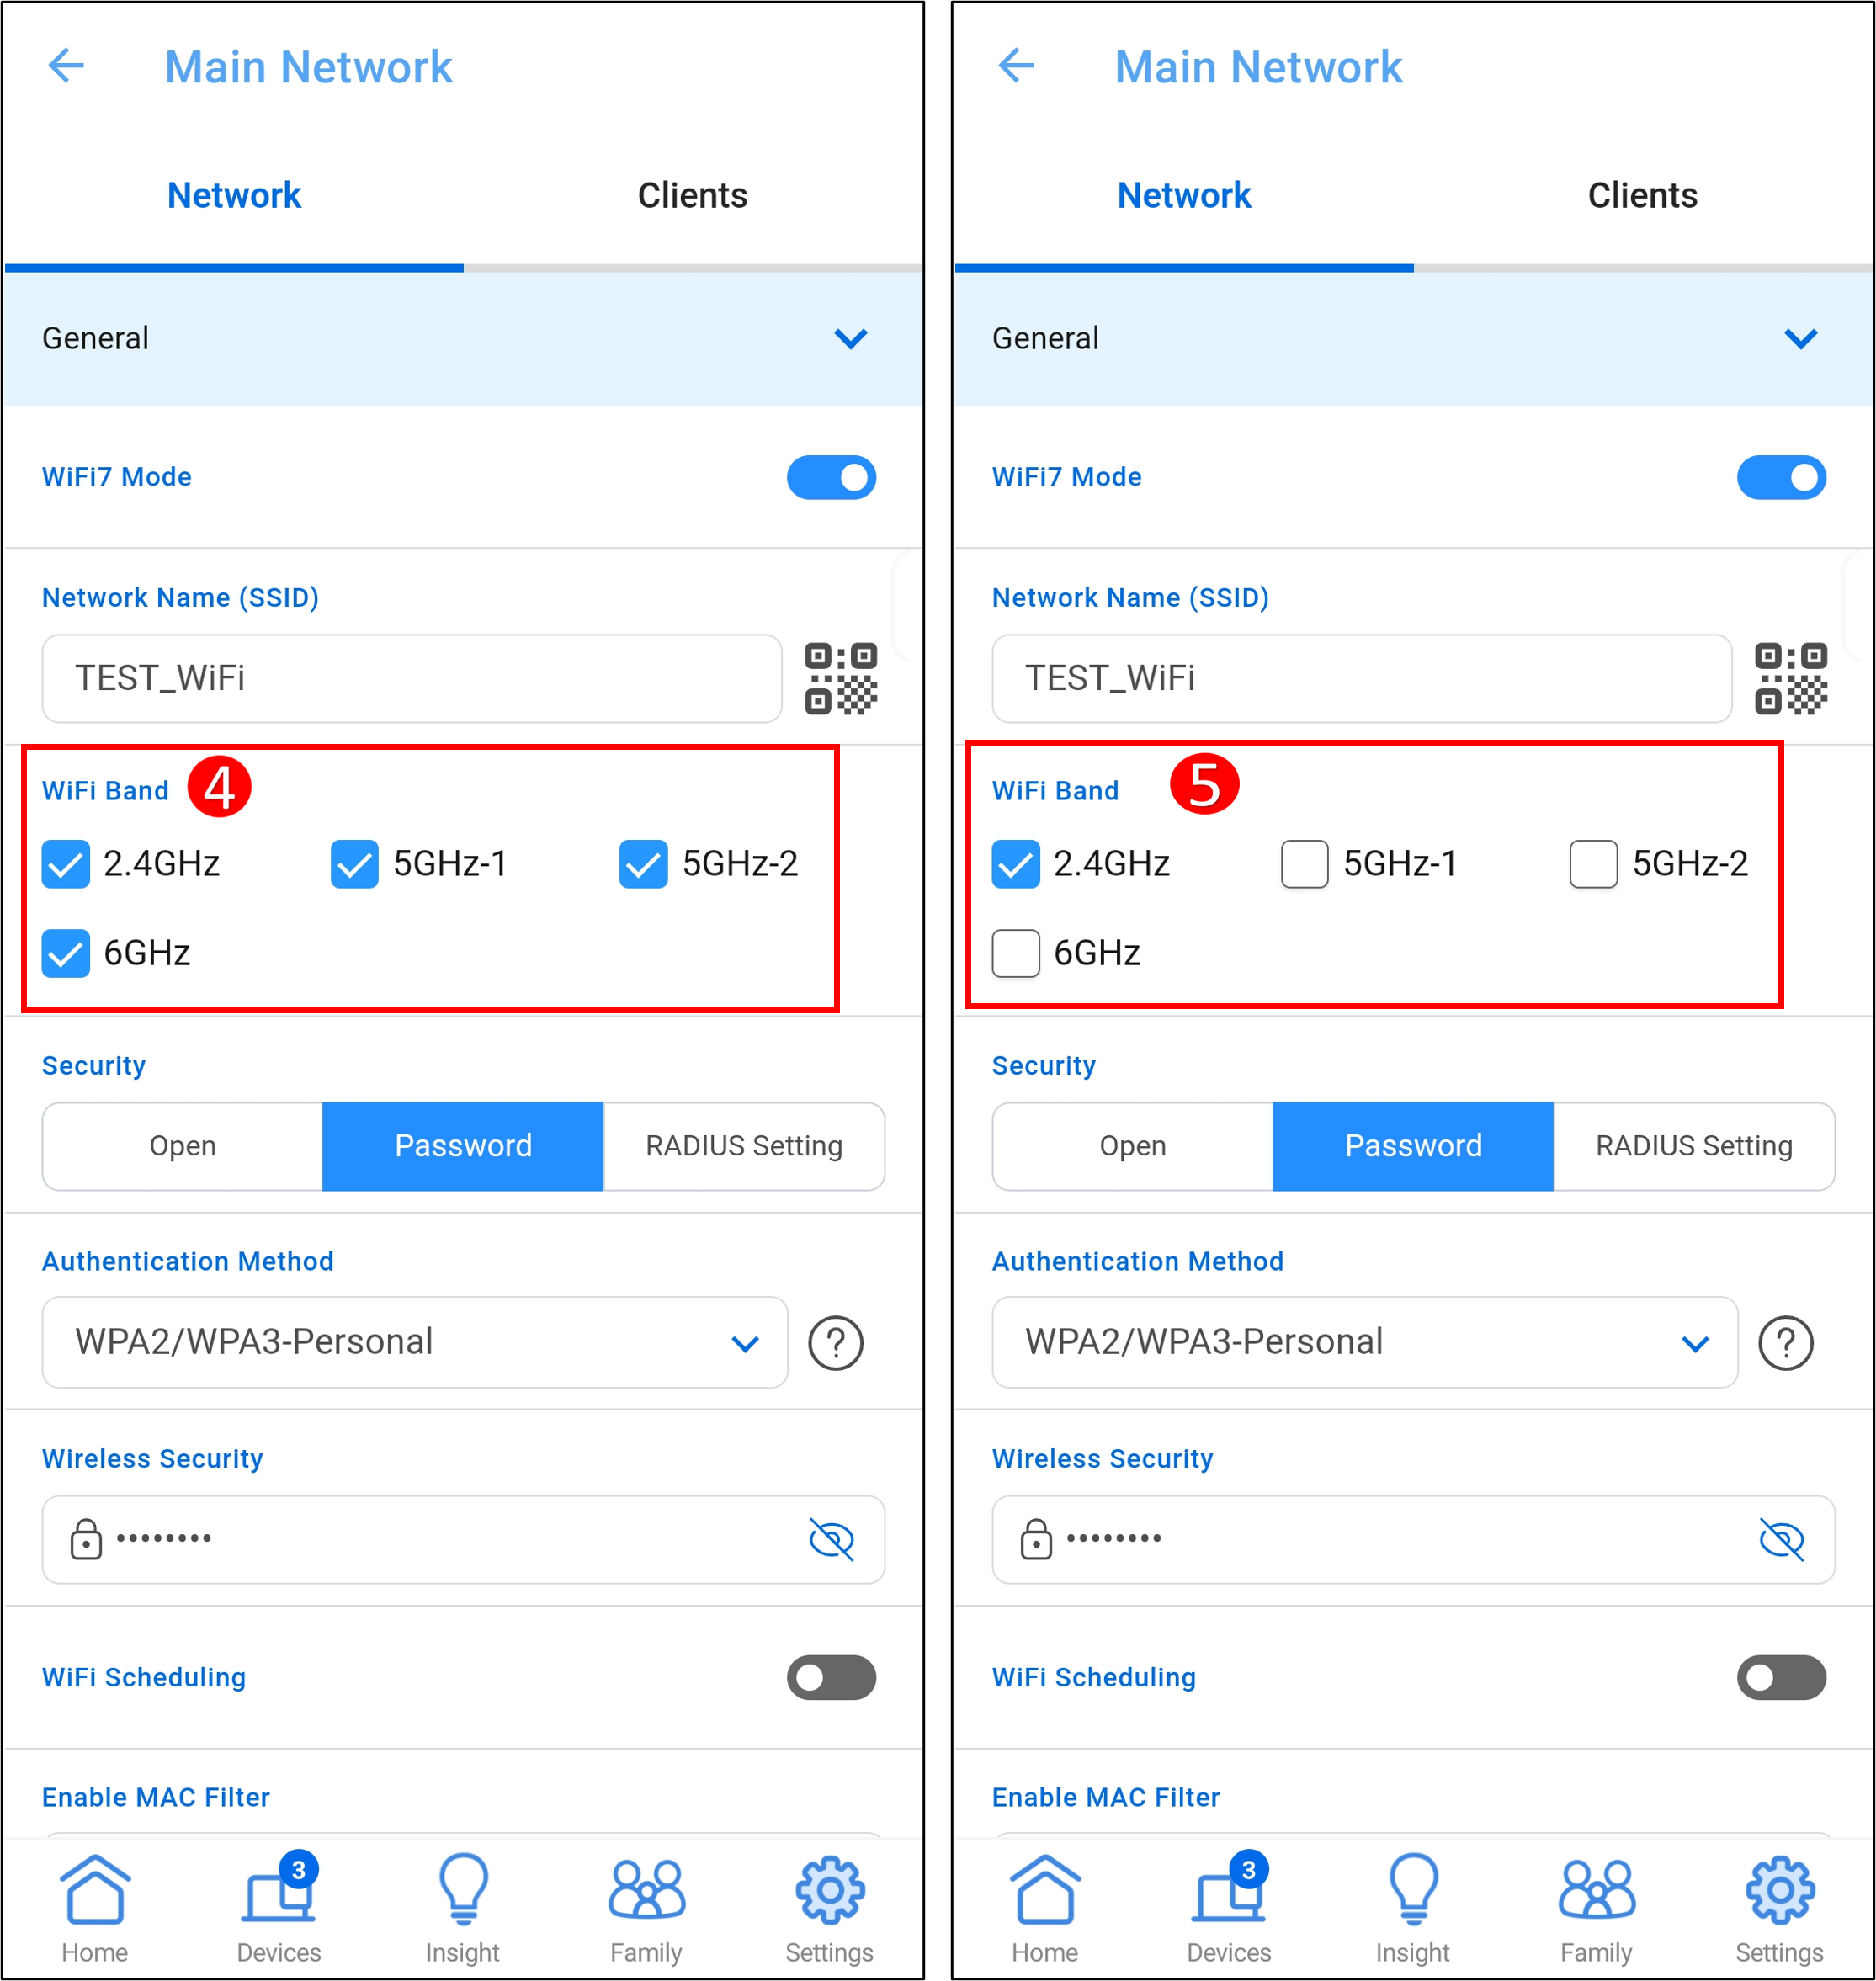
(3). As shown in the figure below, the WiFi network is in the 2.4GHz WiFi band, that is, the Smart Connect is turned off.
- For more information about how to add other WiFi bands (WiFi name), see the following example:
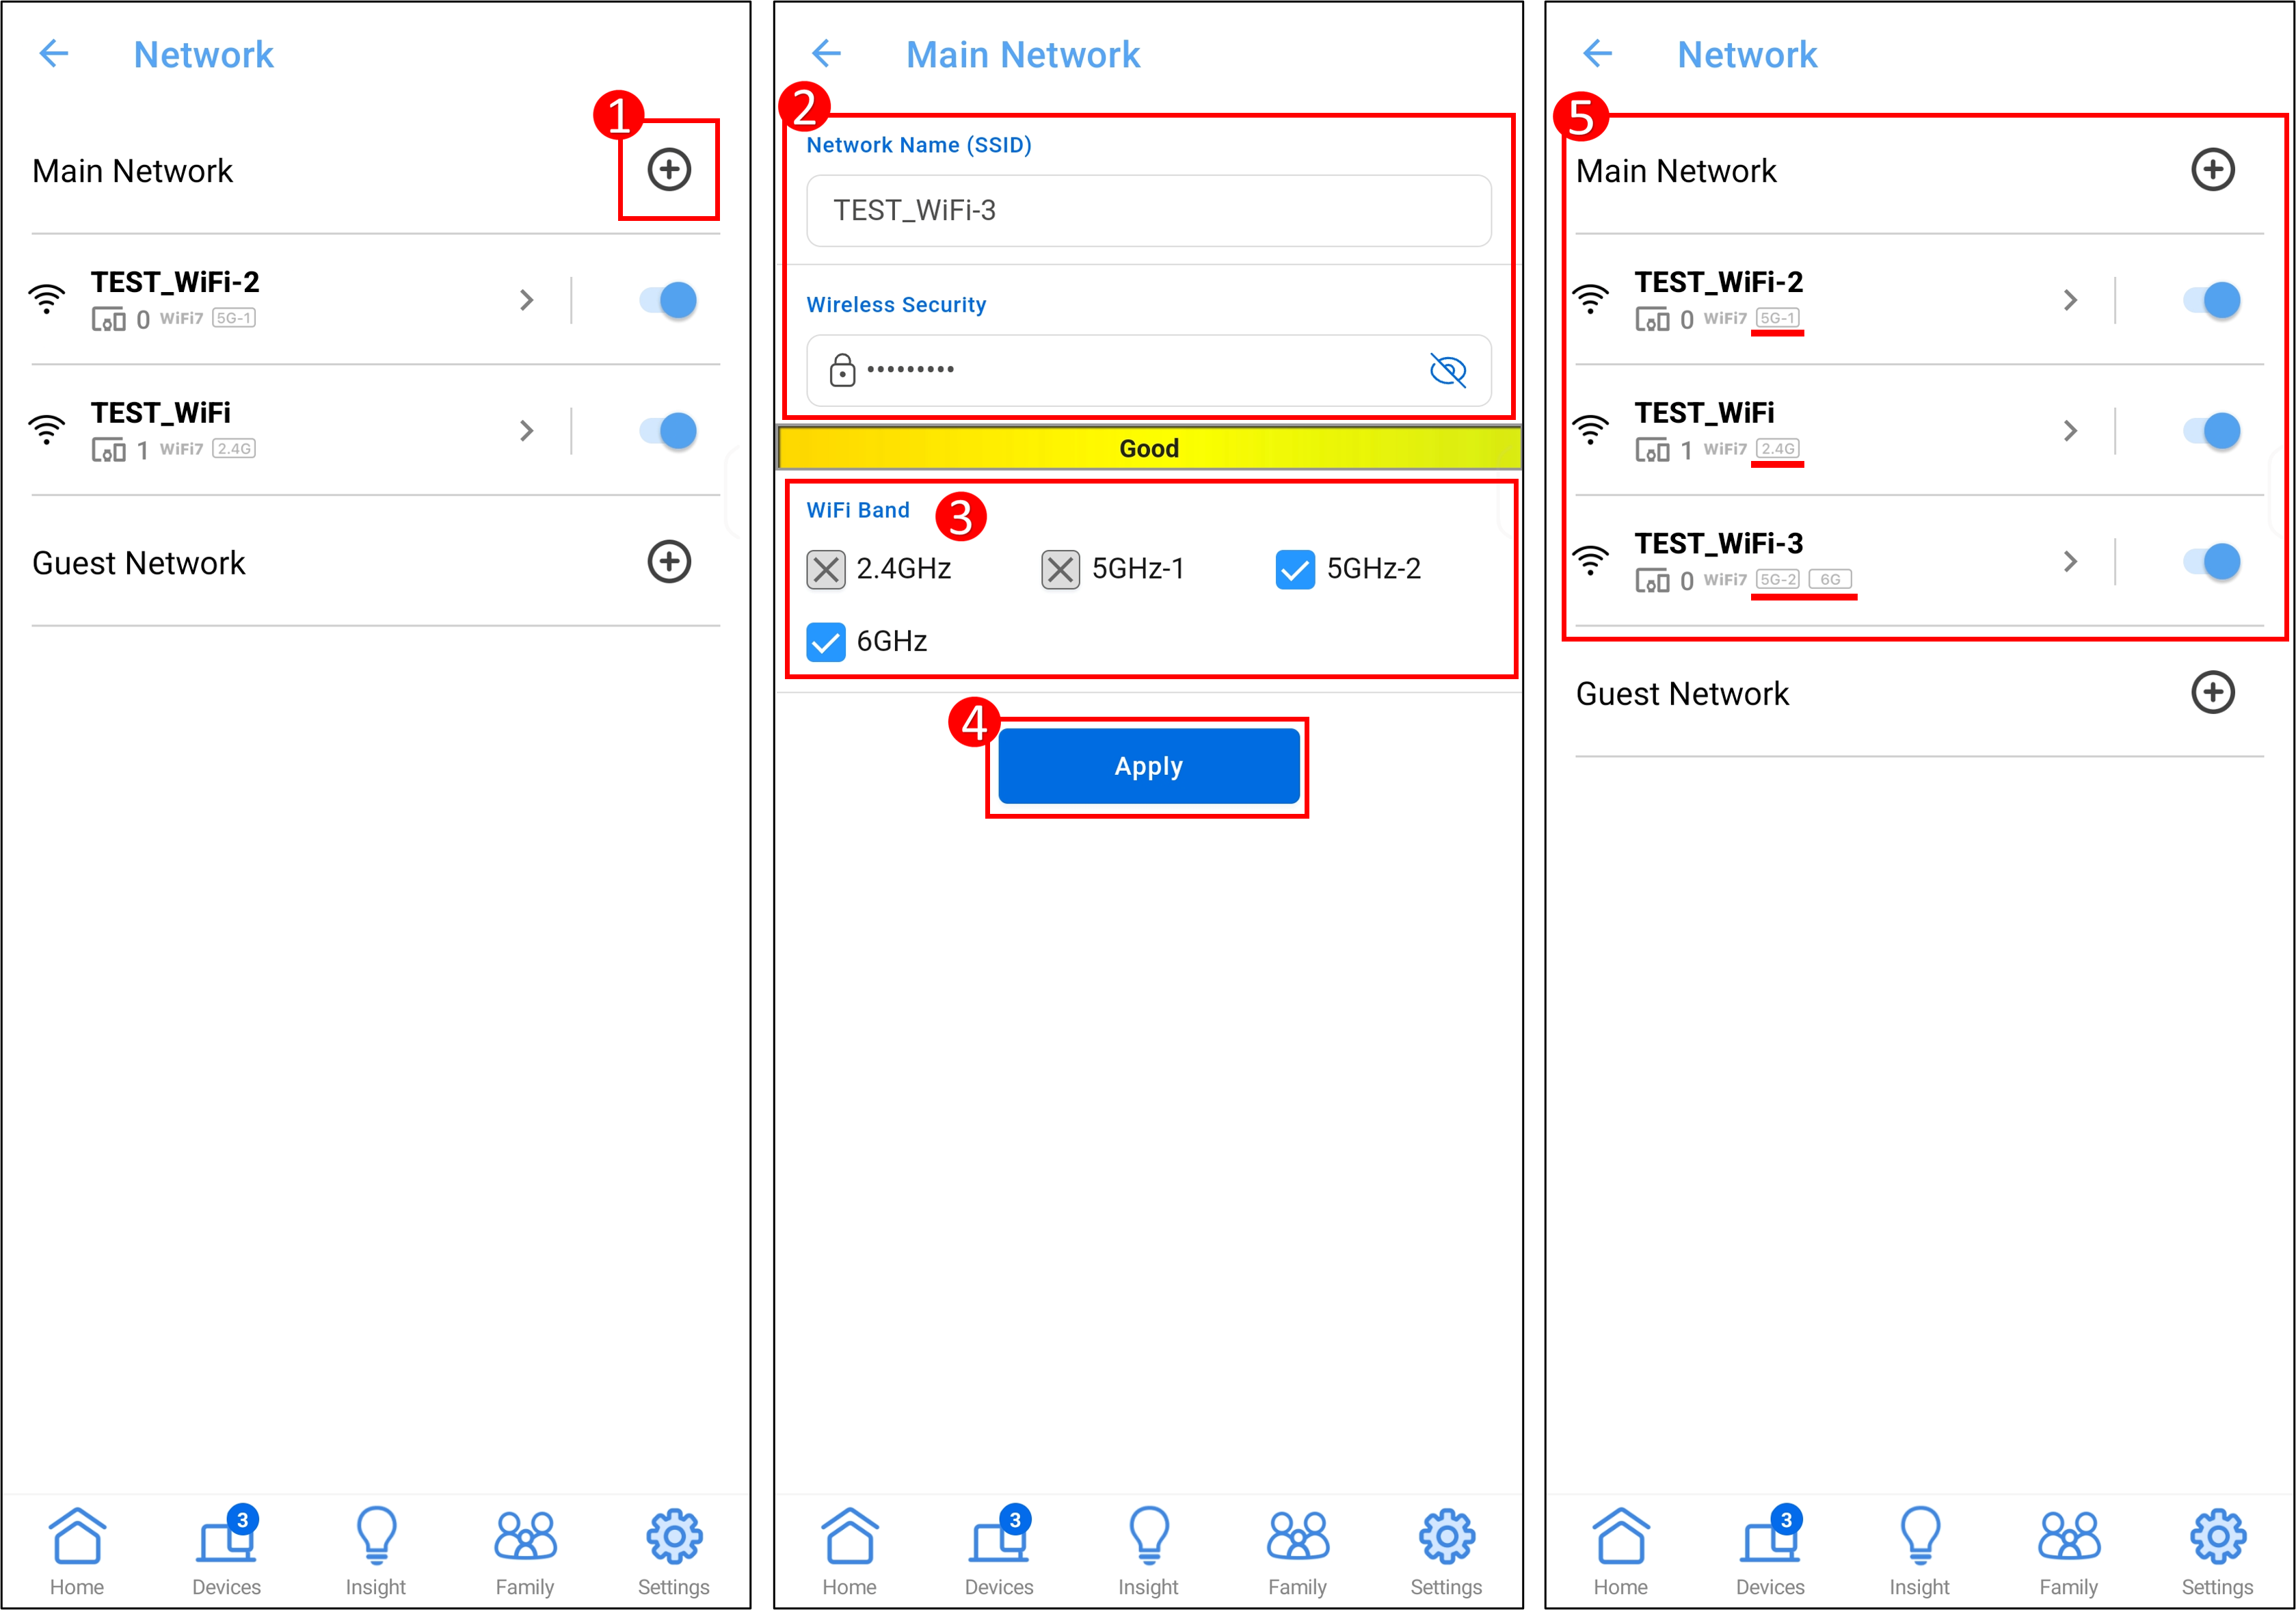
Tap the [+] icon on the right side of Main Network to add a WiFi network, set the network name and password, select one or more WiFi bands, and tap [Apply] to save the settings to complete the new WiFi network.
Note: To delete a WiFi network from Main Network, go to the WiFi network profile > and tap [Delete] to finish.
B. Use the ASUS router Web GUI to enable Smart Connect
1. Connect your laptop to the router via wired or Wi-Fi connection and enter your router LAN IP or router URL http://www.asusrouter.com to the WEB GUI.

Please refer to How to enter the router setting page(Web GUI) to learn more.
2. Key in your router's username and password to log in.
Note: If you forget the user name and/or password, please restore the router to the factory default status and setup.
Please refer to [Wireless Router] How to reset the router to factory default setting? for how to restore the router to default status.
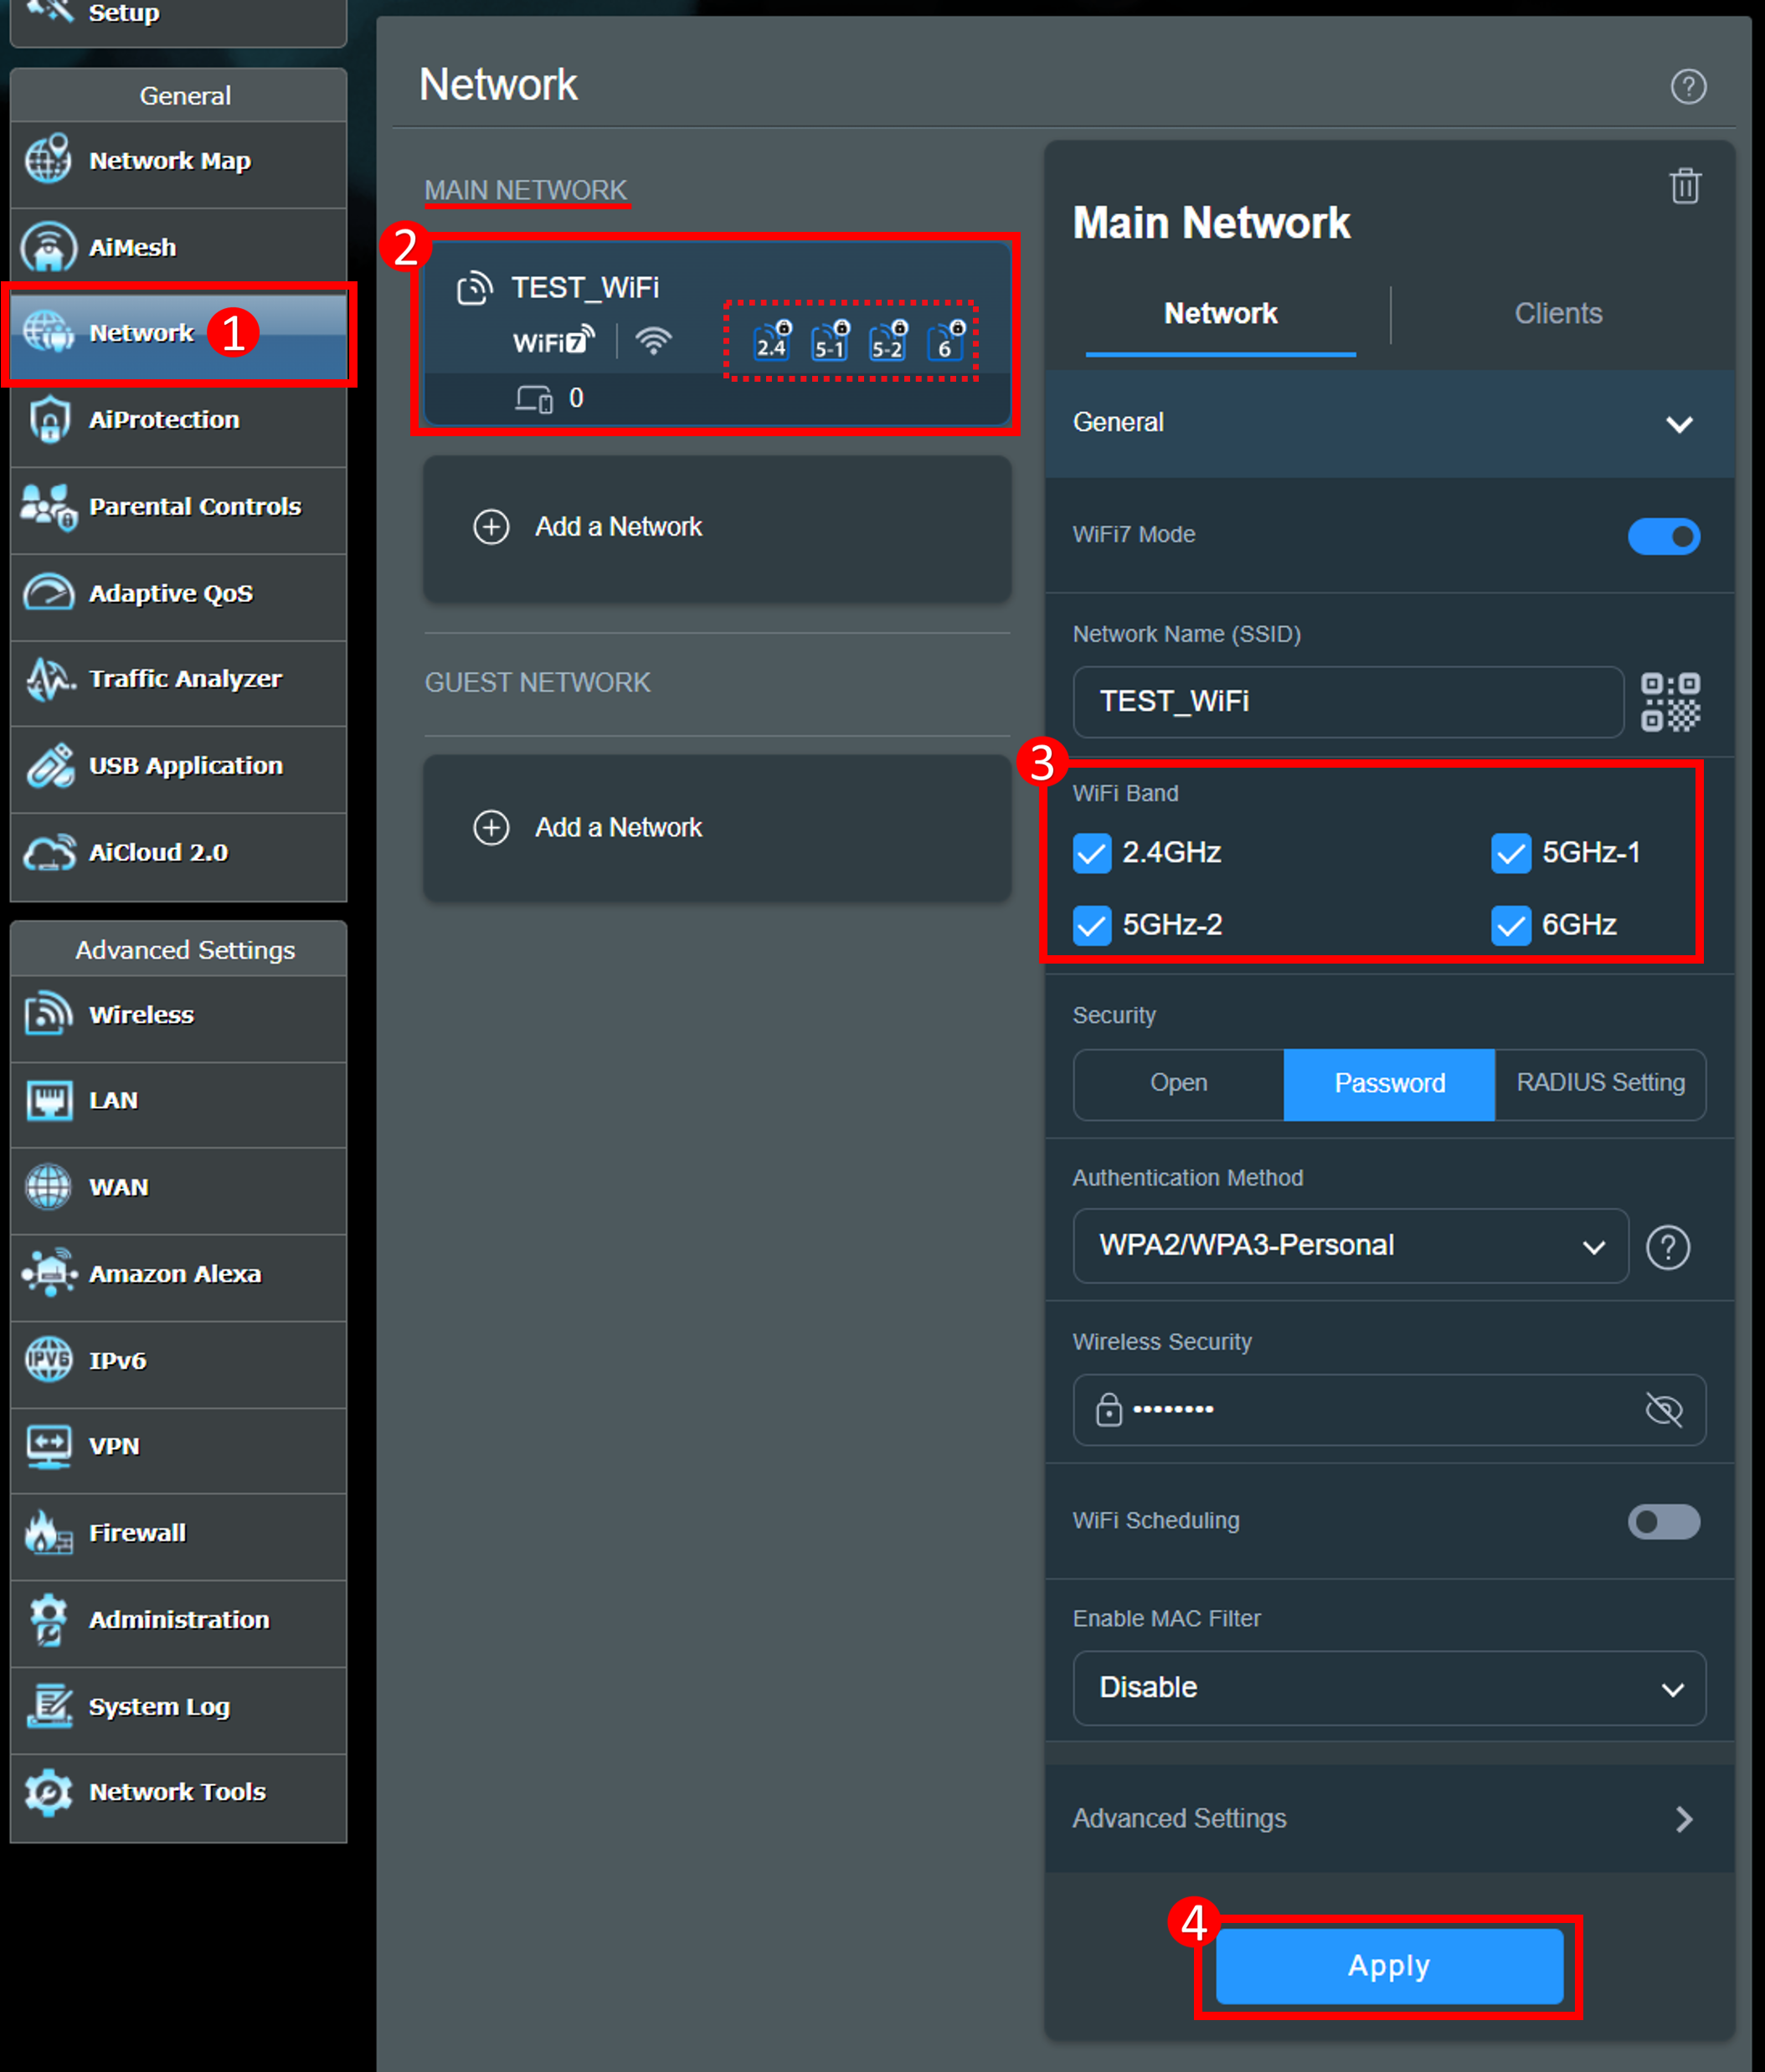
3. Go to [ Network ] > [ Main network profile ] > select all WiFi bands, and then click [Apply] to save the settings.
4. All WiFi bands will use the same WiFi name and password.(Smart Connect has been enabled.)
- If you need to turn off Smart Connect, you can set different WiFi names and passwords for different WiFi bands.
(1) For example, if you want to add a new 2.4GHz WiFi band, keep 2.4GHz, uncheck other WiFi bands, and then click [Apply] to save the settings.
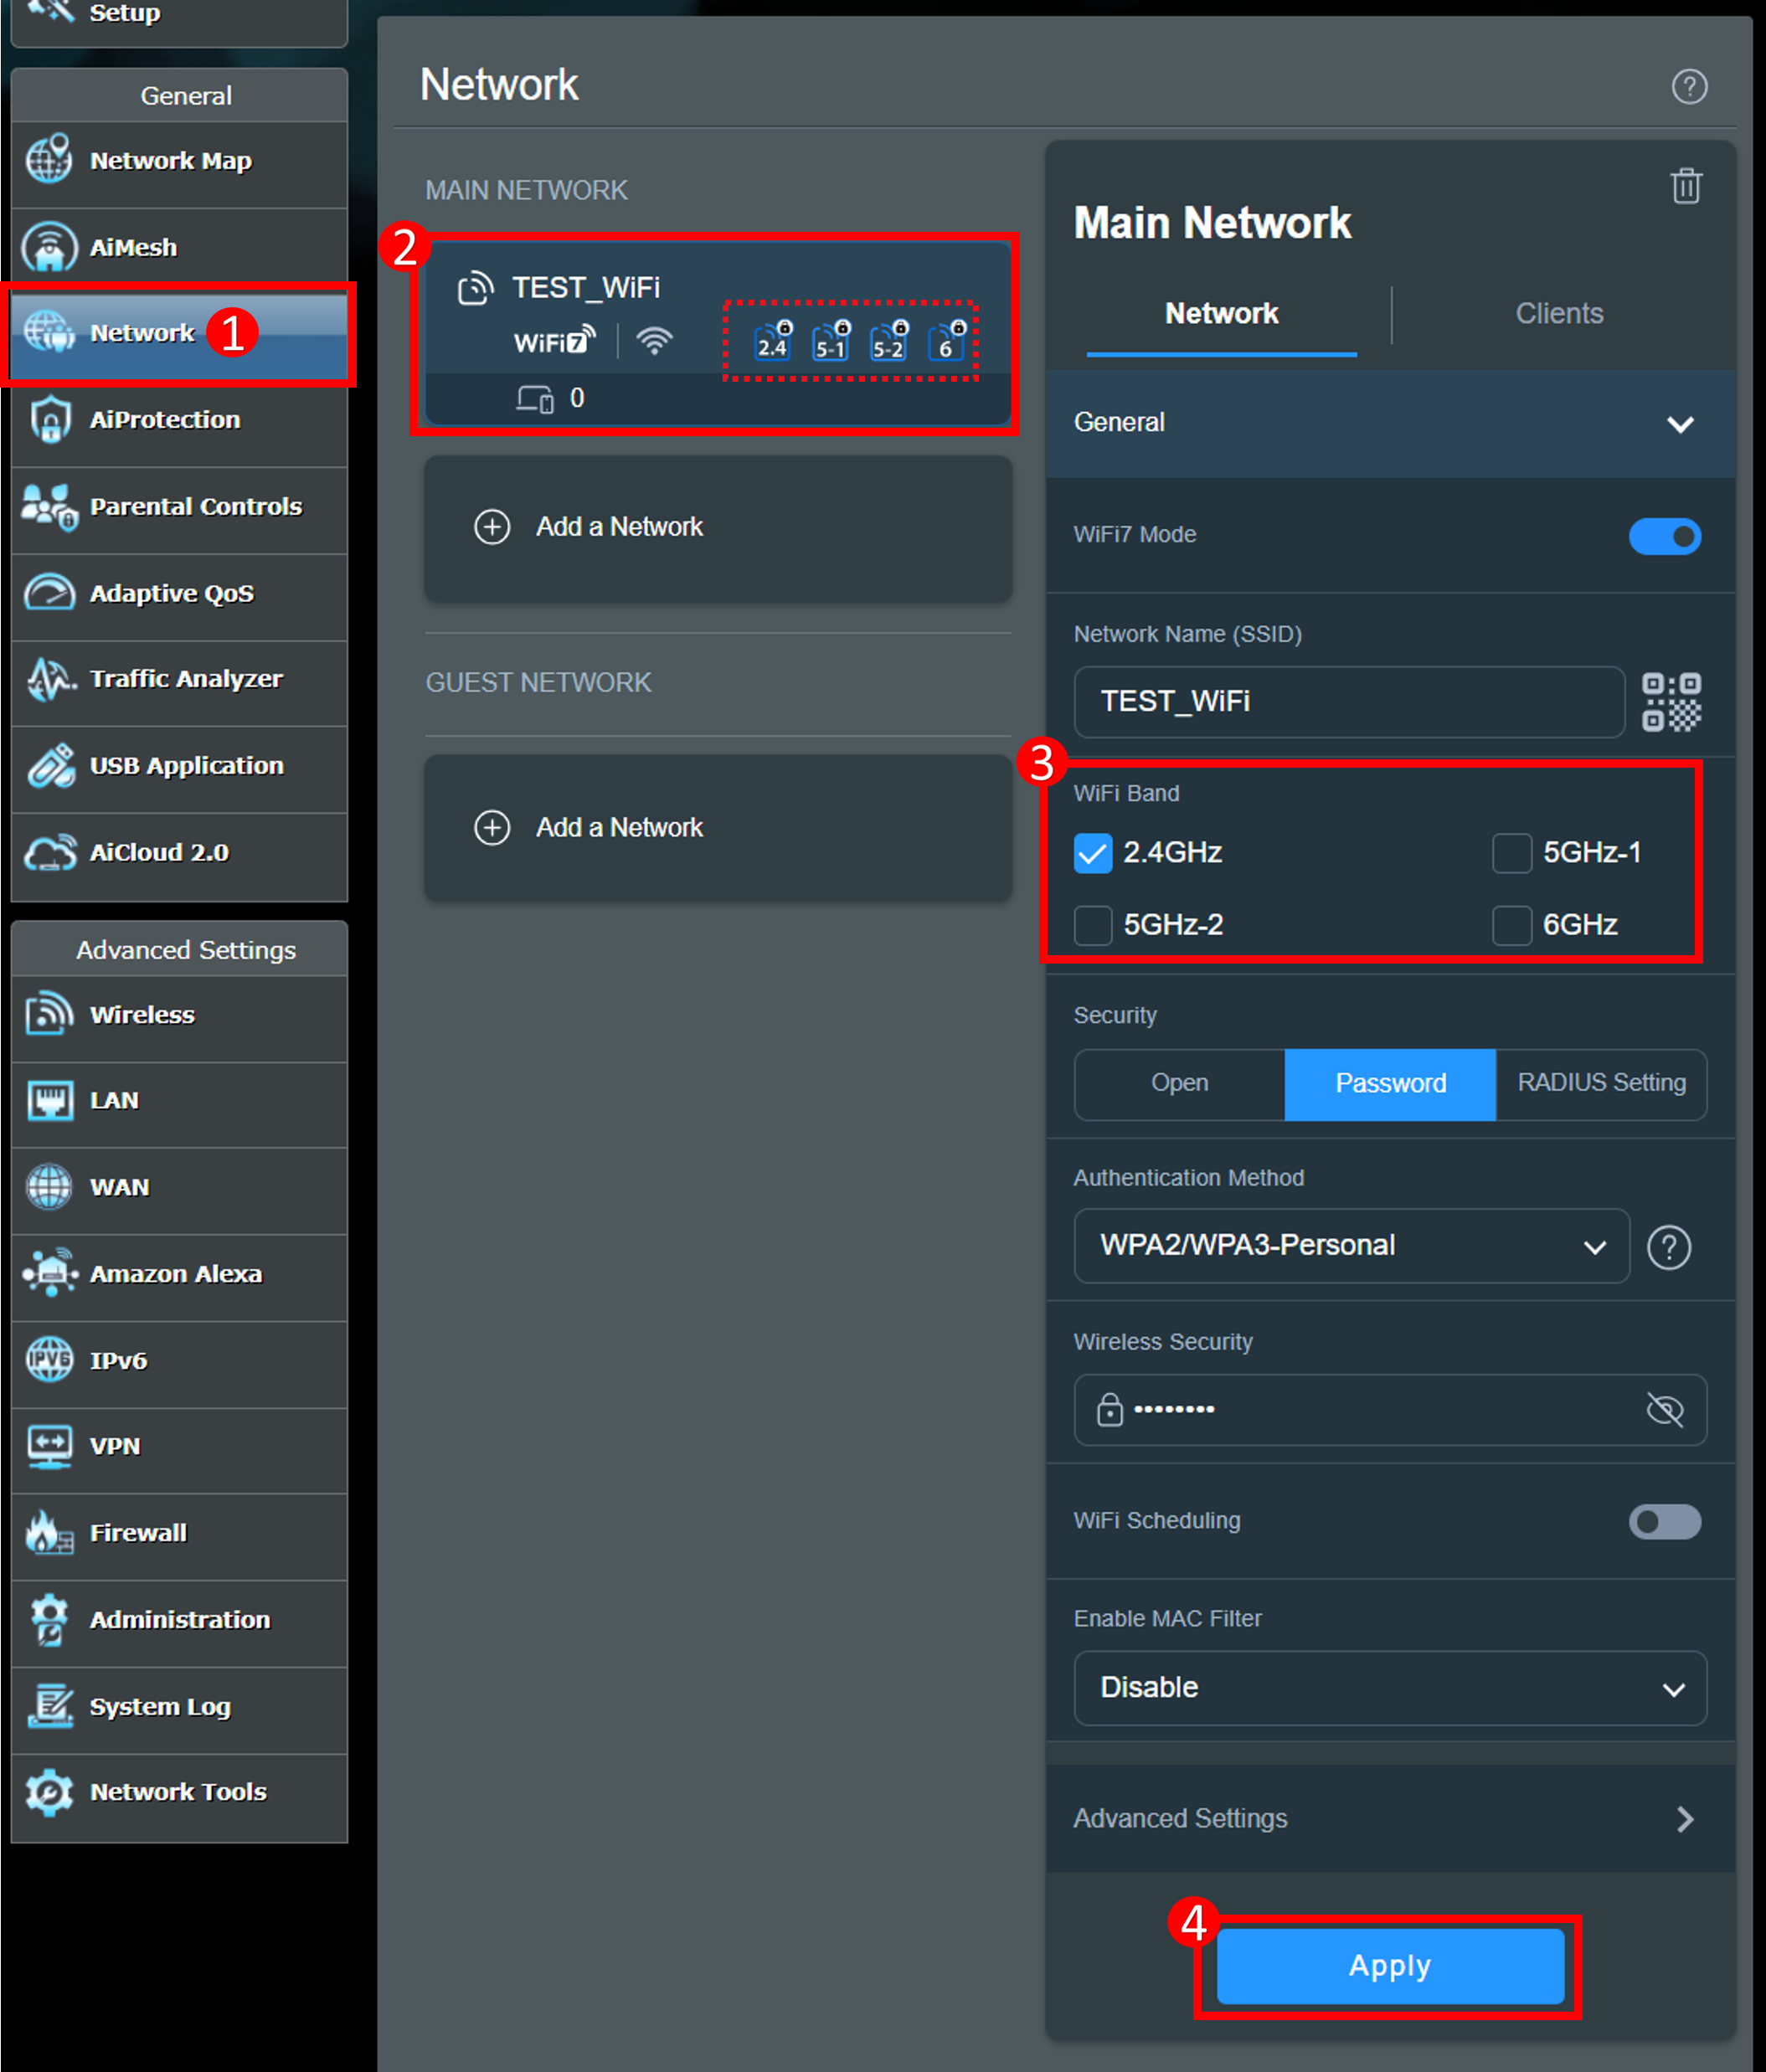
(2) As shown in the figure below, the WiFi network is in the 2.4GHz WiFi band, that is, the Smart Connect is turned off.
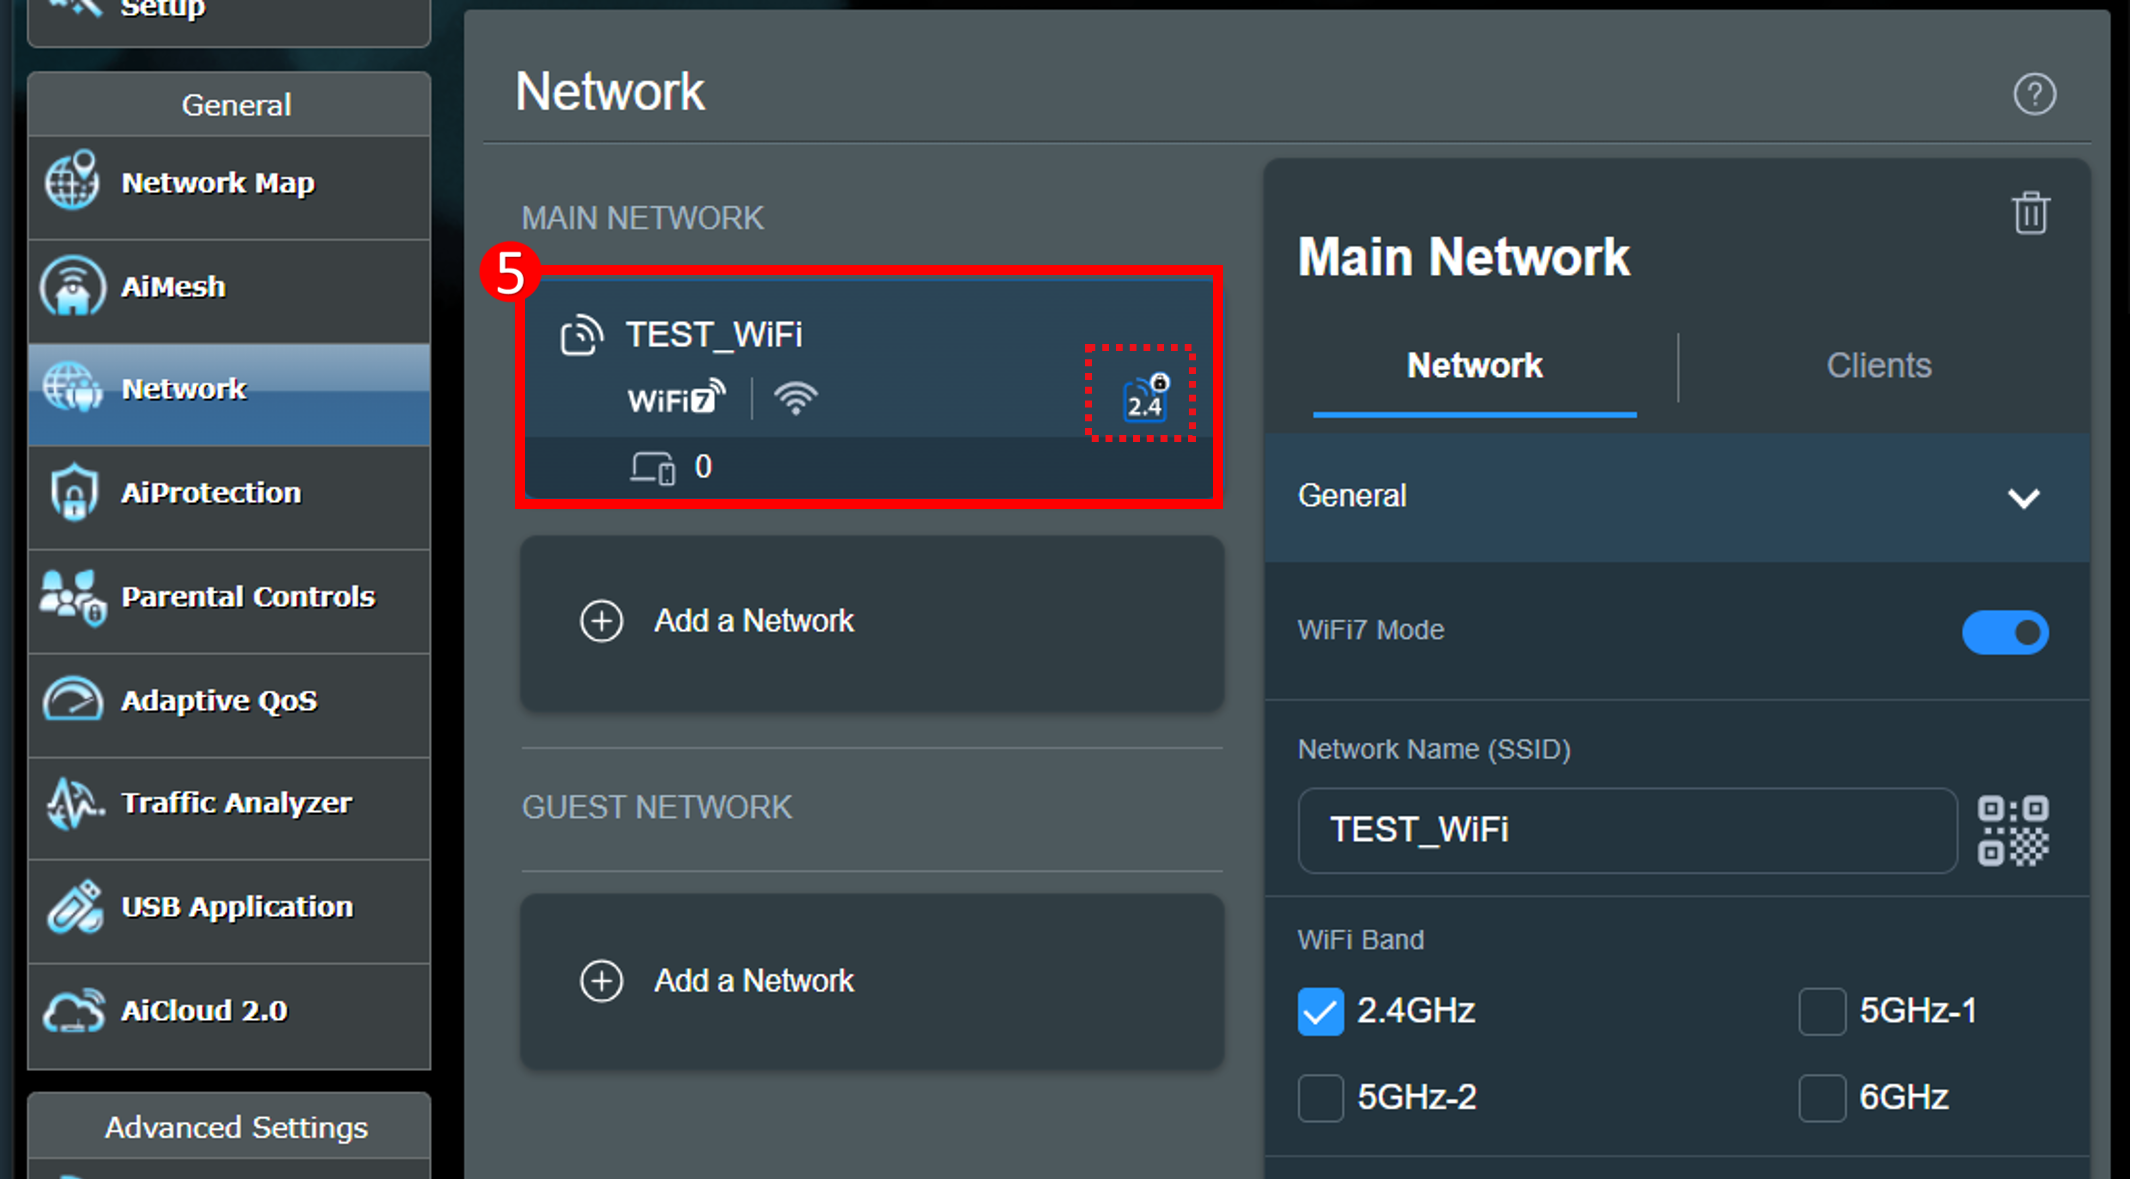
- For more information about how to add other WiFi bands (WiFi name), see the following example:
(1) Click [Network] > [Add Network] under the main network.
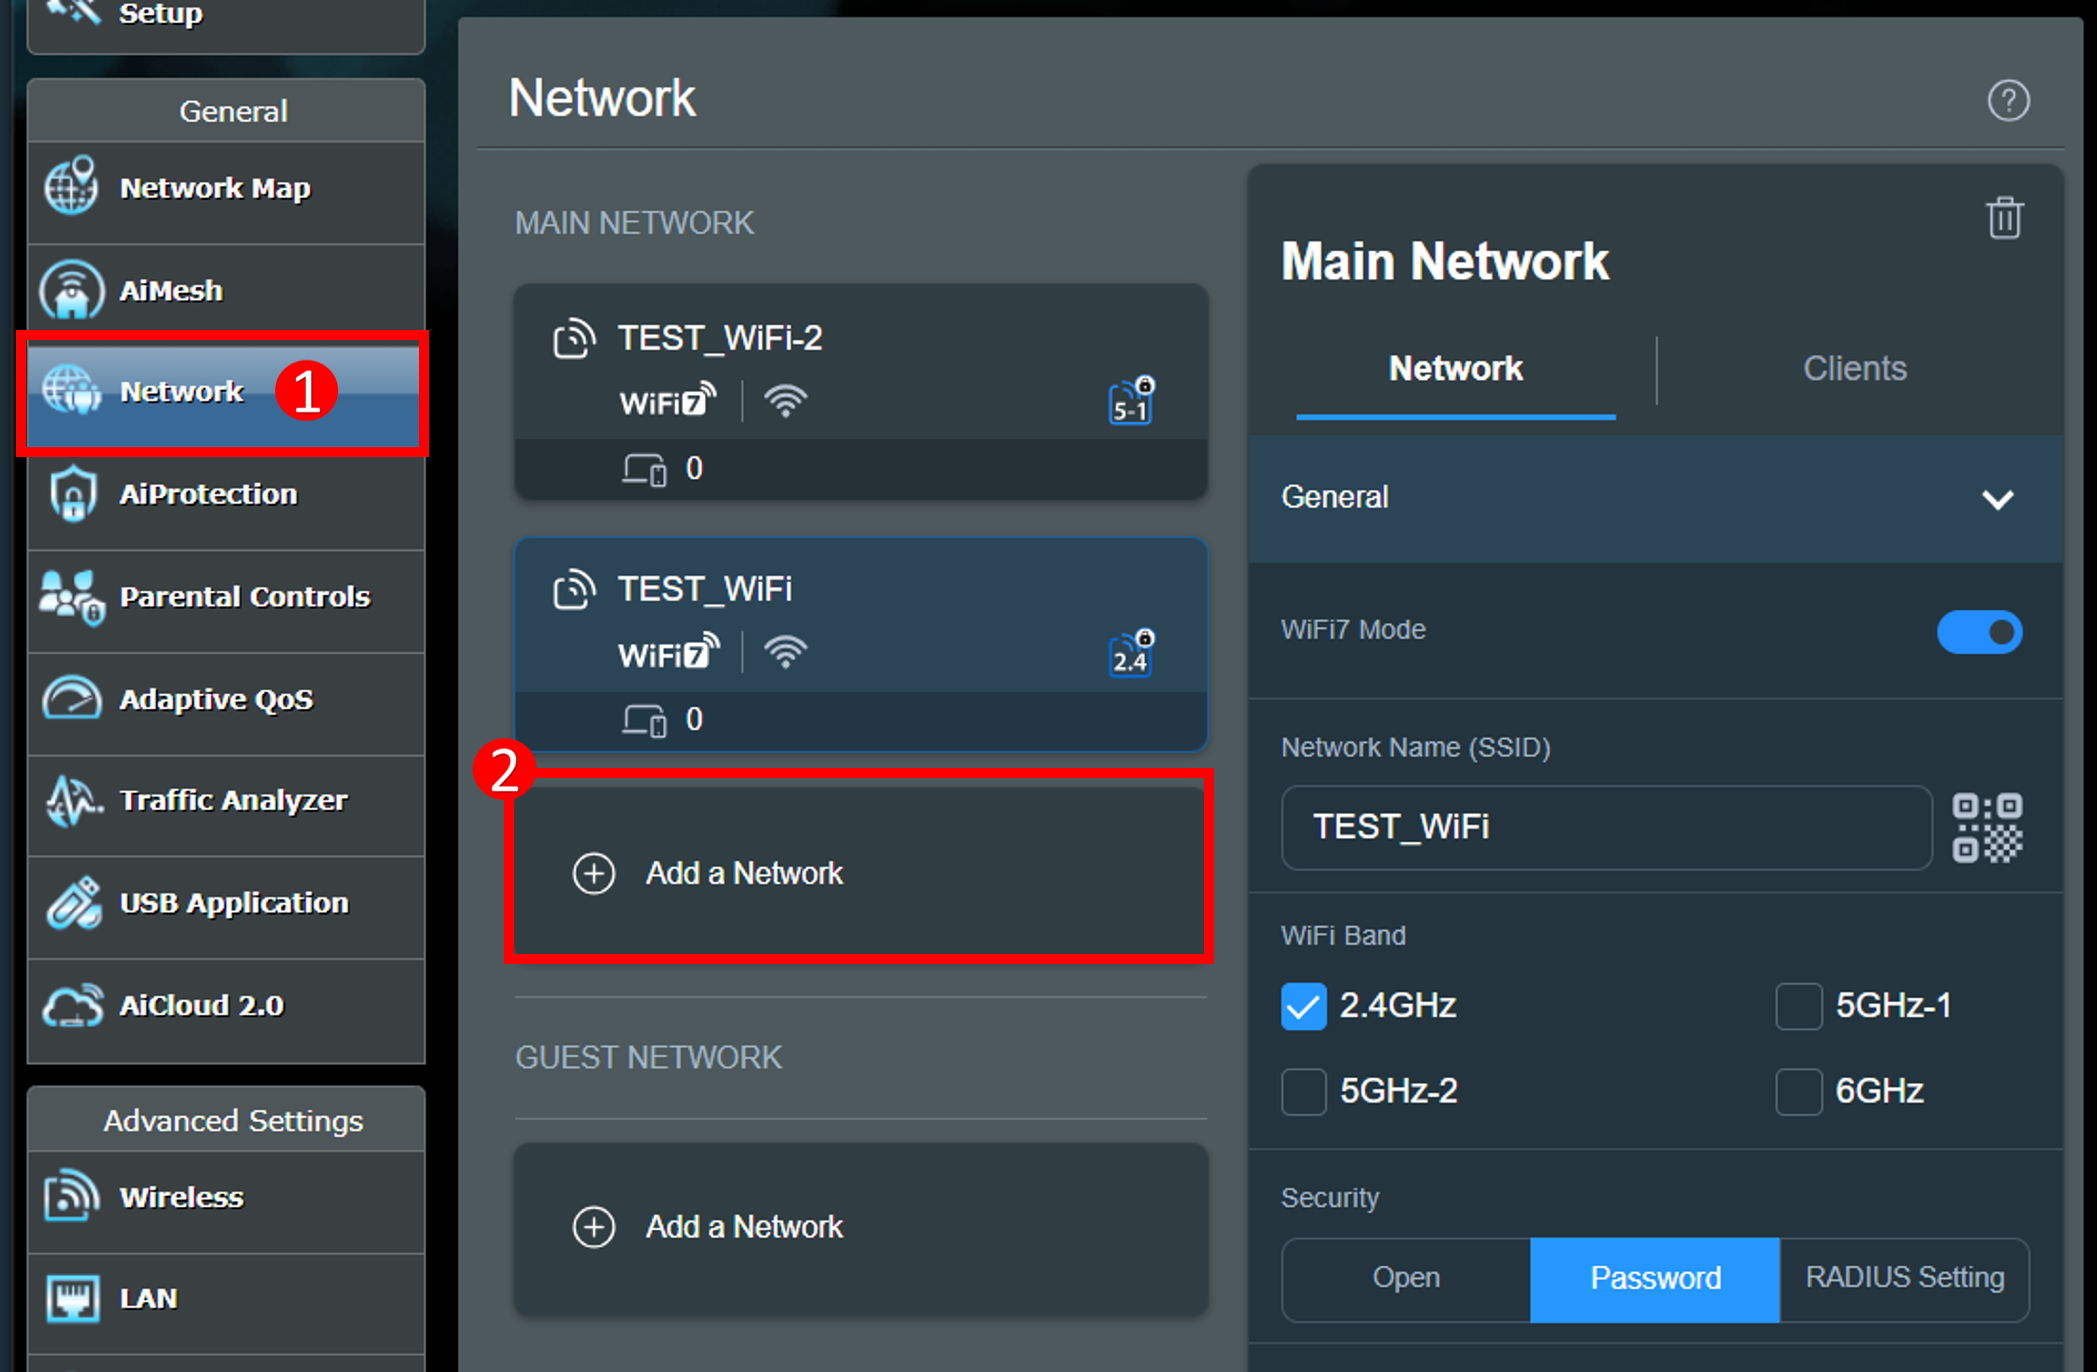
(2) Set the network name and password, select one or more WiFi bands, and click [Apply] to save the settings.
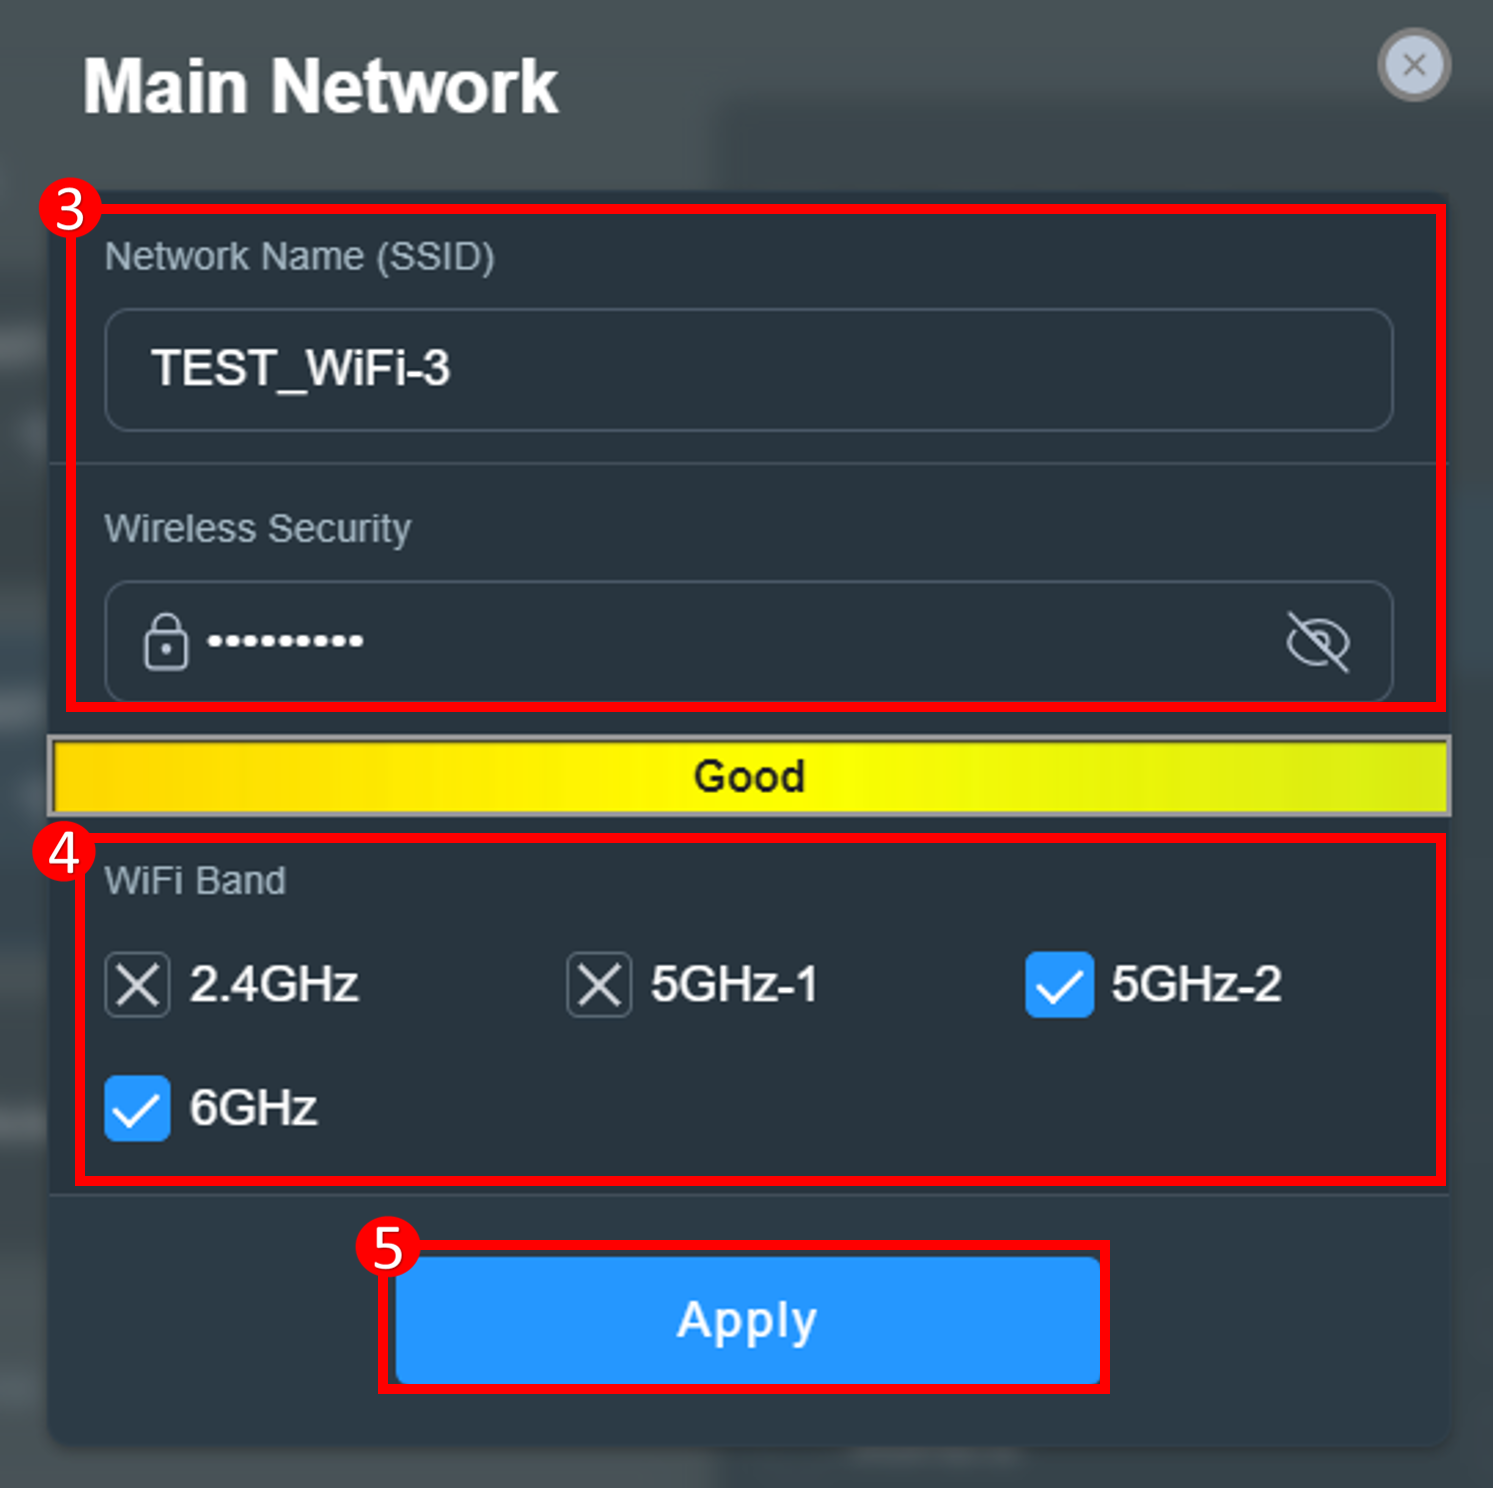
(3) The new WiFi network addition is complete.
Note: To delete a WiFi network from Main Network, go to the WiFi network profile > and click delete icon to finish.
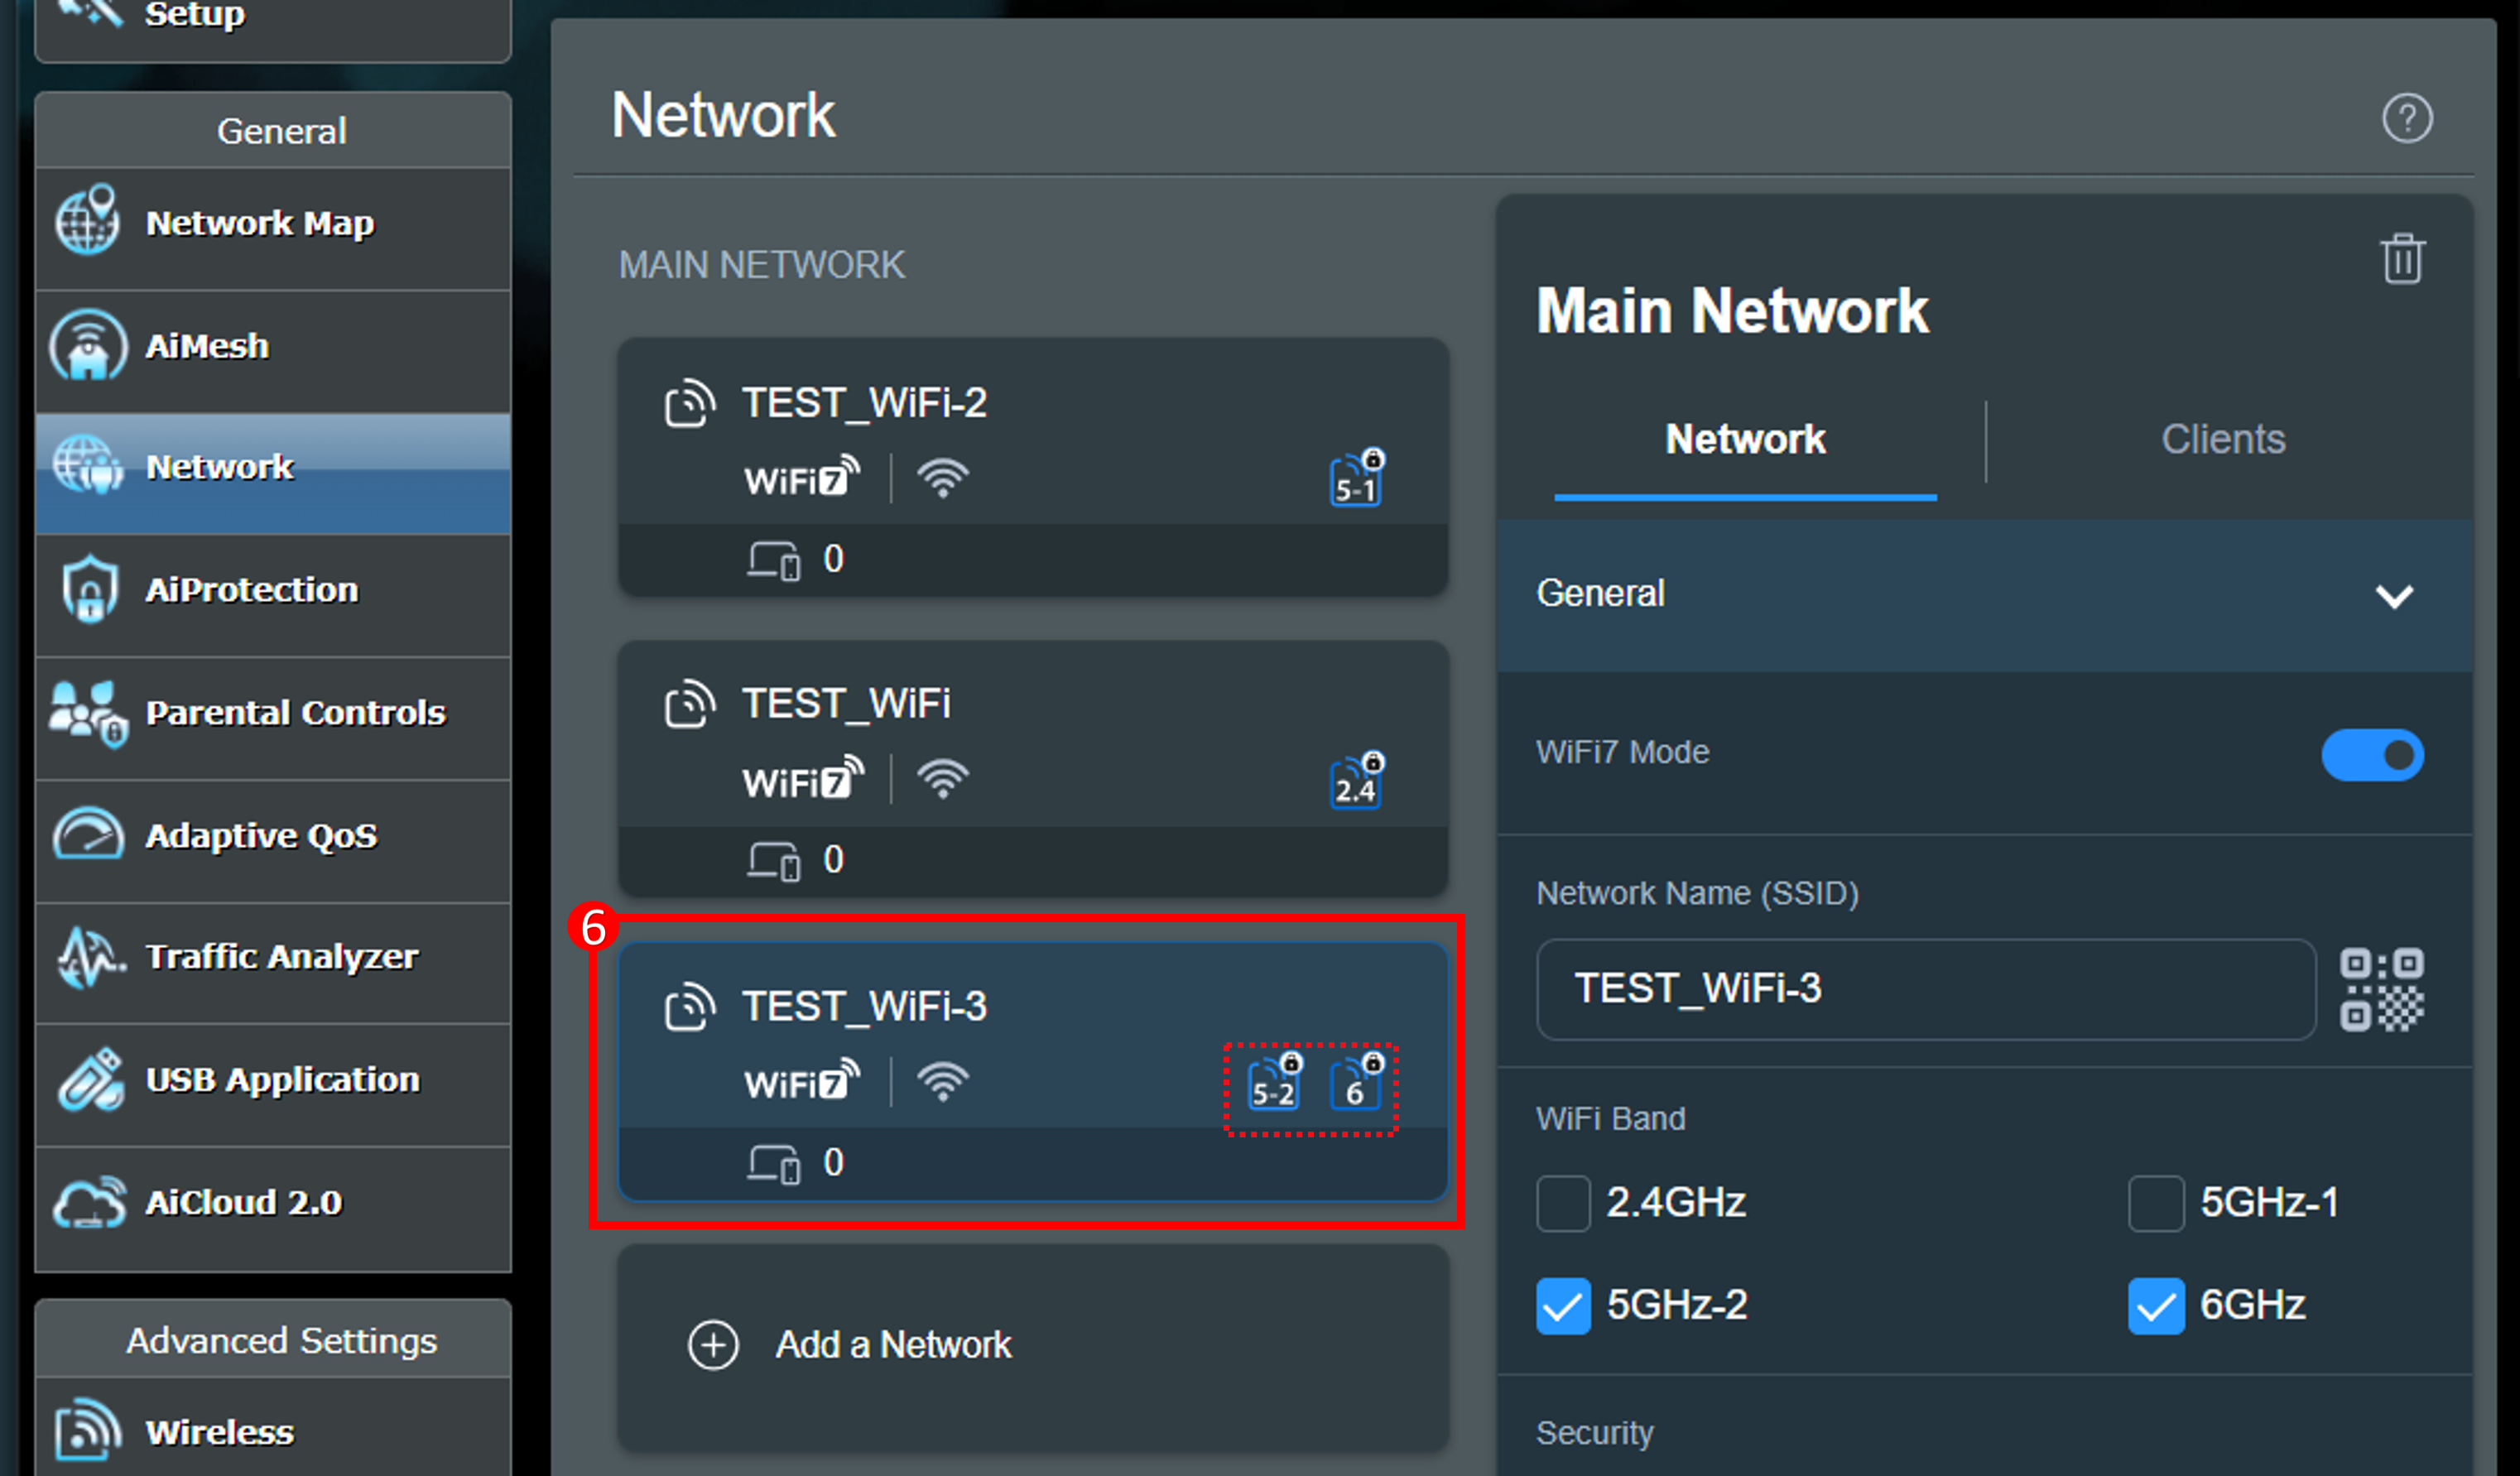
Note:
(1) Only one WiFi band can be selected at the same time.
(2) If you don't need to use the WiFi band, just unchecked it.
Please click here for an example of a WiFi band combination:
(a) All WiFi bands use the same WiFi name and password.
WiF Band | WiFi name(1) |
2.4G | V |
5G-1 | V |
5G-2 | V |
6G | V |
(b) All WiFi bands have different WiFi names and passwords.
WiFi Band | WiFi name(1) | WiFi name(2) | WiFi name(3) | WiFi name(4) |
2.4G | V |
|
|
|
5G-1 |
| V |
|
|
5G-2 |
|
| V |
|
6G |
|
|
| V |
(c) Set the WiFi band to 2 different WiFi names and passwords.
WiF Band | WiFi name(1) | WiFi name(2) |
2.4G | V |
|
5G-1 | V |
|
5G-2 |
| V |
6G |
| V |
WiF Band | WiFi name(1) | WiFi name(2) |
2.4G |
| V |
5G-1 | V |
|
5G-2 | V |
|
6G |
| V |
WiF Band | WiFi name(1) | WiFi name(2) |
2.4G | V |
|
5G-1 |
| V |
5G-2 | V |
|
6G |
| V |
WiF Band | WiFi name(1) | WiFi name(2) |
2.4G | V |
|
5G-1 | V |
|
5G-2 | V |
|
6G |
| V |
WiF Band | WiFi name(1) | WiFi name(2) |
2.4G |
| V |
5G-1 | V |
|
5G-2 | V |
|
6G | V |
|
WiF Band | WiFi name(1) | WiFi name(2) |
2.4G | V |
|
5G-1 |
| V |
5G-2 | V |
|
6G | V |
|
WiF Band | WiFi name(1) | WiFi name(2) |
2.4G | V |
|
5G-1 | V |
|
5G-2 |
| V |
6G | V |
|
A. Use the ASUS Router APP to enable Smart Connect
1. Enter the ASUS Router App, tap [ Settings ] > [ WiFi ] > [ Wireless Settings ] > [ Network Settings ].
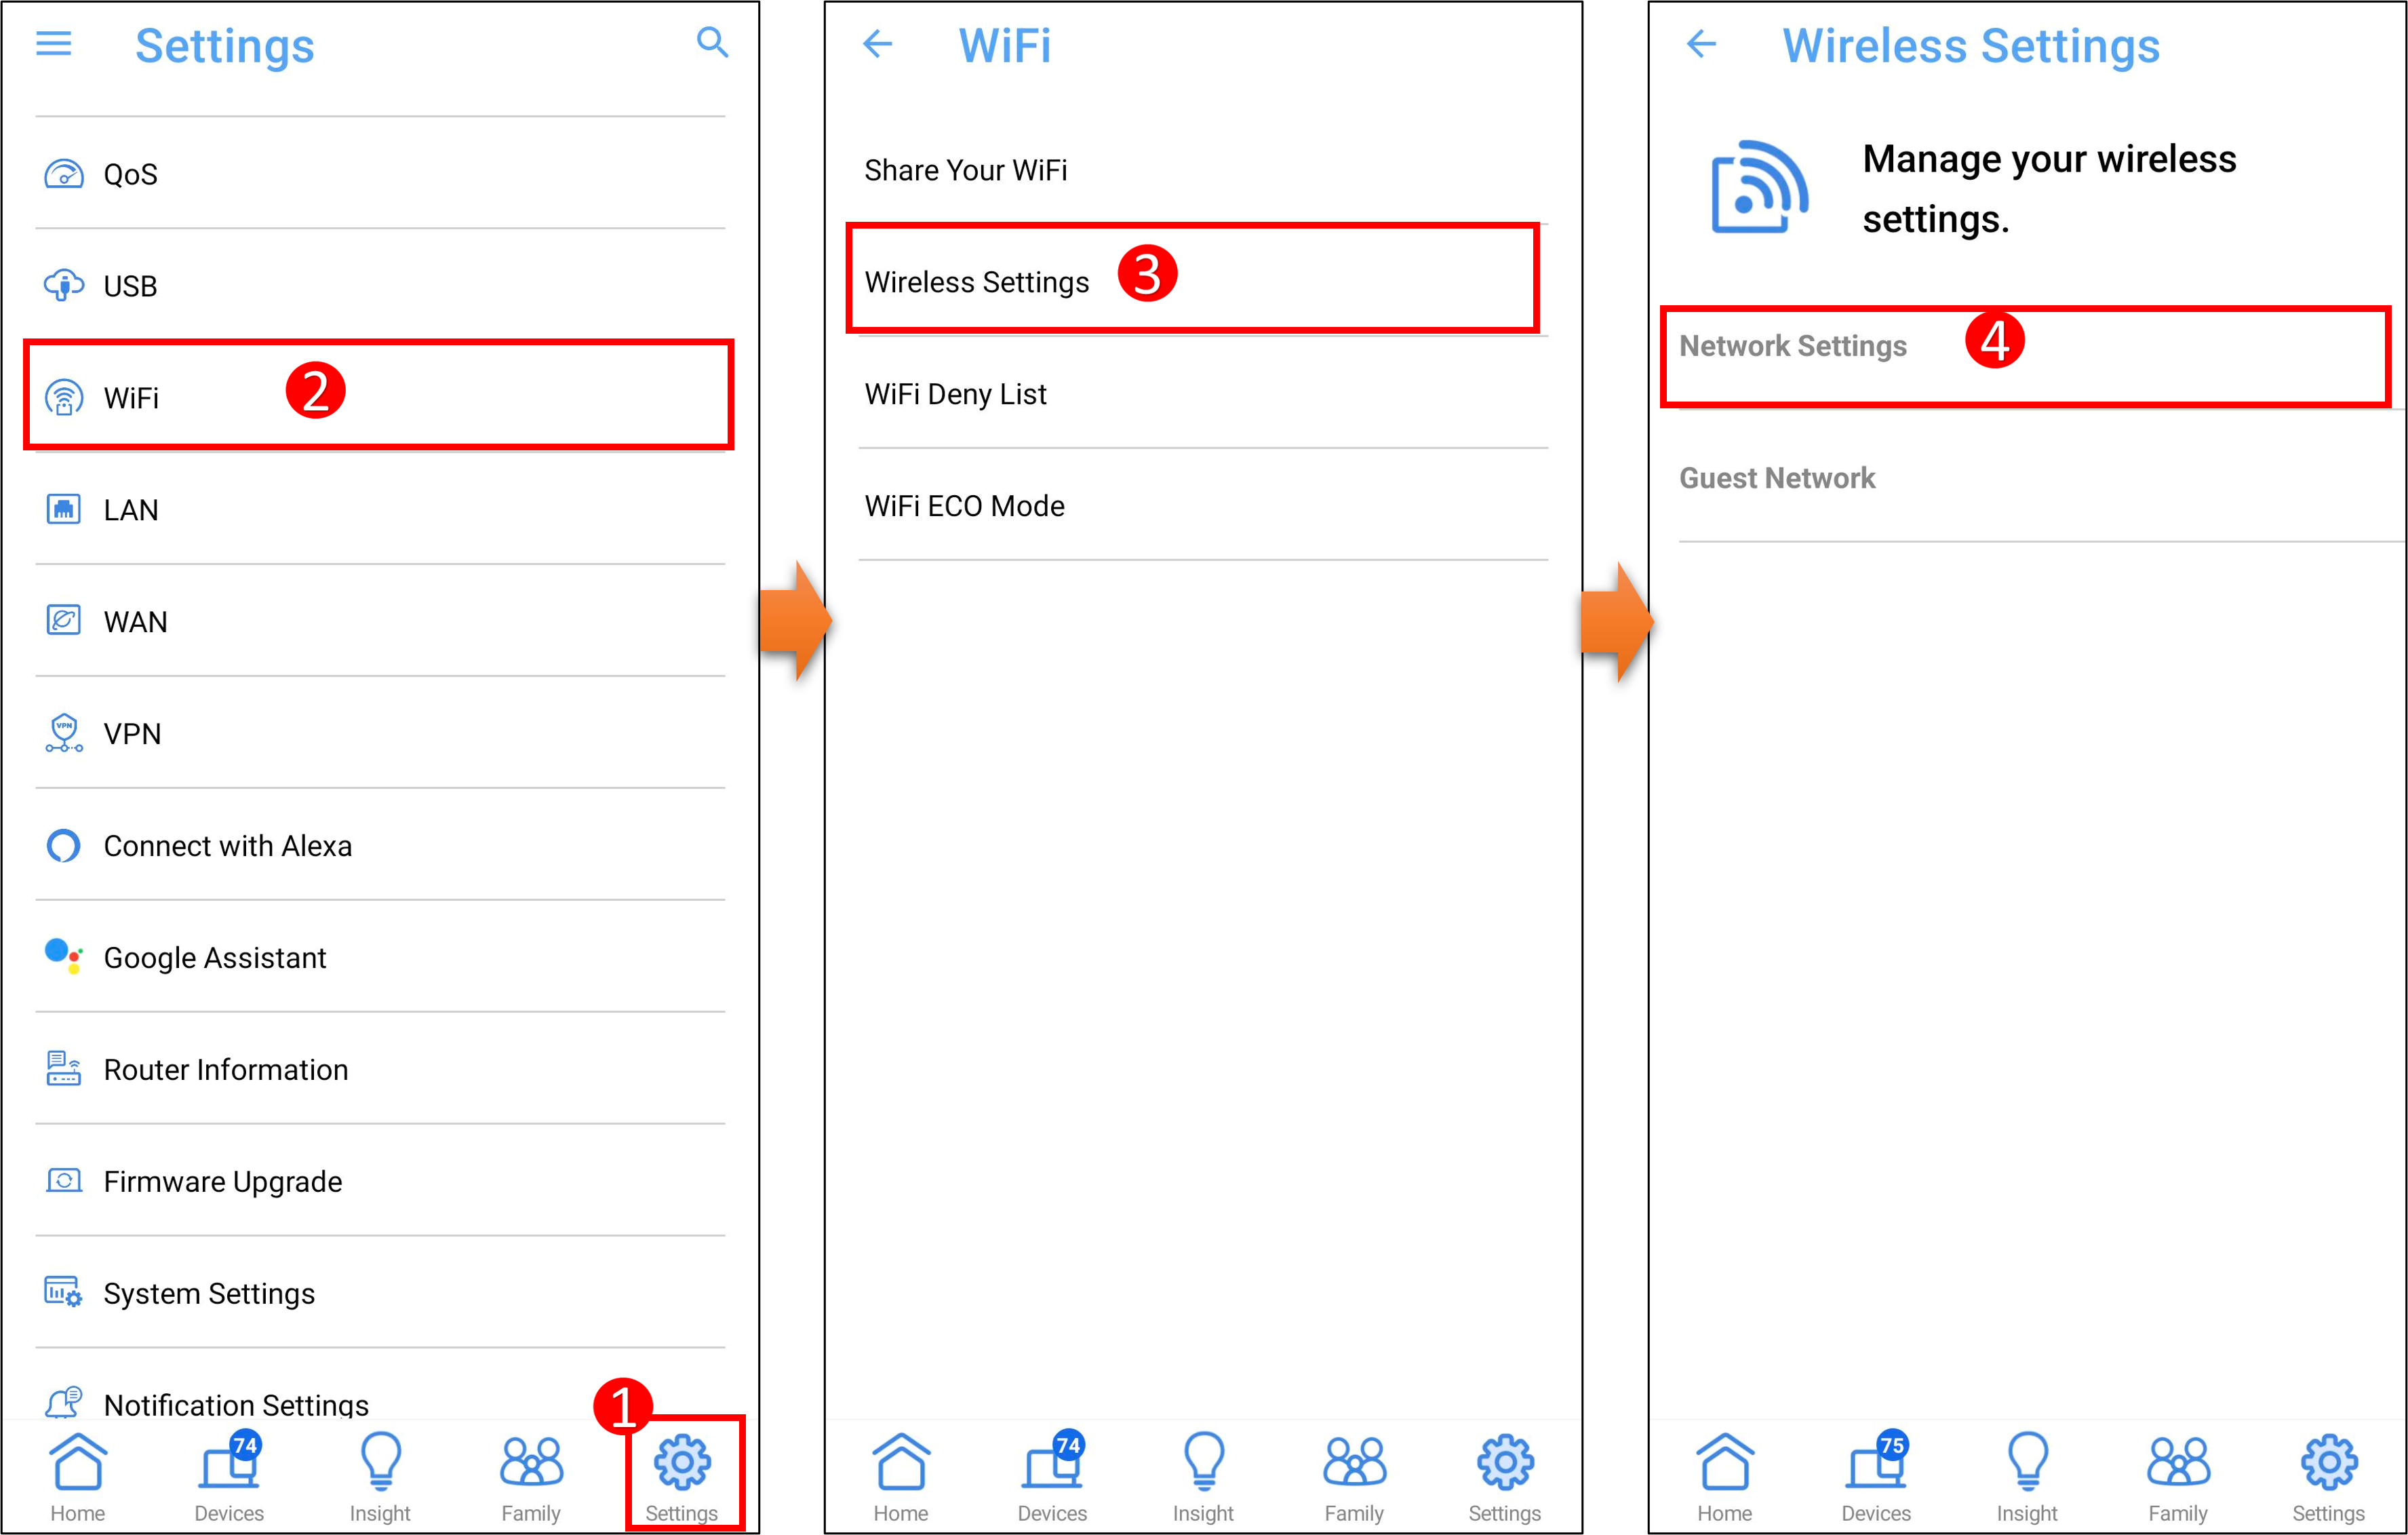
2. Select [ Tri-Band Smart Connect ] and tap [ Apply ] to save the settings.
As shown in the following example, after the setting is completed, the three bands of 2.4GHz/5GHz-1/5GHz-2 will use the same WiFi network name and password.
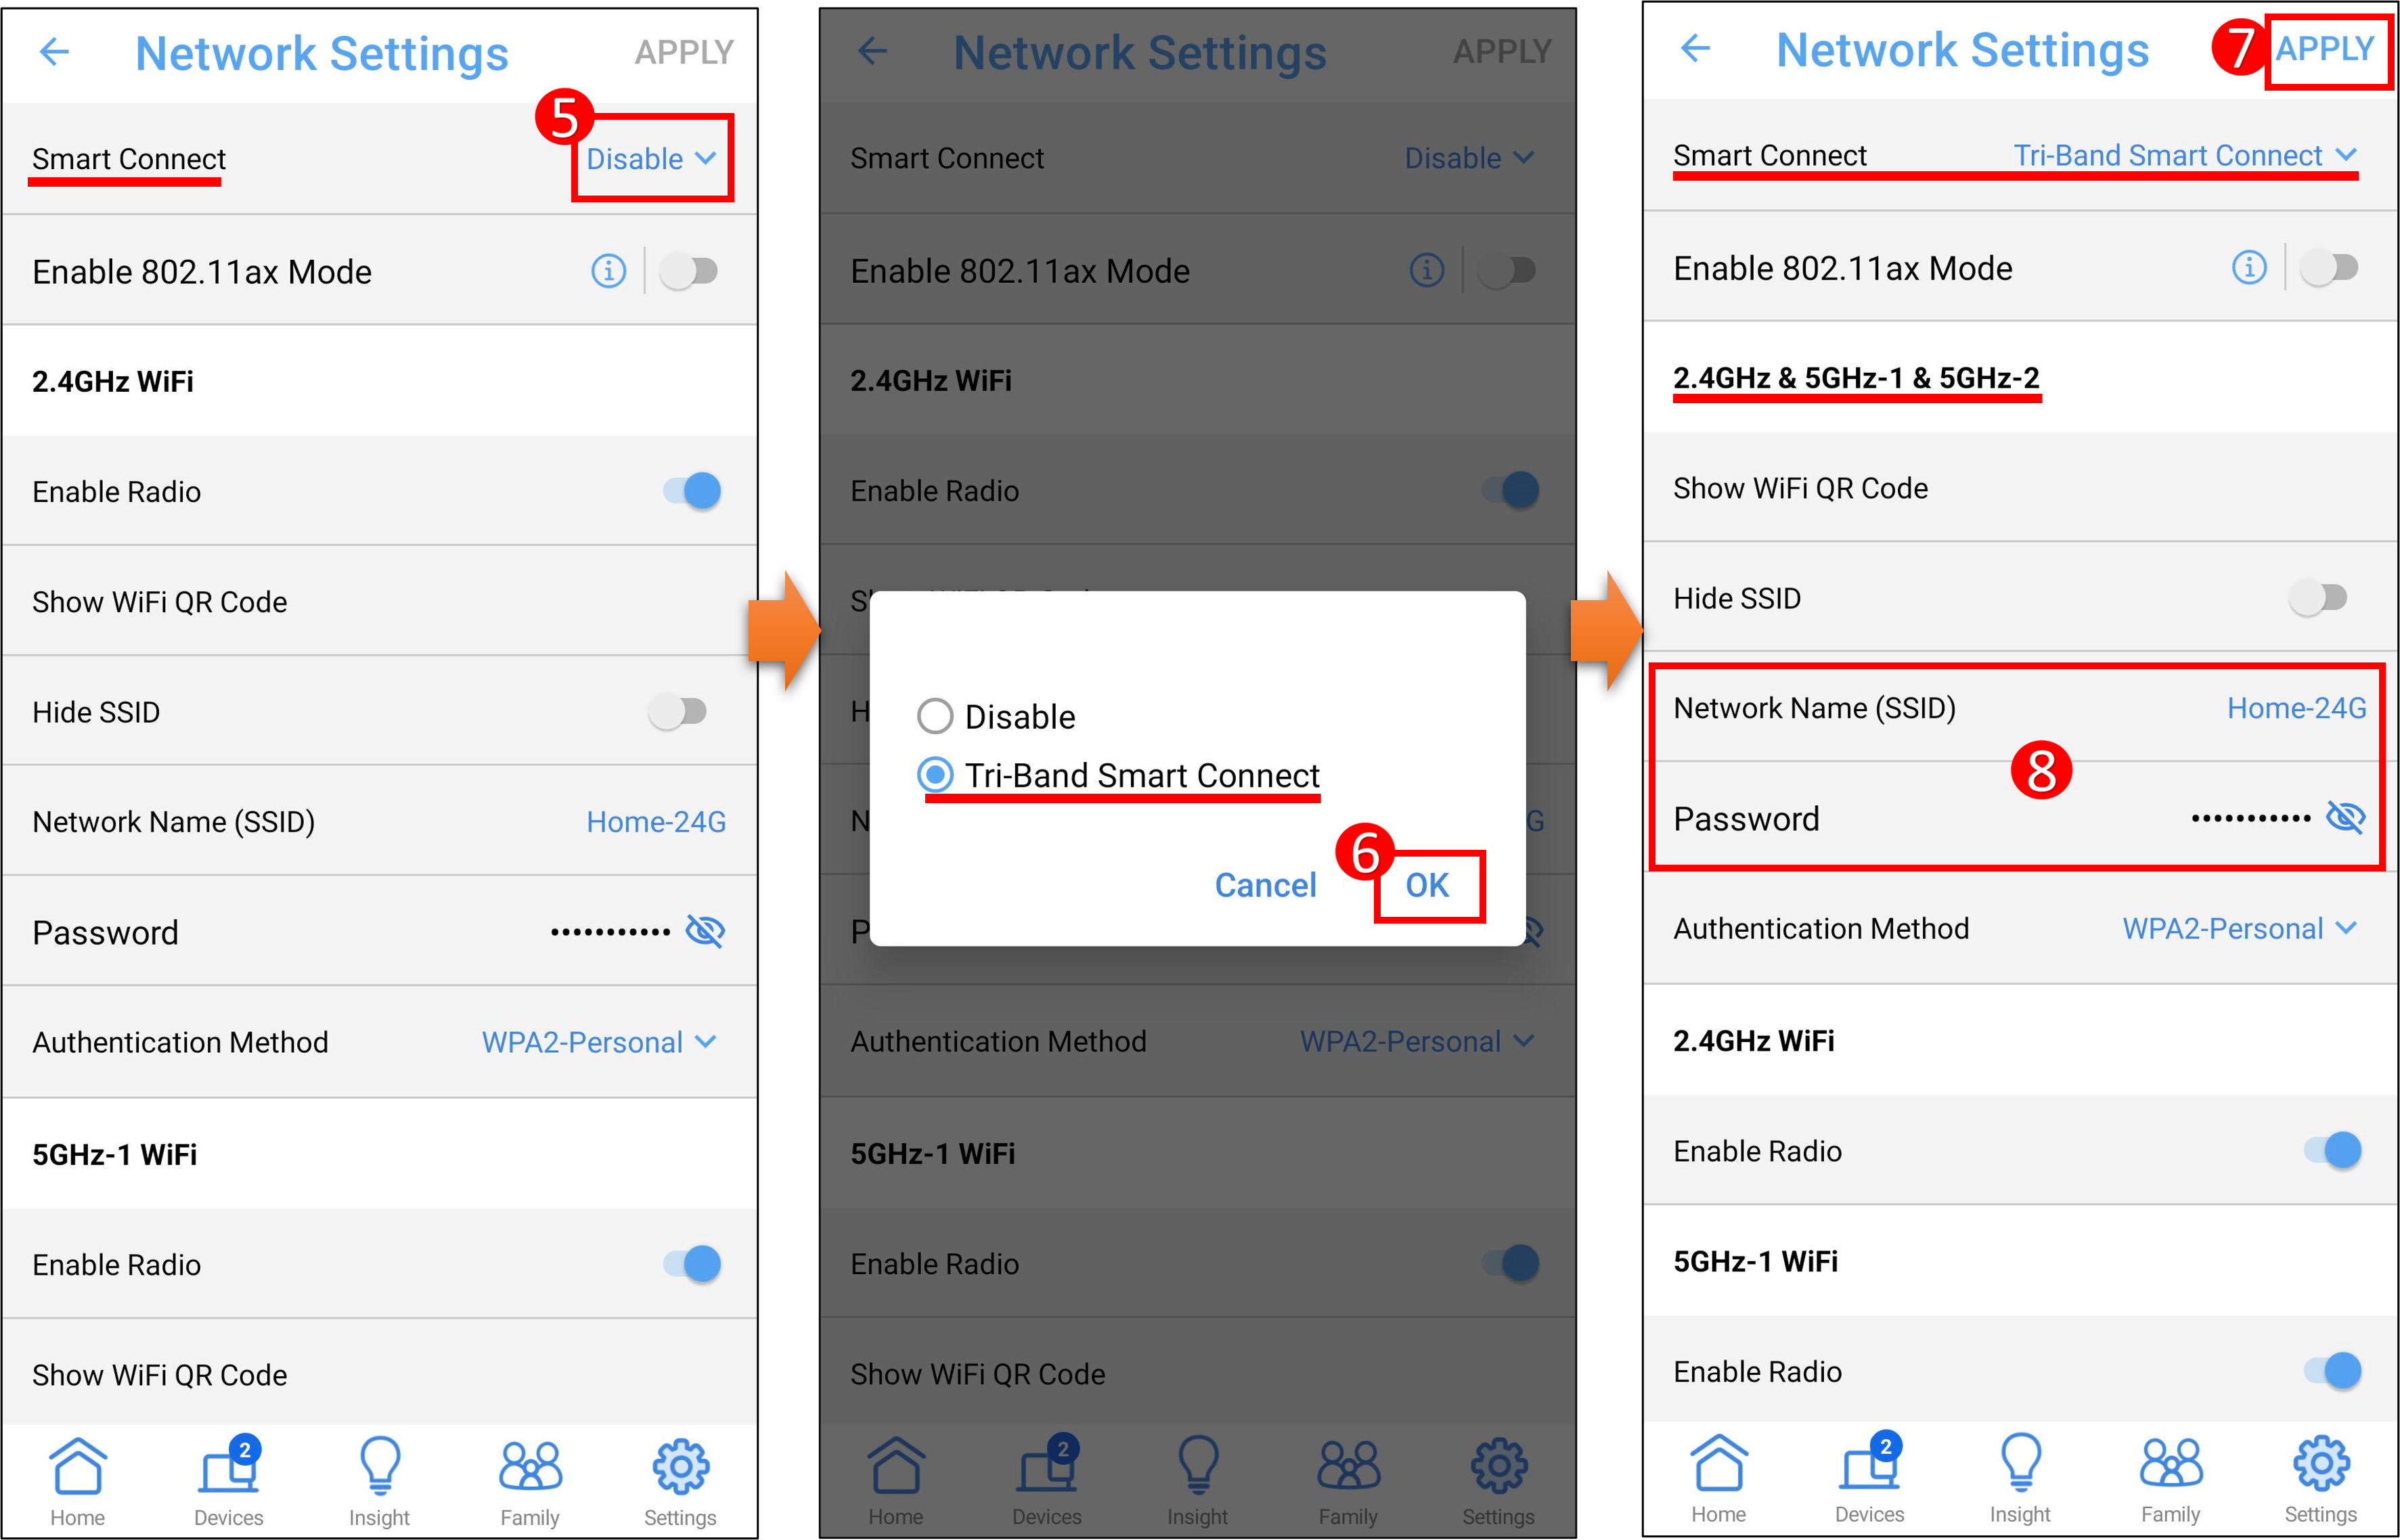
If your router supports two bands( 2.4GHz / 5GHz ), the option will show [ Dual-Band Smart Connect ].
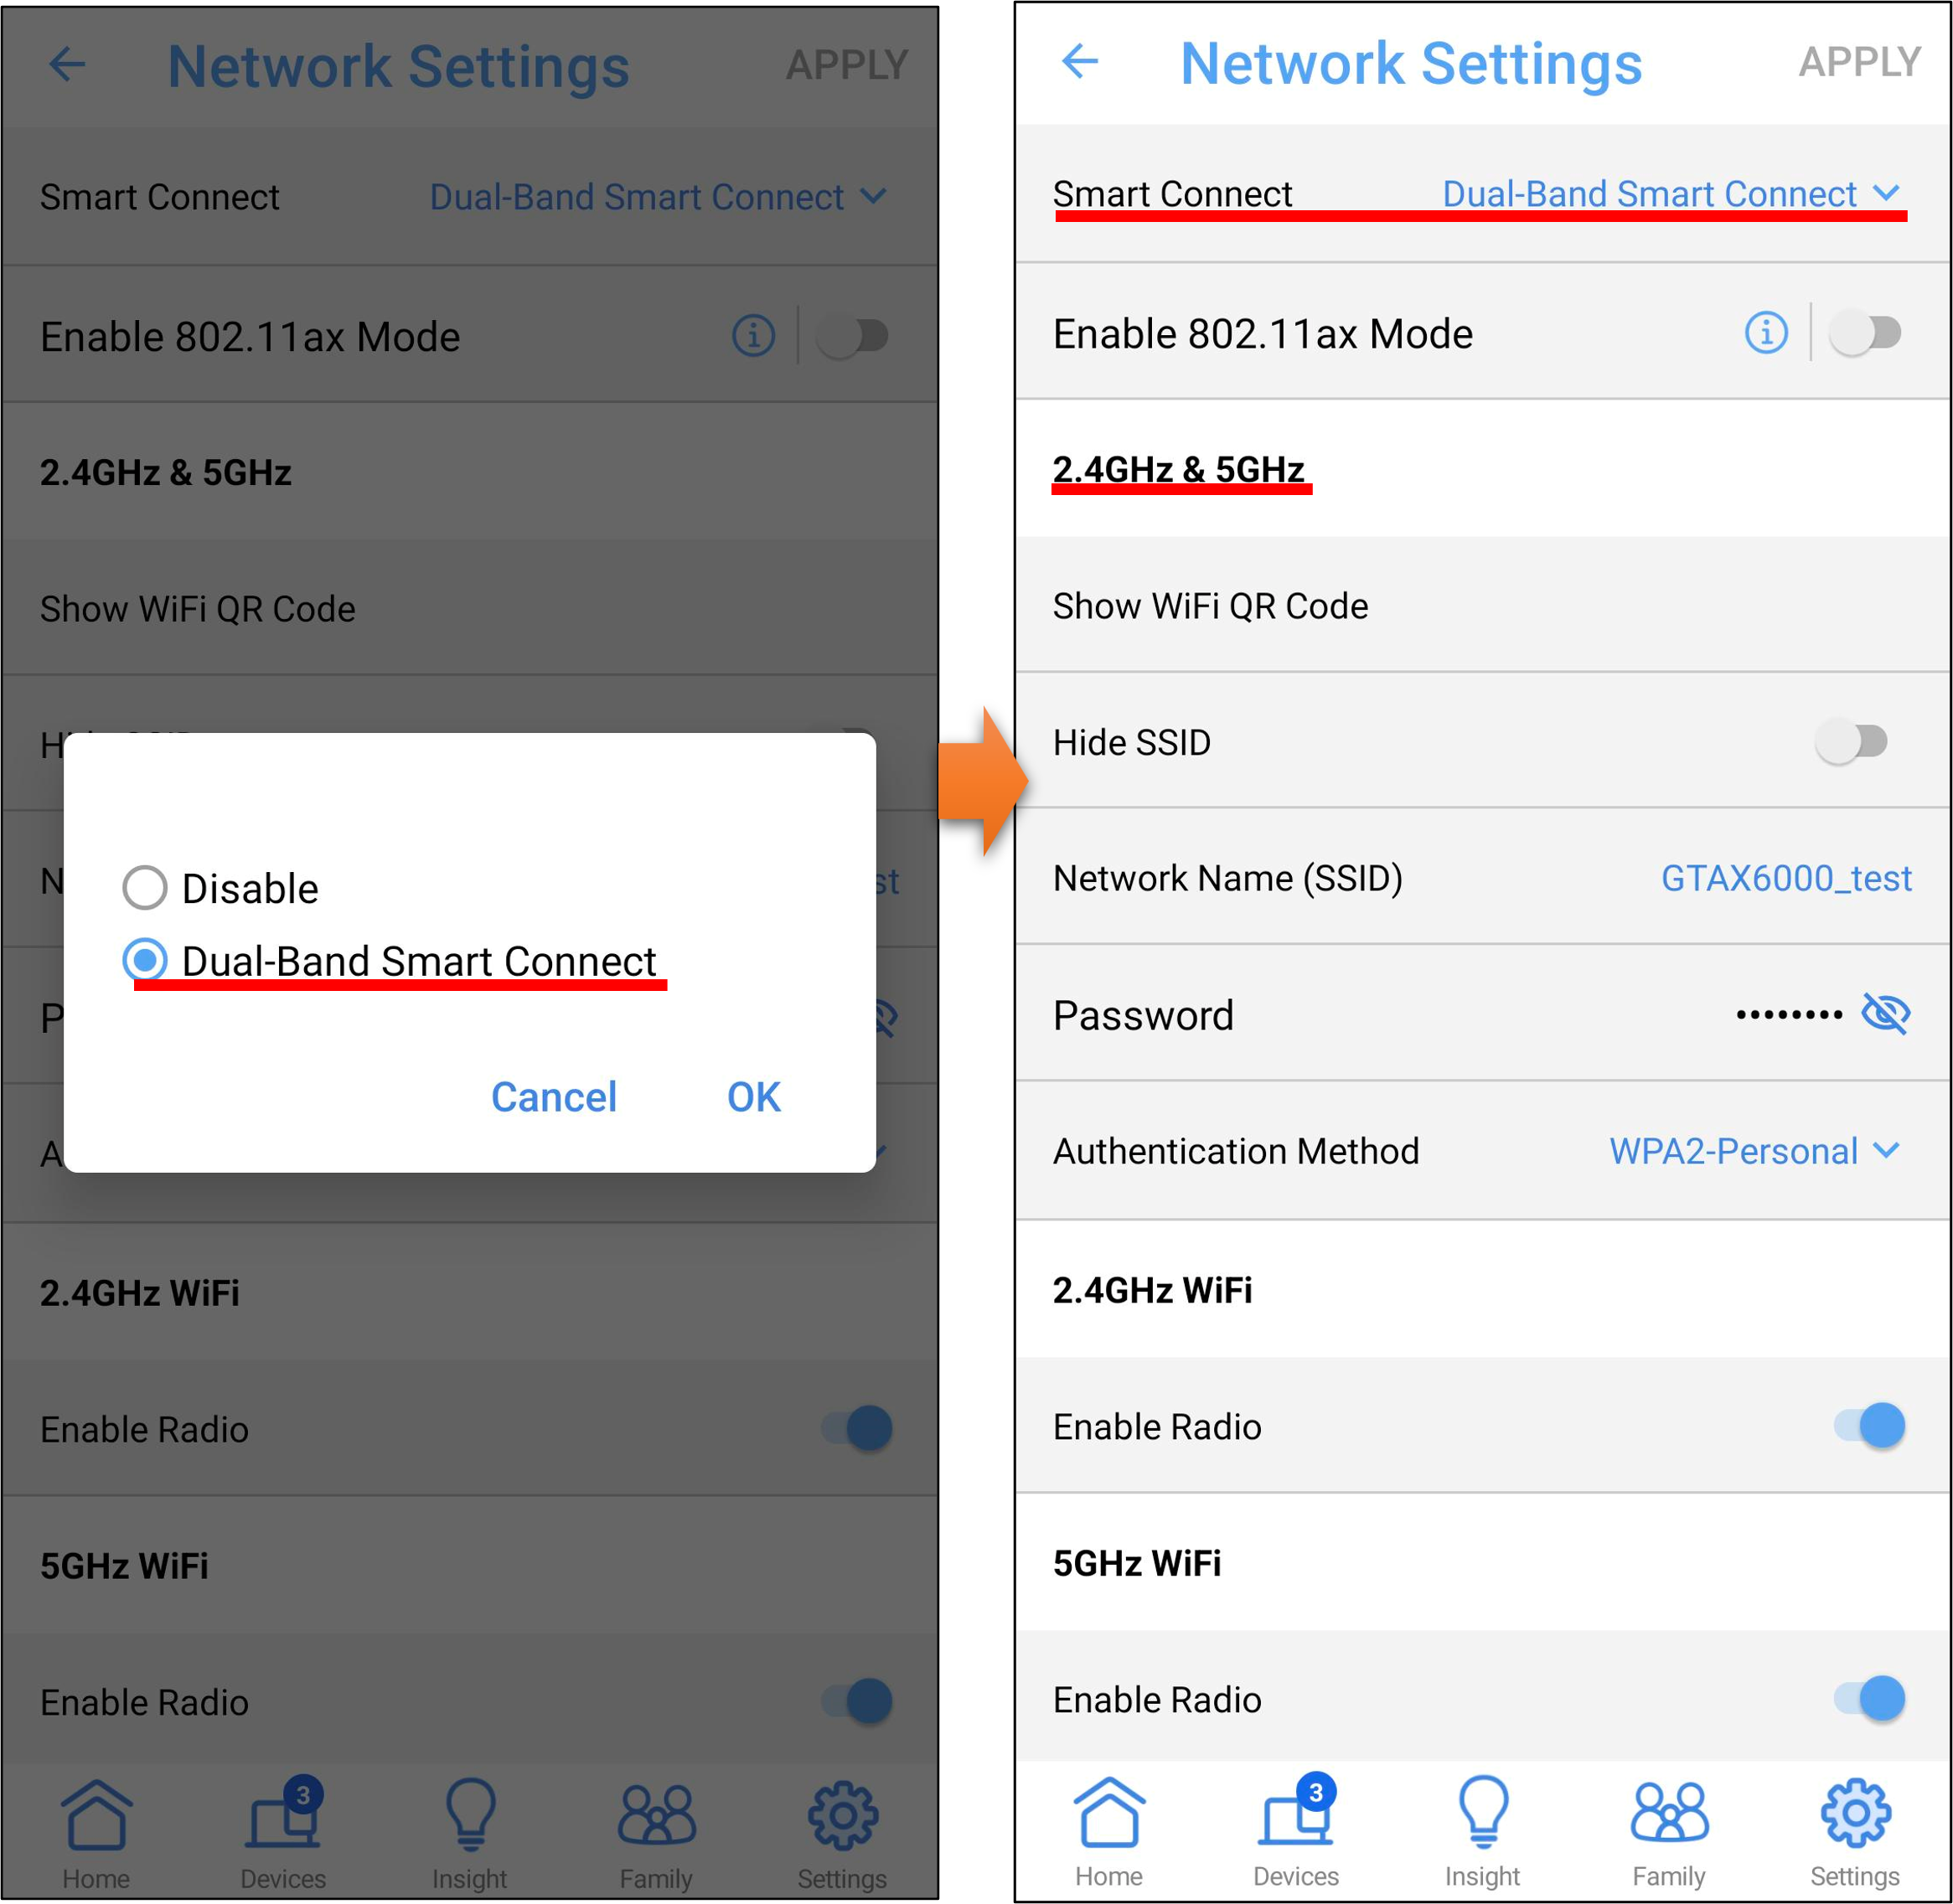
Note: ASUS wireless routers have different functions depending on the model. Please check ASUS product specifications to confirm that your router supports bands.
B. Use the ASUS router Web GUI to enable Smart Connect
1. Connect your laptop to the router via wired or Wi-Fi connection and enter your router LAN IP or router URL http://www.asusrouter.com to the WEB GUI.

Please refer to How to enter the router setting page(Web GUI) to learn more.
2. Key in your router's username and password to log in.
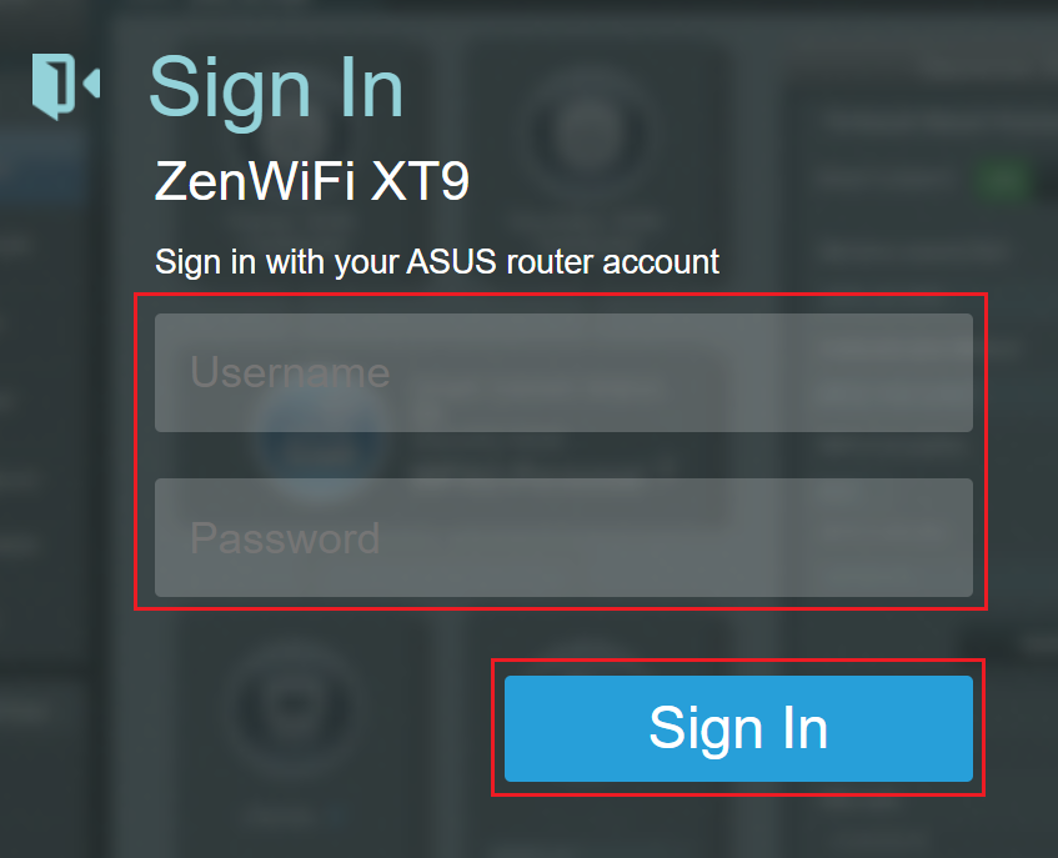
Note: If you forget the user name and/or password, please restore the router to the factory default status and setup.
Please refer to [Wireless Router] How to reset the router to factory default setting? for how to restore the router to default status.
3. Wireless Router: Go to Wireless > General > Switch the button on [Enable Smart Connect] to ON.
ExpertWiFi Router: Go to Settings > Wireless > General > Switch the button on [Enable Smart Connect] to ON.
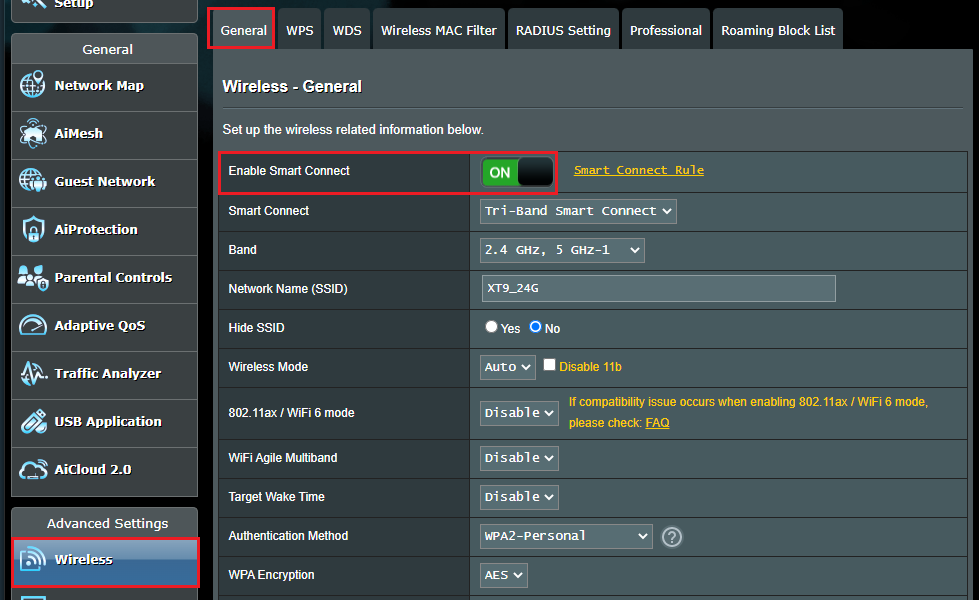
4. Click [Apply] to save the settings.

Now the three bands of 2.4GHz/5GHz-1/5GHz-2 will use the same Wi-Fi network name and password.

Note: ASUS wireless routers have different functions depending on the model. Please check ASUS product specifications to confirm that your router supports bands.
C. Advanced setting for Smart Connect(Smart Connect Rule)
ASUS Router comes with a default trigger condition setting for the Smart Connect switching mechanism. However, depending on your networking environment, you may need to customize the trigger condition. To do this, navigate to the Smart Connect Rule page in Network Tools or simply click the Smart Connect Rule link in Wireless General.
Note: Some models do not support the advanced settings of Smart Connect. If you do not see [Smart Connect Rules] when activating Smart Connect, which means your model does not support it.
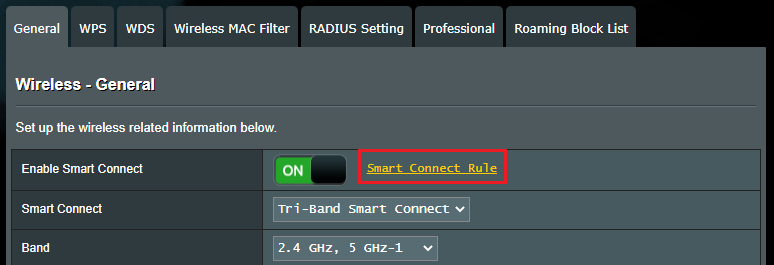
Introduction to Smart Connect Rule
If there are no special requirements, it is recommended to use the default settings.
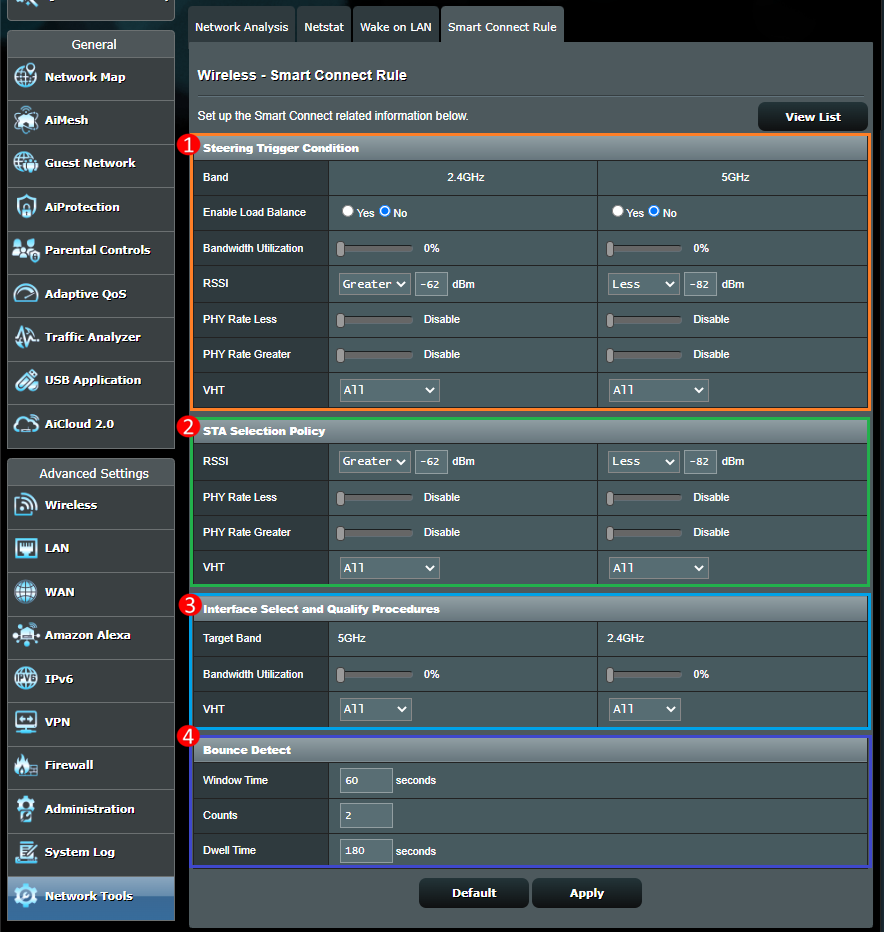
In summary, the (1) and (2) items represent the filter conditions, while the (3) item specifies the band to switch to when those conditions are met. The (4) item aims to minimize the band of switching between different bands, thereby optimizing the system's performance.
(1) Steering Trigger Condition
Steering Trigger Condition is the condition to check if steering needs to be triggered or not.
(2) STA Selection Policy
Once the band steering is triggered, the router will follow [STA Selection Policy] to pick up client/STA steered to the most appropriate band.
(3) Interface Select and Qualify Procedures
Once a trigger condition is reached, the client device steers to the target band.
(4) Bounce Detect
To prevent possible client/STA bounce back issues, you may change client/STA’s steered Counts with Window Time and it will remain connected to the current band during Dwell time.
For example, if the device is steered twice with 60 seconds, the device will remain connected in the current band for 180 seconds.
Note: If your device only supports 802.11n, but selects AC only in VHT, the device will not be able to connect to the wireless network of this router.
Description of VHT options of (1)(2)(3) items (*AC refers to Wireless WiFi Network Protocol 802.11ac)
All: All client devices
AC only: All AC client devices
Not-allowed: All non- AC client devices

After completing the configuration, click [Apply] to save the settings.

1. How to reset Smart Connect to its default settings?
Click [Default] button in Smart Connect Rule page to restore the settings.

Note: Some models do not support the advanced settings of Smart Connect. If you do not see [Smart Connect Rules] when activating Smart Connect, which means your model does not support it.
2. How to determine the current connection signal strength based on the dBm value?
- Signal strength (good): -20 dBm to -70 dBm
- Signal strength (fair): -71dBm to -80 dBm
- Signal strength (weak): -81dBm or higher
The current signal strength can be determined based on the dBm value.
If the signal strength is weak, please refer to this FAQ: [ASUS Wireless Router] How to improve reception of wireless(WiFi) signals(reduce wireless interference)
3. Why I can't see the advanced settings of Smart Connect (Smart connect rule) in ASUS Router APP and ExpertWiFi App?
The Router APP do not support Advanced settings of Smart Connect (Smart connect rule ), which is only available in Web GUI.
4. Why doesn't the function take effect after the router is set?
(1) If you are using the router app, please update the app to the latest version, please refer to the following FAQ for information on how to use the app
ASUS Router App
[Wireless Router] How to set up ASUS Wi-Fi router via ASUS Router App? (QIS, Quick Internet Setup)
[Wireless Router]How to manage multiple ASUS routers by ASUS router app?
ASUS ExpertWiFi App
[ASUS ExpertWiFi Router] Easy QR Code Scan Setup
(2) Please update your router firmware to the latest version, please refer to the following FAQ for information on how to update the firmware
[Wireless Router] How to update the firmware of your router to the latest version ?
(3) It is recommended to restore the router to the factory default and refer to this article to set it again.
Please refer to FAQ [Wireless Router] How to reset the router to factory default setting?
How to get the (Utility / Firmware)?
You can download the latest drivers, software, firmware and user manuals in the ASUS Download Center.
If you need more information about the ASUS Download Center, please refer this link.