Relaterede emner
[Windows 11/10] Troubleshooting - Wireless Network (Wi-Fi) Issues
Applicable Products: Notebook, Desktop, All-in-One PC, Gaming Handheld, MiniPC, NUC
We first have to check whether the problems are caused either by the device or by Internet equipment (modem/Internet cable/wireless share device) or the Internet service provider before we look to solve the Internet problem.
This troubleshooting only offers solutions to Internet dysfunction caused by a device. (The common symptoms, such as no Wi-Fi icon, Wi-Fi fails, no Wi-Fi signal, WiFi slow, or exclamation mark appeared in Wi-Fi of device manager, etc.)
For other inquiries about Internet equipment / service, please contact the Internet service provider for further information.
Assume that you use both Device (A) & Smart Phone (B), and connect them to the Internet network by Wi-Fi:
Both (A) & (B) cannot connect to the internet -> problems usually result from Internet facilities or Internet service providers.
(A) cannot connect to internet but (B) is able to -> Please refer to the solutions below:
Note: It will be helpful on the network speed problem if you improve the system performance. Here you can learn more about How to Change Power mode and plan.
To provide you more detailed instruction, you can also click ASUS YouTube video link below to know more about How to Fix Wireless Problems on ASUS Laptops.
https://www.youtube.com/watch?v=RsYwzIOySBk
Please go to the corresponding instruction based on the current Windows operating system on your device:
Windows 11 operating system
Make sure the wireless function is activated
Click [Network & Internet] icon on the taskbar①, then make sure Wi-Fi is [Turn on]②.
Note: When the Wi-Fi icon highlights to blue, it means the function is enabled. 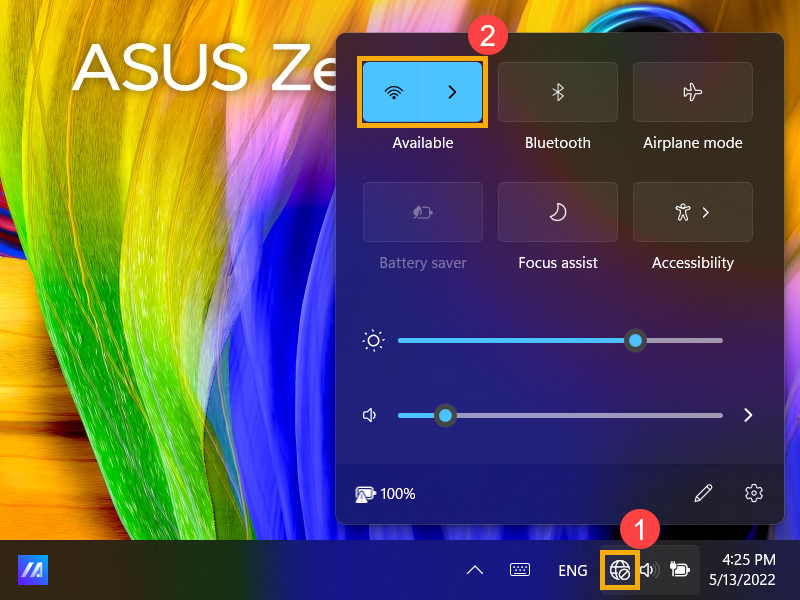
If the problem persists, please continue the next troubleshooting step.
Restore BIOS settings
- Access the BIOS setup screen on the device.
When the device is not powered on, press and hold the [F2] key on the keyboard, then press the power button to turn on the device. Keep holding the [F2] key until the BIOS setup screen appears, then release the [F2] key. Learn more about How to enter the BIOS setup screen.
Note: For some older desktop models, you may need to press and hold the [Del] key during startup to access the BIOS configuration screen.
Note: Gaming handhelds need to press and hold the [Volume Down] button, then press the power button to turn on the device. - Once in the BIOS setup screen, please refer to the article: How to restore BIOS settings.
- When reset the BIOS settings is completed, the device will restart and enter Windows. Please check the problem again. If the problem persists, please continue the next troubleshooting step
Turn the device off completely
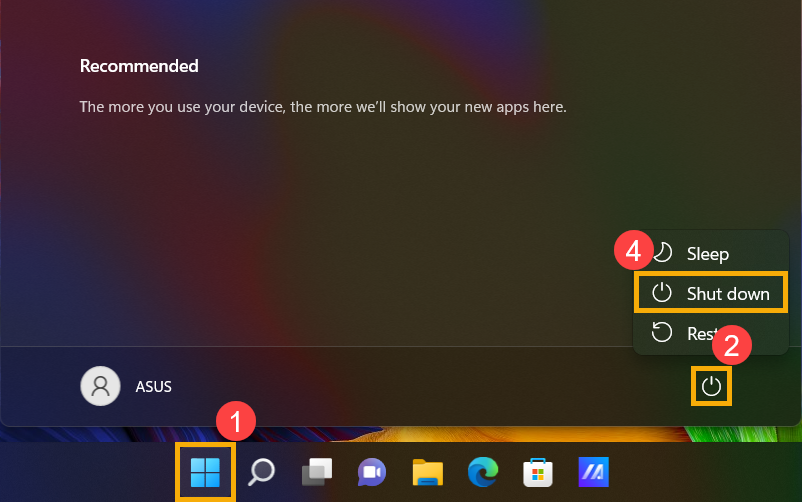
Click the [Start] icon on the taskbar①, select the [Power]
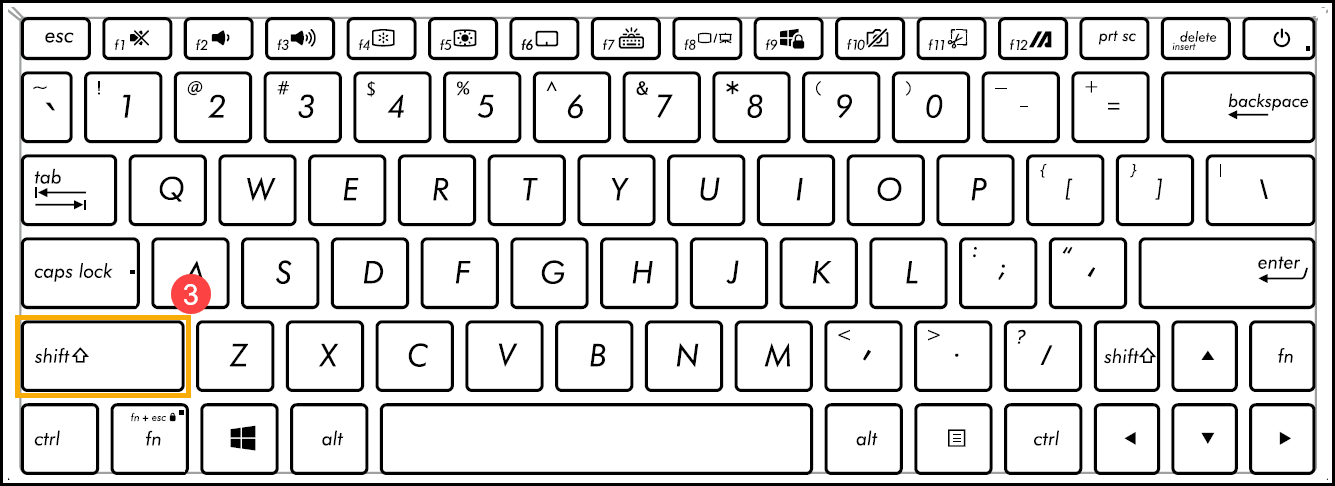
 icon②, then press and hold the [Shift] key③ on the keyboard as well as select [Shut down]④ at the same time. Your device will be turned off completely.
After turning the device off completely, please restart your device and check whether the problem is resolved. If the problem persists, please continue the next troubleshooting step.
Run Wireless Diagnosis in MyASUS
Use System Diagnosis in MyASUS to check wireless connectivity problems.
- Type and search [MyASUS] in the Windows search bar①, then click [Open]②.
Note: If you cannot find MyASUS, it may not be installed on your device. Refer to How to install MyASUS.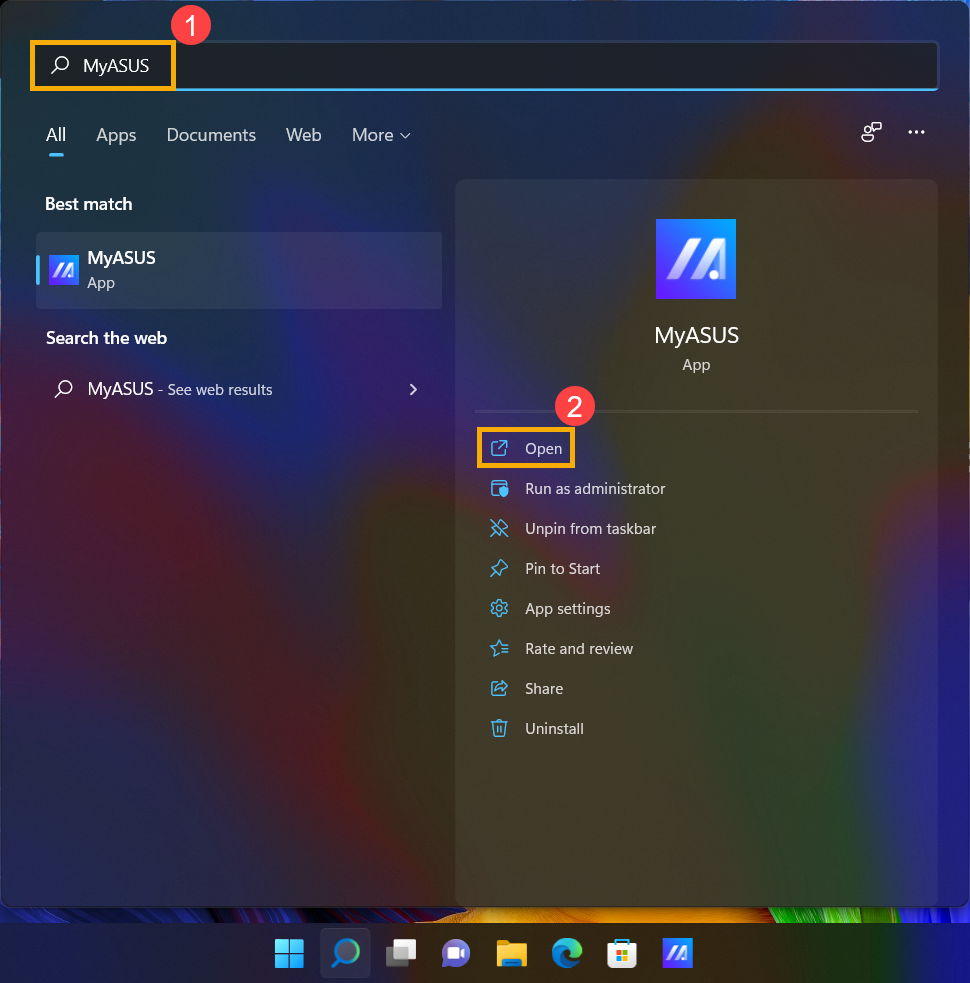
- In the MyASUS app, click [System Diagnosis]③.
Note: If your device does not display the system diagnosis page in MyASUS software, it means your device does not support this feature. Continue to the next section for further troubleshooting. Here you can learn more about Why can I only see the partial features in the MyASUS app.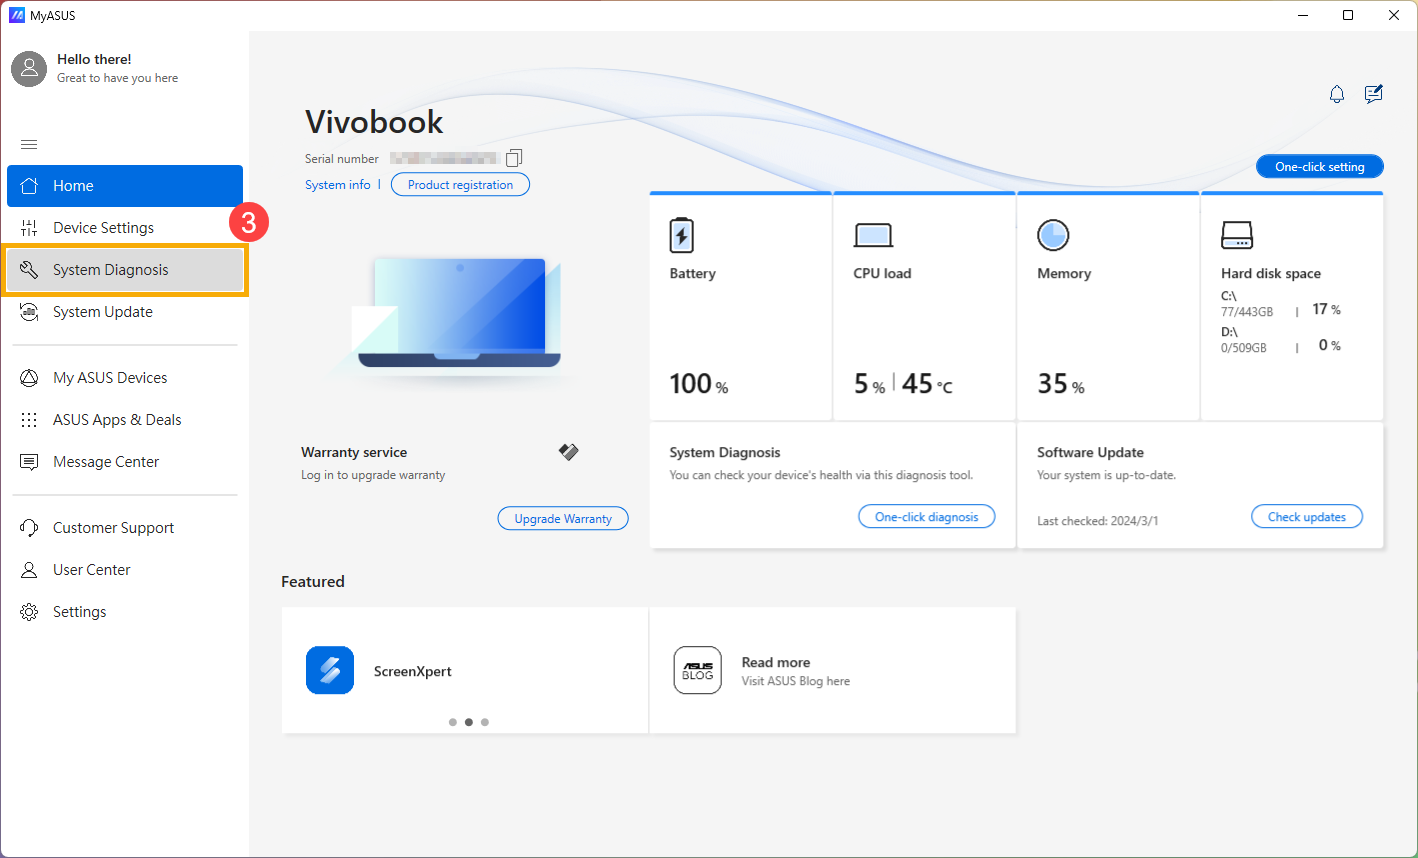
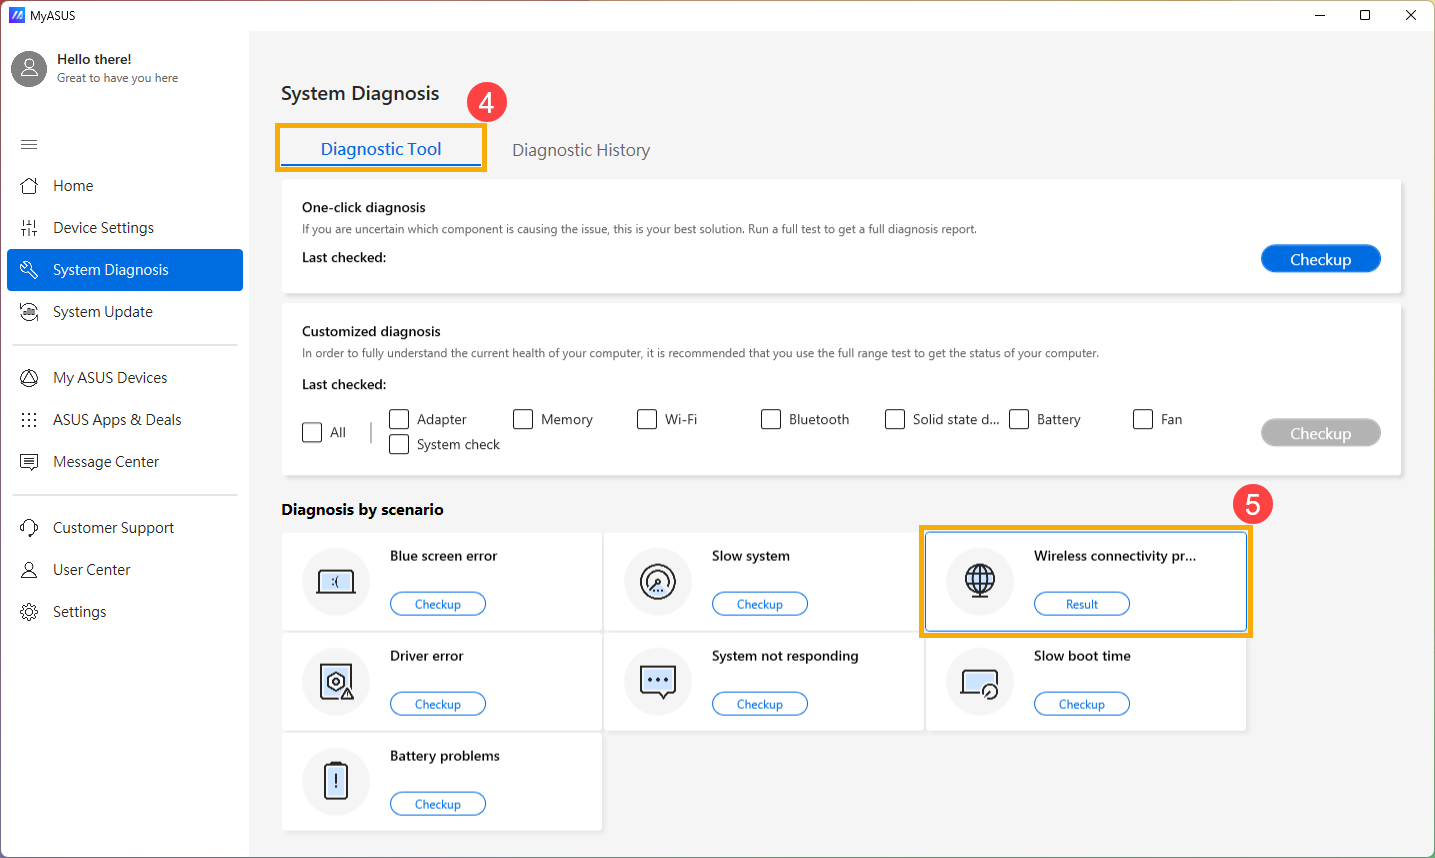
- In [Diagnosis Tool]④, click [Wireless connectivity problems]⑤. Here you can learn more about MyASUS System Diagnosis - Introduction.
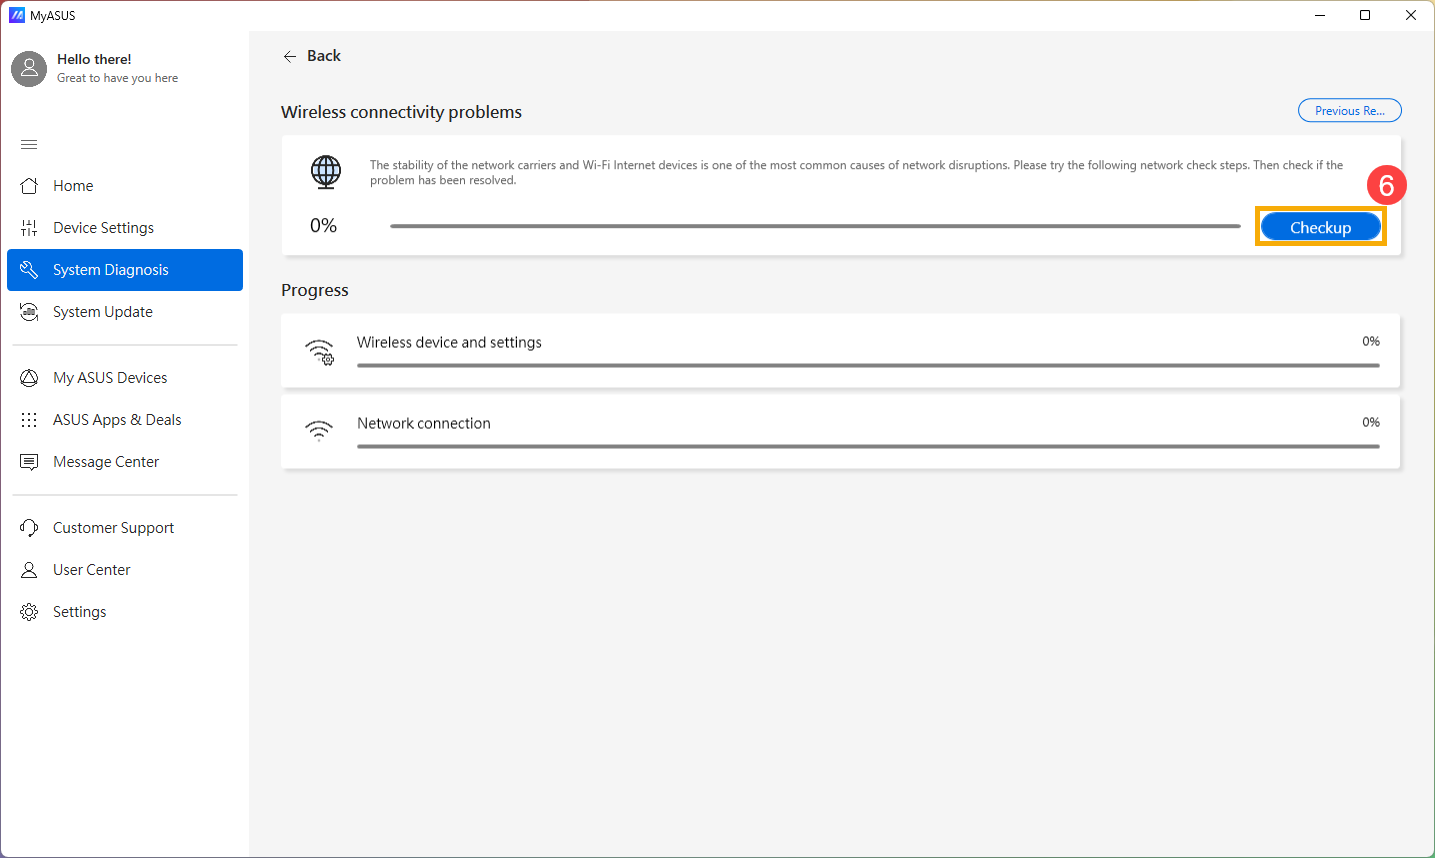
- Click [Checkup]⑥.
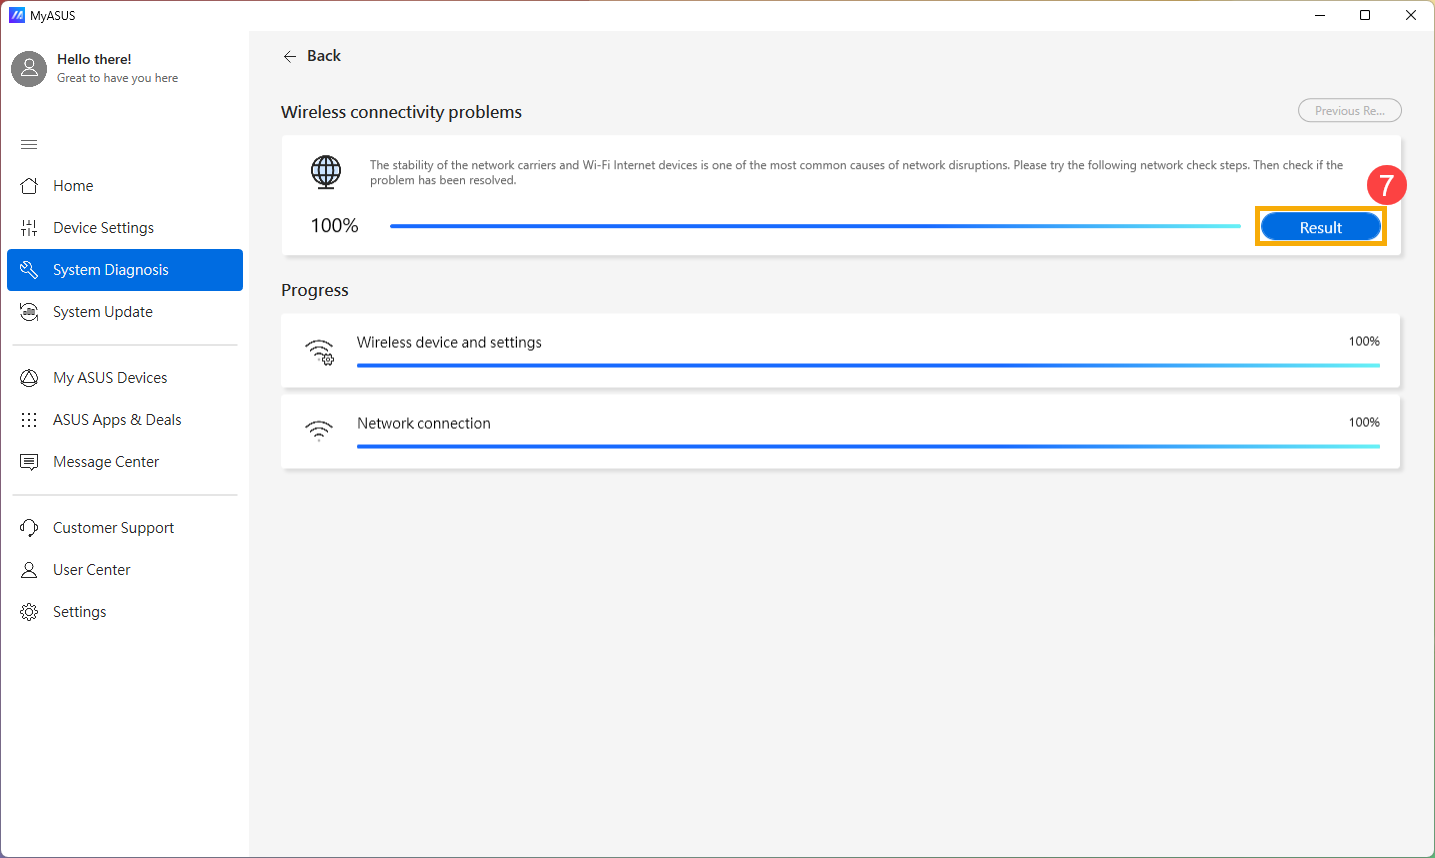
- After the check, click [Results]⑦. If errors are detected, try the troubleshooting suggestions provided by MyASUS. If the problem persists, proceed to the next troubleshooting step.
Wireless network adapter with Yellow Exclamation in Device Manager
If you experience that wireless network adapter with Yellow Exclamation in Device Manager, please try the following way to solve it. (This step is for laptop products only. For desktop, AIO PCs, and gaming handheld, please continue the next troubleshooting.)

- Remove the AC adapter.
Note: Please don’t remove the AC adapter for ASUS laptop TP420IA and UX425IA model. (These models need to plug in the AC adapter to do the Hard reset process.) - Press and hold the Power button for 40 seconds, to perform the hardware reset.
- Wait for 90 seconds, then your PC will automatically boot up.
- After your PC boots up, please check the wireless network adapter in Device Manager again whether it is normal. If the problem persists, please continue the next troubleshooting step.

Update the Wireless and Bluetooth drivers through Device Manager
If the versions are too different between the Wireless and Bluetooth drivers, it may cause a software compatible issue. So, we recommend updating both drivers to the latest version.
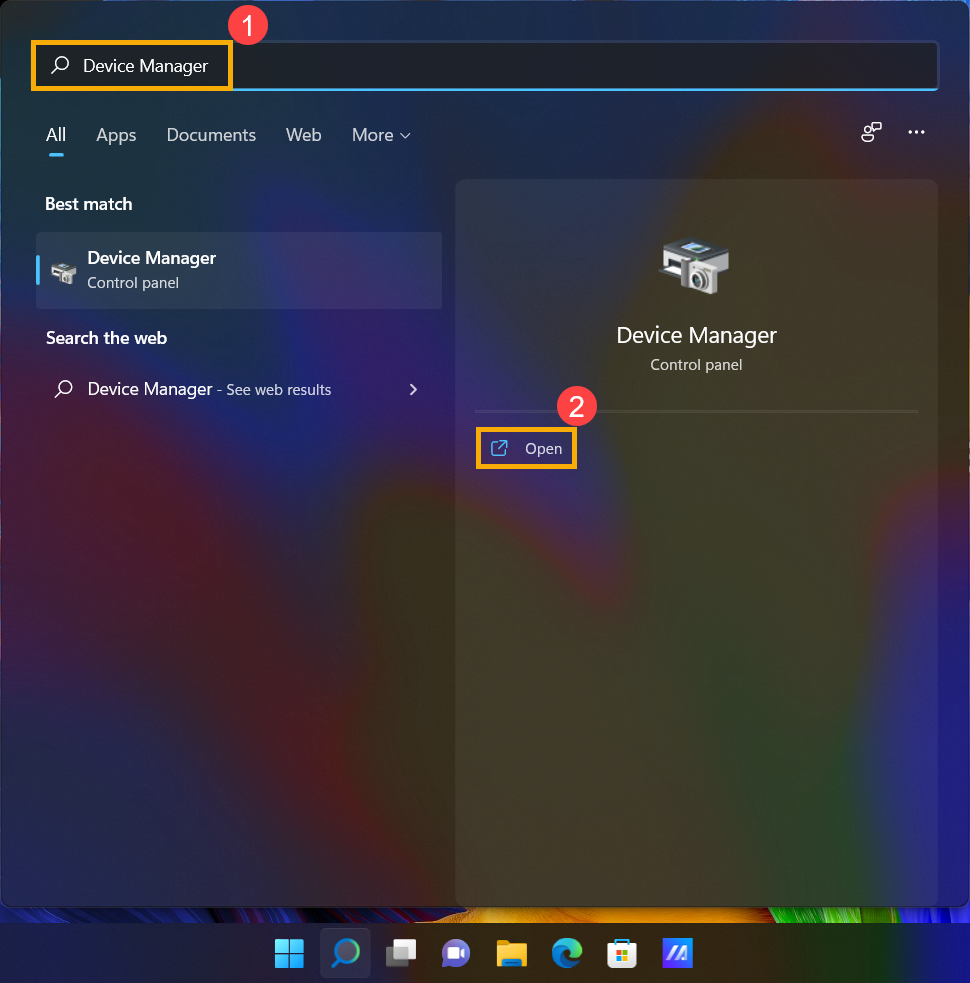
- Type and search [Device Manager] in the Windows search bar①, then click [Open]②.
- Check the arrow next to [Network adapters]③, then right-click [Intel(R) Wi-Fi 6 AX201 160MHz]④ and select [Uninstall device]⑤.
Note: The device name may be different based on different models.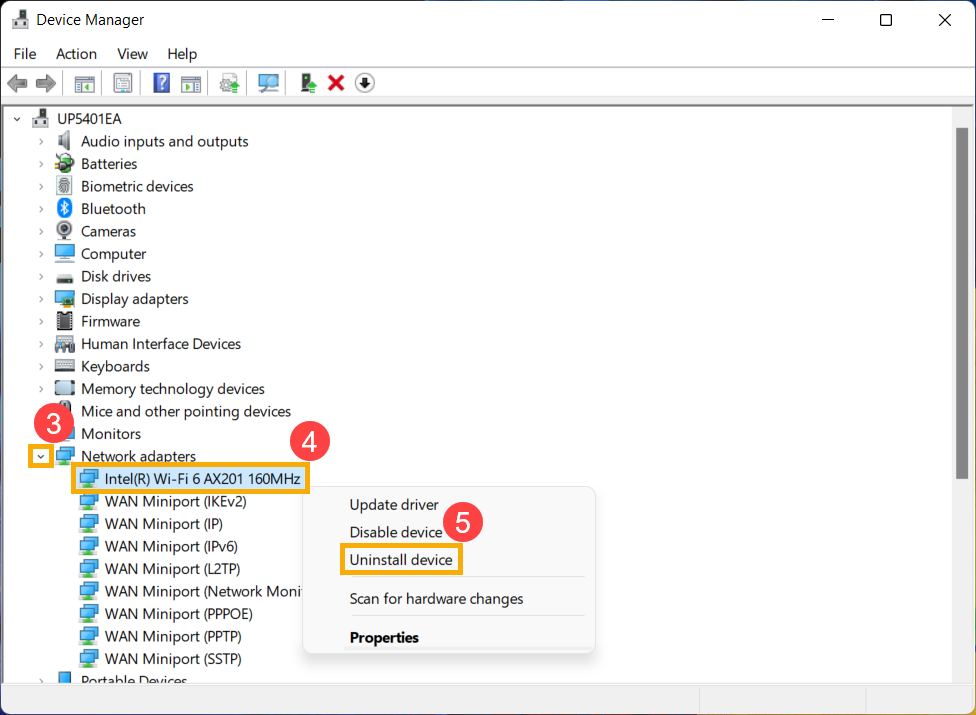
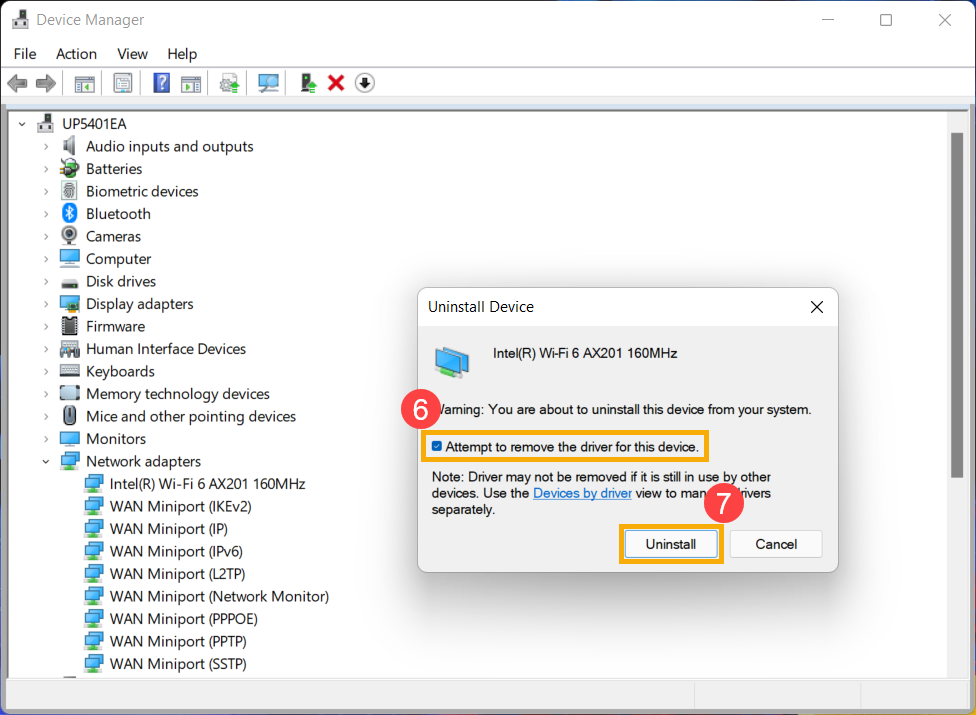
- Select [Attempt to remove the driver for this device]⑥, then click [Uninstall]⑦.
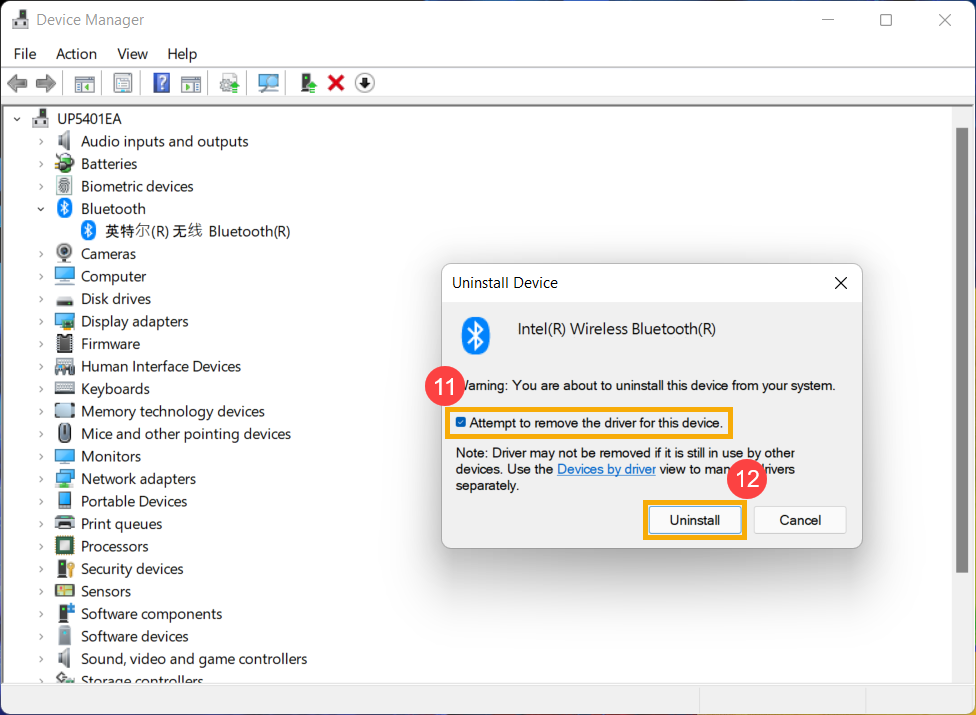
- Check the arrow next to [Bluetooth]⑧, then right-click [Intel(R) Wireless Bluetooth(R)]⑨ and select [Uninstall device]⑩.
Note: The device name may be different based on different models.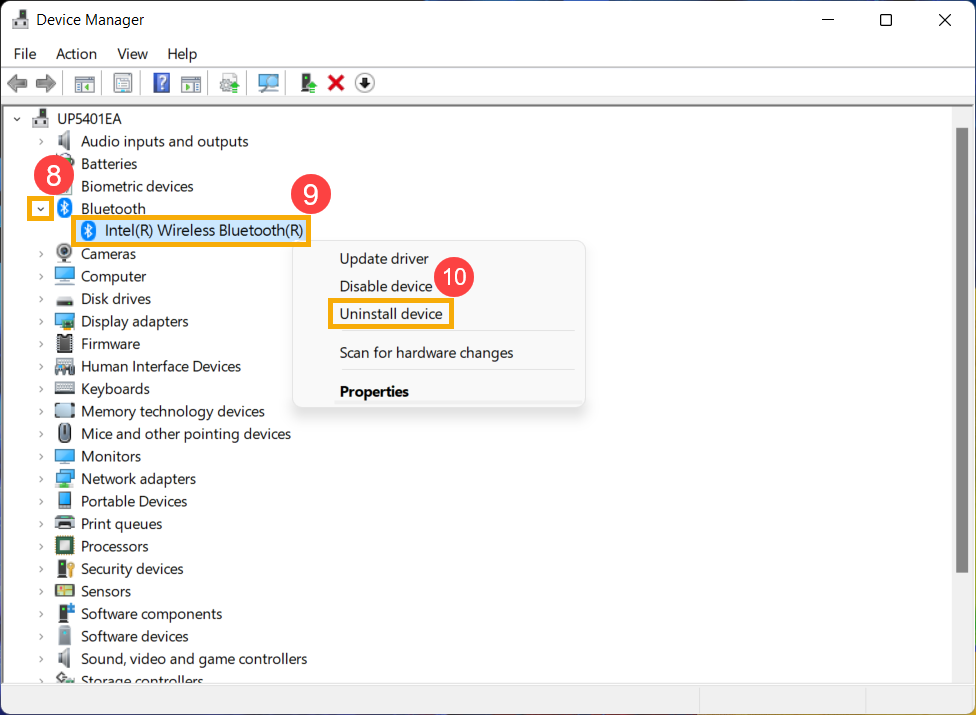
- Select [Attempt to remove the driver for this device]⑪, then click [Uninstall]⑫.
- After uninstalling the network adapter and Bluetooth, please click [Action]⑬ and select [Scan for hardware changes]⑭.
The device will reinstall the wireless network and Bluetooth, and the devices will display in the Network adapters and Bluetooth categories.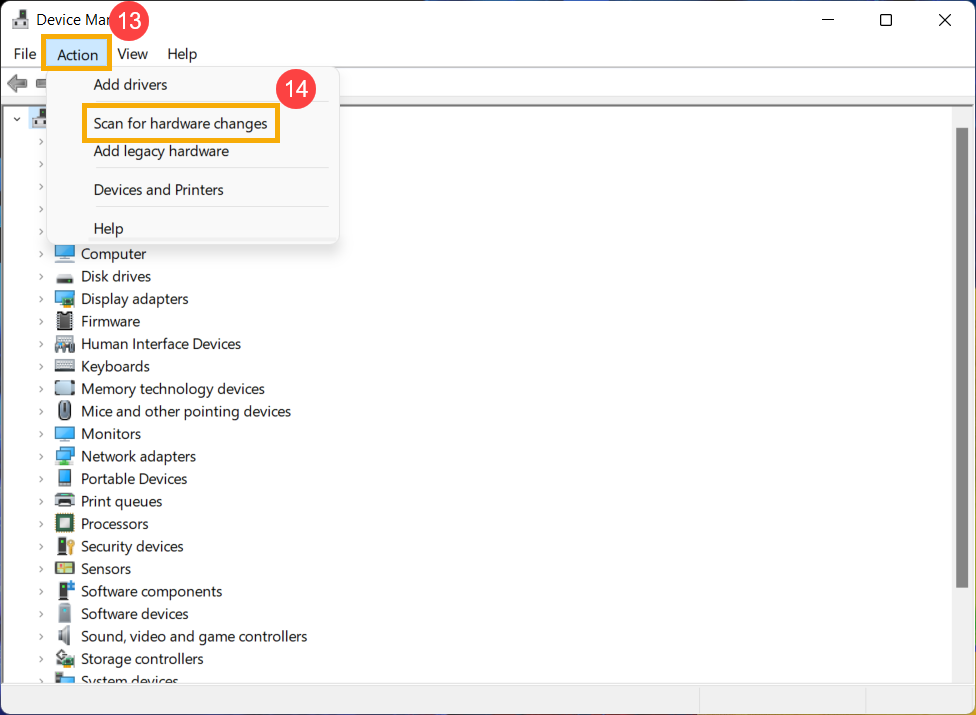
- If it fails to update the wireless or Bluetooth driver through Device manager, you can download and install the latest driver from the ASUS Support Site. Here you can learn more about How to search and download drivers.
Note: Search for the wireless or Bluetooth driver paired with the vendor name which is used on your device. The vendor name of wireless device is [Intel] as an example.

If the problem persists, please continue the next troubleshooting step.
Reset network
- Click [Start menu]
 ①, then select [Settings]
 ②.
②. 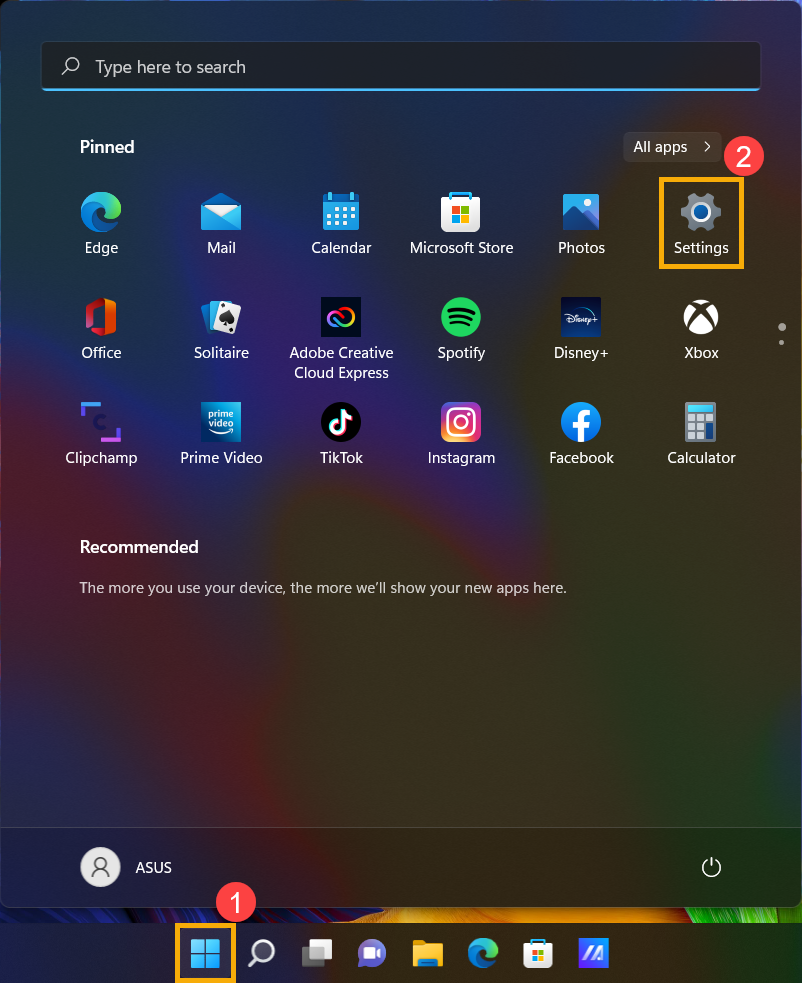
- Select [Network & internet]③, then select [Advanced network settings]④.
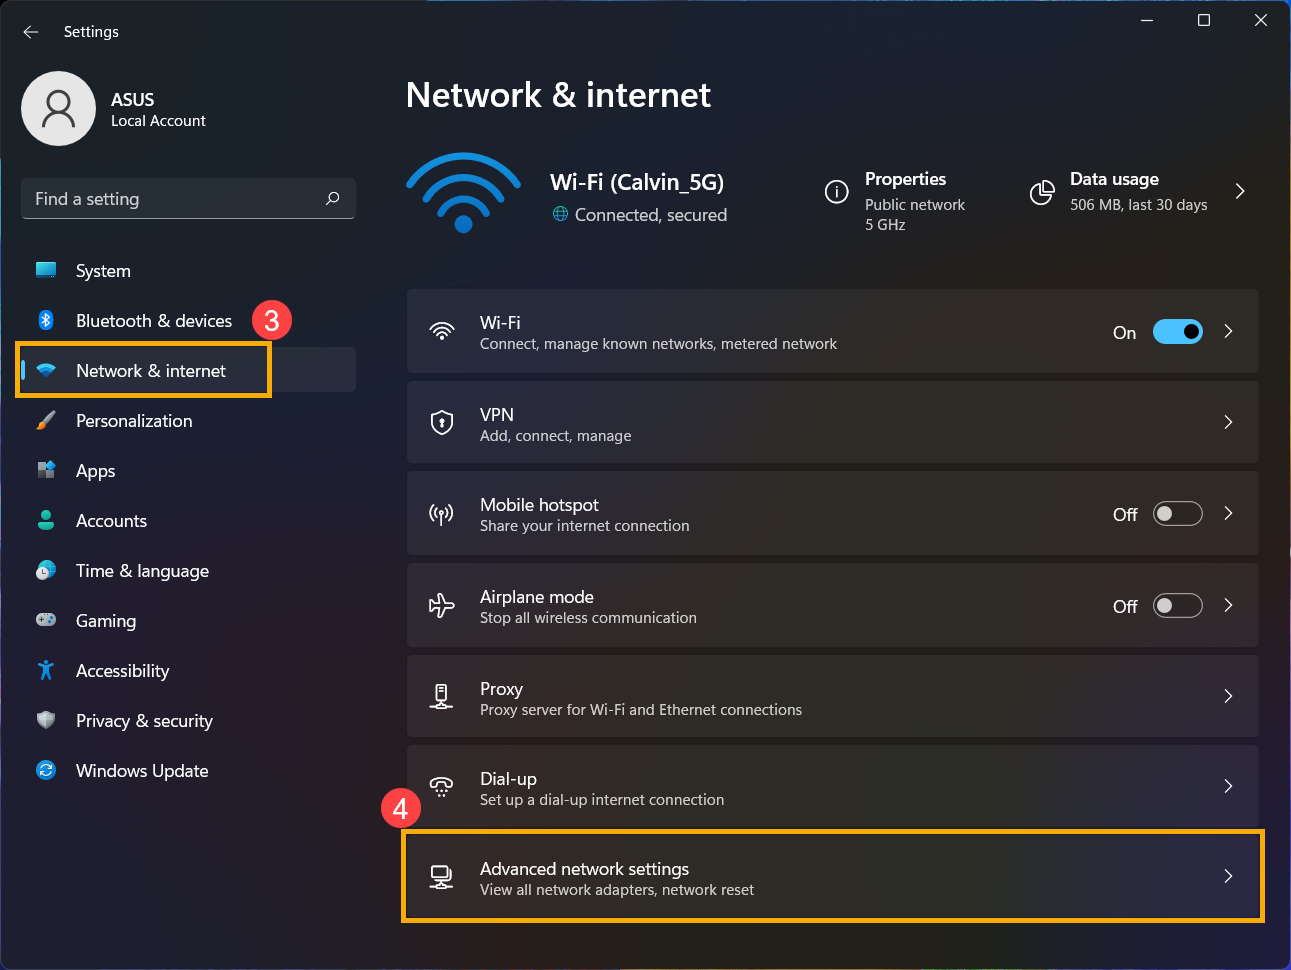
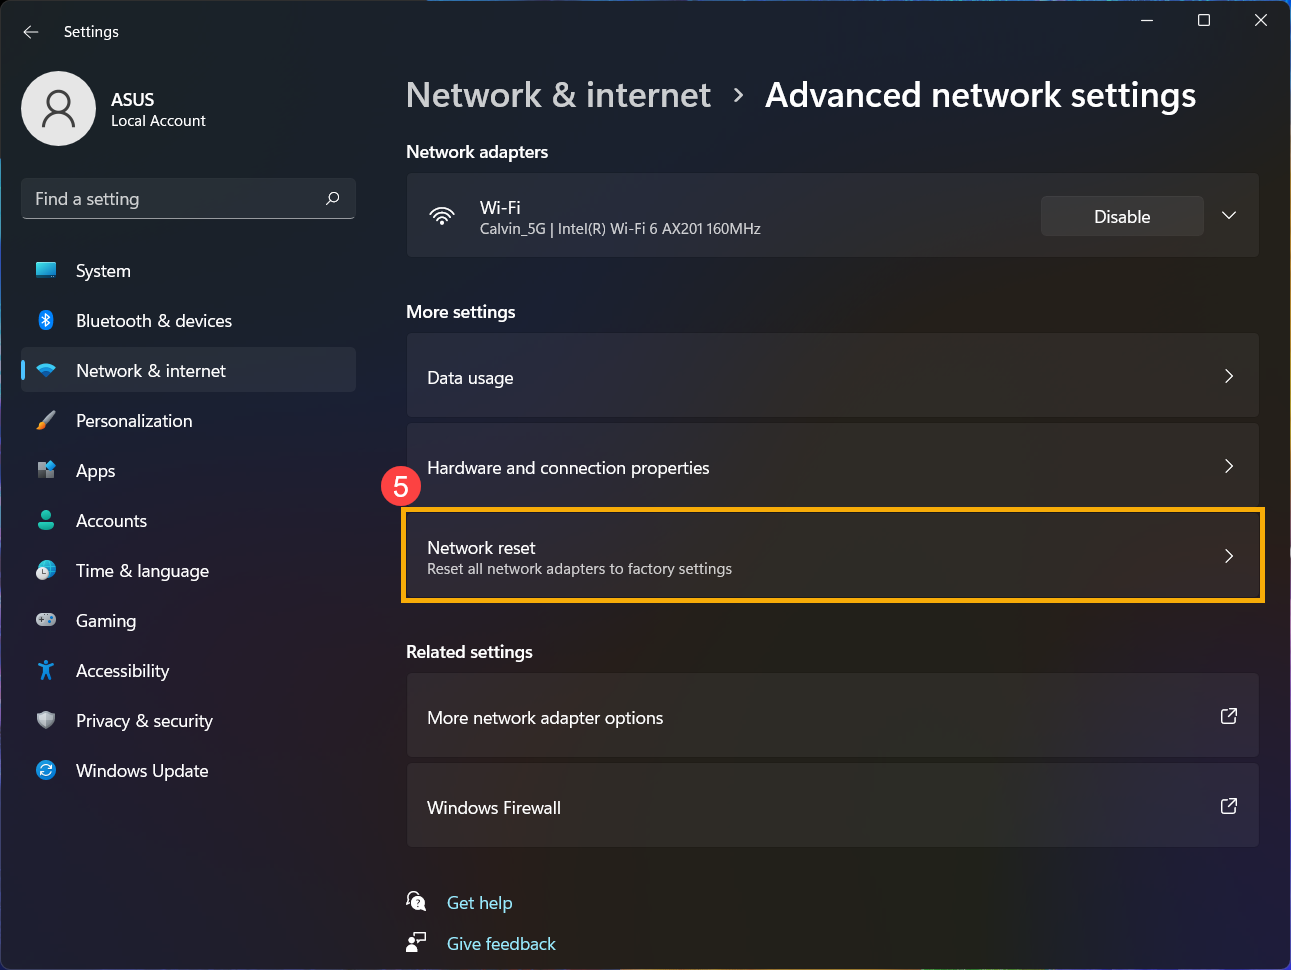
- Select [Network reset]⑤.
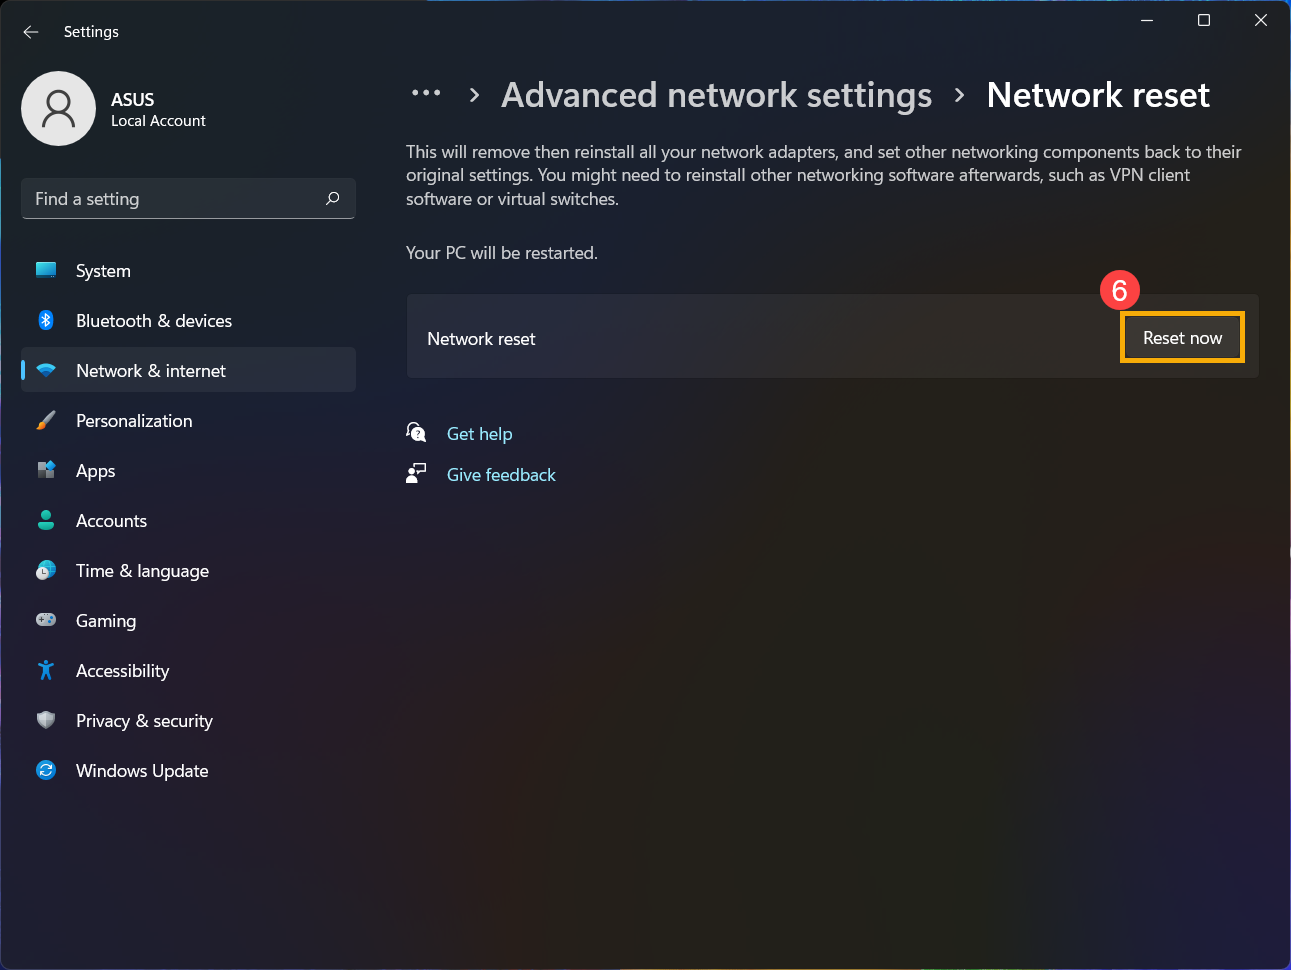
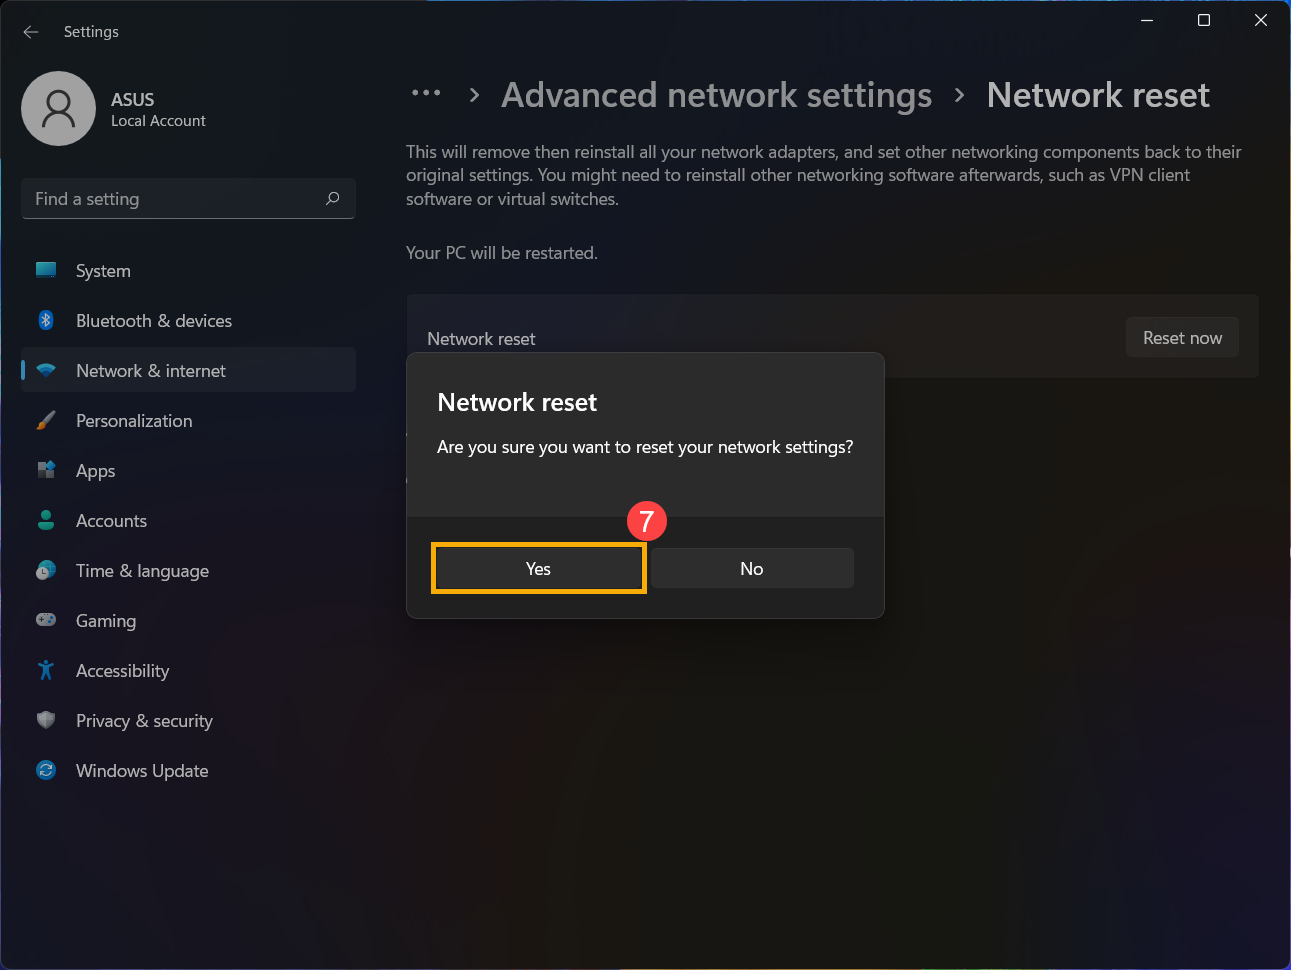
- Click [Reset now]⑥, then select [Yes]⑦. Your device will be restarted after the reset is completed.
- If the problem persists, please continue the next troubleshooting step.
Reset internet browser
If you fail to connect to internet by the browser but the chatting app is working normally, you can try to reset the browser to solve this issue.
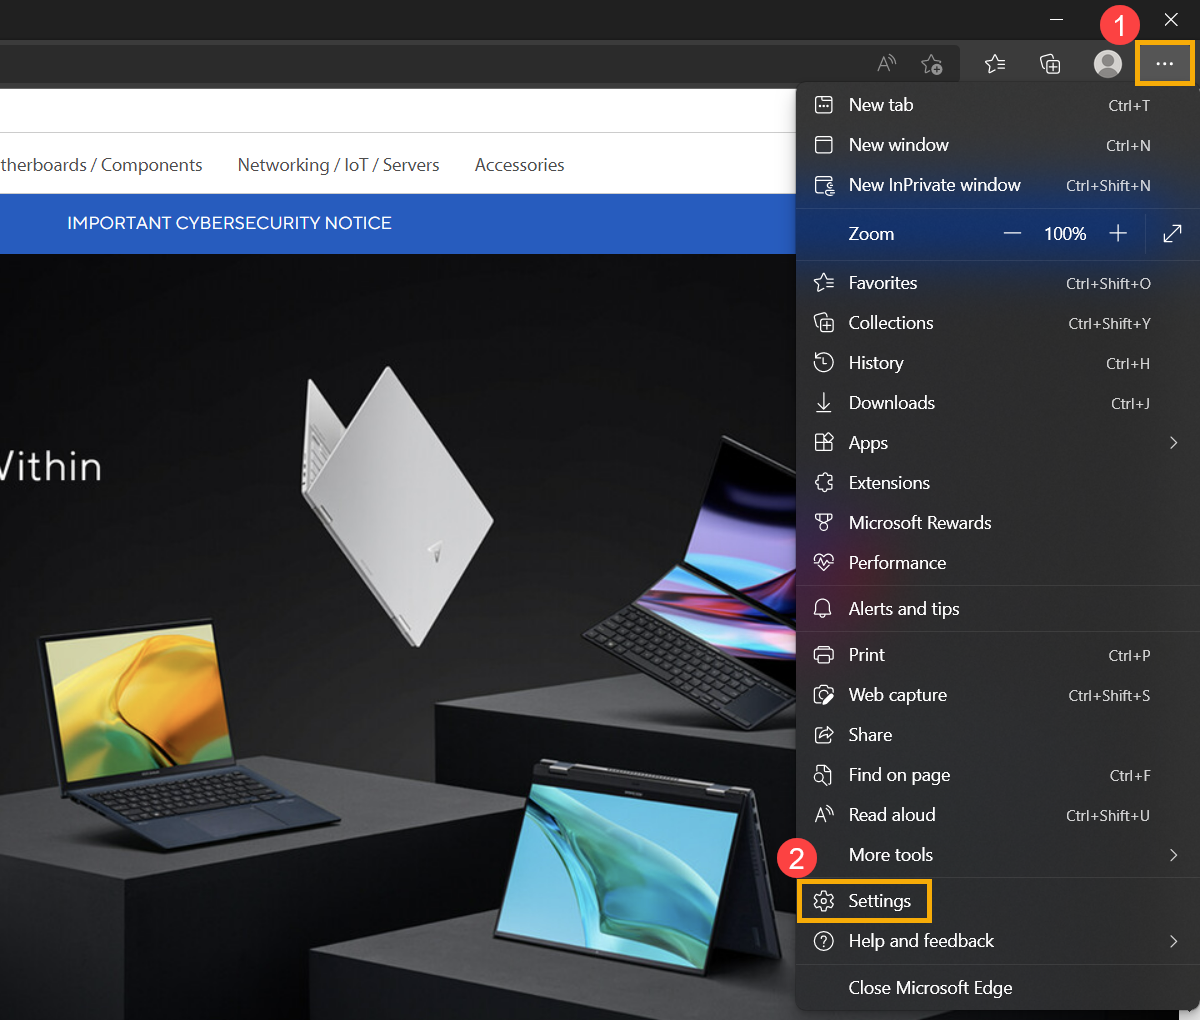
- Take Microsoft Edge for example. Click the [Settings and more]
 icon① on the right top corner and then select [Settings]②.
- Select [Reset settings]③ and click [Restore settings to their default values]④.
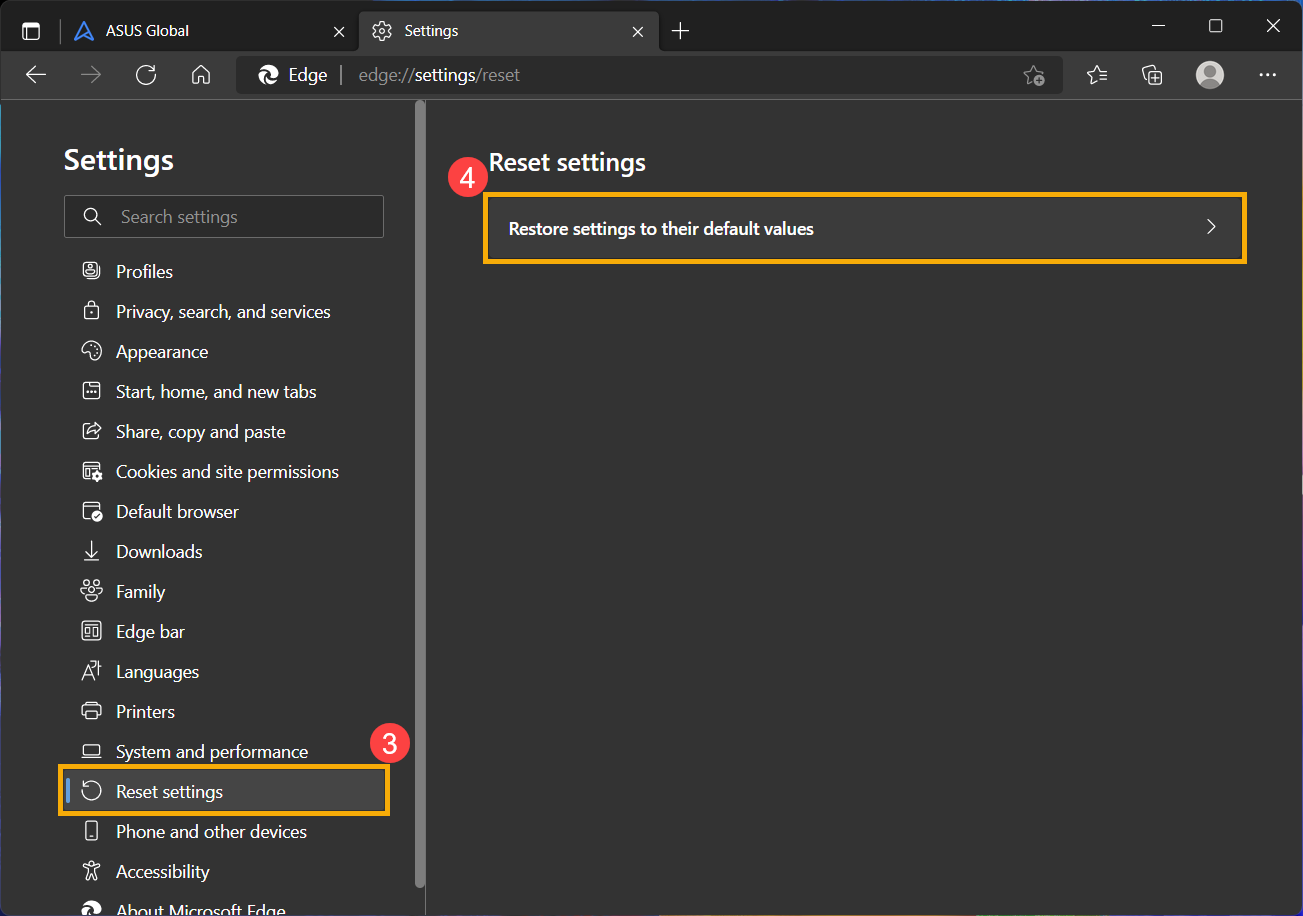
- Select [Reset]⑤.
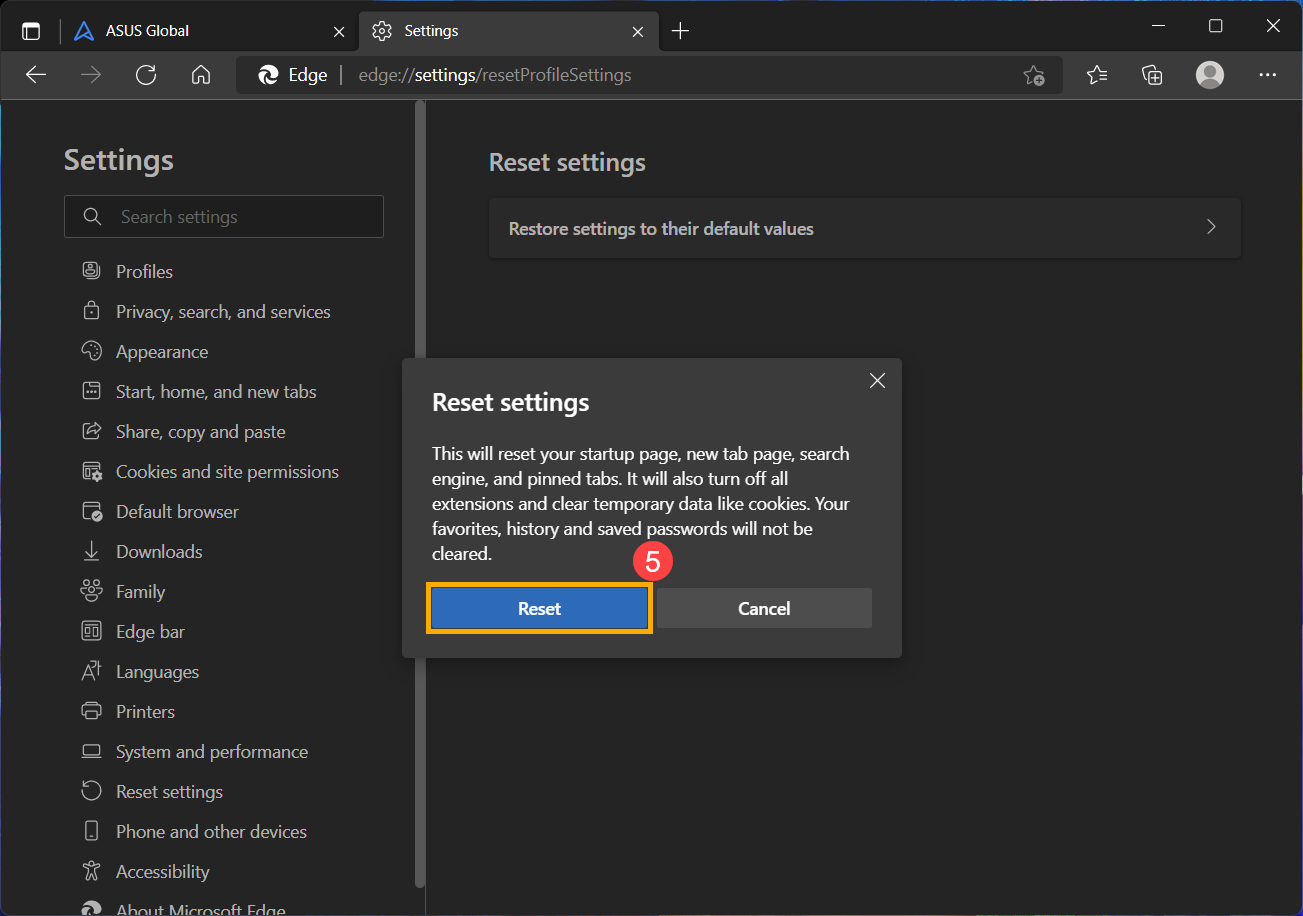
- If the problem persists, please continue the next troubleshooting step.
Update BIOS, Windows packages, and drivers
Regularly updating BIOS, Windows, and drivers can enhance system stability and performance. Ensure that your device is using the latest versions. Learn more about updating BIOS:
How to update the BIOS version in Windows system
How to use EZ Flash to update the BIOS version
(For desktop products, please refer to ASUS Motherboard EZ Flash 3 Introduction.)
Learn more about updating Windows and drivers:
How to update drivers via System Update in MyASUS
If the problem persists after you have updated BIOS/Windows packages/drivers to the date, proceed to the next troubleshooting step.
Perform CMOS Reset/Hard Reset
Try performing an EC (Embedded Controller) reset, RTC (Real-Time Clock) reset, or a hard reset to restore hardware to default settings and resolve Wi-Fi issues. Refer to the following articles for detailed steps:
- Notebook/All-in-One PC/Gaming handheld: How to Reset the Embedded Controller (EC), Real-Time Clock (RTC), and Perform a Hard Reset
- Desktop PC: How to clear CMOS
If the issue persists after performing the CMOS clear (EC reset), proceed to the next troubleshooting step.
Restore the system from restore point
If the problem happens recently, and if you have ever created a restore point or there is an automatic system restore existed, try to restore the device to a point before the problem began to resolve the problem. Here you can learn more about How to use restore point to restore the system. If the problem persists, please continue the next troubleshooting step.
Reset your PC
If the problem persists after all troubleshooting steps are completed. Please backup your personal files, then reset the device to back to its original configuration. Here you can learn more about How to reset the system.
You also can refer to the suggestions of Microsoft, here you can learn more about how to fix network connection issues in Windows.
If your problem persists after following the above troubleshooting steps, the problem may be caused by the Internet service provider (ISP) or Internet equipment (modem/Internet cable/wireless share device). We suggest you should contact your ISP or try to implement the troubleshooting of Internet equipment. Here you can learn more about the troubleshooting of ASUS router:
[Troubleshooting] Failed Internet access through router
[Troubleshooting] Wi-Fi signal is often disconnected
Windows 10 operating system
Make sure the wireless function is activated
Click [Network & Internet] icon on the taskbar①, then make sure Wi-Fi is [Turn on]②.
Note: When the Wi-Fi icon highlights to blue, it means the function is enabled.
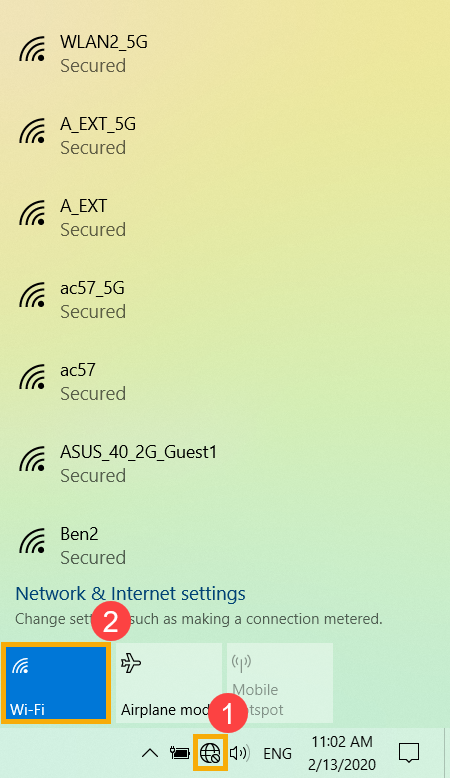
If the problem persists, please continue the next troubleshooting step.
Restore BIOS settings
- Access the BIOS setup screen on the device.
When the device is not powered on, press and hold the [F2] key on the keyboard, then press the power button to turn on the device. Keep holding the [F2] key until the BIOS setup screen appears, then release the [F2] key. Learn more about How to enter the BIOS setup screen.
Note: For some older desktop models, you may need to press and hold the [Del] key during startup to access the BIOS configuration screen.
Note: Gaming handhelds need to press and hold the [Volume Down] button, then press the power button to turn on the device. - Once in the BIOS setup screen, please refer to the article: How to restore BIOS settings.
- When reset the BIOS settings is completed, the device will restart and enter Windows. Please check the problem again. If the problem persists, please continue the next troubleshooting step
Turn the device off completely
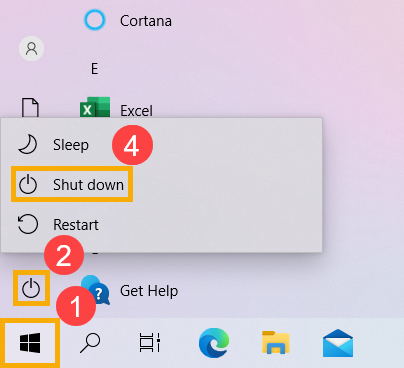
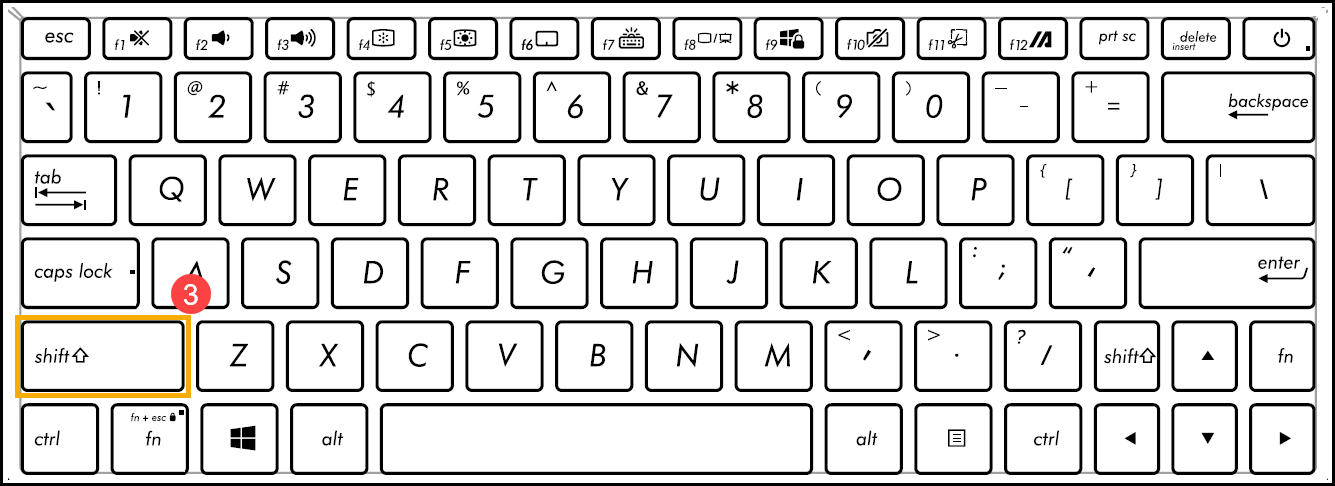
Click the [Start] icon on the far left of the taskbar①, select the [Power]
 icon②, then press and hold the [Shift] key③ on the keyboard as well as select [Shut down]④ at the same time. Your device will be turned off completely.
After turning the device off completely, please restart your device and check whether the problem is resolved. If the problem persists, please continue the next troubleshooting step.
Run Wireless Diagnosis in MyASUS
Use System Diagnosis in MyASUS to check wireless connectivity problems.
- Type and search [MyASUS] in the Windows search bar①, then click [Open]②.
Note: If you cannot find MyASUS, it may not be installed on your device. Refer to How to install MyASUS.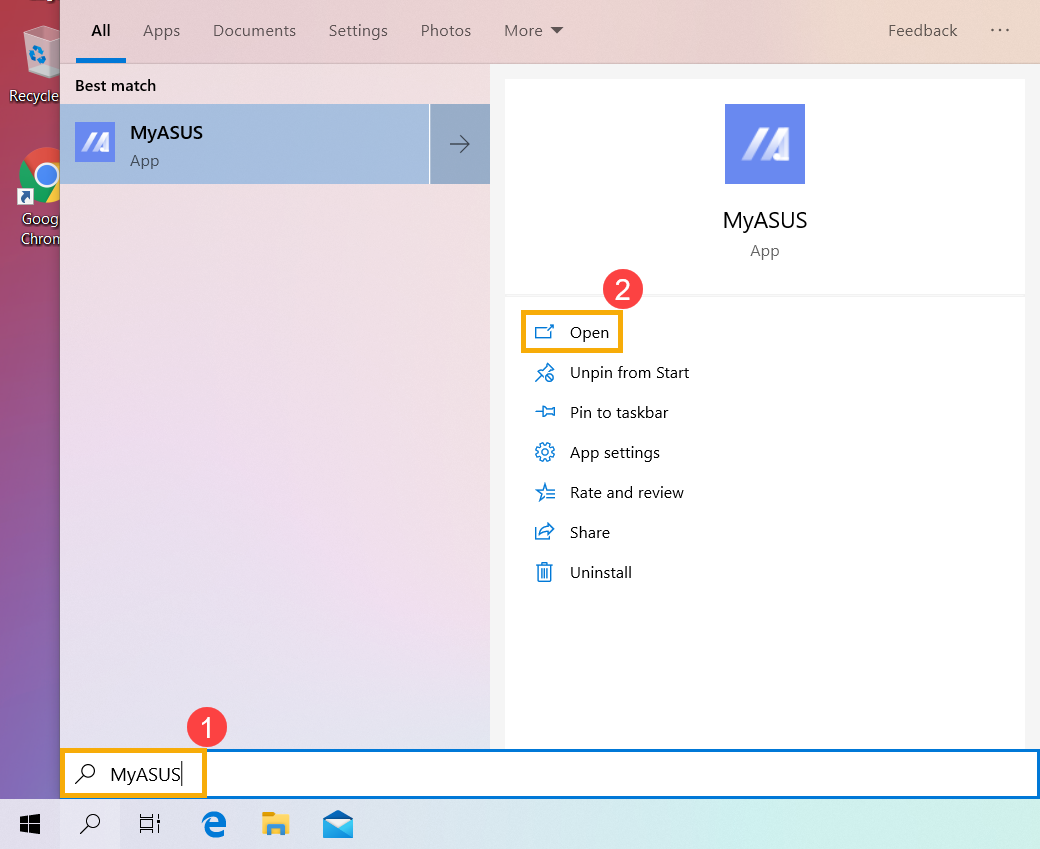
- In the MyASUS app, click [System Diagnosis]③.
Note: If your device does not display the system diagnosis page in MyASUS software, it means your device does not support this feature. Continue to the next section for further troubleshooting. Here you can learn more about Why can I only see the partial features in the MyASUS app.
- In [Diagnosis Tool]④, click [Wireless connectivity problems]⑤. Here you can learn more about MyASUS System Diagnosis - Introduction.

- Click [Checkup]⑥.

- After the check, click [Results]⑦. If errors are detected, try the troubleshooting suggestions provided by MyASUS. If the problem persists, proceed to the next troubleshooting step.

Wireless network adapter with Yellow Exclamation in Device Manager
If you experience that wireless network adapter with Yellow Exclamation in Device Manager, please try the following way to solve it. (This step is for laptop products only. For desktop, AIO PCs, and gaming handheld, please continue the next troubleshooting.)

- Remove the AC adapter.
Note: Please don’t remove the AC adapter for ASUS laptop TP420IA and UX425IA model. (These models need to plug in the AC adapter to do the Hard reset process.) - Press and hold the Power button for 40 seconds, to perform the hardware reset.
- Wait for 90 seconds, then your PC will automatically boot up.
- After your PC boots up, please check the wireless network adapter in Device Manager again whether it is normal. If the problem persists, please continue the next troubleshooting step.

Update the wireless driver through Device Manager
If the versions are too different between the Wireless and Bluetooth drivers, it may cause a software compatible issue. So, we recommend updating both drivers to the latest version.
- Right-click [Start menu]①, then click [Device Manager]②.
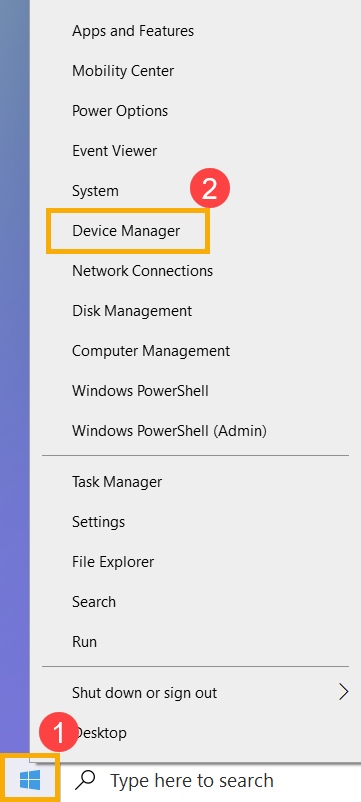
- Check the arrow next to [Network adapters]③, then right-click [Intel(R) Dual Band Wireless-AC 8265]④ and select [Uninstall device]⑤.
Note: The device name may be different based on different models.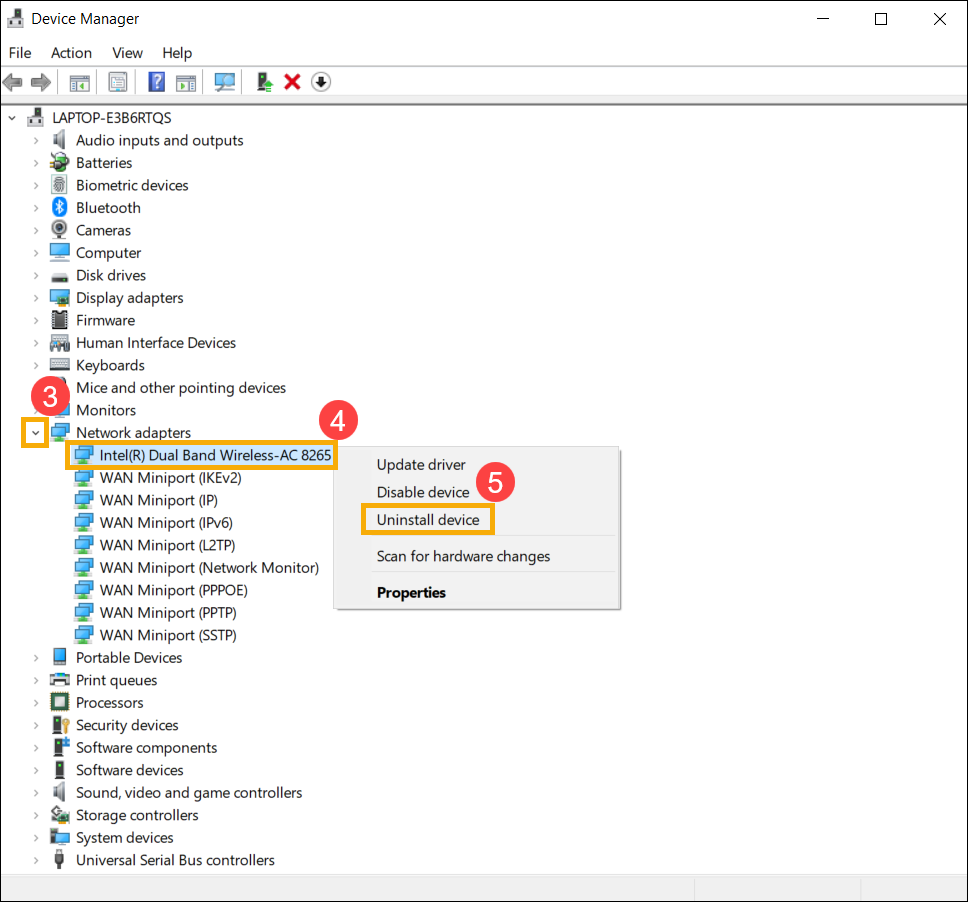
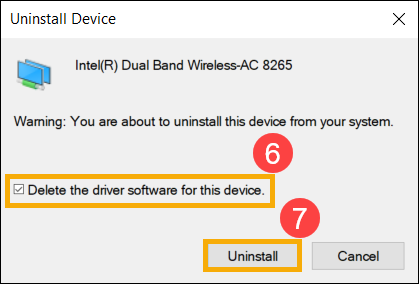
- Select [Delete the driver software for this device]⑥, then click [Uninstall]⑦.
- Check the arrow next to [Bluetooth]⑧, then right-click [Intel(R) Wireless Bluetooth(R)]⑨ and select [Uninstall device]⑩.
Note: The device name may be different based on different models.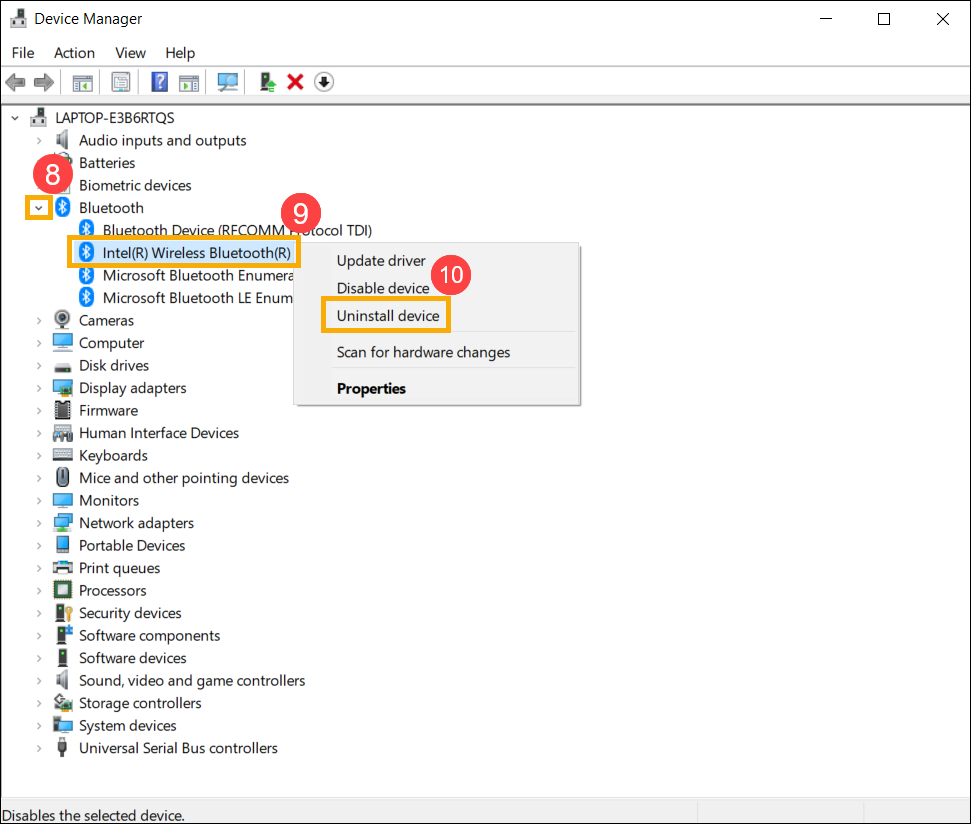
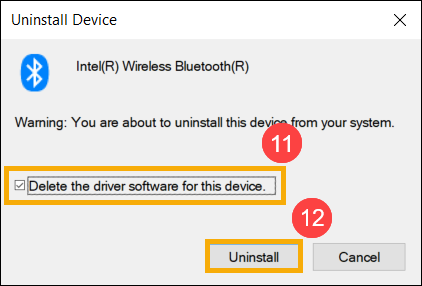
- Select [Delete the driver software for this device]⑪, then click [Uninstall]⑫.
- After uninstalling the network adapter and Bluetooth, please click [Action]⑬ and select [Scan for hardware changes]⑭.
The device will reinstall the wireless network and Bluetooth, and the devices will display in the Network adapters and Bluetooth categories.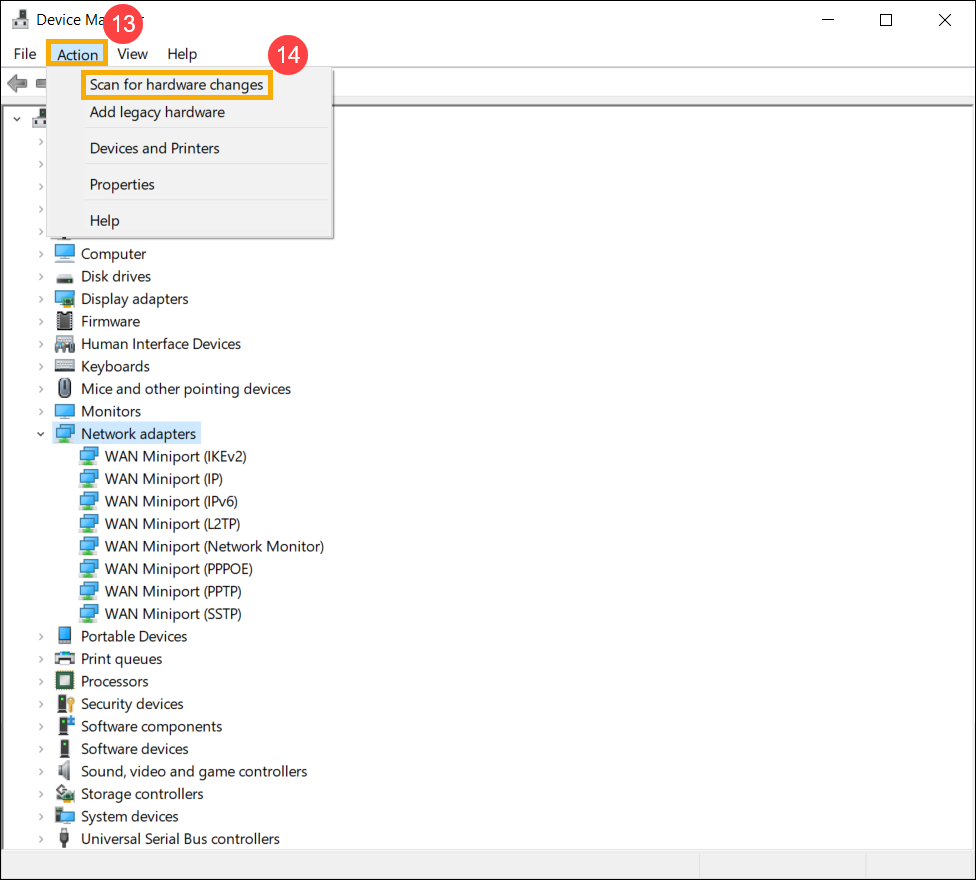
- If it fails to update the wireless or Bluetooth driver through Device manager, you can download and install the latest driver from the ASUS Support Site. Refer to How to search and download drivers.
Note: Search for the wireless or Bluetooth driver paired with the vendor name which is used on your device. The vendor name of wireless device is [Intel] as an example.

- If the problem persists, please continue the next troubleshooting step.
Reset network
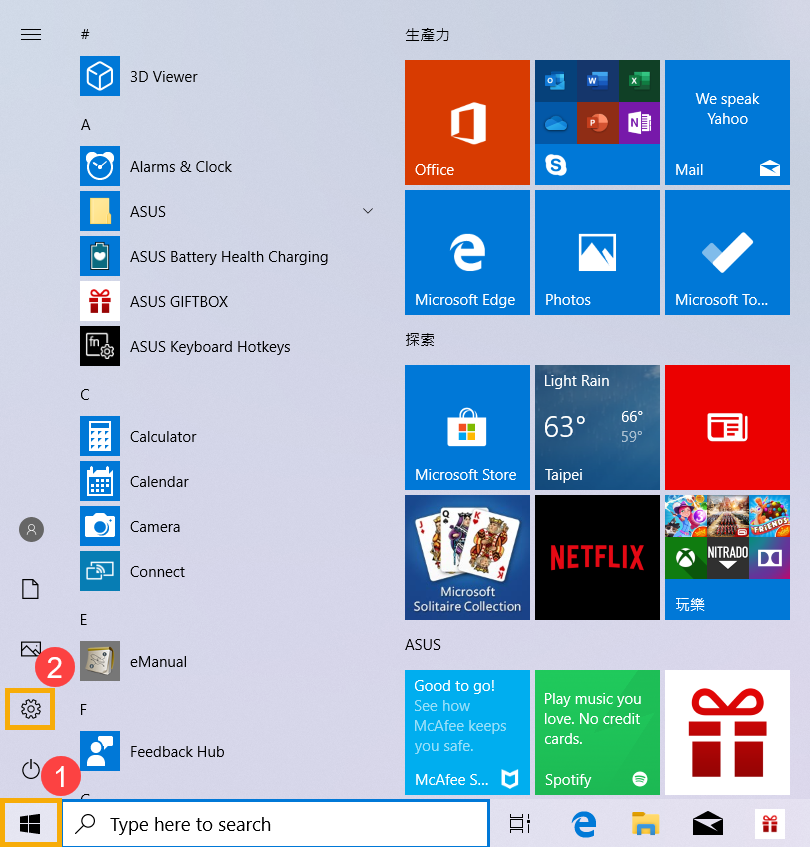
- Click [Start menu]①, then click [Settings]②.
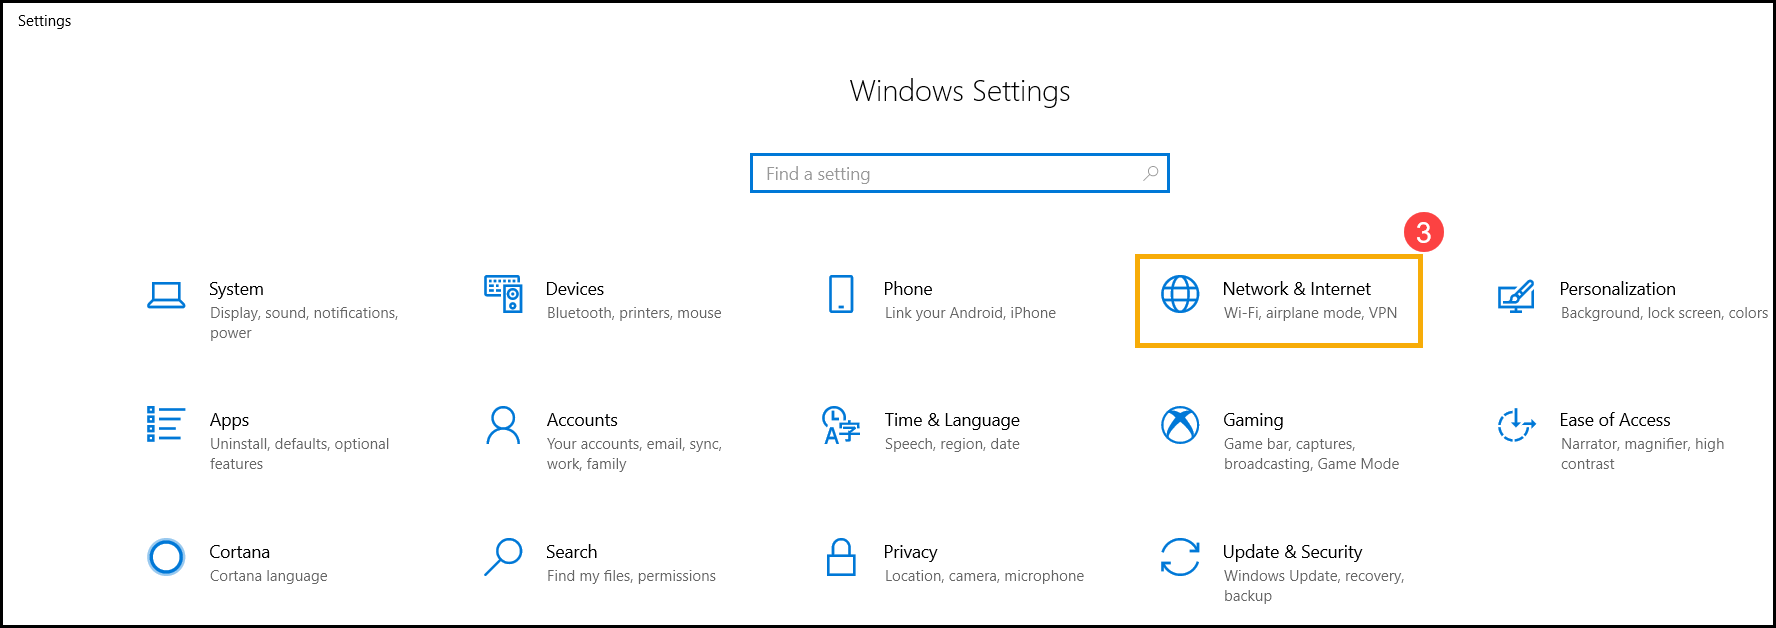
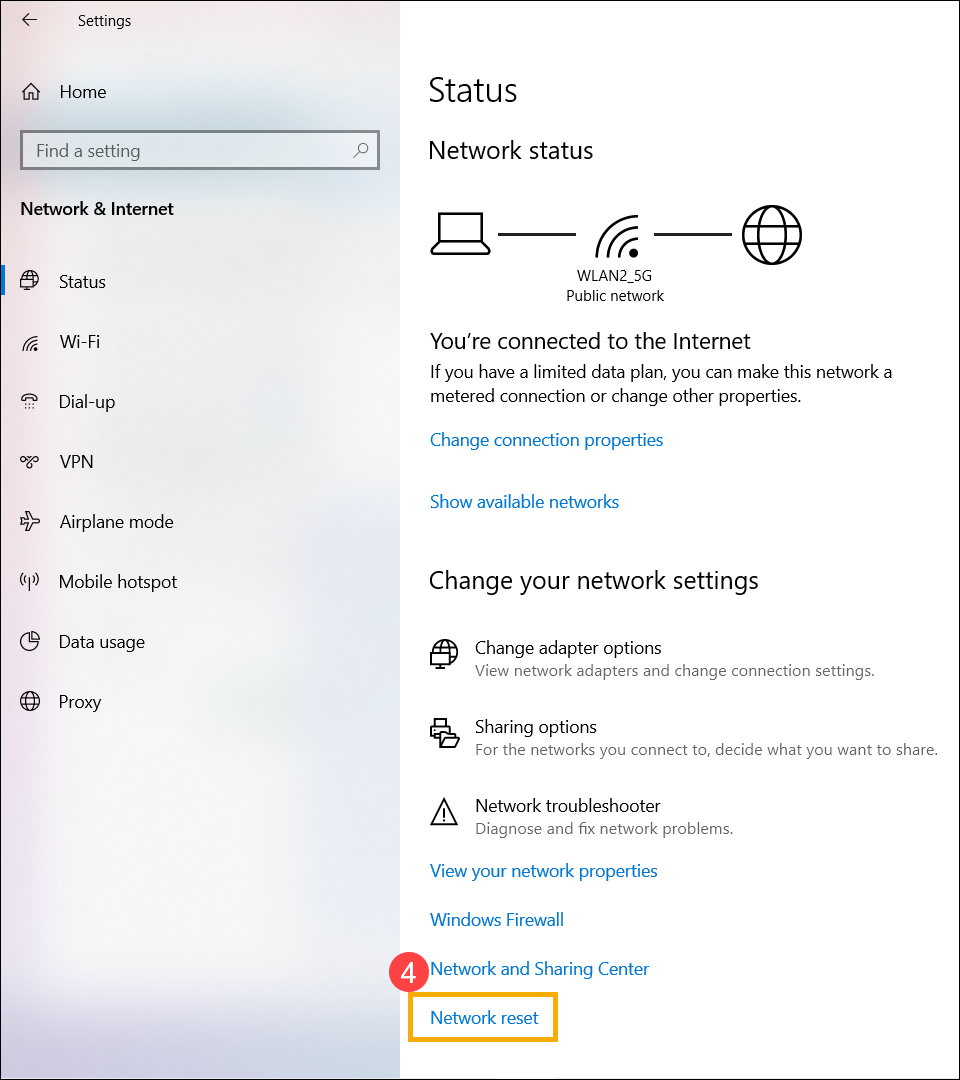
- Select [Network & Internet]③, then click [Network reset]④.
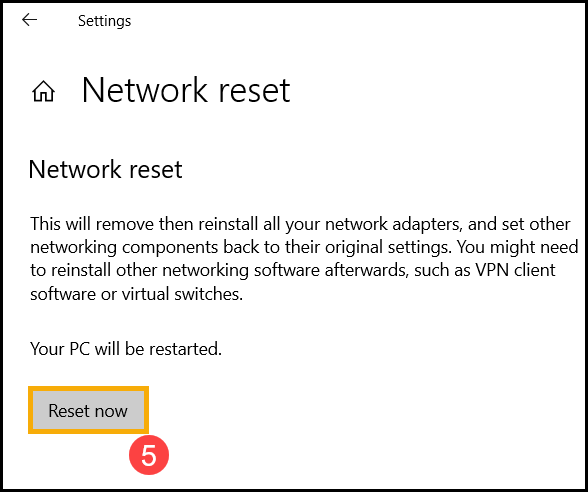
- Click [Reset now]⑤, then select [Yes]⑥. Your device will be restarted after the reset is completed.
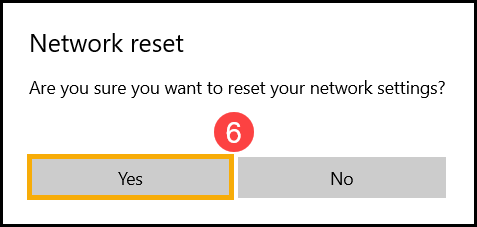
- If the problem persists, please continue the next troubleshooting step.
Reset internet browser
If you fail to connect to internet by the browser but the chatting app is working normally, you can try to reset the browser to solve this issue.
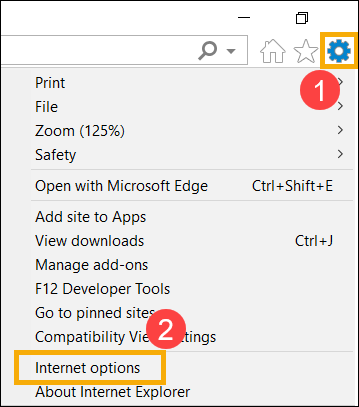
- Take Internet Explorer 11 (IE11) for example. Click the [Gear sign]① on the right top corner and choose [Internet Options]②.
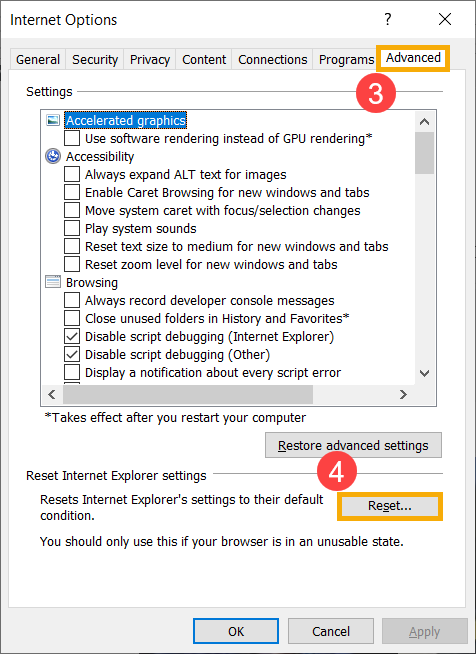
- Choose [Advanced]③ and click [Reset]④ to proceed.
- If the problem persists, please continue the next troubleshooting step.
Update BIOS, Windows packages, and drivers
Regularly updating BIOS, Windows, and drivers can enhance system stability and performance. Ensure that your device is using the latest versions. Learn more about updating BIOS:
How to update the BIOS version in Windows system
How to use EZ Flash to update the BIOS version
(For desktop products, please refer to ASUS Motherboard EZ Flash 3 Introduction.)
Learn more about updating Windows and drivers:
How to update drivers via System Update in MyASUS
If the problem persists after you have updated BIOS/Windows packages/drivers to the date, proceed to the next troubleshooting step.
Perform CMOS Reset/Hard Reset
Try performing an EC (Embedded Controller) reset, RTC (Real-Time Clock) reset, or a hard reset to restore hardware to default settings and resolve Wi-Fi issues. Refer to the following articles for detailed steps:
- Notebook/All-in-One PC/Gaming handheld: How to Reset the Embedded Controller (EC), Real-Time Clock (RTC), and Perform a Hard Reset
- Desktop PC: How to clear CMOS
If the issue persists after performing the CMOS clear (EC reset), proceed to the next troubleshooting step.
Restore the system from restore point
If the problem happens recently, and if you have ever created a restore point or there is an automatic system restore existed, try to restore the device to a point before the problem began to resolve the problem. Here you can learn more about How to use restore point to restore the system. If the problem persists, please continue the next troubleshooting step.
Reset your PC
If the problem persists after all troubleshooting steps are completed. Please backup your personal files, then reset the device to back to its original configuration. Here you can learn more about How to reset the system.
You also can refer to the suggestions of Microsoft, here you can learn more about how to fix network connection issues in Windows.
If your problem persists after following the above troubleshooting steps, the problem may be caused by the Internet service provider(ISP) or Internet equipment (modem/Internet cable/wireless share device). We suggest you should contact your ISP or try to implement the troubleshooting of Internet equipment. Here you can learn more about the troubleshooting of ASUS router:
If your problem is not resolved, please contact ASUS customer service center for further assistance.