MyASUS Frequently Asked Question (FAQ)
Table of Contents
[Phone] MyASUS App - Introduction
[Motherboard] MyASUS introduction
[Notebook] MyASUS-Unable to reset GPU mode to default value
[Notebook] MyASUS - Introduction
[Notebook] MyASUS- Settings
[Notebook] MyASUS - Device Settings
[Notebook] MyASUS - User Center
[Notebook] MyASUS - ASUS One
[Notebook] MyASUS - Customer Support
[Notebook] MyASUS - Switch and Recovery
[Notebook] MyASUS - System Diagnosis
[Notebook/Desktop/AIO] How to check and update the version of MyASUS and ASUS System Control Interface
[Notebook/Desktop/AIO] MyASUS System Diagnosis - Reset my PC and create a recovery drive
[Notebook] How to update MyASUS?
[Notebook] MyASUS - How do get the latest version of MyASUS or ASUS System Control Interface / ASUS System Control Interface V3?
[Notebook] How to install MyASUS application
[Notebook] MyASUS - Why can I only see the partial features in the MyASUS app?
[Phone] How to download MyASUS app?
[ProArt Series] MyASUS System Diagnosis - Reset my PC and create a recovery drive V2.0
[MyASUS] Warranty extension package Purchase Process
How to apply the repair request after doing Hardware Diagnostic on MyASUS?
[Notebook] Troubleshooting MyASUS issues
[Notebook] MyASUS - Introduction
New Experience in MyASUS
- New Interface Design
- Quick Access Options
- Fast Account/Product Registration
- Easy System Status Monitoring
- *Features may different from software structure or models. (learn more here)
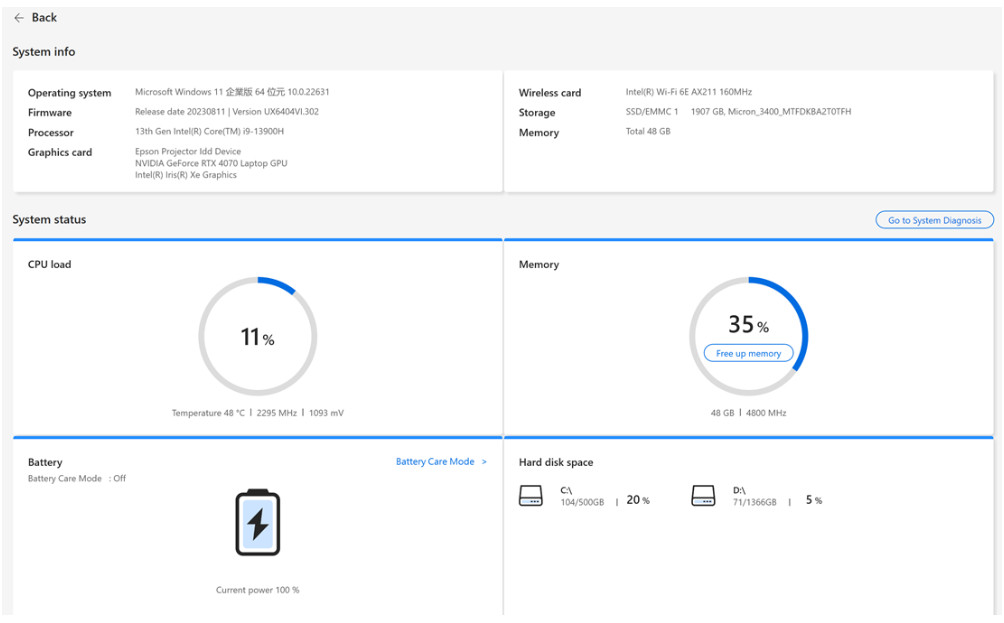
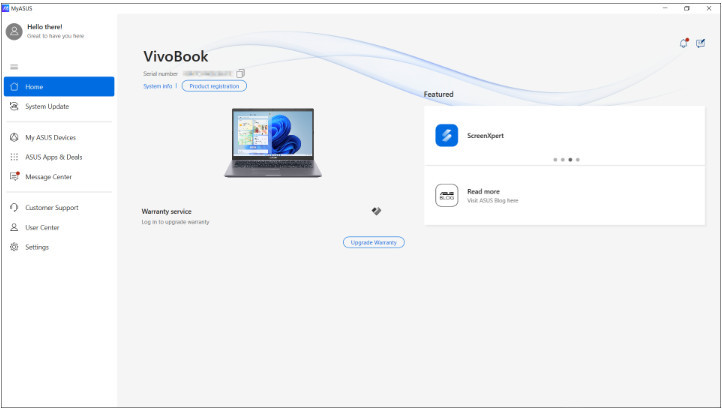
MyASUS Home Page

System info
User can find software and hardware information about the system by clicking ”System Info”.
Detailed system status can also be found here.
1. Home
The Home Page display the main features of MyASUS, users can enter appropriate pages by clicking the buttons on the Home page to access further settings and details.
Besides, user could click on “One-click diagnosis” to run system diagnosis directly.
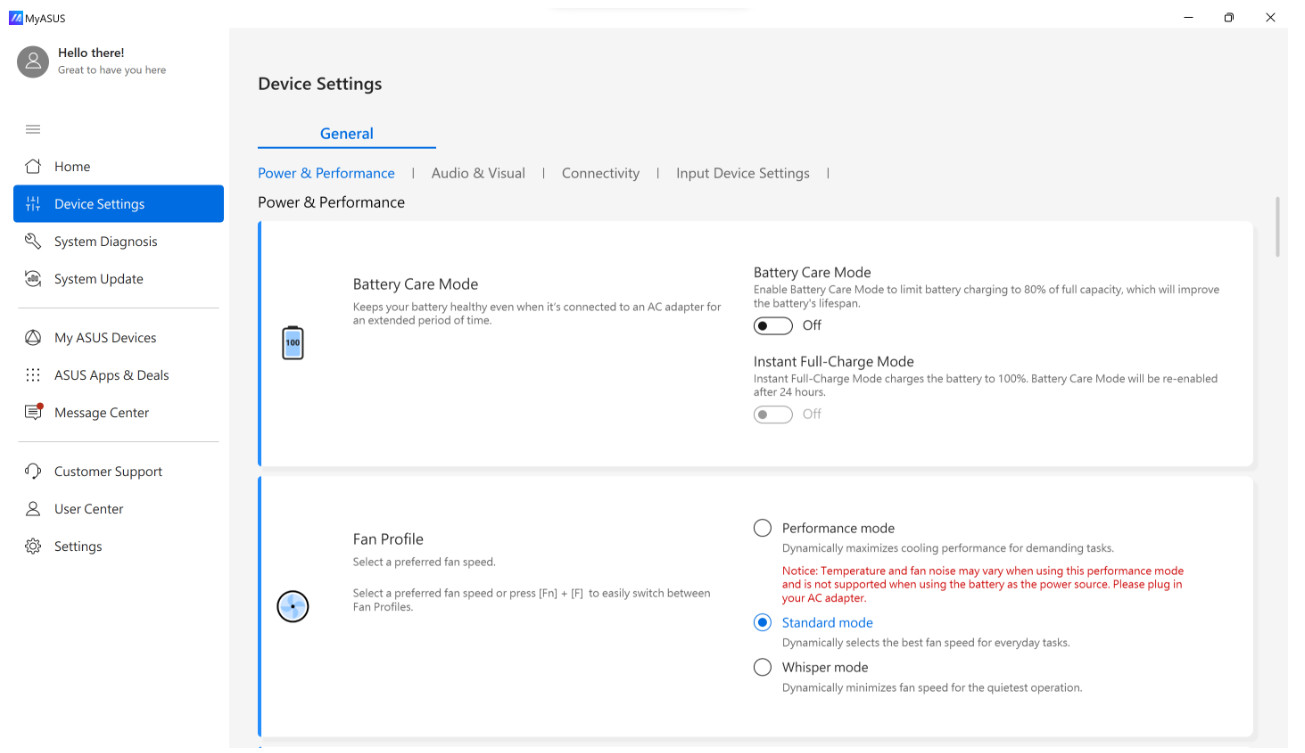
2. Device Setting
The Device Settings menu allows users to fine-tune their laptops according to their unique needs — whether it's customizing the usage experience, ensuring top-notch performance, or increasing battery life and overall device longevity.
• [Power & Performance]]
• [Audio & Visual]
• [Connectivity]
• [Input Device Settings]
• [Privacy & Security]
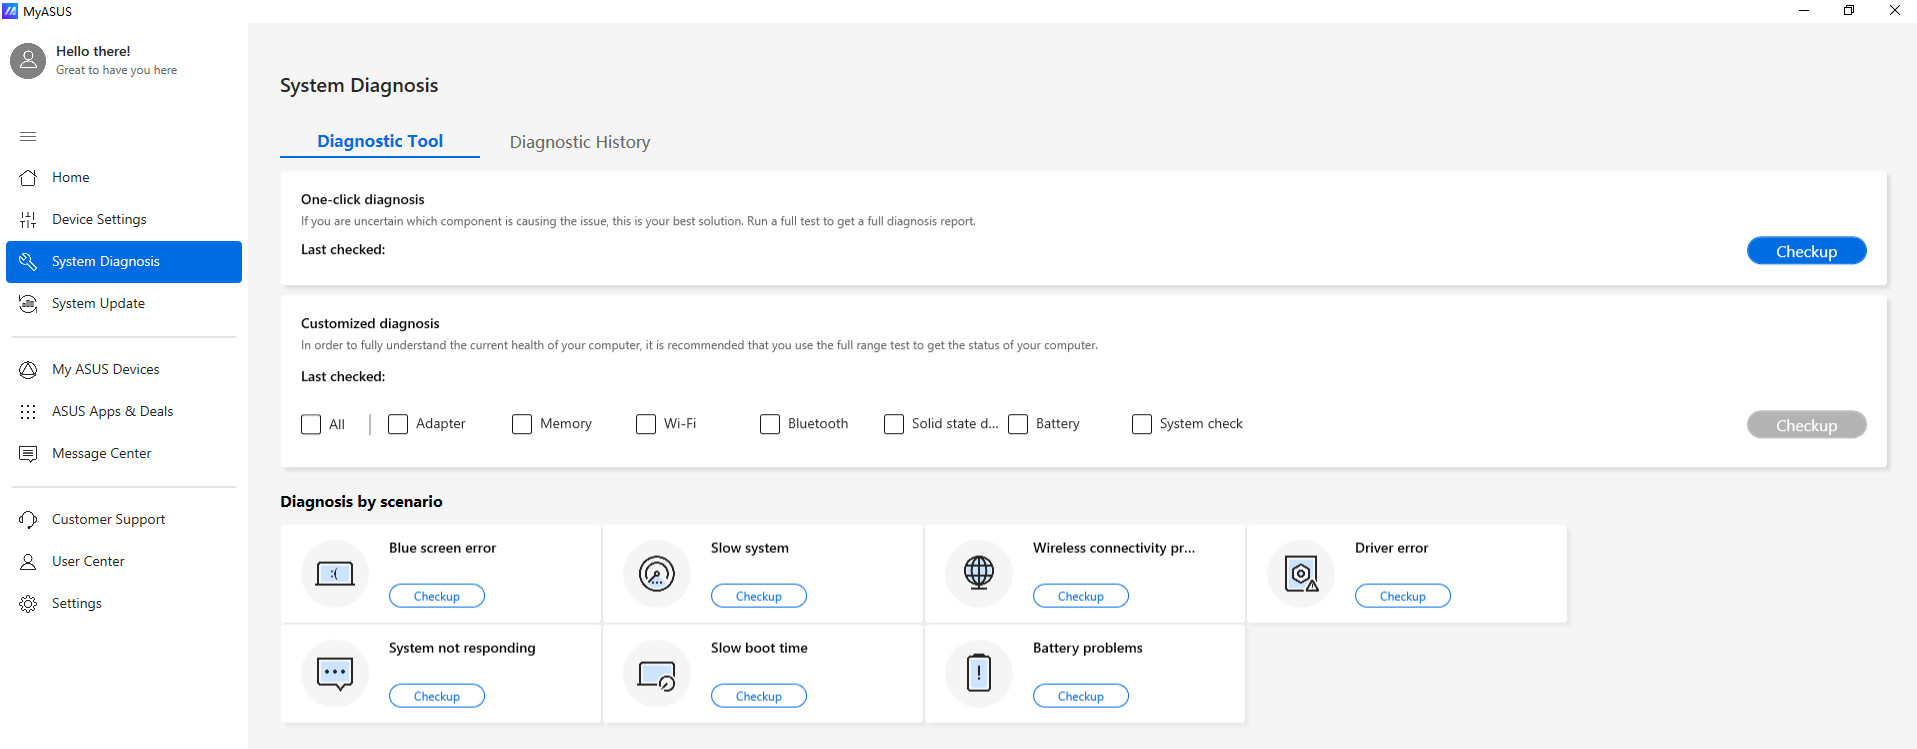
3. System Diagnosis
In the [System Diagnosis] page, it could help identify any problems that users may encounter with their laptops. It automatically reports the sources of the issues and provides instant fixing suggestions. It also helps our customer service representatives identify problems quickly and efficiently when repairing your laptop.(*Not available for Windows S mode)
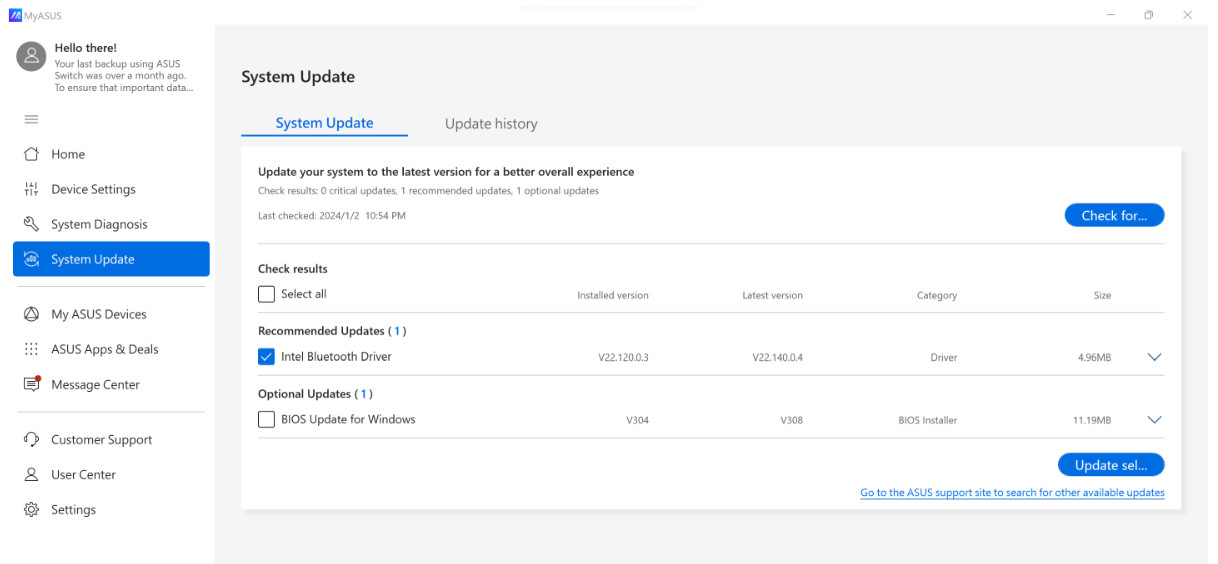
4. System Update
In the System Update page, users can update the latest software, including BIOS, drivers, and firmware in just one-click. (*Not available for Windows S mode)
5. My ASUS Devices
In this page, you can quickly and conveniently set your ASUS Routers and ASUS Display when it is connecting to your personal computer.
6. ASUS Apps & Deals
ASUS Apps & Deals does not only provide a quick access to ASUS in-house apps but also give users updates on latest exclusive offers.
[ASUS Apps]: You can quick launch or download ASUS in-house apps in this tab, including ScreenXpert, GlideX & ASUS Smart Input. (*Not available for Windows S mode)
Besides, you can get access to ASUS Switch function in this page as well.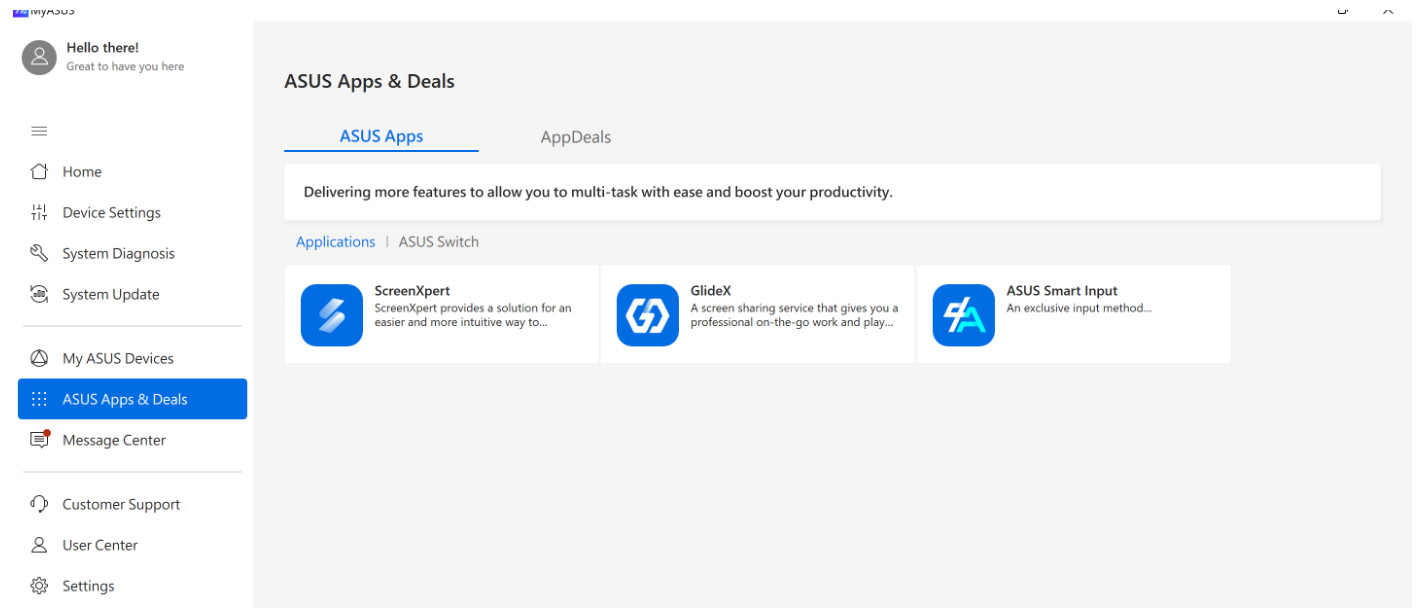
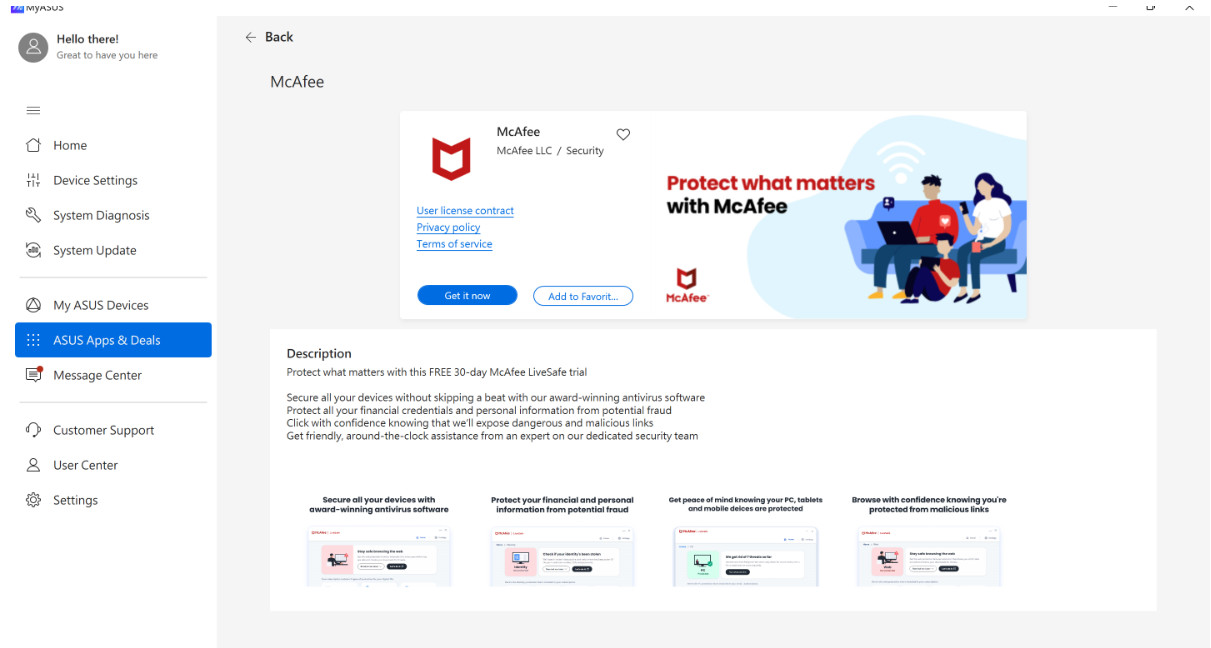
[AppDeals]: The [AppDeals] tab allows users to quickly and conveniently download various third-party apps. In addition, you can also find updates on latest exclusive deals, discounts, and recommendations tailored to you. (*Not available for Windows S mode)
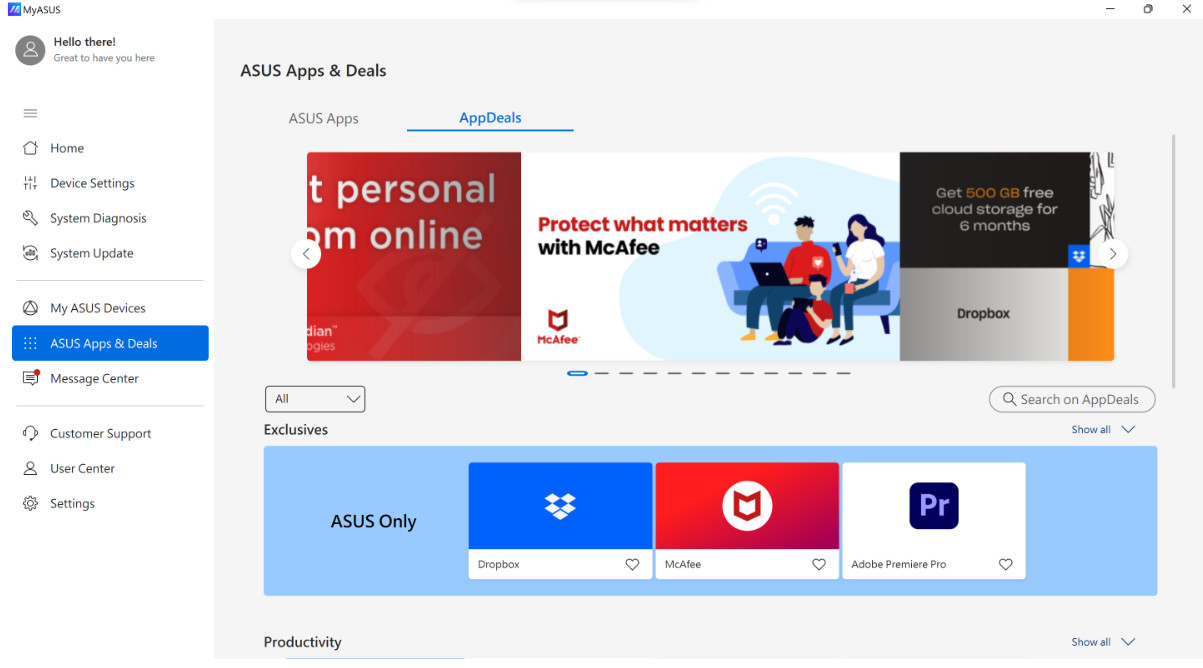
To access the apps you want to use, simply select them from the menu, and click the [Get it now] button to download and install.
*Note: In MyASUS V2.0.17.0 or later, Giftbox has been renamed as AppDeals.
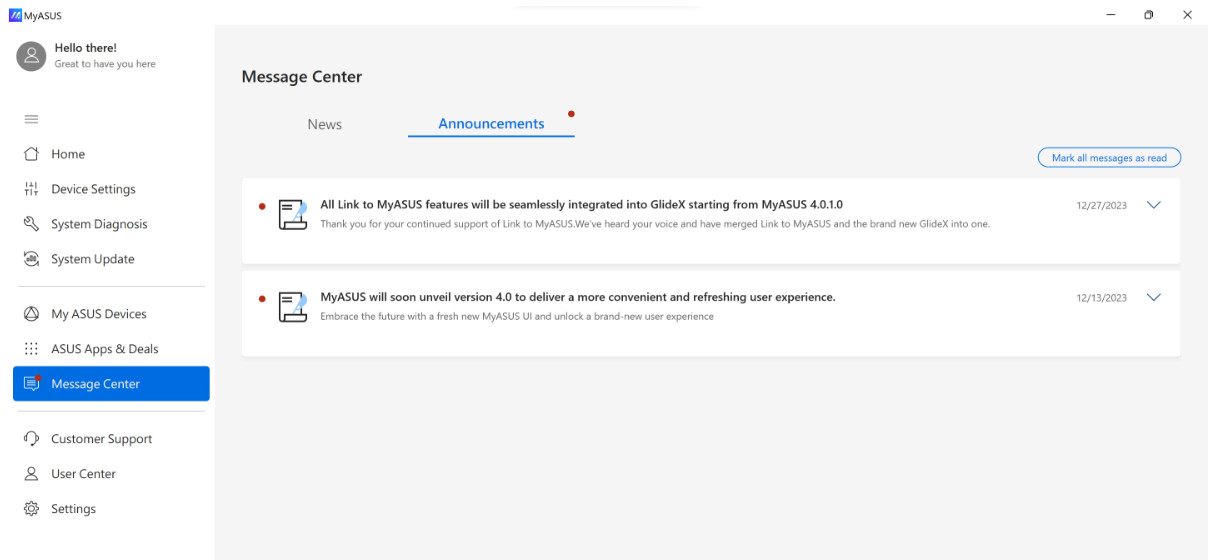
7. Message Center
In this page, you can have a quick glance of the latest ASUS event or MyASUS related messages.
[News]: In the [News] tab, users can find the latest information about new products, events, and others.
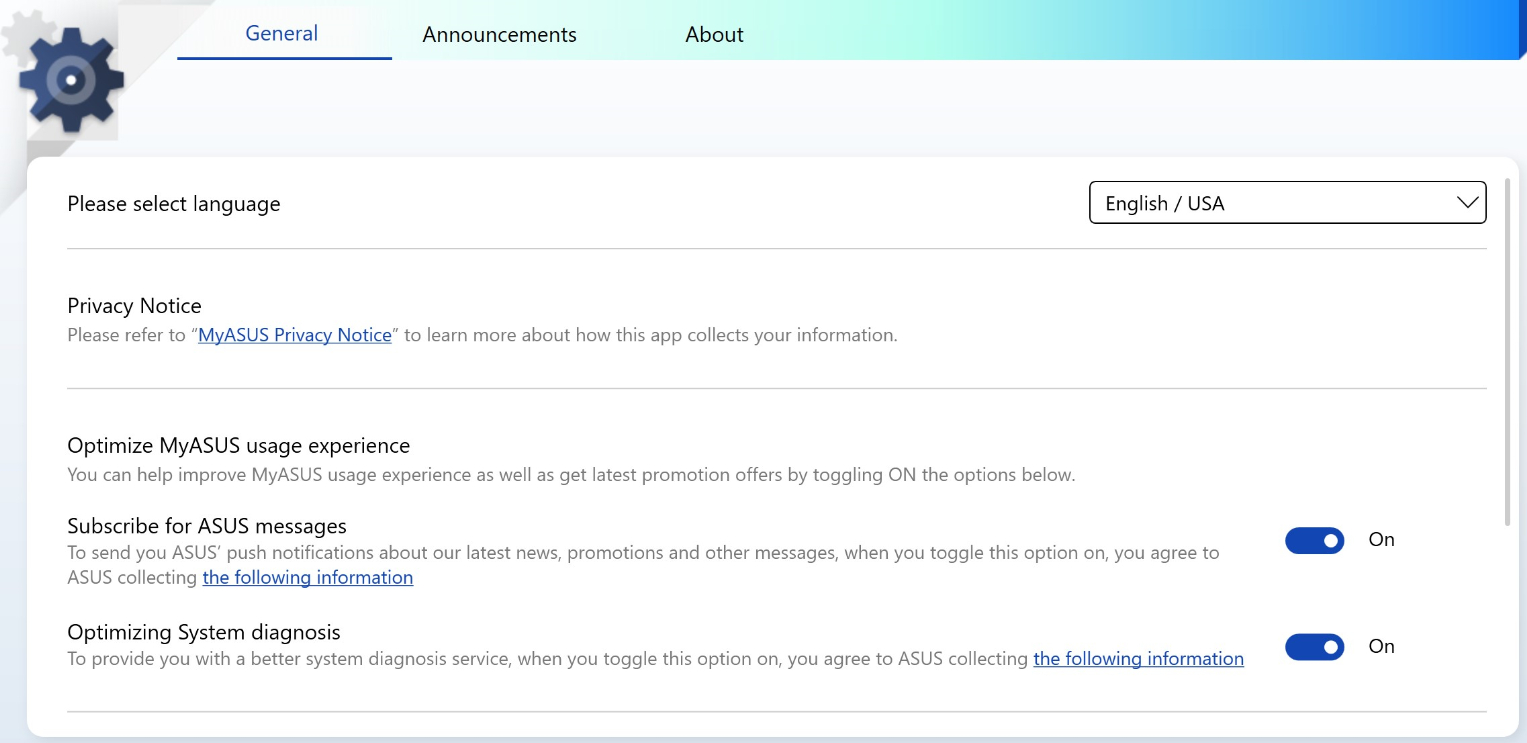
You could agree to MyASUS privacy policy settings to subscribe for ASUS messages.
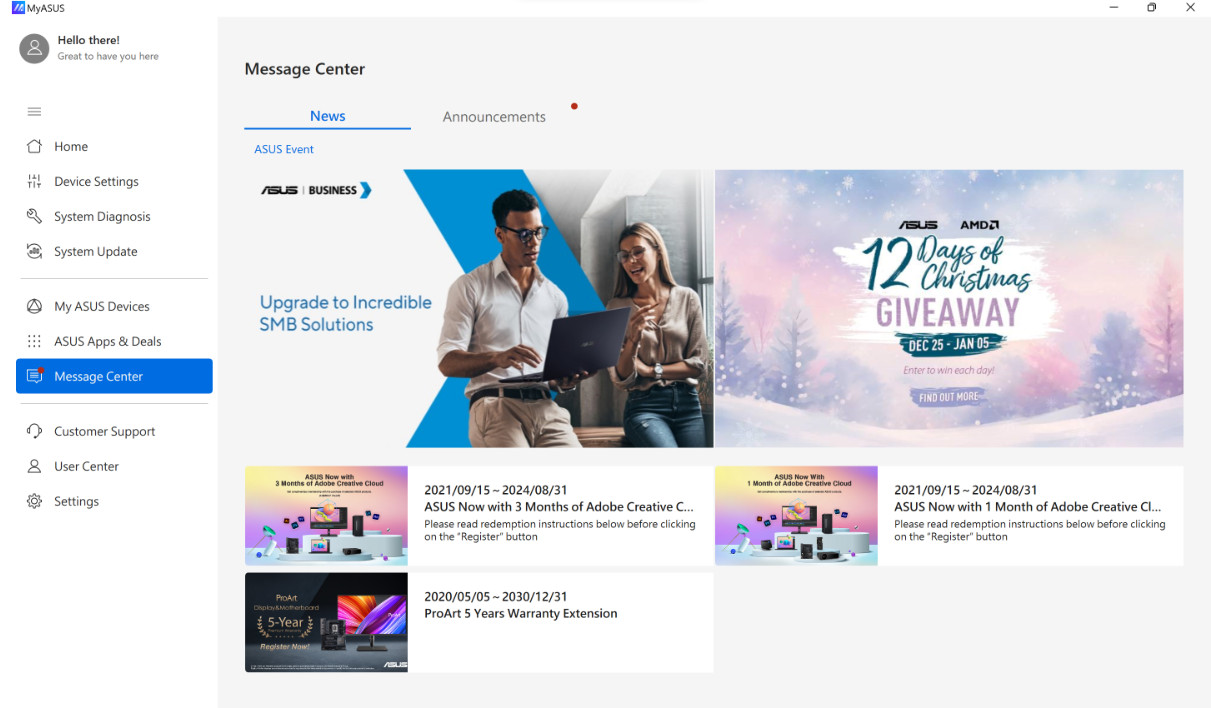
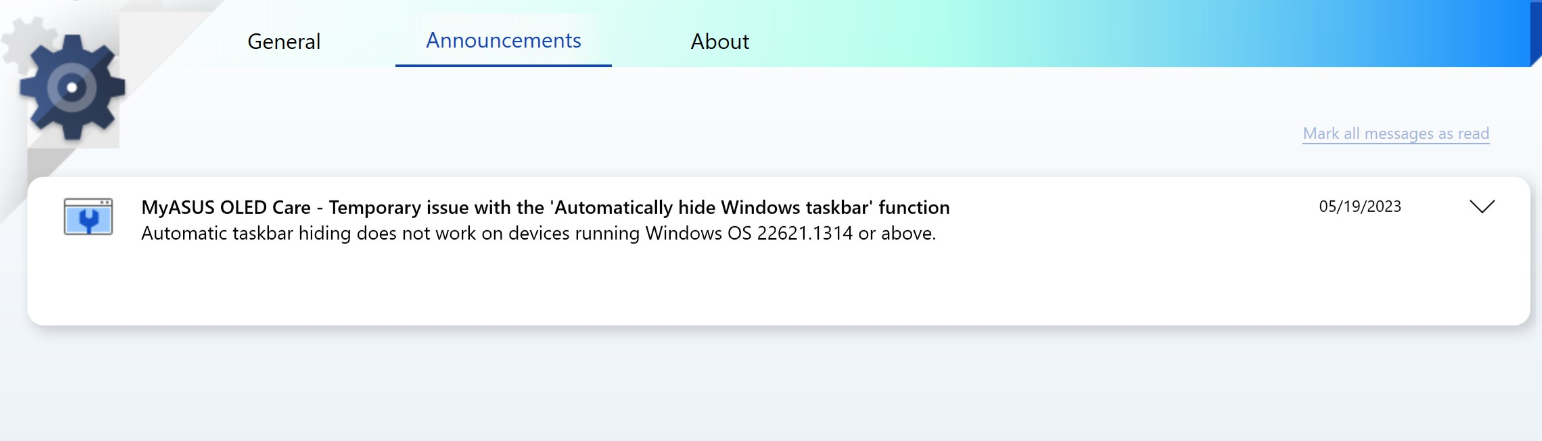
In the [Announcements] tab, users can see important announcements related to MyASUS.
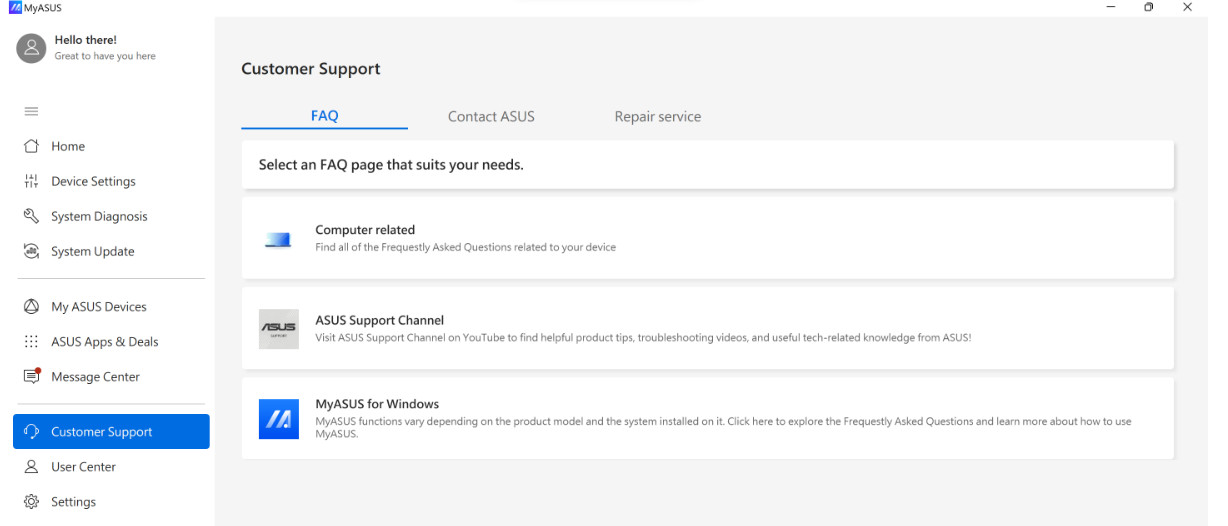
8. Customer Support
The Customer Support menu is where you can find help when issue encountered on your device — whether using FAQ to troubleshoot by yourselves, or seeking specialists' help. In this page, you can also check the repair status or search for the repair center nearby.
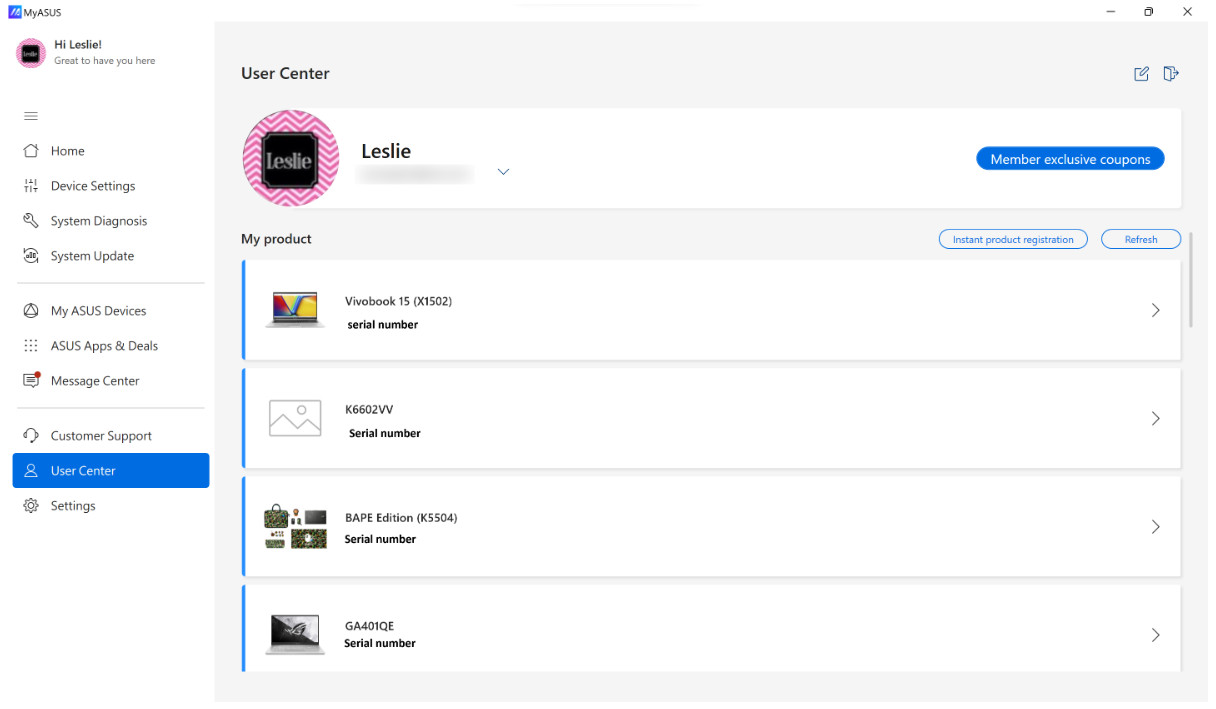
9. User Center
The User Center menu is where you experience the ownership of ASUS products.
The [My product] section allows you to register your ASUS products quickly and easily.
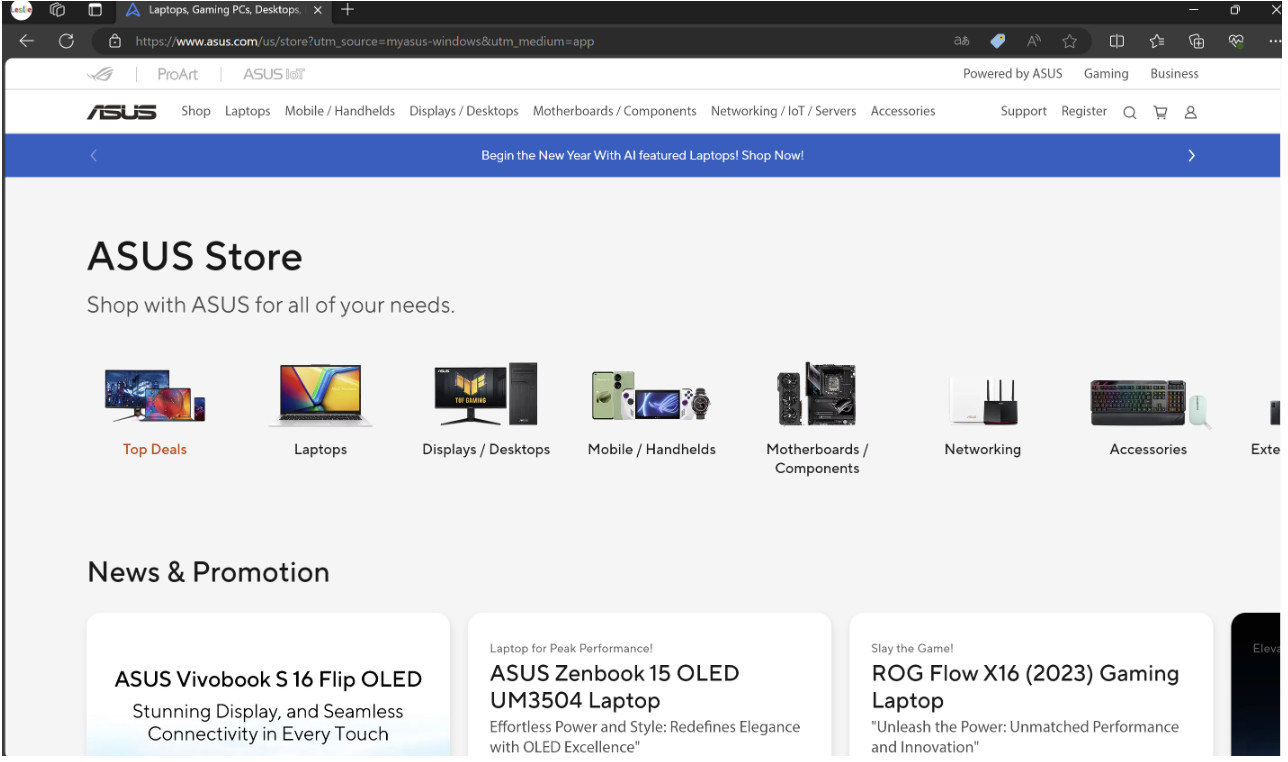
In the [Exclusives] section, users can redirect to ASUS Store for the best deals for ASUS products.
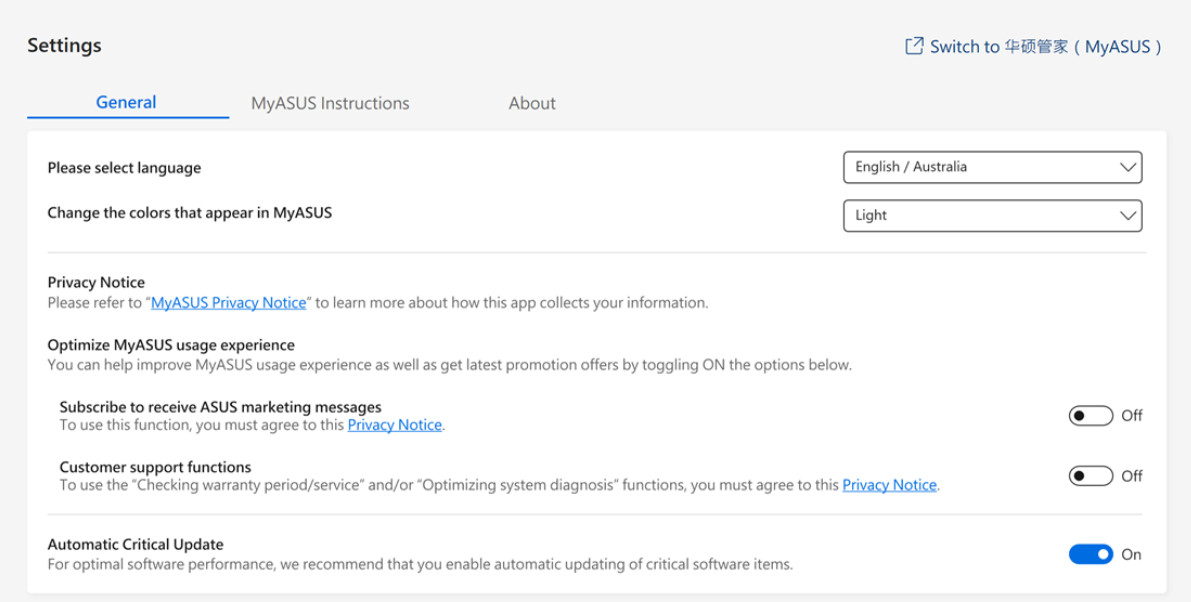
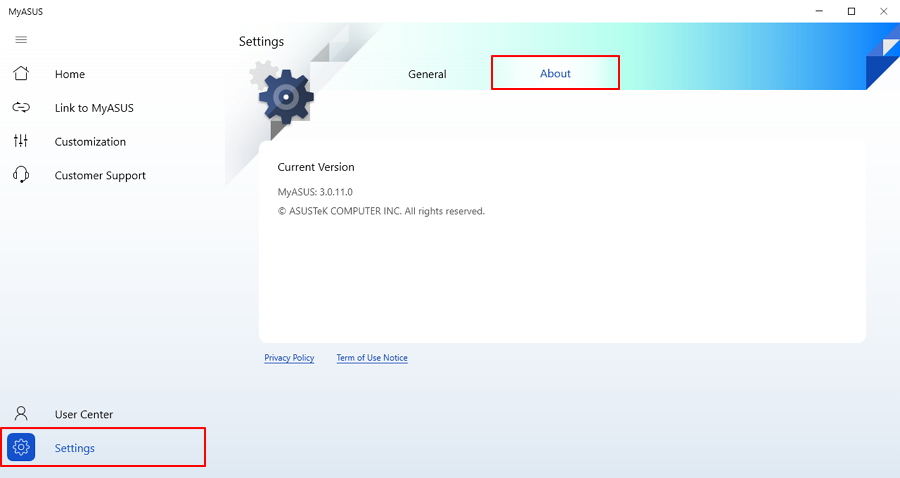
10. Settings
The Settings menu is where you can adjust your MyASUS experience.
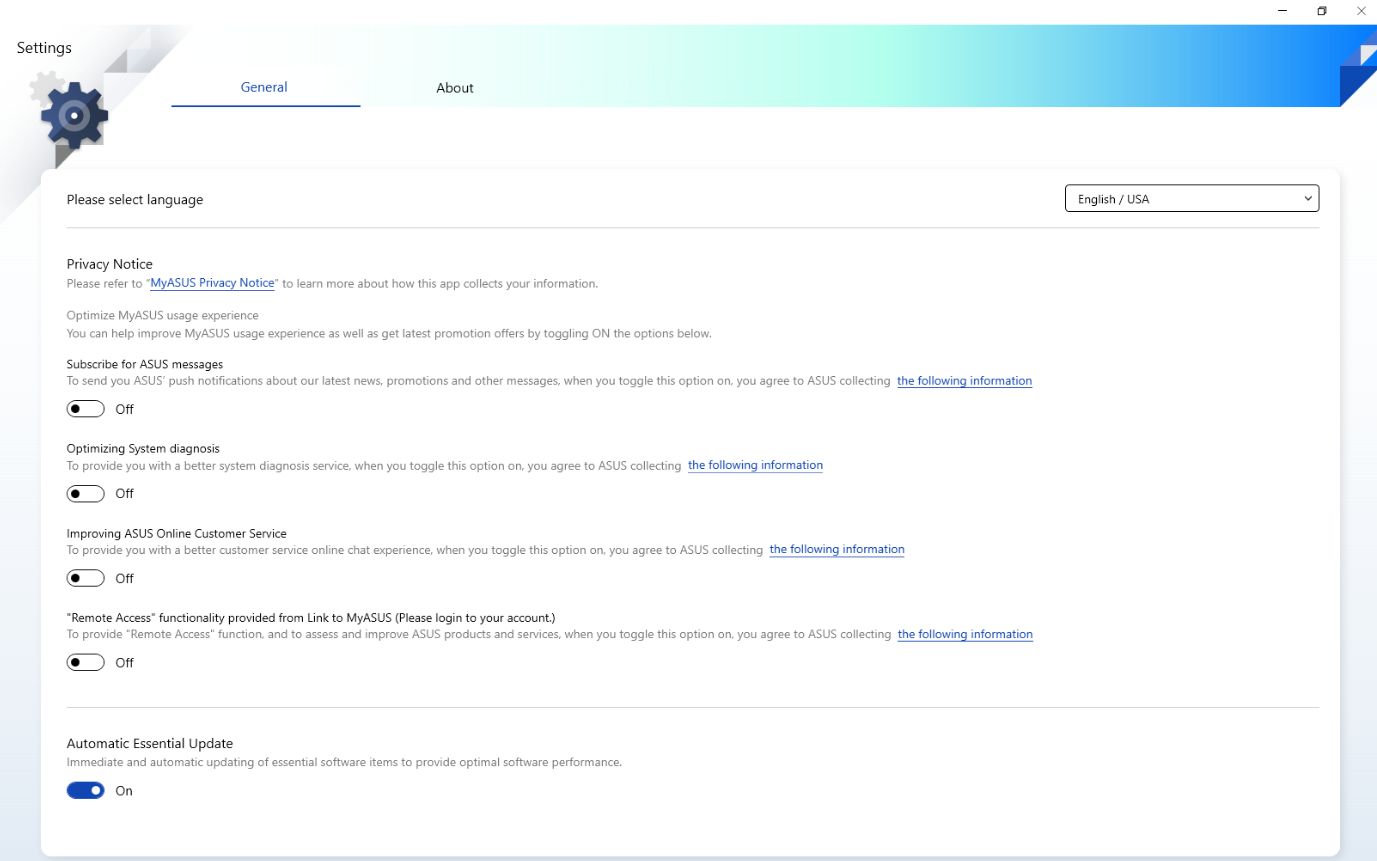
In the [General] tab, users can adjust language settings, see privacy terms, modify their subscription to ASUS, and others.
In the [MyASUS Instructions] tab, you can replay MyASUS quicktips shown in Home page, check MyASUS related FAQs or send a feedback to MyASUS team.
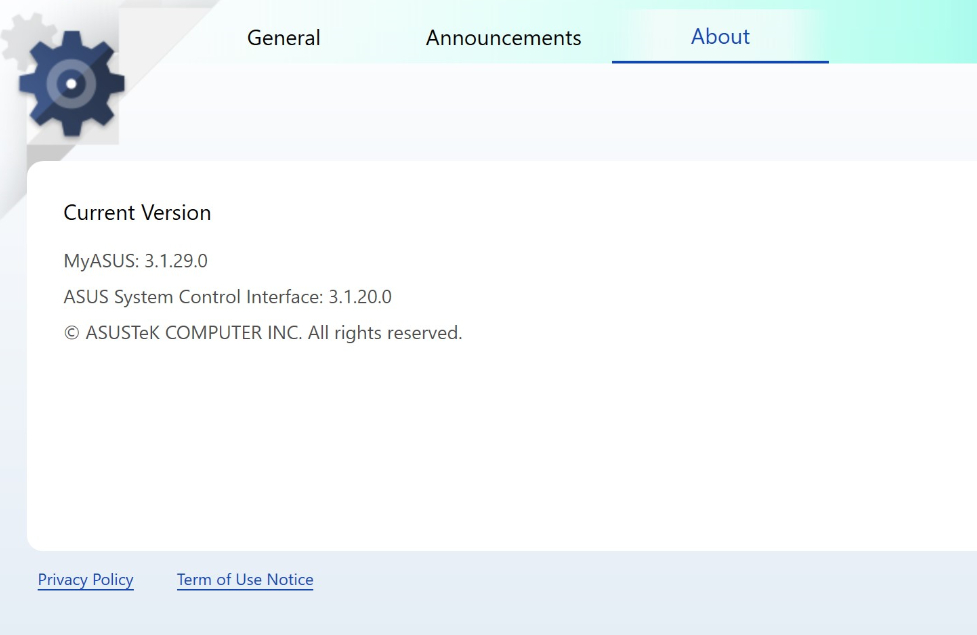
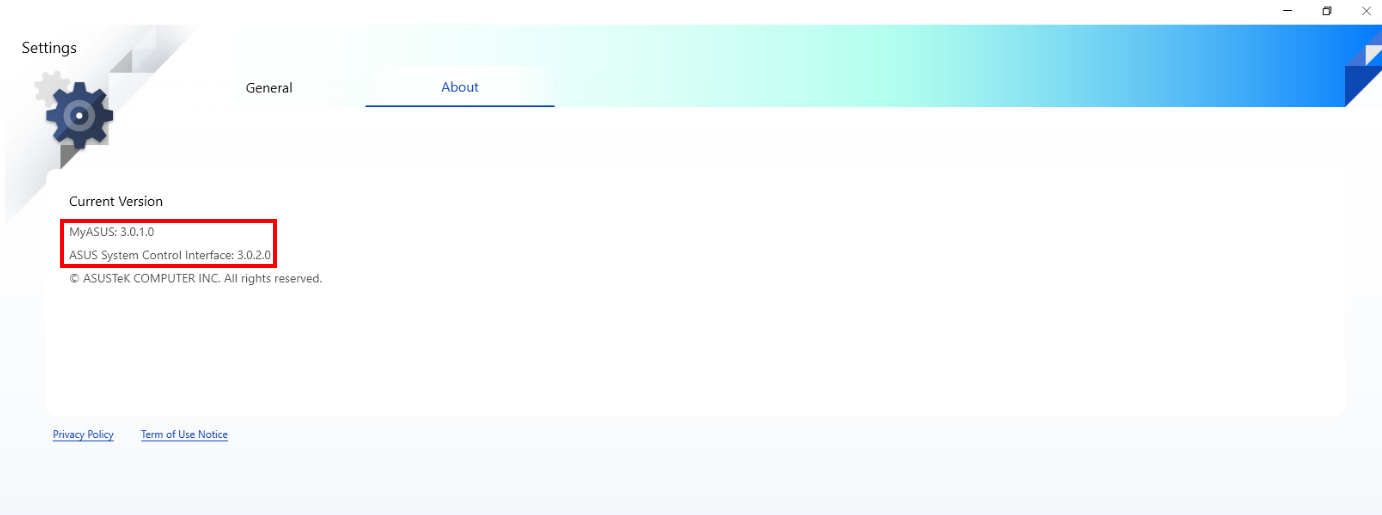
In the [About] tab, users can check the current app version, see the Privacy Policy, or read the Terms of Use Notice.
11. How to get MyASUS?
MyASUS is pre-installed on all ASUS computers compatible with MyASUS. You can also download it from Microsoft Store: MyASUS - Official app in the Microsoft Store
12. How to uninstall MyASUS.
If you want to uninstall the app, please refer to the link below: [Windows 11/10] How to uninstall Apps, Windows installed updates, Drivers | Official Support | ASUS Global
13. Troubleshooting
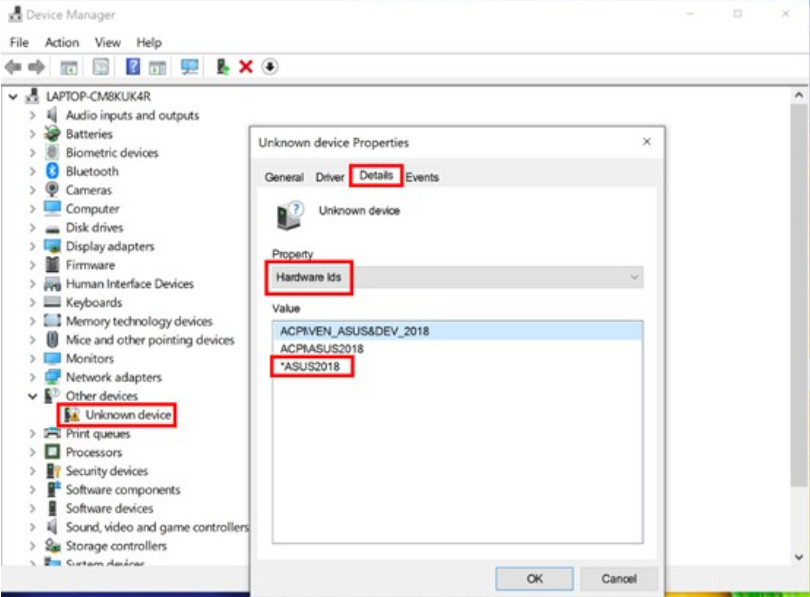
Q1: How to check which driver version should be installed on my device?
A: Open “Device Manager” > Check the unknown devices > Right click to Properties > Access Detail tab > Select Hardware Ids from property menu > Check if it's ASUS2018 or ASUS1000
If ASUS1000, install ASUS System Control Interface
if ASUS2018, install ASUS System Control Interface V3
Q2: Why can I only see the partial features in the MyASUS app?
A: Please refer to : MyASUS - Why can I only see the partial features in the MyASUS app? | Official Support | ASUS Global
Q3: How do get the latest version of MyASUS or ASUS System Control Interface V3?
A: You can update the drivers via the Windows Update. Alternatively, you can update the MyASUS app from the Windows Store.
For more details, please refer to : [Notebook/Desktop/AIO] How to use Windows Update in OS system and how to update BIOS through Windows update | Official Support | ASUS Global
Q4: Troubleshooting common issues when using MyASUS
A: Most issues can be solved by updating or reinstalling drivers or the MyASUS app. Please try the steps listed in following articles first when facing common issues with the MyASUS app:
1. Updating Windows10 drivers: Please refer to How to use Windows Update in OS system?
2. How to check for MyASUS driver updates: Please refer to How to update MyASUS?
3. Uninstall and re-install MyASUS: Please refer to How to install MyASUS?
If the problem cannot be solved after the above troubleshooting, you can directly put forward problems and suggestions to ASUS through Give feedback of MyASUS.
For more information, please refer to give feedback in the menu.
[Phone] MyASUS App - Introduction
*The features show on the Main page in app may be different due to different language versions and country locations.
The example pictures below are for the "Global/English" region. You can tap the Settings icon on top of the app screen to change the country location.


Main page

Registration
Scan the serial number barcode on the product packaging or manually enter the product serial number to register your ASUS product.


Email Us
You can email questions to us about your ASUS product or to share your experience with us.


ZenTalk Forum
You can find the answers and suggested solutions to all your questions about ASUS ZenFone products.


Call Us
You can check the status of the existing repair request online and look for other technical support.


ACCOUNT
General settings of your MyASUS account. Also, you can check the product information that you've registered.


NOTIFICATION
Get the latest information about ASUS products, events or the updated customer service information.

[Motherboard] MyASUS introduction
MyASUS offers a variety of support features on the selected models. You can contact the customer service center via MyASUS, optimize your system performance and troubleshoot the issues by system diagnostic.
Directory
1. Model lists that support MyASUS.
1. Model lists that support MyASUS
Intel 500 series platform.
Chipset | Model |
Z590 | ROG MAXIMUS XIII EXTREME GLACIAL |
ROG MAXIMUX XIII EXTREME | |
ROG MAXIMUS XIII APEX | |
ROG MAXIMUX XIII HERO | |
ROG STRIX Z590-E GAMING WIFI | |
ROG STRIX Z590-F GAMING WIFI | |
ROG STRIX Z590-A GAMING WIFI | |
ROG STRIX Z590-I GAMING WIFI | |
TUF GAMING Z590-PLUS WIFI | |
H570 | ROG STRIX H570-I GAMING WIFI |
TUF GAMING H570-PRO WIFI | |
B560 | ROG STRIX B560-F GAMING WIFI |
ROG STRIX B560-G GAMING WIFI | |
ROG STRIX B560-A GAMING WIFI | |
ROG STRIX B560-I GAMING WIFI | |
TUF Gaming B560-PLUS WIFI | |
TUF Gaming B560M-PLUS WIFI | |
H510 | PRIME H510M-A WIFI |
Intel Z690 series platform.
Intel Z690 Model |
ROG MAXIMUS Z690 EXTREME GLACIAL |
ROG MAXIMUS Z690 EXTREME |
ROG MAXIMUS Z690 APEX |
ROG MAXIMUS Z690 FORMULA |
ROG MAXIMUS Z690 HERO |
ROG STRIX Z690-E GAMING WIFI |
ROG STRIX Z690-F GAMING WIFI |
ROG STRIX Z690-A GAMING WIFI D4 |
ROG STRIX Z690-G GAMING WIFI |
ROG STRIX Z690-I GAMING WIFI |
TUF GAMING Z690-PLUS WIFI D4 |
PRIME Z690-P WIFI D4 |
PRIME Z690-P WIFI |
Intel H670/B660 series platform.
H670 | TUF GAMING H670-PRO WIFI D4 |
B660 | ROG STRIX B660-F GAMING WIFI |
ROG STRIX B660-A GAMING WIFI | |
ROG STRIX B660-A GAMING WIFI D4 | |
ROG STRIX B660-G GAMING WIFI | |
ROG STRIX B660-I GAMING WIFI | |
TUF GAMING B660-PLUS WIFI D4 | |
TUF GAMING B660M-PLUS WIFI D4 | |
PRIME B660M-A WIFI |
ProArt series platform:
ProArt X570-CREATOR WIFI
ProArt B550-CREATOR
ProArt Z490-CREATOR 10G
ProArt B660-CREATOR D4
ProArt Z690-CREATOR WIFI
Step 1. Press F2 or ESC while system is booting.
Step 2. Choose Tool, then enable MyASUS function.


Step 3. When you get into the operation system, the system will automatically install the MyASUS.
(MyASUS version of this article is 3.0, to check your MyASUS version, please refer to the FAQ)
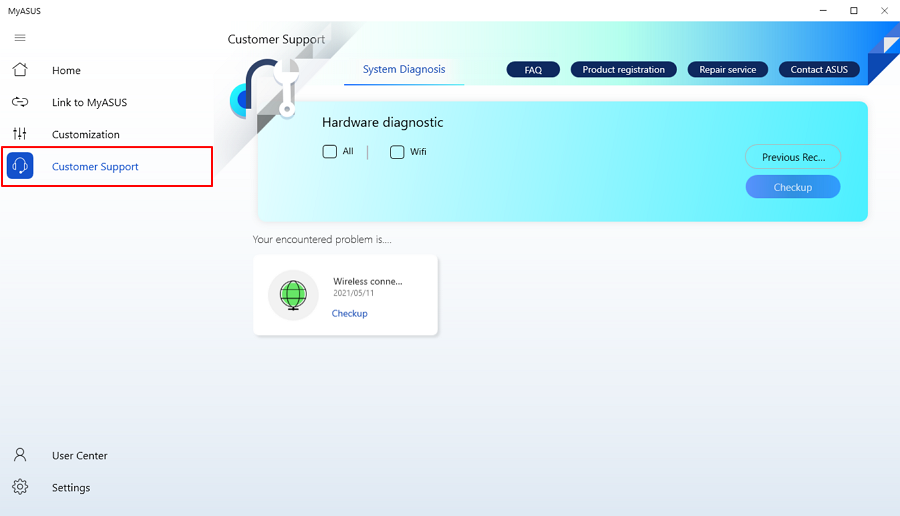
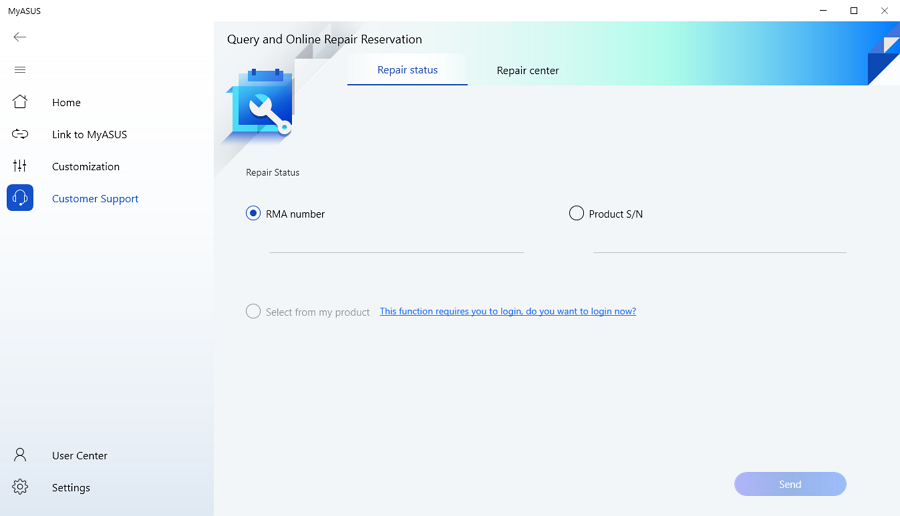
Customer Support
Customer Support allows you to contact ASUS by phone, email or online chat and provides a list of useful FAQs for your information.
You can also check the RMA status by either RMA number or Product S/N from "Query and Online Repair Reservation"
Contact ASUS
You can search the related topic to troubleshoot the system, or click Contact ASUS to contact ASUS directly by phone or email.


Query and Online Repair Reservation
Check the repair status by either your RMA number or product S/N. You can also choose the product which you registered and repaired.
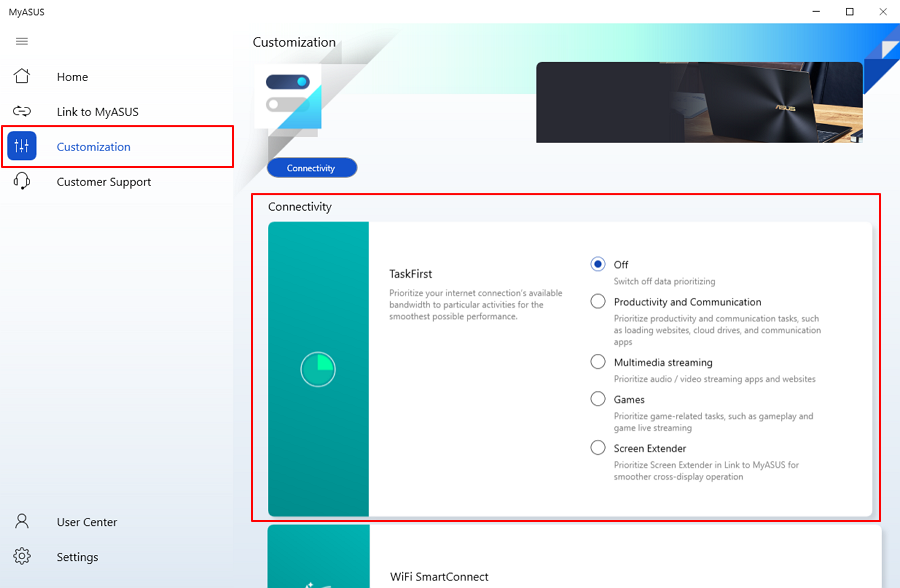
Hardware Setting
Hardware Settings provides features that you can modify and customize for your device.
Taskfirst
*MyASUS does not support it if there is GameFirst/CreationFirst/Turbo Lan in the device.
With TaskFirst, user can personalize the distribution of internet connection's available bandwidth. Users can distribute throughput evenly among all tasks, or prioritize data to particular activities for the smoothest possible performance.
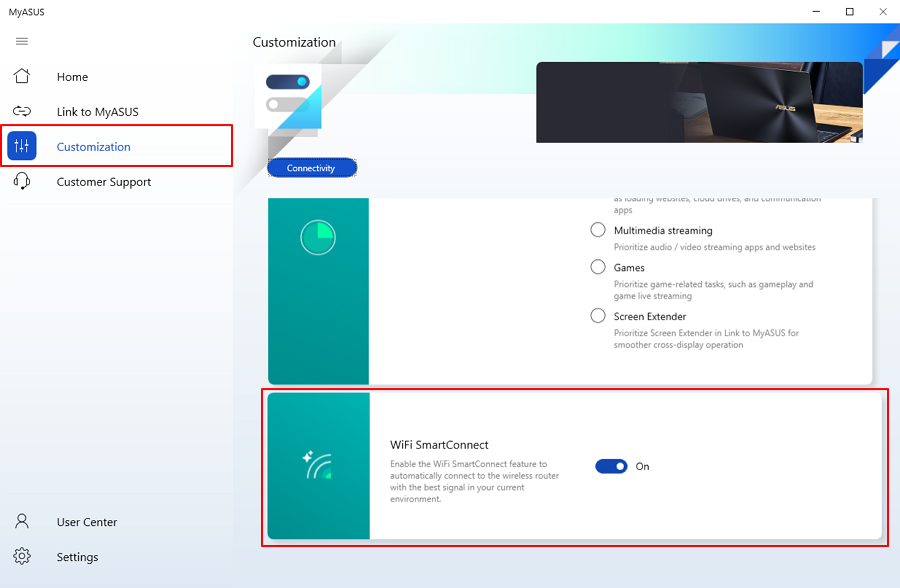
Wifi Smart connect
Wifi Smart connect can Optimizes your connection. Enable Wi-Fi SmartConnect feature to automatically connect to the wireless router with the best signal in your current environment. And record the hotspot you have connected to and automatically connects once the hotspot turned on.
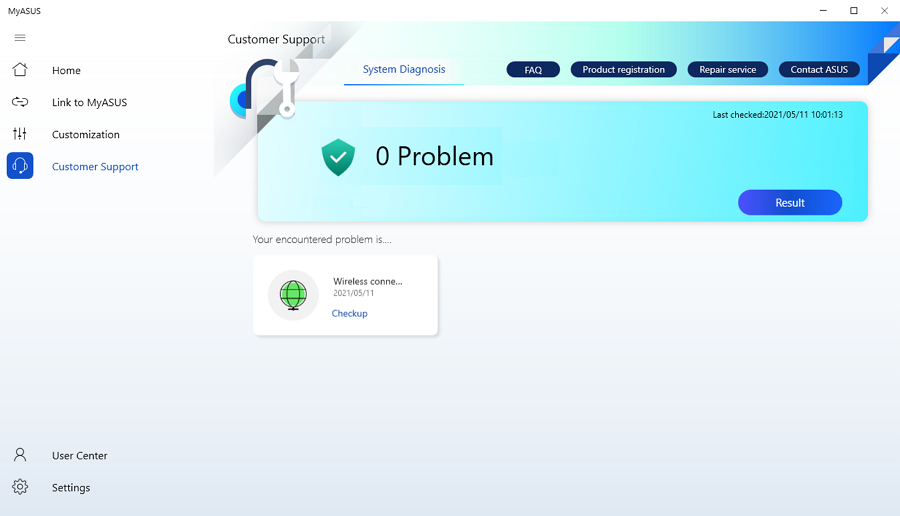
System Diagnostic
*Only supported on the devices with the WiFi module
Wireless connectivity problems
The stability of the network carriers and WiFi Internet devices is one of the most common causes of network disruptions.
Step 1. Click Checkup.

Step 2. System will diagnose the wireless connectivity problems.
Link to MyASUS is a software solution that allows you to connect the system to a mobile device.
Click the Link to MyASUS for more information.
5. FAQ
Q1. Why am I unable to use MyASUS?
A1. Make sure to enable the MyASUS function in the BIOS setting.
Q2. Why doesn’t Taskfirst show?
A2. MyASUS does not support TaskFirst if there is GameFirst/CreationFirst/Turbo Lan in your device.
Q3. How to inquire MyASUS version?
A3. Click the setting in menu, then choose about to check your MyASUS version.
Q4. Where can I download MyASUS after removal?
A4. My ASUS APP download:
https://www.microsoft.com/store/apps/9N7R5S6B0ZZH?tp=U29mdHdhcmVOb3RlYm9vaw==
[General]: you can set language, privacy terms & subscription options to ASUS here.
[Announcements]: users can see important announcements related to MyASUS.
 [About]:Check MyASUS and ASUS System Control Interface version here.
[Notebook] MyASUS - Device Settings
According to the users' scenarios, MyASUS provides different groups of customization items.
General
[Power & Performance]
[Audio & Visual]
[Connectivity]
[Input Device Settings]
[Privacy & Security]
Exclusives
[Lighting effect]
These groups help you quickly find the items to customize your device settings depending on various using scenarios.
You can click  to go to [Device Settings] in MyASUS.
* Note: The features supported in [Device Settings] will vary by model. The following options may not be supported/available in every model.
(Gaming Notebook only support some of the features below. )
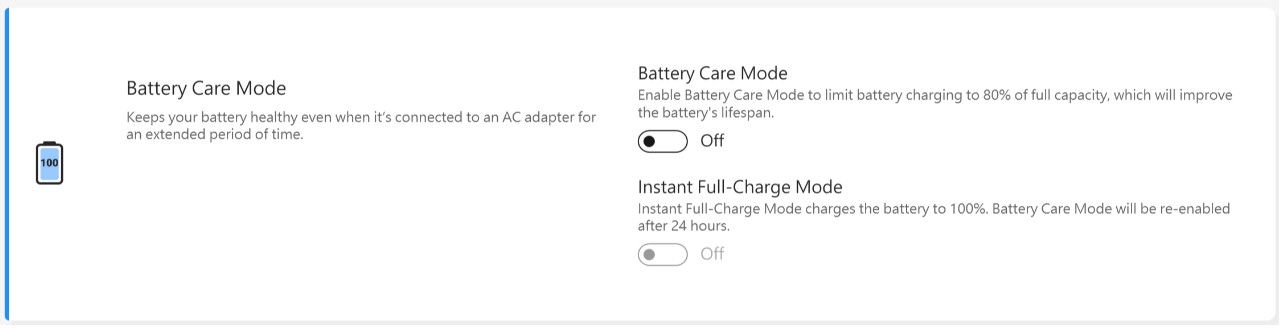
Battery Care Mode (Battery Health Charging)
Overcharging a laptop may degrade the battery, resulting in a shorter lifespan, or even swelling due to oxidation.
You can choose to turn on Battery Care Mode, so that the battery can be charged to 80% to improve its lifespan.
When Battery Care Mode is enabled, this mechanism will smartly adjust the recharge trigger point to protect the battery when AC power is connected all the time.
If you need to recharge to 80% immediately, please unplug and plug AC power to fulfill this demand.
If there is a need for using it on-the-go, you can switch on Instant Full-Charge Mode for a one-time full (100%) charge. The system will turn back to the limit charging state after 24 hours.
With the CPU models before Intel Alderlake or AMD Rembrandt, you could choose to limit the charges to 60%, 80%, or 100% to prolong battery lifespan and reduce the chance of damage from battery swelling.
According to how the notebook is being used, you can choose : Full capacity mode, Balanced mode, and Maximum Lifespan mode
*If you experience the problem which is the battery stop being charged after the battery level is charged to 60% or 80%, please check if you set up charging mode in Battery Health Charging.
(Balance Mode: The battery can be charged up to 80%, Maximum lifespan mode: The battery only allows being charged up to 60%)
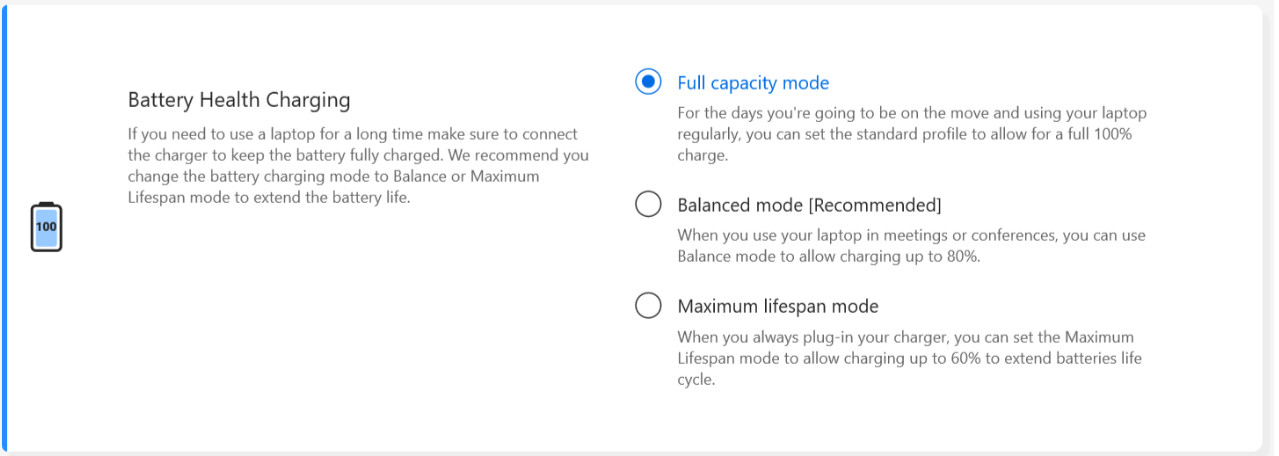
Full capacity mode : When you use the laptop regularly, you can set the standard profile to allow for a full 100% charge.
Balanced mode: When using the laptop in meetings, you can use Balanced mode to allow charging up to 80%.
Maximum Lifespan mode: When you always plug-in your charger, you can set the Maximum Lifespan mode to allow charging up to 60% to extend batteries life cycle.
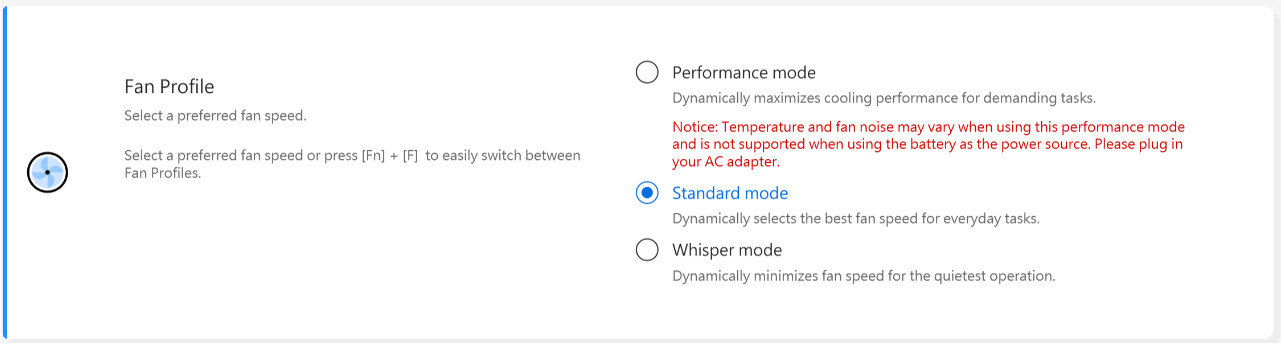
Fan Profile *The features supported will vary by model.
Fan profile is the setting that allows users to customize fan speed for different workloads on selected models with an ultra-slim chassis.
There are three modes to choose from. With this feature selected, you can have a quiet operating environment through a balance between temperature and performance
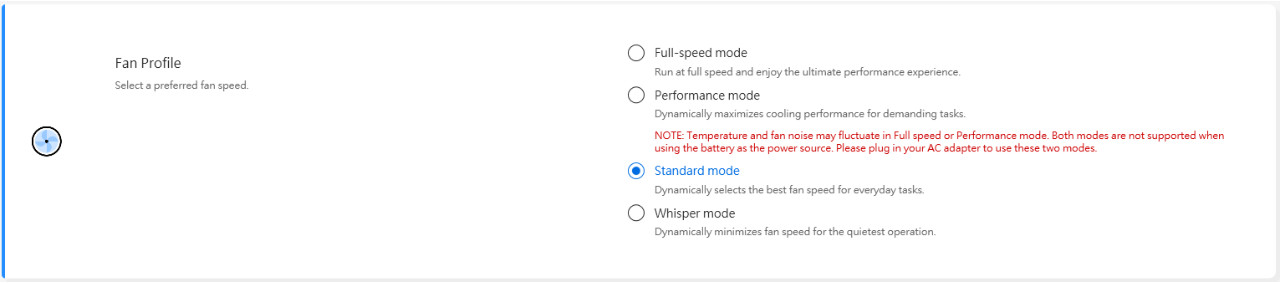
Standard mode -- Dynamically selects the best fan speed for everyday tasks
Whisper mode -- Dynamically minimizes fan speed for the quietest operation
Performance mode -- Dynamically maximizes cooling performance for demanding tasks
*The modes in Fan Profile may vary by model.
*If your laptop supports AIPT, you will see AIPT in Customization instead of Fan Profile.
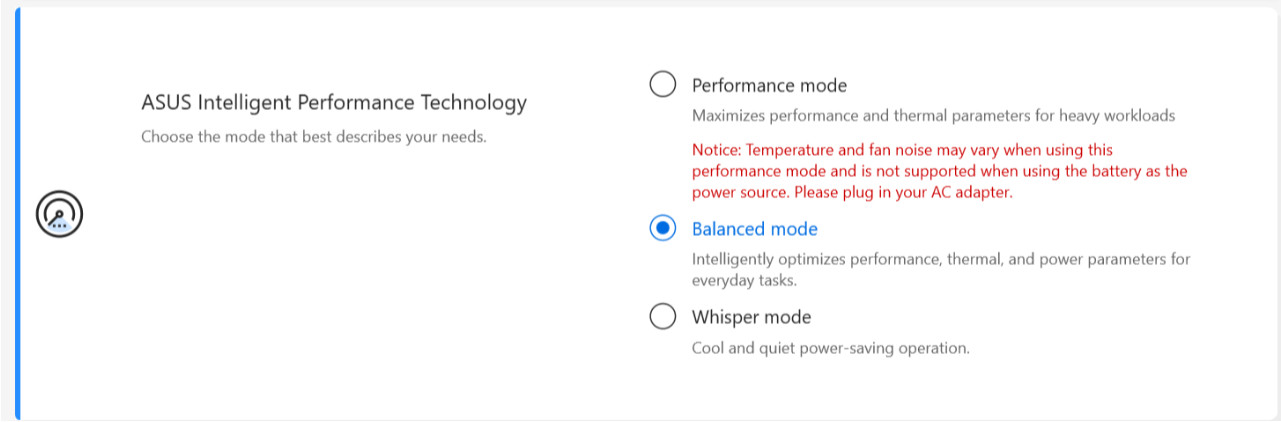
ASUS Intelligent Performance Technology (AIPT) is the solution that allows users to have maximized CPU performance at 28W TDP for heavy workloads on selected models with a chassis providing more room for thermals.
Performance Mode: Maximizes performance and thermal for heavy workloads (This let you play a game or use Premiere Pro more smoothly)
Balanced Mode: Intelligently optimizes performance, thermal, and power parameters for everyday tasks
Whisper Mode: Cool and quiet power-saving operation (To get all day long battery life, please choose this mode)
For more introduction about AIPT, please refer to here.
*For the 2024 new models, Full-speed mode will be supported to provide the ultimate performance.(It is supported starting with models with Intel MTL or AMD HawkPoint/StrixPoint platform. You can go to ASUS website to check the CPU platform of your device.)
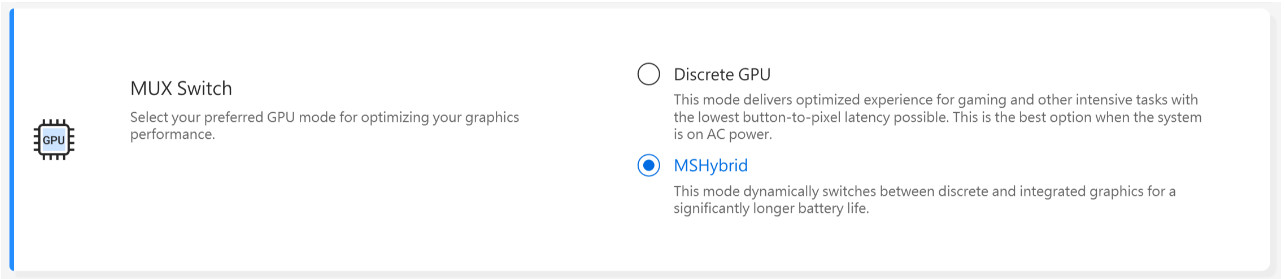
MUX Switch *The features supported will vary by model.
MUX switch microchip allows the dedicated GPU to bypass the CPU and push its frames directly to the display, reducing latency and boosting framerates.
When battery life is crucial, your machine will act accordingly. But in a competitive game where every millisecond counts, you can enable a direct GPU mode in MyASUS to get the best gaming performance possible.
MSHybrid: The MSHybrid mode dynamically switches between the discrete and integrated graphics for a significantly longer battery life.
Discrete GPU: The Discrete GPU mode offers an optimized experience on gaming and other intensive tasks with the lowest button-to-pixel latency possible. This is the best option when the system is on AC power.
*Notice:
1. The mode can't be adjusted or reset to default if you remove MyASUS.
2. Please close Bitlocker before setting this control.
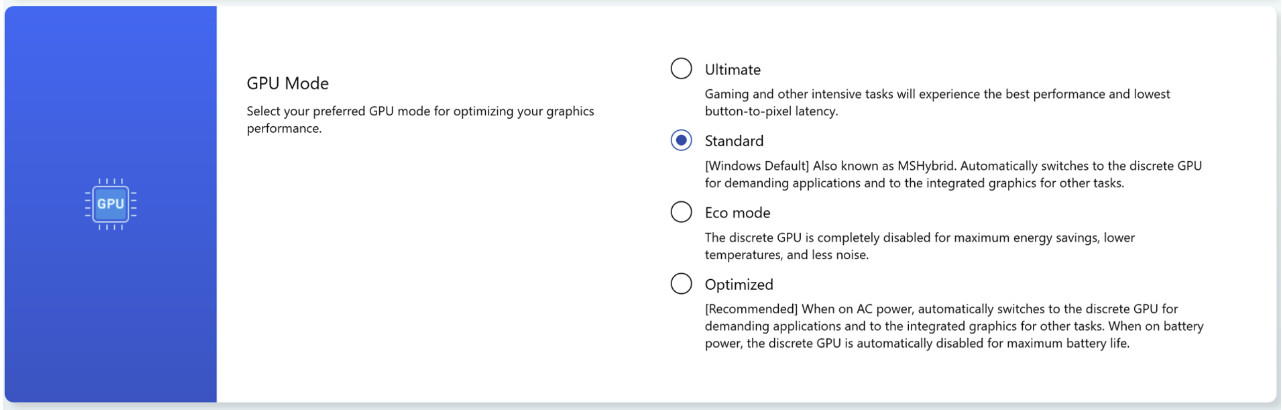
*For the 2024 new models, GPU Mode will be supported to fulfill different using scenarios.
Hibernate Helper *The features supported will vary by model.
To avoid system abnormalities that may cause the device to press the power button, close the lid, or idle in battery mode, and not properly enter the modern standby mode, resulting in power consumption and system heating.

Notice:
1. Support need: MyASUS 3.1.22.0 + ASUS System Control Interface 3.1.16.0(or above)
2. It is default on.
Memory Allocated to GPU *The features supported will vary by model.
Not enough GPU may lead to lag on graphic intensive tasks such as playing games. Gamers can dynamically assign the system memory to the GPU that suits their needs.

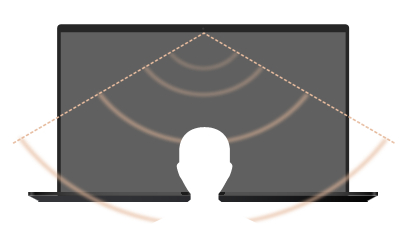
AI Noise-Canceling Microphone *It is supported starting models with Intel Tiger Lake / AMD Lucienne platform. You can go to ASUS website to check the CPU platform of your device.(For Comet Lake platform, only support X409FAC/X509FAC/UX535LH/UX535LI)
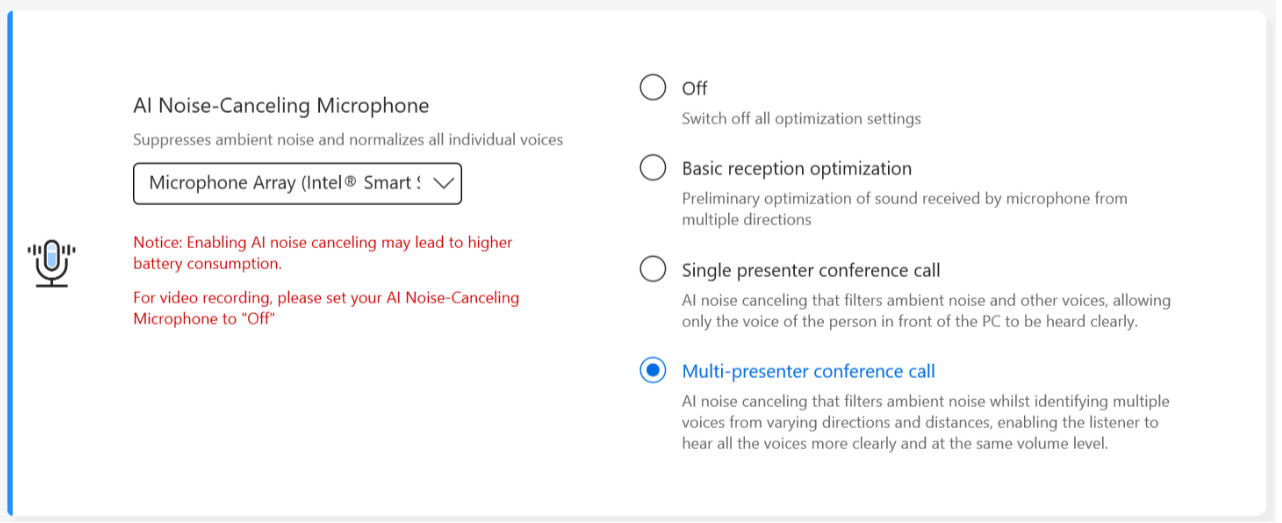
AI Noise-Canceling Microphone feature allows users to filter out ambient noise and normalize all individual voices from different positions for optimum group conference-call quality.
Single-Presenter mode:AI noise canceling that filters ambient noise and other voices. This mode allows only the voice of the person in front of the PC to be heard clearly.
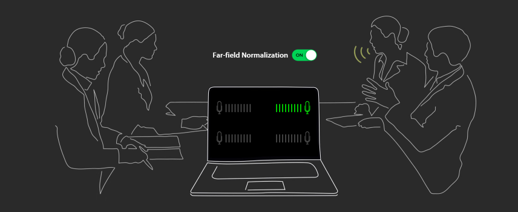
Multi-Presenter mode: AI noise canceling that filters ambient noise whilst identifying multiple voices from varying directions and distances and normalizes voices by adjusting all voices to the same volume level.
*The quality of AI Noise Canceling-Microphone depends on different applications.
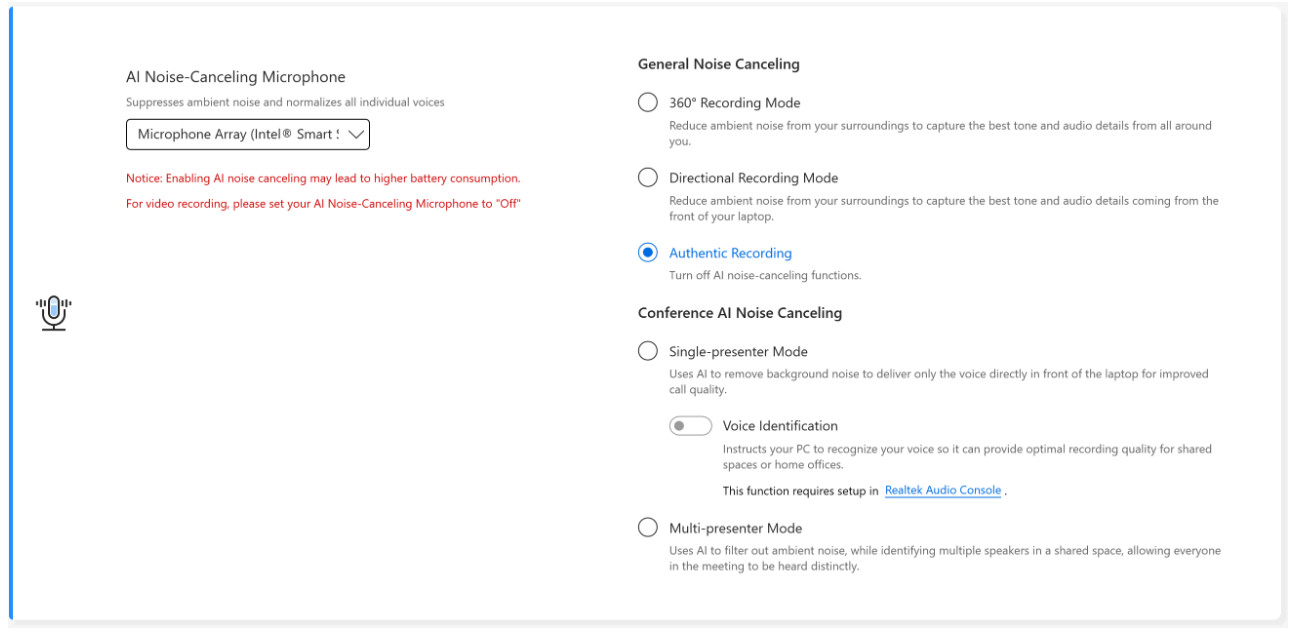
For the product produced after 2023, you may see the AI Noise-Canceling Microphone user interface shows as below. You could adjust it depends on the circumstances (Studio-quality or Conference call)
Besides, Target Speaker Tracking function could be set to on under Single presenter conference call. This features could targets and tracks new talker to improve the signal-to-noise ratio and enhance recording quality.
*Small core CPU DO NOT support Target Speaker Tracking
AI Noise-Canceling Speaker *It is supported starting with models with Intel Tiger Lake/AMD Lucienne platform. You can go to ASUS website to check the CPU platform of your device.
(For Comet Lake platform, only support X409FAC/X509FAC/UX535LH/UX535LI)
AI Noise-Canceling Speaker filters out all noise except for human voices coming out from the laptop speaker.
Therefore, even if the person on the other side of the voice call is in a noisy environment, the user can still hear their voice clearly.

*Why doesn't it work even if AI Noise Canceling-Microphone or AI Noise Canceling-Speaker is turned on? Please refer to here.
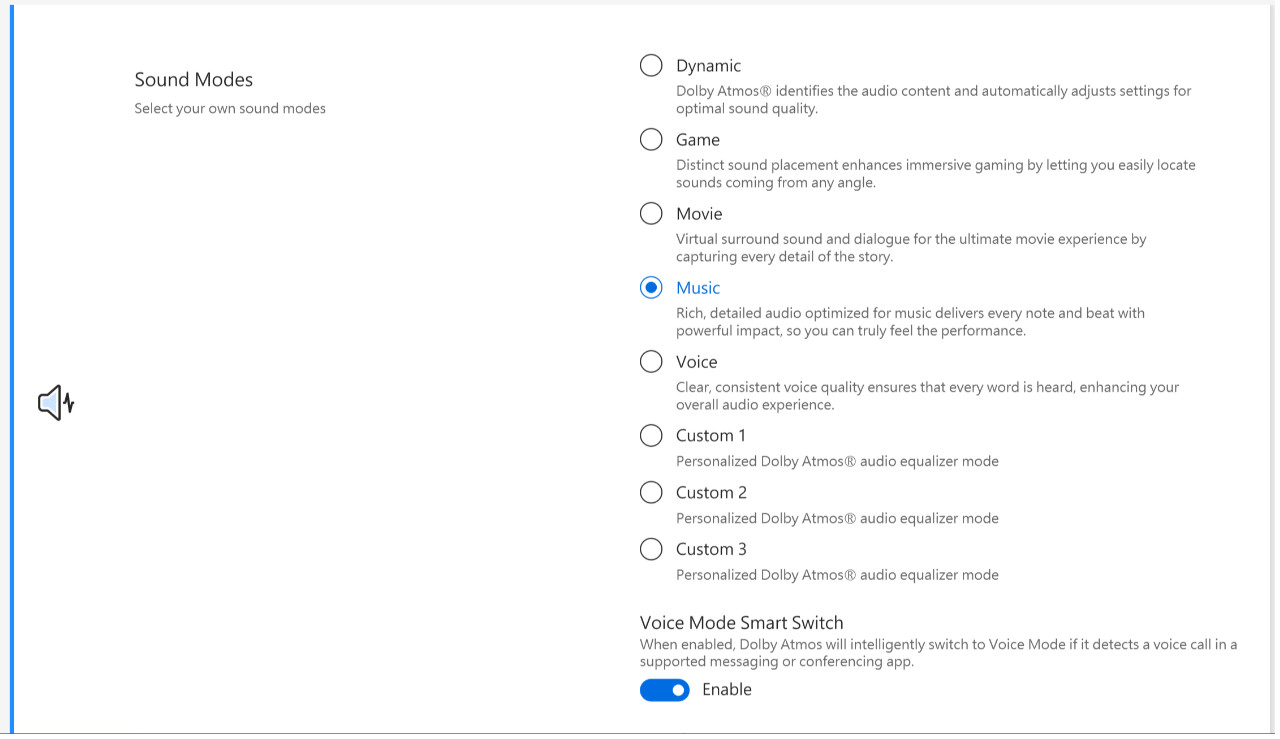
Sound Modes
Select the sound modes you’d like to apply to enhance the audio experience.
If your device is equipped with Dolby Atmos, there will be customized functions for you to adjust in Dolby control panel.
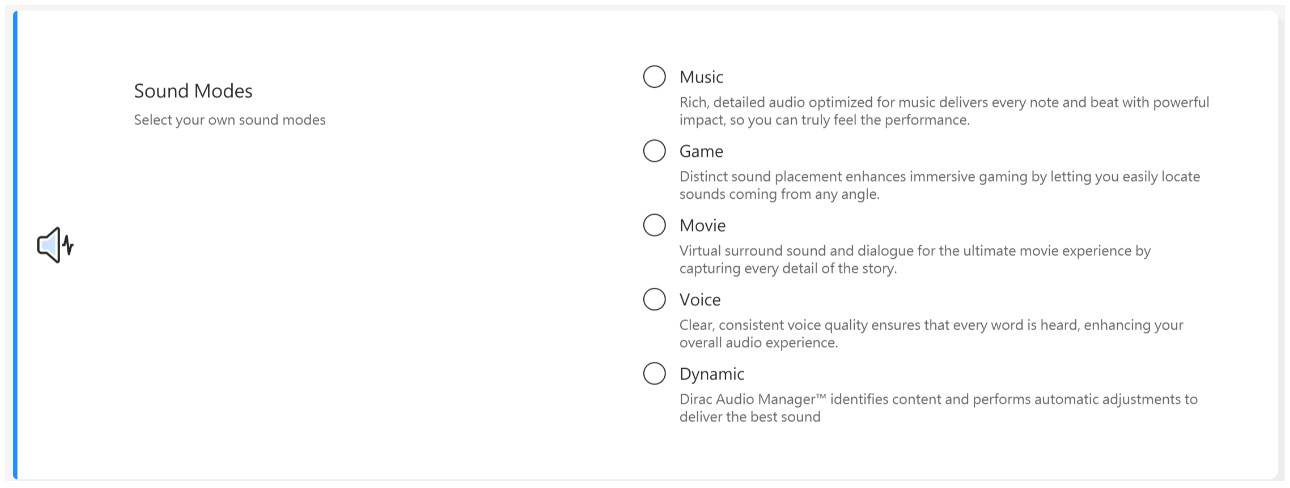
If your device is equipped with Dirac solution, the control panel will be shown like below.
Volume Booster
Makes all the sounds on your device much louder, with minimum distortion.

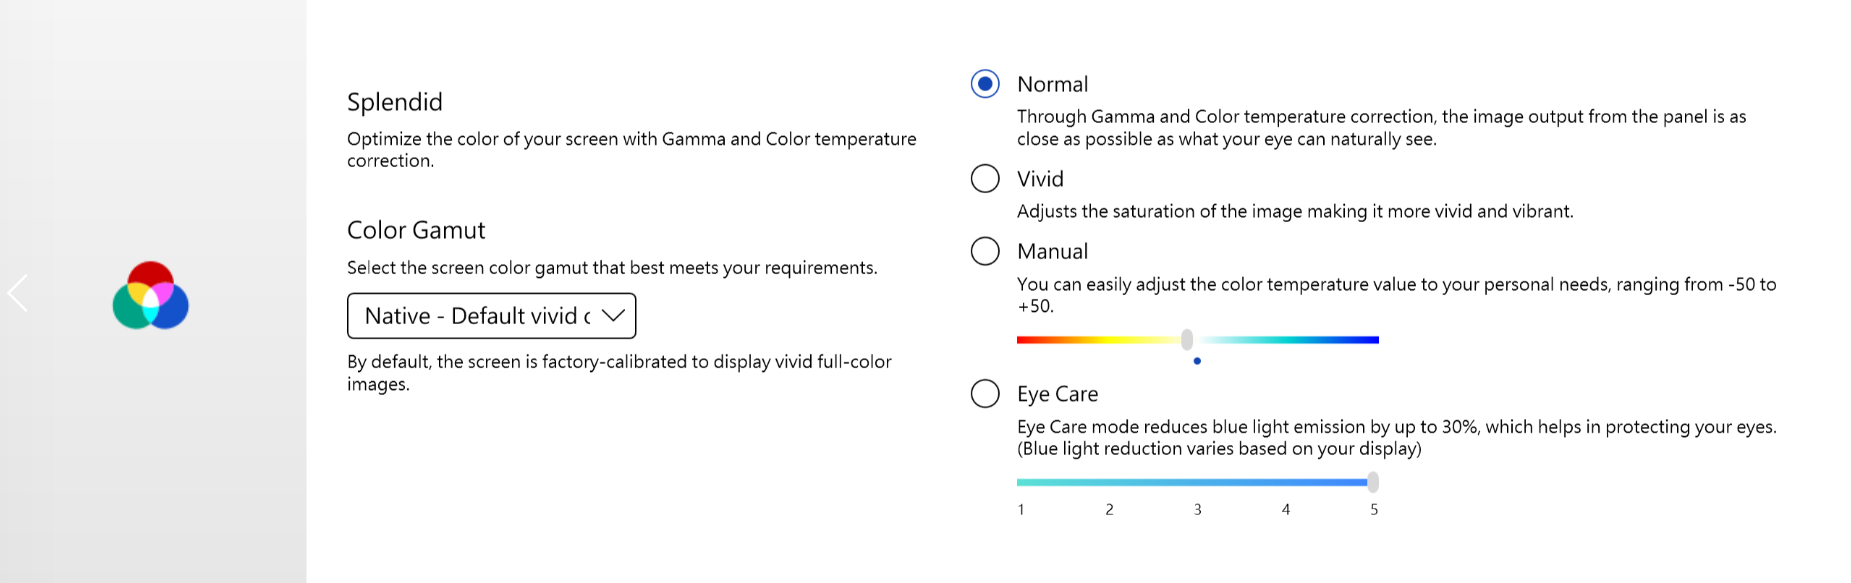
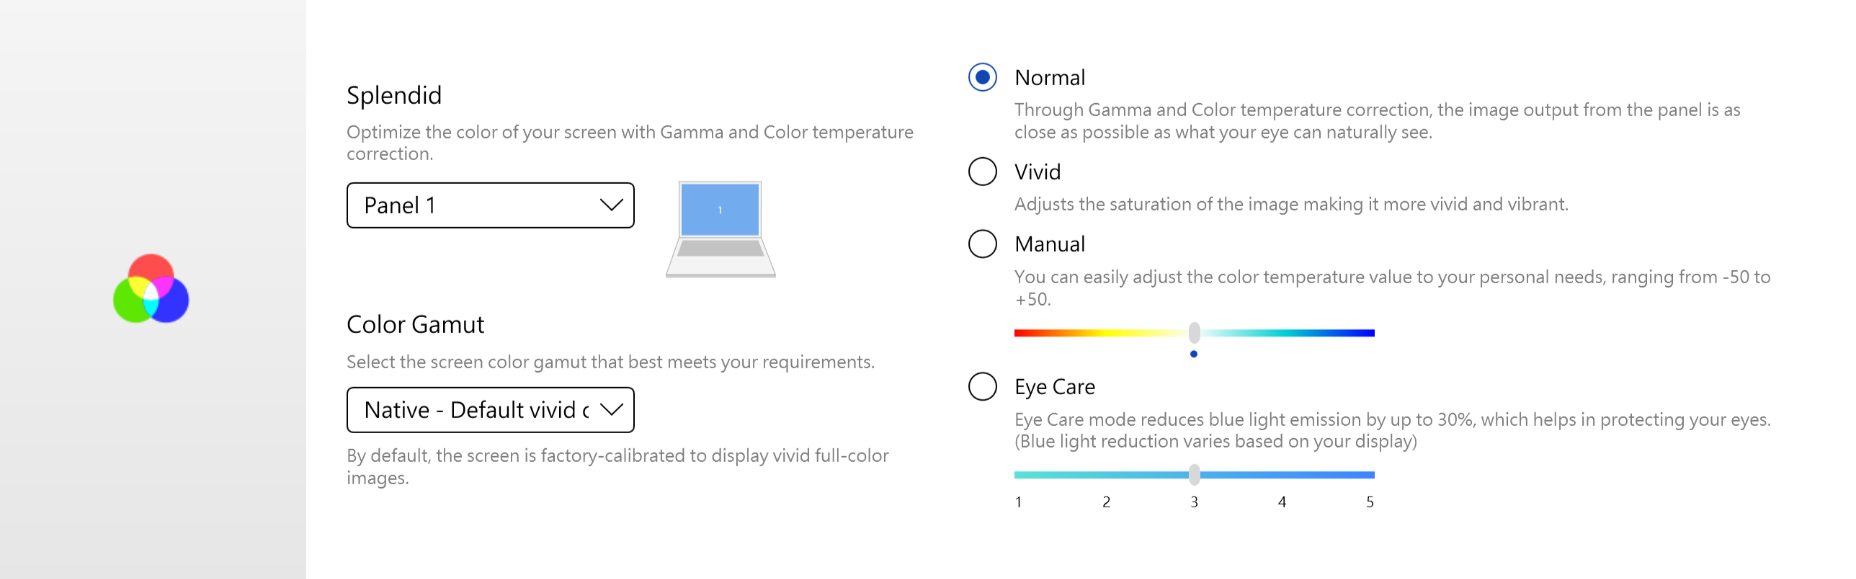
Splendid
Optimize the color of your screen with Gamma and fine-tuning the color temperature. By default, ASUS Splendid panels are set up to show the most accurate colors possible for the best viewing experience. However, sometimes users might want to make adjustments to color. For this reason, we've included three additional modes beyond Normal mode: Vivid mode, Eye Care mode, and Manual mode.
*If your device is connected to an external display and the multiple displays set as "Show desktop only on 2" or "Clone mode", ASUS Splendid is automatically disabled to avoid any problems or conflicts.
Splendid options
Normal: Through Gamma and Color temperature correction, the image output from the panel is as close as possible as what your eye can naturally see.
Vivid: Adjusts the saturation of the image making it more vivid and vibrant.
Manual: You can easily adjust the color temperature value to your personal needs, ranging from -50 to +50.
Eye Care: Eye Care mode reduces blue light emission by up to 30% helping protect your eyes. (Blue light reduction varies based on your LCD panel)
Color Gamut *The features supported will vary by model.
The display's color gamut can be quickly and easily switched for different tasks or preferences. On top of the ultravivid native color setting, choose sRGB for creating web content or browsing, DCI-P3 for cinema content, or
Display P3 for movie-grade colors finessed to fit everyday viewing in the real world.
If your laptop has screenpad or screenpad plus, the option for Splendid is shown as below.
Tru2Life *The features DO NOT support on device with AMD and Intel JasperLake CPU.
ASUS Tru2Life Video is an exclusive video enhancement technology that's similar to that found in high-end TVs. It uses intelligent software algorithms to optimize the brightness and sharpness of every video frame, improving contrast by up to 200%. As a result, video imagery looks more colorful, more vivid and sharper with incredible contrast.

ASUS OLED Care *It supports some models with OLED panel.
ASUS OLED Care includes a set of optimization settings that's proven to protect your OLED display and maximize display lifespan.
Pixel refresh: Launch a special screen saver after being idle for 30 minutes. This screen saver refreshes your screen pixels and optimizes picture quality.
Pixel shift: Your displayed pixels would move slightly to avoid consistently showing static images on your desktop. The shifting effect is barely visible and wouldn't affect usage.
Automatically hide Windows taskbar in desktop mode: Automatically hide Windows taskbar in desktop mode when not in use to avoid consistently showing static images.
Windows taskbar transparency effect: Enable a semi-transparent effect on Windows taskbar.

Notice:
1. Avoid displaying static images at maximum brightness for extended periods; otherwise, it might cause permanent burn-in damage to your OLED display.
2. You can only manage it in MyASUS. If you remove MyASUS, you can't manage ASUS OLED Care anymore (turn on/off it).
3. Here you can learn more about The related settings of screen saver/maintenance, which also helps to avoid causing the "burn-in" symptom.
4. If the Windows taskbar transparency effect couldn't apply accordingly, please press winkey to solve it.
Target Mode
When enabled, the brightness of the active window will remain unchanged, whereas non-active areas will be dimmed for power saving.

Notice:
1. Support need: MyASUS 3.1.0.0 + ASUS System Control Interface 3.1.0.0(or above)
2. Only for OLED models.
3. It is default off.
4. This feature only supports main screen, and cannot be applied to external screens.
Adaptive Edge Brightness
Automatically adjust the brightness and contrast of your screen‘s edge to extend battery life.
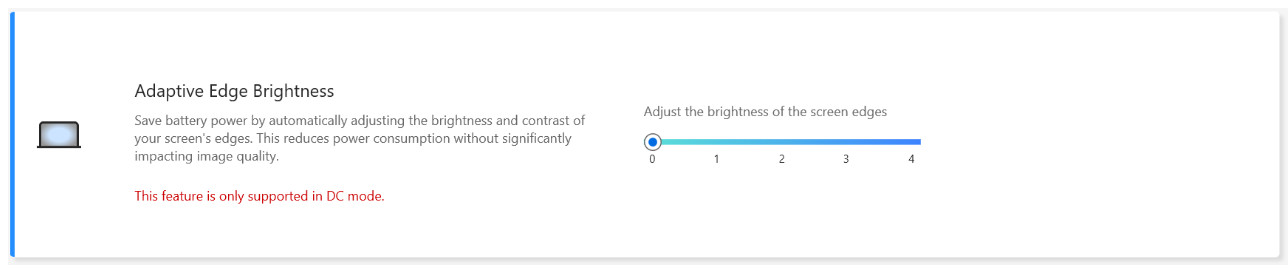
Notice:
1. Support need: MyASUS 4.2.13.0 + ASUS System Control Interface 3.2.28.0(or above)
2. Only for ARM models (e.g. S5507 & HT5306).
AiSense Camera ( (There won't be this item in MyASUS for models which support NPU, you can refer to here to check how to set up AiSense Camera)
Optimize your webcam with these features for an upgraded and diverse webcam experience.
Lighting Optimization: Detects the lighting conditions and dynamically adjusts the webcam settings for the best result.
Background Blurring: Blurs the background to protect your privacy.
Gaze correction: Automatically detect your eyes movement and adjust your gaze to be looked as if you look directly to the camera.
Motion Tracking: Automatically detects and follows your motion for a better webcam experience while you are moving around.
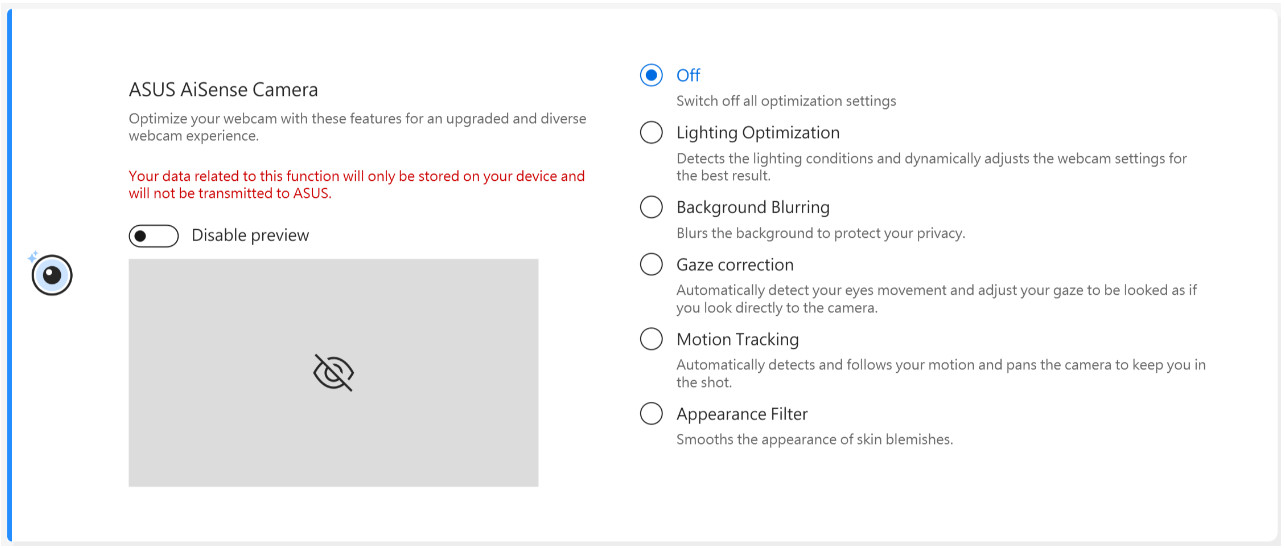
Notice:
1. Support need: MyASUS 3.0.34.0 + ASUS System Control Interface 3.0.19.0(or above)
2. Only for special camera module, need to install specific camera driver .
3. It is default off.
4. Gaze correction supported will vary by model.
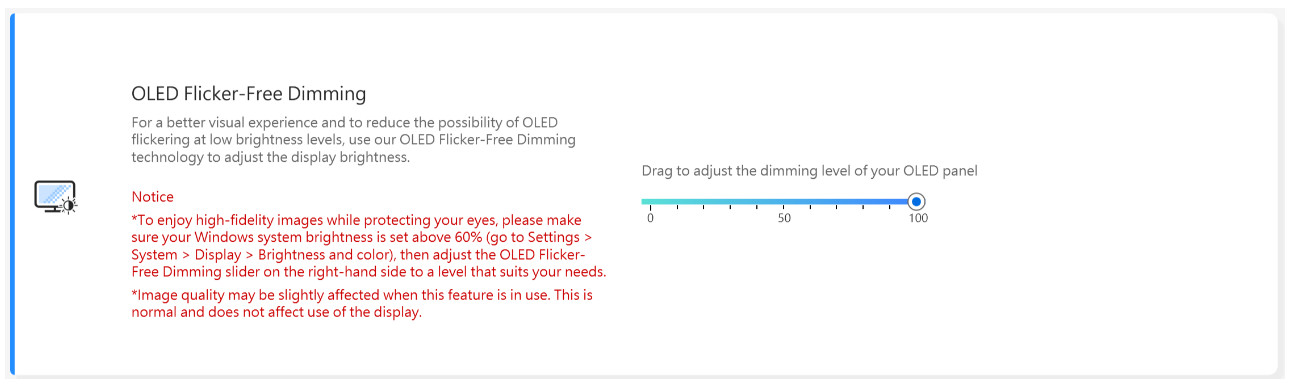
OLED Flicker-Free Dimming *The features only support devices equipped with OLED panel.
Some users may notice a slight OLED flickering at lower brightness values.
To reduce this effect, MyASUS integrate an OLED Flicker-Free DC Dimming technology to adjust panel brightness, reducing the flash and protect your eyesight.
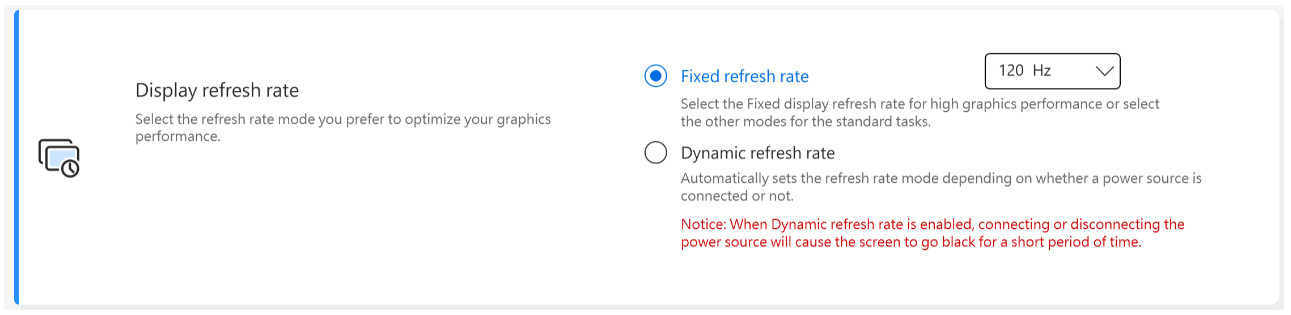
Display refresh rate * The features only support devices equipped with OLED panel
Display refresh rate feature offers the options for users to choose and optimize the graphic performance. Fixed refresh rate / Dynamic refresh rate
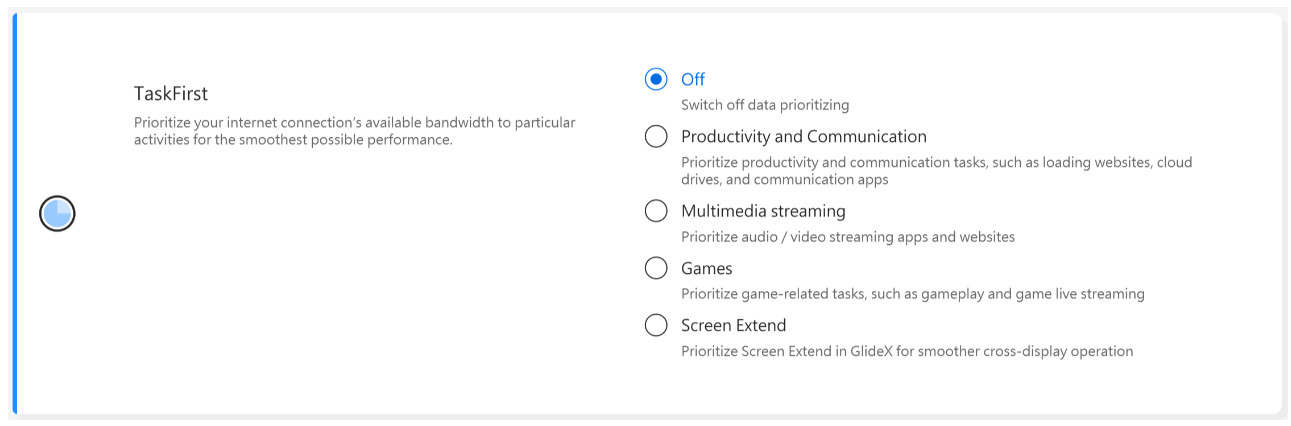
TaskFirst * It is supported starting version V2.2.34.0 of MyASUS and version V2.2.26.0 of ASUS System Control Interface V2
With TaskFirst, user can personalize the distribution of internet connection's available bandwidth.
Users can distribute throughput evenly among all tasks, or prioritize data to particular activities for the smoothest possible performance.
Notice: If Intel connectivity performance suite or Intel connectivity network service (Intel Evo) is supported, taskfirst and WiFi smartconnect will hide to prevent mutual interference.
WiFi SmartConnect *Only supports products which shipped after 2019/ November.
When moving between different meeting rooms with a laptop, the WiFi signal can become unstable. With ASUS Smart WiFi, your laptop will automatically connect to the router with the best available signal in your current environment.
It also memorizes the mobile hotspots you connect to and prioritizes connections to them when they're detected.

Notice: If Intel connectivity performance suite or Intel connectivity network service (Intel Evo) is supported, taskfirst and WiFi smartconnect will hide to prevent mutual interference.
WiFi RangeBoost Sensor *The features supported will vary by model.
WiFi RangeBoost Sensor is an environment-detection sensor. The user can enable and disable the sensor to dynamically adjust signal strength for maximum WiFi coverage.
When the sensor detects the PC is placed on a stable surface, the signal will be strengthened to ensure better WiFi connectivity.

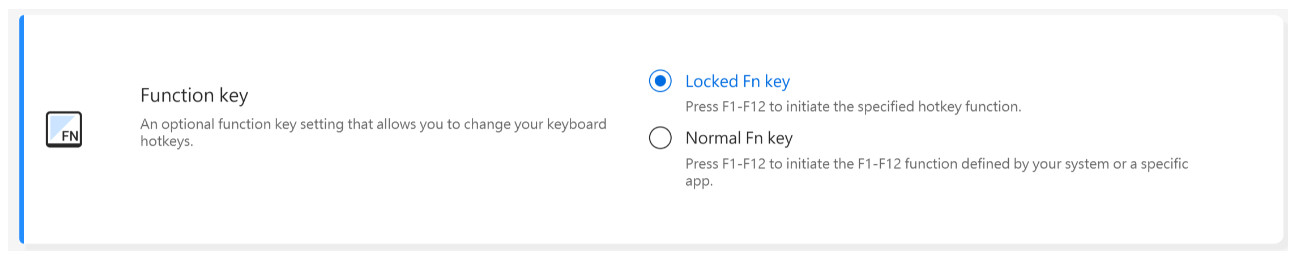
Function key lock *The features supported will vary by model. *Only supports laptops with ASUS System Control Interface V2. (Gaming- series Laptops don't support)
Function Key Lock allow users to adjust keyboard workflow with ease. Either choose the traditional way of pressing the Fn key along with the keyboard function keys, or use the new method of accessing the function keys directly without the Fn key. Choose the following way to switch function keys according to your habits :
1) Locked Fn key : Press F1-F12 to initiate the specified hotkey function.
2) Normal Fn key : Press F1-F12 to initiate the F1-F12 function defined by your system or a specific app.
NumberPad Lock
Click to lock the NumberPad function on the touchpad to prevent accidentally activating.

Notice:
1. Support need: MyASUS 3.0.34.0 + ASUS System Control Interface 3.0.19.0(or above), Touchpad driver:17.0.0.5 or above.
2. Only lock the NumberPad function on the touchpad not for external digital keyboard.
3. It is default unlock.
4. It doesn't support gaming NB.
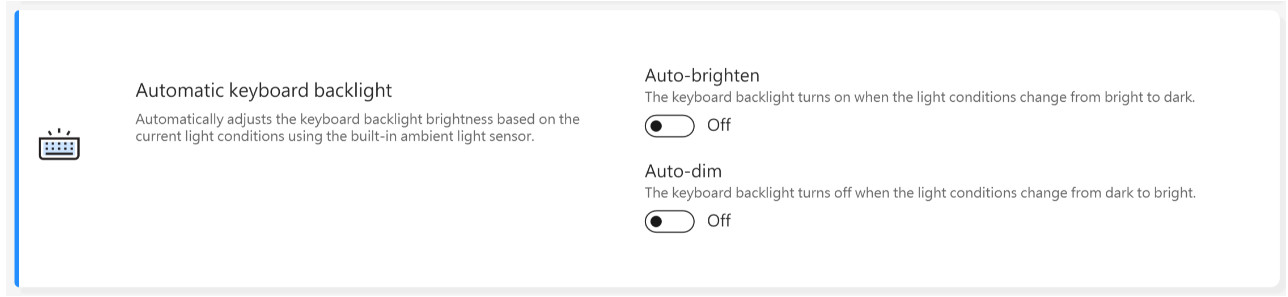
Automatic Keyboard Backlight * The features supported will vary by model.
Brightens or dims the automatic keyboard backlight according to the current light conditions using the built-in Ambient Light Sensor.
Auto-brighten: The keyboard backlight turns on when the light conditions change from bright to dark.
Auto-dim: The keyboard backlight turns off when the light conditions change from dark to bright.
*This function is unavailable when battery level is under 20% and the Windows battery saving mode is activated.
Touchpad *The features supported will vary by model. (Only supports laptops with ASUS System Control Interface V2/V3.)

Notice:
1. Requirement: MyASUS 3.1.18.0 + ASUS System Control Interface 3.1.14.0(or above)
2. Default setting is based on Microsoft's setting.
3. Models with screenpad don't support this function.
4. When Internal Point Device is disabled in BIOS, MyASUS will hide this item.
5. When the Touchpad Lock is enabled, NumberPad Lock of MyASUS will be grey out at the same time.
Touchpad with stylus support *The features supported will vary by model.

Notice:
1. Requirement: MyASUS 3.1.18.0 + ASUS System Control Interface 3.1.14.0(or above)
2. Default setting is based on Microsoft's setting.
3. Models with screenpad don't support this function.
4. When disable Internal Point Device in BIOS setting menu, MyASUS will hide this item.
Smart Gestures *The features supported will vary by model.
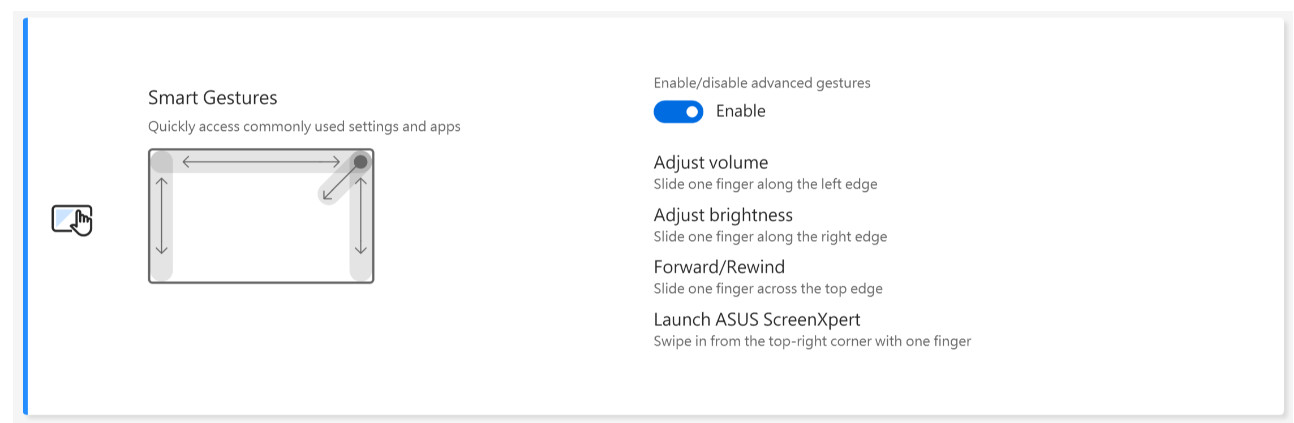
Notice:
1. Requirement: MyASUS 4.0.9.0 + ASUS System Control Interface 3.1.25.0(or above).
2. Disable Smart Gestures is set by default.
3. Function introduction:
a. Slide one finger along the left edge to adjust system volume.
b. Slide one finger along the right edge to adjust panel brightness
c. Slide one finger across the top edge to forward or rewind the video
d. Swipe in from the top-right corner with one finger to launch ASUS ScreenXpert app
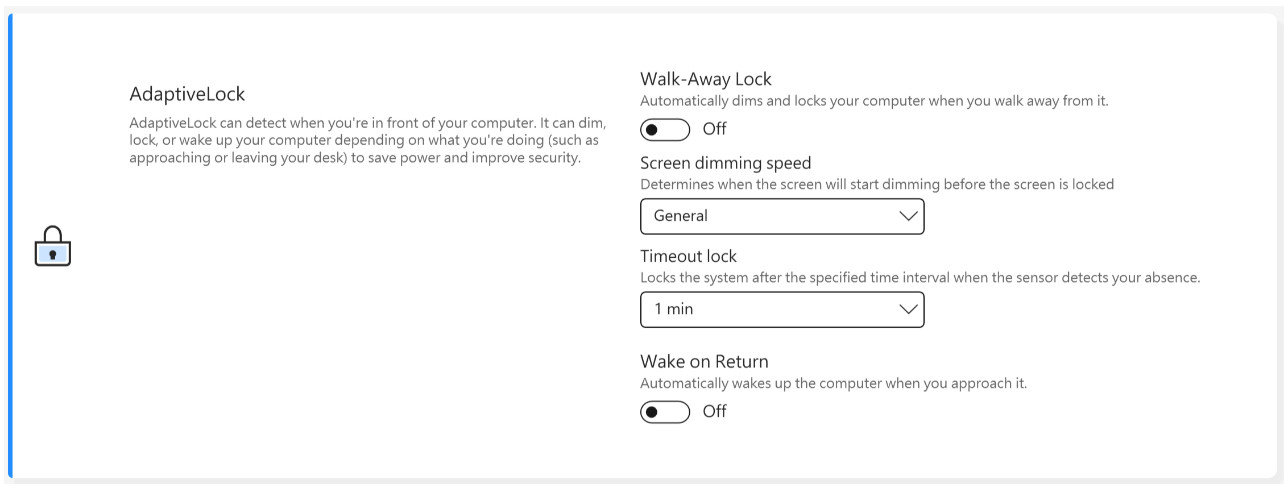
AdaptiveLock
AdaptiveLock uses a proximity sensor to detect whether the user is in front of the PC.
[Supported on selected models of NB for work]
Lock the system upon leaving: Users can turn on Walk-Away Lock to enhance security and save battery, locking the PC when the user walks away from the device.
Screen dimming speed: Set the time to start dimming before the screen is locked.
Time out lock: When it is detected that you are not near the computer, lock the system after the specified time interval.
Wake up the system after returning: The system can also log back in and resume once detected the user's return.
[Supported on selected models of NB for home]
Presence Detection
Lock the system upon leaving: Users can turn on Walk-Away Lock to enhance security and save battery, locking the PC when the user walks away from the device.
Wake up the system after returning: The system can also log back in and resume once detected the user's return.
Screen brightness decreases when the line of sight leaves: Automatically adjust the screen brightness depending on where you're facing.
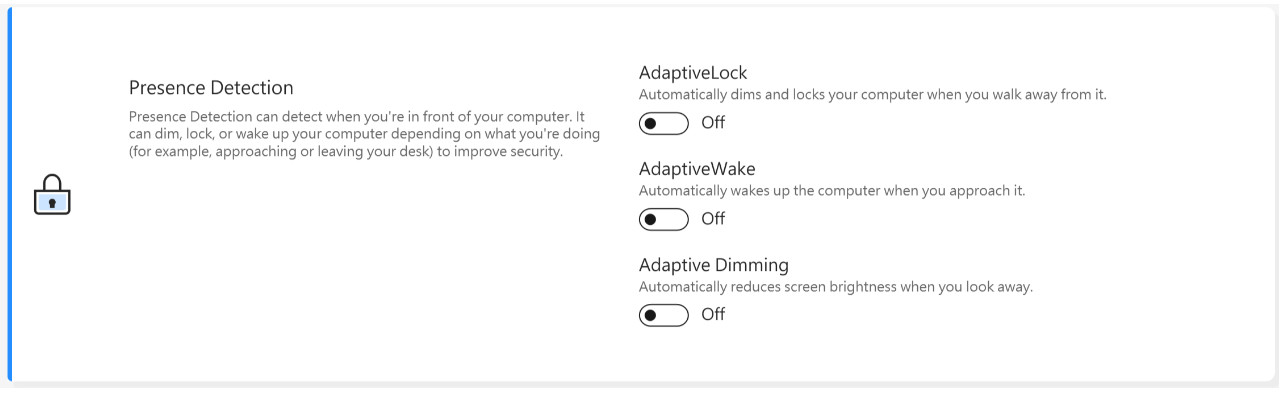
*This feature only supports main screen locking and wake-up, and cannot be applied to external screens.
Though MyASUS Exclusives feature, users can customize RGB lighting on LCD cover or keyboard for their own device.
*The features supported will vary by model.
[Vivobook Pro 16 AURA version]

① Lighting effect: To select your device lighting effects.
② Lighting settings: According to the lighting effects selection, user can setup color、speed and brightness of lighting effect.
③ Apply effect: To apply a selected lighting effect on device.
④ Reset to default: To select “Reset to default”, all lighting settings will return to the default.
⑤ Settings: To select Settings* to get into Setting page, and user can turn on/off each functions.
*Settings
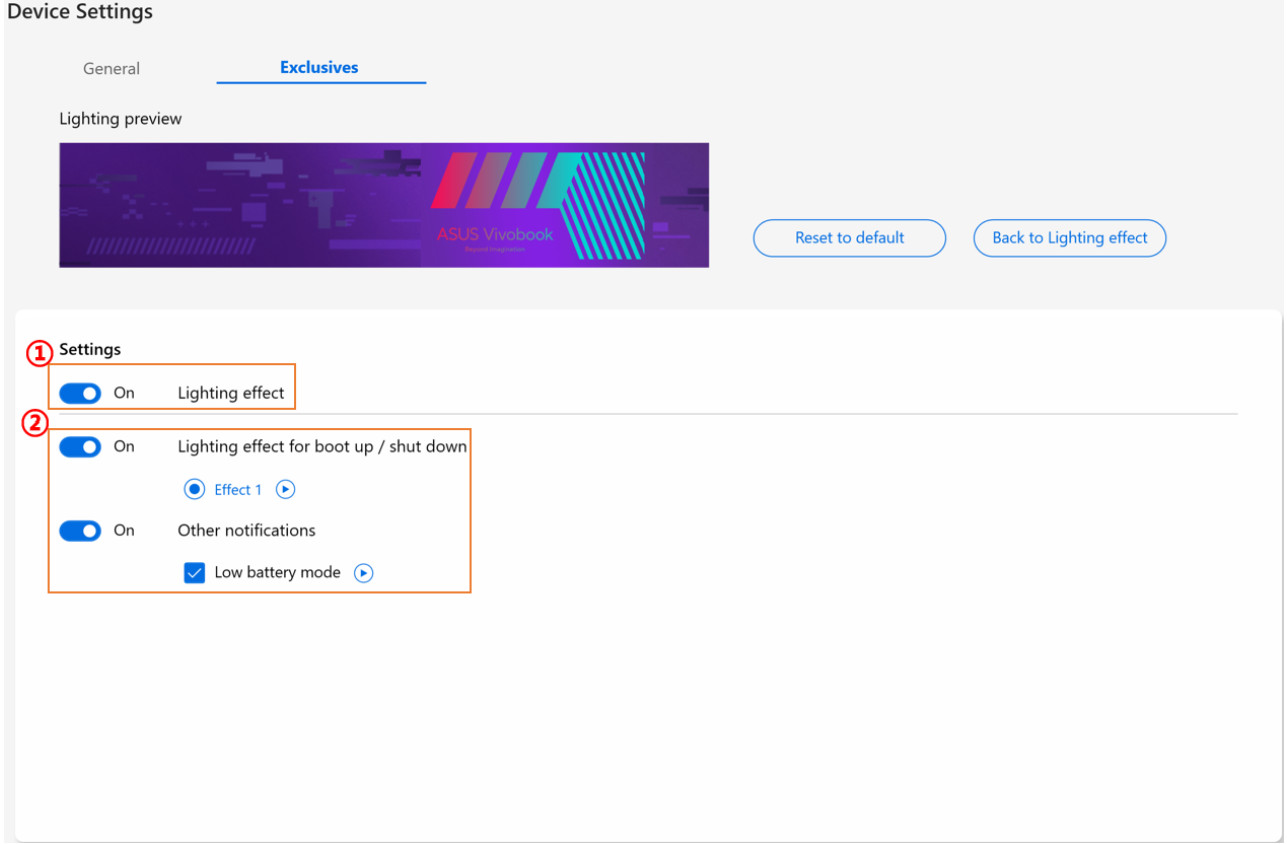
① Lighting settings: To turn on/off the lighting effects.
② Lighting effects: Through clicking  , user can preview utility preset lighting effects, and through each on/off switch, user can turn on/off for each preset lighting effects.
[Zenbook Pro 15 Flip]
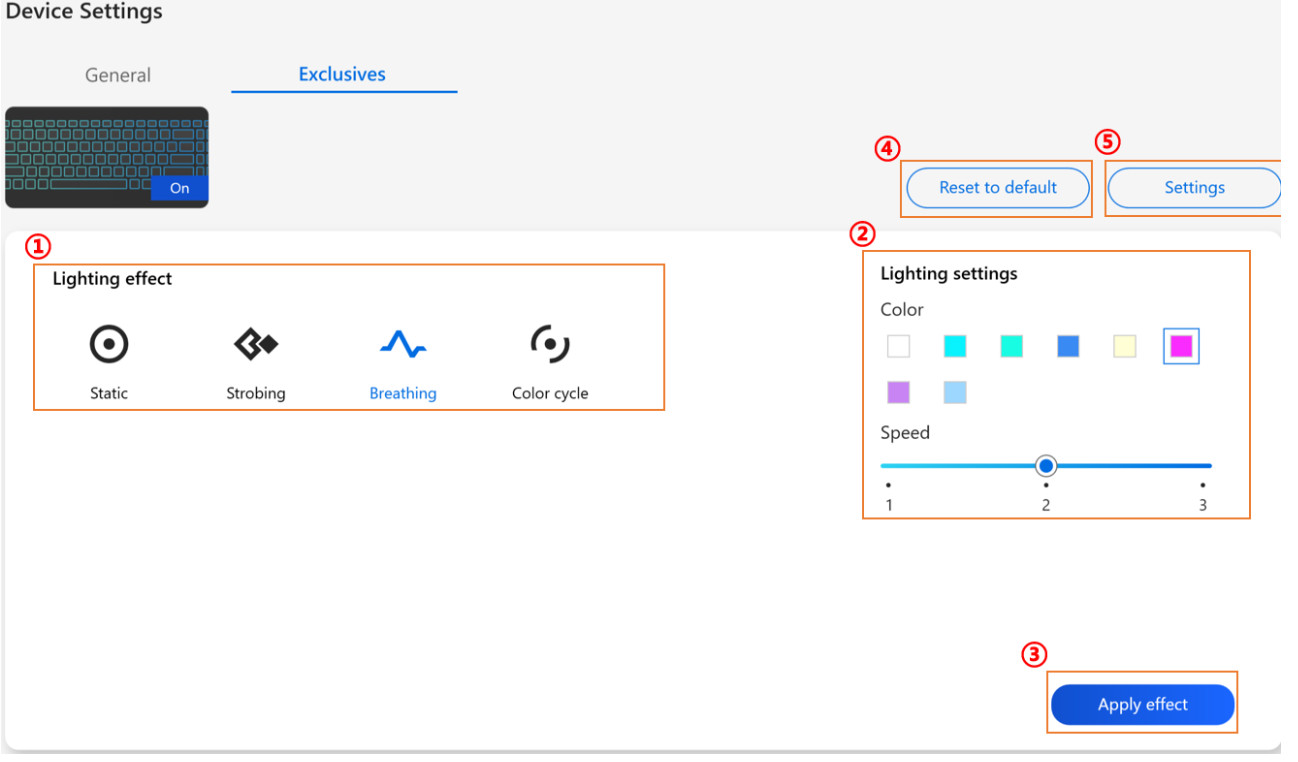
① Lighting effect: To select your device lighting effects.
② Lighting settings: According to the lighting effects selection, user can setup color、speed of lighting effect.
③ Apply effect: To apply a selected lighting effect on device.
④ Reset to default: To select “Reset to default”, all lighting settings will return to the default.
⑤ Settings: To select Settings* to get into Setting page, and user can turn on/off lighting effect.
*Settings
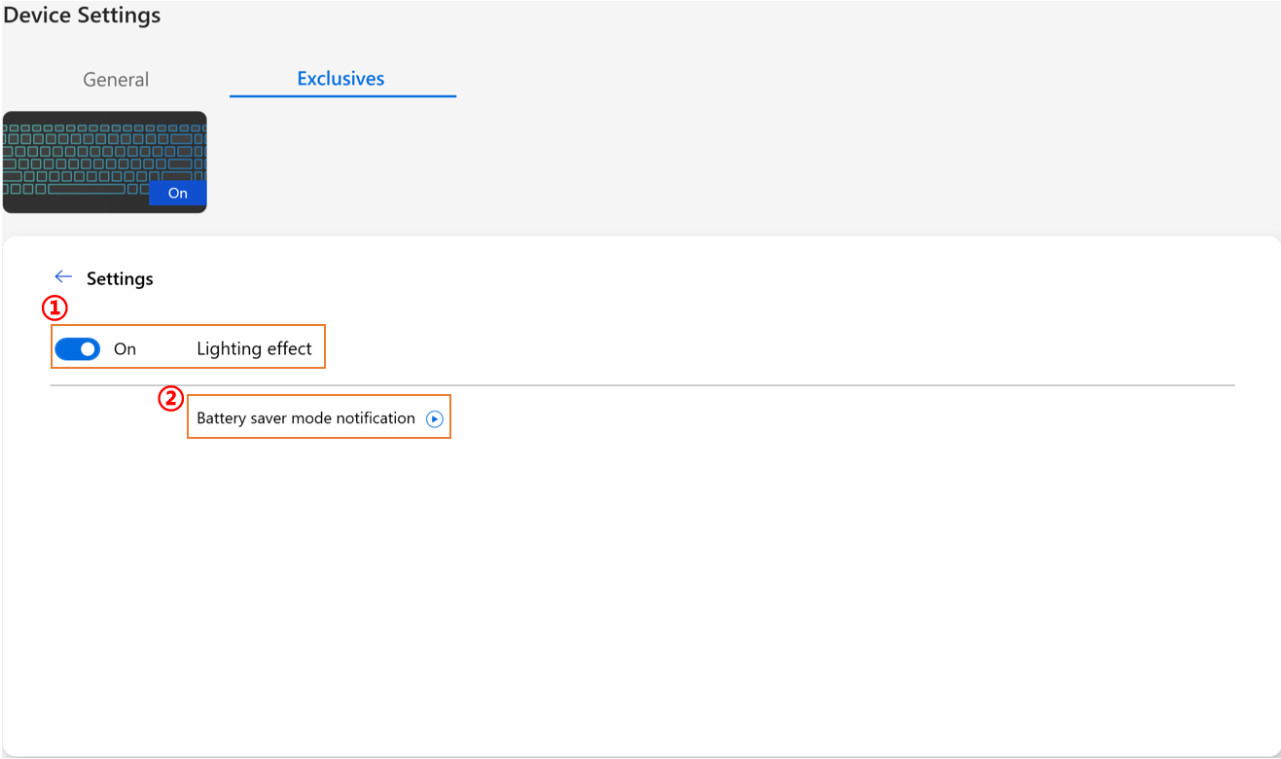
① All Lighting settings: To turn on/off the lighting effects.
② Default Lighting effects: Through clicking , user can preview the battery saver mode effect.
[Zenbook 14X OLED Space Edition]
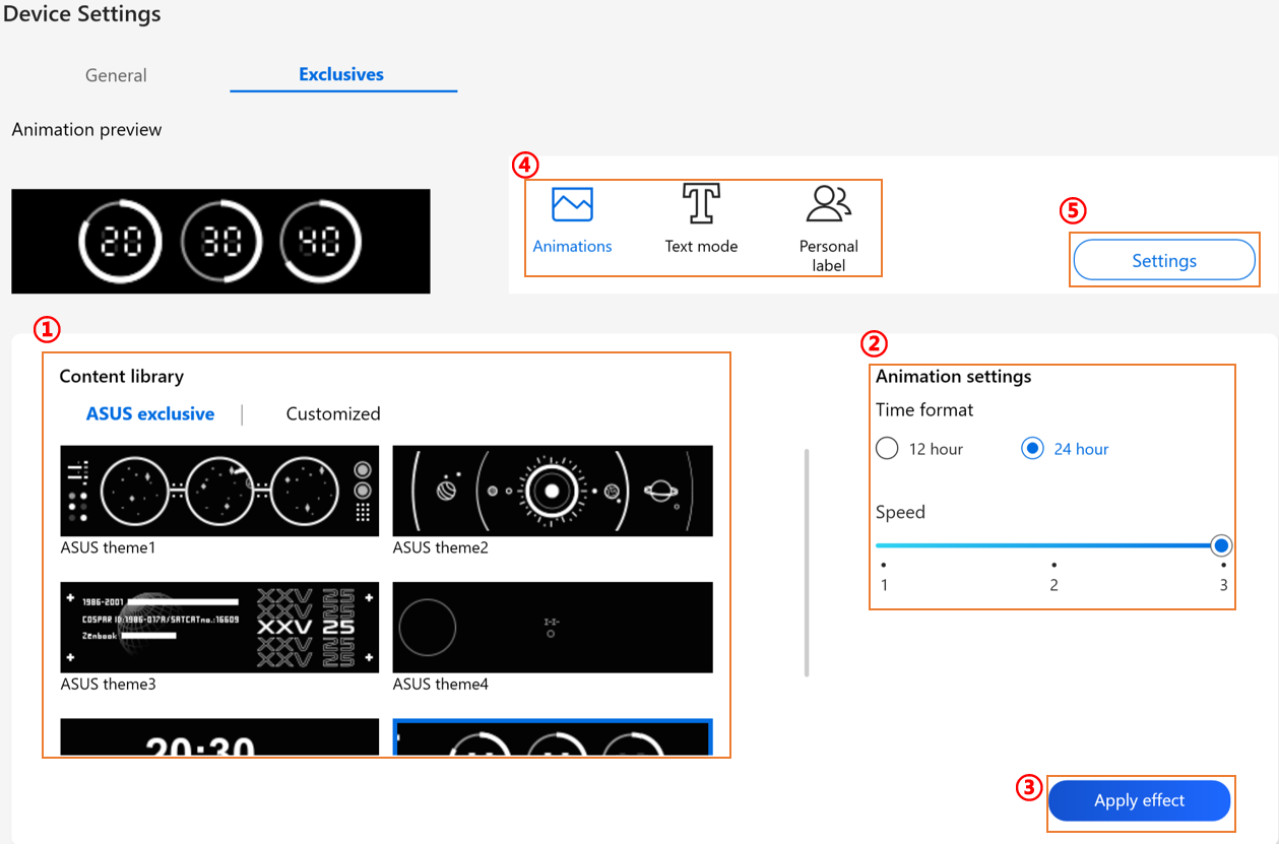
① Content library: To select the Animation effects.
② Animation settings: User can setup speed of each animation.
③ Apply effect: To apply selected effect on device.
④ Category: There are three types, Animation, Text, Personal label template to use.
⑤ Settings: To select Settings* to get into Setting page, and user can turn on/off lighting effect.
*Settings

① Effect settings: To turn on/off the PMOLED display or change the brightness.
② Event trigger animation: Through clicking , user can preview the boot animation.
[Zenbook Pro 16X OLED]

① Lighting effect: To select your device lighting effects.
② Lighting settings: According to the lighting effects selection, user can setup color、speed、direction of lighting effect.
③ Apply effect: To apply a selected lighting effect on device.
④ Reset to default: To select “Reset to default”, all lighting settings will return to the default.
⑤ Settings: To select Settings* to get into Setting page, and user can turn on/off lighting effect.
*Settings

① Lighting settings: To turn on/off lighting effects.
② Default lighting effects: Through clicking , user can preview each effects and easily opt-on by one click.
Q&A
Q1: Why can't I find Splendid, Tru2Life and OLED Flicker-Free Dimming in Device Settings after I reinstall Windows and MyASUS?
A1: Please refer to here.
Q2: Why my MyASUS Device Settings features are little different from this article?
A2: The features supported in [Device Settings] will vary by model, and not all products are with all Device Settings features.
[Notebook] MyASUS - User Center
Firstly, you need to login①. If you don't have ASUS ID, you can register here②.
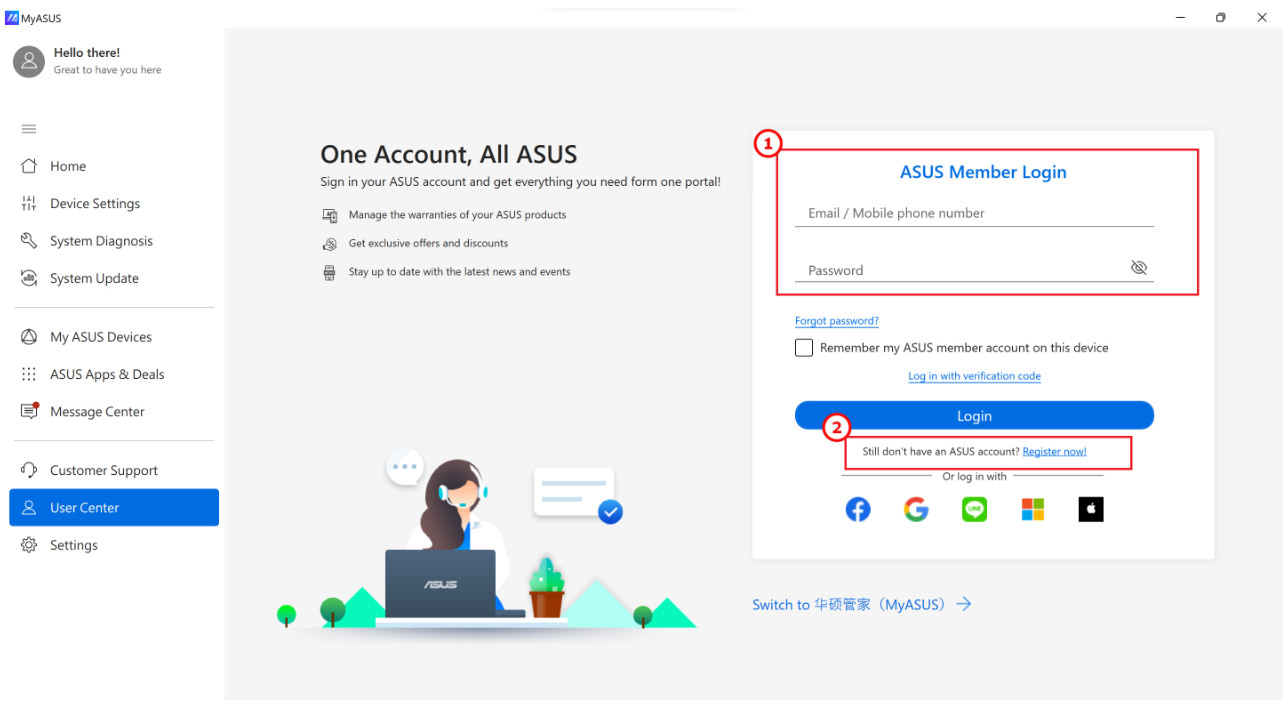
By clicking  , you can edit your personal info and change password.

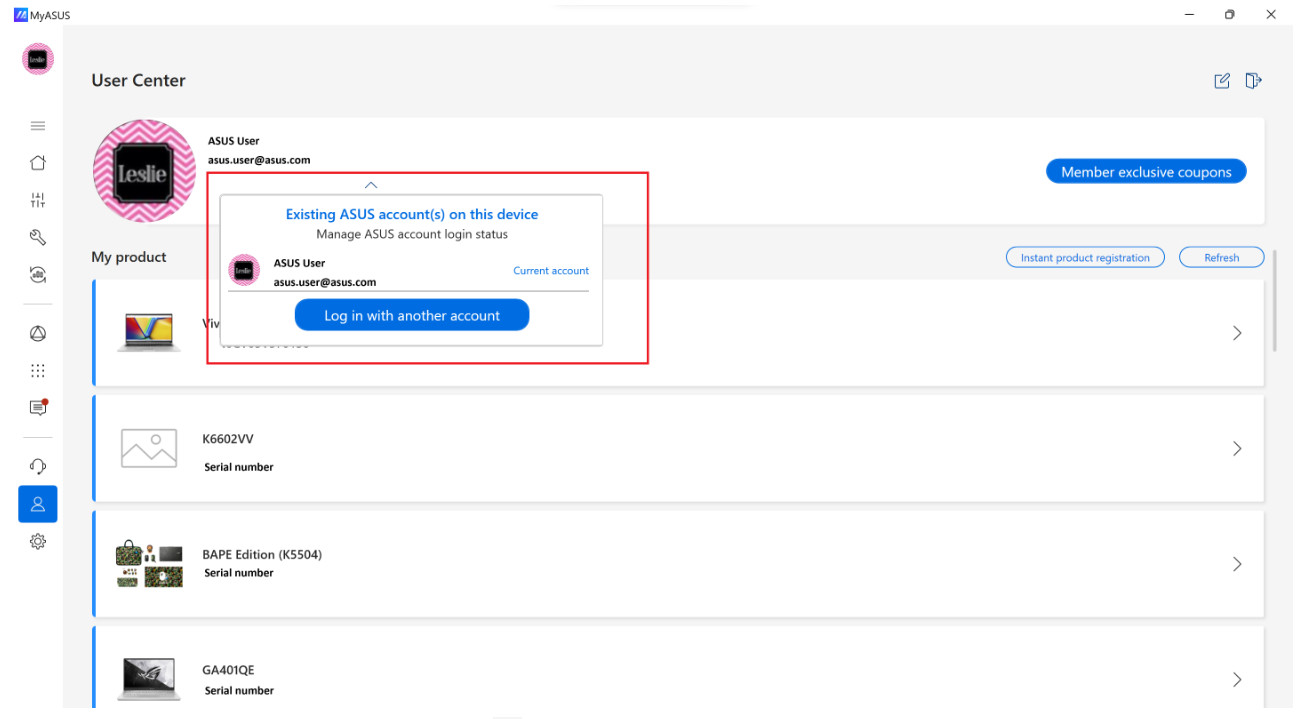
You can also manage accounts among other ASUS in-house apps such as GlideX.
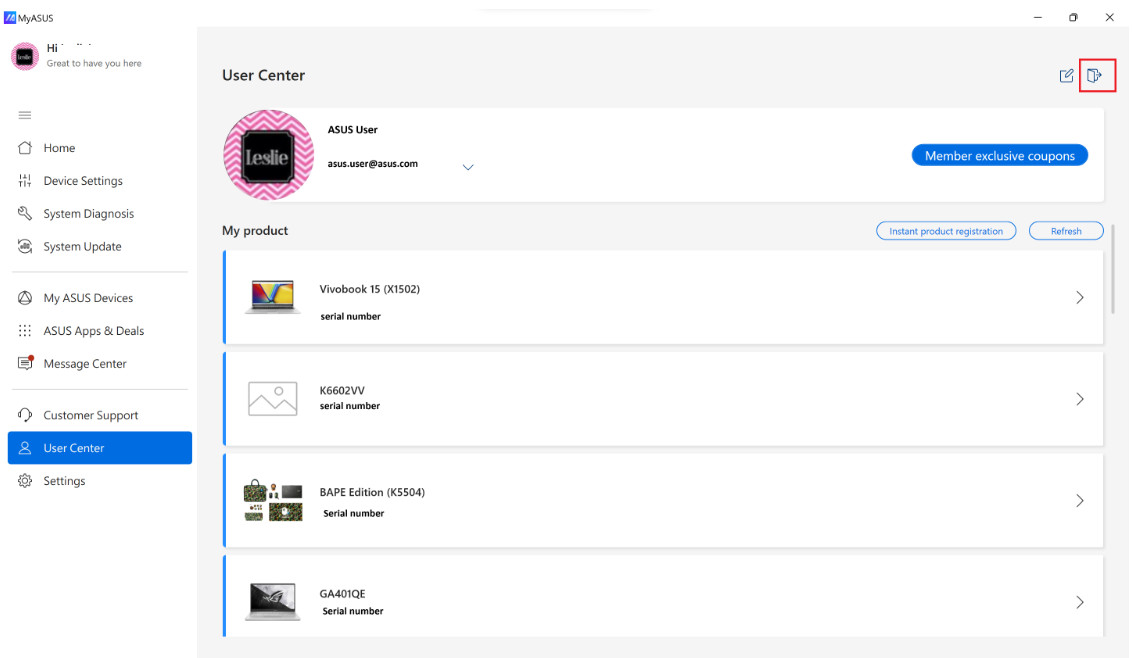
You can log out the current account by pressing  .
.
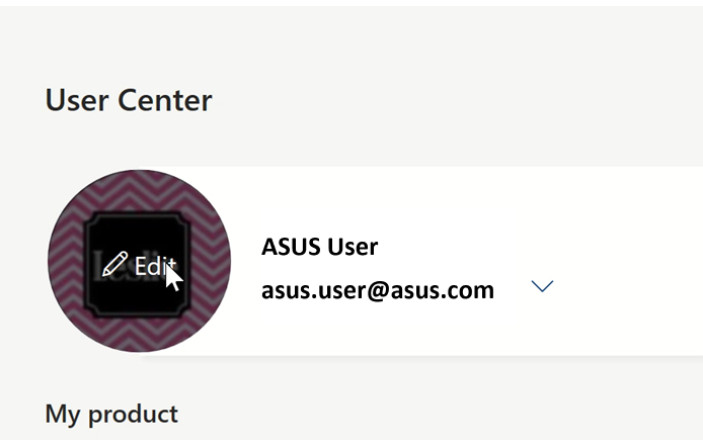
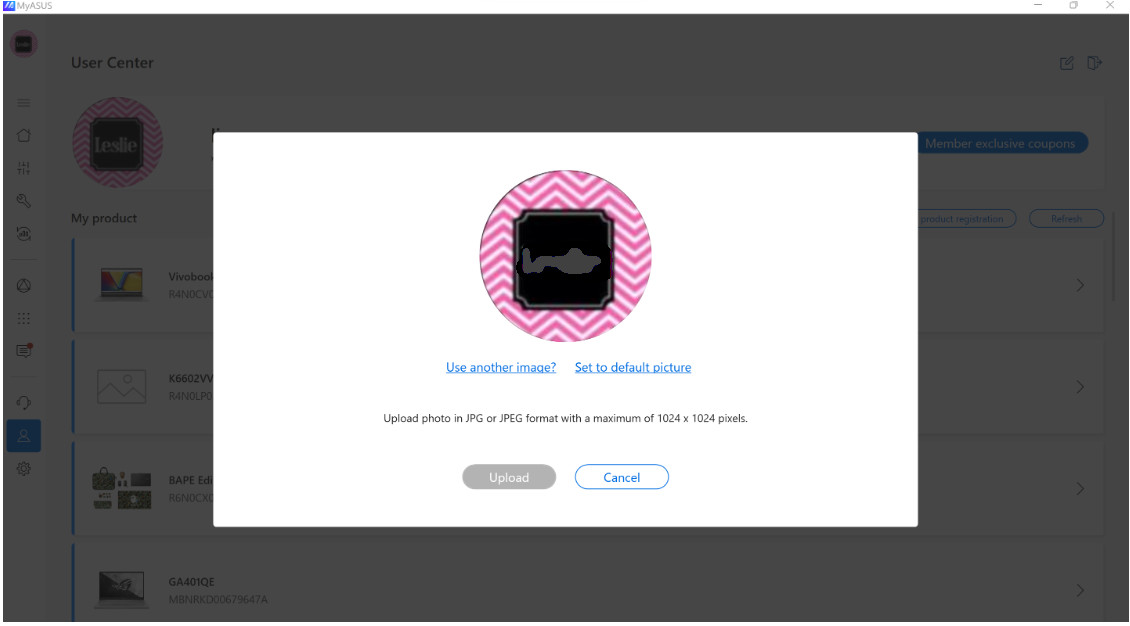
[Edit profile picture]: You can edit your profile picture by pressing the current picture.
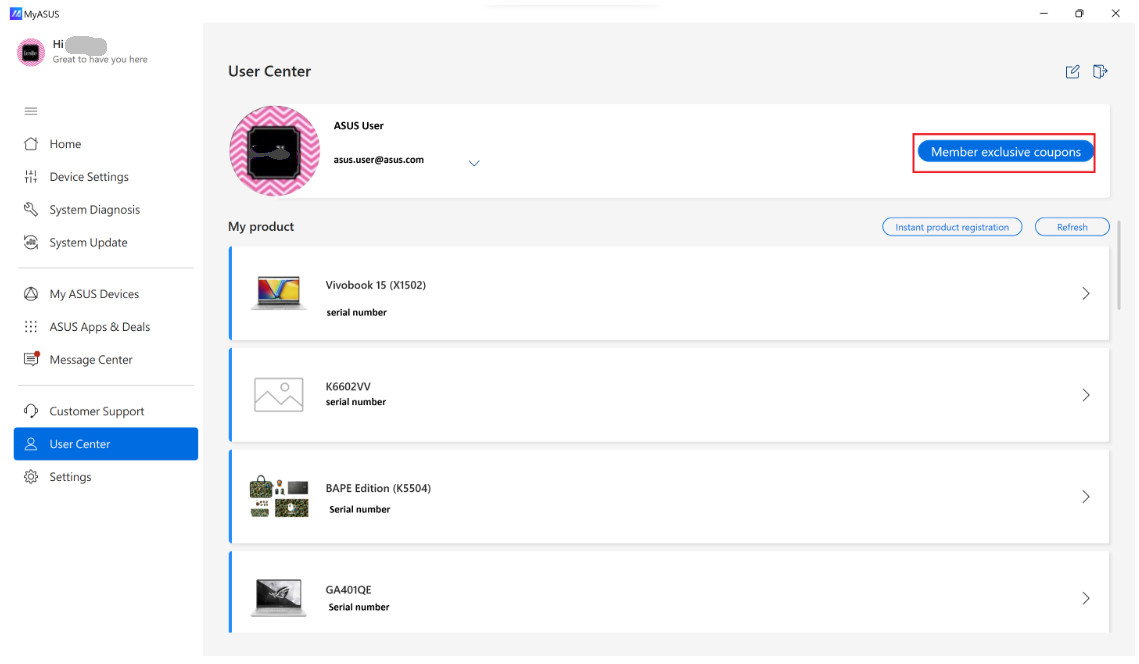
[Member exclusive coupon]: When acquiring coupons, all of them will be saved here for future use.
[Product Registration]: You can register all ASUS product through MyASUS easily and enjoy the warranty service.
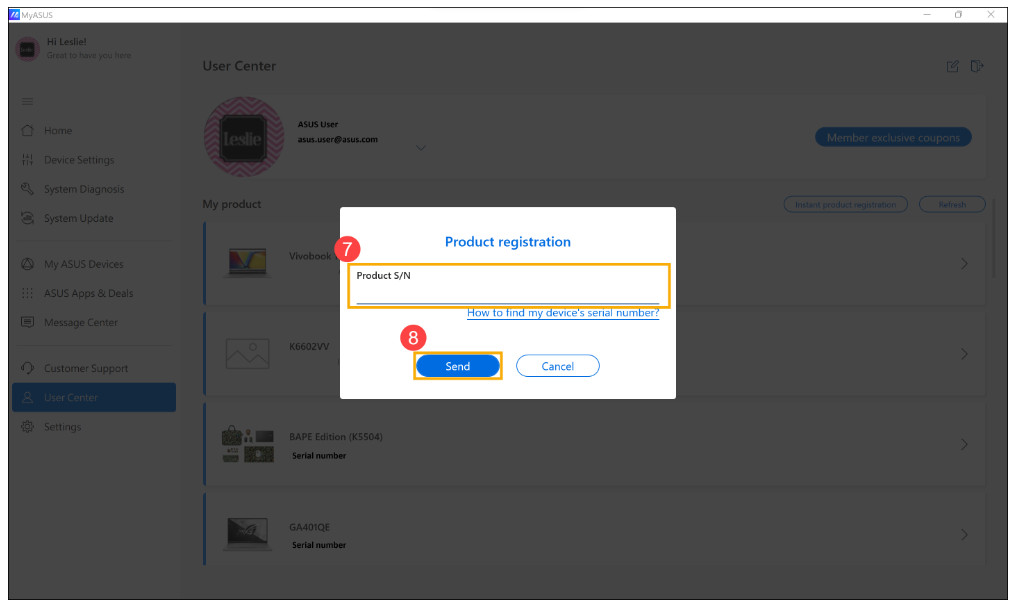
1. Click [Instant product registration].

2. Type product serial number and press [Send] to complete the registration.
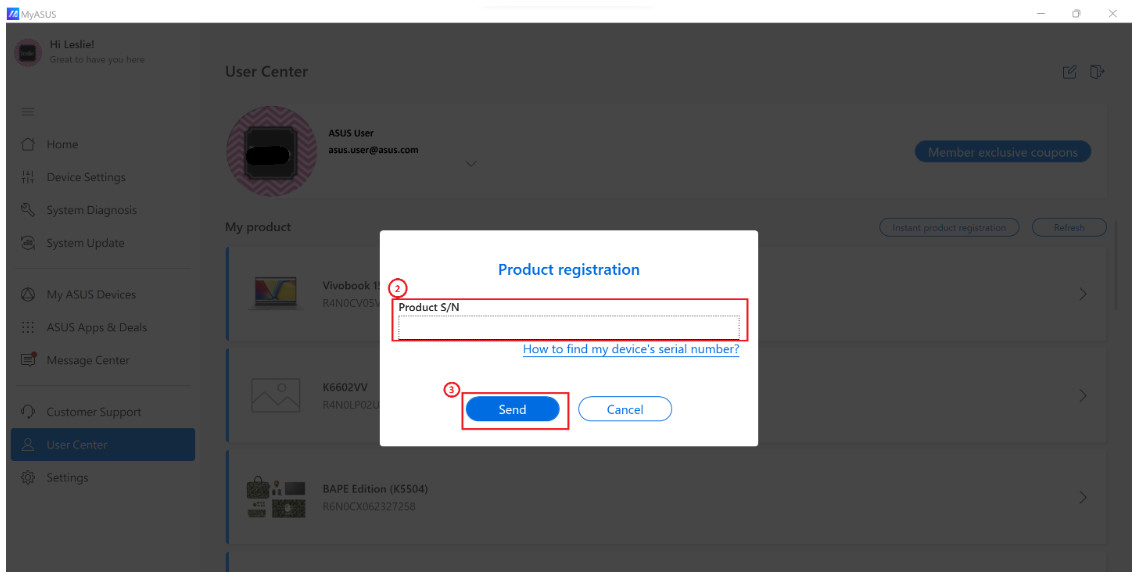
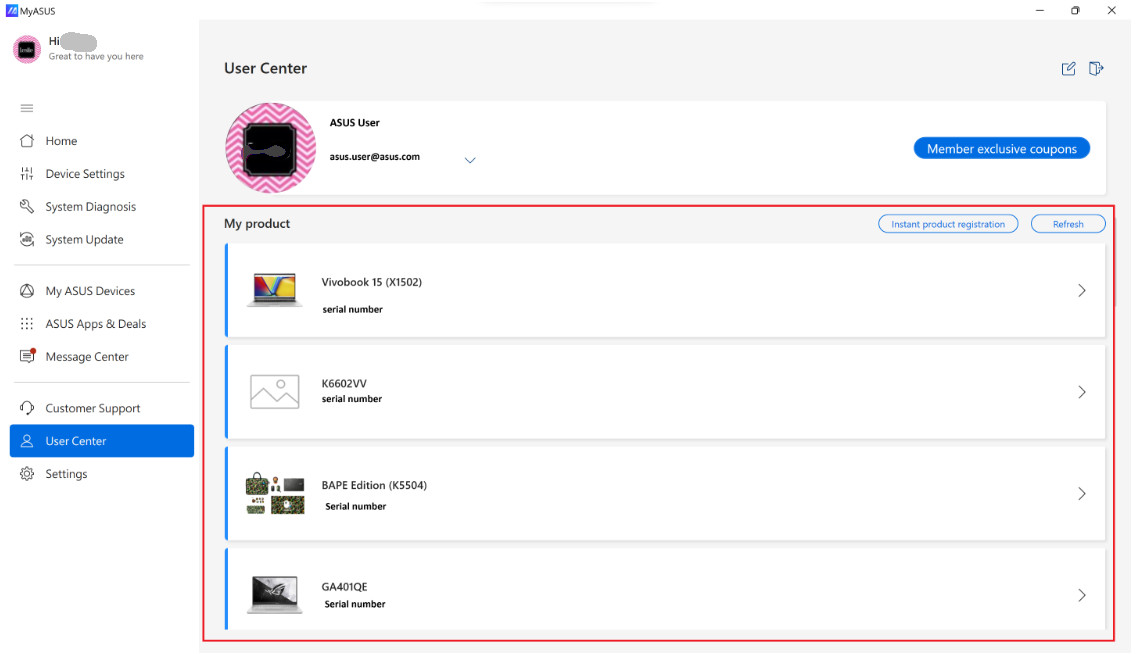
3. The registered product will be shown in the [My product] section.
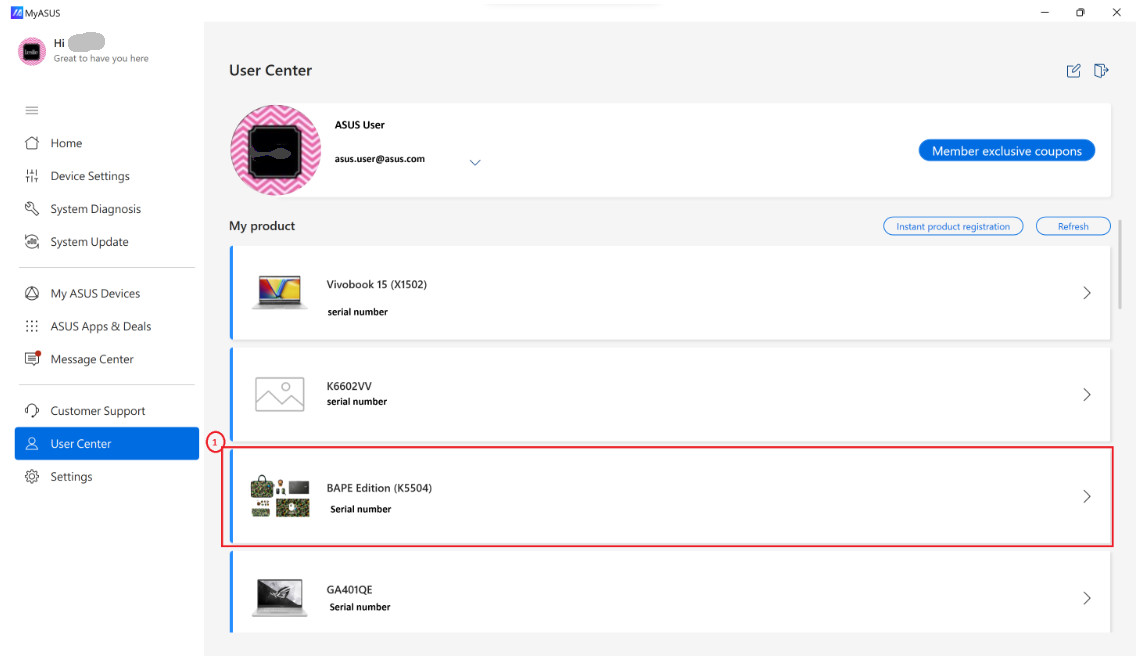
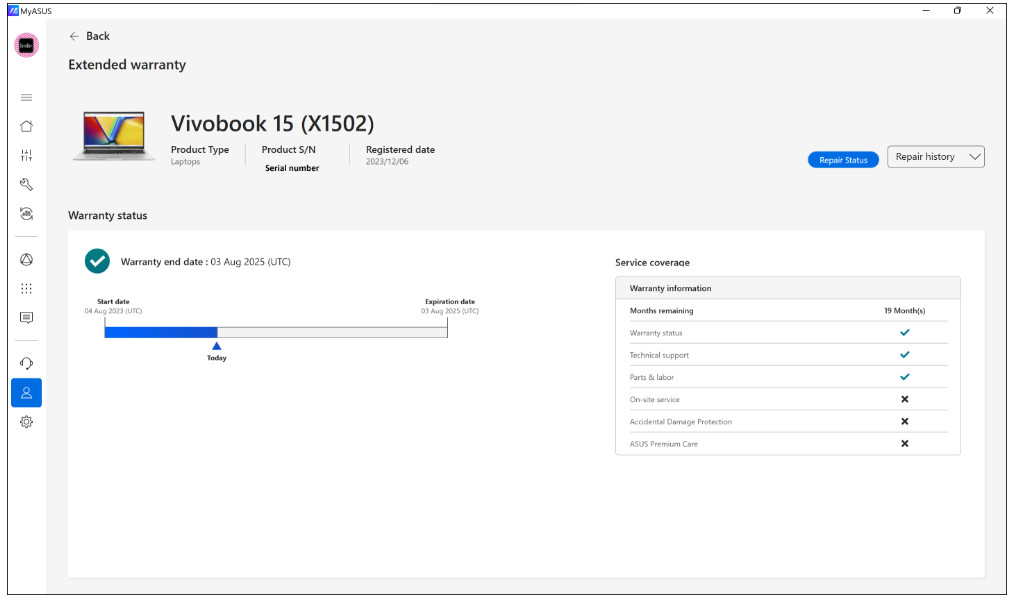
[Product Footprint]: You can check the registered device status in one page including product technical specification, repair status, warranty status and also repair history.
1. Click one of the registered products you’d like to check.
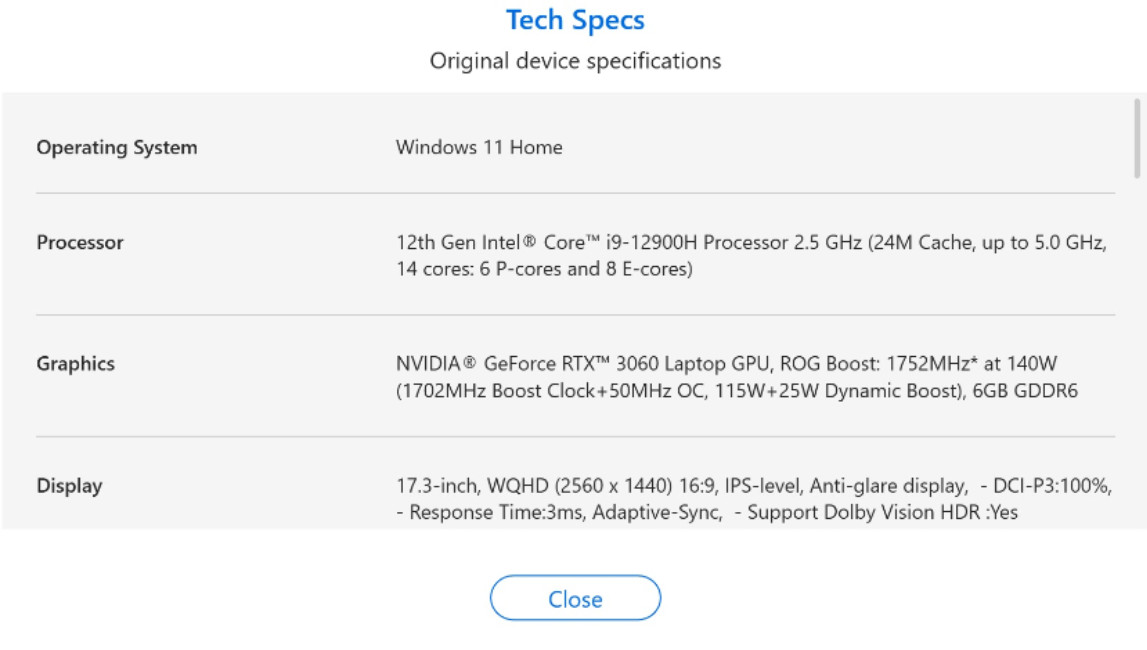
Click[Tech Specs]
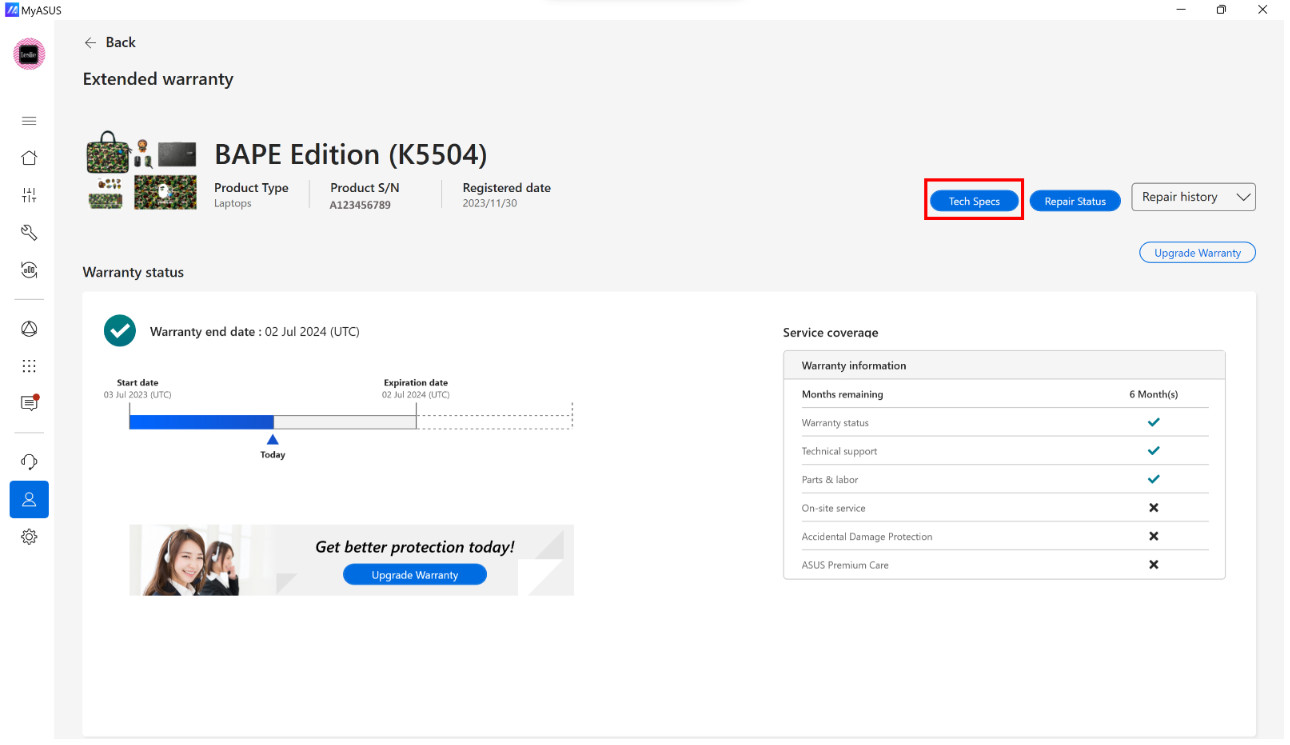
You can check the detail specs of your product here.
2. You can also upgrade warranty in this page, just click [Upgrade Warranty] button from the top or at the bottom banner.
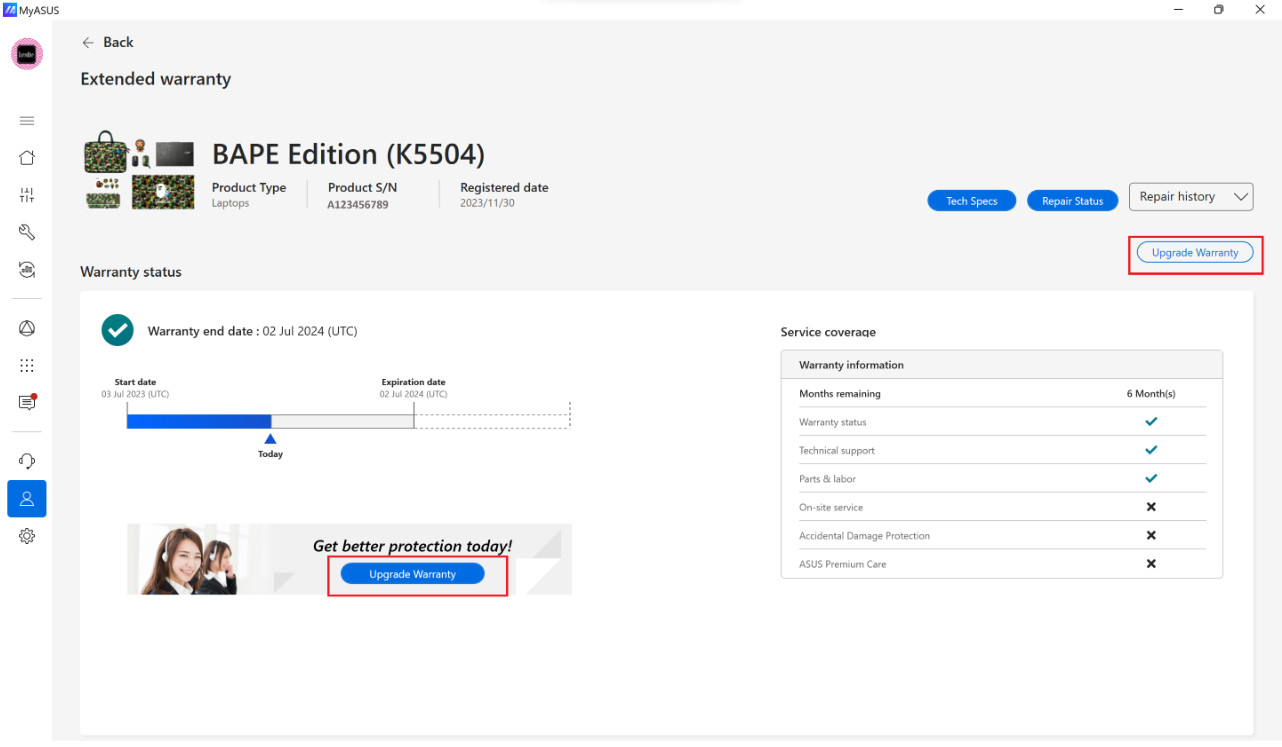
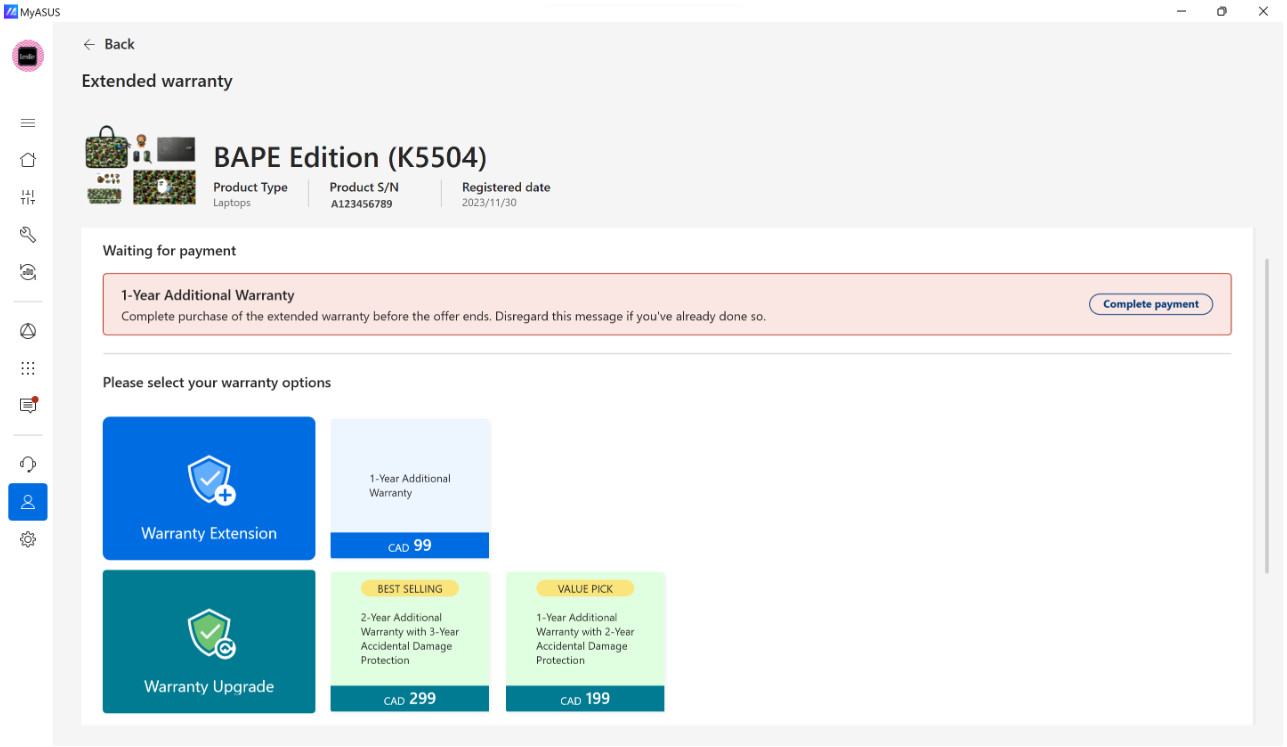
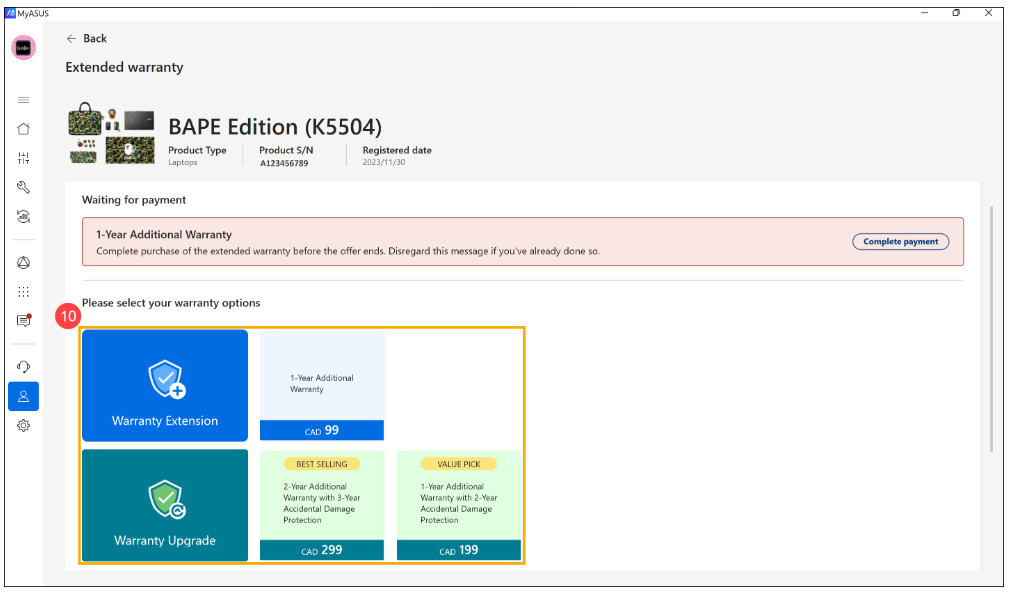
3. After clicking the [Upgrade Warranty button], available warranty packages will be shown, you can base on your needs to choose the one to purchase.
If you have selected a package without complete the payment, a red banner will be shown to guide you to complete the payment or you can reselect a new package.
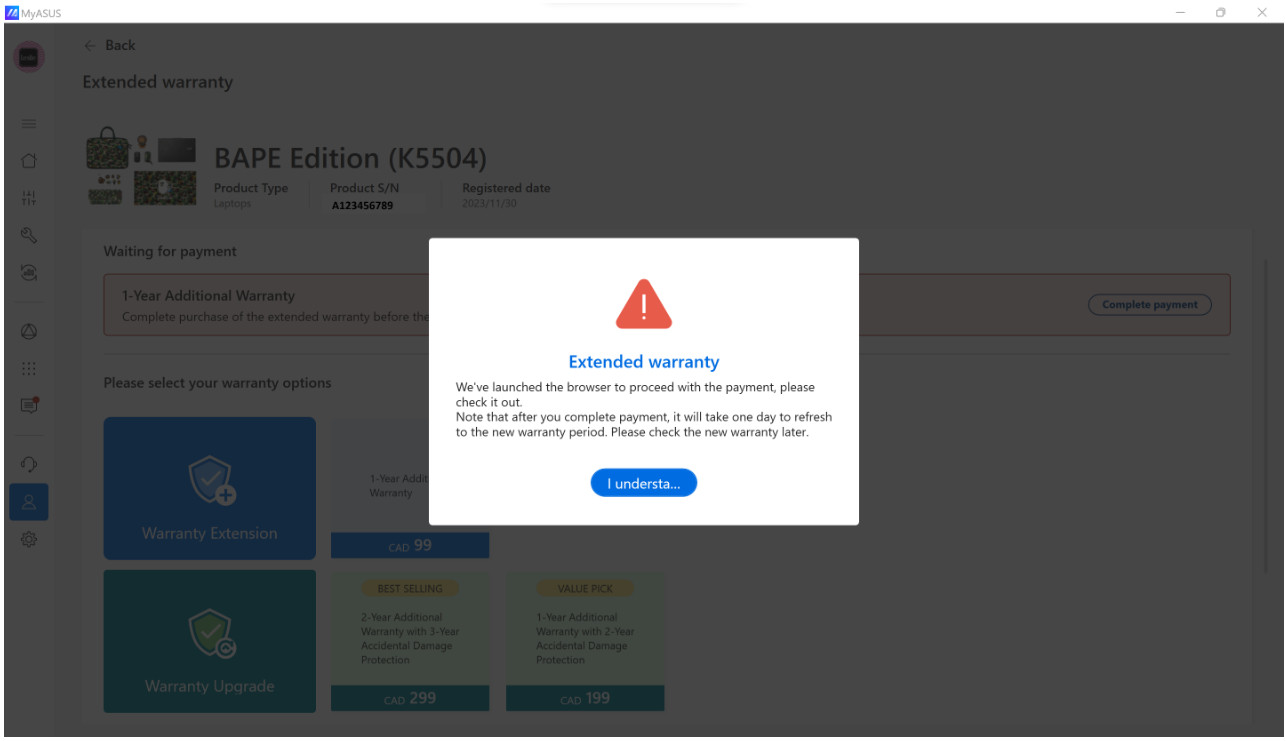
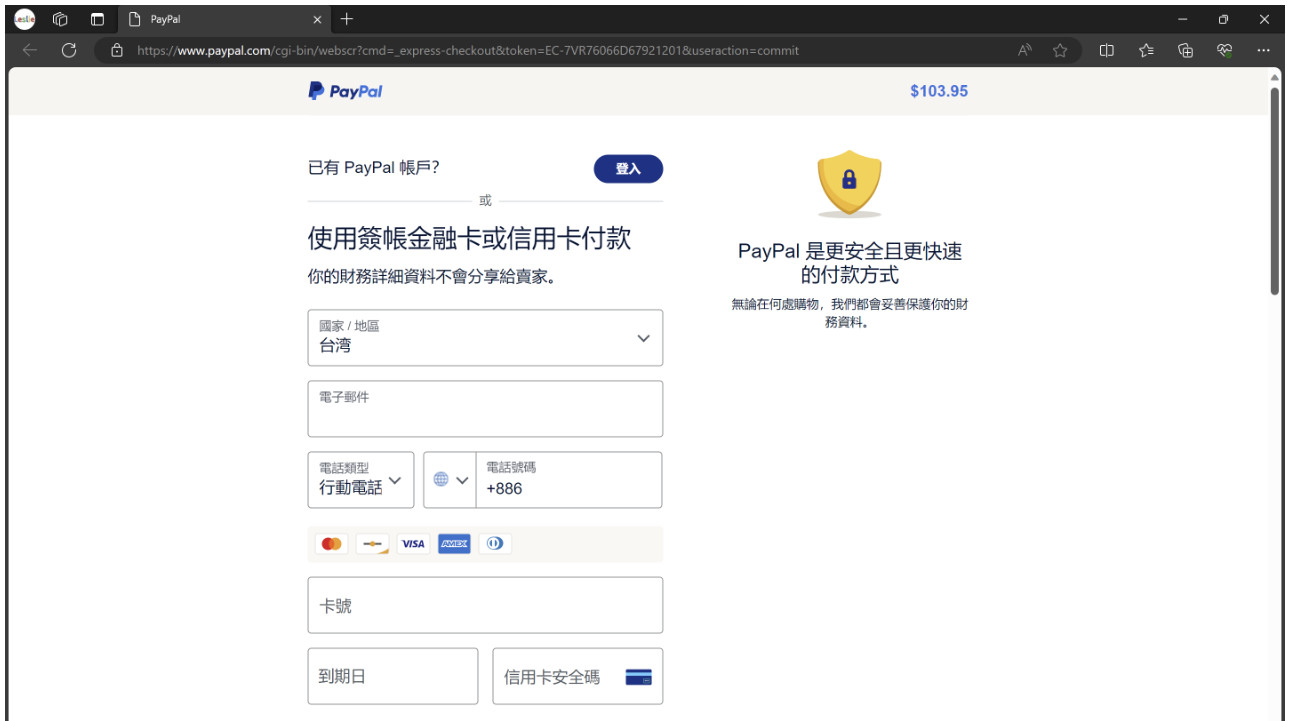
4. When all required info has been filled in, the payment page will be pop-out from browser, the warranty purchase will not be completed unless you complete the payment from the browser.
Note: after completing warranty purchase, the new warranty end date will be refreshed within 3 to 5 days.
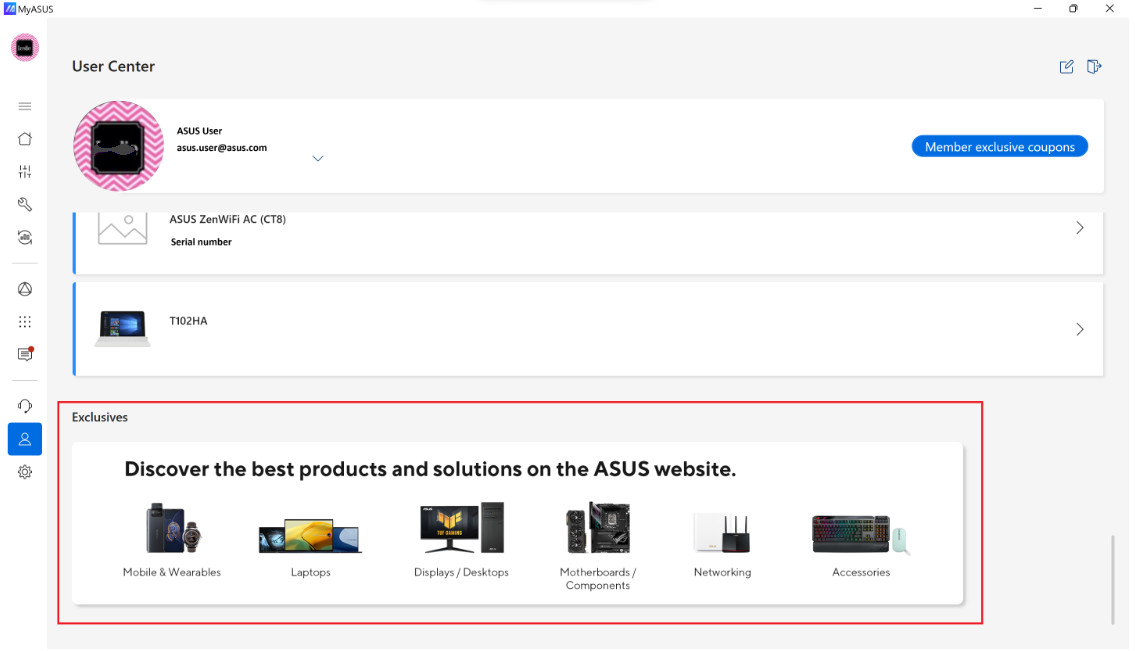
[Exclusives]: You can go to ASUS Store to check more promotions by clicking the banner below.
Introduction
In ASUS One, you can simply find the ASUS branded application or connect and control configurations for your ASUS Router and ASUS Monitor. Once you have any of those devices, you can enter MyASUS to explore more functions specific for you.
Note: ASUS One is supported by MyASUS 3.0.34.0 + ASUS System Control Interface 3.0.19.0 or above.
Get started
Find [ASUS One]① in MyASUS
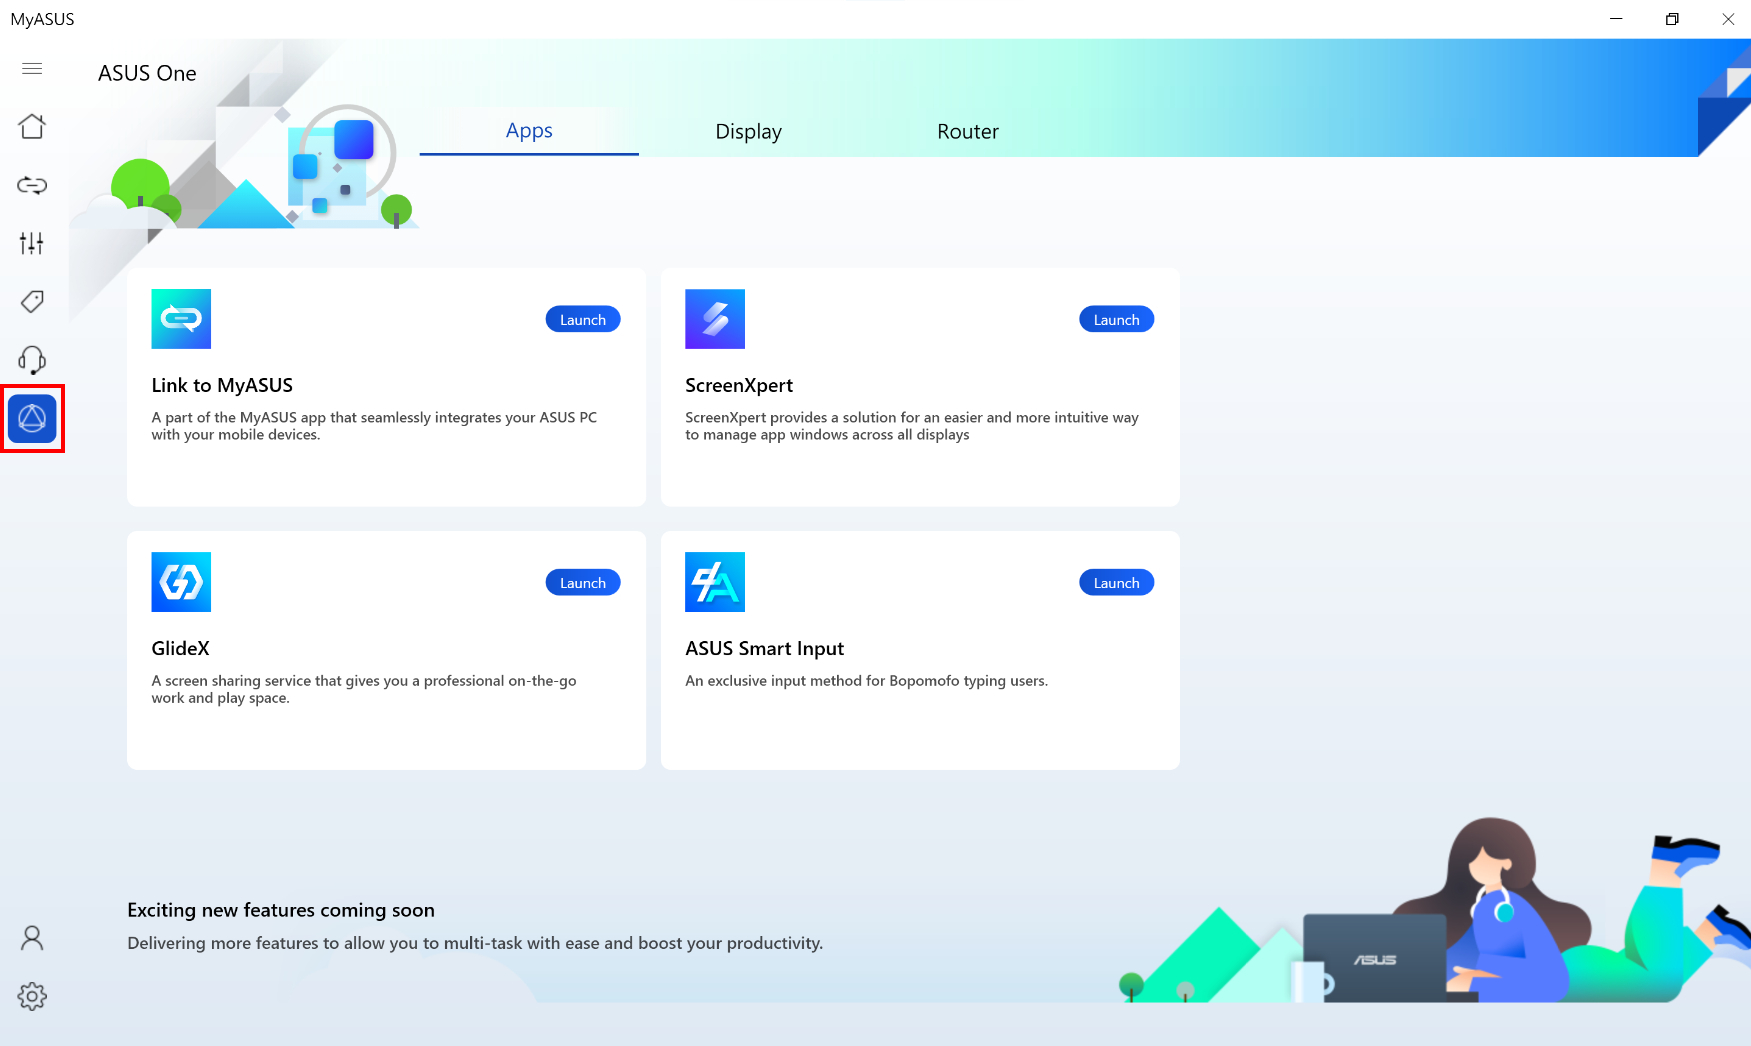
Apps
ASUS branded apps could help you manage daily activities and maximize overall efficiency. As of now, you can find link to [Link to MyASUS], [ScreenXpert] and [GlideX] listed here.
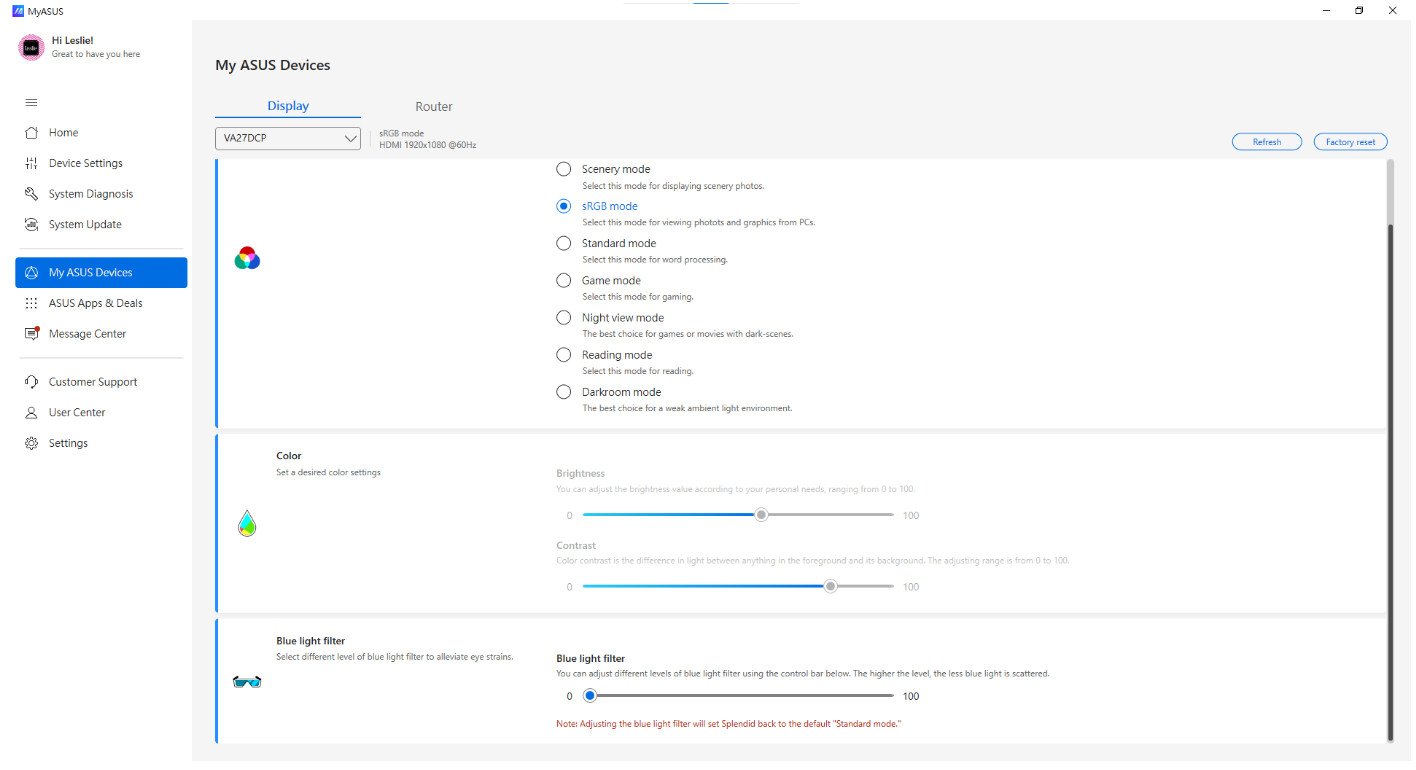
Display
You can adjust the monitor settings via MyASUS instead of pressing the buttons on monitors (Be sure that the monitor is connected to your laptop).
We aim to solve the inconvenience that the monitor may place where is not convenient to reach.
Supported models: please refer to here.
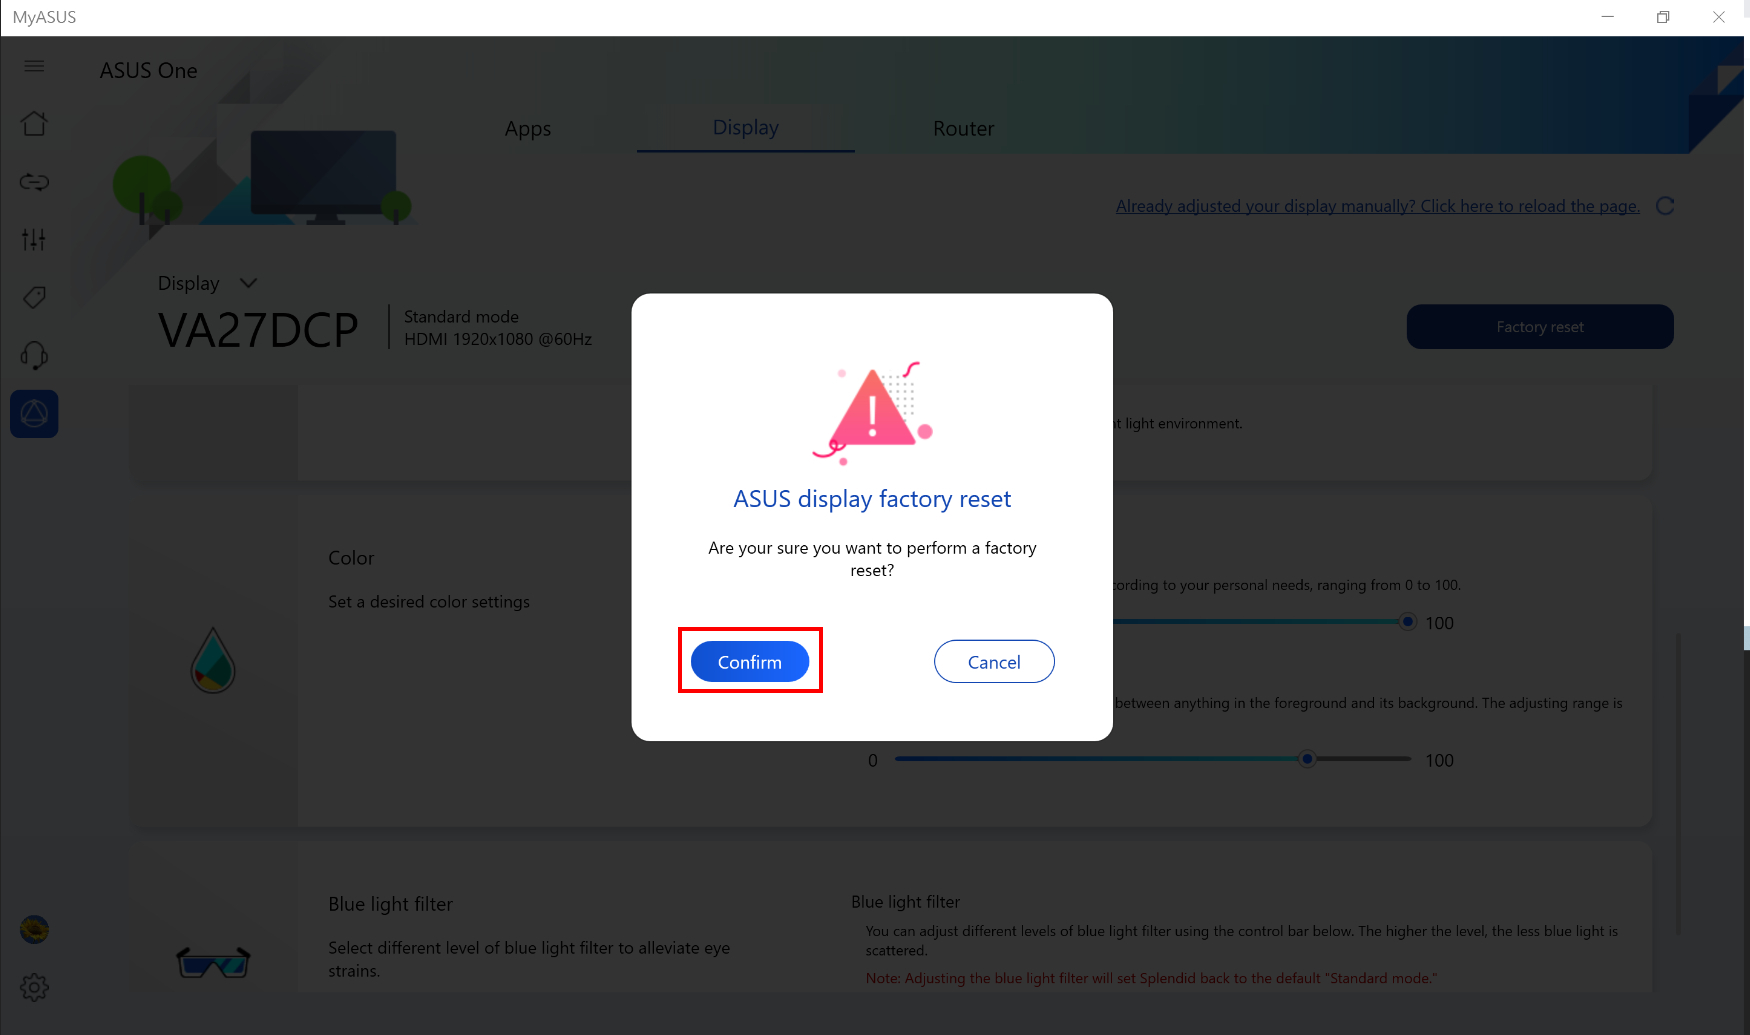
Factory Reset: Reset your monitor back to factory default setting.
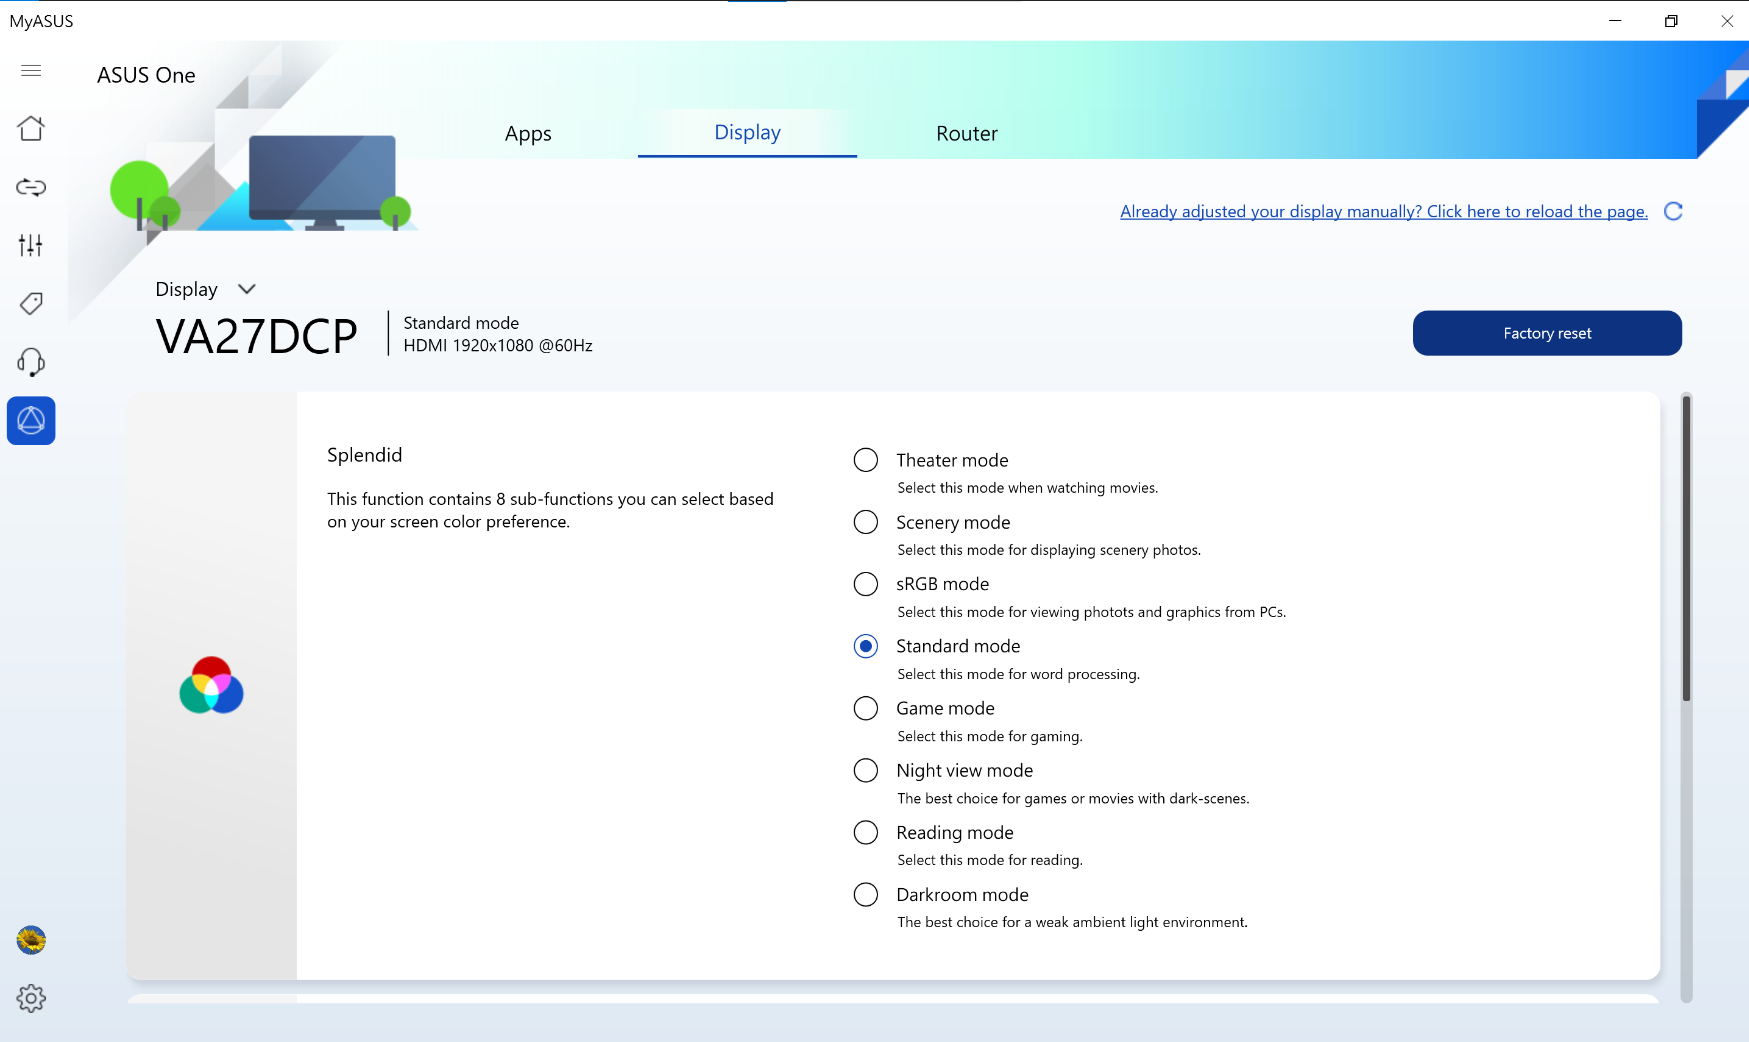
Click [Confirm] to reset.
Splendid: This function contains 8 sub-functions that you can select , based on your screen color preference.

Color: Set a desired color settings of brightness and contrast.
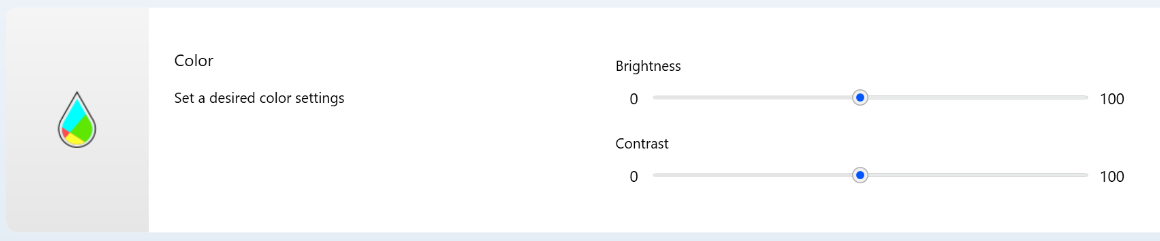
Blue light filter: Select different levels of blue light filter to alleviate eye strains.

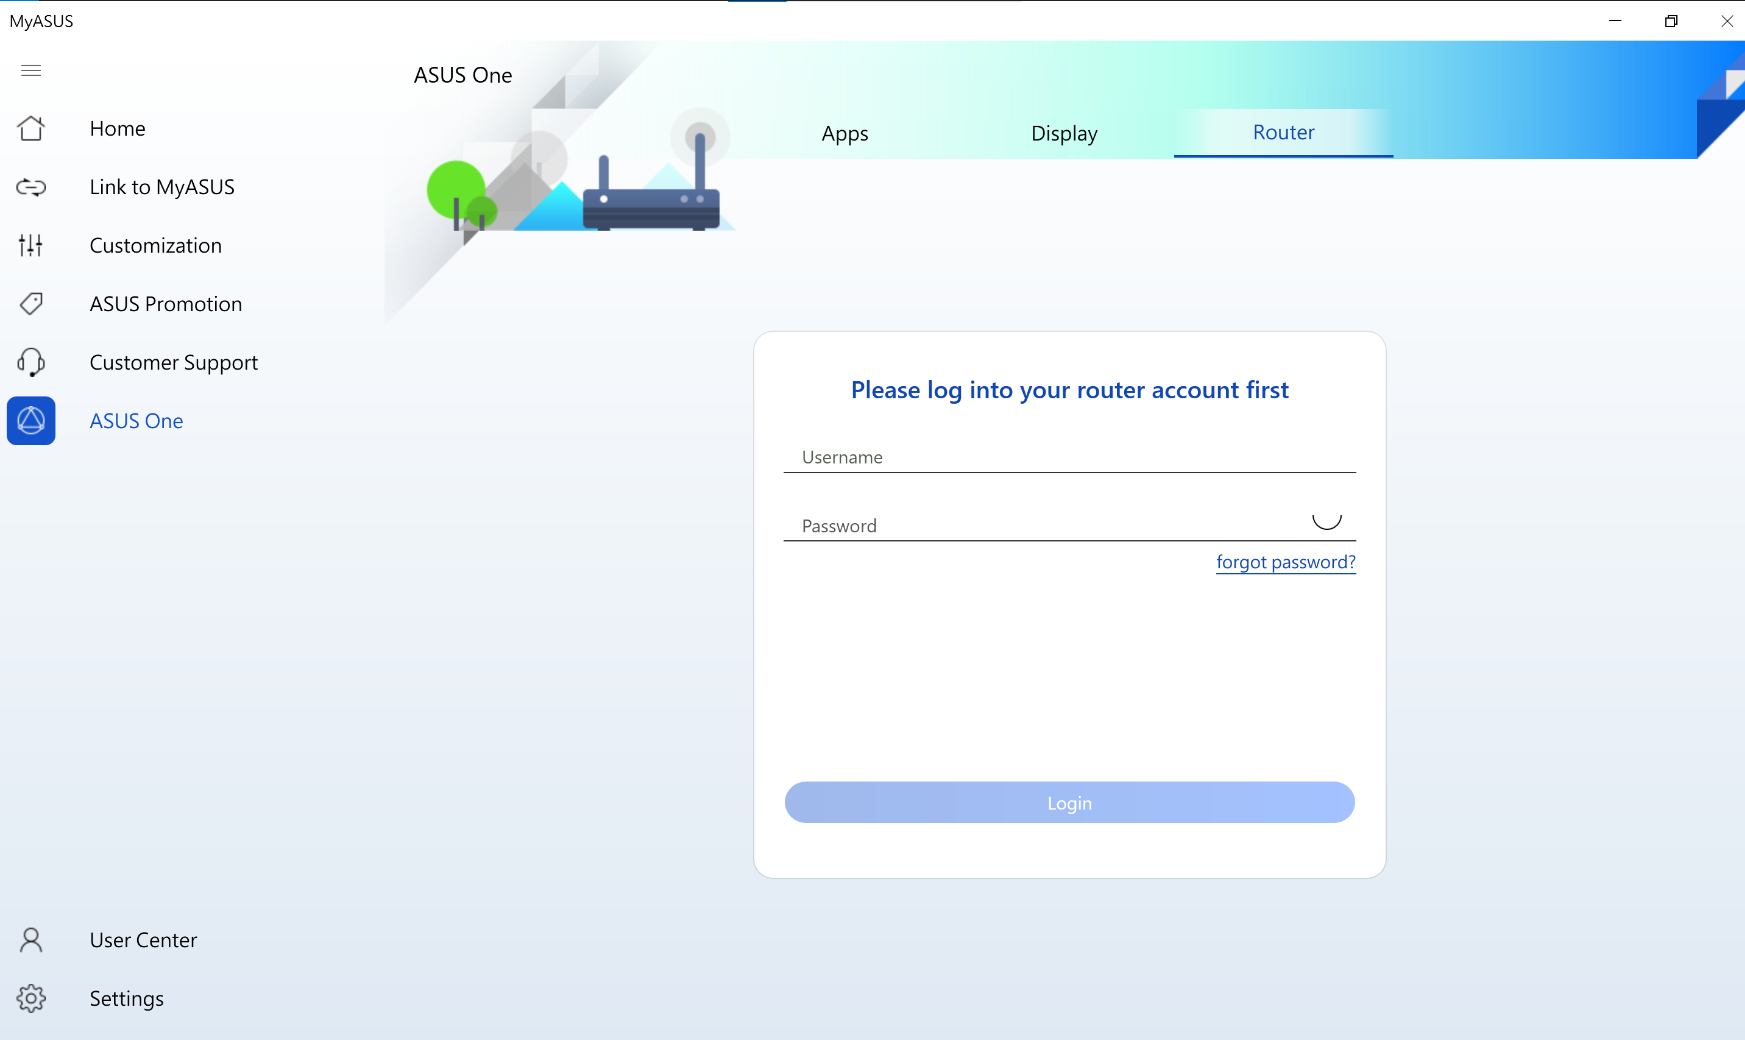
Router
You can complete the settings of the router via MyASUS, such as changing the Wi-Fi name and the password. Also, you can update to the latest router firmware with one click in MyASUS.
You can check ASUS Router Support List here.
Please login to your router account first.
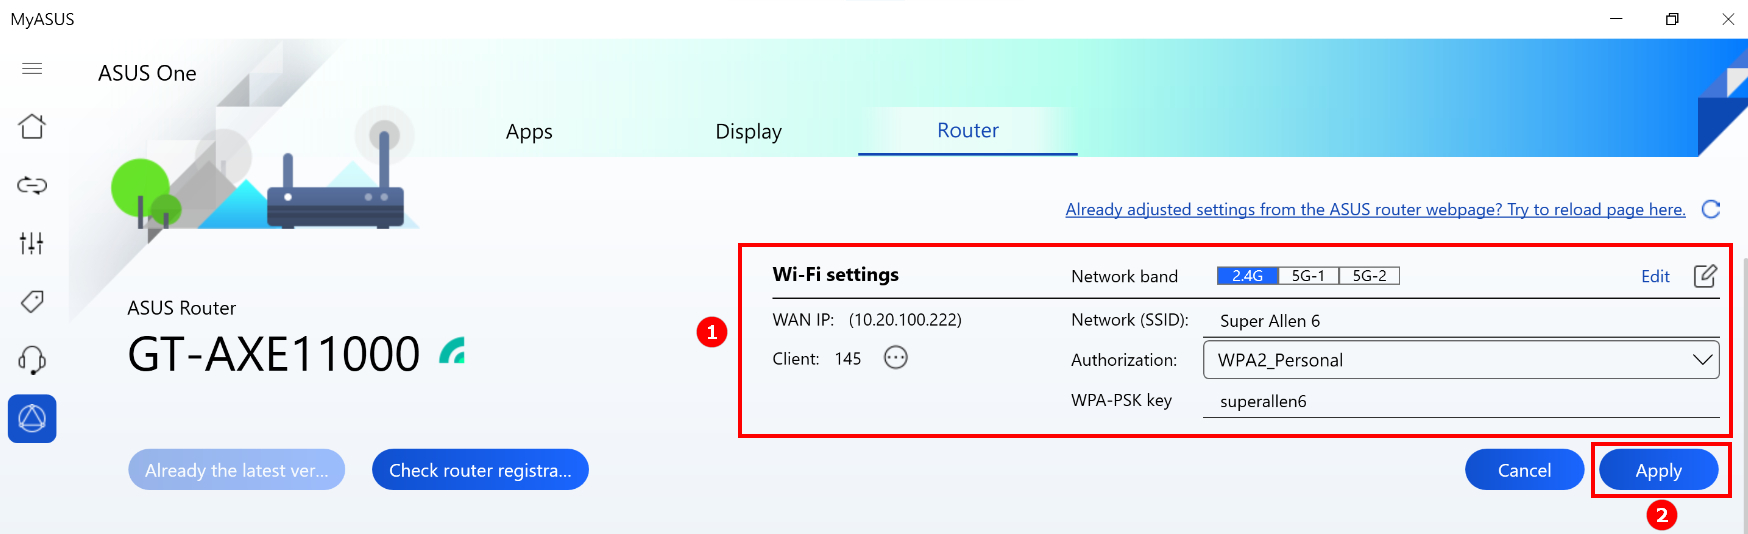
Wi-Fi Settings: Click  to change SSID Name, Authorization, WPA and WPA PSK Key ①. Click [Apply] to finish it ②.
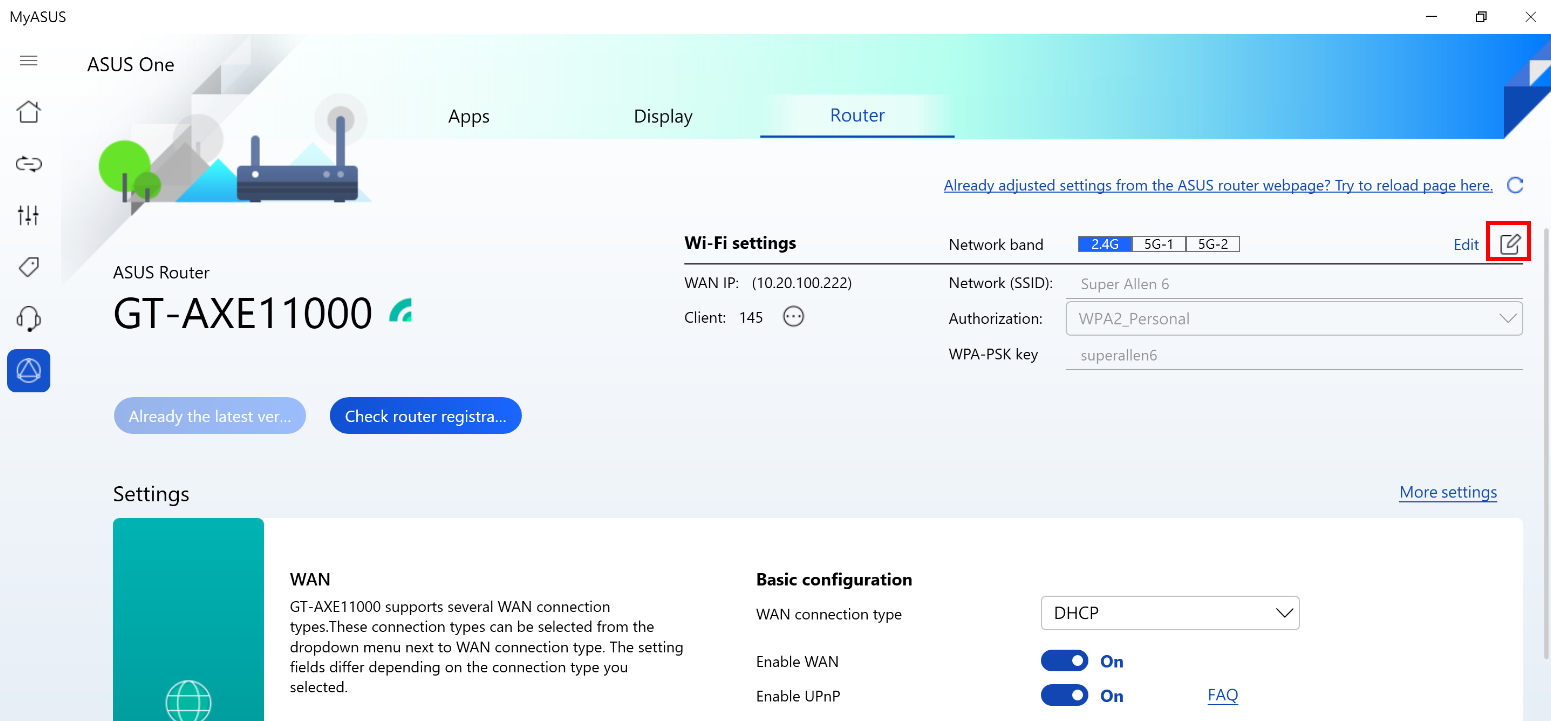
Update Firmware:You can check firmware status and update version here if available.

Settings: Advanced configurations items for you.
WAN connection types -These connection types can be selected from the drop-down menu next to WAN connection type.
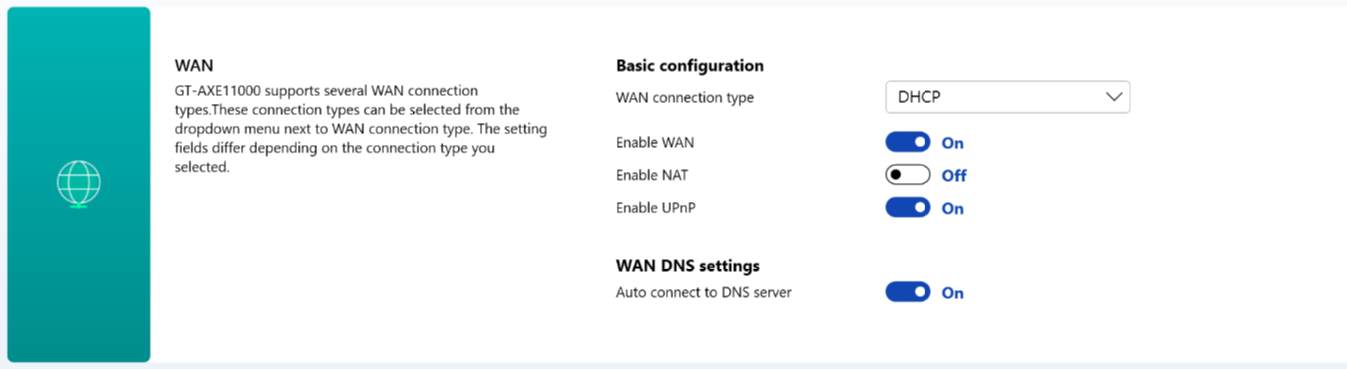
Adaptive QoS - Ensures inbound and outbound bandwidth on both wired and wireless connections for prioritized applications and tasks.

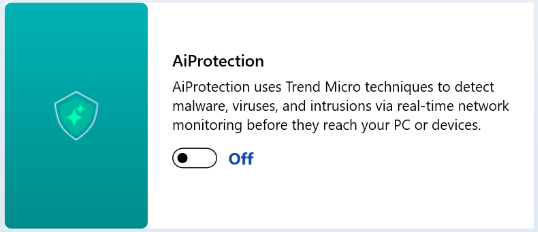
AiProtection - Uses Trend Micro techniques to detect malware, viruses, and intrusions via real-time network monitoring before they reach your PC or devices.
Development License
OpenSSL - https://www.openssl.org/
OpenSSL is licensed under an Apache-style license, which basically means that you are free to get and use it for commercial and non-commercial purposes subject to some simple license conditions.
Curl - https://curl.se/docs/copyright.html
Curl and libcurl are true Open Source/Free Software and meet all definitions as such. It means that you are free to modify and redistribute all contents of the curl distributed archives. You may also freely use curl and libcurl in your commercial projects.
[Notebook] MyASUS - Customer Support
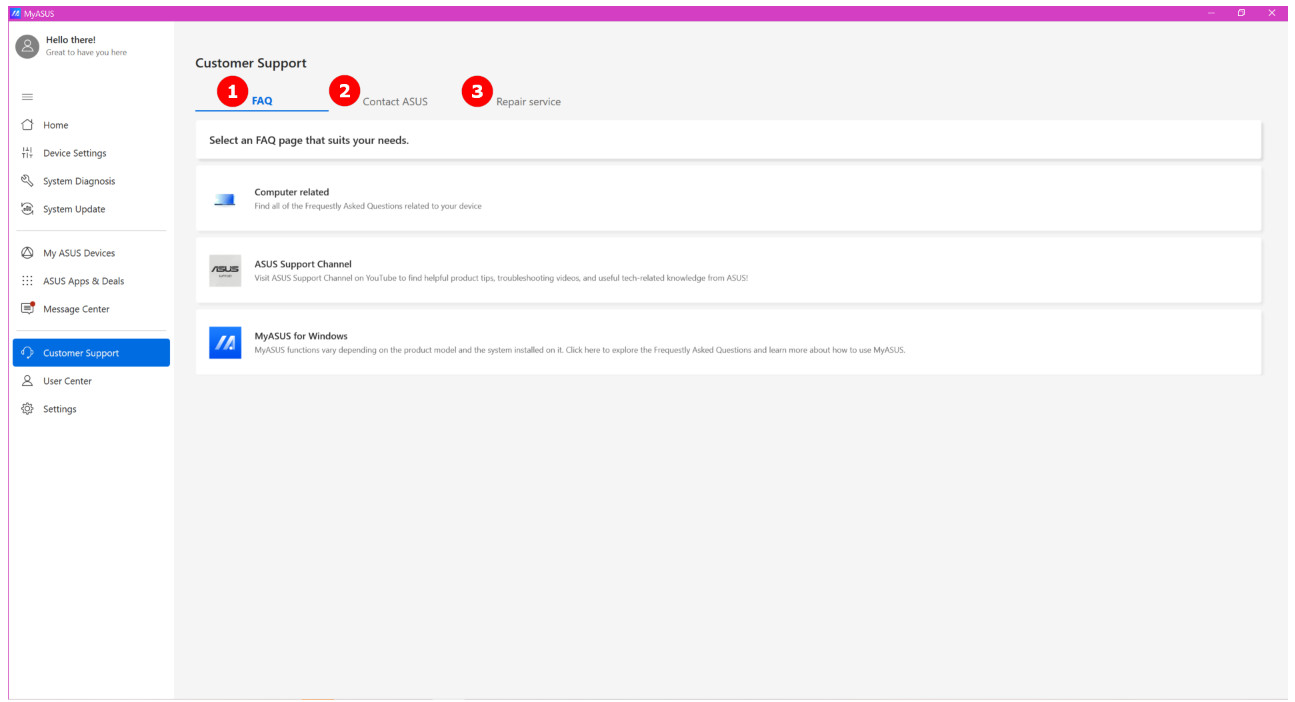
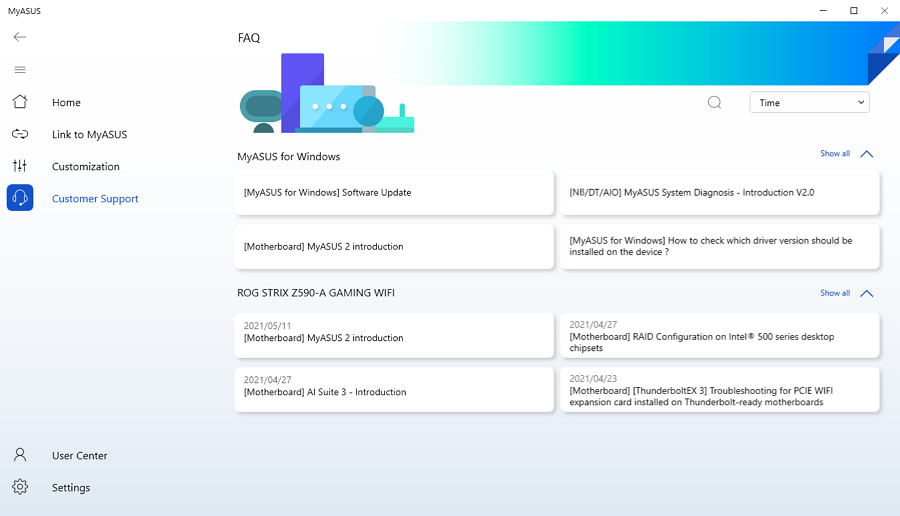
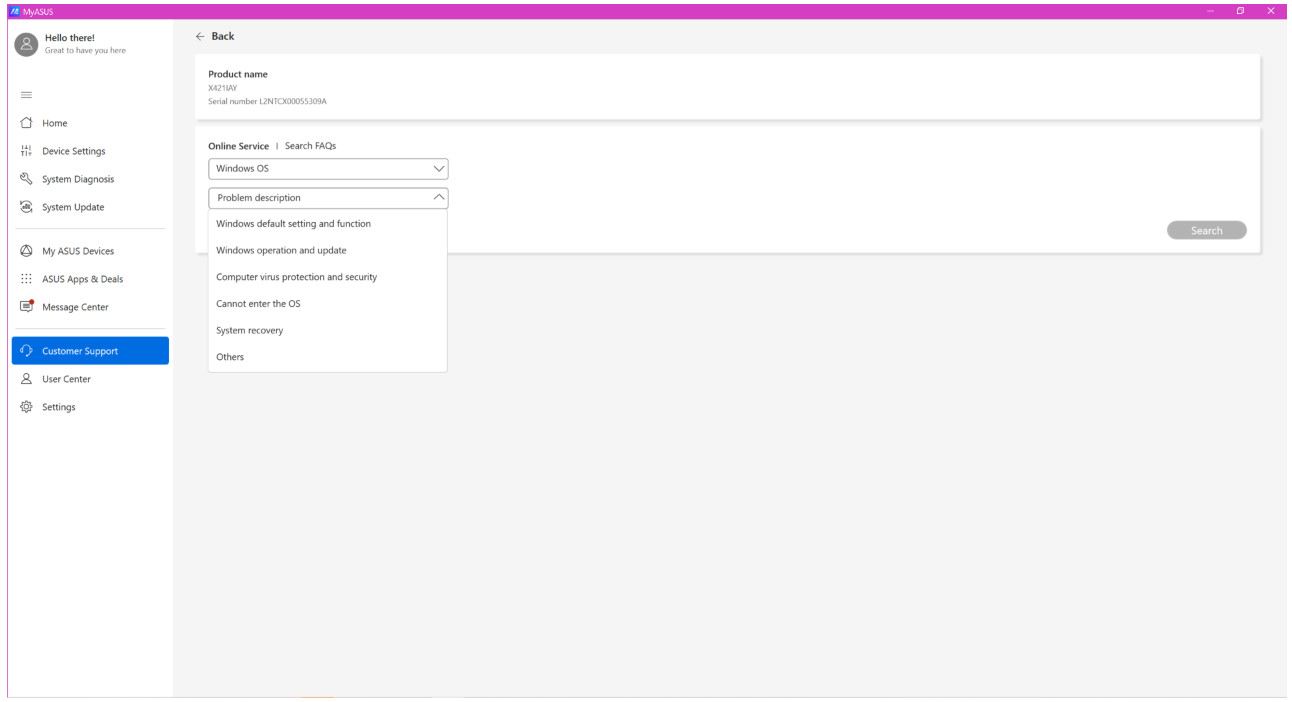
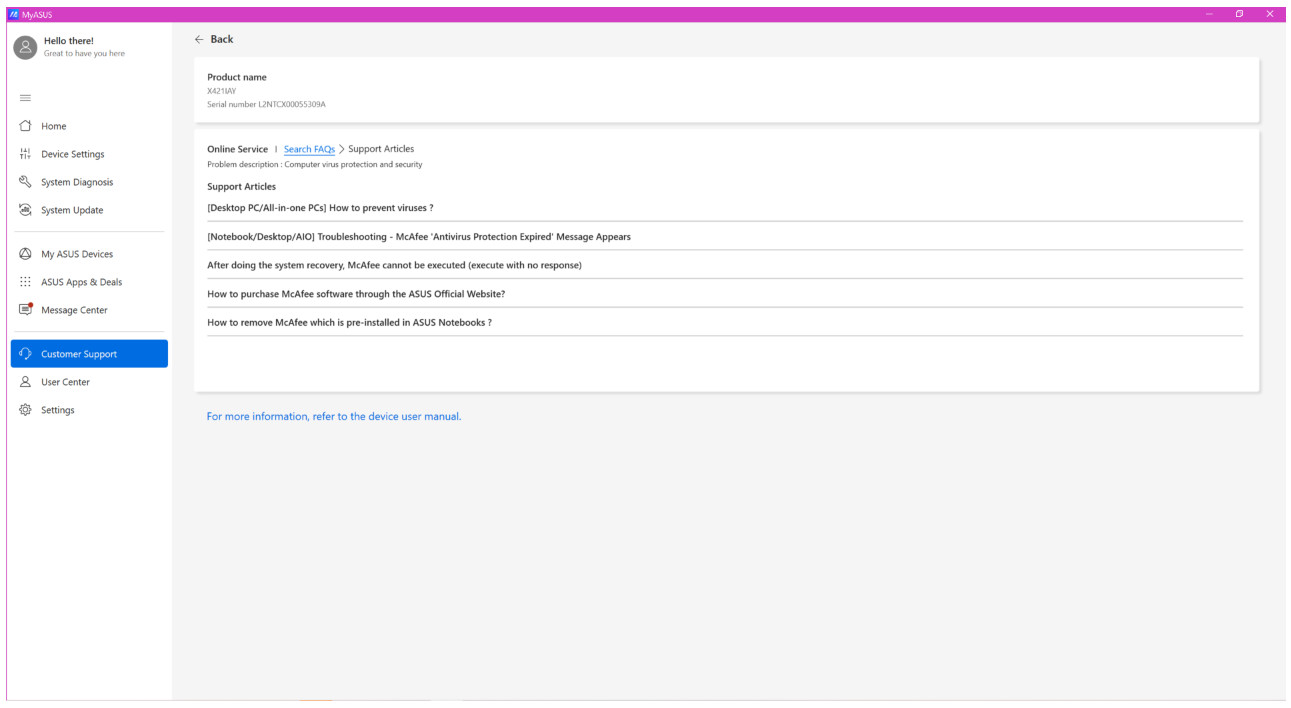
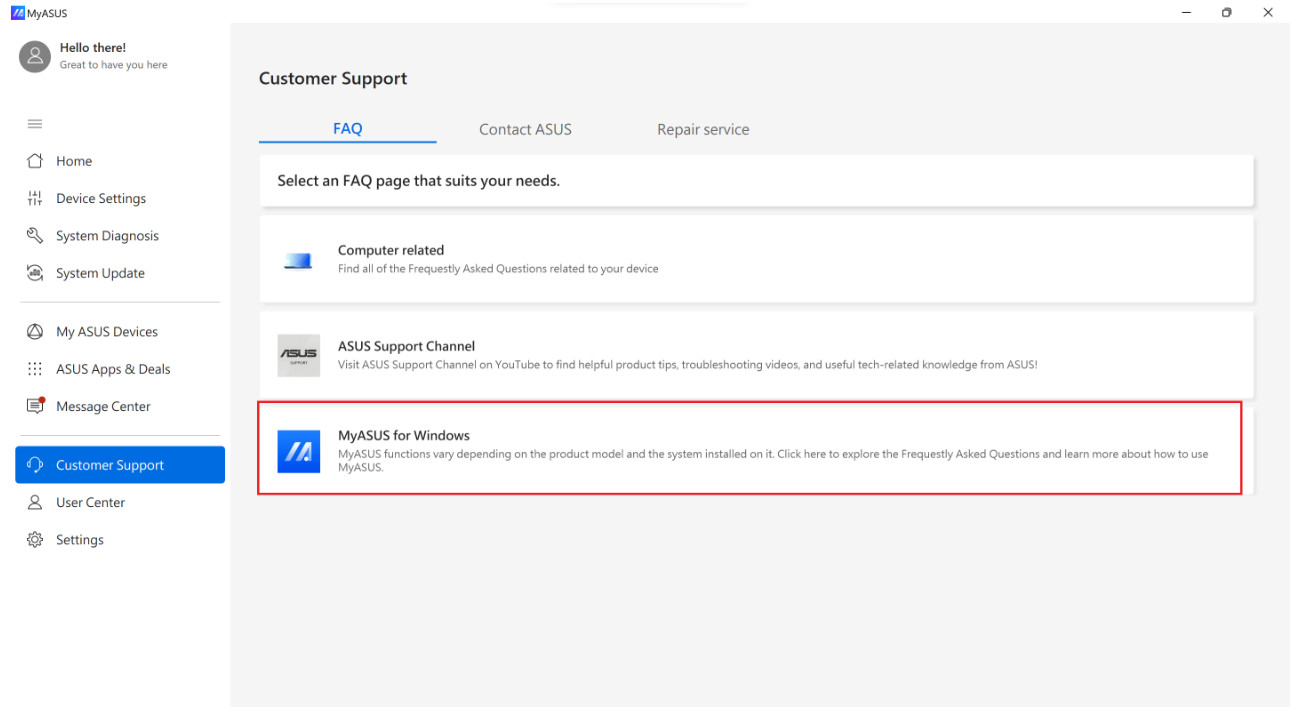
1.[FAQ]

If you want to understand more or you want to find out some particle articles regarding your laptop, FAQ section can help you to quickly find out what you need.
⑴ Under the Computer related section, you can select the category you are concerned with and choose which kind of problem you want to know, and then MyASUS will search those relative articles for you.
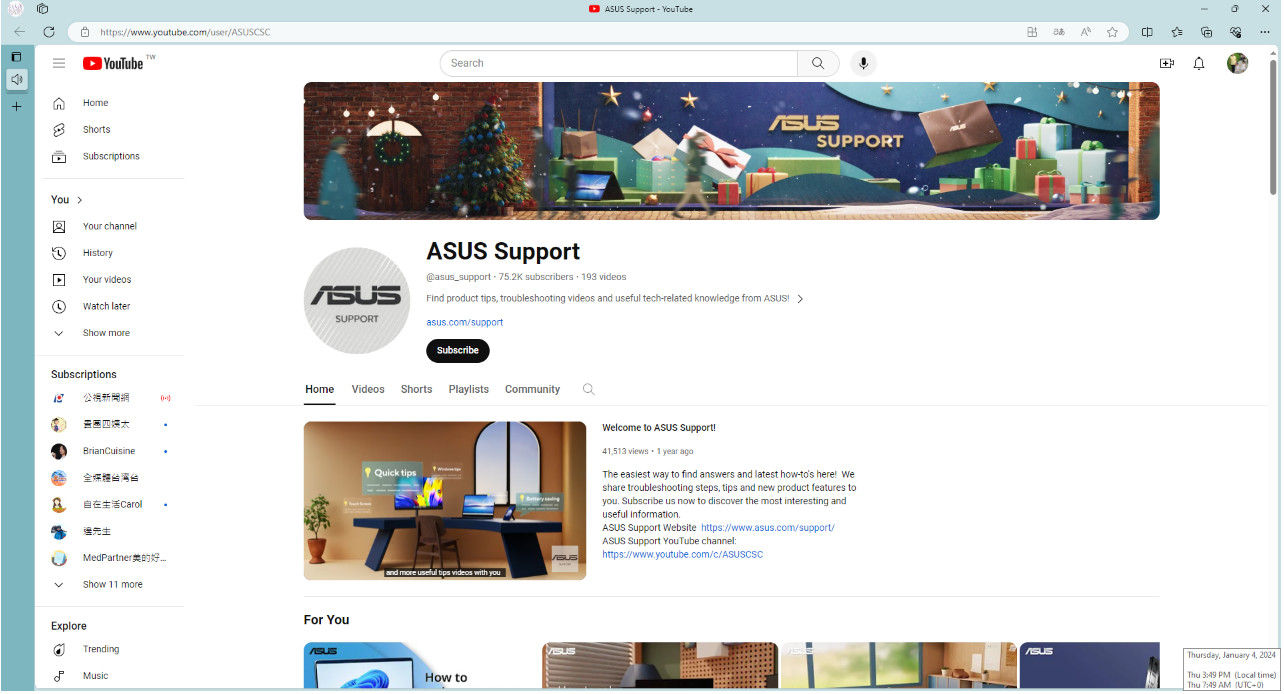
⑵ If you click ASUS Support Chanel, MyASUS will redirect to YouTube – ASUS Support Chanel, which collects many answers and the latest how-to’s.
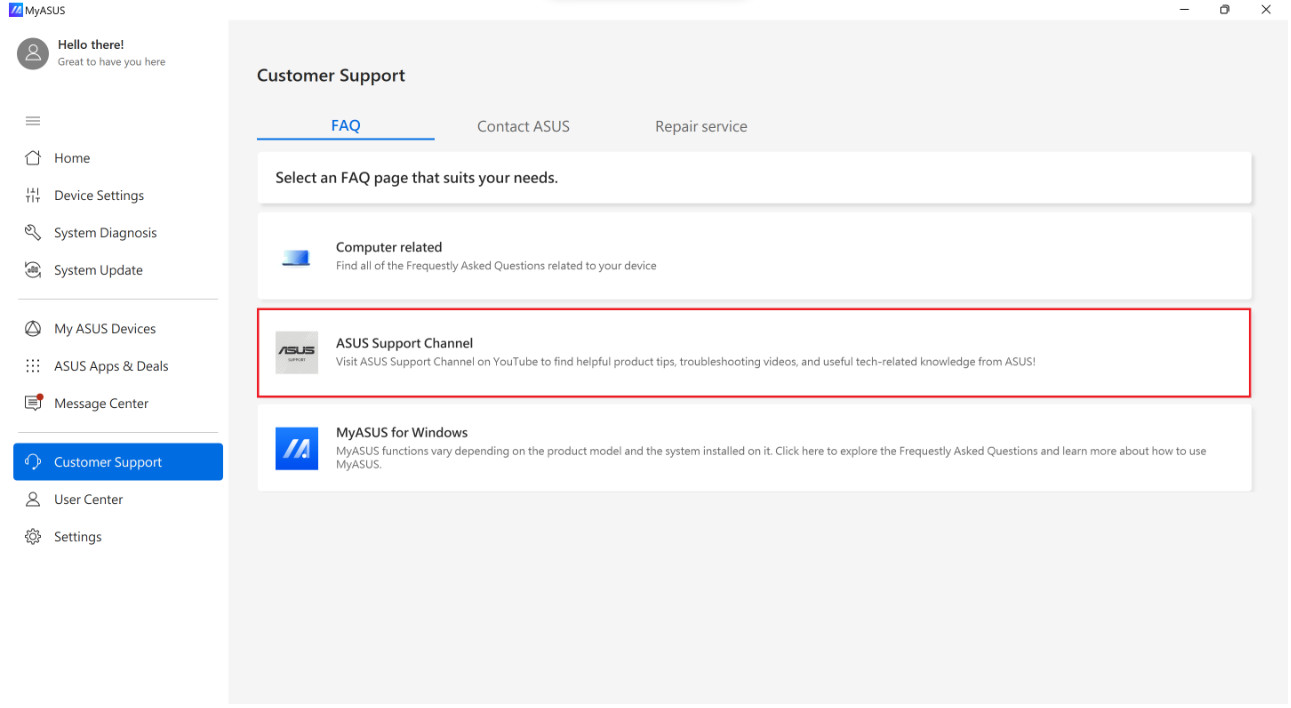
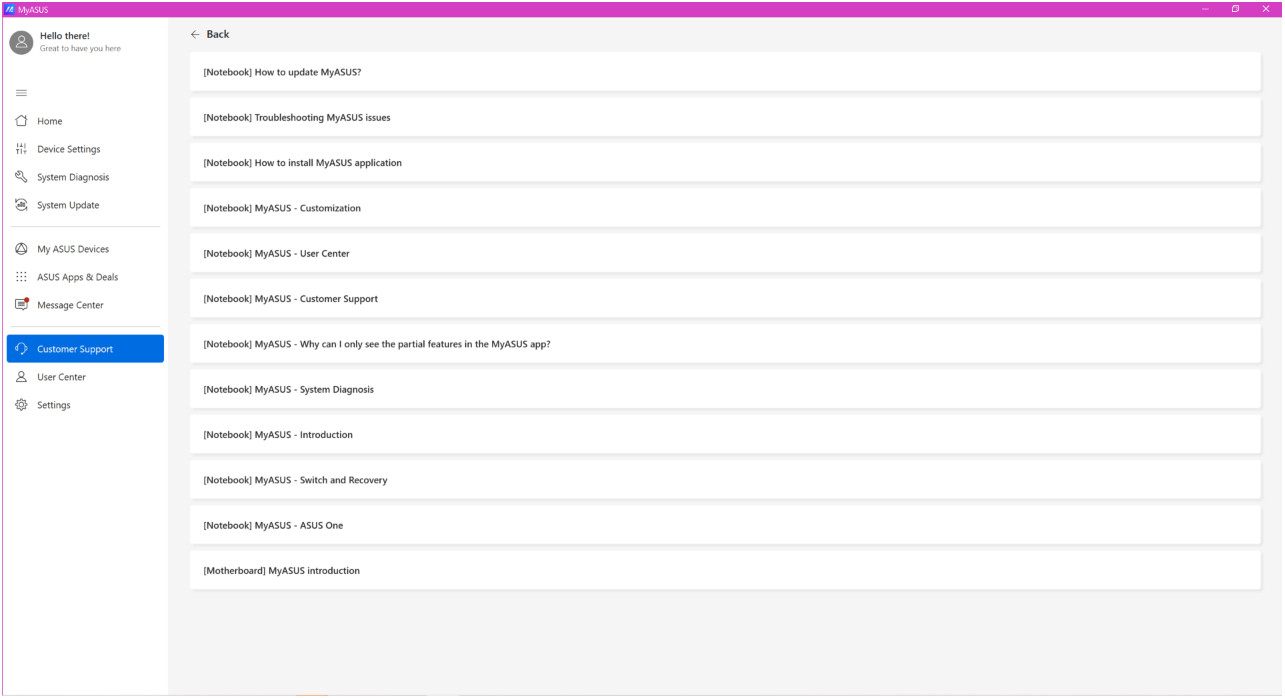
⑶ Under the MyASUS for Windows section, we’ll show you most of what MyASUS can help with your laptop.
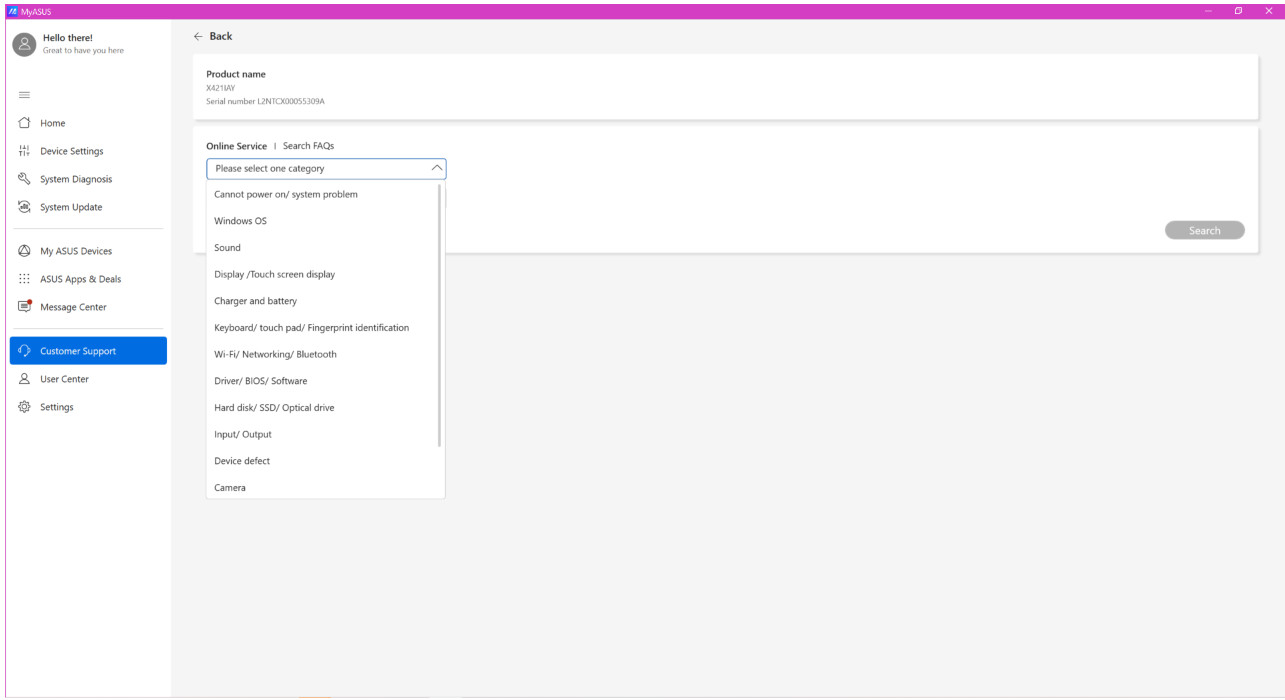
2. [Contact ASUS]
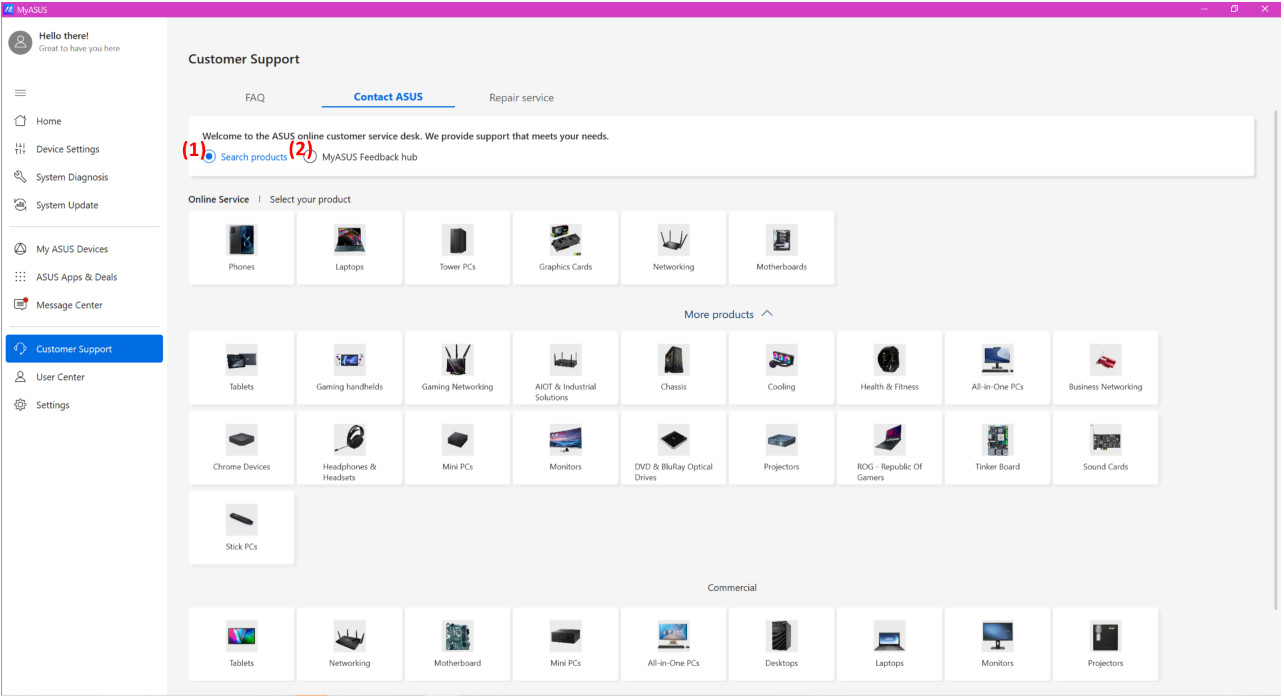
⑴ Select Search Products > Select your product category > Select product series and model > Select problem category and description > Click Search

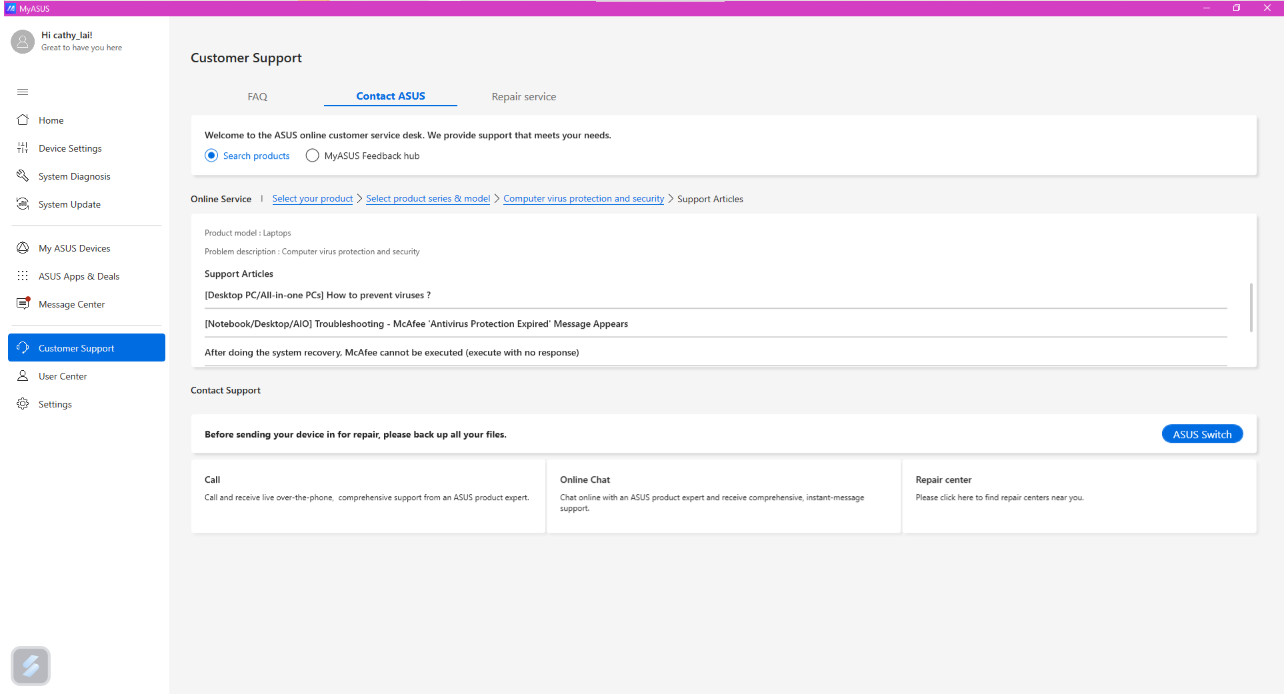
Some articles shown up may be helpful for you.
What’s more, you can select other services provided by ASUS – Call / Online Chat / Mail / Repair Center for further assistance. Suggest to back up your data before send the device to the Repair Center.
Note: Call, Online Chat, Mail services may vary by different region.
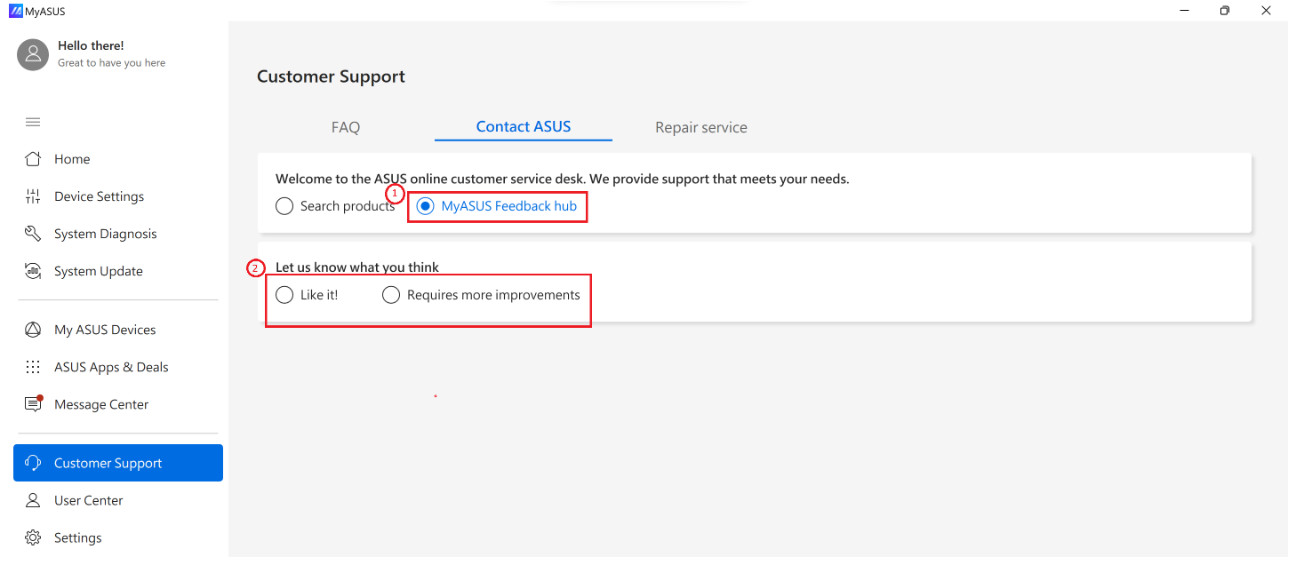
⑵ MyASUS Feedback Hub
Let us know what you think about MyASUS or what issues you encountered with MyASUS.
- Select MyASUS Feedback hub to starting provide your thoughts or issue encountered.①
- Choose whether to give encouragements or report issues to us. ②
- After selecting the category, you can start typing the comments here.
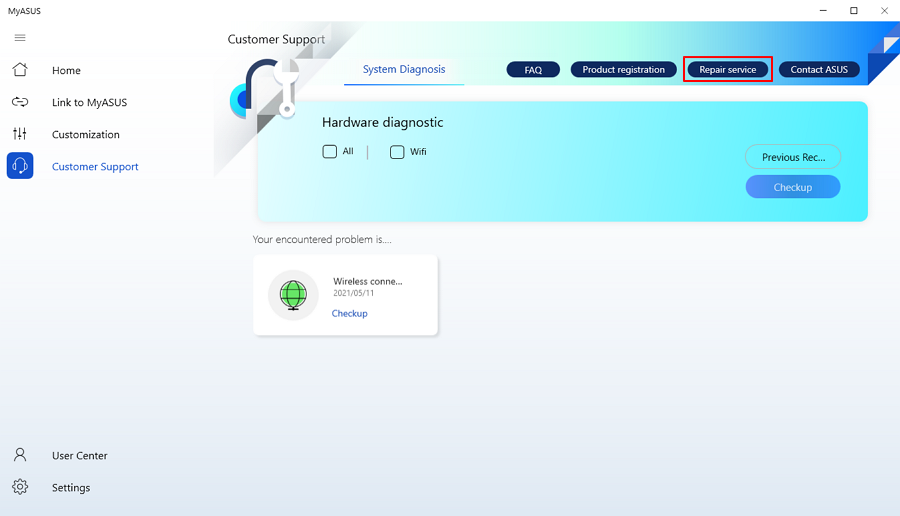
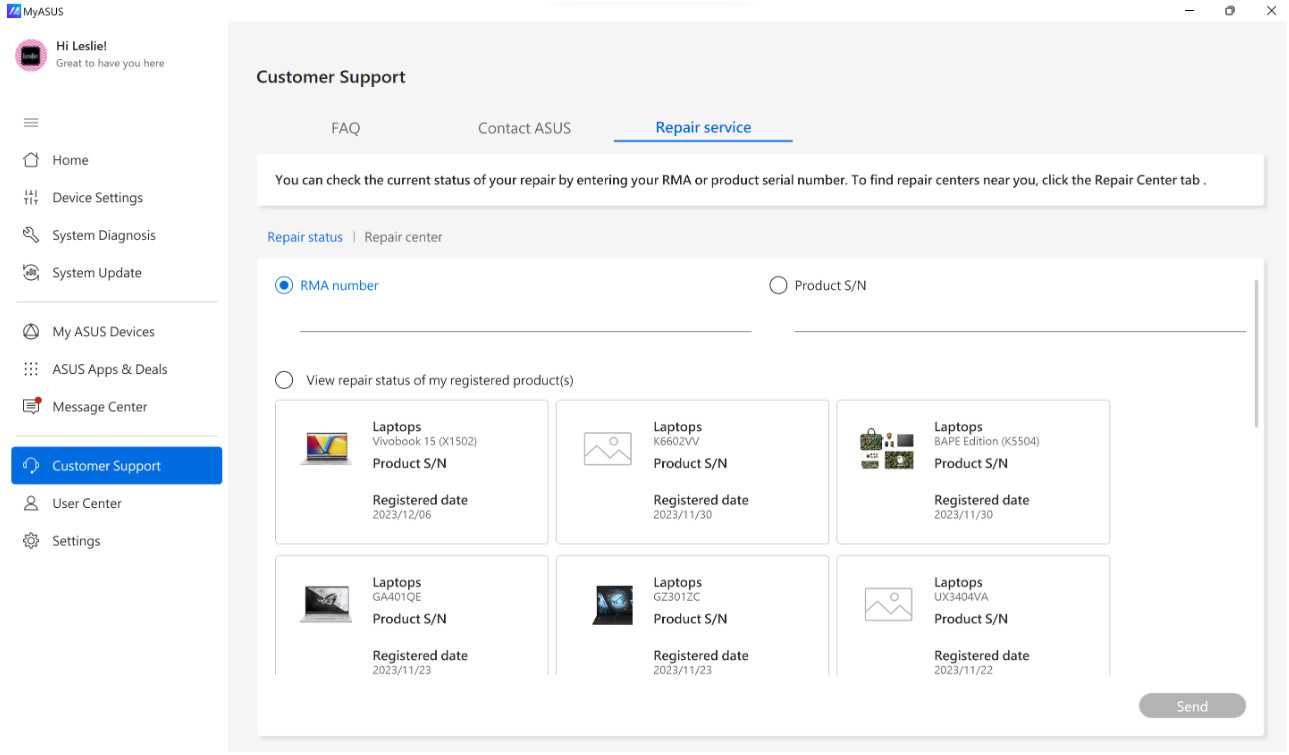
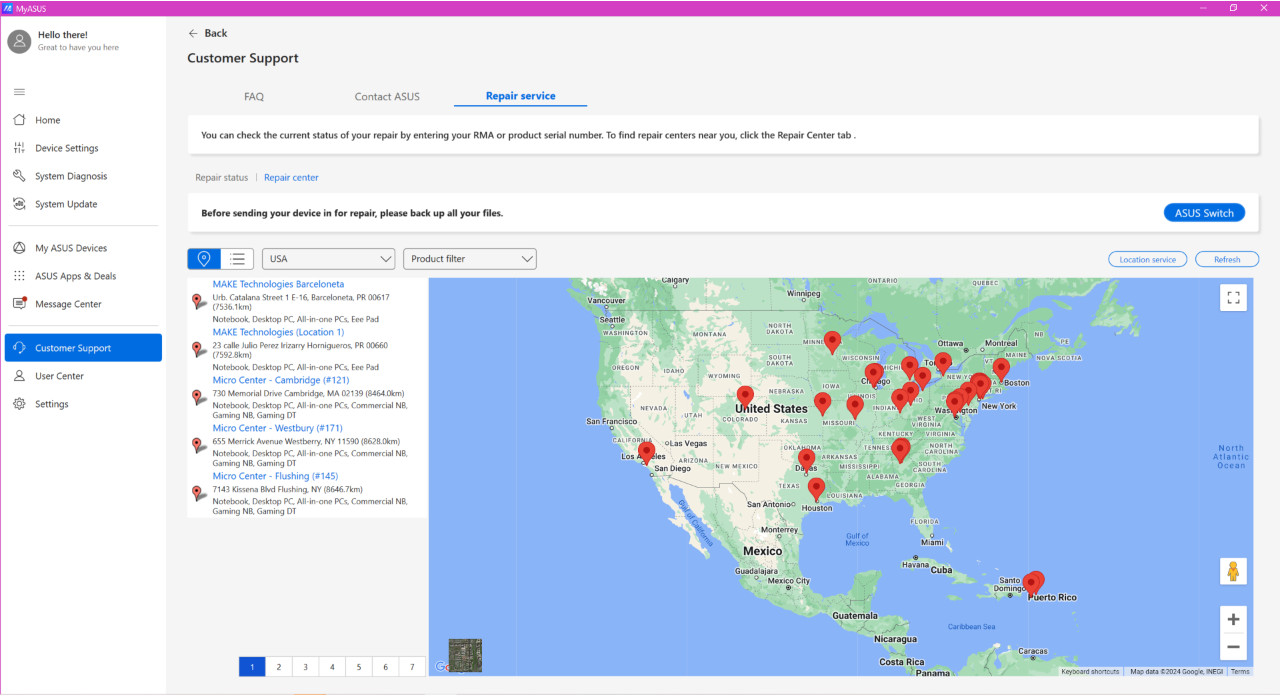
3. [Repair service]
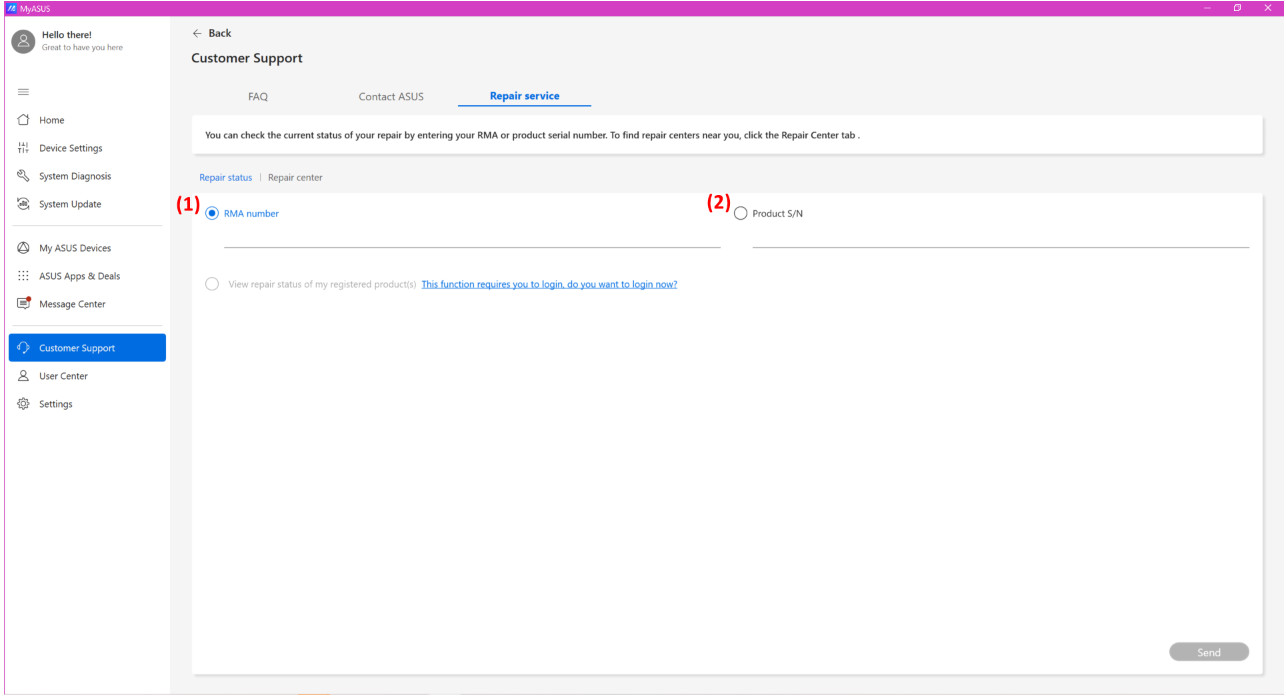
⑴ Repair status: you can check the repair status using RMA number or product S/N. Or, if you have logged into your ASUS account, you can simply select the product to check the repair status.
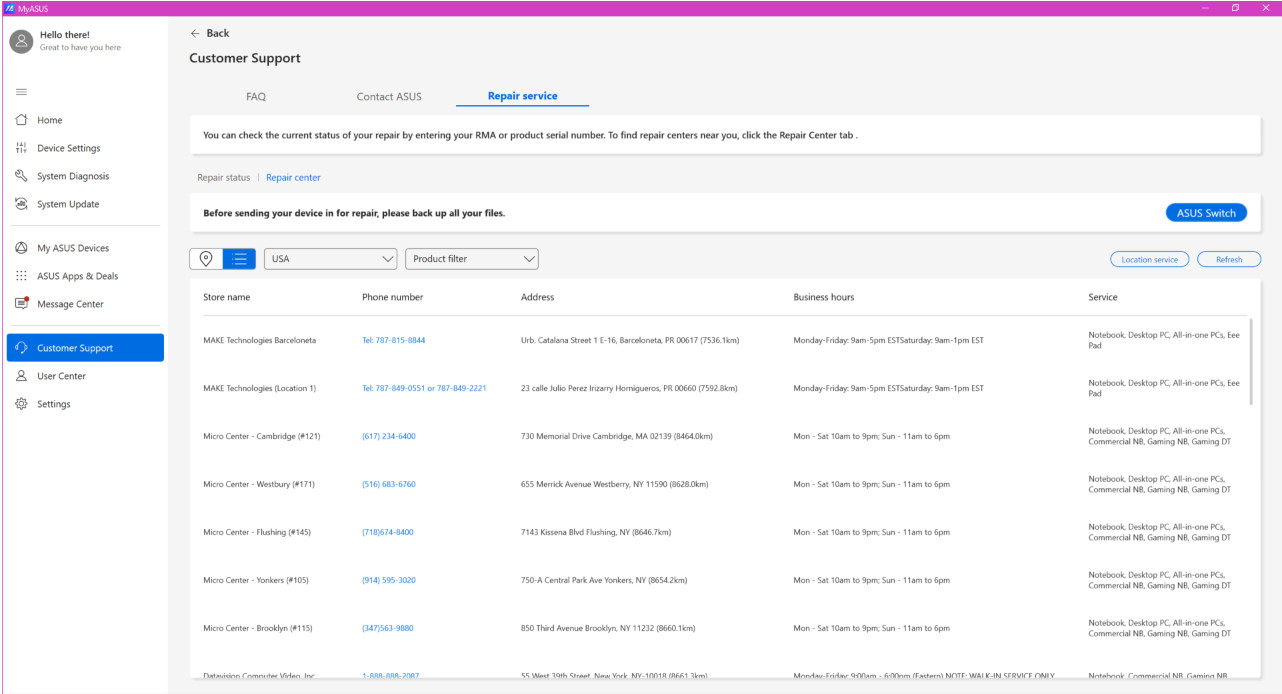
⑵ Repair center: it will show all repair centers in your country. If you have allowed MyASUS to access to your location, we will show the repair centers nearby.
In this section, 2 options can be used to view the repair center, list view and map view.
[Notebook] MyASUS - Switch and Recovery
ASUS Switch
Transfer via different routes depending on your preferences
• Transfer via Wi-Fi
• Transfer via external hard disk
• Transfer via Dropbox
Recovery
Introduction
Get started
Cloud Recovery
ASUS Switch
Introduction
ASUS Switch provides a simple way to transfer files, applications and related system settings by the same local network.
You can easily transfer your data from the original laptop to your ASUS laptop.
Note:
1. You can transfer data, applications and settings from ASUS or other brands laptop to another ASUS laptop.
2. You need to install ASUS Switch installer if the original laptop is other brands.
3. ASUS Switch only supports windows 10 or above.
4. The ASUS laptop recieving data needs to install MyASUS application of version 3.0.32.0 or above(with ASCI above 3.0.15.0 or ASCI above 1.0.40.0).
Use ASUS Switch to transfer files, applications and related system settings by the same local network
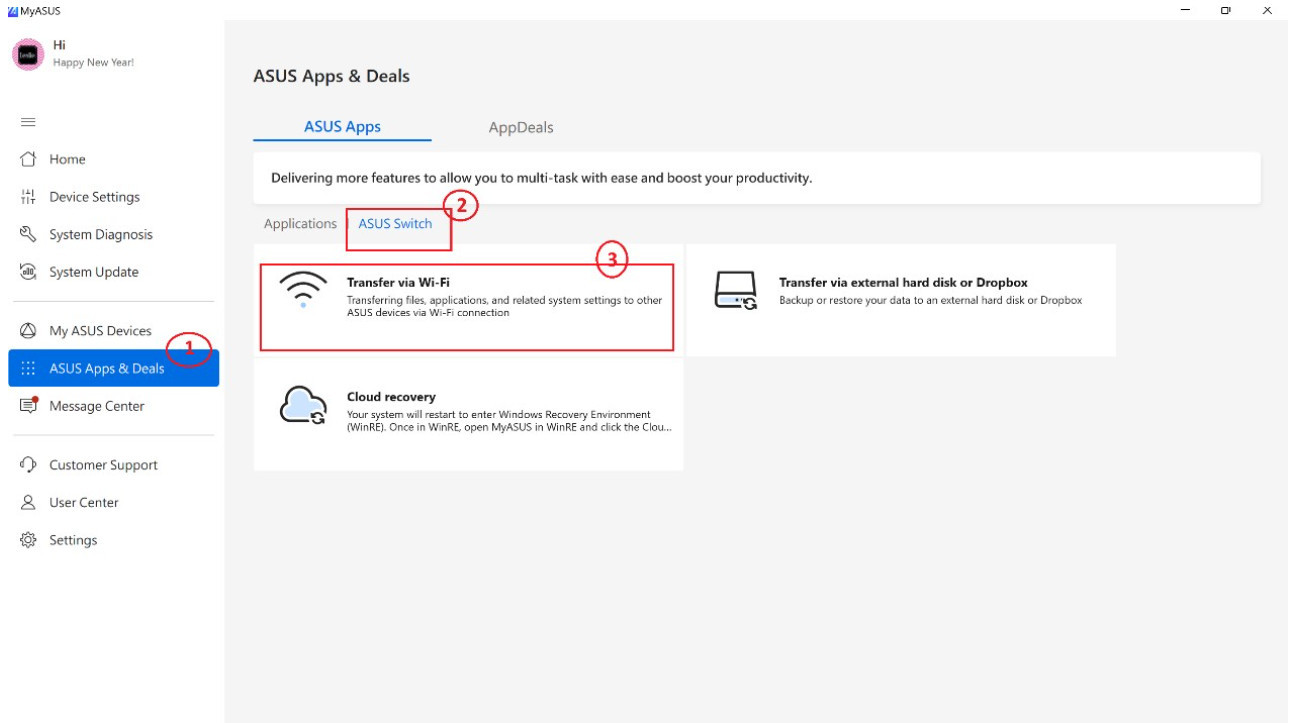
1. Go to [ASUS Switch] ② in MyASUS-ASUS Apps & Deals page ①. Select Transfer via Wi-Fi③.
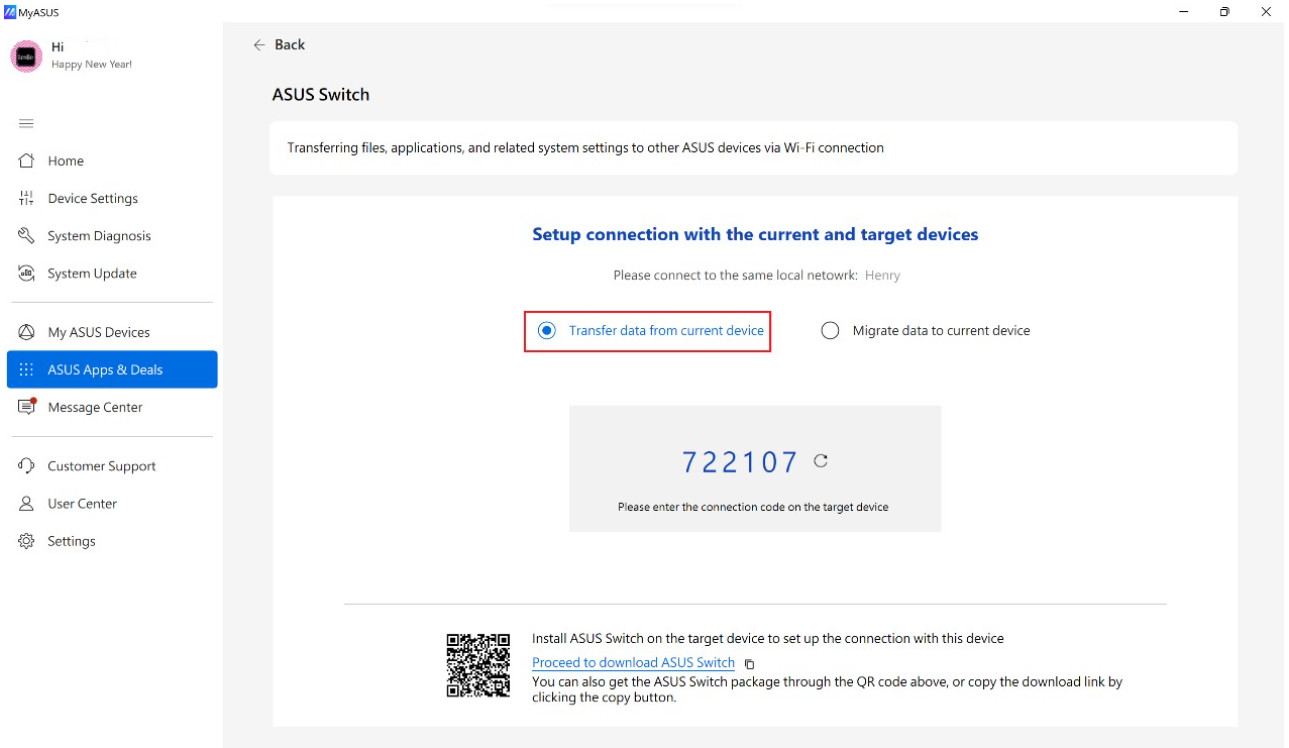
2. Select [Transfer data from current device] on original laptop. There will be connection code generated.
Note: You can Download the ASUS Switch installer and install it in the original laptop if you are using laptop with other brands, otherwise, you can't find [ASUS Switch] in MyASUS.
3. Select [Migrate data to current device] on new laptop. Input the pairing code shown in the original laptop.
Note: Both laptops are required to connect to the same local network.
4. Select the original laptop's documents & files ① you want to transfer, confirm the transferring size and time. Click [Next]②. (The selected files will be copied to new laptop according to the original path)
Documents & files

5. Select the original laptop's applications① & Settings ② you want to transfer. Confirm the transferring size and time and click [Start Transfer]③. (Supported applications: Chrome, Firefox, WinRAR, 7zip)
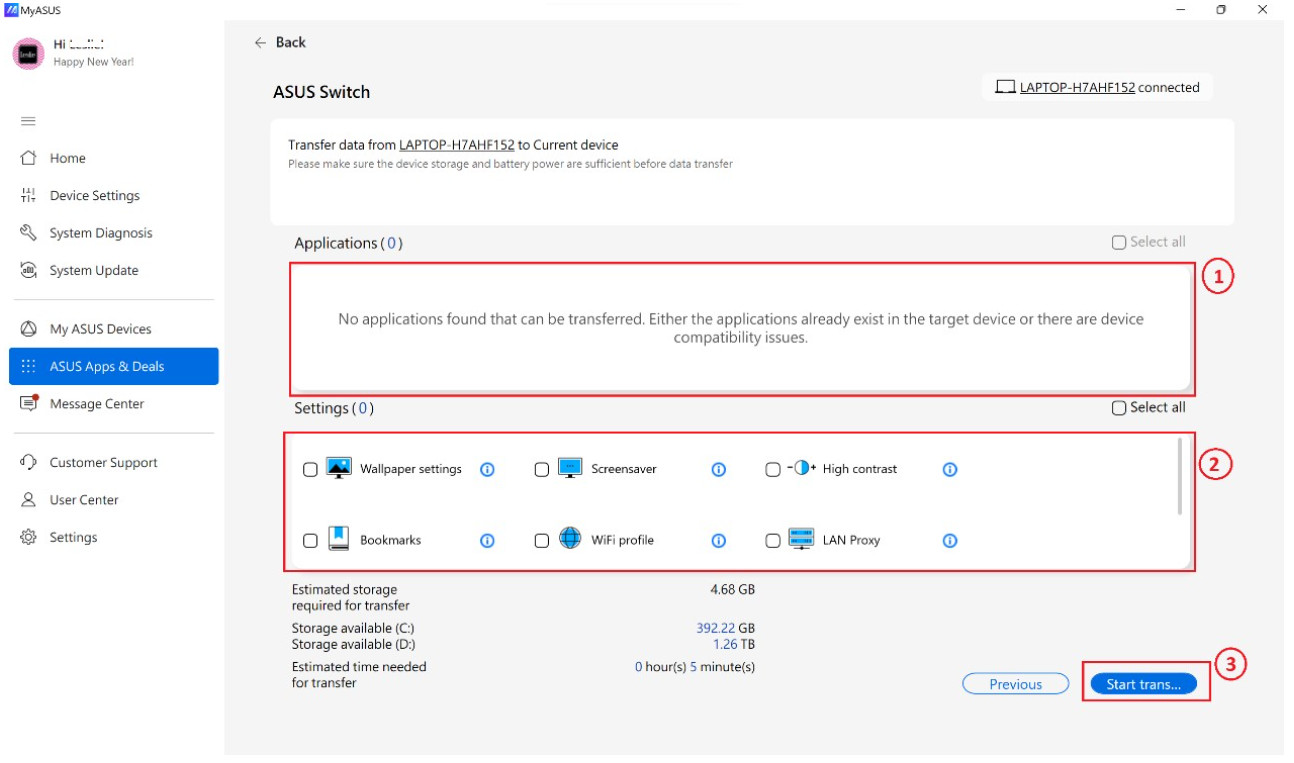
Data transfer complete as below shown.
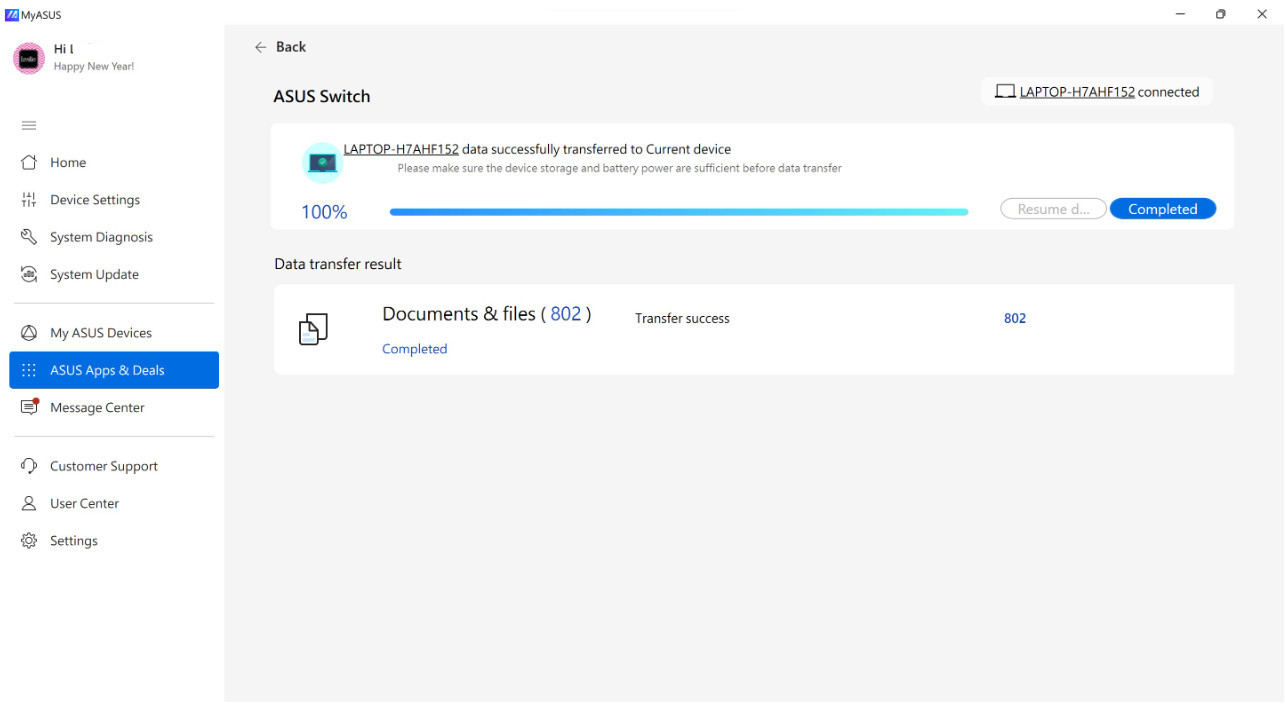
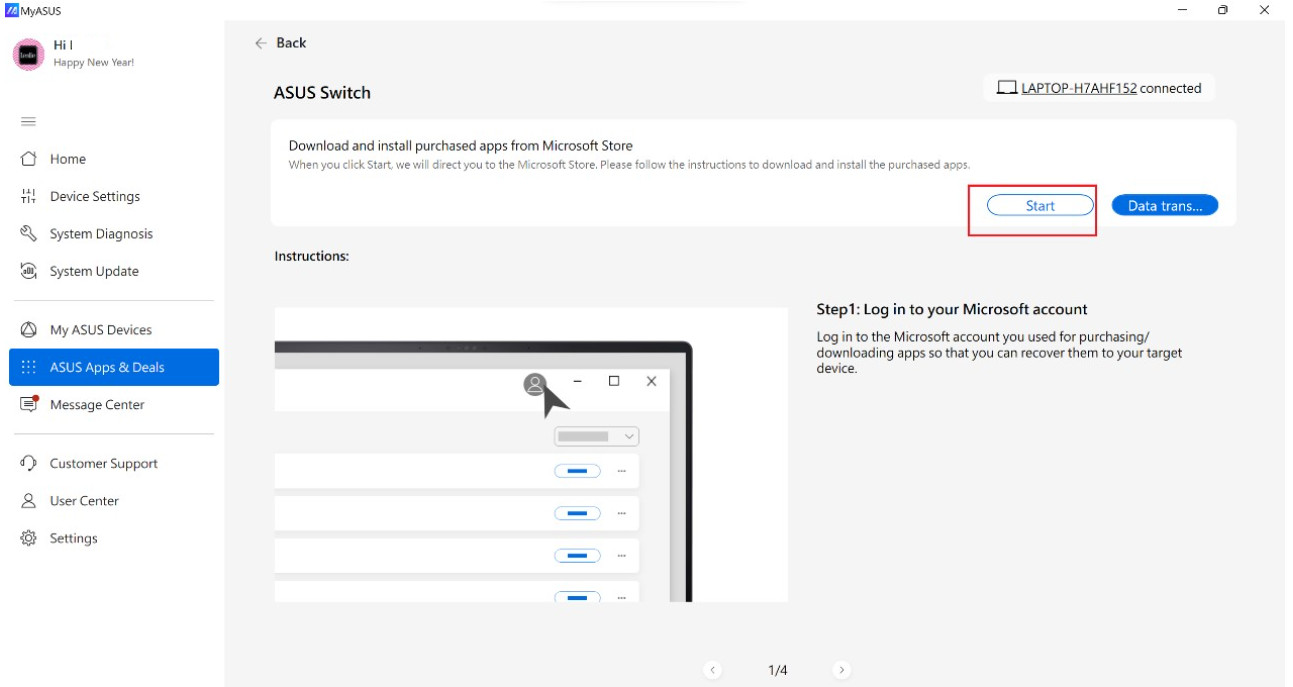
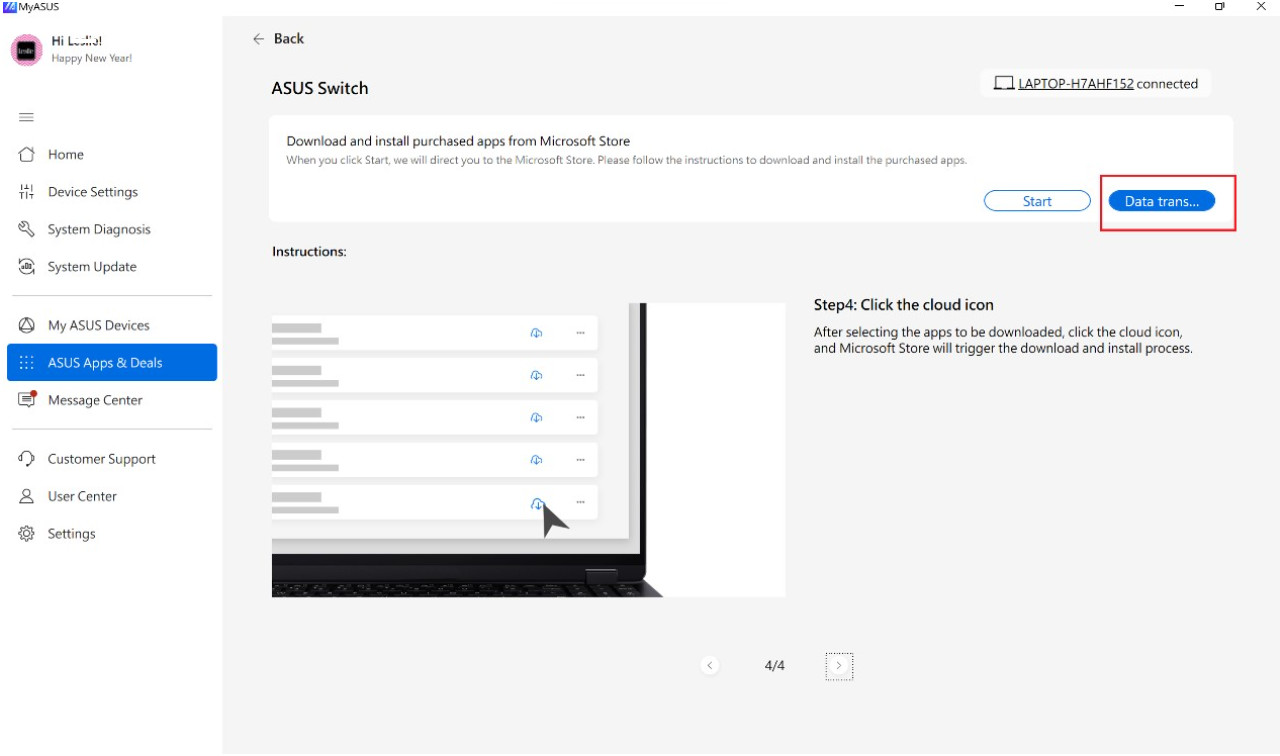
If you have Microsoft apps that need to be transfer, ASUS Switch will guide you to the Microsoft Store to download the app. Also, there will be a tutorial below to instruct you how to download those apps successfully.
1. Click the [Start] button and Microsoft Store will be launched immediately.
2. Once you have log in to your Microsoft account, the apps have been downloaded before will display in the Library.
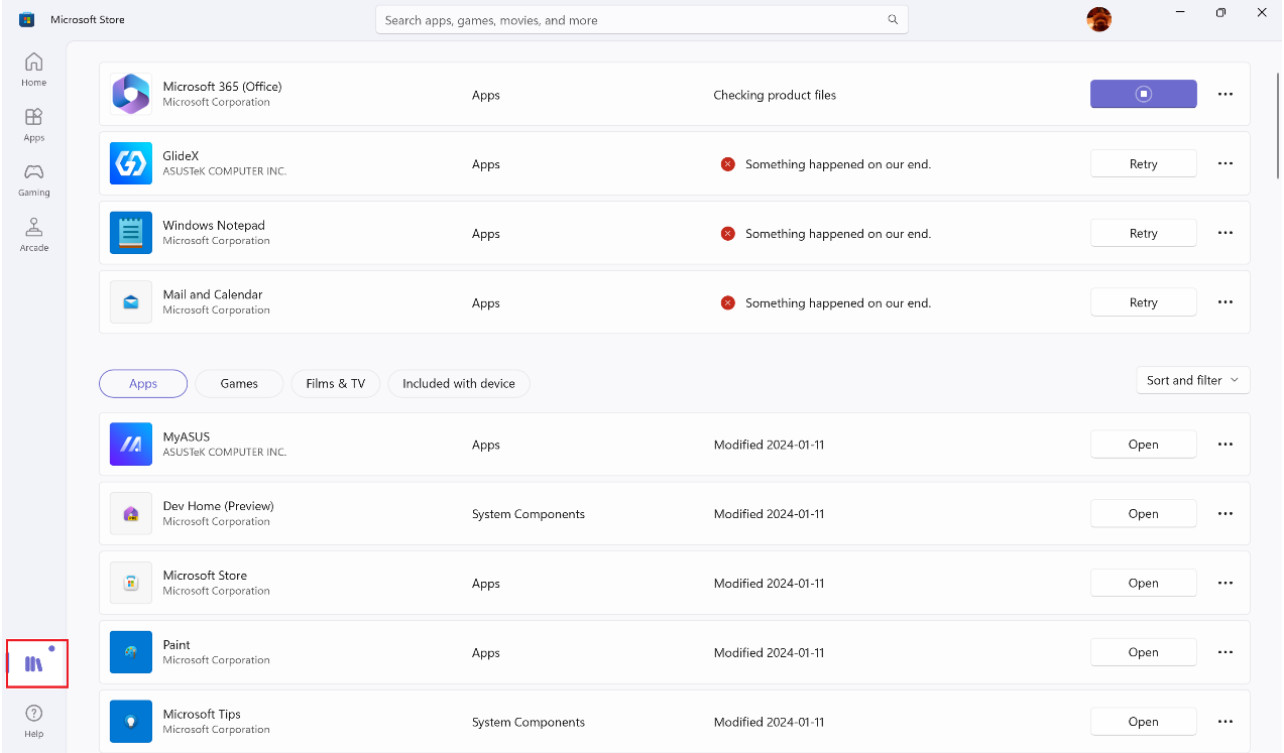
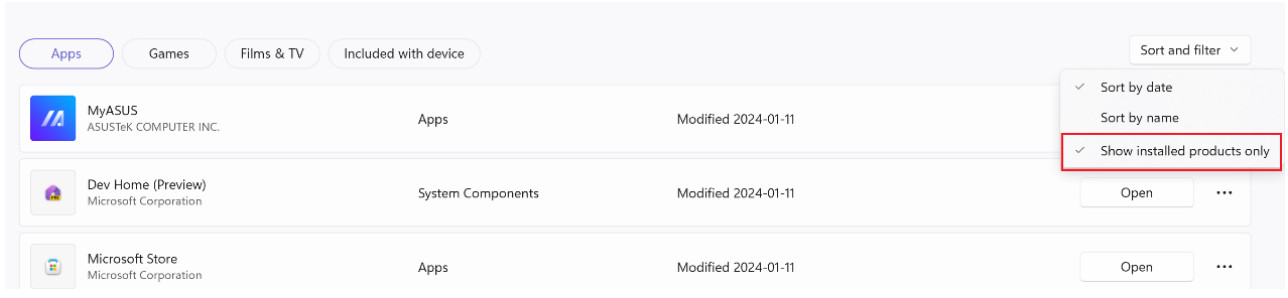
3. Uncheck “Only show the installed items” and click the cloud icon to start the app download.
4. When every thing is done, you can click “Data transfer complete” to finish the Wi-Fi Transfer.
Transfer via External hard disk
Use ASUS Switch to transfer files, applications and related system settings by external Hard disk
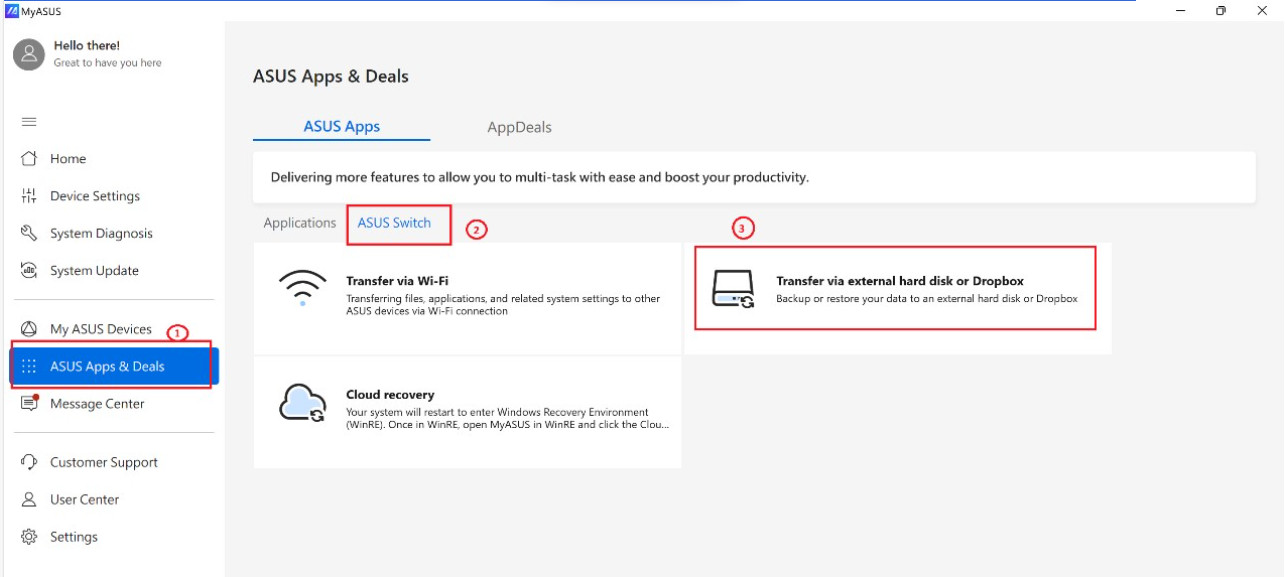
1. Go to [ASUS Switch] ② in MyASUS-ASUS Apps & Deals page ①. Select Transfer via External hard disk or Dropbox③.
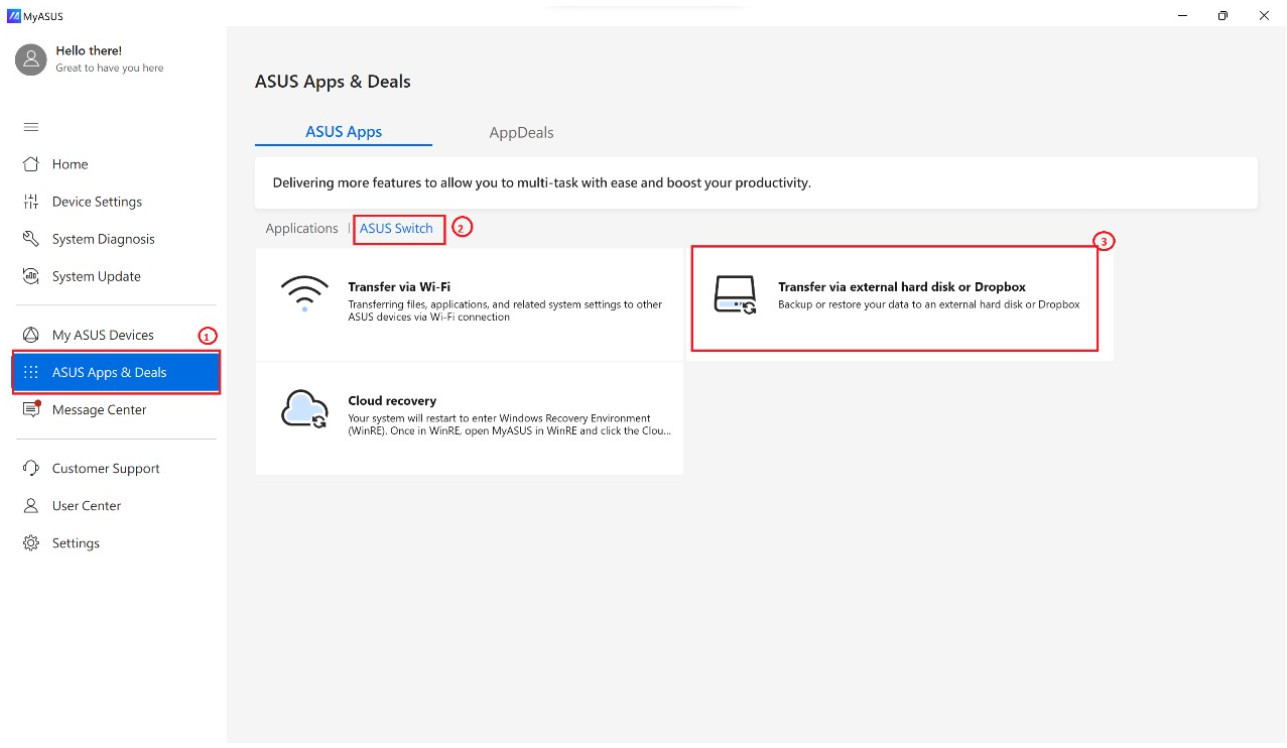
Note: You can Download the ASUS Switch installer and install it in the original laptop if you are using laptop with other brands, otherwise, you can't find [ASUS Switch] in MyASUS.
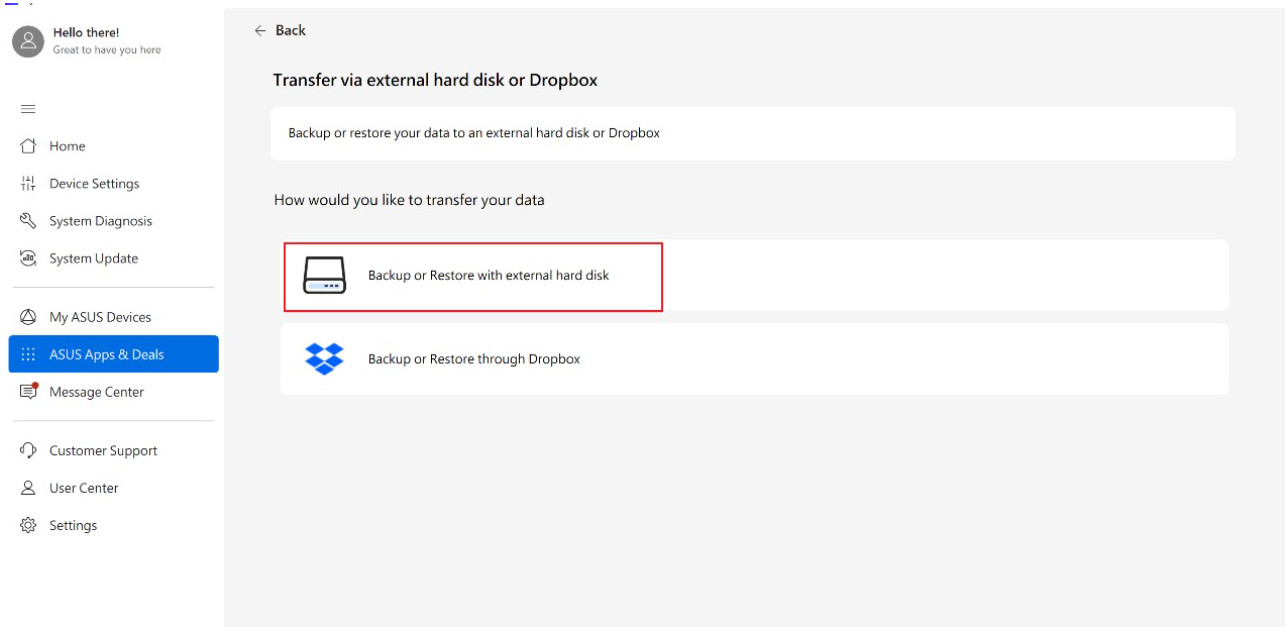
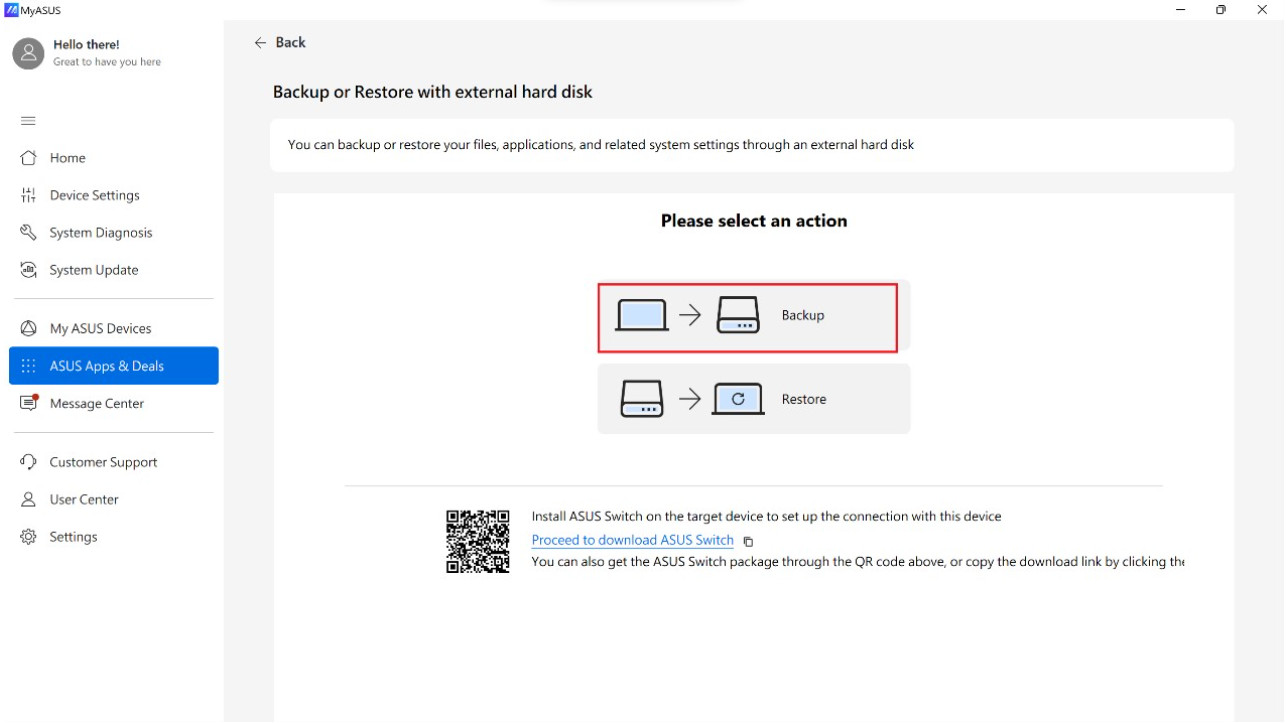
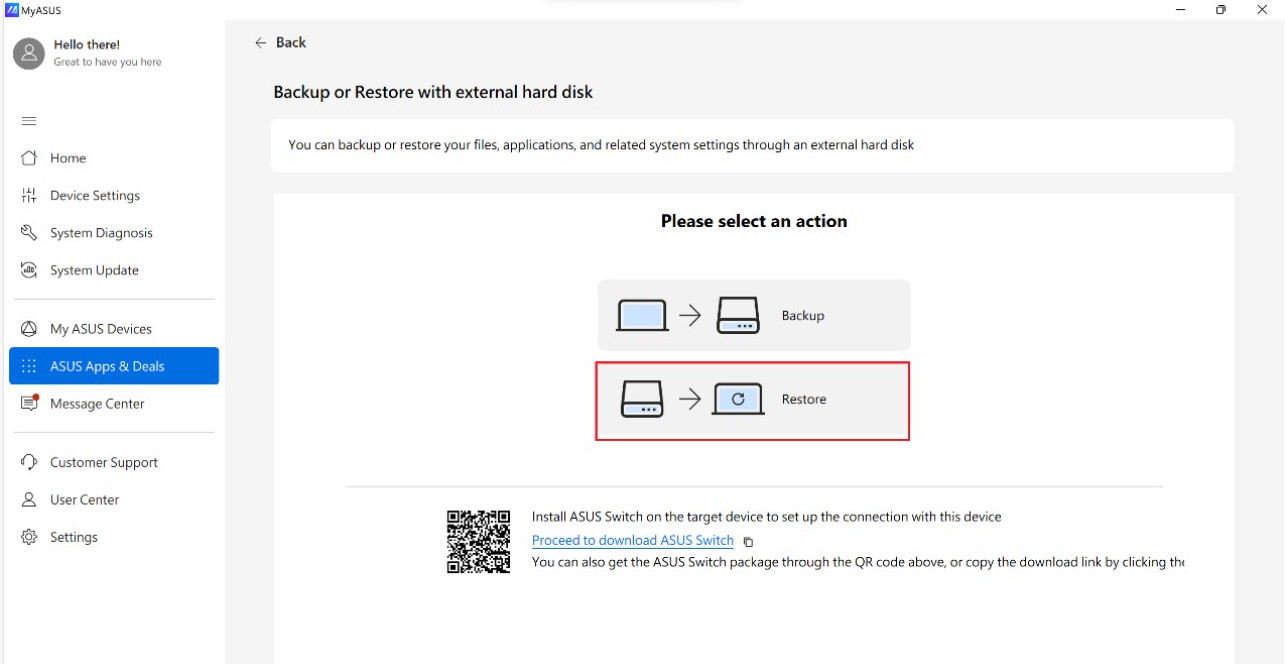
2. Choose [Backup or Restore with external hard disk].
3. Choose whether you’d like to [Backup] or [Restore]
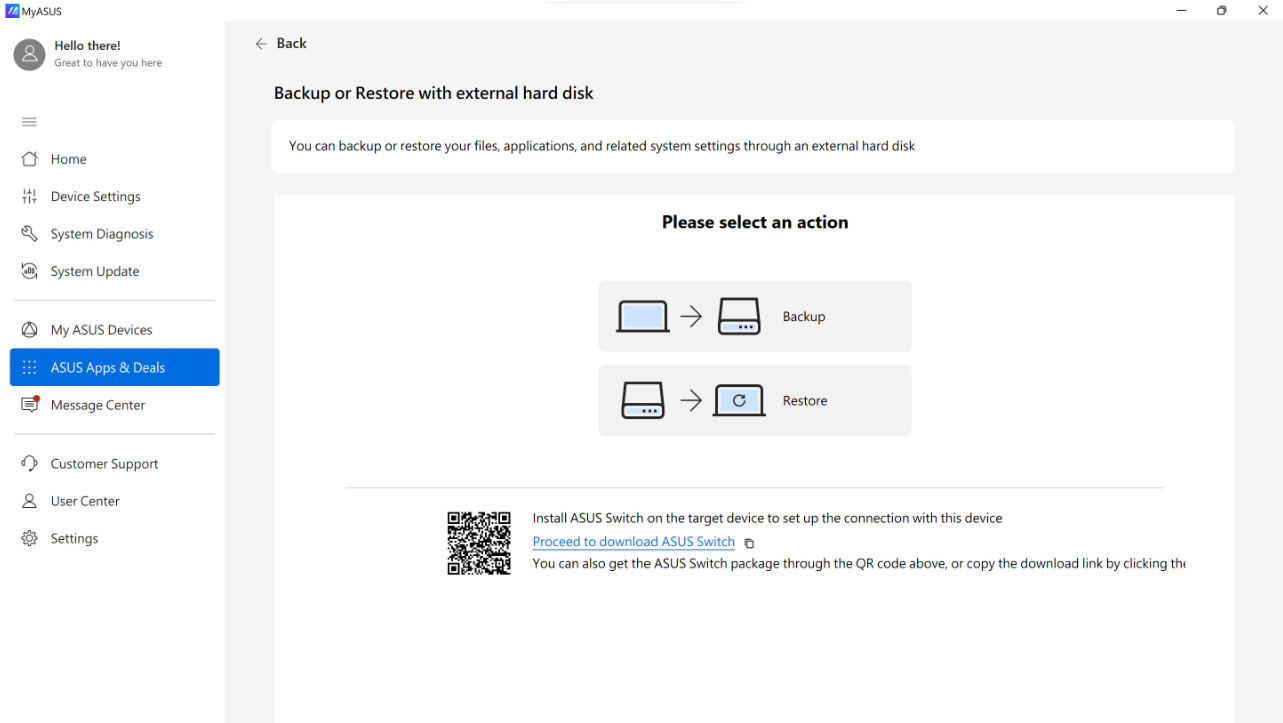
4. Select [Backup]

5. Select your target external hard disk.
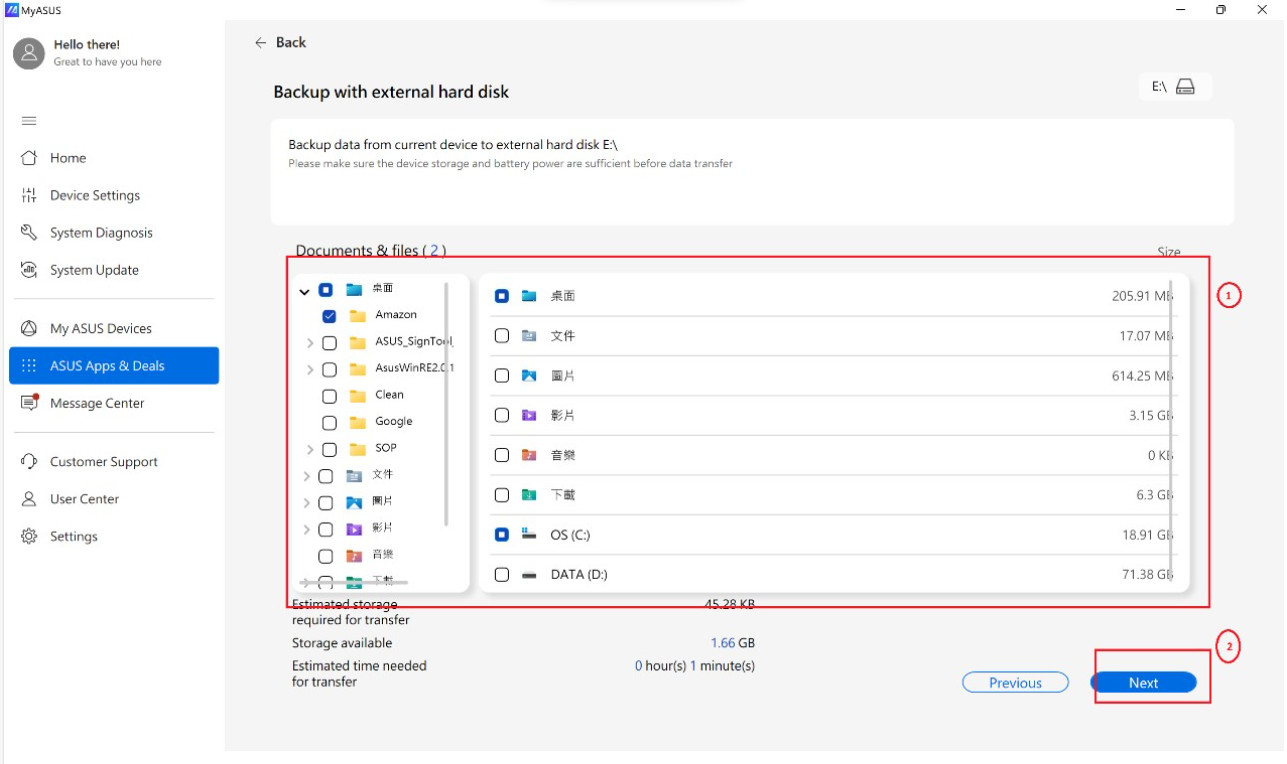
6. Select the original laptop's documents & files① you want to transfer. Confirm the transferring size and time, click [Next]②.
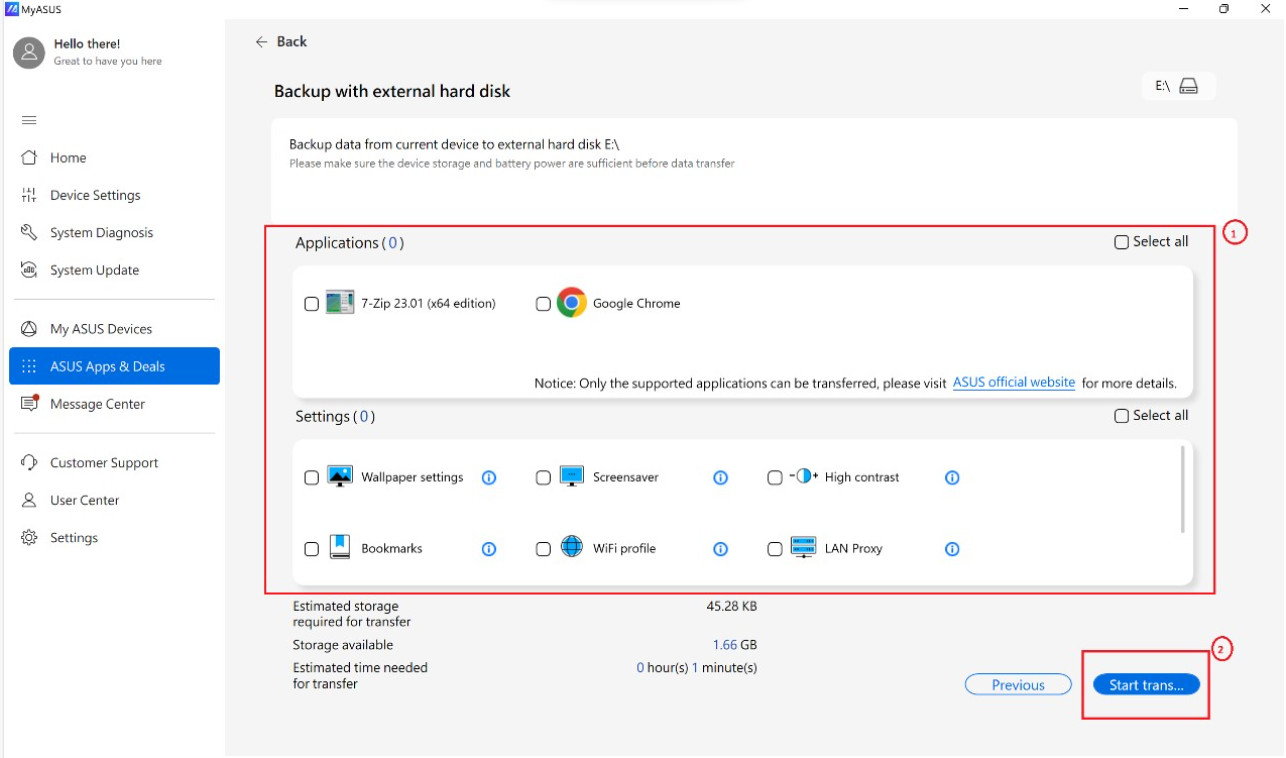
7. Select the original laptop's applications① & Settings② you want to transfer. Confirm the transferring size and time, click [Start Transfer]③. (Supported applications: Chrome, Firefox, WinRAR, 7zip)
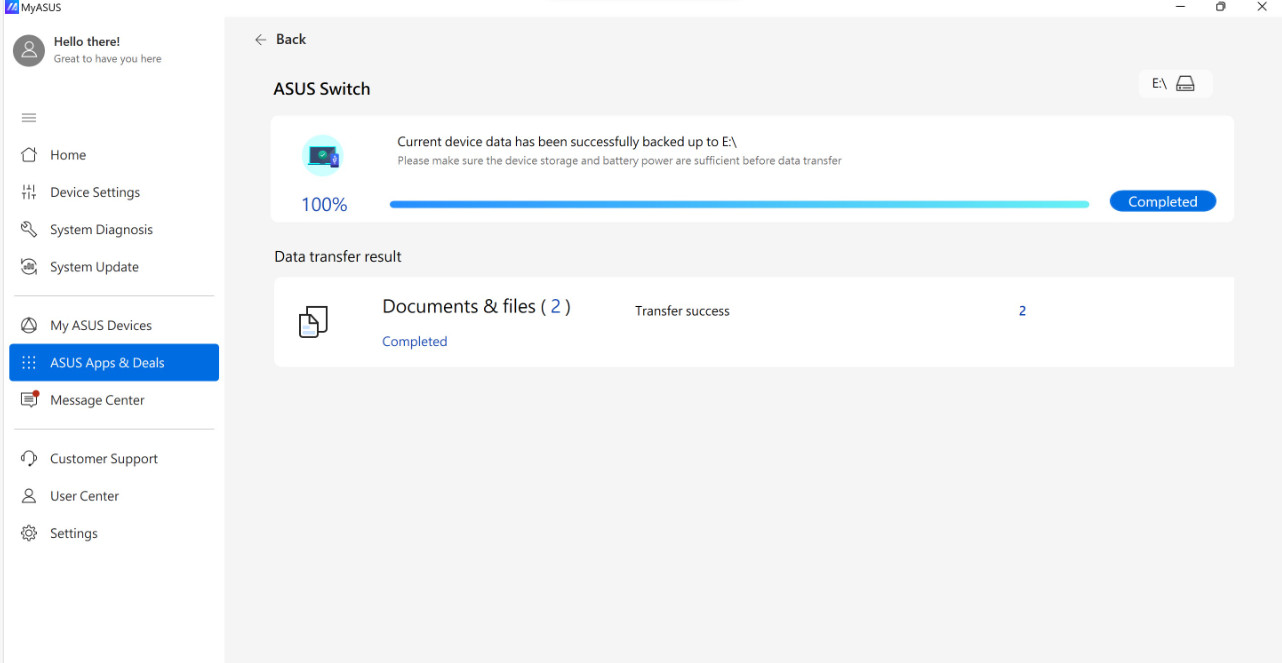
Data transfer complete as below shown, please click [Completed] to end up the process.
8. If you’d like to restore the backup file to the new device, just insert the external hard disk to your new ASUS laptop and select [Restore].
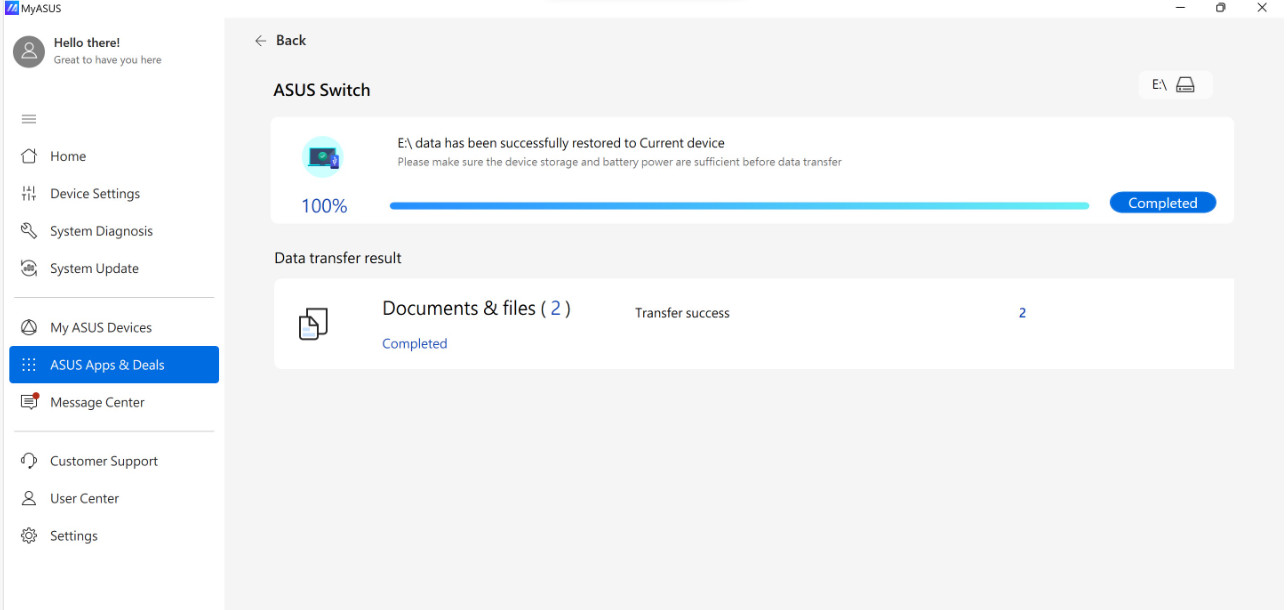
9. Select the external hard disk ① and file folder ②. Click [Restore]③ to start the transfer process.

Data transfer complete as below shown, please click [Completed] to end up the process.
Backup or Restore to Dropbox
MyASUS app offers ASUS devices a quick backup and restore access with Dropbox space. You can Signup or login your Dropbox account to backup your files.
Moreover, you could have an exclusive Dropbox Plus Plan offer via this process.
Notice:
1. Use of Dropbox is subject to the Dropbox Terms of Service, Privacy Policy, and other terms. Dropbox service and promotion not available in China, Cuba, Iran, North Korea, Sudan, or Syria.
2. When you reset your device, the data will be deleted and ASUS neither stores nor has the ability to recover your data. Please login into Dropbox and ensure your files are back up successfully before you recover / reset your device.
1. Go to [ASUS Switch] ② in MyASUS-ASUS Apps & Deals page ①. Select Transfer via External hard disk or Dropbox③.
Note: You can Download the ASUS Switch installer and install it in the original laptop if it is other brands laptop, otherwise, you can't find [Switch & Recovery] in MyASUS.
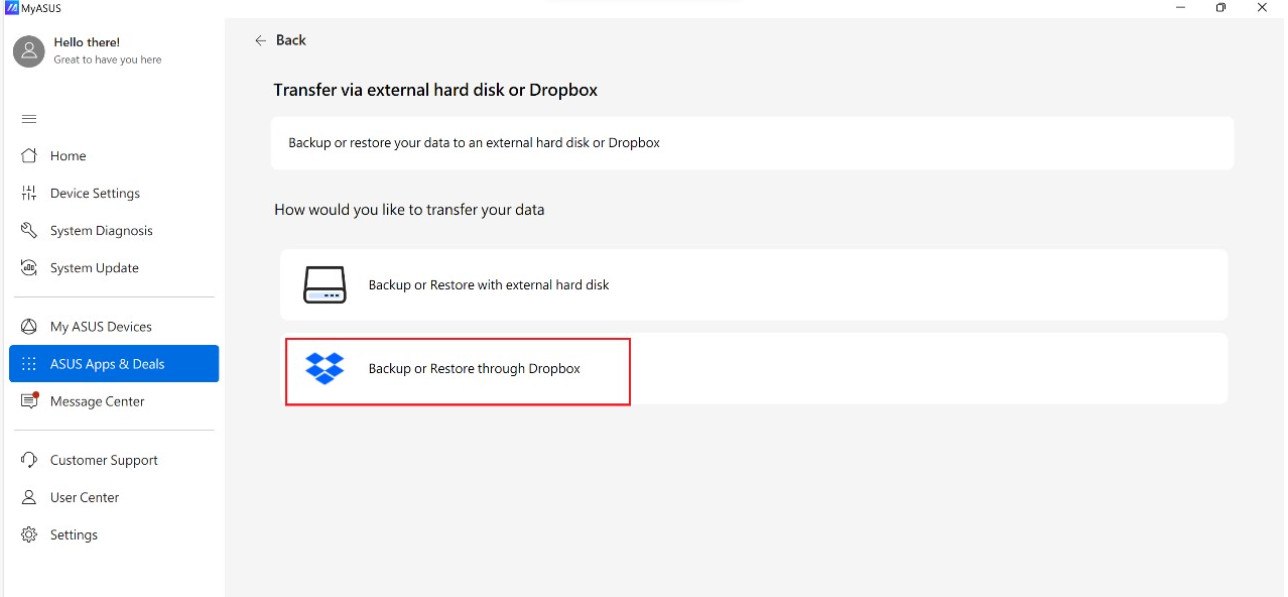
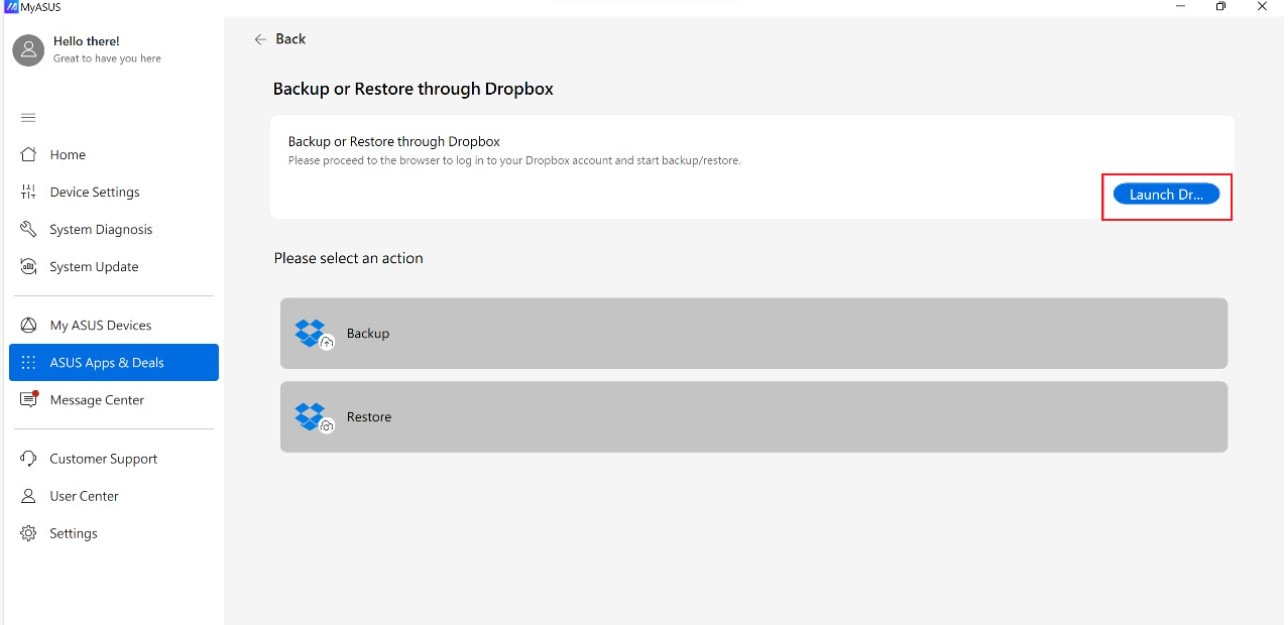
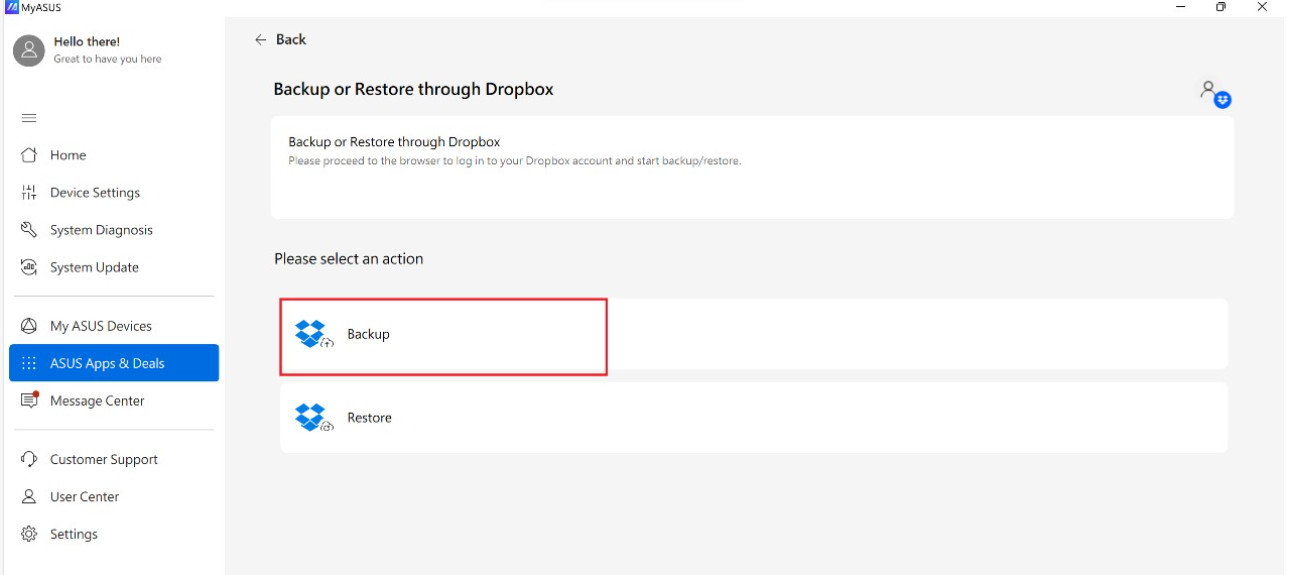
2. Choose [Backup or Restore through Dropbox].
3. Click [Launch Dropbox] to login your Dropbox account
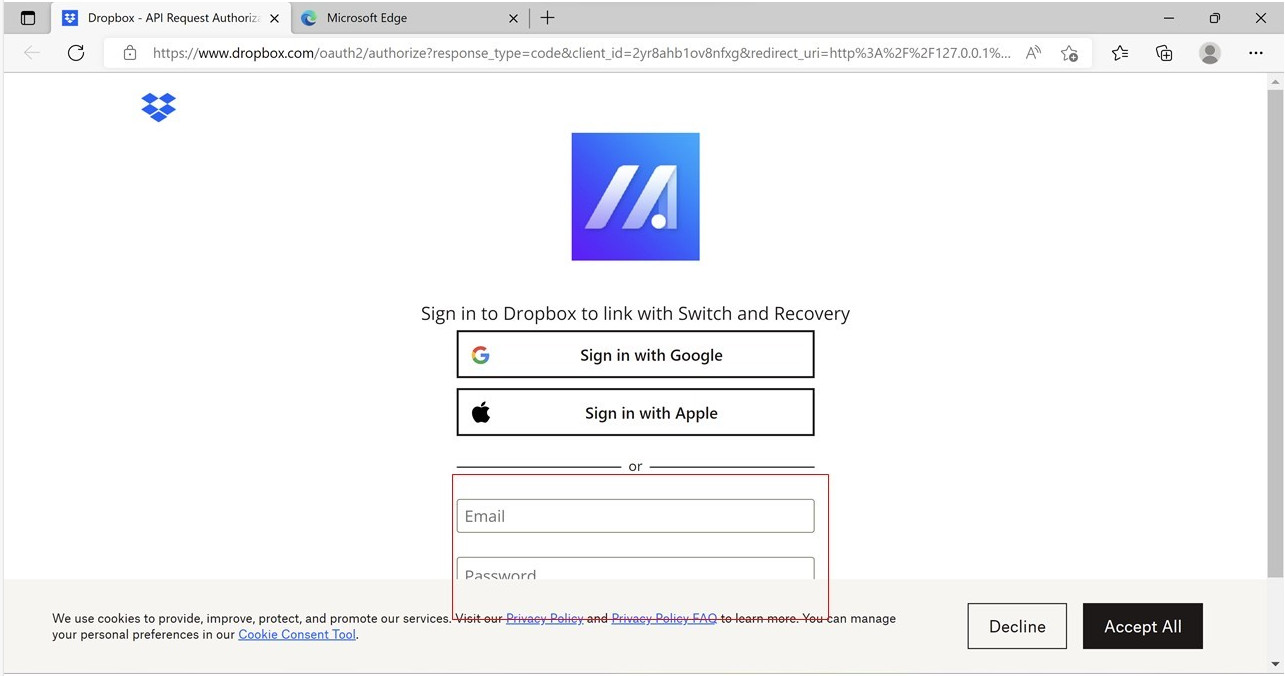
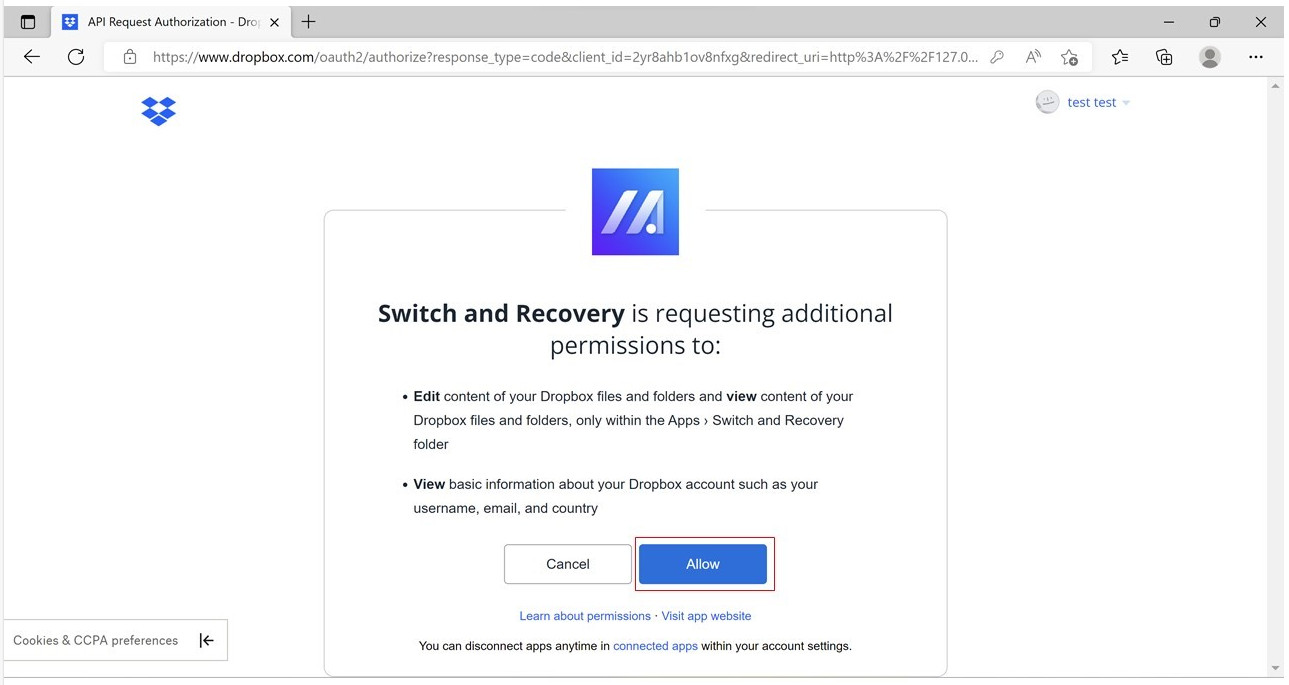
4. Follow the login instruction on the browser and allow the permission.
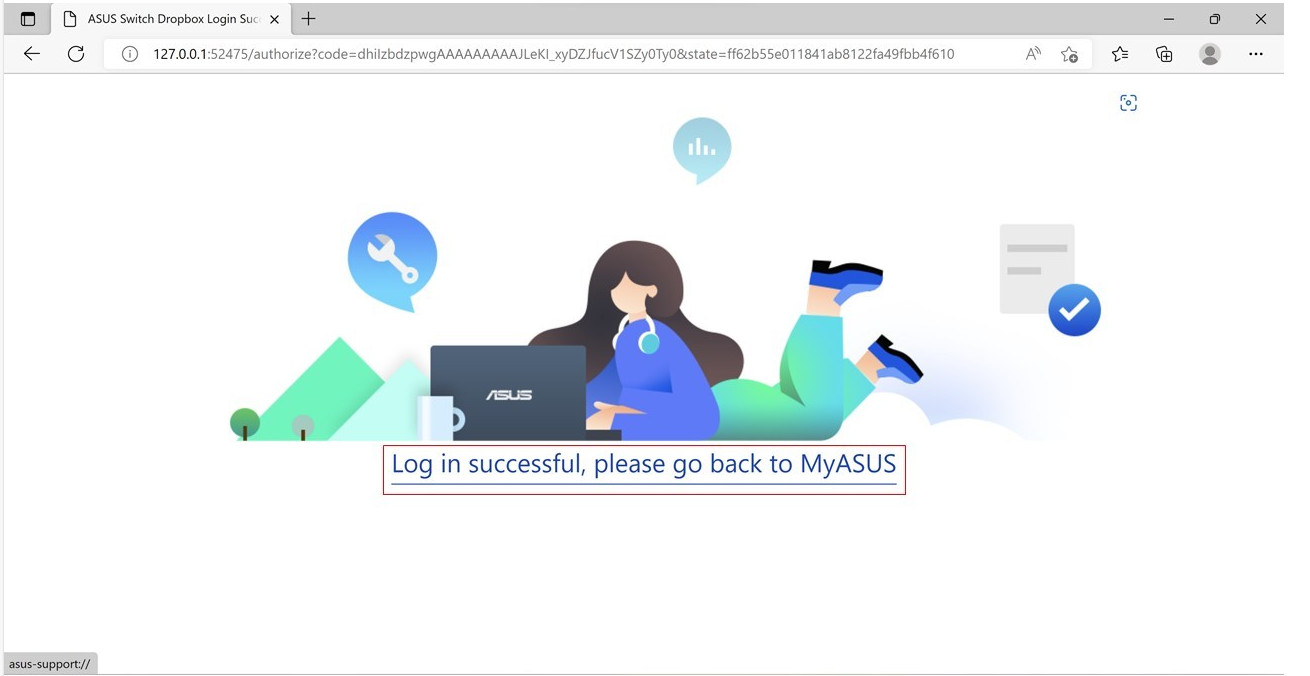
5. Go back to MyASUS application and select [Backup].
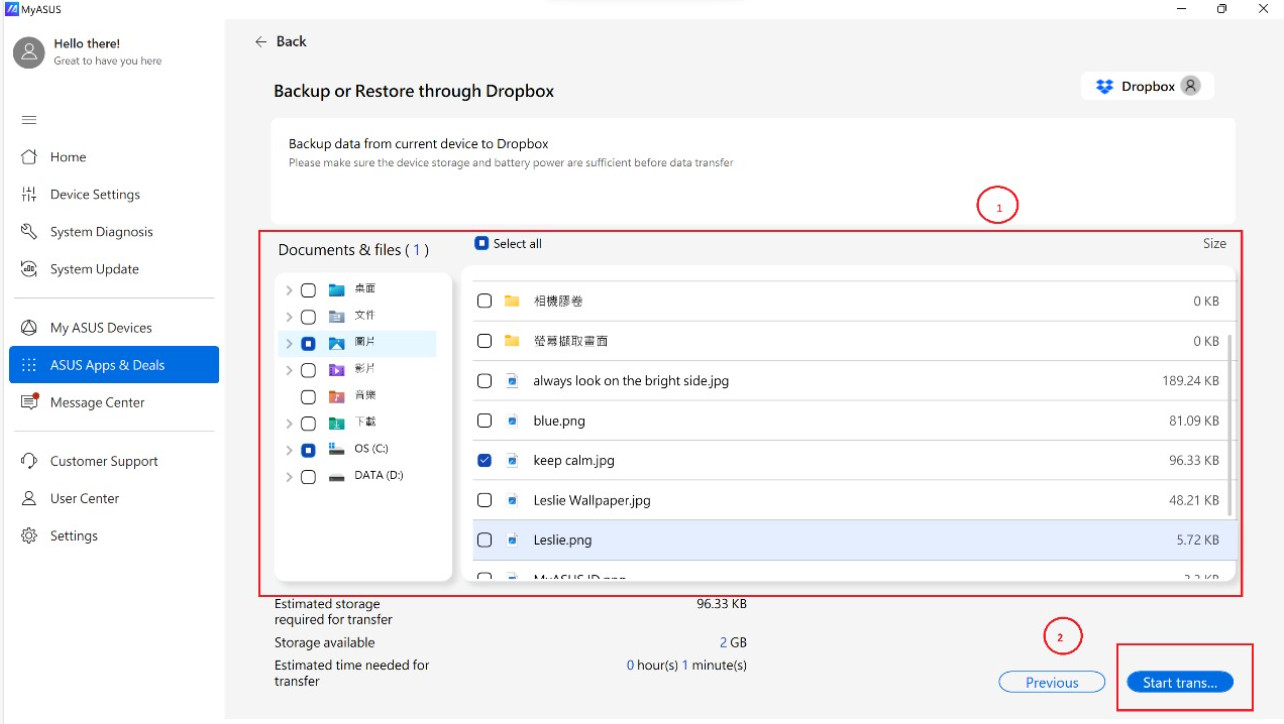
6. Select the items① you would like to backup through Dropbox and click [Start transfer]②.
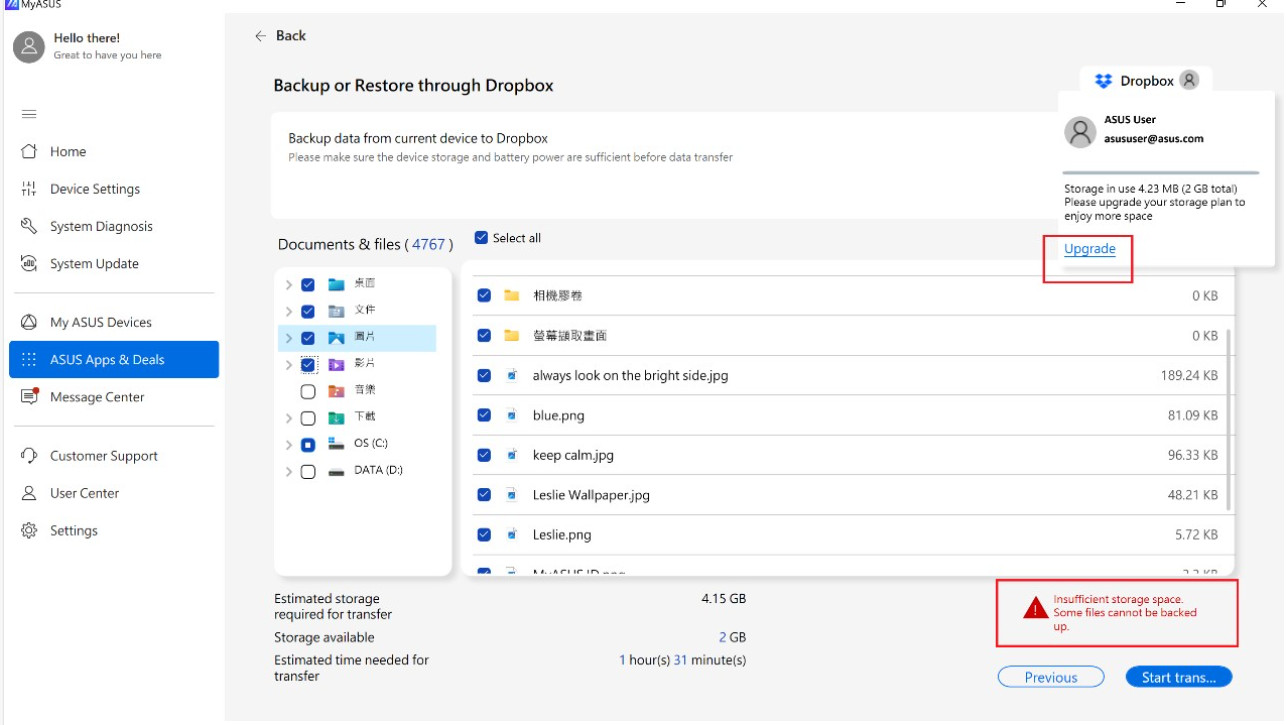
7. If you don’t have enough space in Dropbox, you can click [Upgrade] to get more spaces with lower price.
8. Data transfer complete as below shown, please click on [Completed] to end up the process.

9. Select [Restore].
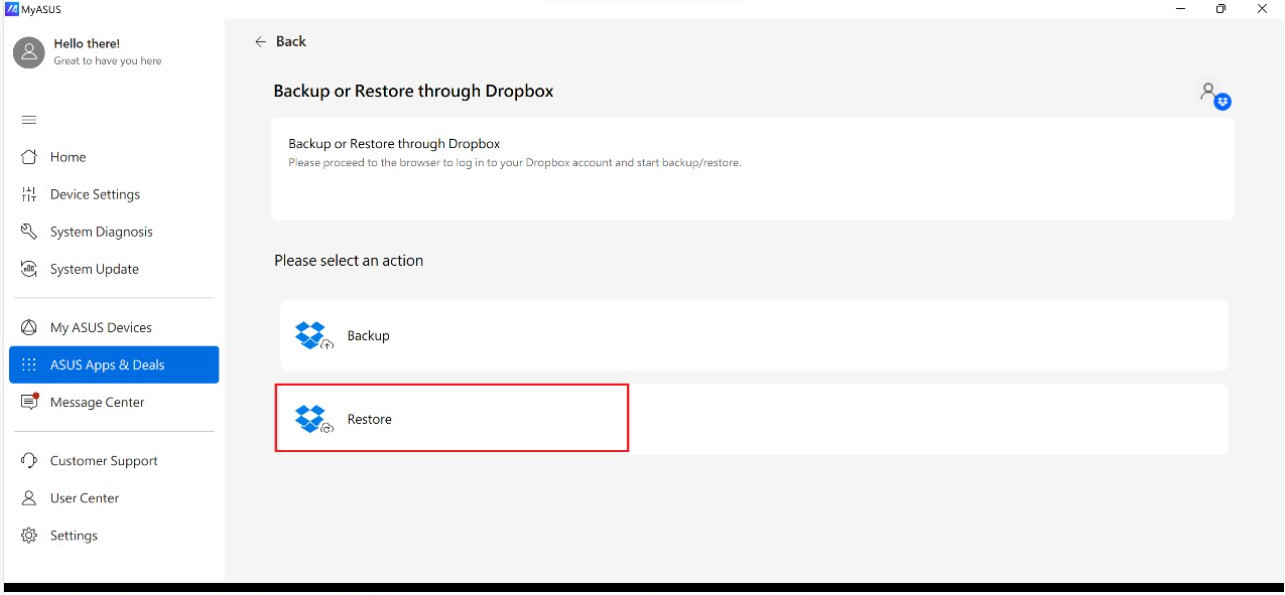
10. You could see the files you backup through Dropbox before, select the one you'd like to restore① and click [Restore]②.
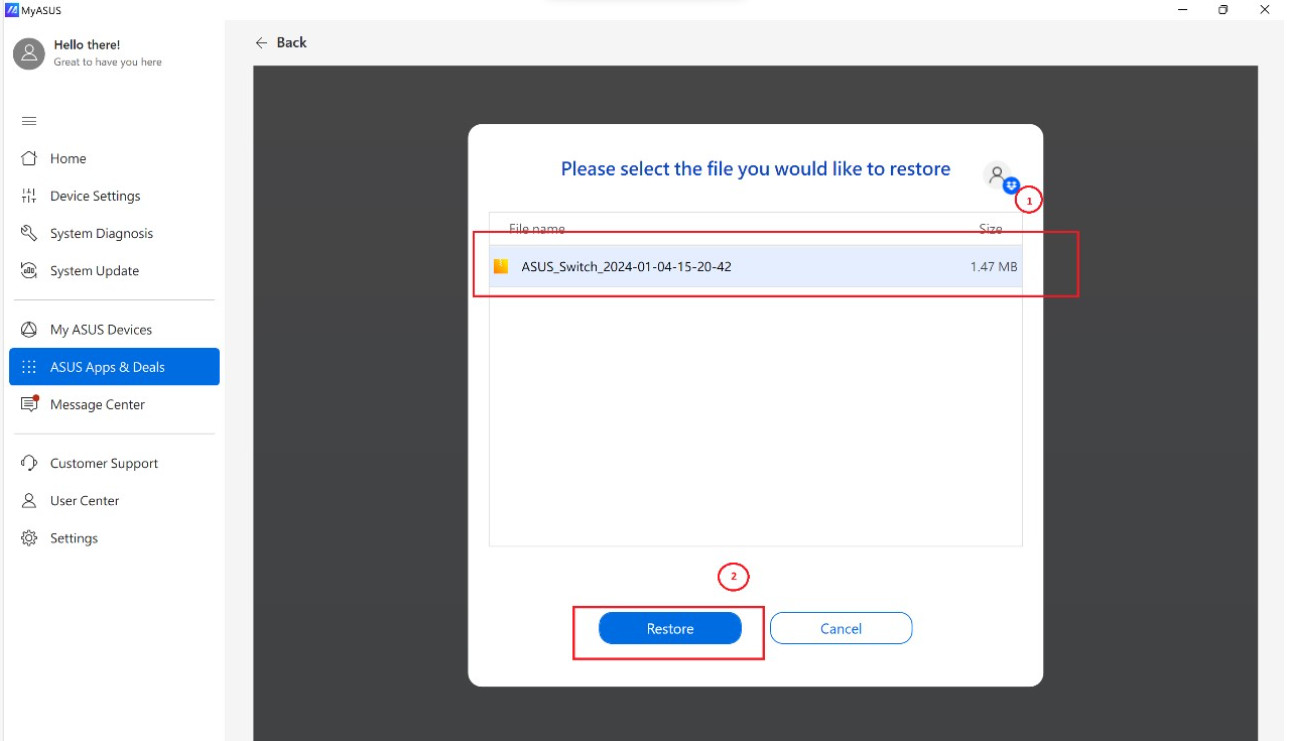
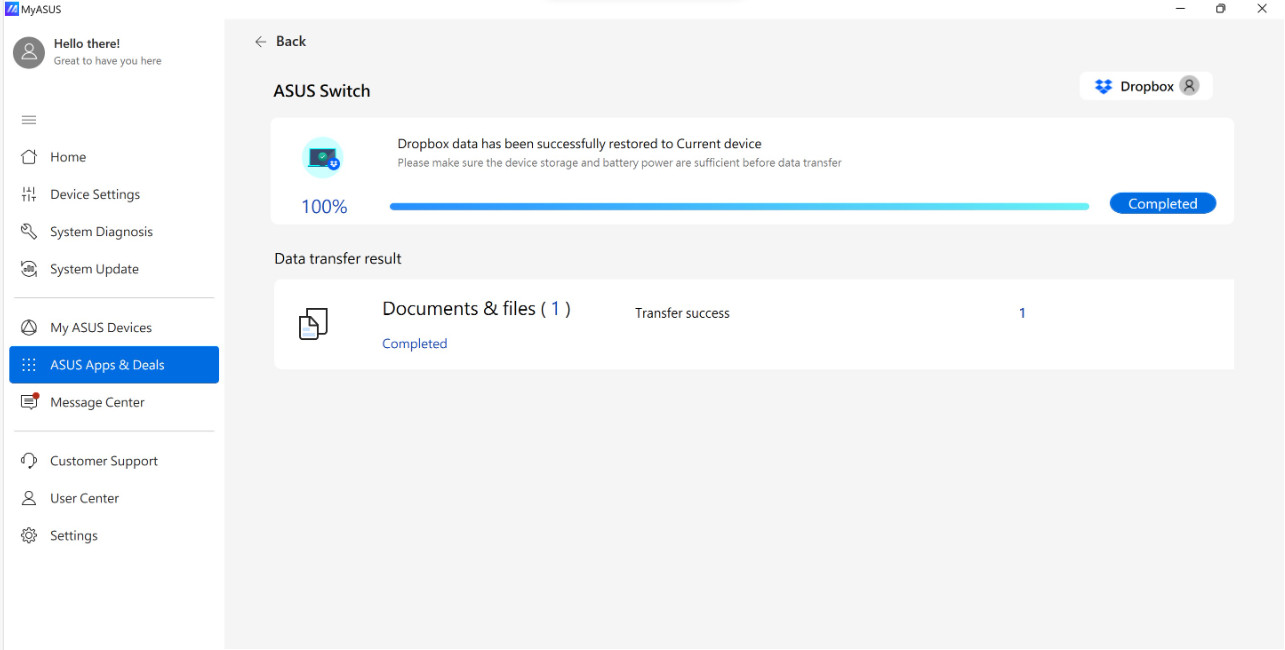
11. Data transfer complete as below shown.
Recovery
Introduction
MyASUS provides the function of creating a system repair drive. If the laptop cannot start, you can use the repair drive to reset it.
If you back up the system file to the repair drive, you can also use the system file to reinstall Windows.
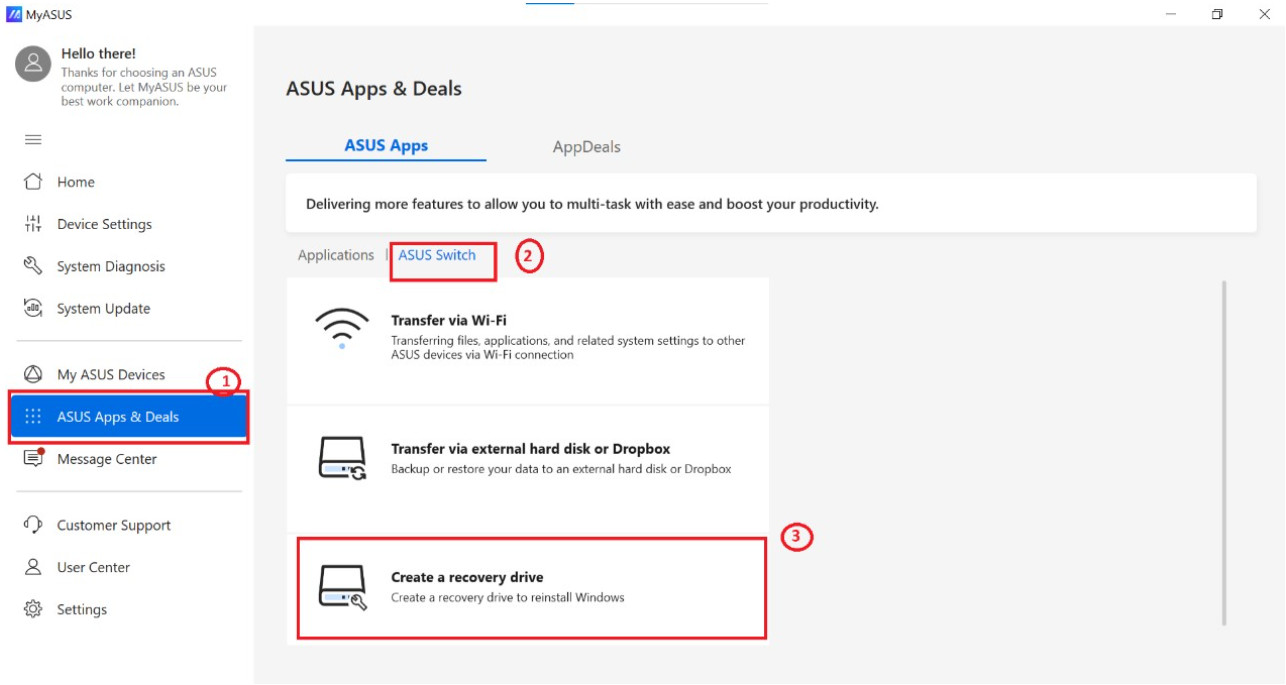
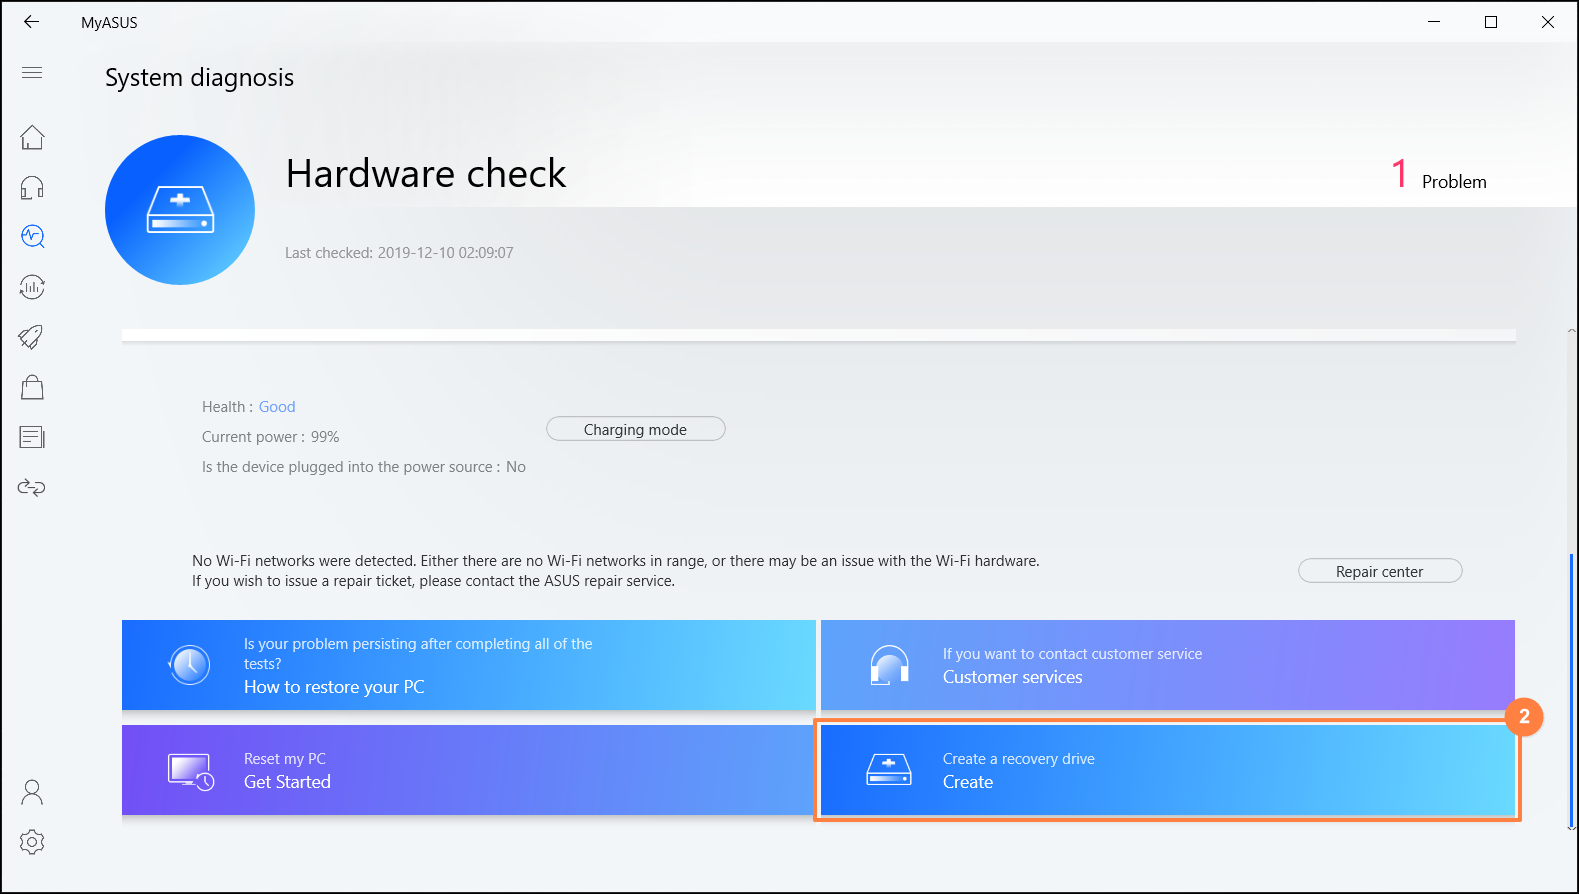
1. Go to [ASUS Switch] ② in MyASUS-ASUS Apps & Deals page ①. Select Create a recovery drive③.
The following steps, you can refer to here.
Cloud Recovery
Introduction
MyASUS provides a function that allow you to recover your device to the factory image.
Get Started
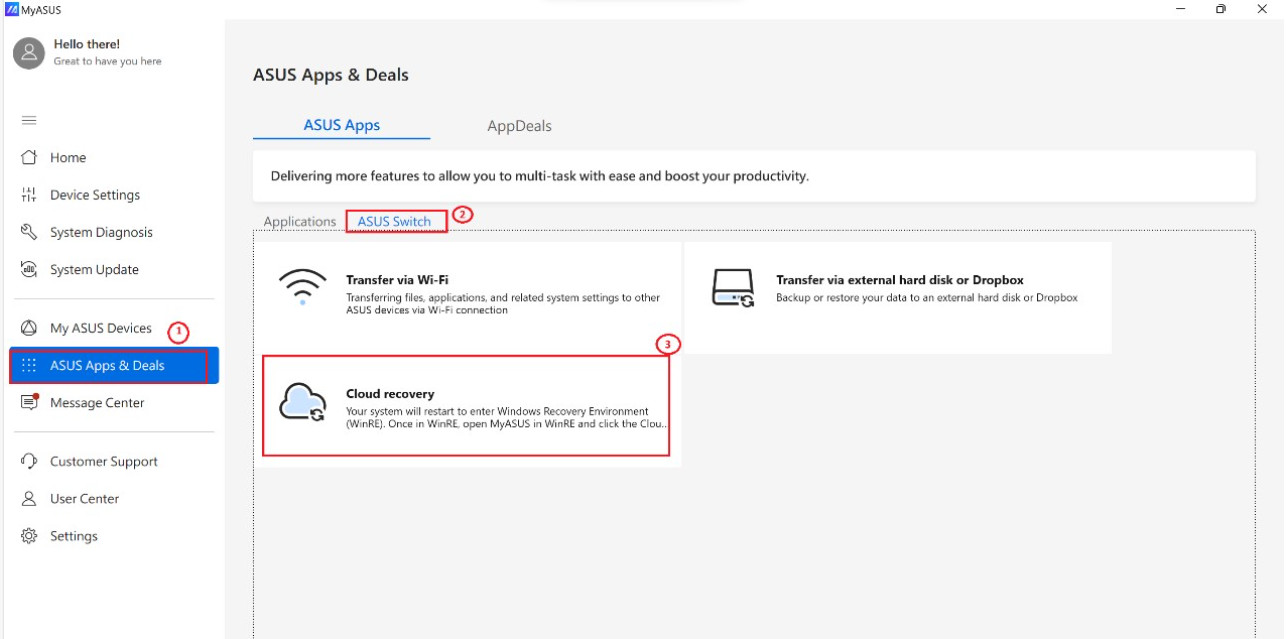
1. Go to [ASUS Switch] ② in MyASUS-ASUS Apps & Deals page ①. Select Cloud recovery③.
2. When pressing [Confirm], system will reboot to guide you to enter Windows Recovery Environment. It will then allow you to start Cloud Recovery Process.
For more information, please visit here.

[Notebook] MyASUS - System Diagnosis
MyASUS - System Diagnosis
Applicable Products: Notebook, Desktop, All-in-One PC, Gaming Handheld
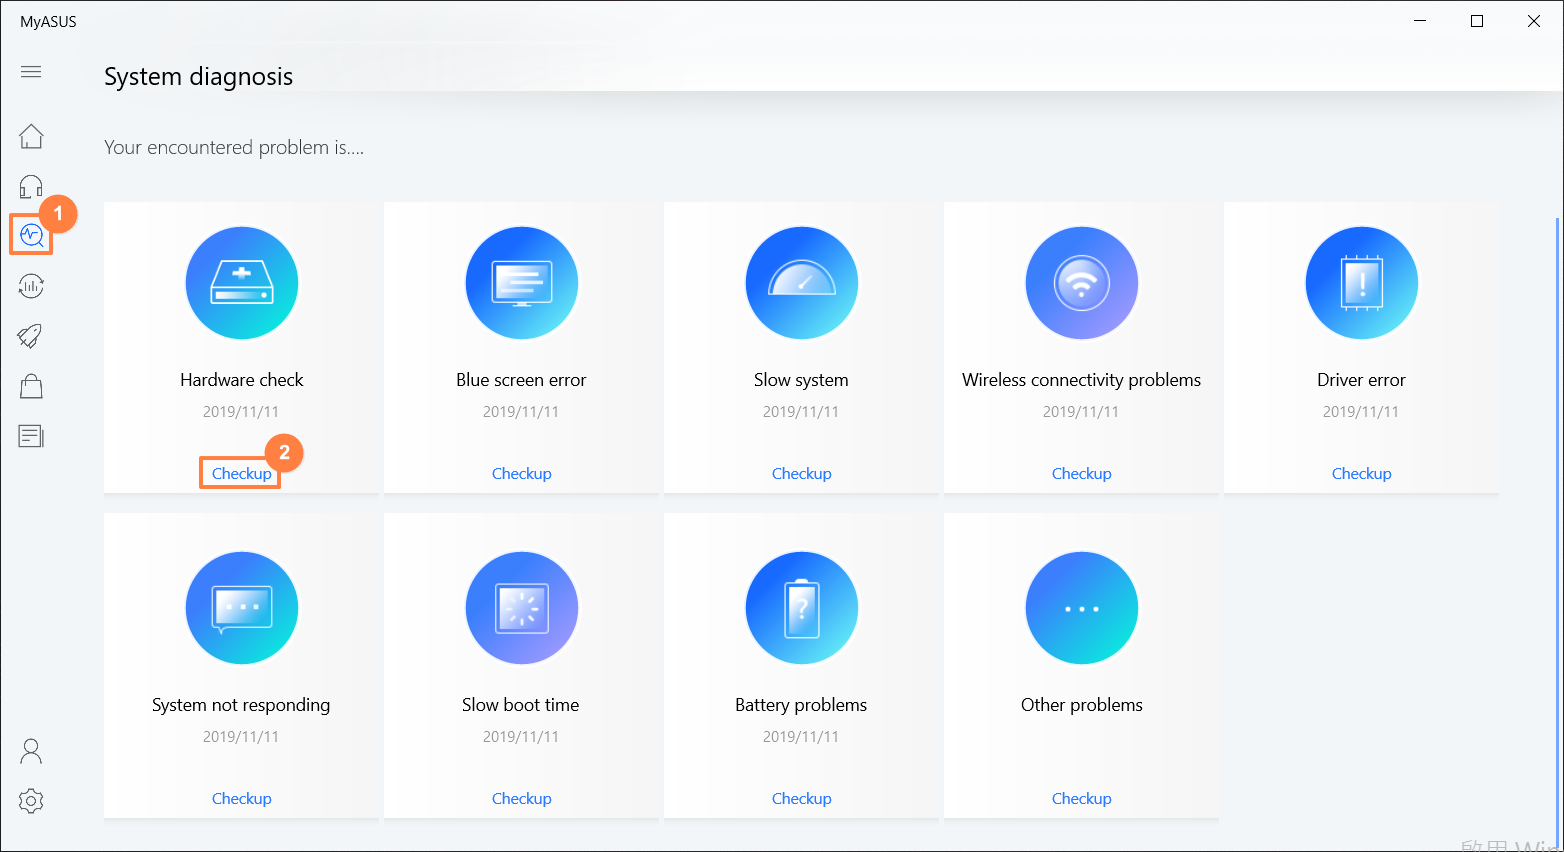
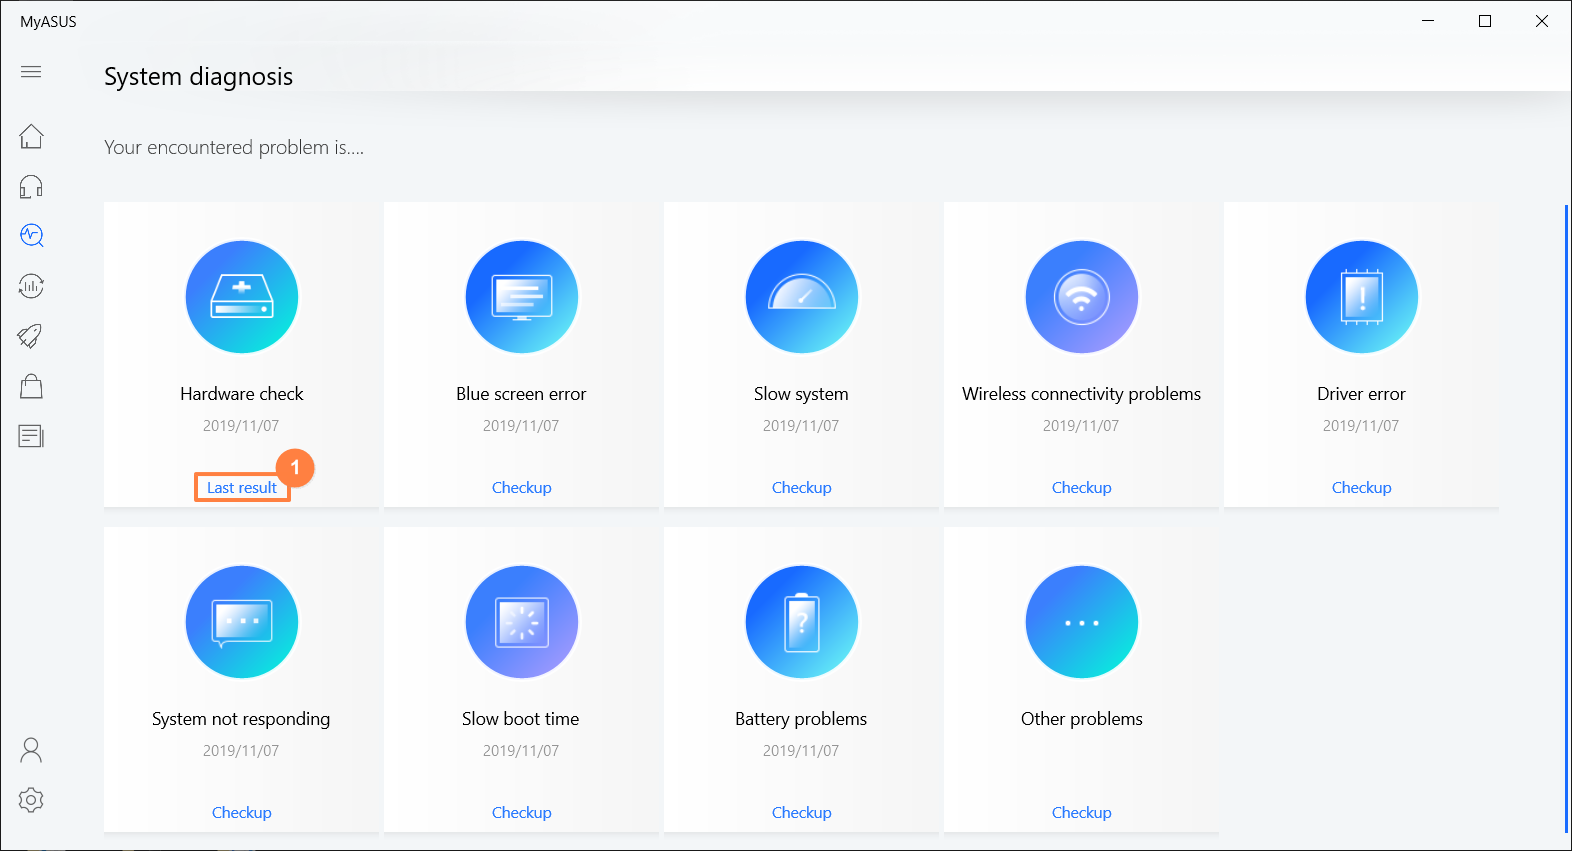
MyASUS System Diagnosis lists seven scenarios commonly encountered with PC devices and a one-click overall Hardware diagnostic. Each scenario comes with a brief description and allows you to quickly identify the scenario you have encountered and select the necessary Checkup. To help save time from contacting Asus Product Support, various tests are provided within each scenario. These tests not only verify the problems encountered, but also provide the proper solutions.
To provide you more detailed instruction, you can also click ASUS YouTube video link below to know more about How to use MyASUS Diagnostics Function.
https://www.youtube.com/watch?v=J8OSaBDXumI
Scenarios | Description | Check item |
One-Click diagnosis | If you have no idea one which component to be tested, you can choose this option to run a full system test. | Adapter, Memory, Wi-Fi, Bluetooth, Hard disk drive, Solid state disk, Battery, Fan, System check |
Customized diagnosis | To be fully aware of the hardware health of your PC, it's recommended to run the Hardware Check to verify the hardware status in your PC. | Adapter, Memory, Wi-Fi, Bluetooth, Hard disk drive, Solid state disk, Battery, Fan, System check |
Blue screen error | A Blue Screen of Death is usually hardware or driver related. Most BSOD's show a STOP code that can be used to help figure out the root cause of the Blue Screen. | Memory, Hard disk drive, Sector check, Device driver |
Slow system | Insufficient memory and hard disk space are common causes of system slow down. Having multiple applications and windows open at the same time may also be the problem. | Memory, Hard disk drive, Hard disk space, Application usage, Fan |
Wireless connectivity problems | The stability of the network carriers and Wi-Fi Internet devices is one of the most common causes of network disruptions. | Wireless device and settings, Network connection |
Driver error | Setup of a wrong or old driver may cause the system to be unstable and system crash. | Device driver |
System not responding | Random crashes usually result from the Windows settings, hardware failures, or malware damage. | Hard disk drive, Sector check, File distribution |
Slow boot time | A bad hard disk or running too many programs in the background may influence the boot time and make boot time longer. | Memory, Hard disk drive, Boot time check, Task scheduler check |
Battery problems | Make sure the system power supply is firmly plugged in with AC adapter. Check the power supply and confirm if all the detachable power cords are fully inserted. Make sure the battery is properly seated in the battery compartment, and the battery or system contacts without any problems. | Battery |
Note: The above check items may vary depending on the device model.
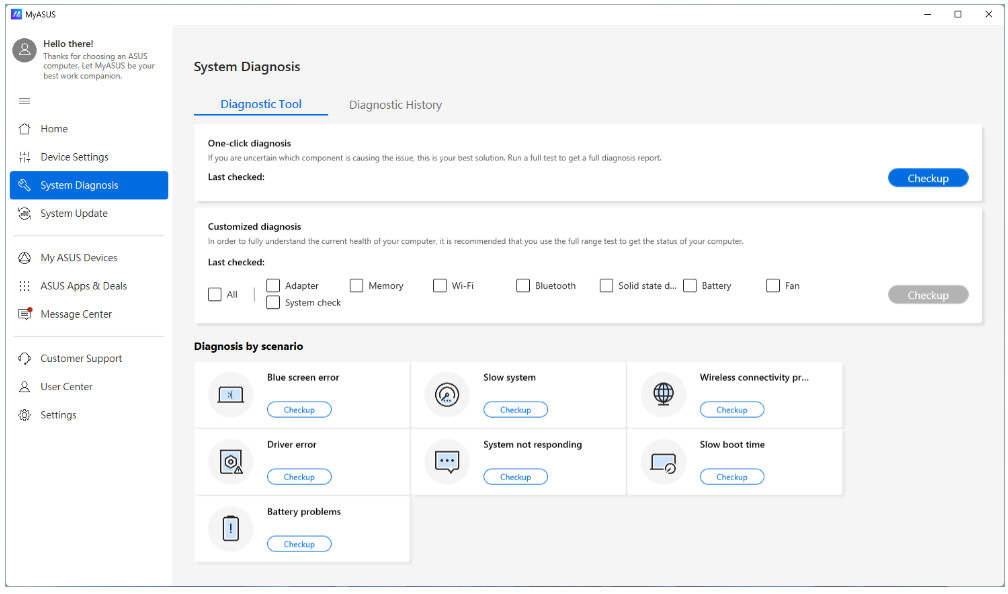
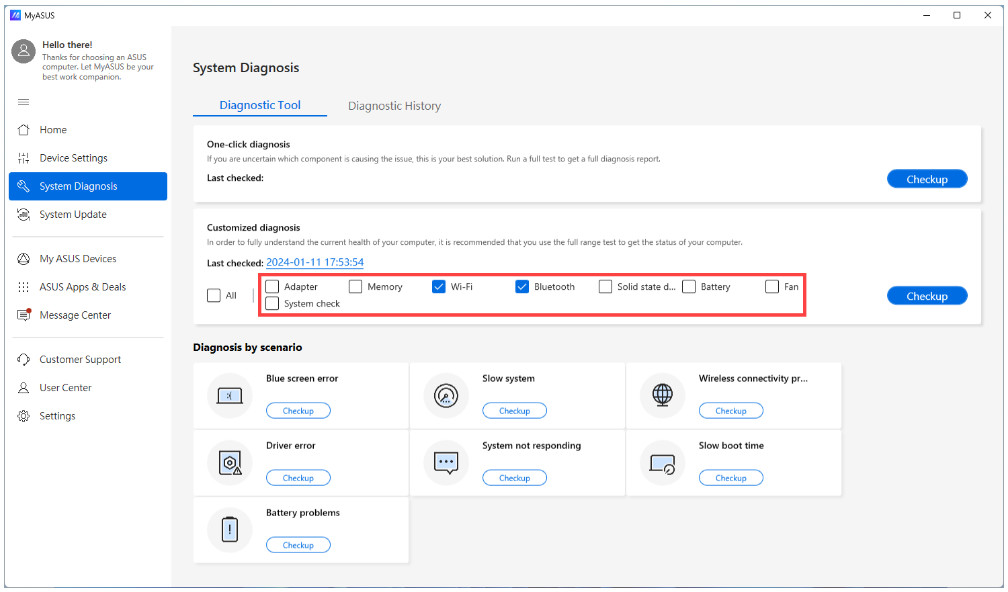
- Here are three methods to conduct system diagnostics. You can choose One-click diagnosis①, select the items you want to check in Customized diagnosis②, and then click [Checkup]③ to start to check. Or, click any of the scenarios below of Diagnosis by scenario④ to get more details of check items. (The following takes Customized diagnosis for example.)
The time required for the tests to complete will vary, so please be patient as some may take several minutes.

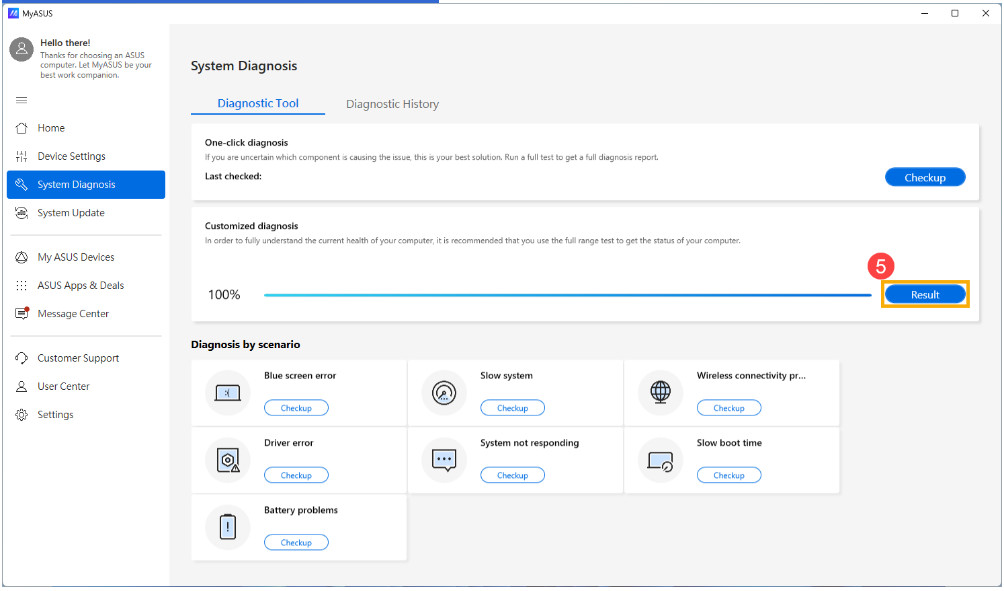
2.Click [Result] after the test is completed⑤.
3.If any error occurs after the test is completed, it will provide the error items, troubleshooting suggestions, and possible approaches to resolve the problem⑥. Besides, if there’s any hardware error, you can also issue a repair ticket in this page or you can test again to double check the error⑦.
Note: Please aware that some circumstances may need to do Windows Update which may lead to BitLocker recovery. We highly recommend you to save the BitLocker recovery key or disable BitLocker before executing Windows Update, you could refer to this article to learn more: https://www.asus.com/support/FAQ/1042922/. 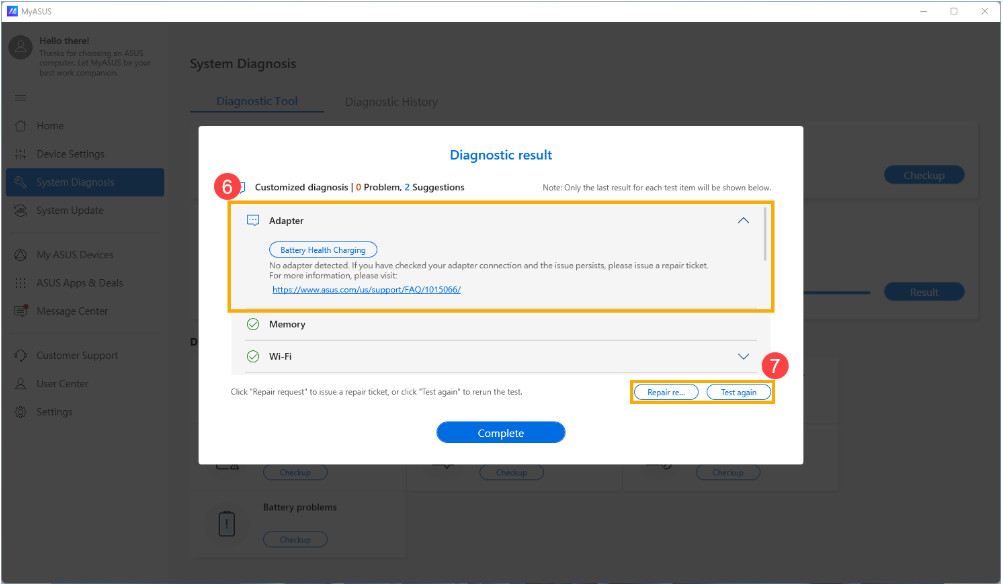
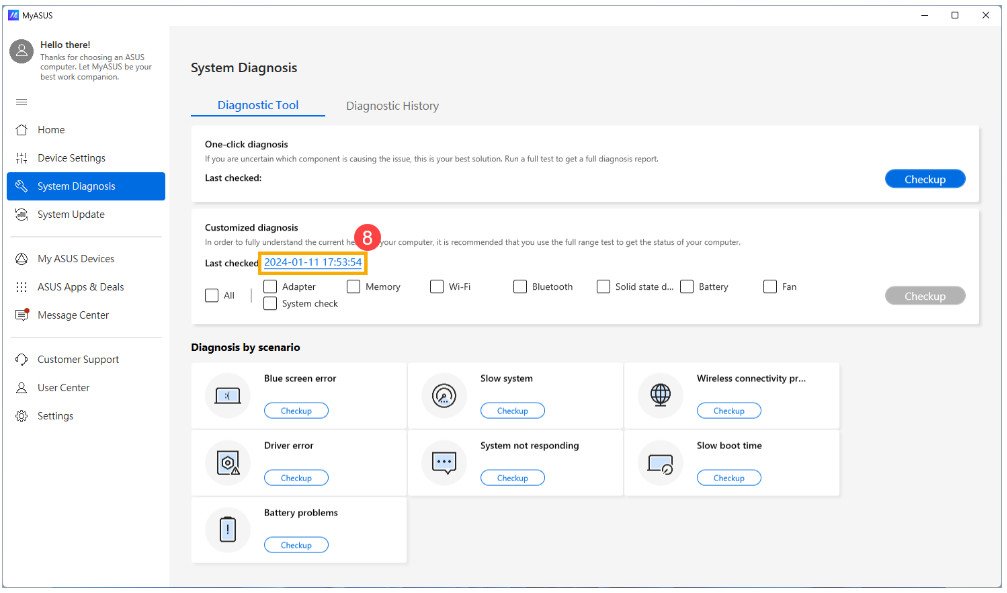
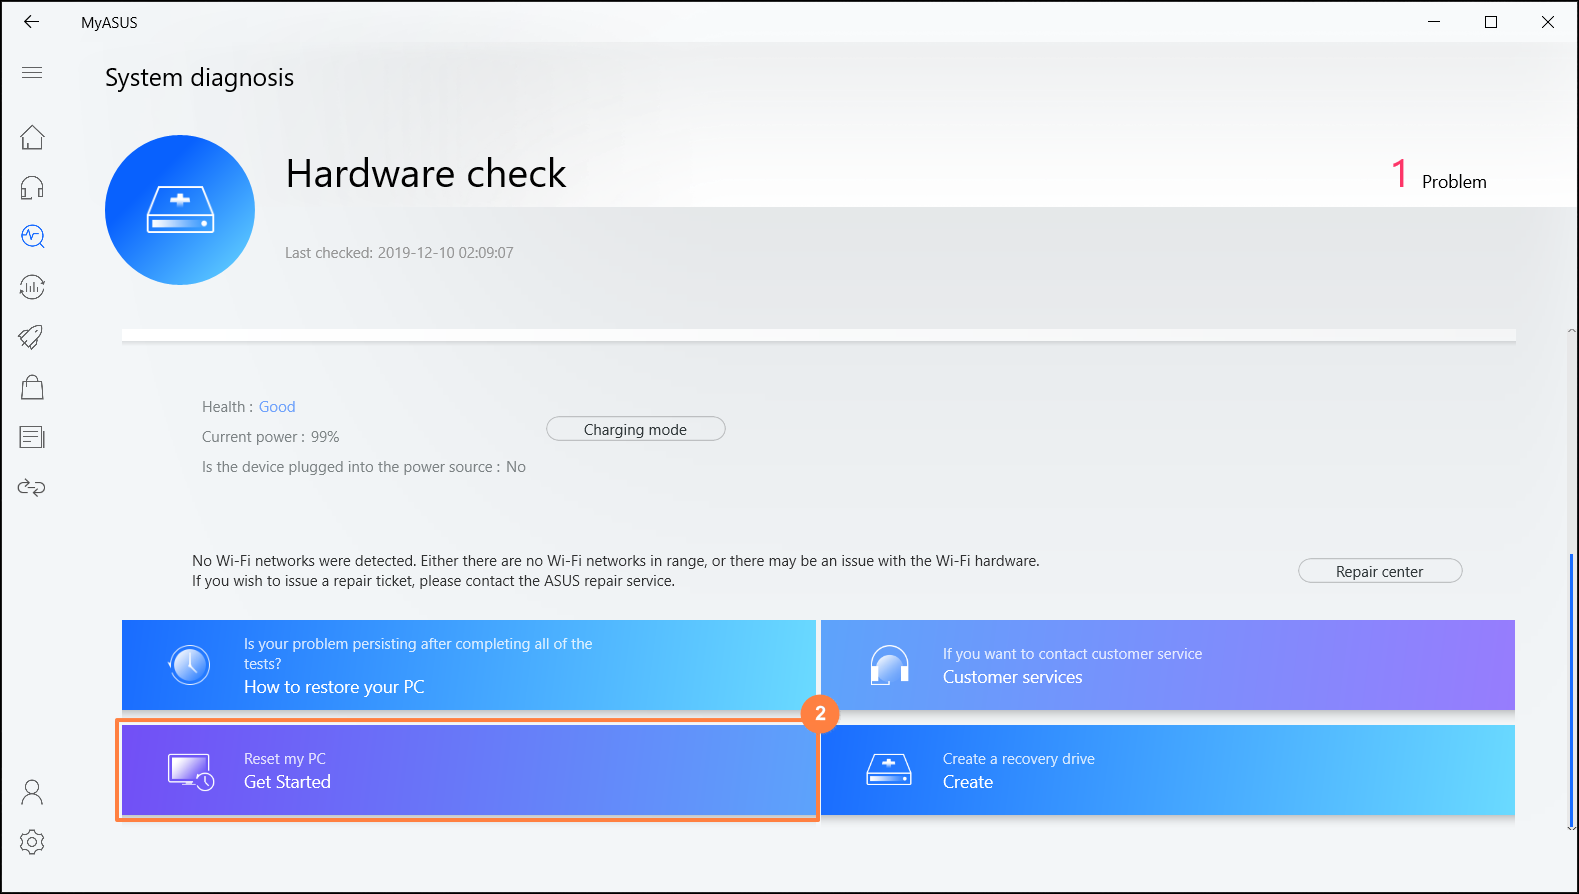
4.You can also click [the last diagnosis time]⑧ to view the last test results.
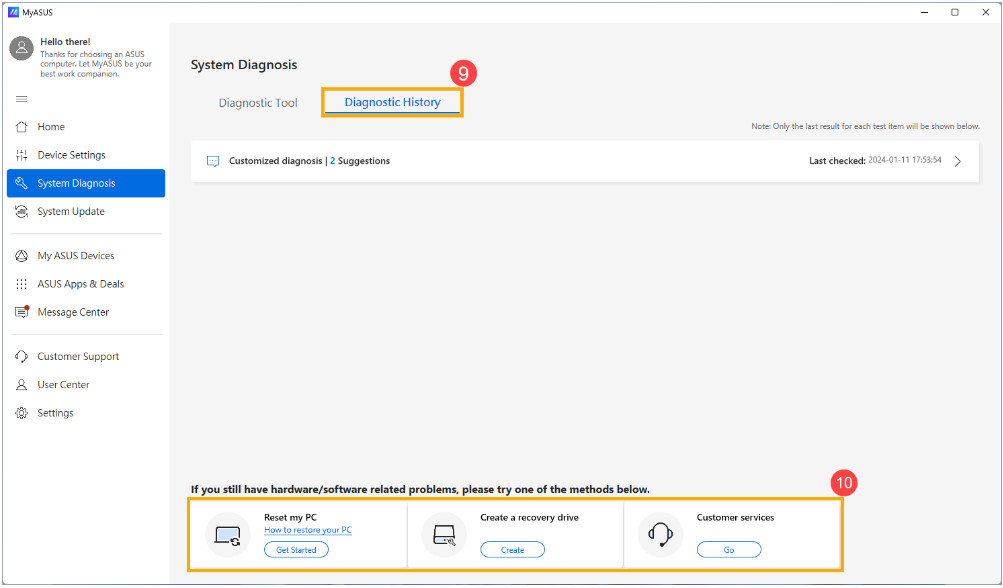
5.In Diagnostic History⑨, you can see the previous diagnosis history, and in this page, you can have options to Reset my PC, Create a recovery drive or contact ASUS Customer services⑩. Please click [How to restore your PC] to learn more about restore process introduction, or click [Get Started] that will run the restore process directly.
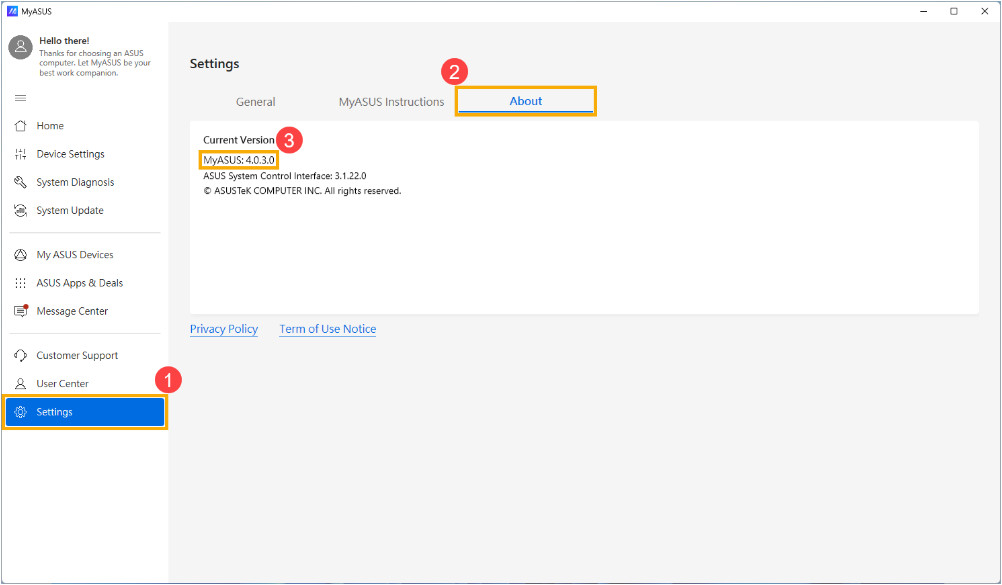
Q1: How to check the MyASUS version?
A1: Please click the [Settings] from the left menu①, and then select [About] from the top②, you will find the version number of the MyASUS installed in Current Version③.
Q2: Can I perform the system diagnosis of MyASUS in airplane mode?
A2: Except for Wi-Fi & Bluetooth of Customized diagnosis and Wireless connectivity problems, the other tests can be performed in airplane mode.
Q3: How to apply the repair request after doing Hardware Diagnostic on MyASUS?
A3: Here you can learn more about How to apply the repair request after doing Hardware Diagnostic on MyASUS.
Q4: Why can I only see the partial features in the MyASUS app?
A4: When you download MyASUS from the Microsoft Store, you may only see partial functionalities, lacking features such as system diagnostics, software updates, and device settings. It is because your product is not equipped with ASUS System Control Interface driver or the driver version does not support the full functionality of MyASUS. For more information, please refer to this article.
[Notebook] How to install MyASUS application
How to Install MyASUS Application
Applicable Products: Notebook, Desktop, All-in-One PC, Gaming Handheld
Please, based on your device's current Windows operating system version, follow the corresponding instructions:
Before installing MyASUS, you need to check whether your computer had been installed the ASUS System Control Interface driver first, and then start to install MyASUS.
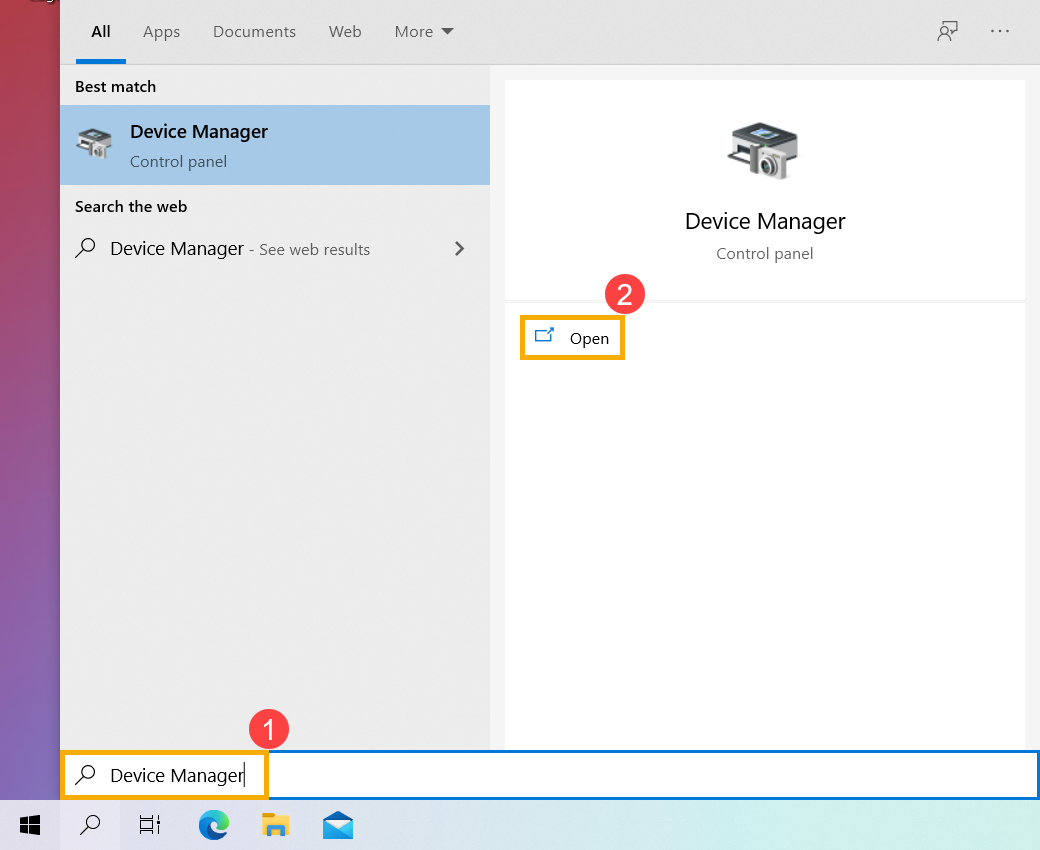
- Type and search [Device Manager] in the Windows search bar①, then click [Open]②.
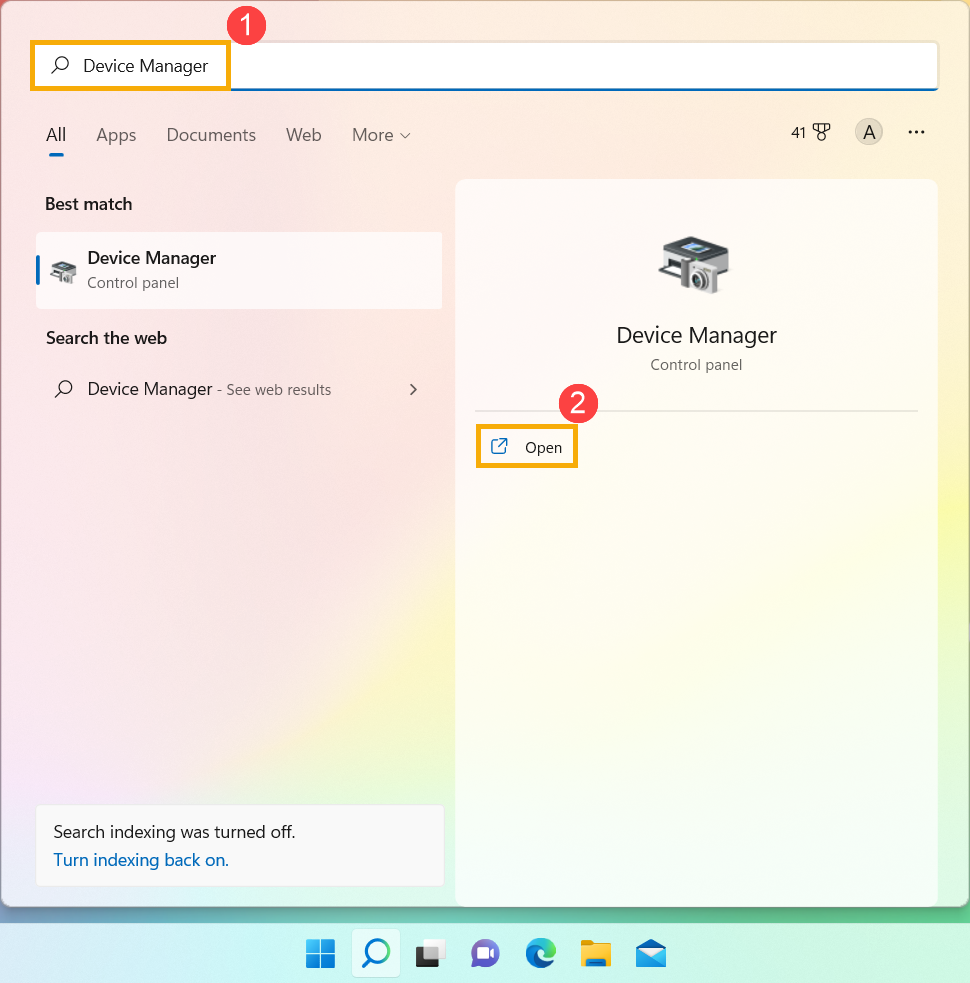
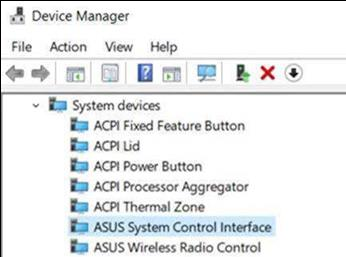
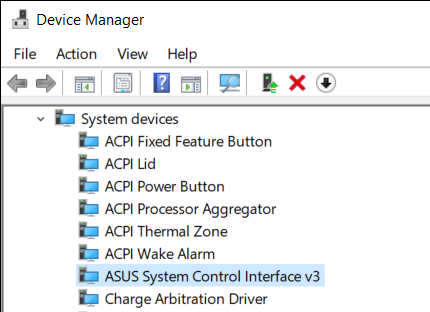
- Check the arrow next to [System devices]③, then confirm whether the [ASUS System Control Interface] driver had been installed④. (There is V1 or V3 version, depending on different models, and the supported options in MyASUS are determined by this driver version.)
If your computer had been installed this driver, please click here to know How to install MyASUS.
If your computer didn’t install this driver yet, please click here to know How to download and install the ASUS System Control Interface driver.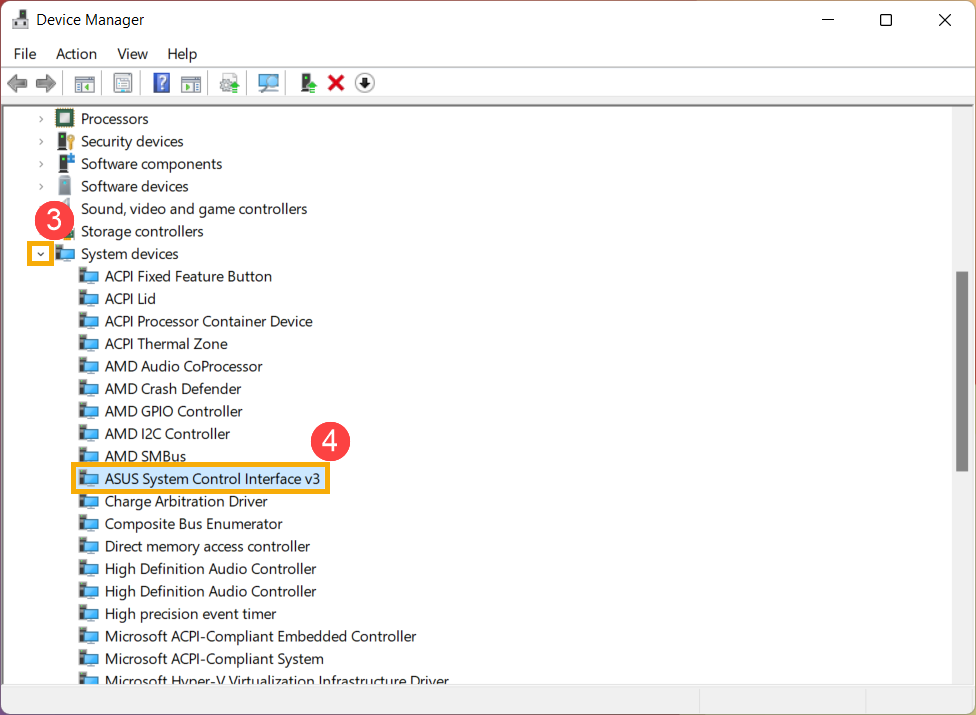
How to download and install the ASUS System Control Interface driver
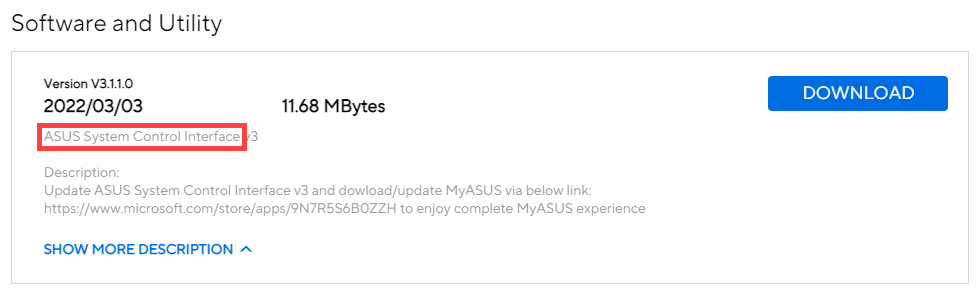
Please go to the ASUS support site, then download and install the ASUS System Control Interface driver on the Software and Utility category. Here you can learn more about How to search and download drivers.
If you don’t find the ASUS System Control Interface driver on the ASUS support site of your computer model, it means your computer doesn’t support most features in MyASUS. Here you can learn more about Why can I only see the “Customer Support” feature in the MyASUS app.
After the download is complete, please go to the corresponding install instruction based on the driver generation on your computer.
| Driver generation | Support Model | Install Instruction |
| ASUS System Control Interface V3 | Model list | Click to paragraph |
| ASUS System Control Interface V1 | Model list | Click to paragraph |
Install the latest ASUS System Control Interface V3 driver
Note: The following pictures are the current version as a reference, please download the latest version from the ASUS Support Site.
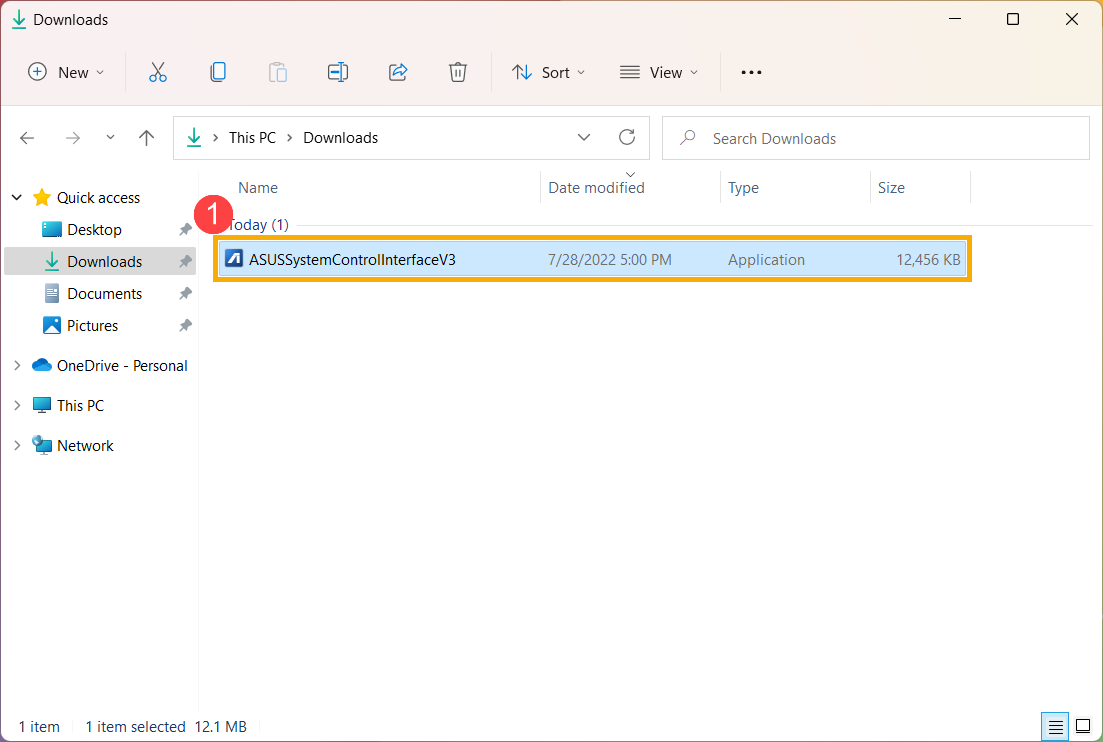
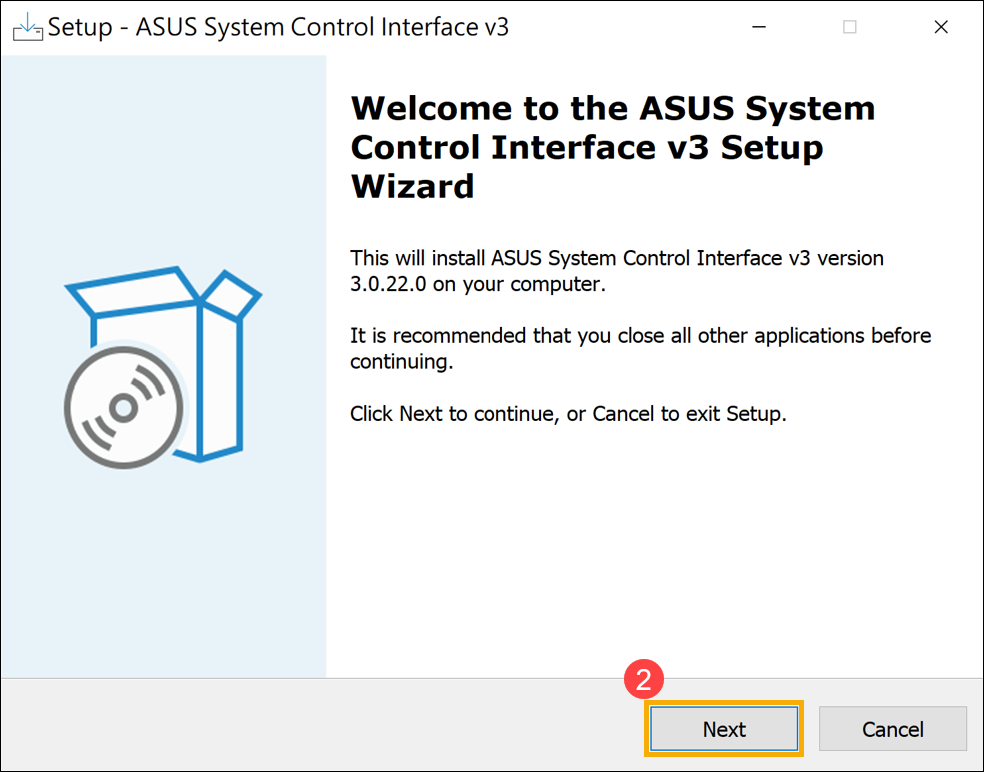
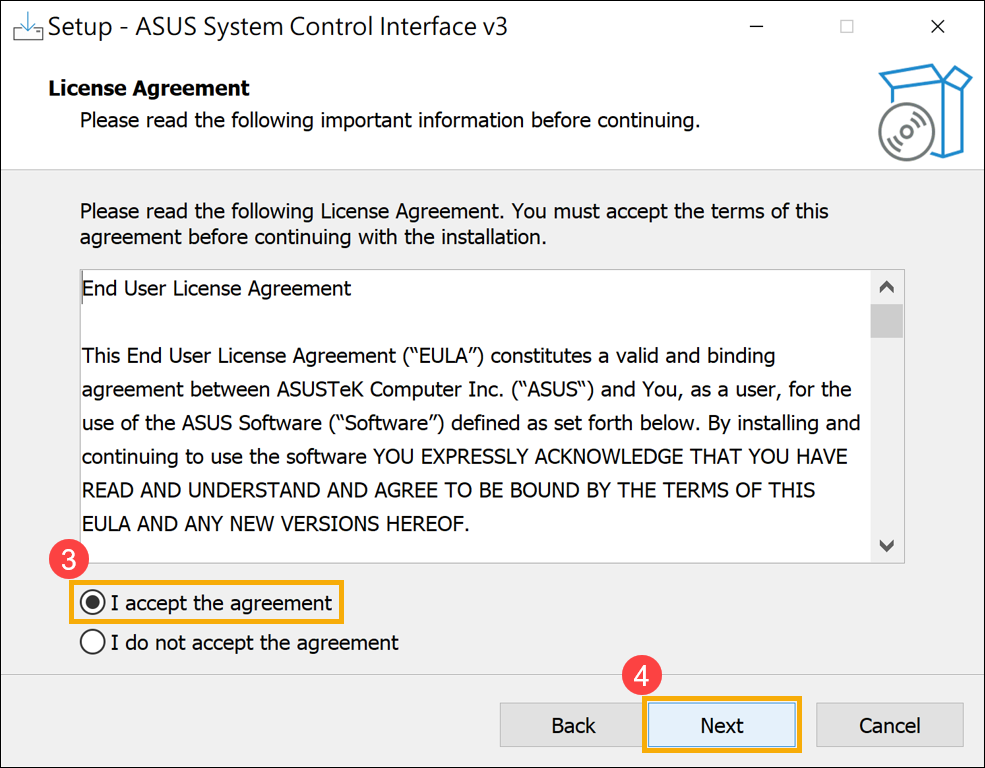
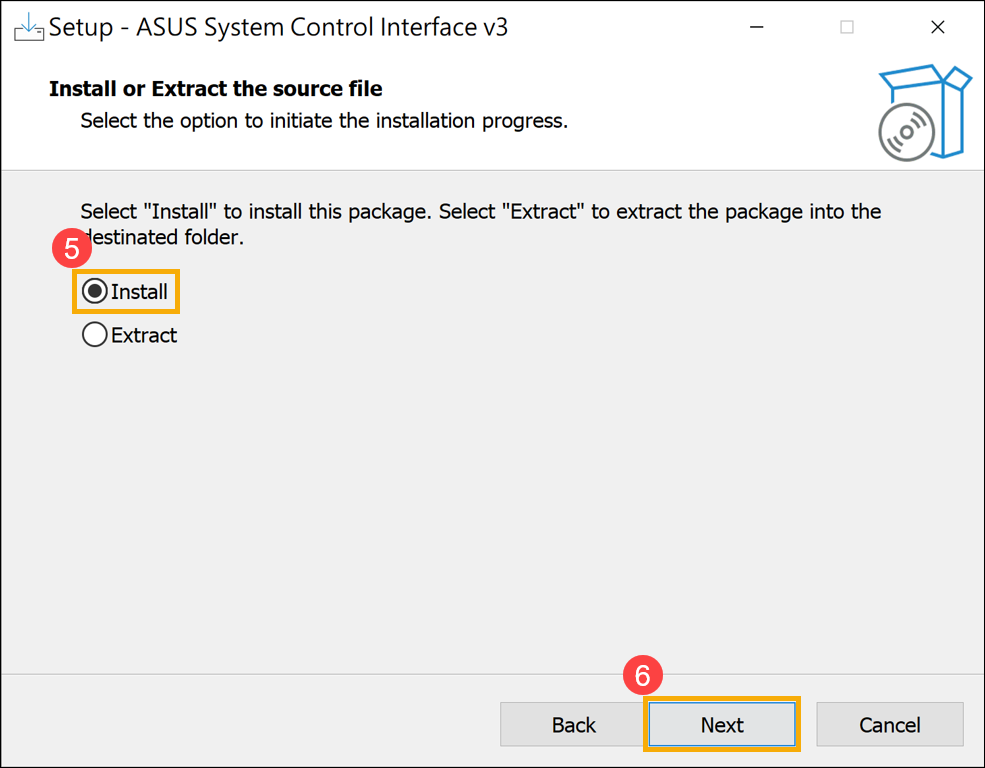
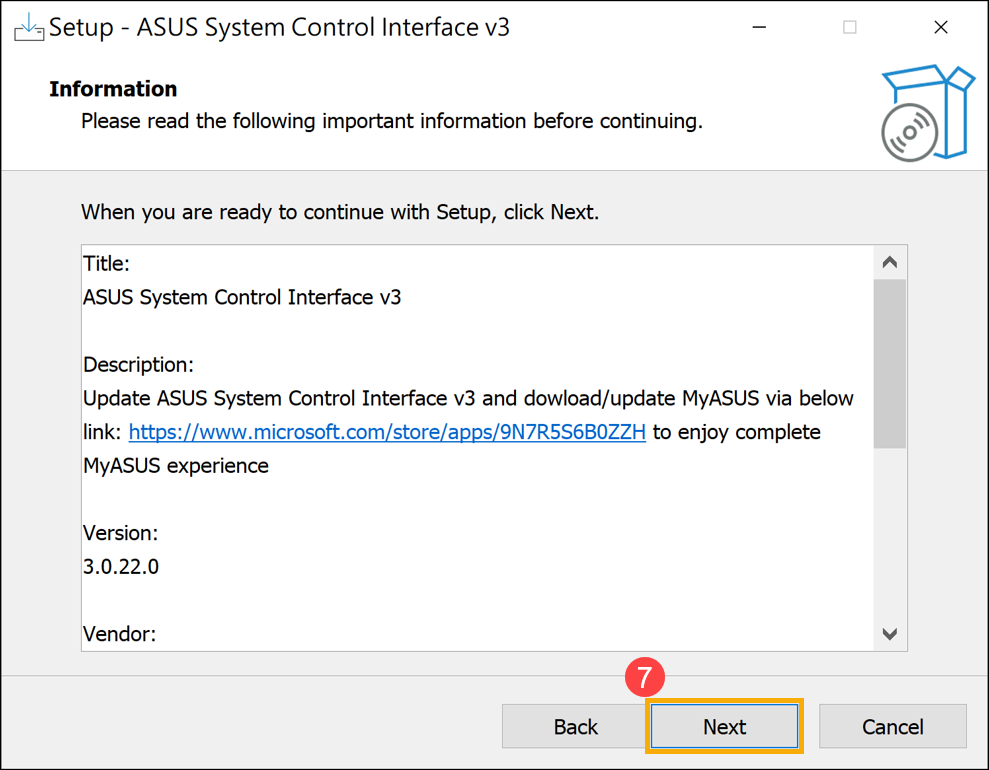
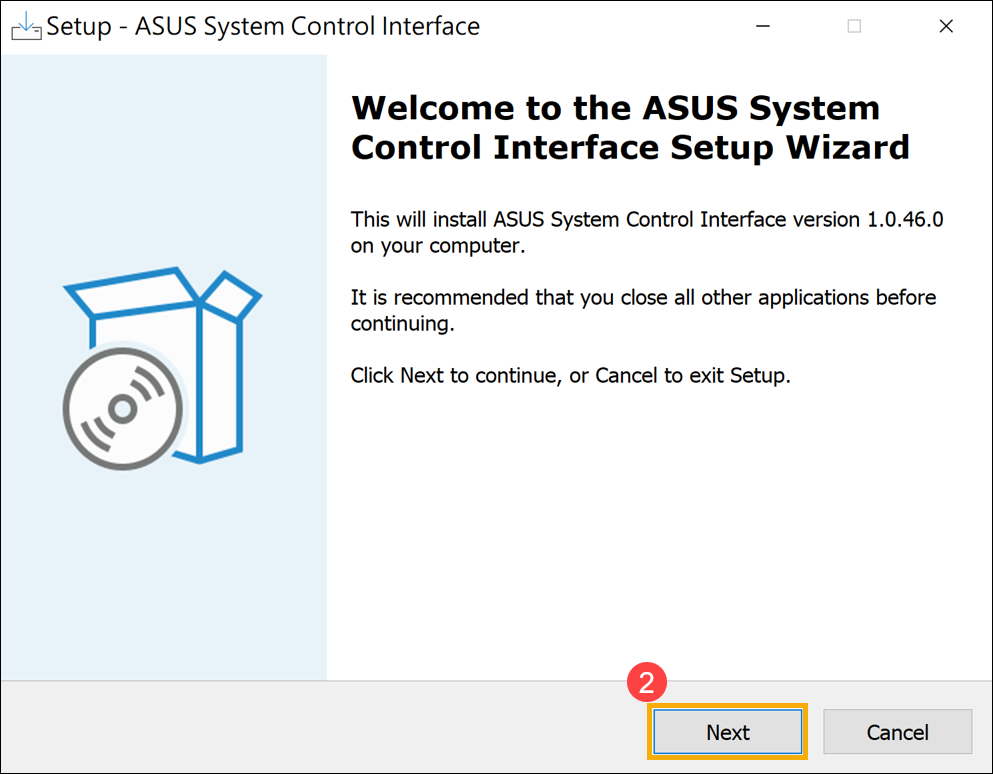
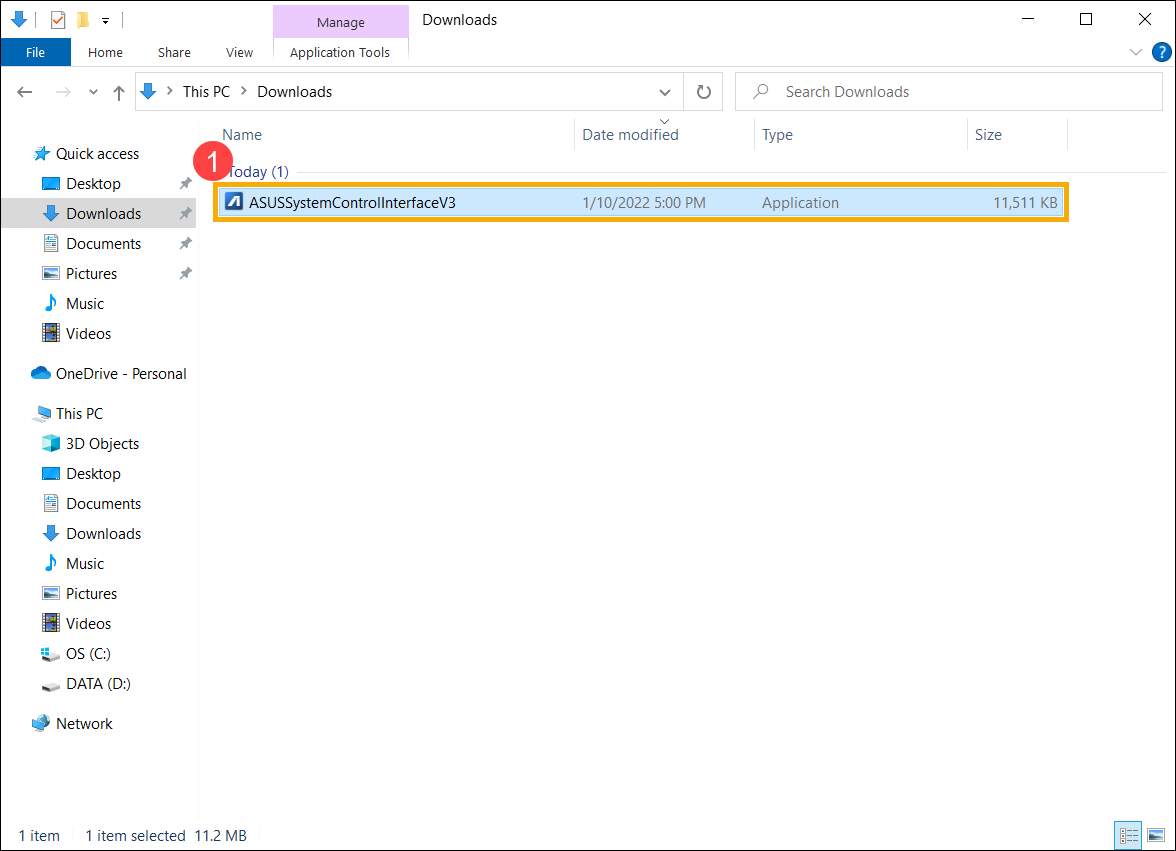
- After downloading the file, double-click on the [ASUSSystemControlInterfaceV3.exe] file to start the installation①.
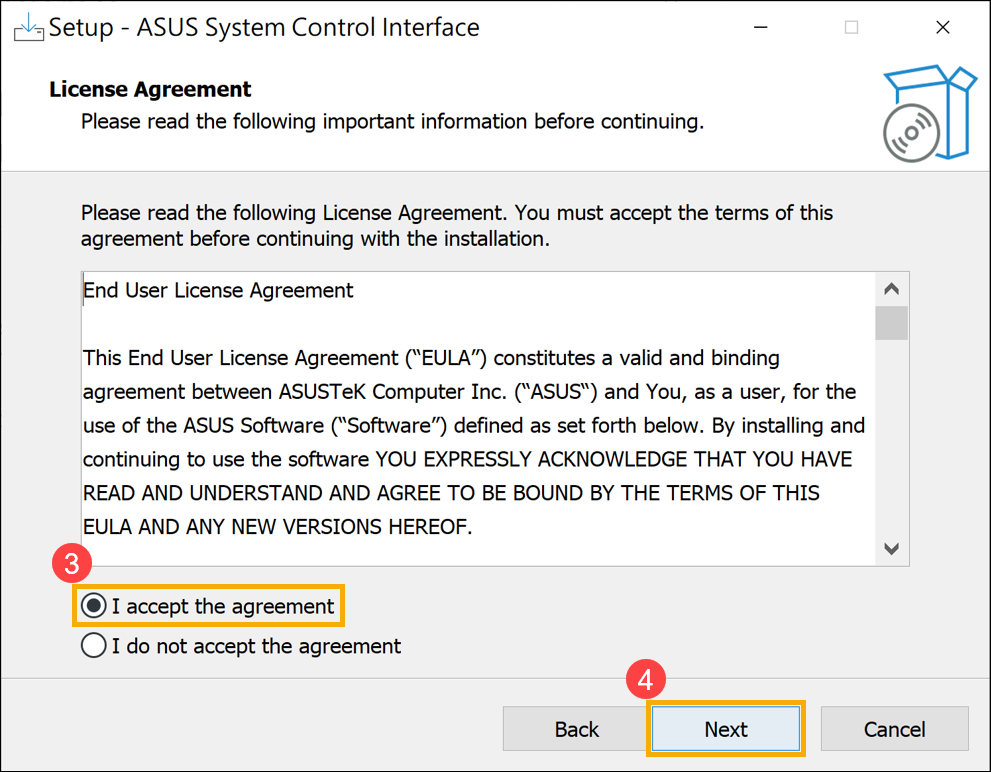
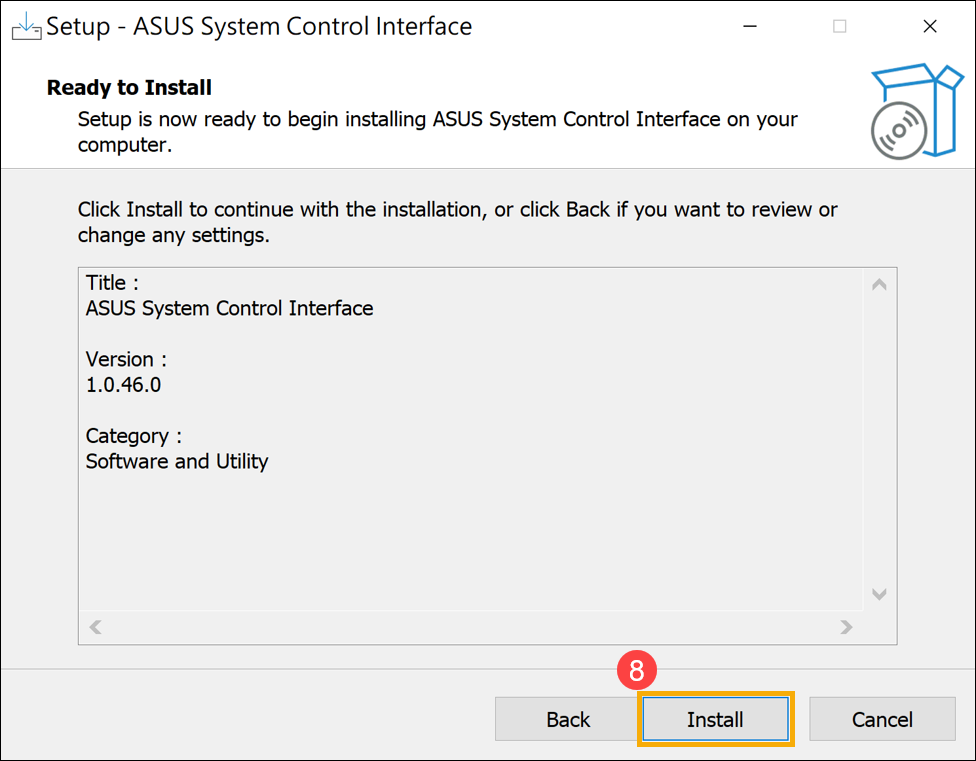
- Follow the indicator to accept the license agreement and process the installation.
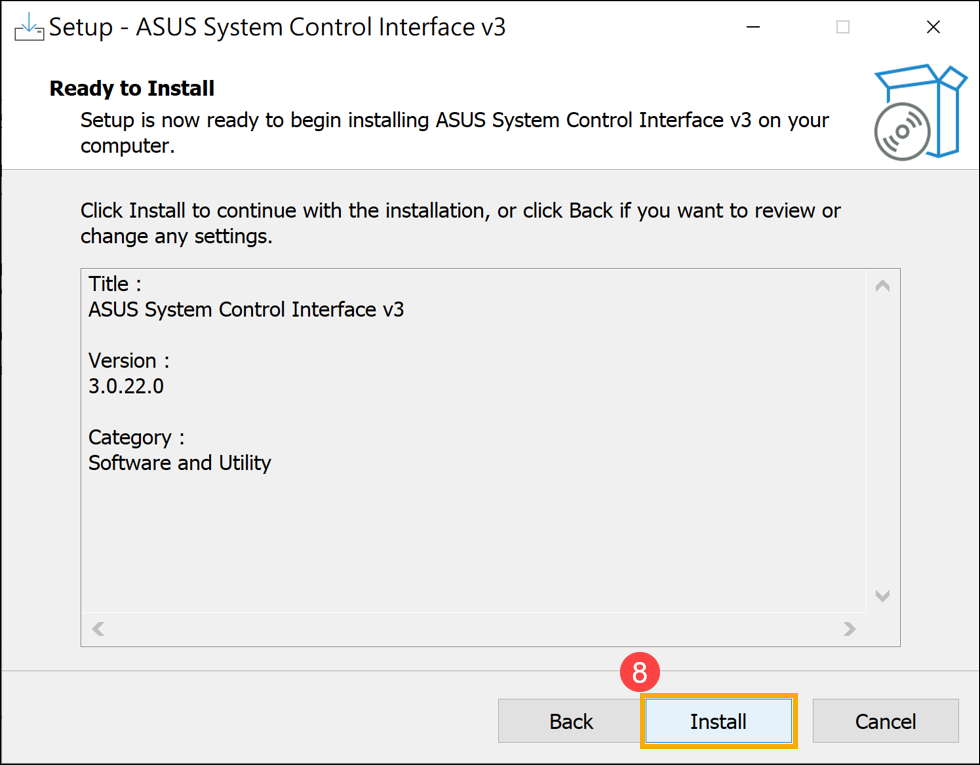
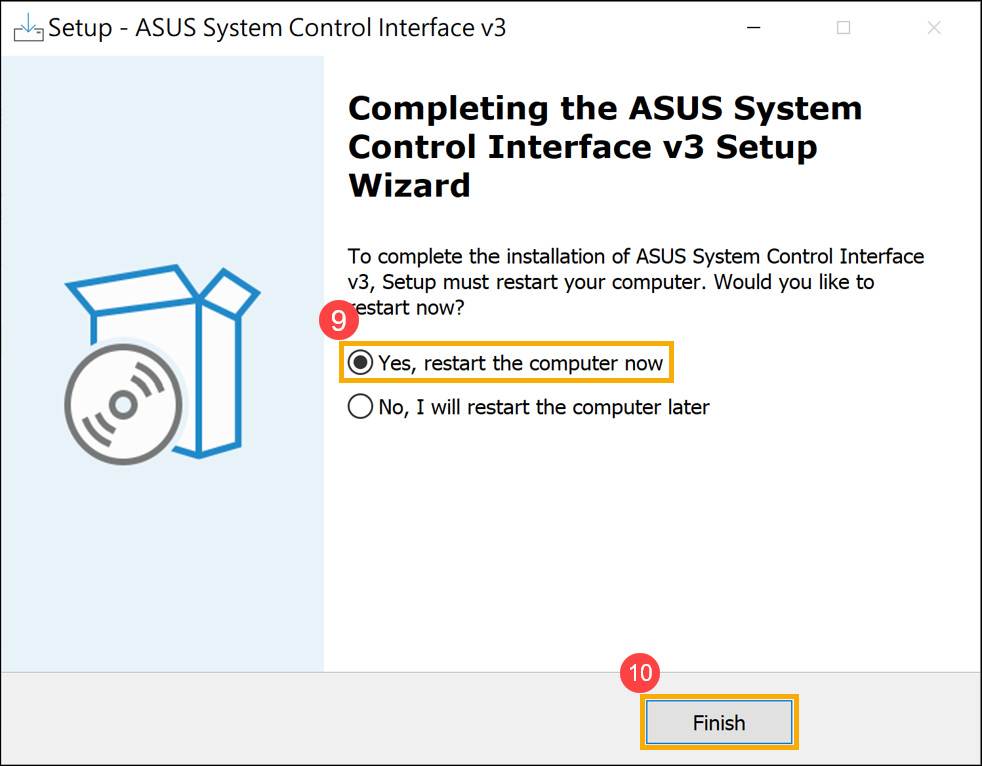
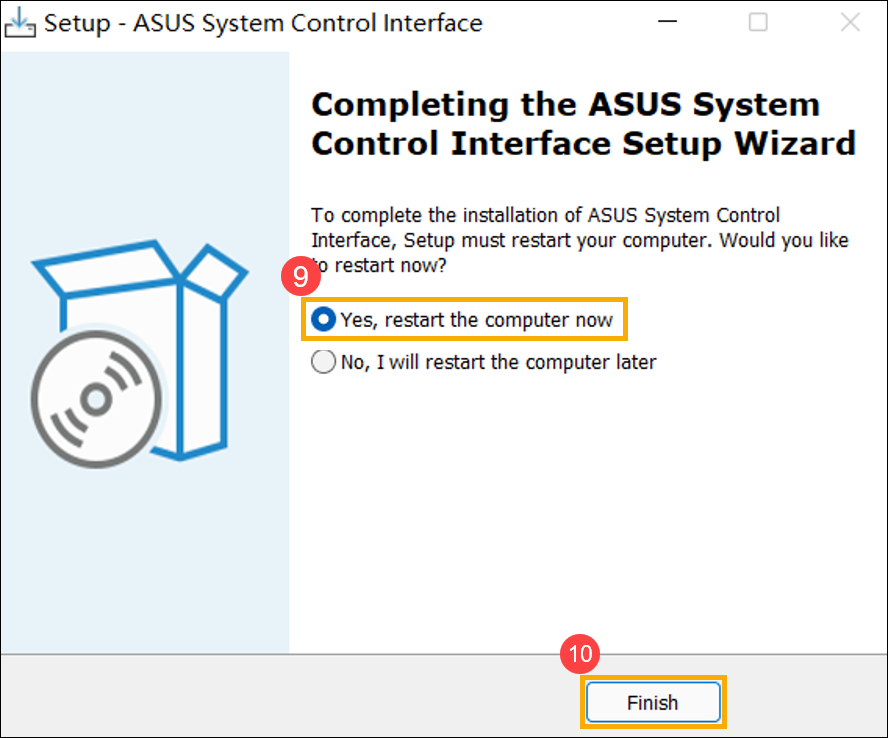
- Click [Finish]⑩ and restart your device to complete the installation.
- After reboot, right-click on the [Start]
 icon⑪, then select [Device Manager]⑫.
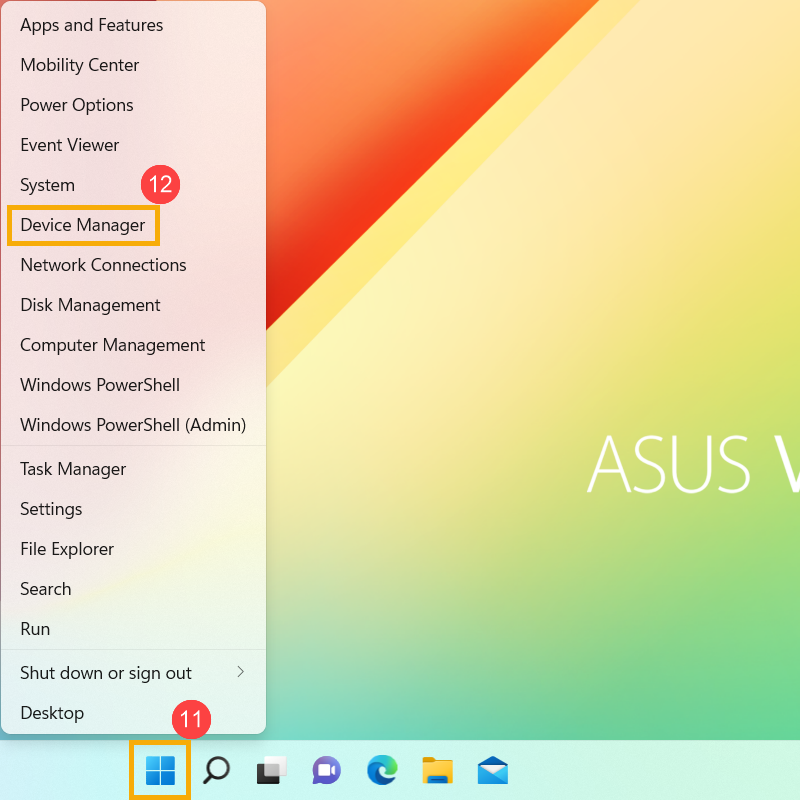
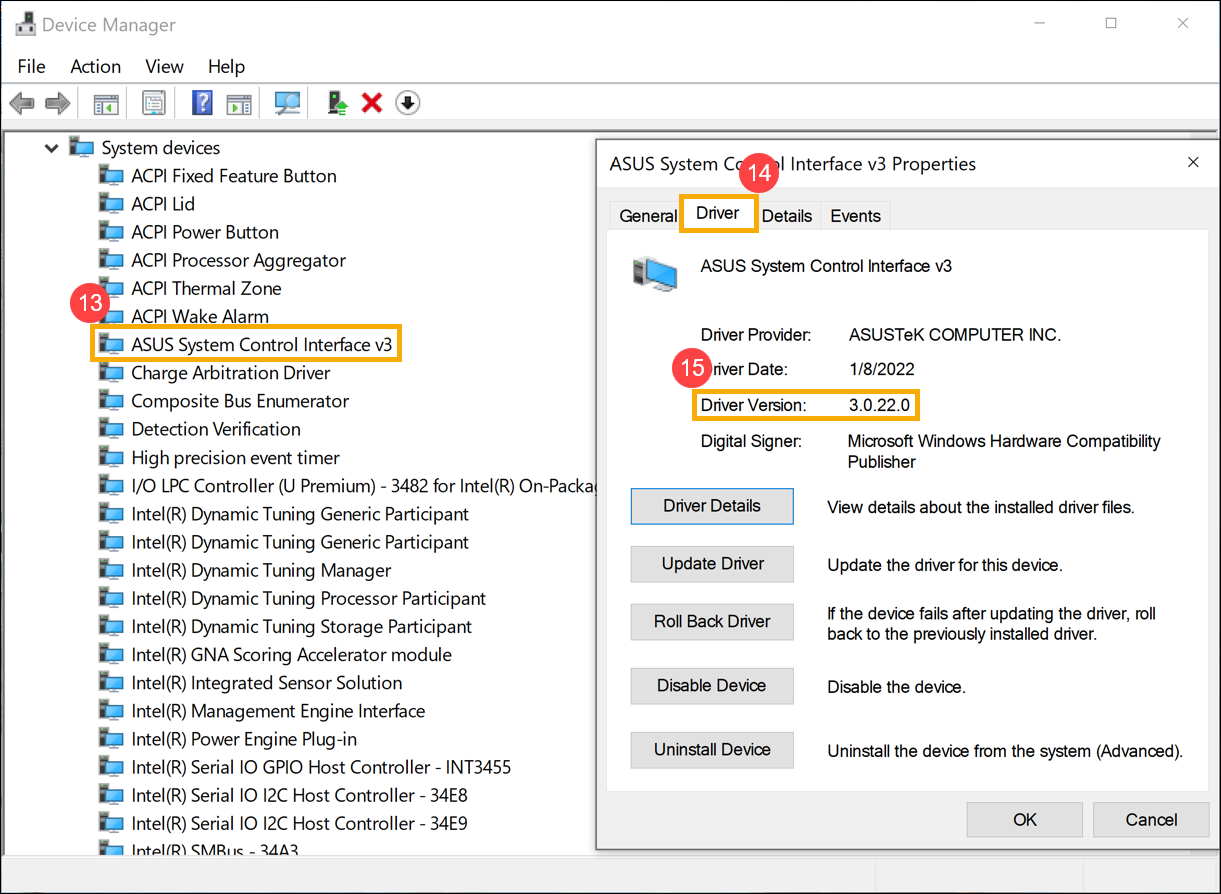
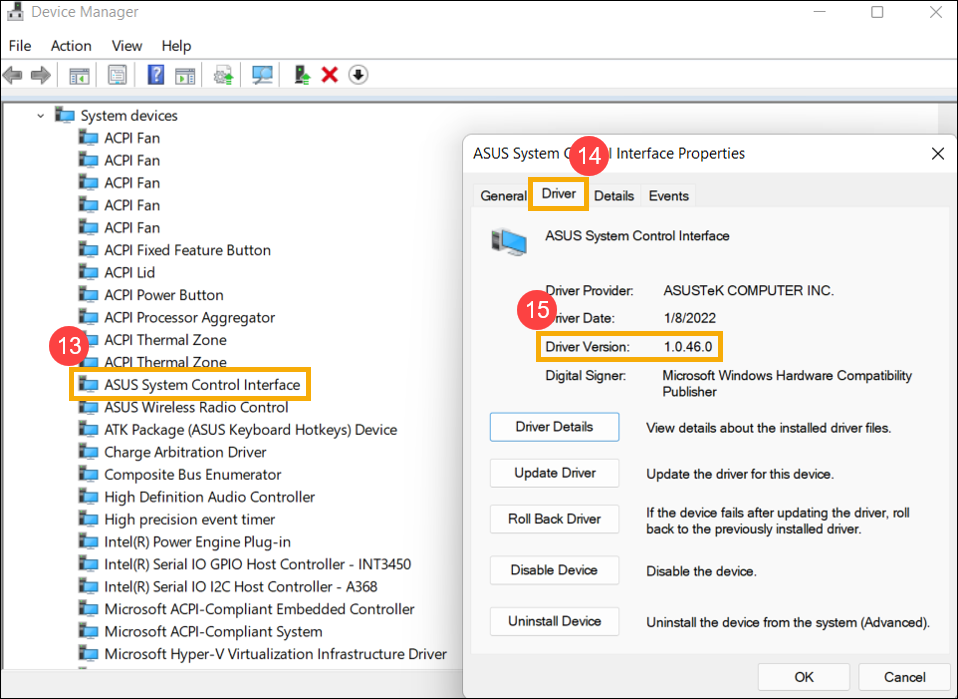
- In the System devices category, double-click on [ASUS System Control Interface]⑬, then select [Driver] tab⑭ to check the [Driver Version]⑮.
- After the installation of ASUS System Control Interface driver is complete, click here to know How to install MyASUS.
Install the latest ASUS System Control Interface V1 driver
Note: The following pictures are the current version as a reference, please download the latest version from the ASUS Support Site.
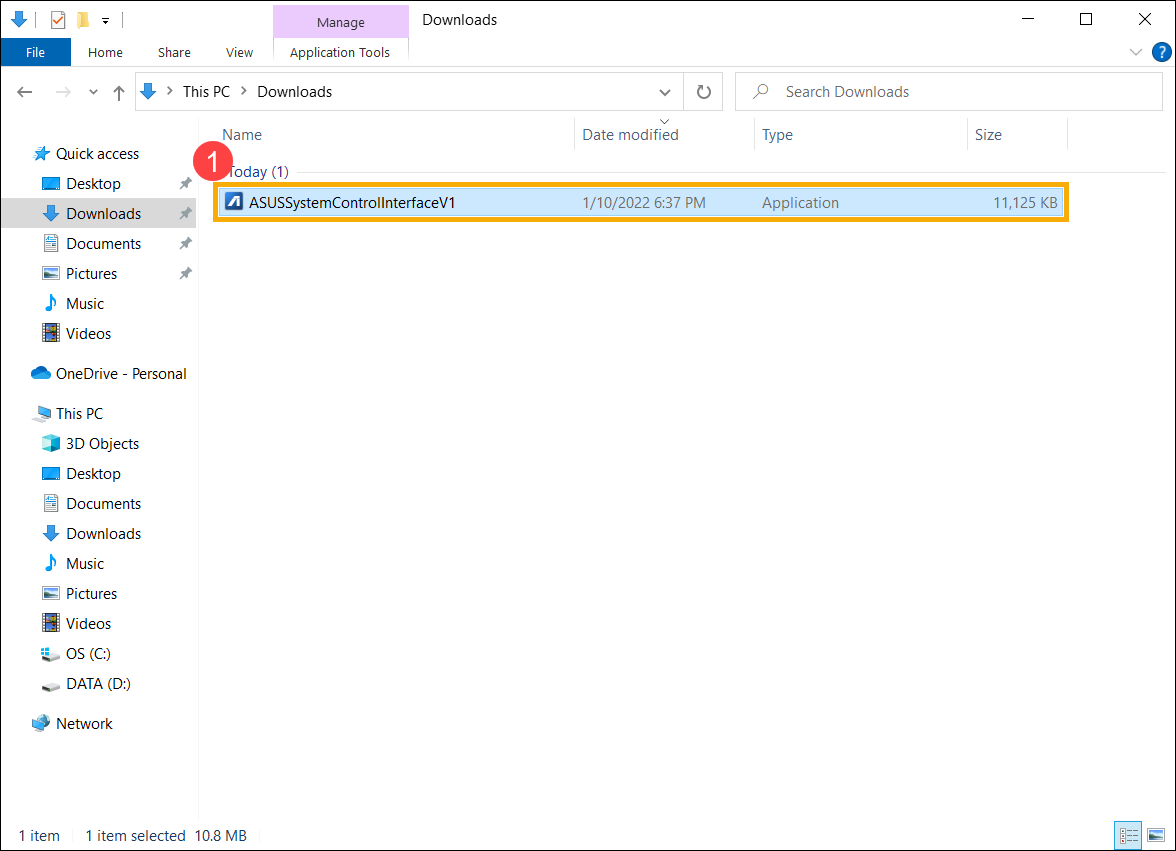
- After downloading the file, double-click on the [ASUSSystemControlInterfaceV1.exe] file to start the installation①.

- Follow the indicator to accept the license agreement and process the installation.


- Click [Finish]⑩ and restart your device to complete the installation.
- After reboot, right-click on the [Start] icon⑪, then select [Device Manager]⑫.
- In the System devices category, double-click on [ASUS System Control Interface]⑬, then select [Driver] tab⑭ to check the [Driver Version]⑮.
- After the installation of ASUS System Control Interface driver is complete, click here to know How to install MyASUS.
Please follow the below steps to search for MyASUS application and install.
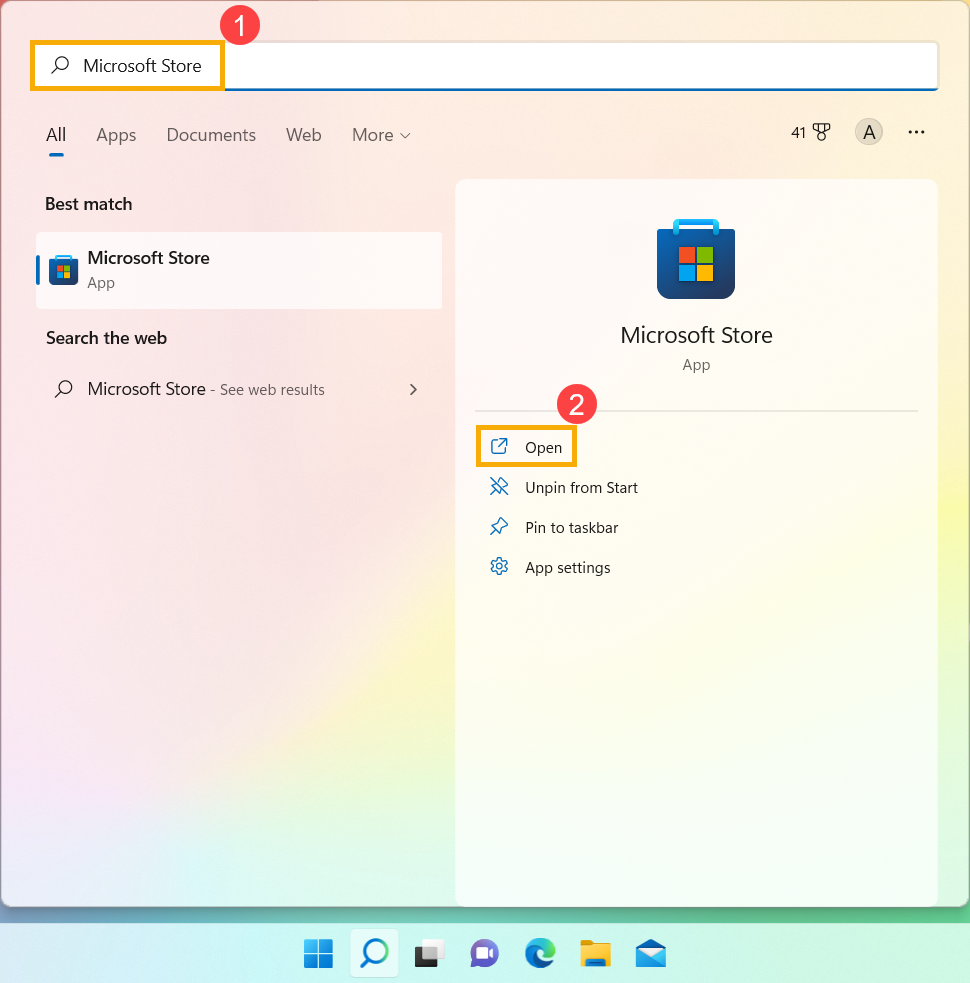
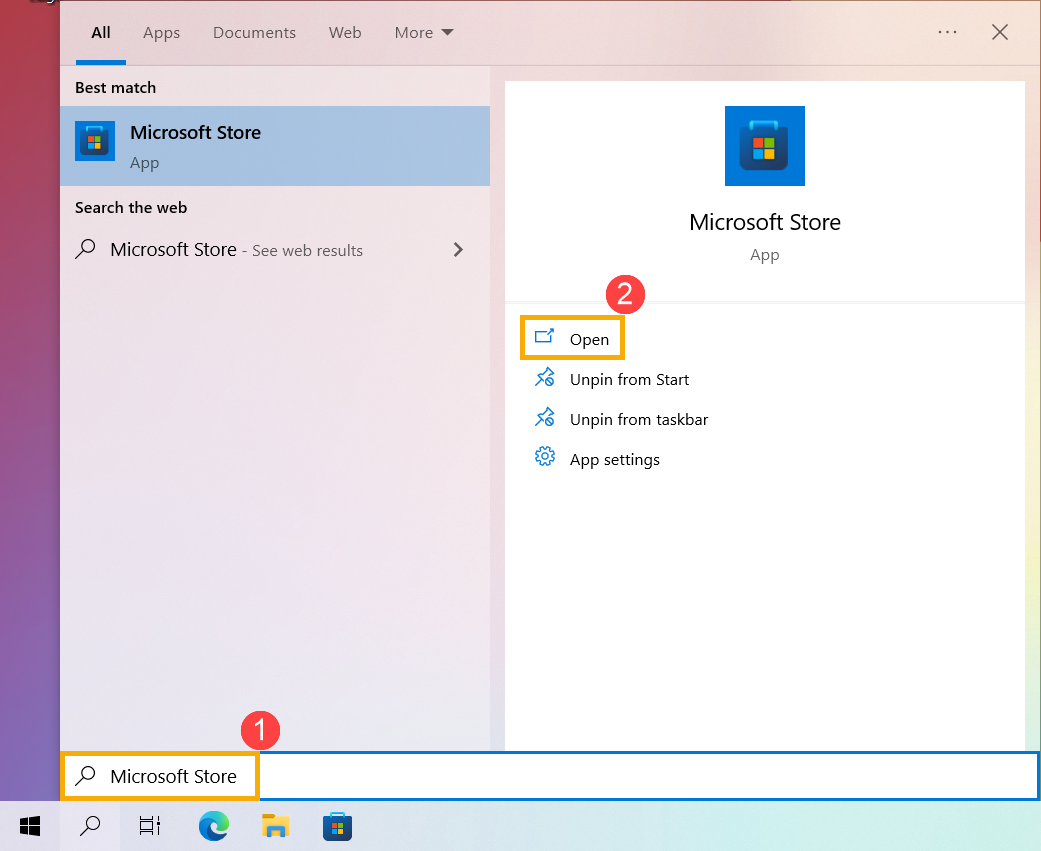
- Type and search [Microsoft Store] in the Windows search bar①, then click [Open]②.
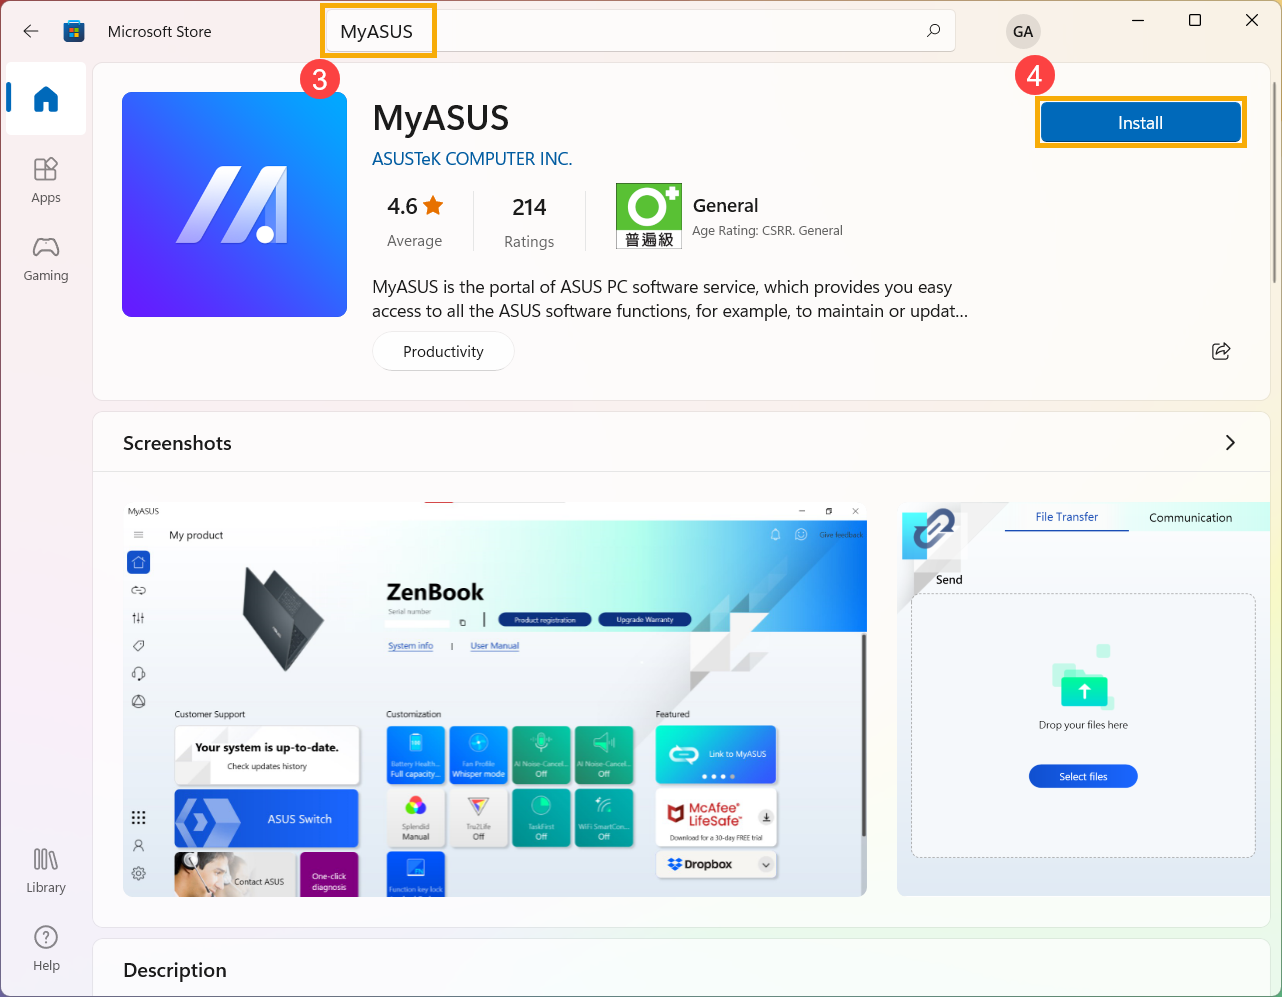
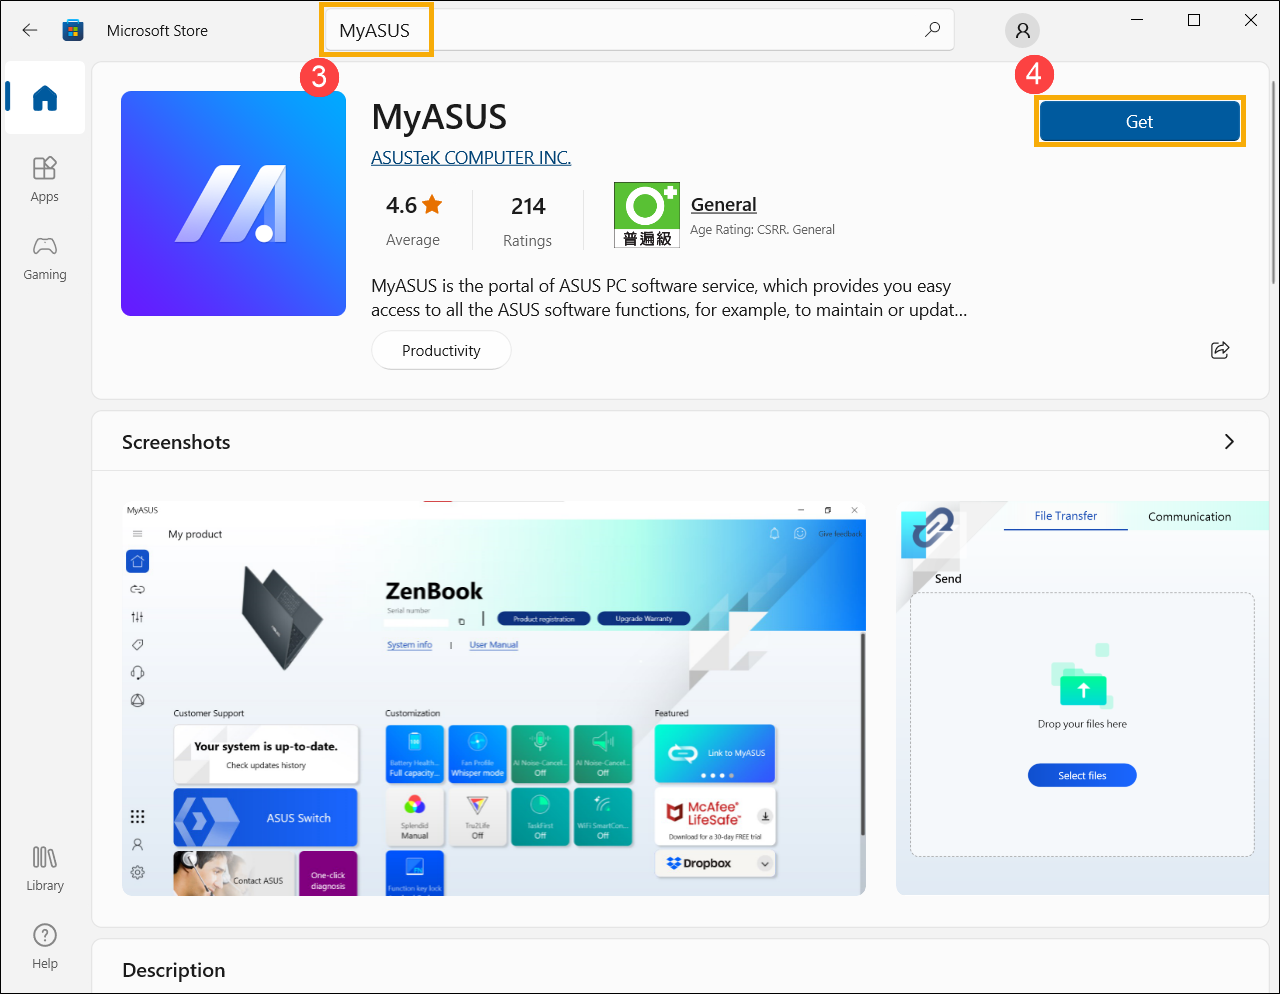
- Type and search [MyASUS] in the Microsoft Store search bar③, then click [Install]④ to start the download and installation of MyASUS.
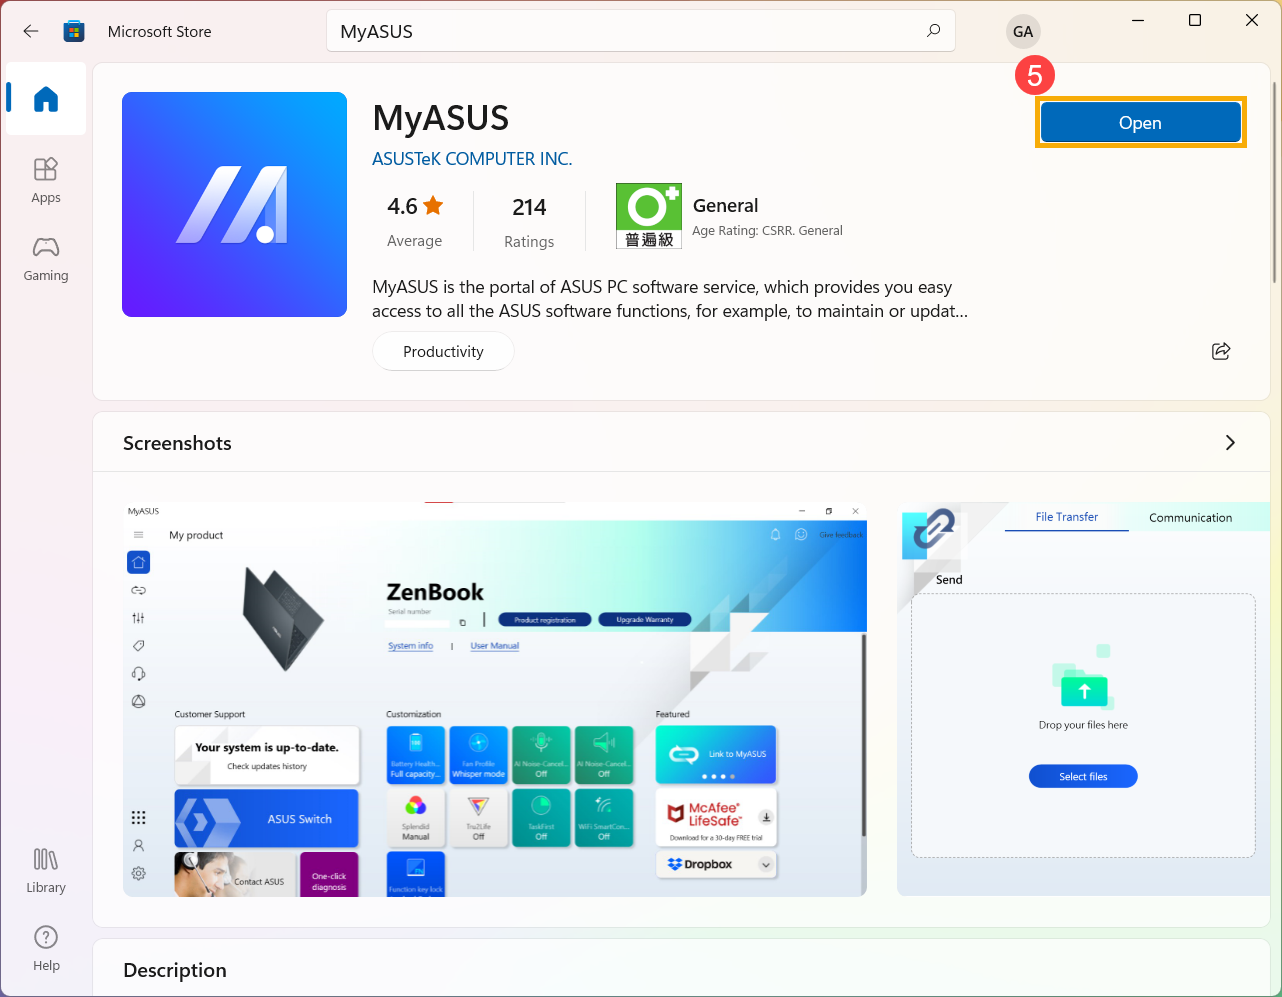
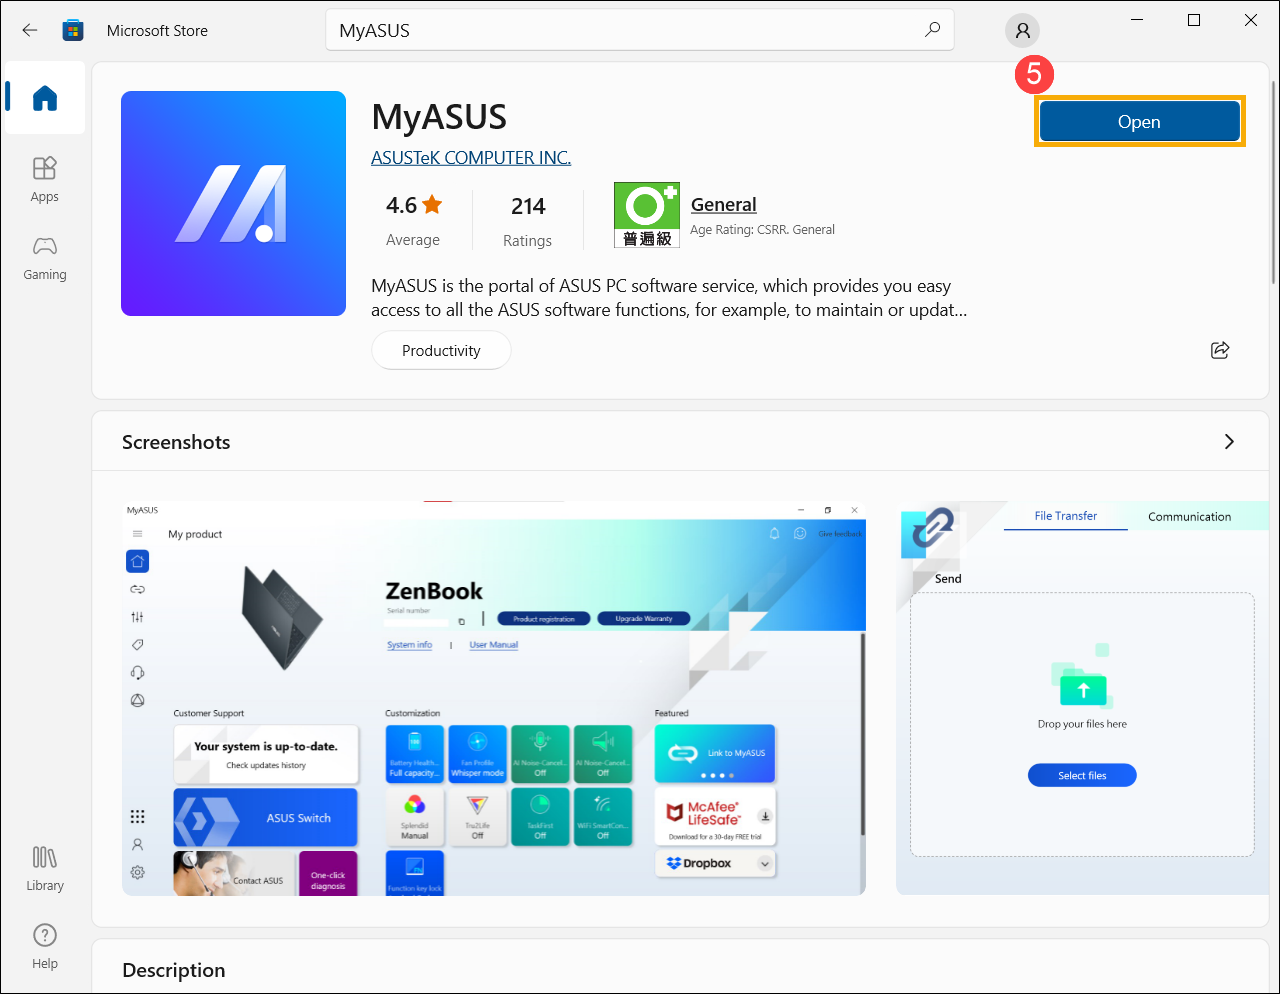
- Please wait until the download and installation is complete. After the installation is done, click [Open]⑤ to enjoy MyASUS.
Download MyASUS now to experience perfect service . Click below!

Before installing MyASUS, you need to check whether your computer had been installed the ASUS System Control Interface driver first, and then start to install MyASUS.
- Type and search [Device Manager] in the Windows search bar①, then click [Open]②.
- Check the arrow next to [System devices]③, then confirm whether the [ASUS System Control Interface] driver had been installed④. (There is V1 or V3 version, depending on different models, and the supported options in MyASUS are determined by this driver version.)
If your computer had been installed this driver, please click here to know How to install MyASUS.
If your computer didn’t install this driver yet, please click here to know How to download and install the ASUS System Control Interface driver.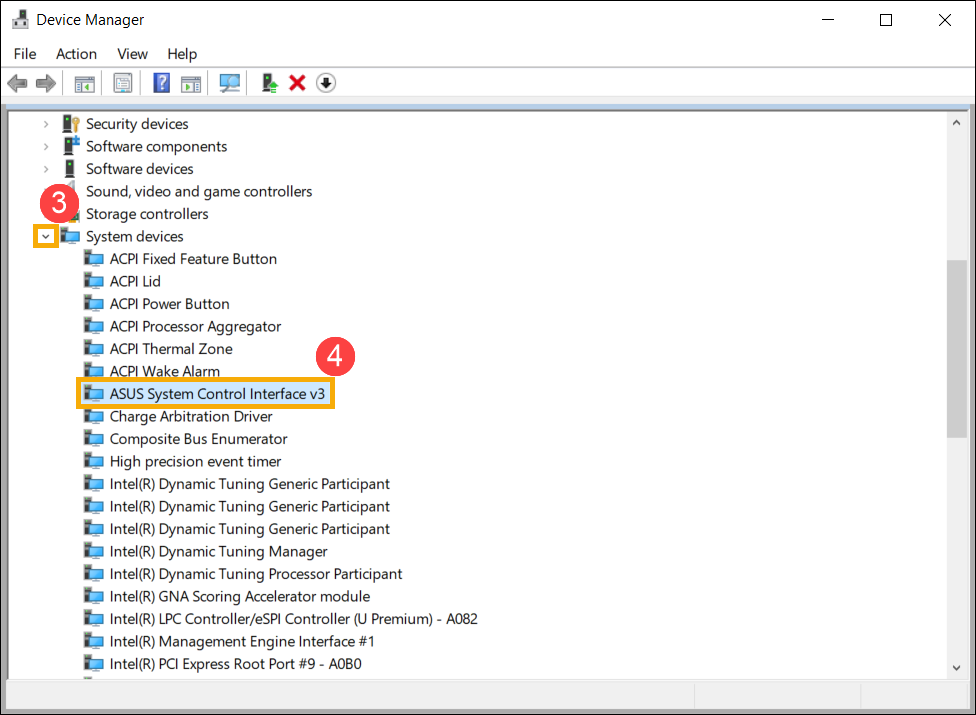
How to download and install the ASUS System Control Interface driver
Please go to the ASUS support site, then download and install the ASUS System Control Interface driver on the Software and Utility category. Here you can learn more about How to search and download drivers.
If you don’t find the ASUS System Control Interface driver on the ASUS support site of your computer model, it means your computer doesn’t support most features in MyASUS. Here you can learn more about Why can I only see the “Customer Support” feature in the MyASUS app.
After the download is complete, please go to the corresponding install instruction based on the driver generation on your computer.
| Driver generation | Support Model | Install Instruction |
| ASUS System Control Interface V3 | Model list | Click to paragraph |
| ASUS System Control Interface V1 | Model list | Click to paragraph |
Install the latest ASUS System Control Interface V3 driver
Note: The following pictures are the current version as a reference, please download the latest version from the ASUS Support Site.
- After downloading the file, double-click on the [ASUSSystemControlInterfaceV3.exe] file to start the installation①.
- Follow the indicator to accept the license agreement and process the installation.
- Click [Finish]⑩ and restart your device to complete the installation.
- After reboot, right-click on the [Start]
 icon⑪, then select [Device Manager]⑫.
- In the System devices category, double-click on [ASUS System Control Interface]⑬, then select [Driver] tab⑭ to check the [Driver Version]⑮.
- After the installation of ASUS System Control Interface driver is complete, click here to know How to install MyASUS.
Install the latest ASUS System Control Interface V1 driver
Note: The following pictures are the current version as a reference, please download the latest version from the ASUS Support Site.
- After downloading the file, double-click on the [ASUSSystemControlInterfaceV1.exe] file to start the installation①.
- Follow the indicator to accept the license agreement and process the installation.
- Click [Finish]⑩ and restart your device to complete the installation.
- After reboot, right-click on the [Start] icon⑪, then select [Device Manager]⑫.
- In the System devices category, double-click on [ASUS System Control Interface]⑬, then select [Driver] tab⑭ to check the [Driver Version]⑮.
- After the installation of ASUS System Control Interface driver is complete, click here to know How to install MyASUS.
Please follow the below steps to search for MyASUS application and install.
Note: System requirement is Windows 10 RS3 (version 1709) or later version.
- Type and search [Microsoft Store] in the Windows search bar①, then click [Open]②.
- Type and search [MyASUS] in the Microsoft Store search bar③, then click [Get]④ to start the download and installation of MyASUS.
- Please wait until the download and installation is complete. After the installation is done, click [Open]⑤ to enjoy MyASUS.
Download MyASUS now to experience perfect service . Click below!
https://www.asus.com/support/myasus-deeplink/
[Phone] How to download MyASUS app?
You can get MyASUS app for your devichttps://www.asus.com/support/myasus-deeplink/e from the Google Play Store app. The Play Store app comes pre-installed on the Android devices that support Google Play.
Download MyASUS app from Google Play Store
1. Tap the " Play Store app "。
2. The app will open and you can search for MyASUS and download.
Download MyASUS app from App Store ( iOS )
To download MyASUS app from the App Store, you need an Apple ID. Your Apple ID is the account that you use to access Apple services.
If you've used other Apple services like iCloud, sign in to the App Store with the same Apple ID. If you don't have an Apple ID, you can create one.
On the homepage of App Store > Click "Search" at the right bottom corner, then you can input "MyASUS" to search for the app.
When you find MyASUS app, download it to your device:
1. Tap on the MyASUS app to view the product page of MyASUS app.
2. To get MyASUS app, tap Get.
[Notebook] How to update MyASUS?
When a new version of MyASUS is available for download, you will find the update notice after enabling MyASUS. (As shown below)
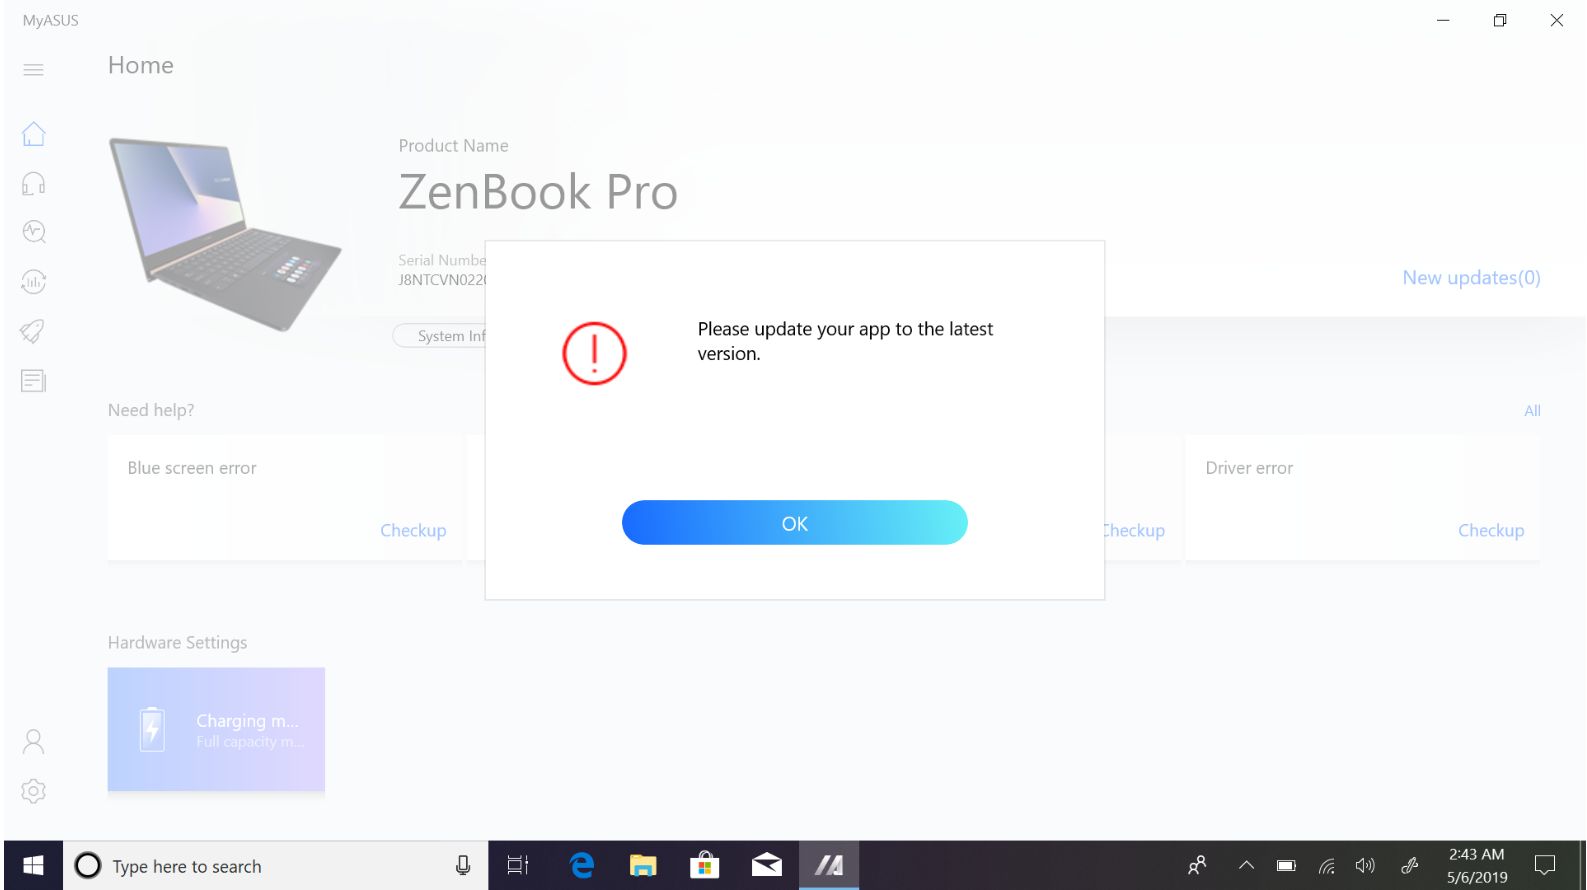
Click OK and you will be directed to the Microsoft Store page. Please download the new version of MyASUS from the Microsoft Store.
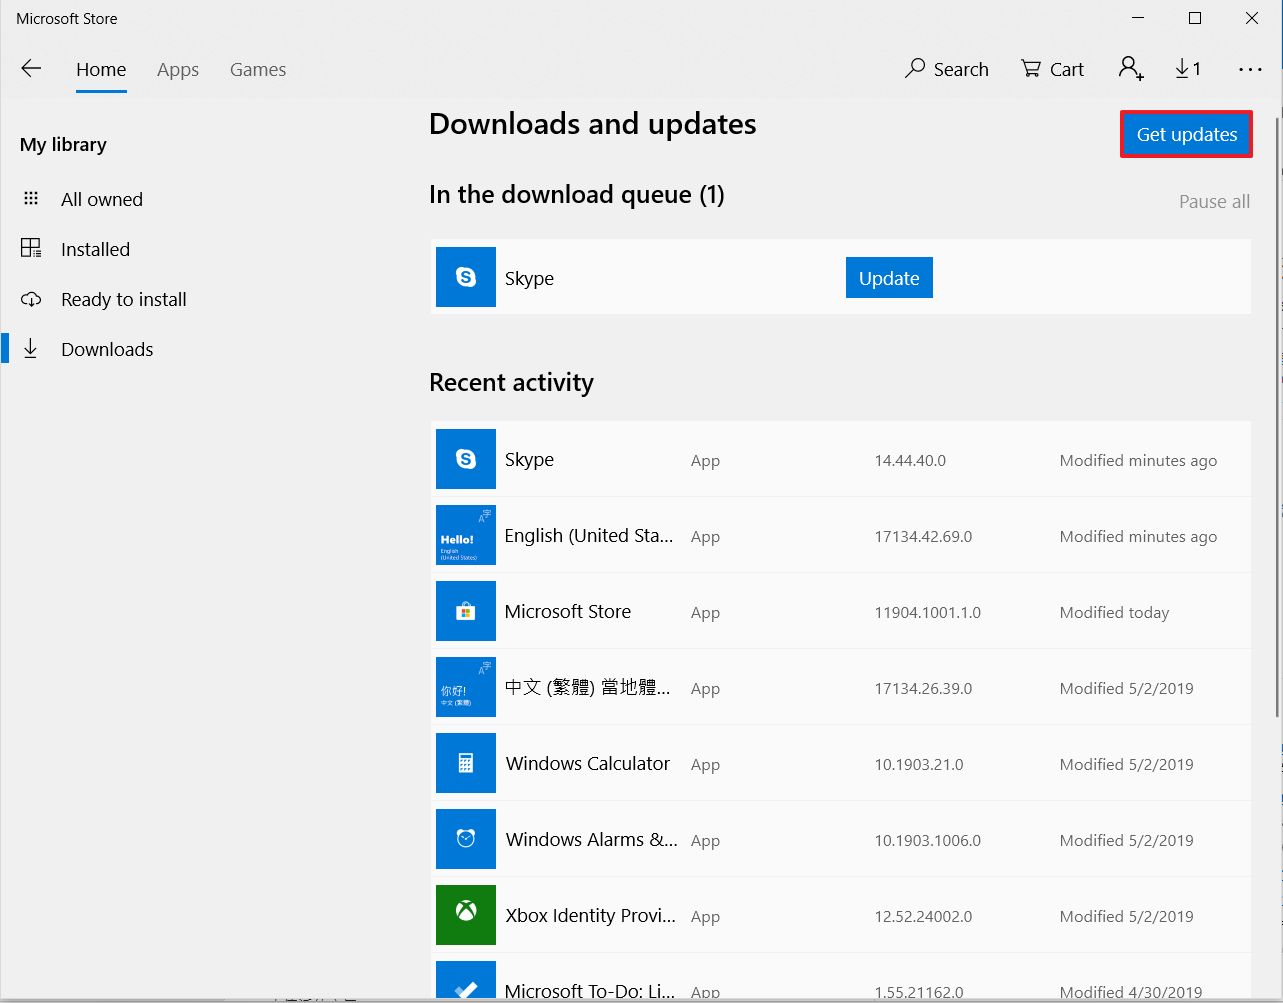
Also, you can click the menu icon at the top right and choose Downloads and Updates to see if there is any later version for downloading.
1. Click  at the top right and choose Downloads and Updates.
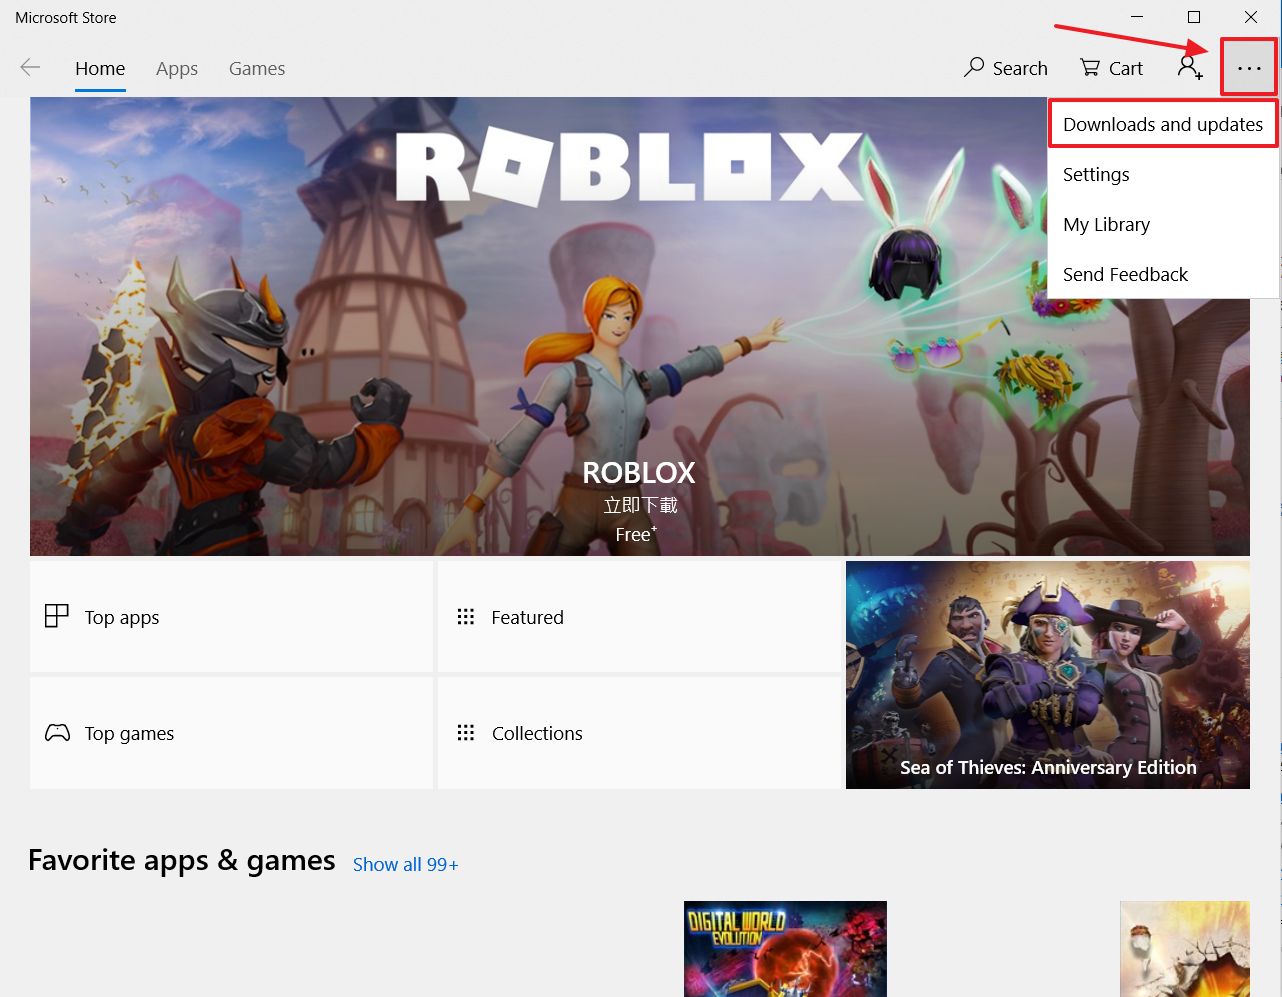
2. Click Get Updates to automatically download and install the latest version of MyASUS whenever detected.
You can update the drivers via the Windows update ,and also update MyASUS app from the Windows Store.
Reference : How to use Windows Update in OS system?
[Notebook] MyASUS - Why can I only see the partial features in the MyASUS app?
When you download MyASUS from the Microsoft Store, you may find it only supports partial functions, excluding System diagnosis, System Update, and Device Settings.
It is because your product does not equip with ASUS System Control Interface driver or the driver version does not support the full functionality of MyASUS.
If your model supports V3 driver, please click here to download the Install Wizard to help you install the driver.
For more information, please refer to the below table:
Note: If you are unsure about the product model, please refer to How to Find Your Model Name for guidance.
| MyASUS 4.0 functions | Without ASUS System Control Interface | With ASUS System Control Interface V1 | With ASUS System Control Interface V3 | |
| Model supported | ||||
| Tutorial | V | V | V | |
| System Info | V | V | V | |
| Announcements | V | V | V | |
| Feedback Hub | V | V | V | |
| One-click Settings | N/A | N/A | V | |
| Upgrade Warranty | V | V | V | |
| System Diagnosis | N/A | V | V | |
| System Update | N/A | V | V | |
| Featured | V | V | V | |
| N/A | V | V | ||
| N/A | V | V | ||
| N/A | V | V | ||
| V | V | V | ||
| ASUS Apps & Deals | Apps | V | V | V |
| N/A | V | V | ||
| AppDeals | N/A | V | V | |
| Message Center | News | V | V | V |
| Announcements | V | V | V | |
| FAQ | V | V | V | |
| Contact ASUS | V | V | V | |
| Repair services | V | V | V | |
| V | V | V | ||
| V | V | V | ||
You can check the version of [ASUS System Control Interface] from [Device Manager] > [System Devices].
If you cannot find ASUS System Control Interface in Device Manager, it means your device belongs to old model and MyASUS only supports ASUS Promotion and limited Customer Support.
To get more information about drivers and MyASUS installation, please refer to [Notebook] How to install MyASUS application.
Check and Update the version of MyASUS as well as ASUS System Control Interface
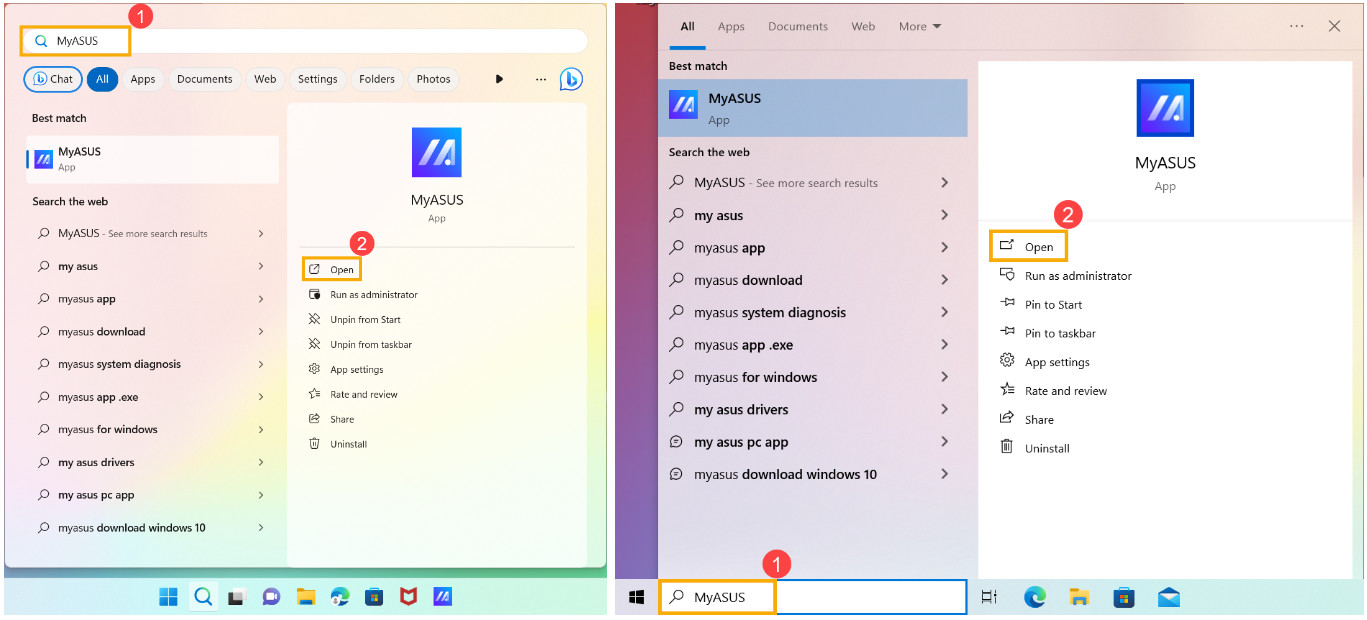
- Type and search [MyASUS] in the Windows search bar①, then click [Open]②. (The left-side illustration below is in Windows 11, and the right-side is Windows 10.)
- In MyASUS, click the [Settings] from the left menu③, and then select [About] from the top④, you will find the Current Version of MyASUS and ASUS System Control Interface⑤.
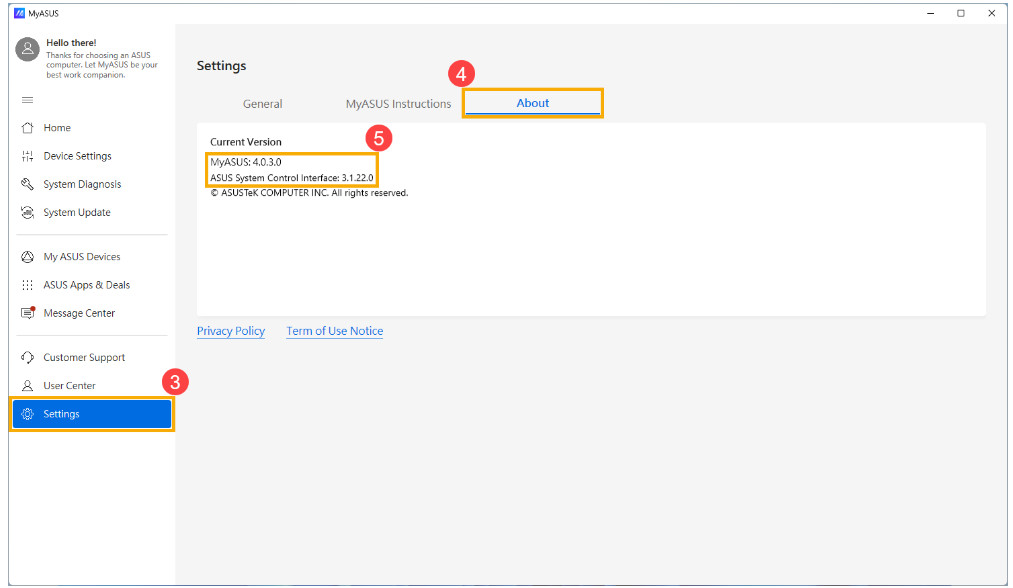
- You can update MyASUS via Microsoft Store, here you can learn more about How to update MyASUS.
You can update ASUS System Control Interface driver via Windows Update, here you can learn more about How to execute Windows Update. Or, update it manually, learn more about How to search and download drivers.
Download MyASUS now to experience perfect service. CLICK https://www.asus.com/support/myasus-deeplink/
[Notebook/Desktop/AIO] MyASUS System Diagnosis - Reset my PC and create a recovery drive
When you use MyASUS system diagnosis and have followed the troubleshooting suggestions provided by MyASUS, and the device still persists with issues, you can refer to this article to perform a device reset or create a system recovery drive. Learn more about the introduction of System reset and Recovery drive.
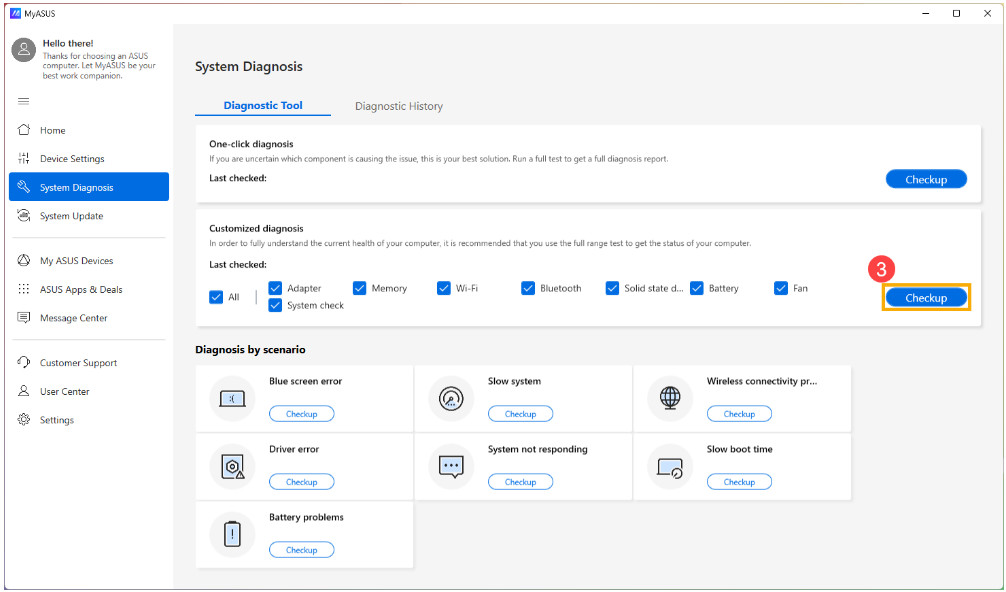
1.After entering MyASUS, click on the [System Diagnosis] from the left menu①. Select the section you want to test② and click [Checkup]③. 

2.As soon as the test is completed, click on the [Result]④. 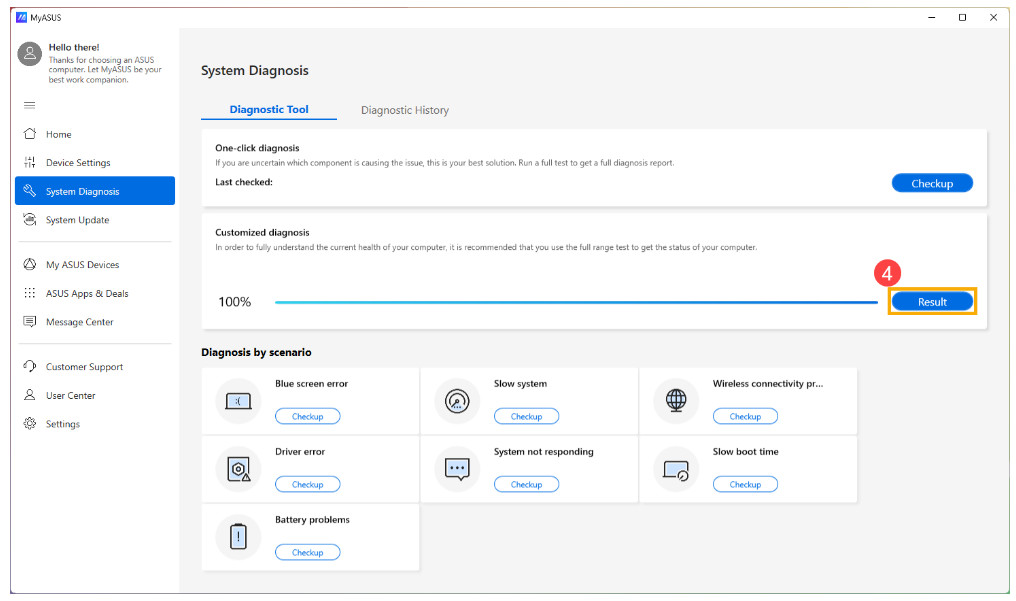
3.After checking the result, go to [Diagnostic History]⑤ and click [Get Started]⑥ on the Reset my PC section. 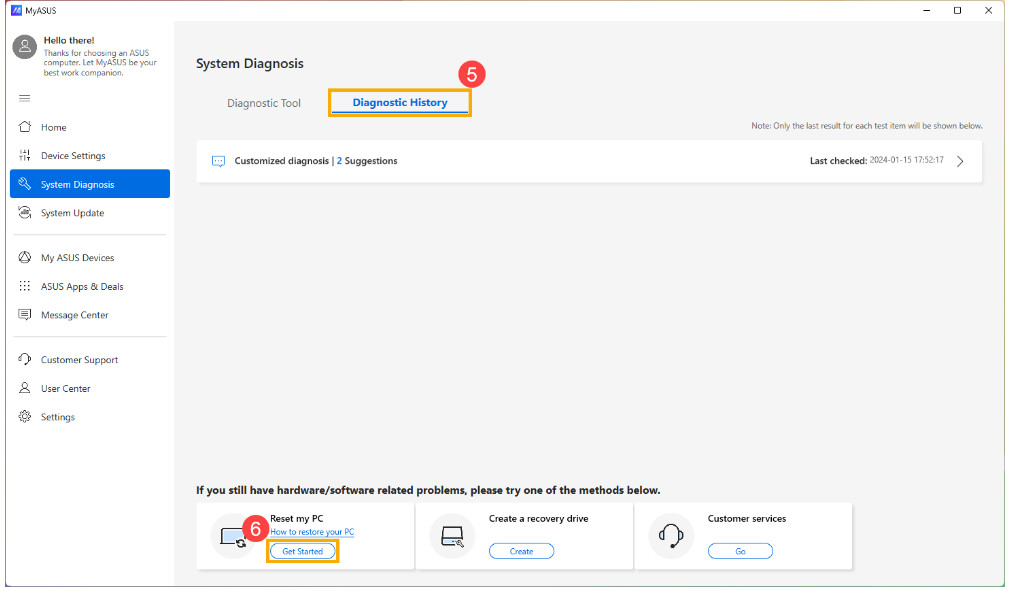
4.After clicking 「Get Started」, the system will run system repair before resetting your device.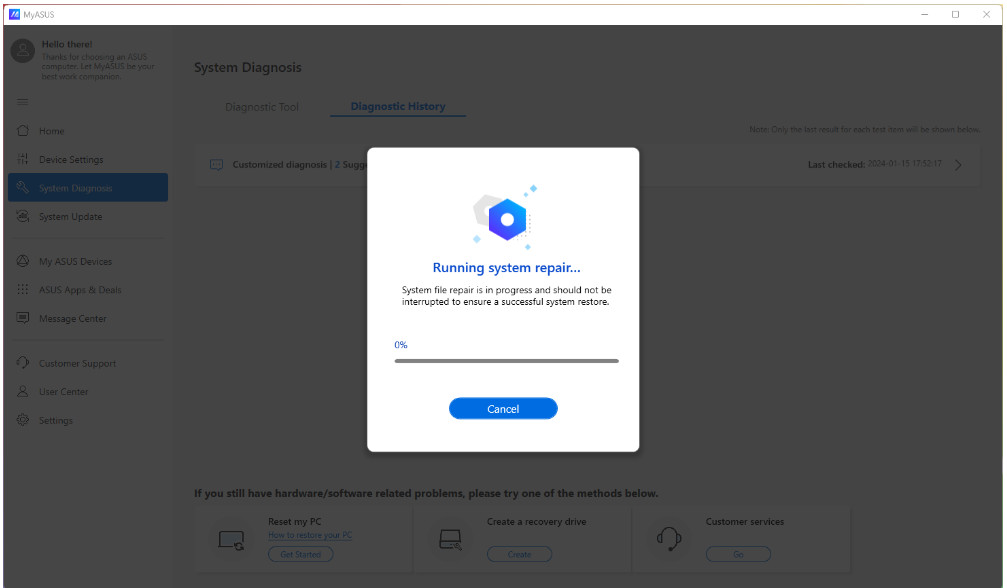
5.When system repair is completed, click [Reset my pc]⑦. 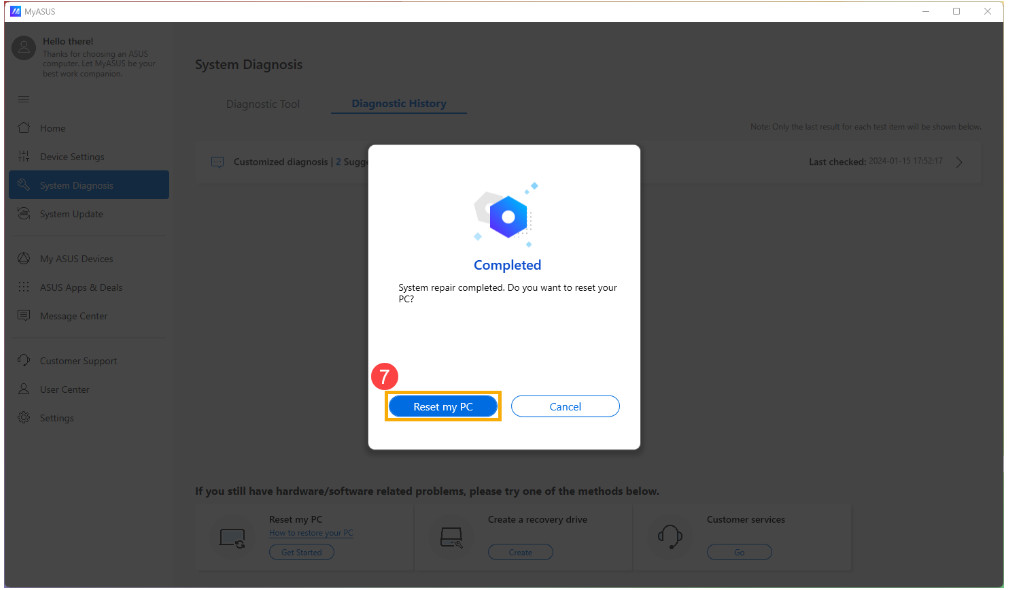
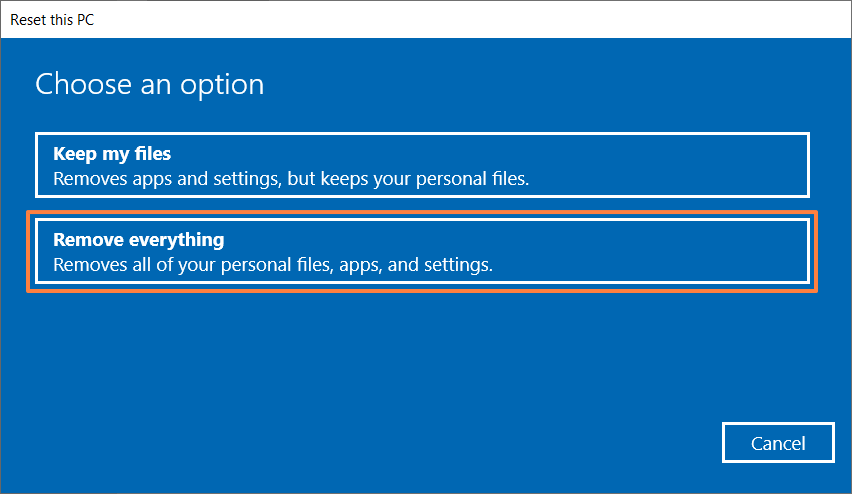
6.The following step will delete all the personal files. Please be sure to back up all your files if necessary. Click on [Remove everything]⑧.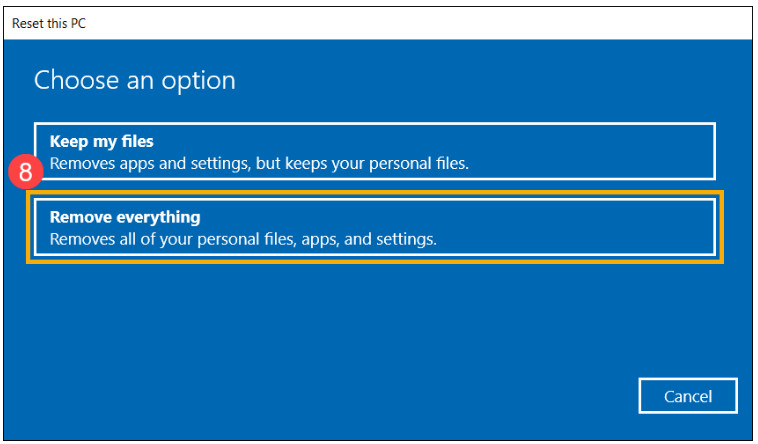
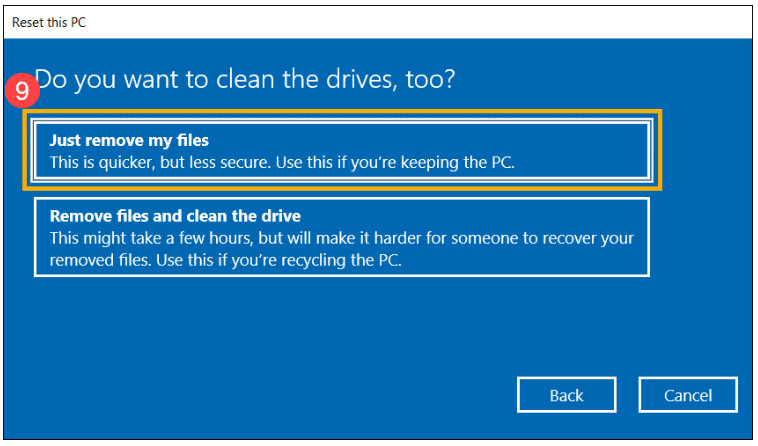
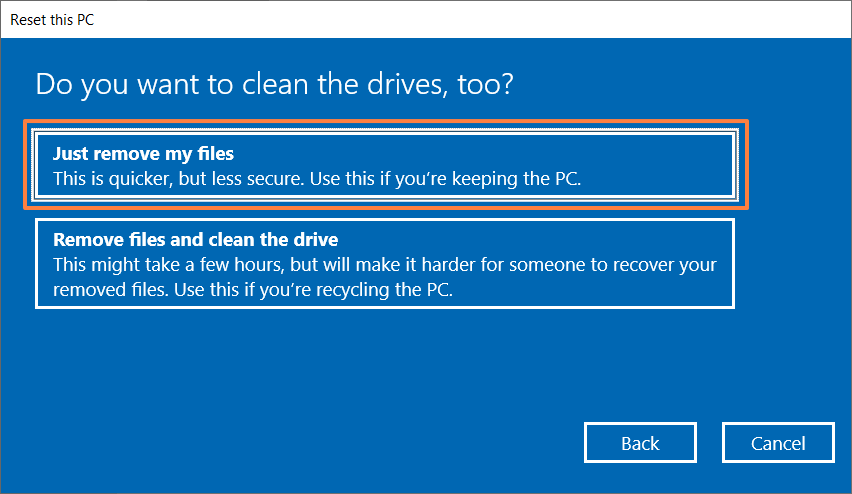
7.Click [Just remove my files]⑨.
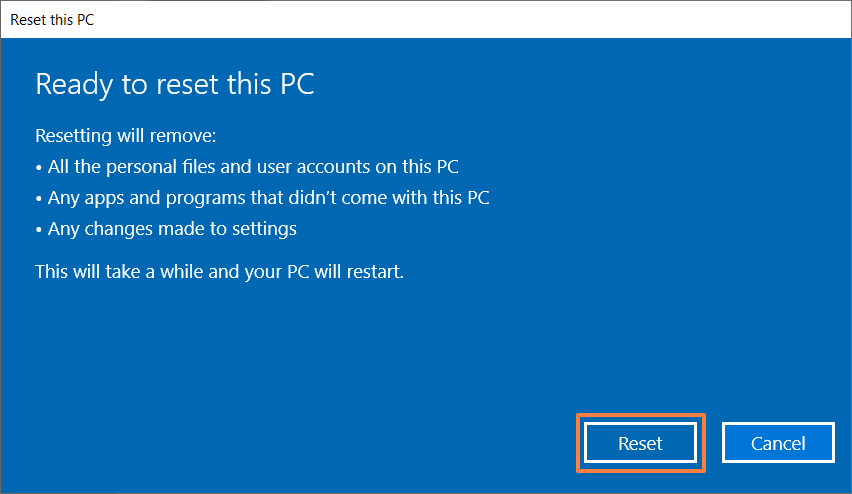
8.Click [Reset]⑩ to start resetting the PC, then the system will restart for several times. As soon as it's completed, the PC will start the initialization. 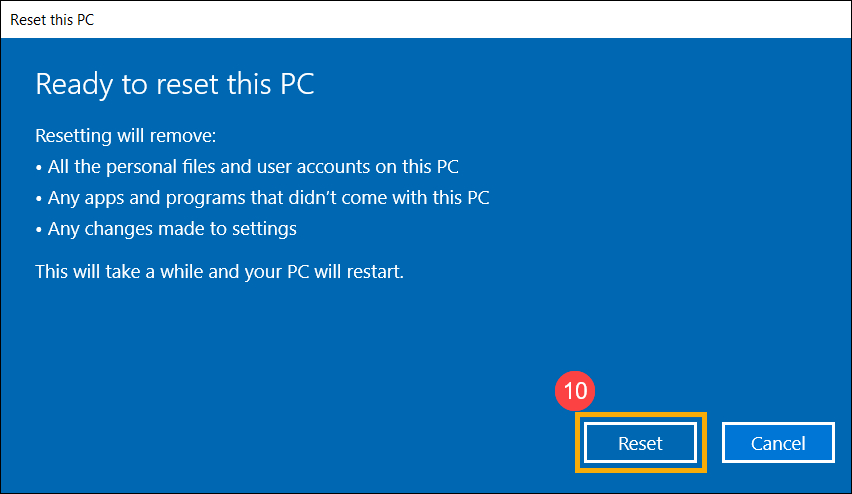
1.After entering MyASUS, click on the [System Diagnosis] from the left menu①. Select the section you want to test② and click [Checkup]③. 
2.As soon as the test is completed, click on the [Result]④. 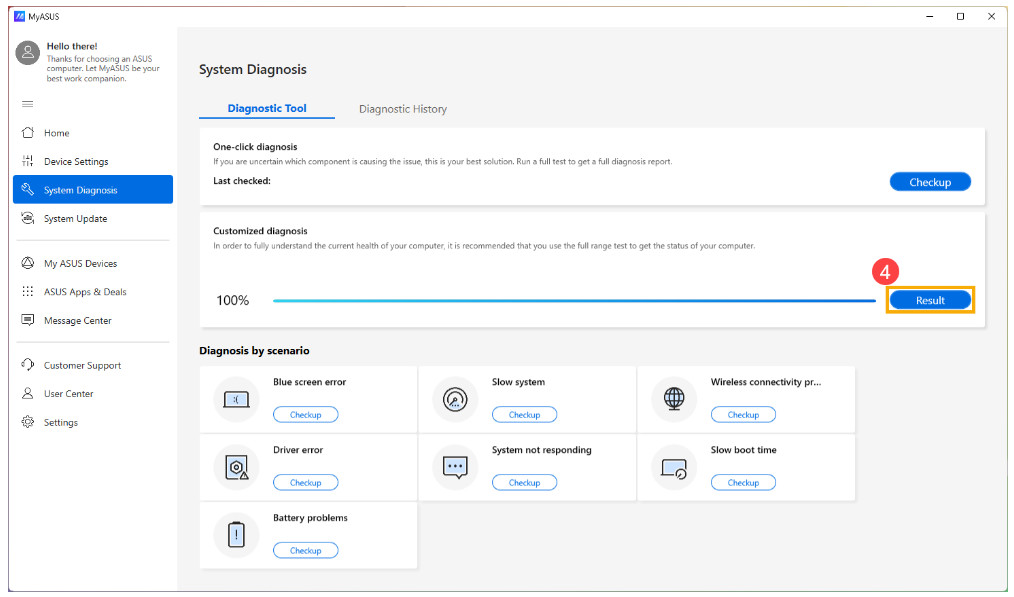
3.After checking the result, go to [Diagnostic History]⑤ and click [Create]⑥ on the Create a recovery drive section. 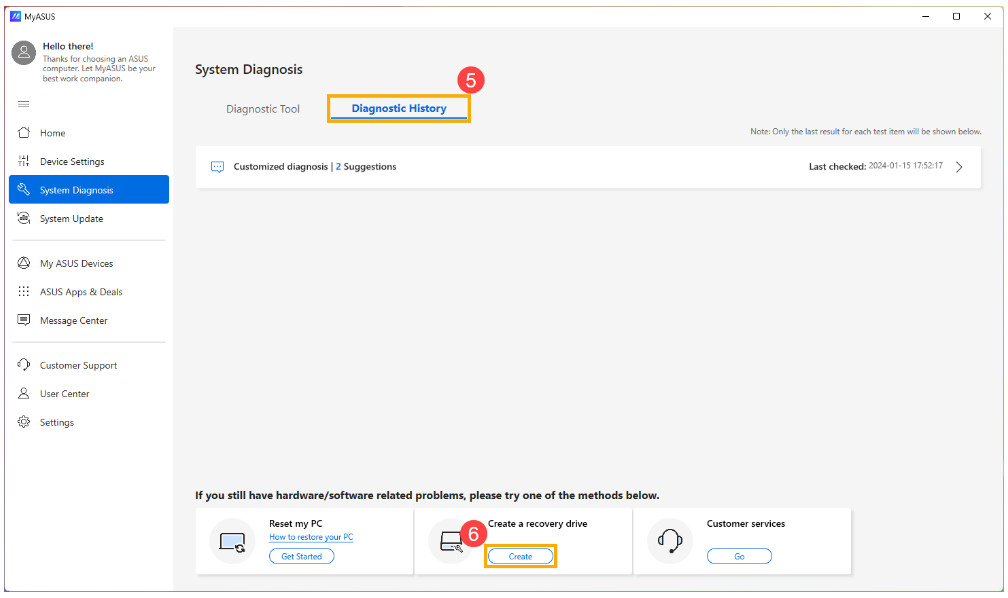
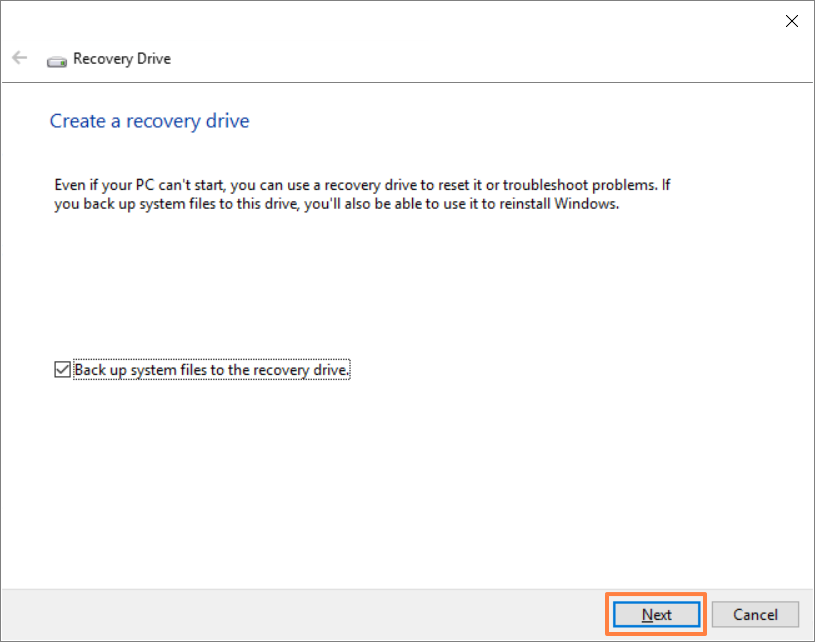
4.A window pop-up will appear on the MyASUS for creating a recovery drive. Insert a USB flash drive with the storage capacity at least 16GB to the PC. Be aware that everything on the drive will be totally deleted after this process. Select [Back up system files to the recovery drive]⑦, then click on [Next]⑧ and wait for a few minutes. 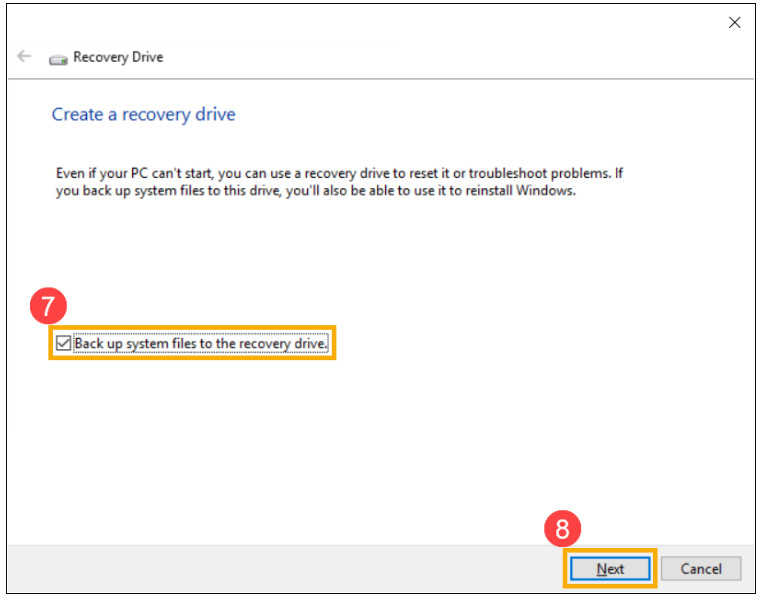
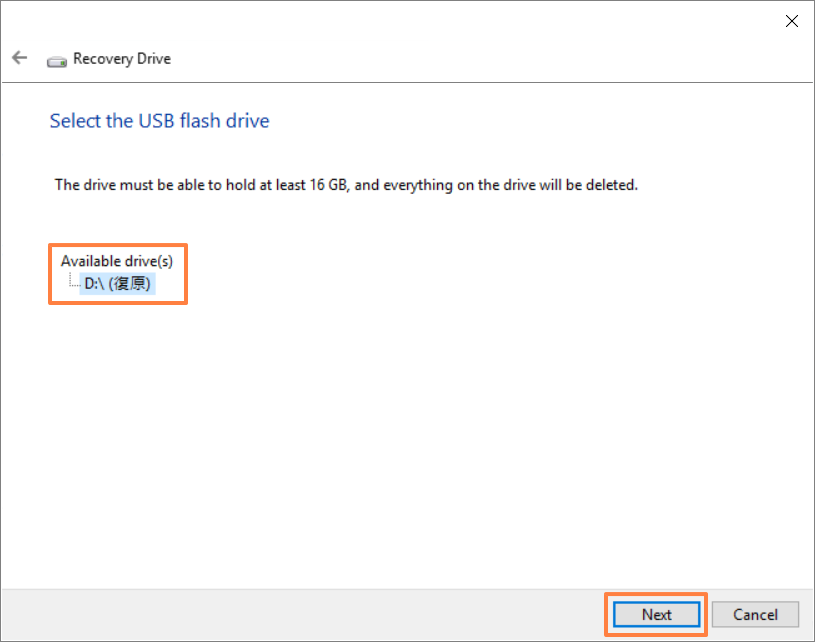
5.Please confirm the drive letter of the USB flash drive is the one intended for creating the recovery drive (drive D: is assigned to the USB flash drive, as shown)⑨, in order to prevent data or files from being mistakenly deleted in the wrong USB flash drive. Click [Next]⑩. 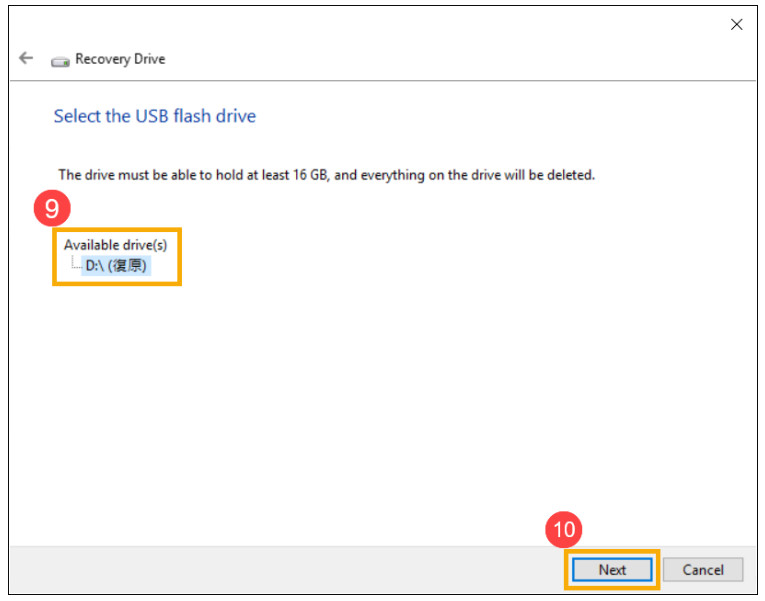
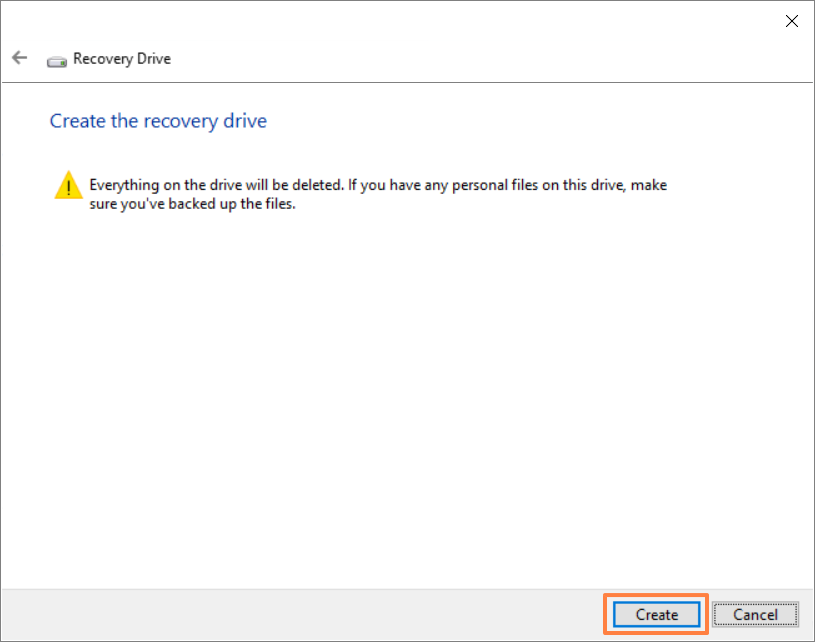
6.This notification is the warning that everything will be deleted throughout the process. Please make sure the file has been backed-up. Click [Create]⑪ to proceed.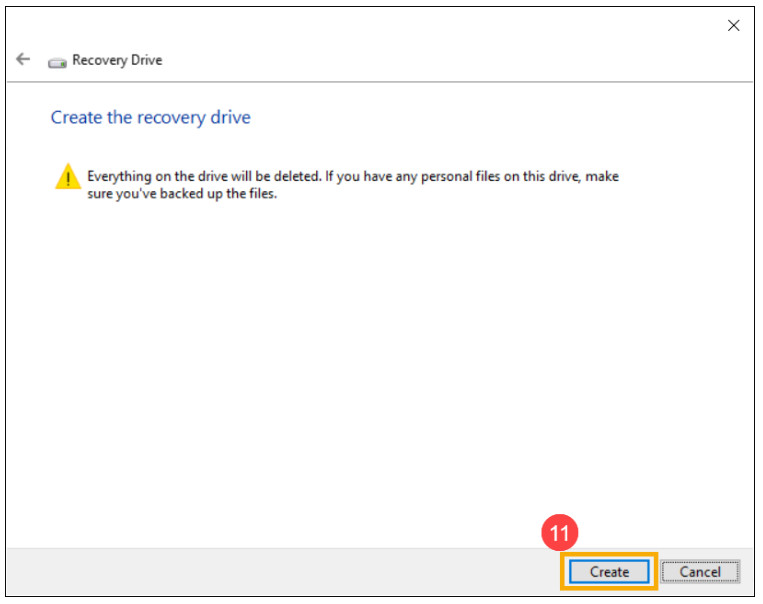
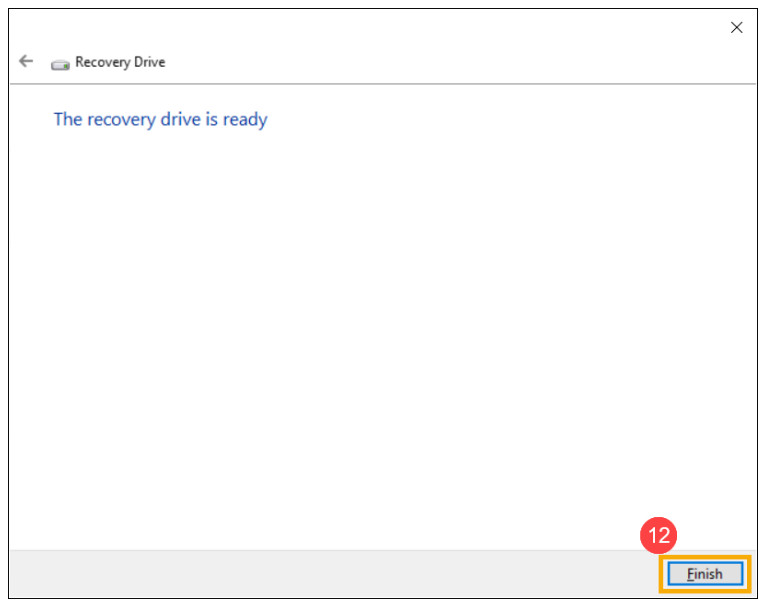
7.Wait until the process is completed and click [Finish]⑫ to end the process.
[Notebook] MyASUS-Unable to reset GPU mode to default value
MyASUS provides customized settings of "MUX switch" for models that support MUX switch microchips. This setting is preset to [MSHybrid] mode, which provides your best configuration according to the battery status.
If you adjust to [Discrete GPU] mode to optimize the fluency of games and other intensive work according to your needs, but delete the MyASUS application, this setting will not be reset to the default value.
To solve this problem, you can download and install MyASUS again in the Microsoft Store, and enter the [Customization] page to readjust the settings.
You can refer to [How to get MyASUS] from here to reinstall MyASUS.
How to apply the repair request after doing Hardware Diagnostic on MyASUS?
1. When system is detected with hardware problem after the Hardware Diagnostic on MyASUS, click “Repair Request”.
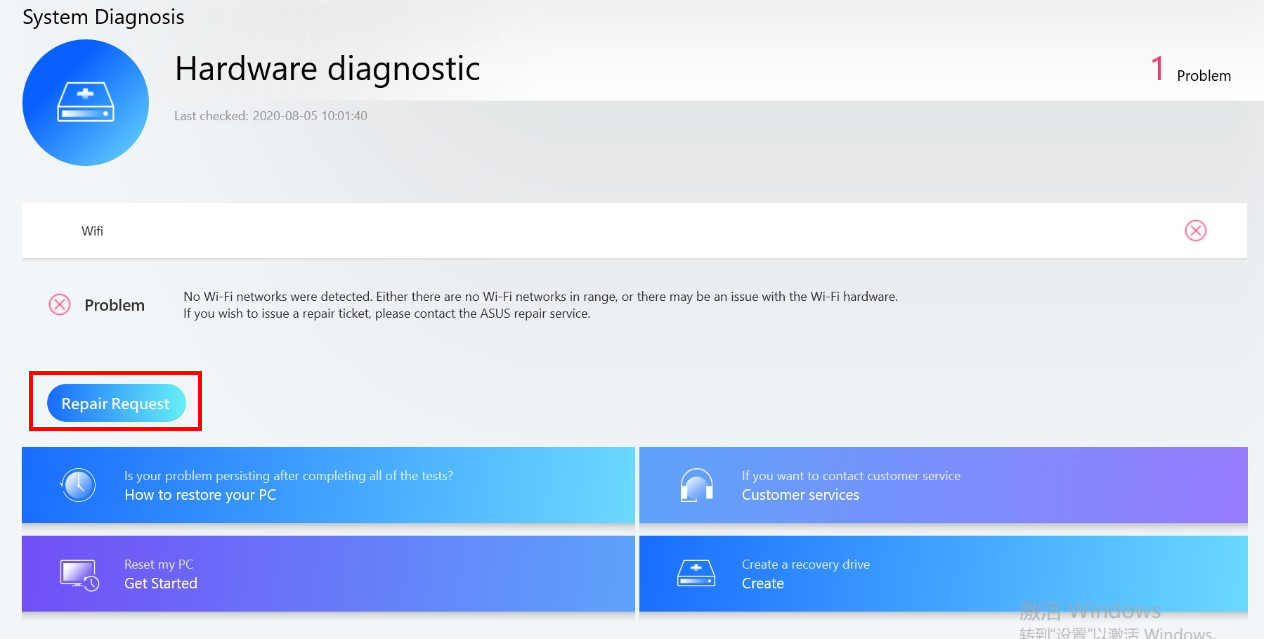
2. The serial number of your device will be automatically shown on the RMA application page (If you agree with the Privacy Policy)
If you don’t click Agree on the Privacy Policy, you will need to key in the Serial number of the device by yourself.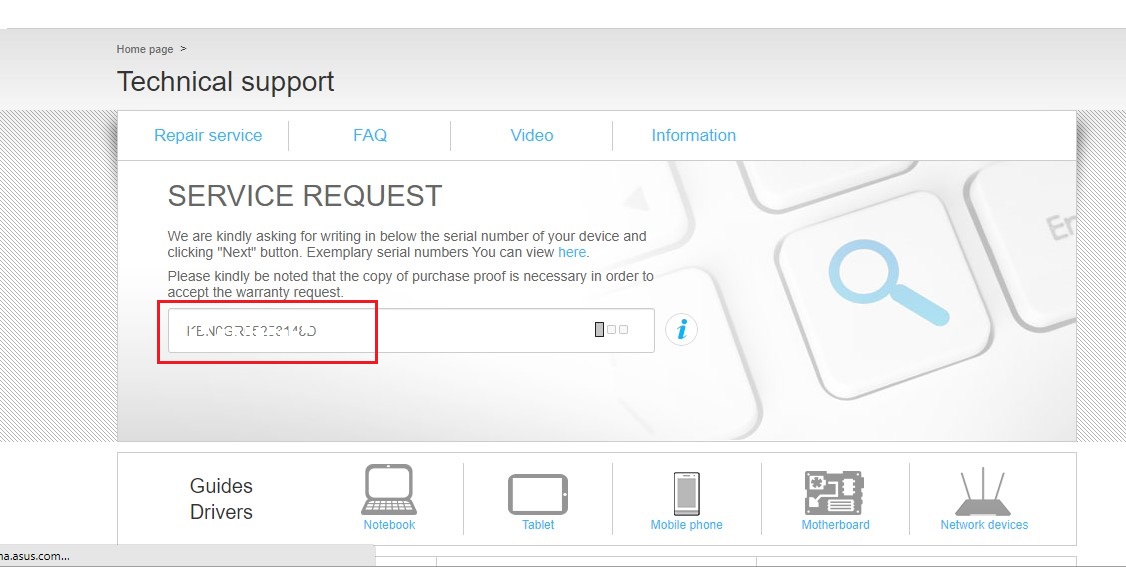
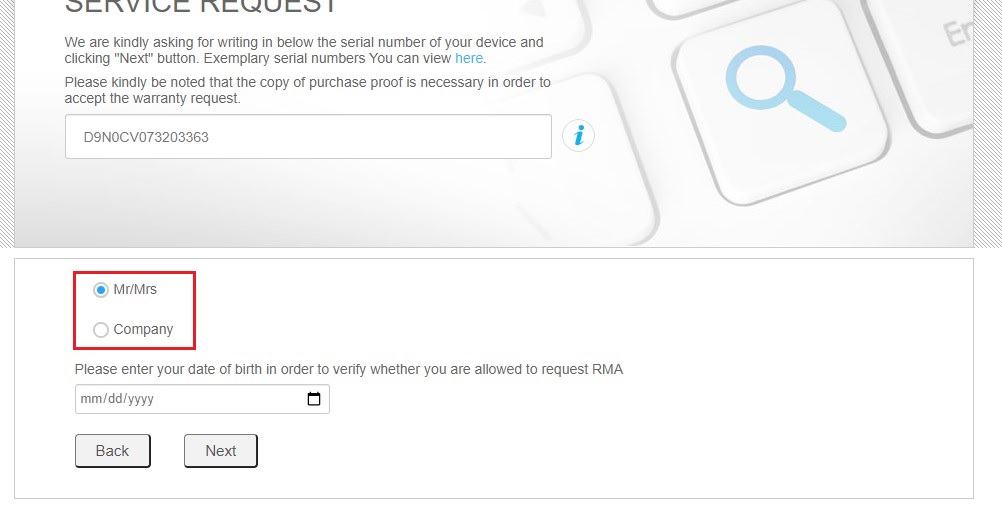
3. Select you're a personal user or commercial user.
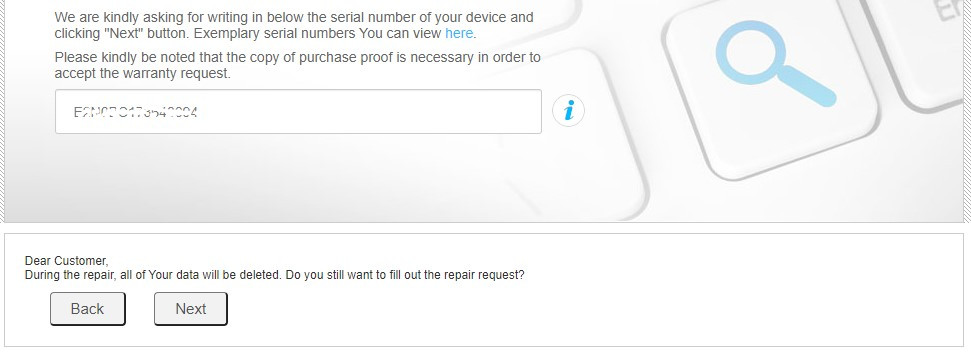
4. Confirm that you have backed-up your device before the repair.
5. Read the local Service Terms and Policy.
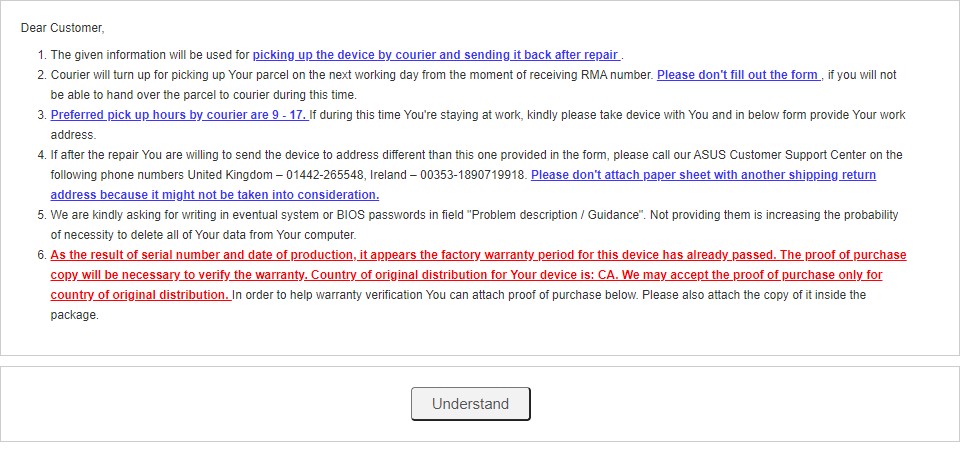
6. The error code generated after the diagnosis will be carried to the RMA application page.
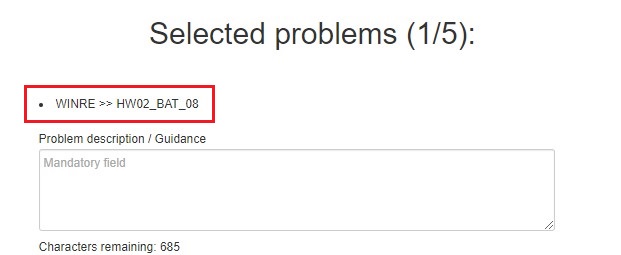
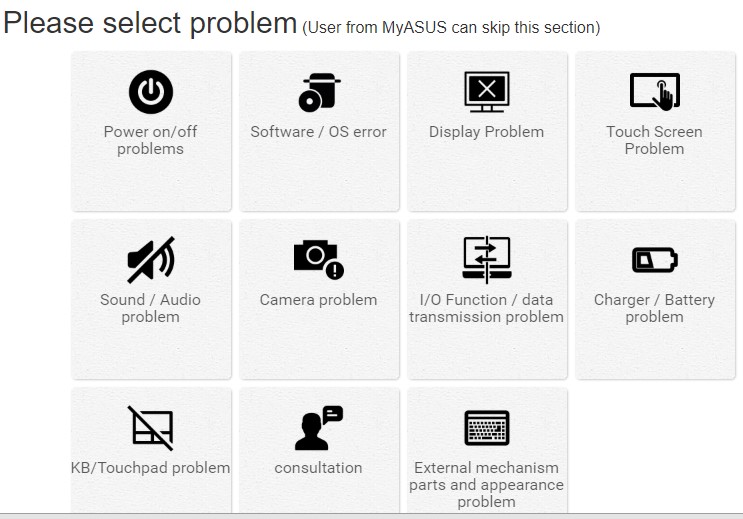
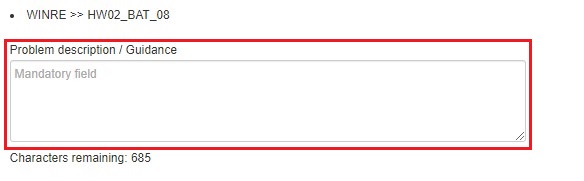
7. You can also add more problem description/options below based on your requirement.
8. Fill the problem description in the field
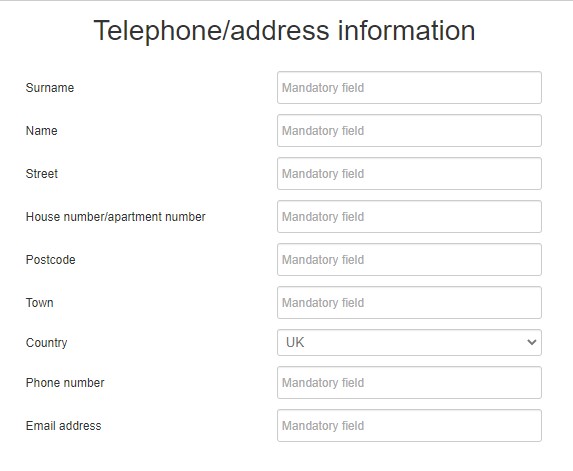
9. Fill in the contact and shipping information
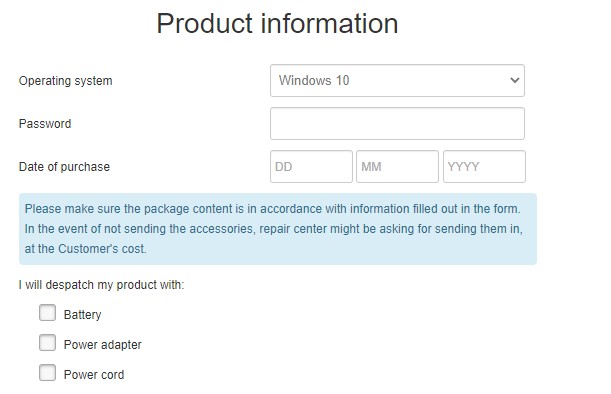
10. Fill in the product information
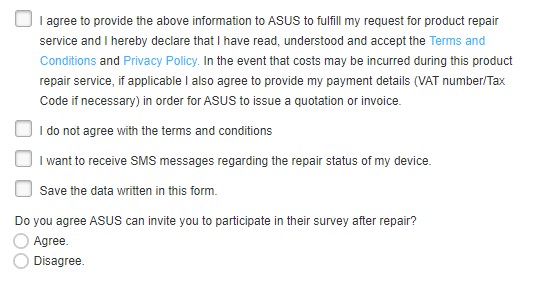
11. Agree with the T&C and Privacy policy.
12. Click ”Next” or ”Submit” to send out the request.

[ProArt Series] MyASUS System Diagnosis - Reset my PC and create a recovery drive V2.0
After the Checkup in System diagnosis has been performed, MyASUS provides the features to recover your PC (Reset my PC), or to create a recovery drive to reinstall Windows 10 (Create a recovery drive). This article briefly explains the steps on how to proceed with these features.
Contents:
• Reset my PC
• Create a recovery drive
Reset my PC
1. After entering MyASUS, click on the System diagnosis from the left menu and click [Checkup] on any of the tests.
2. As soon as the test is completed, click on the [Last result] and scroll down to the very bottom of the page. Click [Reset my pc].
3. The following step will delete all the personal files. Please be sure to back up all your files if necessary. Click on [Remove everything].
4. Click [Just remove my files].
5. Click [Reset] to start resetting the PC, then the system will restart for several times. As soon as it's completed, the PC will start the initialization.
Create a recovery drive
1. After entering MyASUS, click on the System diagnosis from the left menu and click [Checkup] on any of the tests.

2. As soon as the test is completed, click on the [Last result] and scroll down to the bottom of the page. Click on the [Create a recovery drive].

3. A window pop-up will appear on the desktop for creating a recovery drive. Insert a USB flash drive with the storage capacity at least 16GB to the PC. Be aware that everything on the drive will be completely deleted after this process. Click on [Next] and wait for a few minutes.
4. Please confirm the drive letter of the USB flash drive is the one intended for creating the recovery drive (drive D: is assigned to the USB flash drive, as shown). With this confirmed, you can prevent data or files from being mistakenly deleted in the wrong USB flash drive.
5. This notification is the warning that everything will be deleted throughout the process. Please make sure the file has been backed-up. Click [Next] to proceed.
6. Wait until the process is completed and click [Finish] to end the process.

[MyASUS] Warranty extension package Purchase Process
Purchase ASUS Premium with one click
- ASUS Warranty Extension Package: For laptop products, it must be purchased within the warranty period. For other ASUS products, it should be acquired within 180 days from the date of your ASUS product purchase.
- ASUS other services (Local Accidental Damage Protection/ Battery Service Package/ Hard Disk Drive Retention/ On-Site Service) must be purchased and activated within 180 days of your ASUS product invoice date.
- Only Notebook can purchase extended warranty within the machine's warranty period. For Notebook/Gaming Notebook, the maximum total warranty period after extension is three years, while for Commercial Notebook, the maximum total warranty period after extension is five years.
- Please select MyASUS location in the settings to be in line with the region where you purchased the ASUS product.
- ASUS Premium Care can only be purchased once. ASUS will not provide Premium Care on the same ASUS product twice.
- When you've completed the purchase via MyASUS, your ASUS Premium Care will be activated automatically. You don't need to activate it via the official ASUS website.
- To the maximum extent permitted by law, the ASUS Premium Care cannot be refunded after purchase.
Warranty extension package Purchase Process
1.Type and search [MyASUS] in the Windows search bar①, then click [Open]②. (The left-side illustration below is in Windows 11, and the right-side is Windows 10.)
If there is no result searched that means your computer may not install it, refer to How to install MyASUS. 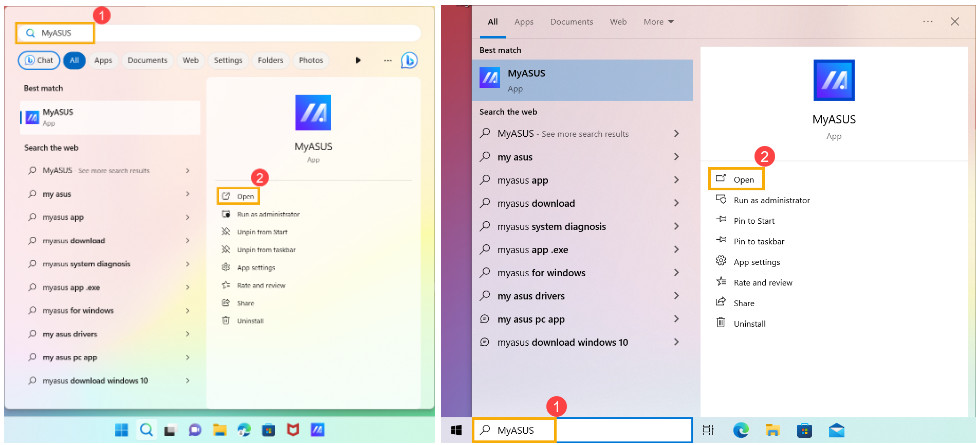
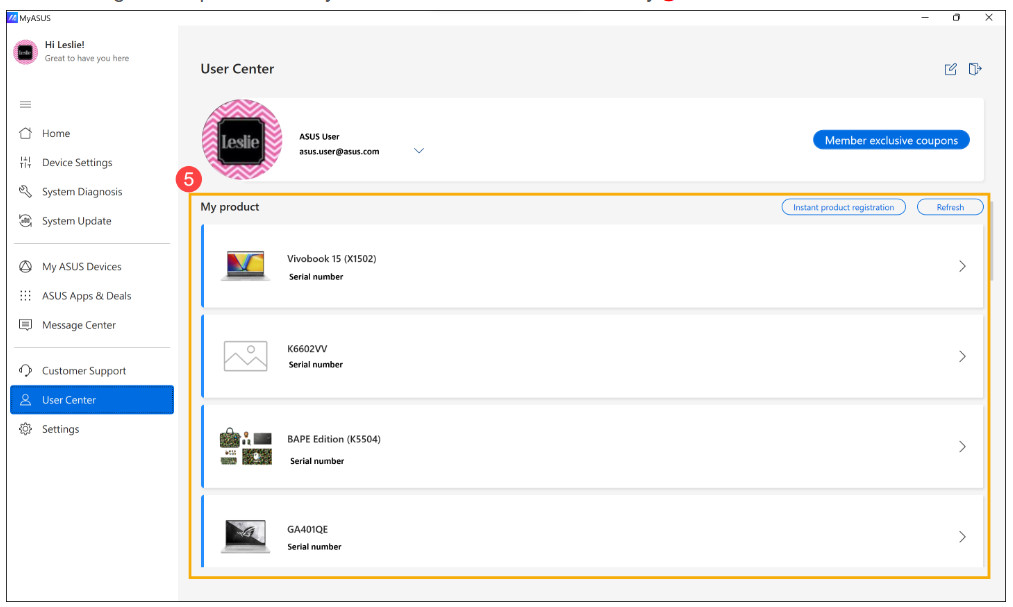
2.Select [User Center]③, and then login to MyASUS with your ASUS account④.
If you do not have an ASUS account yet, please register it now!
3.Select a registered product that you would like to extend warranty⑤.
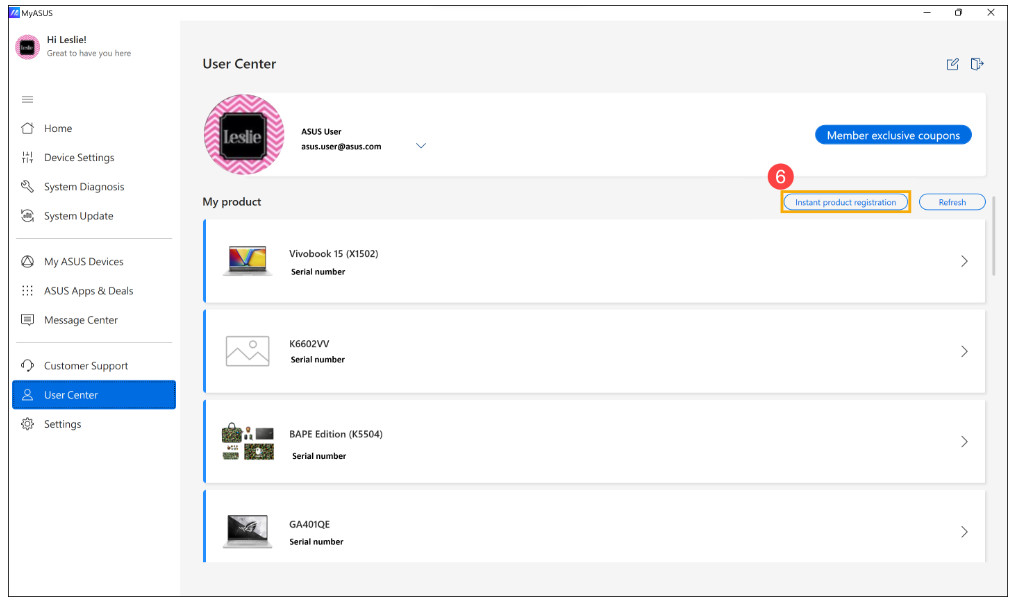
If you do not register your product yet, please select [Instant product registration]⑥, then input Serial Number⑦ and click [Send]⑧.
4.After selecting a product, you will see a detailed product info page. Click [Upgrade Warranty]⑨, then you will see warranty packages available for you to choose. 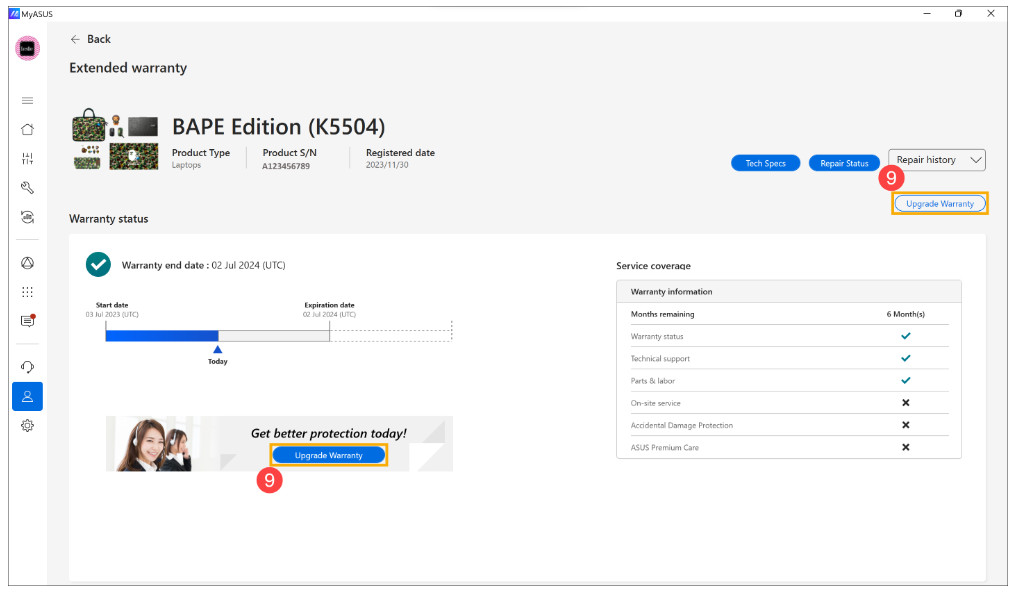
If your product isn't qualified for purchasing a Warranty extension package, MyASUS will not show the Upgrade Warranty button in the product page.
5.Please select your warranty options⑩.
6.Fill in your contact and payment information to purchase, and then click [Check Input]⑪. If every input is correct, then a purchase button will be shown.
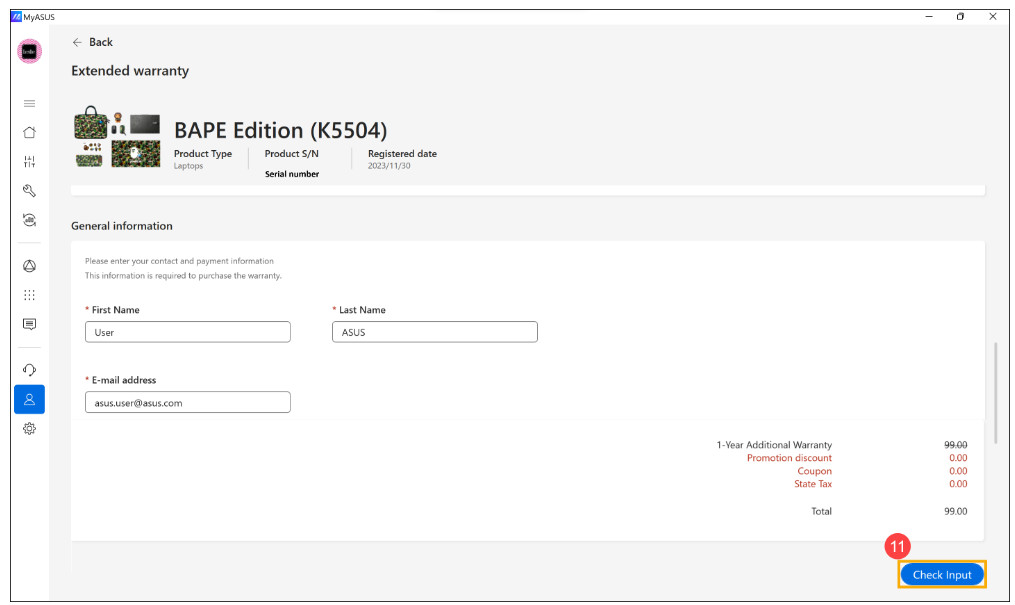
7.MyASUS will automatically enter a payment website, and you can pay with PayPal account or credit card.
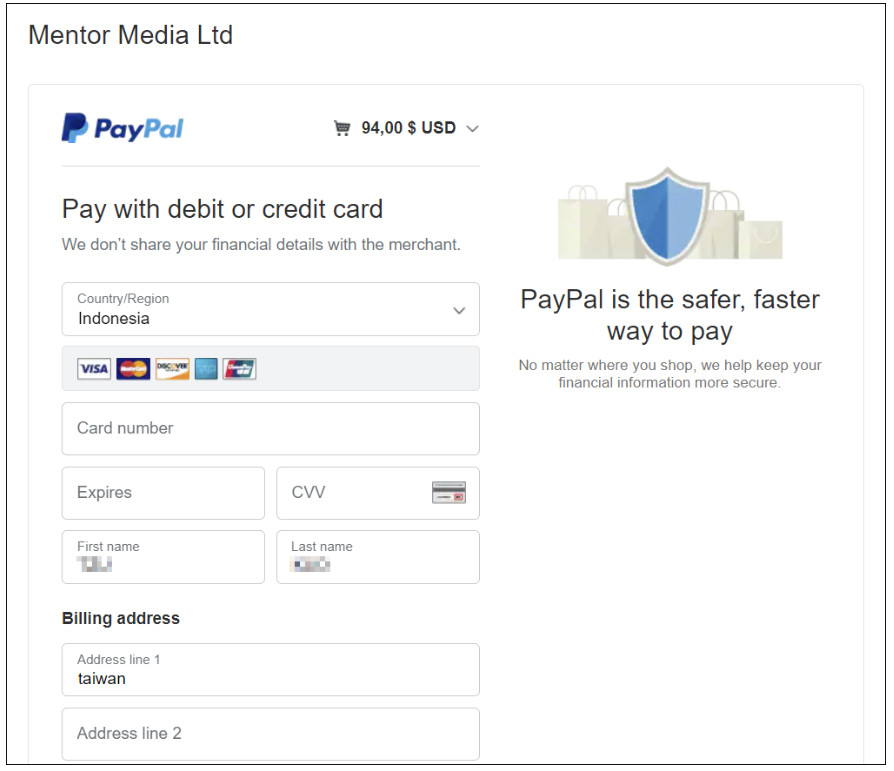
8.Back to User Center, and click the product you have purchased the warranty extension. Warranty extension package is activated for your device successfully!
Note: After completing warranty purchase, the new warranty end date will be refreshed within 3 to 5 days.
[Notebook] Troubleshooting MyASUS issues
Please try these troubleshooting steps if you experience problems with MyASUS:
1. Updating the Windows driver : Please refer to How to use Windows Update in OS system.
2. How to check for MyASUS driver updates : Please refer to [Notebook] How to update MyASUS?
3. Uninstall and re-install MyASUS: Please refer to [Notebook] How to install MyASUS ?